路由配置
//导入页面
import Home from '@/views/home'
import User from '@/views/user'
import UserAvatar from '@/views/user/userAvatar.vue'
import UserPwd from '@/views/user/userPwd.vue'


const routes = [
  { path: '/login', component: Login },
  { path: '/reg', component: Reg },
  {
    path: '/',
    component: Layout,
    redirect: '/home',
    // 子路由
    children: [
      { path: '/home', component: Home },
      // 用户基本信息
      { path: '/user-info', component: User },
      // 更换头像
      { path: '/user-avatar', component: UserAvatar },
      // 重置密码
      { path: 'user-pwd', component: UserPwd },
      // 文章分类
      { path: '/art-cate', component: Cate }
    ]
  }
]
前置守卫
- 用到前置守卫,拦截除去登录、注册页以外的页面,验证有没有token
- includes方法 查询字符串
数组.includes(查询内容,从第几个索引开始查询默认为0)- 如果找到匹配的值返回true,未找到返回false ```javascript // 导入vuex实例 import store from ‘@/store’
// 前置守卫 router.beforeEach((to, from, next) => { // 定义白名单 const whiteList = [‘/login’, ‘/reg’] // 排除白名单,查询匹配直接放行 if (whiteList.includes(to.path)) { next() } else { // 非白名单 验证是否有token 使用vuex中存贮的token需要导入vuex实例 if (store.state.user.token) { // 验证成功放行 next() } else { // 验证失败跳转登录页 next(‘login’) } } })
<a name="tf0dJ"></a>
## **token失效跳回登录页**
```javascript
import router from '@/router'
// 导入vuex的实例
import Store from '@/store/index'
// 响应拦截器
request.interceptors.response.use(function (response) {
  return response
}, function (error) {
  console.log('响应错误', error)
  if (error.response.status === 401) {
    // 删除本地token,调用delToken方法
    Store.commit('user/delToken')
    // 跳转回登录页 replace是不让返回上一页,因为token已经过期
    router.replace('/login')
  }
  return Promise.reject(error)
})
上面的代码,会重复跳转,因为请求有两次,所以报错和拦截器页出现两次
解决重复跳转的方法
会有两次请求所以有两个请求错误,会跳转两次,新增一个判断
- 判断如果已经跳回登录页了,后边代码没必要执行了
- 使用router实例:
router.currentRoute.path获取当前访问页面的地址 ```javascript // 响应拦截器 request.interceptors.response.use(function (response) { return response }, function (error) { console.log(‘响应错误’, error)
if (error.response.status === 401) { // 会有两次请求所以有两个请求错误,会跳转两次,新增一个判断 // 判断如果已经跳回登录页了,后边代码没必要执行了 // 使用router实例:router.currentRoute.path 获取当前访问页面的地址 if (router.currentRoute.path) return // 删除本地token,调用delToken方法 Store.commit(‘user/delToken’) // 跳转回登录页 replace是不让返回上一页,因为token已经过期 router.replace(‘/login’) } return Promise.reject(error) })
```javascript
// 重写日志的方法,清空所有日志
console.log = console.warn = () => { }
登录失效消息提示
js没有组件实例,不能使用
this.$message
需要导入import {Message} from 'element-ui'后使用该方法// 导入element message方法 import { Message } from 'element-ui' // 响应拦截器 request.interceptors.response.use(function (response) { return response }, function (error) { console.log('响应错误', error) if (error.response.status === 401) { if (router.currentRoute.path === '/login') return // 提示框 Message.error('账户验证数据失效,请重新登录') // 删除本地token,调用delToken方法 Store.commit('user/delToken') // 跳转回登录页 replace是不让返回上一页,因为token已经过期 router.replace('/login') } return Promise.reject(error) })首页
需要下载echarts
npm i echarts```vue10015篇 总文章数123篇 日新增文章数35条 评论总数123条 日新增评论数
<a name="ycKLA"></a>
# 个人中心
<a name="I1D1d"></a>
## 基本资料
```vue
<template>
<el-card class="box-card">
  <div slot="header" class="clearfix">
    <span>基本资料</span>
  </div>
  <!-- 表单 -->
  <el-form :model="userInfo" ref="form" :rules="rules" label-width="100px">
    <el-form-item label="登录名称" prop="username">
      <el-input v-model="userInfo.username" disabled></el-input>
  </el-form-item>
    <el-form-item label="用户昵称" prop="nickname">
      <el-input
                v-model="userInfo.nickname"
                minlength="1"
                maxlength="10"
                ></el-input>
  </el-form-item>
    <el-form-item label="用户邮箱" prop="email">
      <el-input v-model="userInfo.email"></el-input>
  </el-form-item>
  </el-form>
  </el-card>
</template>

<script>
  export default {
    name: 'UserInfo',
    data () {
      return {
        userInfo: this.$store.state.user.userInfo,
        rules: {
          username: [],
          nickname: [
            { required: true, message: '请输入用户名', trigger: 'blur' },
            { pattern: /^\S{2,10}$/, message: '昵称必须是1-10位的非空字符串', trigger: 'blur' }
          ],
          email: [
            { required: true, message: '请输入用户邮箱', trigger: 'blur' },
            // type: 'email' 是校验是不是邮箱格式的 element封装好的
            { type: 'email', message: '邮箱格式不正确', trigger: 'blur' }
          ]
        }
      }
    }

  }
</script>

<style lang="less" scoped>
  .el-form {
    width: 500px;
  }
</style>
表单数据绑定之前获取到的登陆人信息后,发现刷新就会消失
因为获取数据时axios从后台获取的是异步任务,渲染页面时这个值为空
获取到数据后只改变了vuex的变量,没有渲染到页面中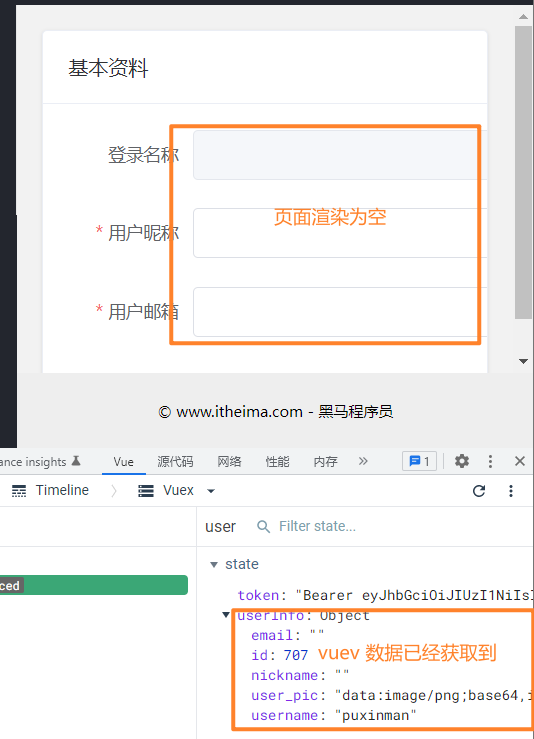
页面同步更改
使用watch监听属性来监听vuex数据的改变,赋值给data变量
达到页面同步更改的效果
watch: {
  // 监听值 不是变量需要写成字符串 这里不写this
  '$store.state.user.userInfo': {
    // 切页面之后数据又消失了
    // 需要加上immediate 页面加载之后立即执行一次监听
    immediate: true,
      handler (newValue) {
      this.userInfo = newValue
    }
  }
}
拷贝
this.userInfo = newValue
这样newValue和vuex是有引用关系的,在页面中输入新的就会直接更改
需要做一个拷贝,切换一个新的地址,这样就不会影响了
- 浅拷贝
{...拷贝对象}
- 深拷贝
<a name="ggZF2"></a>
### 提交数据,修改功能
```javascript
// 修改用户信息
export function updateUserInfoApi () {
  return request.get('/my/userinfo')
}
修改数据之前需要先校验,校验通过后再发送请求
修改之后,本地vuex存的还是之前的旧数据,调用之前封装的获取信息接口
updateUserInfo () {
  // 1.先校验数据
  this.$refs.form.validate(async (isOk) => {
    if (isOk) {
      // 校验通过
      // 2.将修改数据传给后台
      await updateUserInfoApi(this.userInfo)
      // 消息提示框
      this.$message.success('修改信息成功')
      // 3.vuex还没有修改信息 需要更新一下
      this.$store.dispatch('user/getUserInfo')
    }
  })
    }
更换头像
<template>
  <el-card class="box-card">
    <div slot="header" class="clearfix">
      <span>更换头像</span>
    </div>
    <div>
      <!-- 图片,用来展示用户选择的头像 -->
      <img src="../../assets/images/avatar.jpg" alt="" class="preview" />

      <!-- 按钮区域 -->
      <div class="btn-box">
        <el-button type="primary" icon="el-icon-plus">选择图片</el-button>
        <el-button type="success" icon="el-icon-upload" disabled>上传头像</el-button>
      </div>
    </div>
  </el-card>
</template>

<script>
export default {
  name: 'UserAvatar'
}
</script>

<style lang="less" scoped>
.btn-box {
  margin-top: 10px;
}
.preview {
  object-fit: cover;
  width: 350px;
  height: 350px;
}
</style>
添加文件域 type="file"可以选择文件accept="image/*"限定只能选择图片,将文件域隐藏 display="none"或新属性hidden
选择图片按钮点击事件
- 在选择图片的click事件函数内使用
$refs 获取到文件域的dom元素使用
click()方法 ```vue更换头像
选择图片 上传头像
<a name="aPBYX"></a>
#### 头像回显
切页面之后头像没有了,这时候调用vuex里面的头像数据,达到头像回显
```vue
<img
        :src="src || $store.state.user.userInfo.user_pic || defImg"
        alt=""
        class="preview"
      />
上传图片按钮禁用
- 用src变量来判断有没有选择图片 来控制按钮是否禁用
<el-button
        @click="changeimg"
        type="success"
        icon="el-icon-upload"
        :disabled="!src"
        >上传头像
</el-button>
提交头像
```javascript export function updateImgApi (img) { const data = { avatar: img } return request.patch(‘/my/update/avatar’, data) }
```javascript
async changeimg () {
      await updateImgApi(this.src)
      this.$message.success('修改头像成功')
      // vuex还没有修改信息 需要更新一下
      this.$store.dispatch('user/getUserInfo')
    }
  }
}
重置密码
<template>
  <el-card class="box-card">
    <div slot="header" class="clearfix">
      <span>重置密码</span>
    </div>
    <!-- 表单 -->
    <el-form
      :model="pwdForm"
      :rules="pwdFormRules"
      ref="pwdFormRef"
      label-width="100px"
    >
      <el-form-item label="原密码" prop="old_pwd">
        <el-input v-model="pwdForm.old_pwd" type="password"></el-input>
      </el-form-item>
      <el-form-item label="新密码" prop="new_pwd">
        <el-input v-model="pwdForm.new_pwd" type="password"></el-input>
      </el-form-item>
      <el-form-item label="确认新密码" prop="re_pwd">
        <el-input v-model="pwdForm.re_pwd" type="password"></el-input>
      </el-form-item>
      <el-form-item>
        <el-button type="primary">修改密码</el-button>
        <el-button>重置</el-button>
      </el-form-item>
    </el-form>
  </el-card>
</template>

<script>
export default {
  name: 'UserPwd',
  data () {
    return {
      // 表单的数据对象
      pwdForm: {
        old_pwd: '',
        new_pwd: '',
        re_pwd: ''
      },
      // 表单的验证规则对象
      pwdFormRules: {
        old_pwd: [
          { required: true, message: '请输入密码', trigger: 'blur' },
          { pattern: /^\S{6,15}$/, message: '密码长度必须是6-15位的非空字符串', trigger: 'blur' }
        ],
        new_pwd: [
          { required: true, message: '请输入新密码', trigger: 'blur' },
          { pattern: /^\S{6,15}$/, message: '密码长度必须是6-15位的非空字符串', trigger: 'blur' }
        ],
        re_pwd: [
          { required: true, message: '请再次确认新密码', trigger: 'blur' },
          { pattern: /^\S{6,15}$/, message: '密码长度必须是6-15位的非空字符串', trigger: 'blur' }
        ]
      }
    }
  }
}
</script>

<style lang="less" scoped>
.el-form {
  width: 500px;
}
</style>
校验修改密码
自定义函数校验
{ validator:函数名, trigger:'blur' }
- 新密码不能和旧密码一样 ```javascript const changePwd = (rule, value, cd) => { // value是新密码 if (value === this.pwdForm.old_pwd) { cd(new Error(‘新密码与原密码不能一样’)) } else { cd() } }
- 新密码需要和确认密码一样
```javascript
const rePwd = (rule, value, cd) => {
  // value是确认密码
  if (value !== this.pwdForm.re_pwd) {
    cd(new Error('确认密码与新密码不一致'))
  } else {
    cd()
  }
    }
修改密码功能
// 重置密码
export function updateUserPwdApi (data) {
  return request.patch('/my/updatepwd', data)
}
提示弹窗
用到this.$alert('提示内容', '标题',{配置}).then(()=>{点击确定会执行这里})
showClose: false不显示右上角x号updateUserPwd () { // 表单整体校验 this.$refs.pwdFormRef.validate(async (isOk) => { if (isOk) { await updateUserPwdApi(this.pwdForm) this.$alert('修改成功,点击确定重新登录', '提示', { showClose: false }).then(() => { // 点击确定 执行这里 // 删除token this.$store.commit('user/delToken') // 跳转登录页 this.$router.replace('/login') }) } }) }
文章管理
文章分类
<template>
<div>
  <el-card class="box-card">
    <div slot="header" class="clearfix header-box">
      <span>文章分类</span>
      <el-button type="primary" size="mini">添加分类</el-button>
  </div>
    <!-- 分类列表 -->
  </el-card>
  </div>
</template>

<script>
  export default {
    name: 'ArtCate'
  }
</script>

<style lang="less" scoped>
  .header-box {
    display: flex;
    justify-content: space-between;
    align-items: center;
  }
</style>
获取文章分类
import request from '@/utils/request'

// 获取文章分类
export function getCateApi () {
  return request.get('/my/cate/list')
}
<template>
<div>
  <el-card class="box-card">
    <div slot="header" class="clearfix header-box">
      <span>文章分类</span>
      <el-button type="primary" size="mini">添加分类</el-button>
  </div>
    <!-- 分类列表 -->
  </el-card>
  </div>
</template>

<script>
  import { getCateApi } from '@/Api/cate'
  export default {
    name: 'ArtCate',
    data () {
      return {
        cateList: []
      }
    },
    methods: {
      async getCate () {
        const { data } = await getCateApi()
        console.log(data)
        this.cateList = data.data
      }
    },
    created () {
      this.getCate()
    }
  }
</script>

<style lang="less" scoped>
  .header-box {
    display: flex;
    justify-content: space-between;
    align-items: center;
  }
</style>
渲染列表数据
<template>
  <div>
    <el-card class="box-card">
      <div slot="header" class="clearfix header-box">
        <span>文章分类</span>
        <el-button type="primary" size="mini">添加分类</el-button>
      </div>
      <!-- 分类列表 -->
      <el-table :data="cateList" border stripe>
        <el-table-column type="index" label="序号"> </el-table-column>
        <el-table-column prop="cate_alias" label="分类名称"> </el-table-column>
        <el-table-column prop="cate_name" label="分类别名"> </el-table-column>
        <el-table-column label="操作">
          <el-button type="primary" size="mini" @click="">添加</el-button>
          <el-button type="danger" size="mini" @click="">删除</el-button>
        </el-table-column>
      </el-table>
    </el-card>
  </div>
</template>

<script>
import { getCateApi } from '@/Api/cate'
export default {
  name: 'ArtCate',
  data () {
    return {
      cateList: []
    }
  },
  methods: {
    async getCate () {
      const { data } = await getCateApi()
      console.log(data)
      this.cateList = data.data
    }
  },
  created () {
    this.getCate()
  }
}
</script>

<style lang="less" scoped>
.header-box {
  display: flex;
  justify-content: space-between;
  align-items: center;
}
</style>
增删改查(CURD)
弹层
<el-dialog
        title="添加分类"
        :visible.sync="showAdd"
        width="30%"
        @close="!showAdd"
      >
        <span>表单</span>
        <span slot="footer">
          <el-button @click="showAdd = false">取消</el-button>
          <el-button type="primary" @click="">确定</el-button>
        </span>
      </el-dialog>
    </el-card>
表单结构和校验规则
<template>
  <div>
    <el-card class="box-card">
      <div slot="header" class="clearfix header-box">
        <span>文章分类</span>
        <el-button type="primary" size="mini" @click="showAdd = true"
          >添加分类</el-button
        >
      </div>
      <!-- 分类列表 -->
      <el-table :data="cateList" border stripe>
        <el-table-column type="index" label="序号"> </el-table-column>
        <el-table-column prop="cate_alias" label="分类名称"> </el-table-column>
        <el-table-column prop="cate_name" label="分类别名"> </el-table-column>
        <el-table-column label="操作">
          <el-button type="primary" size="mini" @click="">修改</el-button>
          <el-button type="danger" size="mini" @click="">删除</el-button>
        </el-table-column>
      </el-table>

      <!-- 弹层 -->
      <el-dialog
        title="添加分类"
        :visible.sync="showAdd"
        width="30%"
        @close="!showAdd"
      >
        <span>
          <!-- 添加的表单 -->
          <el-form
            :model="addForm"
            :rules="addRules"
            ref="addRef"
            label-width="70px"
          >
            <el-form-item label="分类名称" prop="cate_name">
              <el-input
                v-model="addForm.cate_name"
                minlength="1"
                maxlength="10"
              ></el-input>
            </el-form-item>
            <el-form-item label="分类别名" prop="cate_alias">
              <el-input
                v-model="addForm.cate_alias"
                minlength="1"
                maxlength="15"
              ></el-input>
            </el-form-item>
          </el-form>
        </span>
        <span slot="footer">
          <el-button @click="showAdd = false">取消</el-button>
          <el-button type="primary" @click="">确定</el-button>
        </span>
      </el-dialog>
    </el-card>
  </div>
</template>

<script>
import { getCateApi } from '@/Api/cate'
export default {
  name: 'ArtCate',
  data () {
    return {
      cateList: [],
      showAdd: false,
      addForm: {
        cate_name: '',
        cate_alias: ''
      },
      // 添加表单的验证规则对象
      addRules: {
        cate_name: [
          { required: true, message: '请输入分类名称', trigger: 'blur' },
          { pattern: /^\S{1,10}$/, message: '分类名必须是1-10位的非空字符', trigger: 'blur' }
        ],
        cate_alias: [
          { required: true, message: '请输入分类别名', trigger: 'blur' },
          { pattern: /^[a-zA-Z0-9]{1,15}$/, message: '分类别名必须是1-15位的字母数字', trigger: 'blur' }
        ]
      }
    }
  },
  methods: {
    async getCate () {
      const { data } = await getCateApi()
      console.log(data)
      this.cateList = data.data
    }

  },
  created () {
    this.getCate()
  }
}
</script>

<style lang="less" scoped>
.header-box {
  display: flex;
  justify-content: space-between;
  align-items: center;
}
</style>
添加功能
// 添加分类数据
/**
* @param {*} data ={cate_name:分类名称, cate_alias:分类别名}
* @returns
*/
export function addCateApi (data) {
  return request.post('/my/cate/add', data)
}
addCate () {
      // 表单校验
      this.$refs.addRef.validate(async (isOk) => {
        if (isOk) {
          // 添加数据
          await addCateApi(this.addForm)
          // 重新获取,渲染页面
          this.getCate()
          // 关闭弹层
          this.showAdd = false
        }
      })
    }
修改功能(复用)
修改和添加的弹层是一样的,可以想办法复用一下
区别:标题不同,修改有数据回填
回填的数据为了保证最新的需要调用接口查找获取后再回填
// 根据id查找数据
export function getCateDateApi (id) {
  return request.get('/my/cate/info', { params: { id } })
}
async editCate (id) {
      // 获取数据
      const { data } = await getCateDateApi(id)
      console.log('根据id获取数据', data)
      // 数据回填
      this.addForm = data.data
      // 显示弹层
      this.showAdd = true
    },
点击之后数据会多出id ,根据id有无来区分添加和弹层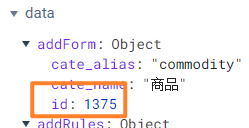
:title="addForm.id ? '修改分类' : '添加分类'"
<el-button type="primary" @click="addCate">{{
  addForm.id ? '修改' : '确定'
          }}</el-button>
点击添加还是修改的样式数据没有重置,需要再关闭弹窗时重置表单数据
这样就只有修改有id,添加就没有了
close () {
  this.showAdd = false
  // 关闭弹层的时候重置表单
  this.$refs.addRef.resetFields()
  // 关闭弹层的时候重置数据
  this.addForm = {
    cate_name: '',
    cate_alias: ''
      }
按钮功能,复用(判断点击的是新增还是添加)
addCate () {
      // 表单校验
      this.$refs.addRef.validate(async (isOk) => {
        if (isOk) {
          if (!this.addForm.id) {
            // 添加数据
            await addCateApi(this.addForm)
          } else {
            // 修改数据
            await editCateApi(this.addForm)
          }

          // 重新获取,渲染页面
          this.getCate()
          // 提示框
          this.$message.success(`${!this.addForm.id ? '添加' : '修改'}成功`)
          // 关闭弹层
          this.showAdd = false
        }
      })
    }
删除功能
// 删除文章分类数据
export function delCateApi (id) {
  return request.delete('/my/cate/del', { params: { id } })
}
// 删除
    delCate (row) {
      this.$confirm(`确定删除${row.cate_name}分类吗?`, '删除').then(async () => {
        // 点击确认
        // 删除数据
        const { data } = await delCateApi(row.id)
        // 提示
        this.$message.success(data.message)
        // 重新渲染列表
        this.getCate()
      }).catch(() => {
        // 点击取消
      })
文章列表
<template>
  <div>
    <el-card class="box-card">
      <div slot="header" class="clearfix">
        <span>文章列表</span>
      </div>
      <!-- 搜索区域 -->
      <div class="search-box">
        <el-form :inline="true" :model="q">
          <el-form-item label="文章分类">
            <el-select
              v-model="q.cate_id"
              placeholder="请选择分类"
              size="small"
            >
              <el-option label="区域一" value="shanghai"></el-option>
              <el-option label="区域二" value="beijing"></el-option>
            </el-select>
          </el-form-item>
          <el-form-item label="发布状态" style="margin-left: 15px">
            <el-select v-model="q.state" placeholder="请选择状态" size="small">
              <el-option label="已发布" value="已发布"></el-option>
              <el-option label="草稿" value="草稿"></el-option>
            </el-select>
          </el-form-item>
          <el-form-item>
            <el-button type="primary" size="small">筛选</el-button>
            <el-button type="info" size="small">重置</el-button>
          </el-form-item>
        </el-form>
        <!-- 发表文章的按钮 -->
        <el-button type="primary" size="small" class="btn-pub"
          >发表文章</el-button
        >
      </div>

      <!-- 文章表格区域 -->

      <!-- 分页区域 -->
    </el-card>
  </div>
</template>

<script>
export default {
  name: 'ArtList',
  data () {
    return {
      // 查询参数对象
      q: {
        pagenum: 1,
        pagesize: 2,
        cate_id: '',
        state: ''
      }
    }
  }
}
</script>

<style lang="less" scoped>
.search-box {
  display: flex;
  justify-content: space-between;
  align-items: flex-start;
  .btn-pub {
    margin-top: 5px;
  }
}
</style>
弹层
fullscreen占用全屏before-close="函数"- 点击x会执行这个函数
- 参数done 是一个函数 执行它就会关闭弹层
```vue
取消 确定
```less
.el-dialog__header {
  background-color: #0976d3;

  padding: 15px;
  .el-dialog__title {
    color: #fff;
  }
  i {
    color: #fff !important;
  }
}
发布表单渲染
用之前封装的Api getcate()获取分类数据 ,把分类数据渲染到<el-option>
下拉框校验无效属于正常的,因为没有这些事件,规则会在兜底校验时校验
<template>
<el-select
  v-model="pubForm.cate_id"
  placeholder="请选择分类"
  style="width: 100%"
>
  <el-option
    v-for="item in cateList"
    :key="item.id"
    :label="item.cate_name"
    :value="item.id"
  ></el-option>
</el-select>
</template>

<script>
import { getCateApi } from '@/Api/cate'
export default {
  name: 'ArtList',
  data () {
    return {
      // 分类数据
      cateList: [],
    }
  }
  methods: {
    async getCate () {
      const { data } = await getCateApi()
      console.log(data)
      this.cateList = data.data
    }
  },
  created () {
    this.getCate()
  }
}
</script>
富文本编辑器
npm i vue-quill-editor
// 导入富文本编辑器样式和组件
import 'quill/dist/quill.core.css'
import 'quill/dist/quill.snow.css'
import 'quill/dist/quill.bubble.css'

import { quillEditor } from 'vue-quill-editor'

export default {
  components: {
    // 注册组件
    quillEditor
  }
}
<template>
<el-form
         :model="pubForm"
         :rules="pubFormRules"
         ref="pubFormRef"
         label-width="100px"
         >
  <!-- 富文本编辑器 -->
  <el-form-item label="文章内容" prop="content">
    <quillEditor v-model="pubForm.content"> </quillEditor>
  </el-form-item>
  </el-form>
</template>

<script>
  // 导入富文本编辑器样式和组件
  import 'quill/dist/quill.core.css'
  import 'quill/dist/quill.snow.css'
  import 'quill/dist/quill.bubble.css'
  import { quillEditor } from 'vue-quill-editor'


  export default {
    name: 'ArtList',
    data () {
      return {
        // 表单的数据对象
        pubForm: {
          title: '',
          cate_id: '',
          // 绑定的文章变量
          content: ''
        },
        // 表单的验证规则对象
        pubFormRules: {
          title: [
            { required: true, message: '请输入文章标题', trigger: 'blur' },
            { min: 1, max: 30, message: '文章标题的长度为1-30个字符', trigger: 'blur' }
          ],
          cate_id: [{ required: true, message: '请选择文章标题', trigger: 'blur' }],
          // 文章的校验规则
          content: [{ required: true, message: '请输入文章内容', trigger: 'blur' }]
        }
      }
    },
    components: {
      // 注册组件
      quillEditor
    },
  }
</script>
min-height设定最小高度,超过了会根据内容自适应
- 发现样式不生效,添加
!important,还没生效 - 组件之间隔离了,需要在类名前加
/deep/
覆盖组件样式技巧(三种情况)
- 可以直接修改
- 2.权重不够添加
!important - 3.组件隔离了添加
/deep/失败:/deep/ + !important// 覆盖富文本样式 /deep/ .ql-editor { min-height: 300px; } // 设置行高 覆盖element /deep/ .ql-snow .ql-picker { line-height: normal; }文章封面
```less
+ 选择封面 file对象,包含文件的所有信息<br />`URL.createObjectURL(图片信息)` 可以转换成图片地址(blob格式) ```vue <template> <!-- 用来显示封面的图片 --> <img :src="previewUrl || defImg" alt="" class="cover-img" ref="imgRef" /> <!-- 文件选择框,默认被隐藏 --> <input @change="previewImg" type="file" hidden accept="image/*" ref="iptFileRef" /> <!-- 选择封面的按钮 --> <el-button @click="chooseImg" type="text">+ 选择封面</el-button> </template> <script> // 导入默认图片 import defImg from '../../assets/images/cover.jpg' export default { name: 'ArtList', data () { return { // 图片地址 previewUrl: '', // 默认图片 defImg, // 表单的数据对象 pubForm: { title: '', cate_id: '', // 图片文件 cover_img: null, // 绑定的文章变量 content: '' }, methods: { // 选择图片 chooseImg () { this.$refs.iptFileRef.click() }, // 预览图片 previewImg (e) { const files = e.target.files if (files.length) { // URL.createObjectURL(选中的图片) 可以转换成图片地址 this.previewUrl = URL.createObjectURL(files[0]) // 存贮地址到表单内 调用后台发表文章接口需要 this.cover_img = files[0] } }, } </script>关闭弹层
关闭后再次打开,发现上次操作的还在,需要重置一下
resetFields不会清空图片数据,需要自己手动设置一下// 重置弹层表单 closeDialog () { // 清空表单校验 this.$refs.pubFormRef.resetFields() // 手动清除封面图片数据 this.previewUrl = '' this.pubForm.cover_img = null // 拿到选择框的dom对象 给value赋值null 就达到了清空files this.$refs.iptFileRef.value = null },清除后发现不能选择和上次一样的图片,
因为选择的图片已经缓存到files里面了,不会执行相同的图片files是只读的,清除它需要 给图片选择框的dom对象value赋值null// 拿到选择框的dom对象 给value赋值null 就达到了清空files this.$refs.iptFileRef.value = null发布和草稿
两个按钮公用一个函数,分别传入不同的大部状态值,对应后台接口state值
<el-form-item>
      <el-button type="primary" @click="publish('已发布')"
                 >发布</el-button
        >
      <el-button type="info" @click="publish('草稿')">草稿</el-button>
</el-form-item>
// 发布文章 export function publishApi (data) { return request.post('/my/article/add', data) }文章封面是否选择需要单独判断
后台接口需要formData格式
需要用到 FormData()对象以及实例方法FormData().append(key,value)可以添加属性到formdata对象FormData().get(key)方法可以看到指定的属性FormData().entries()
可以for in 循环对象for (const key in 需要循环的对象) {}
key是属性名 对象[属性名]获取属性值publish (state) { // 表单整体校验 this.$refs.pubFormRef.validate(async (isOk) => { if (isOk) { if (!this.pubForm.cover_img) return this.$message.error('未选择封面图片') this.pubForm.state = state // console.log('发布文章的数据', this.pubForm) // 后台需要 formdata格式数据 // 创建formdata格式对象 const fd = new FormData() for (const key in this.pubForm) { // key是属性名 对象[属性名]获取属性值 // console.log(key, this.pubForm[key]) fd.append(key, this.pubForm[key]) } // console.log(fd) await publishApi(fd) this.$message.success(`发布文章状态:${state}成功`) // shou = false后 会自动执行closeDialog方法 不需要再重新重置表单了 this.show = false } }) },另一种写法,forEach循环对象
静态方法 (直接调用,不需要实例化)Object.keys(对象)获得对象所有的key 以数组返回Object.values(对象)获得对象所有的 value 以数组返回// 2. forEach 循环对象 Object.keys(this.pubForm).forEach(key => { fd.append(key, this.pubForm[key]) }) await publishApi(fd)列表页面
获取列表数据
// 获取文章数据
/**
*
* @param {*} params 是一个对象
* {
* pagenum页码值,
* pagesize每页显示多少条数据,
* cate_id文章分类的id,
* state文章的发布状态
* }
* @returns
*/
export function getArticleApi (params) {
return request.get('/my/article/list', { params })
}
```vue<!-- 文章表格区域 --> <el-table :data="artList" style="width: 100%;" border stripe> <el-table-column label="文章标题" prop="title"></el-table-column> <el-table-column label="分类" prop="cate_name"></el-table-column> <el-table-column label="发表时间" prop="pub_date"></el-table-column> <el-table-column label="状态" prop="state"></el-table-column> <el-table-column label="操作"></el-table-column> </el-table>
<a name="oEn89"></a>
#### 格式化时间
安装`npm i dayjs`
```javascript
// 封装格式化时间
/**
 *
 * @param {*} time 数据时间
 * @param {*} format 数字字典 1代表YY年MM月DD日 2代表YY-MM-DD
 *
 * @returns
 */
// 设置一个默认值 format = 1
export function format (time, format = 1) {
  if (format === 1) { return dayjs(time).format('YY年MM月DD日') }
  return dayjs(time).format('YY-MM-DD')
}
<el-table-column label="发表时间"> <template #default="{ row }"> {{ format(row.pub_date) }} </template> </el-table-column> <script> // 导入格式化时间函数 import { format } from '@/utils' export default { methods: { // 格式化时间方法 format, } </script>分页器
<template>
<!-- 分页区域 -->
<el-pagination
               style="margin: 20px"
               @size-change="sizeChange"
               @current-change="currentChange"
               :current-page="q.pagenum"
               :page-sizes="[2, 4, 8]"
               :page-size="q.pageSize"
               layout="total, sizes, prev, pager, next, jumper"
               :total="totalNum"
               background
               >
  </el-pagination>
</template>

<script>
  // 导入api
  import { getCateApi, publishApi, getArticleApi } from '@/Api/cate'
  export default {
    name: 'ArtList',
    data () {
      return {
        // 总页数
        totalNum: 0,
        // 文章的列表数据
        artList: [],
        // 总数据条数
        total: 0,
        // 查询参数对象
        q: {
          pagenum: 1,
          pagesize: 2,
          // id 和 状态 查询参数传入空 就可以获取全部状态的数据
          cate_id: '',
          state: ''
        },

        // 表单的数据对象
        pubForm: {
          title: '',
          cate_id: '',
          // 图片文件
          cover_img: null,
          // 绑定的文章变量
          content: '',
          // 发布状态
          state: ''
        },
      },
        methods: {
          currentChange (pagenum) {
            this.q.pagenum = pagenum
            // 根据最新的页码 重新获取数据列表
            this.getArticle()
          },
            // 每页显示数据格式更换
            sizeChange (pagesize) {
              // 页面条数更换
              this.q.pagesize = pagesize
              // 页数重置1
              this.q.pagenum = 1
              // 根据最新的页面条数 重新获取列表数据
              this.getArticle()
            },
              // 获取文章列表数据
              async getArticle () {
                const { data } = await getArticleApi(this.q)
                this.artList = data.data
                // 总条数定义
                this.totalNum = data.total
              }
        }
</script>
筛选重置
视图驱动数据 获取视图中选择的value 改变查询参数,再次获取列表
<el-form-item label="文章分类">
            <el-select
              v-model="q.cate_id"
              placeholder="请选择分类"
              size="small"
            >
              <el-option
                v-for="item in cateList"
                :key="item.id"
                :label="item.cate_name"
                :value="item.id"
              ></el-option>
            </el-select>
          </el-form-item>
          <el-form-item label="发布状态" style="margin-left: 15px">
            <el-select v-model="q.state" placeholder="请选择状态" size="small">
              <el-option label="已发布" value="已发布"></el-option>
              <el-option label="草稿" value="草稿"></el-option>
            </el-select>
          </el-form-item>
          <el-form-item>
            <el-button @click="getArticle" type="primary" size="small"
              >筛选</el-button
            >
            <el-button type="info" size="small">重置</el-button>
          </el-form-item>
数据驱动视图 将数据重置为原来的默认值 重新获取一下列表
// 重置数据
resetList () {
  // 重置查询参数
  this.q = {
    pagenum: 1,
    pagesize: 2,
    // id 和 状态 查询参数传入空 就可以获取全部状态的数据
    cate_id: '',
    state: ''
  }
  // 获取列表数据
  this.getArticle()
    },
展示文章详情
/**
*
* @param {*} id 查询参数 根据id查询获取文章详情
* @returns
*/
export function getDetail (id) {
  return request.get('/my/article/info', {
    params: { id }
  })
}
<template> <el-table-column label="文章标题" prop="title"> <template #default="{ row }"> <el-link @click="lookDetail(row.id)" type="primary"> {{ row.title }} </el-link> </template> </el-table-column> </template> <script> import { getDetail } from '@/Api/cate' export default { name: 'ArtList', methods: { // 查看文章详情 async lookDetail (id) { const { data } = await getDetail(id) // console.log('点击标题获取到的文章详情', data) this.detail = data.data // 打开弹层 this.showDetail = true }, } </script><!-- 文章详情弹层 --> <el-dialog class="info" :title="detail.title" :visible.sync="showDetail"> <span>文章分类:{{ detail.cate_name }}</span> <span>作者:{{ detail.nickname }}</span> <span>日期:{{ format(detail.pub_date) }}</span> <!-- 后台接口没有返回全部的地址需要自己拼接一下 --> <!-- <img :src="`http://big-event-vue-api-t.itheima.net${detail.cover_img}`" alt="" /> --> <img :src="`${baseURL}${detail.cover_img}`" alt="" /> <div v-html="detail.content"></div> </el-dialog>后台基础地址解耦
// 定义根路径
const baseURL = 'http://big-event-vue-api-t.itheima.net'
// 定义新axios实例
const request = axios.create({
  // 配置跟路径
  baseURL
})

// 导出根路径
export { baseURL }
删除文章功能
需要用到具名插槽 来获取当前行的数据
// 根据id删除文章
/**
 *
 * @param {*} id 文章id
 * @returns
 */
export const delArticleApi = id => request.delete('/my/article/info', { params: { id } })
// 删除当前列表数据 async delArticle (row) { try { // 确定是否删除 await this.$confirm(`确定要删除 ${row.title} 这篇文章吗?`) // 删除文章 delArticleApi(row.id) // 重新获取列表数据 this.getArticle() } catch (error) { }如果删除完最后一页数据之后,刷新列表的时候会
查询参数传递的还是最后一页的页码,造成列表请求错误
解决:
1. 页码数组直接-1(当列表数据只剩下一条的时候删除 第一页除外)
2.再获取列表时将页码重置为1,就可以避免该bug// 删除当前列表数据 async delArticle (row) { try { // 确定是否删除 await this.$confirm(`确定要删除 ${row.title} 这篇文章吗?`) // 删除文章 delArticleApi(row.id) // 解决element组件bug 如果列表数据等于1 且 页码不是第一页时 删除数据后页码-1 if (this.artList.length === 1 && this.q.pagenum > 1) { this.q.pagenum-- } // 重新获取列表数据 this.getArticle() this.$message.success('删除成功') } catch (error) { }

若有收获,就点个赞吧
0 人点赞
