Vue3 中文文档:https://vue3js.cn
Vue3 设计理念:https://vue3js.cn/vue-composition/
业内热点框架, 更好的逻辑复用,代码组织 -> compositionAPI 组合式api 更好的类型推导 -> 源码ts重写,typescript支持更好
组件库
- ant-design-vue(PC组件库)
- elemnet-plus (PC组件库)
vant (移动端组件库)
- https://vant-contrib.gitee.io/vant/v3/#/zh-CN
新特性
模板可以有多个根元素 废弃了过滤器,事件总线eventBus,.sync修饰符 更新了部分生命周期函数名字(destroyed -> unmounted)
- https://vant-contrib.gitee.io/vant/v3/#/zh-CN
数据响应原理重新实现(ES6 proxy 替代 ES5Object.defineProperty)
- 虚拟DOM 新算法 速度更快 体积更小
- 提供了compositionAPI,更好的逻辑复用
- 源码用typescript重写,有更好的类型推导
vite
创建项目
npm init vite-app 项目名称yarn create vite-app 项目名称
vue3中的函数
setup函数
- compositionAPI的入口,代码都在这里
- 从生命周期角度,setup会在beforeCreate钩子函数前执行
- setup中不能使用this,this指向undefined
- 在模板中使用的数据和函数,需要setup返回
```vue
{{obj.name}}
控制台输出结果<br />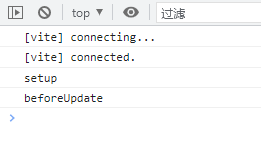
---
<a name="R6Sv1"></a>
### reactive函数(响应式数据)
> setup 需要有返回值, 只有返回的值才能在模板中使用
> 默认普通的数据, 不是响应式的
> 需要reactive将非响应式的对象/数组,处理成响应式的
传入一个复杂数据类型,将复杂类型数据, 转换成响应式数据 (返回该对象的响应式代理)
```vue
<template>
<div>{{obj.name}}</div>
<div>{{obj.age}}</div>
<button @click="changeName">changeName</button>
</template>
<script>
import {reactive} from 'vue'
export default {
name: 'App',
setup() {
const obj = reactive({
name:'张三',
age:20
})
function changeName() {
obj.name = '李四'
console.log(obj.name);
}
return {
obj,
changeName
}
}
}
</script>
ref函数
传入一个数据(一般简单数据类型),包裹一层对象,并转成响应式 ref接收一个值,返回一个响应式对象
- ref对象取值
- 在模板中,ref属性会自动解套,不需要额外的.value
- 在setup函数中,通过ref对象.value,可访问值
- ref函数也支持传入复杂类型
- 明确的对象和属性使用reactive
- 其他情况一律使用ref
```vue
{{str}}
---

<a name="r3qbd"></a>
### toRefs函数
> 场景: 结构之后的数据不在是响应式的
> 作用: 对一个响应式对象所有内部属性,都做响应式处理

```vue
<template>
  <div>{{name}}</div>
  <div>{{age}}</div>
  <button @click="age++">changeName</button>
</template>

<script>
import {reactive, toRefs} from 'vue'
export default {
  name: 'App',
  setup() {
    const obj = reactive({
      name:'张三',
      age:20
    })
    return {
      ...toRefs(obj),
    }
  }
}
</script>
computed函数
- 语法
- 给computed 传入函数,返回值就是计算属性的值
- 这里,双向绑定改值不行,计算属性的的值只读
- 给computed 传入函数,返回值就是计算属性的值
const new = computed (() => {return xx})
- 给computed 传入对象,get获取计算属性的值,set监听计算属性改变
- 对象中有get和set方法
- get 的return 就是计算属性的值
- set 有value参数 就是改变后的值
const new = computed({get() {return xx}set(value) {}})
<template>
<div>
  <p>今年我{{age}}岁</p>
  <input type="text" v-model="nextAge">
  <p>明年我{{nextAge}}岁</p>
  </div>
</template>

<script>
  import {computed, ref} from 'vue'
  export default {
    setup () {
      const age = ref(18)
      // const nextAge = computed(() => {
      //   return age.value+1
      // })
      const nextAge = computed({
        get() {
          return age.value +1
        },
        set(value) {
          age.value = value-1
        }
      })
      return {
        age,
        nextAge
      }
    }

  }
</script>
watch函数
监听器 处理函数与Vue2一样都有newValue参数
- 监听响应式数据
watch(响应式数据,处理函数(newValue))
- 监听响应式数据某个属性
watch(() => 对象.属性名,处理函数)
- 深度监听
watch(() => 对象.属性名,处理函数,{
deep:true,immediate:true})
<template>
  <div>{{obj.name}}</div>
  <div>{{obj.age}}</div>
  <button @click="obj.age= 30">changeName</button>
  <hr>
  <div>{{obj.desc.info}}</div>
  <button @click="obj.desc.info='换个描述'">changeInfo</button>
</template>

<script>
import {reactive, toRefs, watch} from 'vue'
export default {
  name: 'App',
  setup() {
    const obj = reactive({
      name:'张三',
      age:20,
      desc: {
        info: '法外狂徒'
      }
    })
  // watch(obj,(newValue)=> {
  //   console.log('改变了',newValue);
  // })
  watch(()=> obj.age,(newValue)=> {
    console.log('年龄改变了',newValue);
  })
  watch(()=>obj.desc,(newValue)=> {
    console.log('描述改变了',newValue);
  },{
    deep:true,
    immediate:true
  })
    return {
      obj
    }
  }
}
</script>
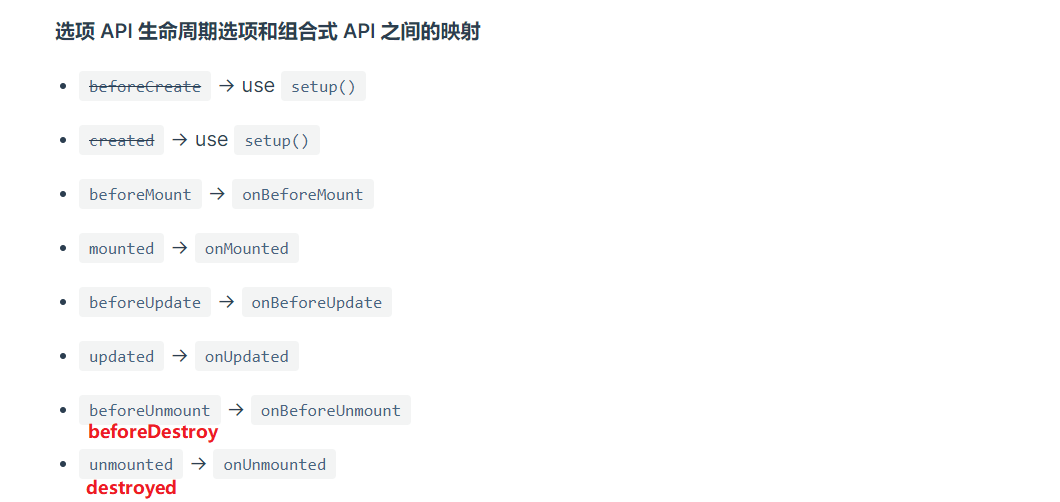
生命周期函数
需要在 setup 中调用 需要导入使用 onXX函数 destoryed = onUnmounted 移除了create和beforeCreate
import { onMounted, onUpdated, onUnmounted } from 'vue'

const MyComponent = {
  setup() {
    onMounted(() => {
      console.log('mounted!')
    })
    onUpdated(() => {
      console.log('updated!')
    })
    onUnmounted(() => {
      console.log('unmounted!')
    })
  }
}
组件通信
父子通信
- 父传子没有任何变化
- 子传父
- vue3中没有this,emit在setup第二个形参
context中 - setup第一个形参是props
```javascript
- vue3中没有this,emit在setup第二个形参
- v-model语法糖
   - 父组件传值需要 在前面加`v-module`
   - 子组件中`context.emit('update:prop属性', 值)`即可更新值
```vue
<template>
  <Son v-model:money="money"/>
</template>

<script>
import Son from './components/son.vue'
import { ref } from "vue";
export default {
  name: 'App',
  components: {
    Son,
  },
  setup() {
   const money = ref(100)
   const spendmoney = (newVal) => {
    console.log(newVal);
    money.value = newVal
   }
   return {
    money,
    spendmoney
   }
  }
}
</script>
<template>
  <div>{{money}}</div>
  <button @click="spendmoney">花钱</button>
</template>

<script>
  export default {
    props: {
      money: {
        type: Number,
        default: 0
      },
    },
    setup(props,context) {
      const spendmoney = ()=> {
        console.log('花钱');
        context.emit('update:money',props.money-1)
      }
      return{
        spendmoney
      }
    }
  }
</script>
依赖注入
父组件提供数据provide('抛出变量名',变量)
<template>
  <Grandson/>
</template>

<script>
import { provide, ref } from 'vue'
import Grandson from './components/a.vue'
export default {
components: {
  Grandson,
},
setup() {
  const myGoods = ref('大金砖')
  provide('goods',myGoods)

  provide('changeGoods',(newValue) =>{
      if (newValue > 999) {
        alert('赚了')
      } else {
        alert('赔了')
      }
      myGoods.value = newValue
    })
  return {
    myGoods
  }
}
}
</script>
子孙后代接收数据const 变量 = inject('接收变量名')
<template>
  <div>
    <h3>我是后代组件{{goods}}</h3>
    <button @click="changeGoods(1000)">卖出去</button>
  </div>
</template>

<script>
import { inject } from 'vue'
export default {
  setup() {
    const goods = inject('goods')
    const changeGoods = inject('changeGoods')
    return {
      goods,
      changeGoods
    }
  }
}
</script>
ref操作dom
基本步骤
- 创建一个空的ref对象
const hRef = ref(null) - 模板中建立联系
<h1 ref="hRef"></h1> - onMounted中使用
hRef.value```vue获取Dom元素
---

<a name="uJWmy"></a>
## vuex
state,这里改成了函数,数据以返回值的形式定义

state本地存贮插件
> 存储在localStorage中
> key是存储数据的键名
> paths是存储state中的那些数据,如果是模块下具体的数据需要加上模块名称,如user.token
> 修改state中的数据即可触发同步机制,可以看到本地存储数据的的变化

`yarn add vuex-persistedstate`
```javascript
import createPersistedstate from 'vuex-persistedstate'
export default createStore({
  modules: {
    user,
    cart
  },
  plugins: [
    createPersistedstate({
      key: 'erabbit-client-pc-store',
      paths: ['user', 'cart']
    }),
  ]
})
本地调试工具Logger Plugin
安装好这个log插件之后,我们每次触发action函数和mutation函数 都可以在控制台打印出当前本地提交的记录详细信息,包括
名称``参数``修改前后的state数据

import { createLogger } from 'vuex'
export default createStore({
  plugins: [
    createPersistedstate({
      key: 'erabbit-client-pc-store',
      paths: ['user', 'cart']
    }),
    createLogger()
  ]
})

若有收获,就点个赞吧
0 人点赞
