配置路由
搭建基础页面
面包屑渲染
接口
import request from '@/utils/request'/*** 根据 id 获取商品详情数据* @param {*} id*/export const reqFindGoods = (id) => request('/goods', 'get', { id })
js逻辑
useRoute 是vue3中的this.route
<script>import { reqFindGoods } from '@/api/goods'import { useRoute } from 'vue-router'import { ref } from 'vue'export default {name: 'XtxGoodsPage',setup () {// 商品数据const goods = ref({})const route = useRoute()console.log('route', route)const findGoods = async () => {const { result } = await reqFindGoods(route.params.id)console.log('res', result)goods.value = result}findGoods()return {goods}}}</script>
面包屑
渲染数据,配置跳转路径
<!-- 面包屑 --><XtxBread><XtxBreadItem to="/">首页</XtxBreadItem><XtxBreadItem :to="'/category/'+goods.categories[1].id">{{goods.categories[1].name}}</XtxBreadItem><XtxBreadItem :to="`/category/sub/${goods.categories[0].id}`">{{goods.categories[0].name}}</XtxBreadItem><XtxBreadItem to="/">{{goods.name}}</XtxBreadItem></XtxBread>
渲染页面后这里报错如下
数组下标查找到的是undefined,因为数据获取是异步的这时组件已经渲染 解决:需要加一个健全判断一下
<div class="container" v-if="goods.categories"><!-- 面包屑 --><XtxBread><XtxBreadItem to="/">首页</XtxBreadItem><XtxBreadItem :to="'/category/'+goods.categories[1].id">{{goods.categories[1].name}}</XtxBreadItem><XtxBreadItem :to="`/category/sub/${goods.categories[0].id}`">{{goods.categories[0].name}}</XtxBreadItem><XtxBreadItem to="/">{{goods.name}}</XtxBreadItem></XtxBread></div>
结构拆分
<!-- 商品信息 --><div class="goods-info"><!-- 图片预览区 --><div class="media">左边</div><!-- 商品信息区 --><div class="spec">右边</div></div>
.goods-info {min-height: 600px;background: #fff;display: flex;.media {width: 580px;height: 600px;padding: 30px 50px;}.spec {flex: 1;padding: 30px 30px 30px 0;}}
图片放大预览组件
组件需要传入
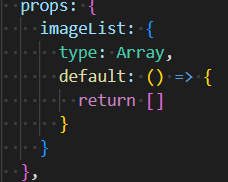
<template><div class="goods-image"><!-- 大图 --><divclass="large":style="[{backgroundImage: `url(${imageList[curIndex]})`,backgroundPositionX: positionX + 'px',backgroundPositionY: positionY + 'px',},]"v-show="showFlag"></div><div class="middle" ref="target"><img :src="imageList[curIndex]" alt="" /><!-- 蒙层容器 --><divclass="layer":style="{ left: left + 'px', top: top + 'px' }"v-show="showFlag"></div></div><!-- 小图 --><ul class="small"><liv-for="(img, i) in imageList":key="i"@mouseenter="mouseEnterFn(i)":class="{ active: i === curIndex }"><img :src="img" alt="" /></li></ul></div></template><script>/*** 交互思路分析:* 1. 基于鼠标移入事件 mouseenter* 2. 鼠标移入哪个就把哪个的下标值记录一下 然后通过下标值去imageList中去取值 把取到的值放到src渲染即可*/import { ref, watch } from 'vue'import { useMouseInElement } from '@vueuse/core'export default {name: 'XtxImageView',props: {imageList: {type: Array,default: () => {return []}}},setup () {// 实现鼠标移入交互const curIndex = ref(0)function mouseEnterFn (i) {curIndex.value = i}// 实现放大镜效果const target = ref(null)// 控制是否显示 false代表不显示 (直接使用isOutside 会有闪动bug)const showFlag = ref(false)// elementX:相较于我们盒子左侧的距离 refObj// elementY:相较于盒子顶部的距离 refObj// isOutSide: 鼠标是否在盒子外部 true代表在外部 refObjconst { elementX, elementY, isOutside } = useMouseInElement(target)// 实现我们滑块跟随鼠标移动的交互效果const left = ref(0)const top = ref(0)const positionX = ref(0)const positionY = ref(0)watch([elementX, elementY, isOutside], () => {showFlag.value = !isOutside.value// 只有进入到容器中才开始做移动判断if (isOutside.value) {return false}// 根据鼠标的坐标变化控制我们滑块的位移 left top值// 1. 控制滑块最大的可移动范围if (elementX.value > 300) {left.value = 200}if (elementX.value < 100) {left.value = 0}// 2. 横向有效移动范围内的逻辑if (elementX.value < 300 && elementX.value > 100) {left.value = elementX.value - 100}if (elementY.value > 300) {top.value = 200}if (elementY.value < 100) {top.value = 0}// 2. 横向有效移动范围内的逻辑if (elementY.value < 300 && elementY.value > 100) {top.value = elementY.value - 100}// 控制背景大图的移动 (背景图的移动 是跟着 滑块的移动走的)// 1.鼠标的移动的方向和大图的方向是相反的 (正负)// 2.鼠标每移动一个像素 大图背景移动俩个像素 (x2)positionX.value = -left.value * 2positionY.value = -top.value * 2})/*** 1. 换算关系 难点* 2. 使用工具函数的时候 返回的数据的类型 ref类型 refObj.value* 3. 在实现一些和样式有关的交互 一定要保证css单位值是有效的*/return {mouseEnterFn,curIndex,target,elementX,elementY,left,top,positionX,positionY,showFlag}}}</script><style scoped lang="less">.goods-image {width: 480px;height: 400px;position: relative;display: flex;.middle {width: 400px;height: 400px;background: #f5f5f5;}.large {position: absolute;top: 0;left: 412px;width: 400px;height: 400px;z-index: 500;box-shadow: 0 0 10px rgba(0, 0, 0, 0.1);background-repeat: no-repeat;// 背景图:盒子的大小 = 2:1 将来控制背景图的移动来实现放大的效果查看 background-positionbackground-size: 800px 800px;background-color: #f8f8f8;}.layer {width: 200px;height: 200px;background: rgba(0, 0, 0, 0.2);// 绝对定位 然后跟随咱们鼠标控制left和top属性就可以让滑块移动起来left: 0;top: 0;position: absolute;}.small {width: 80px;li {width: 68px;height: 68px;margin-left: 12px;margin-bottom: 15px;cursor: pointer;&:hover,&.active {border: 2px solid @xtxColor;}}}}</style>
注册后使用
规格组件
测试商品id: 1379052170040578049
字典筛选(重难点)
将得到的sku组合整理成字典基于字典查询 在字典中的可以点击,不在的按钮需要禁用 库存为0不会出现在字典集合中
<script>import bwPowerSet from '@/vendor/power-set'// console.log(bwPowerSet(['']));// 根据skus 整理路径字典const getPathMap = (skus) => {const pathMap = {}// 1. 过滤出inventory(库存)不为0 有效skuskus.filter(sku => sku.inventory > 0)// filter 返回的还是数组 链式调用循环.forEach(sku => {// 2. 找到了符合条件的sku})return pathMap}export default {name: 'GoodsSku',props: {goods: {type: Object,default: () => ({specs: [],skus: []})}},setup (props) {const pathMap = getPathMap(props.goods.skus)return {changeSku}}}</script>
幂集算法 https://raw.githubusercontent.com/trekhleb/javascript-algorithms/master/src/algorithms/sets/power-set/bwPowerSet.js js算法库 https://github.com/trekhleb/javascript-algorithms
/*** Find power-set of a set using BITWISE approach.** @param {*[]} originalSet* @return {*[][]}*/export default function bwPowerSet(originalSet) {const subSets = [];// We will have 2^n possible combinations (where n is a length of original set).// It is because for every element of original set we will decide whether to include// it or not (2 options for each set element).const numberOfCombinations = 2 ** originalSet.length;// Each number in binary representation in a range from 0 to 2^n does exactly what we need:// it shows by its bits (0 or 1) whether to include related element from the set or not.// For example, for the set {1, 2, 3} the binary number of 0b010 would mean that we need to// include only "2" to the current set.for (let combinationIndex = 0; combinationIndex < numberOfCombinations; combinationIndex += 1) {const subSet = [];for (let setElementIndex = 0; setElementIndex < originalSet.length; setElementIndex += 1) {// Decide whether we need to include current element into the subset or not.if (combinationIndex & (1 << setElementIndex)) {subSet.push(originalSet[setElementIndex]);}}// Add current subset to the list of all subsets.subSets.push(subSet);}return subSets;}
根据算法处理数据,使用算法求子级、整理子级
// 根据skus 整理路径字典const getPathMap = (skus) => {const pathMap = {}// 1. 过滤出inventory(库存)不为0 有效skuskus.filter(sku => sku.inventory > 0)// filter 返回的还是数组 链式调用循环.forEach(sku => {// 2. 找到了符合条件的sku// console.log(sku)const arr = sku.specs.map(item => item.valueName)// console.log(arr)// 3.使用算法求子集const sets = bwPowerSet(arr)// console.log(sets)// 4.整理子集,组合字典sets.forEach(set => {// 把子级数组转换成字符串const key = set.join('')// console.log(key)/*** 当没有pathMap[key] 的时候新建一个 数组 key:[id]* 如果有就push到这个数组中去* */if (pathMap[key]) {pathMap[key].push(sku.id)} else {pathMap[key] = [sku.id]}})})return pathMap}
按钮
禁用(重难点)
模板中添加禁用类 disabled 这里会有一个bug 就算禁用之后点击还是会添加选中状态类 在changesku中做一个健全有这个禁用属性值为true时return
// 禁用const updateDisabledStatus = (specs, pathMap) => {// 深拷贝const selectedJSON = JSON.stringify(getSelectedSpac(specs))// 遍历之后获取到每一行specs.forEach((item, i) => {// 遍历之后获取到每一个按钮item.values.forEach(btn => {// console.log(btn.name)const selectedArr = JSON.parse(selectedJSON)// console.log('selectedArr', selectedArr)// selectedArr[i]是当前行 btn.name所有按钮的名字selectedArr[i] = btn.name// console.log('selectedArr[i]', selectedArr[i])// 筛选出 undefined 然后拼接// const key = selectedArr.filter(v => v).join('')// console.log(selectedArr.filter(v => v))// console.log('key', key)if (pathMap[btn.name]) {btn.disabled = false} else {btn.disabled = true}})})}// 初始化调用 点击按钮也需要更新禁用状态setup (props, context) {if (props.skuId) {initDefaultStatus(props.goods, props.skuId)}const pathMap = getPathMap(props.goods.skus)console.log('path', pathMap)// 初始化的时候禁用updateDisabledStatus(props.goods.specs, pathMap)const changeSku = (item, spec) => {// 健全 如果不可点击直接返回,避免添加类if (item.disabled) {return}// 取反if (item.active) {item.active = false} else {// 排他 先全部取消,在选中当前项spec.values.forEach(element => {element.active = false})item.active = true}// 在点击按钮之后也需要更新禁用状态updateDisabledStatus(props.goods.specs, pathMap)// active 改变时会重新执行这里,对应上了用户的点击顺序const selectedArr = getSelectedSpac(props.goods.specs).filter(v => v)console.log(selectedArr)if (selectedArr.length === props.goods.specs.length) {const skuId = (pathMap[selectedArr.join('')][0])const sku = props.goods.skus.find(sku => sku.id === skuId)console.log('组件中的sku', sku)// 传递context.emit('change', {skuId: sku.id,price: sku.price,oldPrice: sku.oldPrice,inventory: sku.inventory,specsText: sku.specs.reduce((str, item) => `${str} ${item.name}:${item.valueName}`, '').trim('')})} else {// 没选中的context.emit('change', {})}}return {changeSku}}}
获取点击数据
按钮点击之后需要拼接成与字典中相同的数据来匹配 用find方法找到active为true 的一项 这一项就是点击选中的项 将没有点击选中的设为undefinde,然后添加到数组中
// 获得按钮点击之后的数据const getSelectedSpac = (specs) => {const arr = []specs.forEach((spec, index) => {// 获取当前点击的按钮const btn = spec.values.find(obj => obj.active === true)if (btn) {arr[index] = btn.name} else {arr[index] = undefined}})return arr}
处理数据传出组件
const changeSku = (item, spec) => {// 健全 如果不可点击直接返回,避免添加类if (item.disabled) {return}// 取反if (item.active) {item.active = false} else {// 排他 先全部取消,在选中当前项spec.values.forEach(element => {element.active = false})item.active = true}// 在点击按钮之后也需要更新禁用状态updateDisabledStatus(props.goods.specs, pathMap)// active 改变时会重新执行这里,对应上了用户的点击顺序const selectedArr = getSelectedSpac(props.goods.specs).filter(v => v)// console.log(selectedArr)if (selectedArr.length === props.goods.specs.length) {const skuId = (pathMap[selectedArr.join('')][0])const sku = props.goods.skus.find(sku => sku.id === skuId)console.log('组件中的sku', sku)// 传递context.emit('change', {skuId: sku.id,price: sku.price,oldPrice: sku.oldPrice,inventory: sku.inventory,specsText: sku.specs.reduce((str, item) => `${str} ${item.name}:${item.valueName}`, '').trim('')})} else {// 没选中的context.emit('change', {})}}


