- 一:Atlas入门
- 二:Atlas安装及使用
- 修改atlas存储数据主机
atlas.graph.storage.hostname=hadoop102:2181,hadoop103:2181,hadoop104:2181
2)进入到/opt/module/atlas/conf/hbase路径,添加Hbase集群的配置文件到${Atlas_Home}
[atguigu@hadoop102 hbase]$
ln -s /opt/module/hbase/conf/ /opt/module/atlas/conf/hbase/
3)在/opt/module/atlas/conf/atlas-env.sh中添加HBASE_CONF_DIR
[atguigu@hadoop102 conf]$ vim atlas-env.sh - 添加HBase配置文件路径
export HBASE_CONF_DIR=/opt/module/atlas/conf/hbase/conf - 2.2.4 Atlas其他配置
- http://hadoop102:21000
# If enabled and set to true, this will run setup steps when the server starts
atlas.server.run.setup.on.start=false">### Server Properties #########
atlas.rest.address=http://hadoop102:21000
# If enabled and set to true, this will run setup steps when the server starts
atlas.server.run.setup.on.start=false - ### Entity Audit Configs #########
atlas.audit.hbase.zookeeper.quorum=hadoop102:2181,hadoop103:2181,hadoop104:2181
2)记录性能指标,进入/opt/module/atlas/conf/路径,修改当前目录下的atlas-log4j.xml
[atguigu@hadoop102 conf]$ vim atlas-log4j.xml
- http://hadoop102:21000
">去掉如下代码的注释- 在tez引擎依赖的jar包后面追加hive插件相关jar包
export HIVE_AUX_JARS_PATH=/opt/module/atlas/hook/hive - 配置Hive环境变量
export HIVE_HOME=/opt/module/hive
export PATH=$PATH:$HIVE_HOME/bin/ - 建议JDK1.7使用以下配置
export ATLAS_SERVER_HEAP=”-Xms15360m -Xmx15360m -XX:MaxNewSize=3072m -XX:PermSize=100M -XX:MaxPermSize=512m” - 建议JDK1.8使用以下配置
export ATLAS_SERVER_HEAP=”-Xms15360m -Xmx15360m -XX:MaxNewSize=5120m -XX:MetaspaceSize=100M -XX:MaxMetaspaceSize=512m” - 如果是Mac OS用户需要配置
export ATLAS_SERVER_OPTS=”-Djava.awt.headless=true -Djava.security.krb5.realm= -Djava.security.krb5.kdc=”
参数说明: -XX:SoftRefLRUPolicyMSPerMB 此参数对管理具有许多并发用户的查询繁重工作负载的GC性能特别有用。 - username=group::sha256-password
admin=ADMIN::8c6976e5b5410415bde908bd4dee15dfb167a9c873fc4bb8a81f6f2ab448a918
rangertagsync=RANGER_TAG_SYNC::e3f67240f5117d1753c940dae9eea772d36ed5fe9bd9c94a300e40413f1afb9d
(1)admin是用户名称
(2)8c6976e5b5410415bde908bd4dee15dfb167a9c873fc4bb8a81f6f2ab448a918是采用sha256加密的密码,默认密码为admin。
2)例如:修改用户名称为atguigu,密码为atguigu
(1)获取sha256加密的atguigu密码
[atguigu@hadoop102 conf]$ echo -n “atguigu”|sha256sum
2628be627712c3555d65e0e5f9101dbdd403626e6646b72fdf728a20c5261dc2
(2)修改用户名和密码
[atguigu@hadoop102 conf]$ vim users-credentials.properties - username=group::sha256-password
atguigu=ADMIN::2628be627712c3555d65e0e5f9101dbdd403626e6646b72fdf728a20c5261dc2
rangertagsync=RANGER_TAG_SYNC::e3f67240f5117d1753c940dae9eea772d36ed5fe9bd9c94a300e40413f1afb9d - 三:界面查看
- 四:编译Atlas源码
一:Atlas入门
1.1 Atlas概述
Apache Atlas为组织提供开放式元数据管理和治理功能,用以构建其数据资产目录,对这些资产进行分类和管理,并为数据分析师和数据治理团队,提供围绕这些数据资产的协作功能。
1)表与表之间的血缘依赖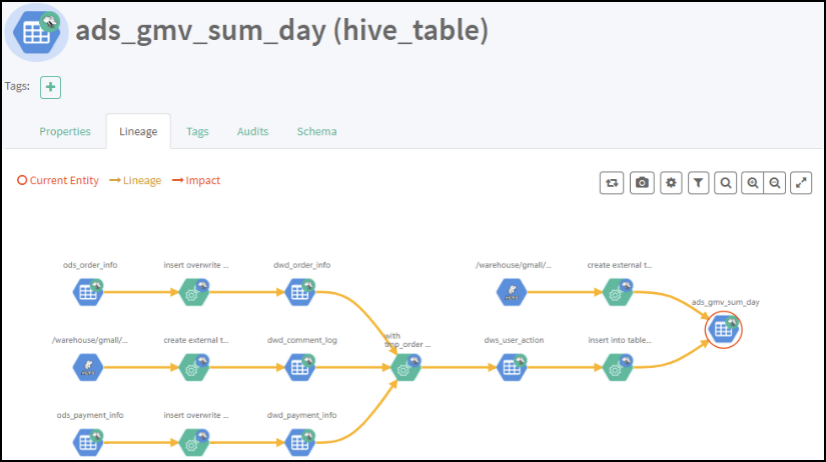
2)字段与字段之间的血缘依赖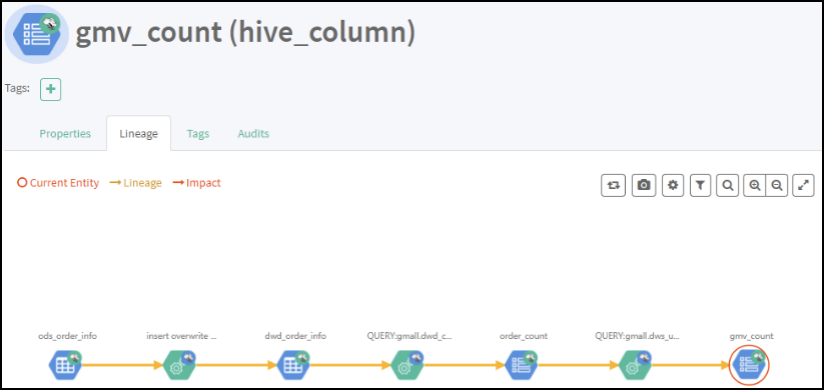
1.2 Atlas架构原理
二:Atlas安装及使用
1)Atlas官网地址:https://atlas.apache.org/
2)文档查看地址:https://atlas.apache.org/0.8.4/index.html
3)下载地址:https://www.apache.org/dyn/closer.cgi/atlas/0.8.4/apache-atlas-0.8.4-sources.tar.gz
2.1 安装前环境准备
Atlas安装分为:集成自带的HBase + Solr;集成外部的HBase + Solr。通常企业开发中选择集成外部的HBase + Solr,方便项目整体进行集成操作。
| 服务名称 | 子服务 | 服务器 hadoop102 |
服务器 hadoop103 |
服务器 hadoop104 |
|---|---|---|---|---|
| HDFS | NameNode | √ | ||
| DataNode | √ | √ | √ | |
| SecondaryNameNode | √ | |||
| Yarn | NodeManager | √ | √ | √ |
| Resourcemanager | √ | |||
| Zookeeper | QuorumPeerMain | √ | √ | √ |
| Kafka | Kafka | √ | √ | √ |
| HBase | HMaster | √ | ||
| HRegionServer | √ | √ | √ | |
| Solr | Jar | √ | √ | √ |
| Hive | Hive | √ | ||
| MySQL | MySQL | √ | ||
| Azkaban | AzkabanWebServer | √ | ||
| AzkabanExecutorServer | √ | |||
| Atlas | atlas | √ | ||
| 服务数总计 | 13 | 7 | 7 |
2.1.1 安装JDK8、Hadoop3.1.3
1)安装Hadoop集群
2)启动Hadoop集群
[atguigu@hadoop102 hadoop-3.1.3]$ sbin/start-dfs.sh
[atguigu@hadoop103 hadoop-3.1.3]$ sbin/start-yarn.sh
2.1.2 安装Zookeeper3.5.7
1)安装Zookeeper集群
2)启动Zookeeper集群
[atguigu@hadoop102 zookeeper-3.7.7]$ zk.sh start
2.1.3 安装Kafka2.4.1
1)安装Kafka集群
2)启动Kafka集群
[atguigu@hadoop102 kafka]$ kf.sh start
2.1.4 安装Hbase2.0.5
1)安装Hbase集群
2)启动Hbase集群
[atguigu@hadoop102 hbase]$ bin/start-hbase.sh
2.1.5 安装Solr5.2.1
1)Solr版本要求必须是5.2.1,见官网
2)Solr下载:http://archive.apache.org/dist/lucene/solr/5.2.1/solr-5.2.1.tgz
3)把solr-5.2.1.tgz上传到hadoop102的/opt/software目录下
4)解压solr-5.2.1.tgz到/opt/module/目录下面
[atguigu@hadoop102 software]$ tar -zxvf solr-5.2.1.tgz -C /opt/module/
5)修改solr-5.2.1的名称为solr
[atguigu@hadoop102 module]$ mv solr-5.2.1/ solr
6)进入solr/bin目录,修改solr.in.sh文件
[atguigu@hadoop102 solr]$ vim bin/solr.in.sh
#添加下列指令
ZK_HOST=”hadoop102:2181,hadoop103:2181,hadoop104:2181”
SOLR_HOST=”hadoop102”
# Sets the port Solr binds to, default is 8983
#可修改端口号
SOLR_PORT=8983
7)分发Solr,进行Cloud模式部署
[atguigu@hadoop102 module]$ xsync solr
提示:分发完成后,分别对hadoop103、hadoop104主机/opt/module/solr/bin下的solr.in.sh文件,修改为SOLR_HOST=对应主机名。
8)在三台节点上分别启动Solr,这个就是Cloud模式
[atguigu@hadoop102 solr]$ bin/solr start
[atguigu@hadoop103 solr]$ bin/solr start
[atguigu@hadoop104 solr]$ bin/solr start
提示:启动Solr前,需要提前启动Zookeeper服务。
9)Web访问8983端口,可指定三台节点中的任意一台IP,http://hadoop102:8983/solr/#/
提示:UI界面出现Cloud菜单栏时,Solr的Cloud模式才算部署成功。
10)编写Solr启动停止脚本
(1)在hadoop102的/home/atguigu/bin目录下创建脚本
[atguigu@hadoop102 bin]$ vim s.sh
在脚本中编写如下内容
#!/bin/bash
case $1 in
“start”){
for i in hadoop102 hadoop103 hadoop104
do
ssh $i “/opt/module/solr/bin/solr start”
done
};;
“stop”){
for i in hadoop102 hadoop103 hadoop104
do
ssh $i “/opt/module/solr/bin/solr stop”
done
};;
esac
(2)增加脚本执行权限
[atguigu@hadoop102 bin]$ chmod 777 s.sh
(3)Solr集群启动脚本
[atguigu@hadoop102 module]$ s.sh start
(4)Solr集群停止脚本
[atguigu@hadoop102 module]$ s.sh stop
2.1.6 安装Hive3.1.2
2.1.7 安装Azkaban3.8.4
2.1.8 安装Atlas2.0
(1)把apache-atlas-2.0.0-server.tar.gz 上传到hadoop102的/opt/software目录下
(2)解压apache-atlas-2.0.0-server.tar.gz 到/opt/module/目录下面
[atguigu@hadoop102 software]# tar -zxvf apache-atlas-2.0.0-server.tar.gz -C /opt/module/
(3)修改apache-atlas-2.0.0的名称为atlas
[atguigu@hadoop102 module]# mv apache-atlas-2.0.0/ atlas
2.2 Atlas集成外部框架
2.2.1 Atlas集成Hbase
1)进入/opt/module/atlas/conf/目录,修改配置文件
[atguigu@hadoop102 conf]$ vim atlas-application.properties
修改atlas存储数据主机
atlas.graph.storage.hostname=hadoop102:2181,hadoop103:2181,hadoop104:2181
2)进入到/opt/module/atlas/conf/hbase路径,添加Hbase集群的配置文件到${Atlas_Home}
[atguigu@hadoop102 hbase]$
ln -s /opt/module/hbase/conf/ /opt/module/atlas/conf/hbase/
3)在/opt/module/atlas/conf/atlas-env.sh中添加HBASE_CONF_DIR
[atguigu@hadoop102 conf]$ vim atlas-env.sh
添加HBase配置文件路径
export HBASE_CONF_DIR=/opt/module/atlas/conf/hbase/conf
2.2.2 Atlas集成Solr
1)进入/opt/module/atlas/conf目录,修改配置文件
[atguigu@hadoop102 conf]$ vim atlas-application.properties 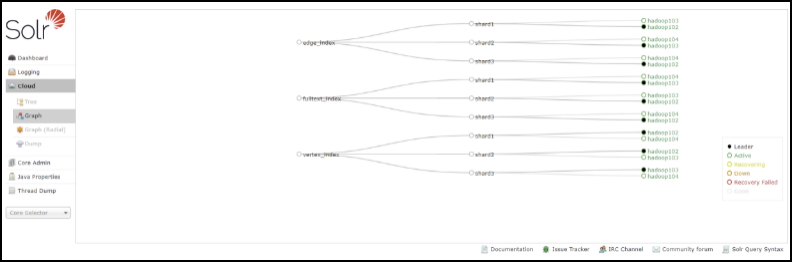
#修改如下配置
atlas.graph.index.search.solr.zookeeper-url=hadoop102:2181,hadoop103:2181,hadoop104:2181
2)将Atlas自带的Solr文件夹拷贝到外部Solr集群的各个节点。
[atguigu@hadoop102 conf]$
cp -r /opt/module/atlas/conf/solr /opt/module/solr/
3)进入到/opt/module/solr路径,修改拷贝过来的配置文件名称为atlas_conf
[atguigu@hadoop102 solr]$ mv solr atlas_conf
4)在Cloud模式下,启动Solr(需要提前启动Zookeeper集群),并创建collection
[atguigu@hadoop102 solr]$ bin/solr create -c vertex_index -d /opt/module/solr/atlas_conf -shards 3 -replicationFactor 2
[atguigu@hadoop102 solr]$ bin/solr create -c edge_index -d /opt/module/solr/atlas_conf -shards 3 -replicationFactor 2
[atguigu@hadoop102 solr]$ bin/solr create -c fulltext_index -d /opt/module/solr/atlas_conf -shards 3 -replicationFactor 2
-shards 3:表示该集合分片数为3
-replicationFactor 2:表示每个分片数都有2个备份
vertex_index、edge_index、fulltext_index:表示集合名称
注意:如果需要删除vertex_index、edge_index、fulltext_index等collection可以执行如下命令。
[atguigu@hadoop102 solr]$ bin/solr delete -c ${collection_name}
5)验证创建collection成功
登录solr web控制台:http://hadoop102:8983/solr/#/~cloud 看到如下图显示:
2.2.3 Atlas集成Kafka
1)进入/opt/module/atlas/conf/目录,修改配置文件atlas-application.properties
[atguigu@hadoop102 conf]$ vim atlas-application.properties
### Notification Configs #########
atlas.notification.embedded=false
atlas.kafka.data=/opt/module/kafka/logs
atlas.kafka.zookeeper.connect=hadoop102:2181,hadoop103:2181,hadoop104:2181/kafka
atlas.kafka.bootstrap.servers=hadoop102:9092,hadoop103:9092,hadoop104:9092
atlas.kafka.zookeeper.session.timeout.ms=4000
atlas.kafka.zookeeper.connection.timeout.ms=2000
atlas.kafka.enable.auto.commit=true
2)启动Kafka集群,并创建Topic
[atguigu@hadoop102 kafka]$ bin/kafka-topics.sh —zookeeper hadoop102:2181,hadoop103:2181,hadoop104:2181/kafka —create —replication-factor 3 —partitions 3 —topic _HOATLASOK
[atguigu@hadoop102 kafka]$ bin/kafka-topics.sh —zookeeper hadoop102:2181,hadoop103:2181,hadoop104:2181/kafka —create —replication-factor 3 —partitions 3 —topic ATLAS_ENTITIES
2.2.4 Atlas其他配置
1)进入/opt/module/atlas/conf/目录,修改配置文件atlas-application.properties
[atguigu@hadoop102 conf]$ vim atlas-application.properties
### Server Properties #########
atlas.rest.address=http://hadoop102:21000
# If enabled and set to true, this will run setup steps when the server starts
atlas.server.run.setup.on.start=false
### Entity Audit Configs #########
atlas.audit.hbase.zookeeper.quorum=hadoop102:2181,hadoop103:2181,hadoop104:2181
2)记录性能指标,进入/opt/module/atlas/conf/路径,修改当前目录下的atlas-log4j.xml
[atguigu@hadoop102 conf]$ vim atlas-log4j.xml
去掉如下代码的注释
2.2.5 Atlas集成Hive
1)进入/opt/module/atlas/conf/目录,修改配置文件atlas-application.properties
[atguigu@hadoop102 conf]$ vim atlas-application.properties
### Hive Hook Configs #######
atlas.hook.hive.synchronous=false
atlas.hook.hive.numRetries=3
atlas.hook.hive.queueSize=10000
atlas.cluster.name=primary
2)将/opt/module/atlas/conf/atlas-application.properties复制到路径/opt/module/hive/conf/下:
[atguigu@hadoop102 conf]$ cp /opt/module/atlas/conf/atlas-application.properties /opt/module/hive/conf/
3)解压apache-atlas-2.0.0-hive-hook.tar.gz到/opt/module/
[atguigu@hadoop102 software]$ tar -zxvf apache-atlas-2.0.0-hive-hook.tar.gz -C /opt/module/
4)剪切hook和hook-bin目录到到/opt/module/atlas文件夹中
[atguigu@hadoop102 software]$ mv /opt/module/apache-atlas-hive-hook-2.0.0/hook-bin/ /opt/module/atlas/
[atguigu@hadoop102 software]$ mv /opt/module/apache-atlas-hive-hook-2.0.0/hook /opt/module/atlas/
5)将atlas-application.properties配置文件加入到atlas-plugin-classloader-1.0.0.jar中
[atguigu@hadoop102 hive]$ zip -u /opt/module/atlas/hook/hive/atlas-plugin-classloader-2.0.0.jar /opt/module/atlas/conf/atlas-application.properties
[atguigu@hadoop102 hive]$ cp /opt/module/atlas/conf/atlas-application.properties /opt/module/hive/conf/
原因:这个配置不能参照官网,将配置文件考到hive的conf中。参考官网的做法一直读取不到atlas-application.properties配置文件,看了源码发现是在classpath读取的这个配置文件,所以将它压到jar里面。
6)在/opt/module/hive/conf/hive-site.xml文件中设置Atlas hook
[atguigu@hadoop102 conf]$ vim hive-site.xml
[atguigu@hadoop102 conf]$ vim hive-env.sh
在tez引擎依赖的jar包后面追加hive插件相关jar包
export HIVE_AUX_JARS_PATH=/opt/module/atlas/hook/hive
2.3 集群启动
1)启动Hadoop集群
[atguigu@hadoop102 hadoop-3.1.3]$ sbin/start-dfs.sh
[atguigu@hadoop103 hadoop-3.1.3]$ sbin/start-yarn.sh
2)启动Zookeeper集群
[atguigu@hadoop102 zookeeper-3.5.7]$ zk.sh start
3)启动Kafka集群
[atguigu@hadoop102 kafka]$ kf.sh start
4)启动Hbase集群:
[atguigu@hadoop102 hbase]$ bin/start-hbase.sh
5)启动Solr集群
[atguigu@hadoop102 solr]$ bin/solr start
[atguigu@hadoop103 solr]$ bin/solr start
[atguigu@hadoop104 solr]$ bin/solr start
6)进入/opt/module/atlas路径,重新启动Atlas服务
[atguigu@hadoop102 atlas]$ bin/atlas_stop.py
[atguigu@hadoop102 atlas]$ bin/atlas_start.py
提示:错误信息查看路径:/opt/module/atlas/logs/*.out和application.log
访问地址:http://hadoop102:21000
注意:等待时间大概2分钟。
账户:admin
密码:admin
2.4 将Hive元数据导入Atlas
1)配置Hive环境变量
[atguigu@hadoop102 hive]$ sudo vim /etc/profile.d/my_env.sh
配置Hive环境变量
export HIVE_HOME=/opt/module/hive
export PATH=$PATH:$HIVE_HOME/bin/
[atguigu@hadoop102 hive]$ source /etc/profile.d/my_env.sh
2)启动Hive,如果Hive能正常启动说明环境OK,就可以退出Hive客户端
[atguigu@hadoop102 hive]$ hive
hive (default)> show databases;
hive (default)> use gmall;
3)在/opt/module/atlas/hook-bin路径,将Hive元数据导入到Atlas
[atguigu@hadoop102 hook-bin]$ ./import-hive.sh
Using Hive configuration directory [/opt/module/hive/conf]
Log file for import is /opt/module/atlas/logs/import-hive.log
log4j:WARN No such property [maxFileSize] in org.apache.log4j.PatternLayout.
log4j:WARN No such property [maxBackupIndex] in org.apache.log4j.PatternLayout.
输入用户名:admin;输入密码:admin
Enter username for atlas :- admin
Enter password for atlas :-
Hive Meta Data import was successful!!!
2.5 Atlas常用配置(可选)
2.5.1 配置内存
如果计划存储数万个元数据对象,建议调整参数值获得最佳的JVM GC性能。以下是常见的服务器端选项
1)修改配置文件/opt/module/atlas/conf/atlas-env.sh
#设置Atlas内存
export ATLAS_SERVER_OPTS=”-server -XX:SoftRefLRUPolicyMSPerMB=0 -XX:+CMSClassUnloadingEnabled -XX:+UseConcMarkSweepGC -XX:+CMSParallelRemarkEnabled -XX:+PrintTenuringDistribution -XX:+HeapDumpOnOutOfMemoryError -XX:HeapDumpPath=dumps/atlas_server.hprof -Xloggc:logs/gc-worker.log -verbose:gc -XX:+UseGCLogFileRotation -XX:NumberOfGCLogFiles=10 -XX:GCLogFileSize=1m -XX:+PrintGCDetails -XX:+PrintHeapAtGC -XX:+PrintGCTimeStamps”
建议JDK1.7使用以下配置
export ATLAS_SERVER_HEAP=”-Xms15360m -Xmx15360m -XX:MaxNewSize=3072m -XX:PermSize=100M -XX:MaxPermSize=512m”
建议JDK1.8使用以下配置
export ATLAS_SERVER_HEAP=”-Xms15360m -Xmx15360m -XX:MaxNewSize=5120m -XX:MetaspaceSize=100M -XX:MaxMetaspaceSize=512m”
如果是Mac OS用户需要配置
export ATLAS_SERVER_OPTS=”-Djava.awt.headless=true -Djava.security.krb5.realm= -Djava.security.krb5.kdc=”
参数说明: -XX:SoftRefLRUPolicyMSPerMB 此参数对管理具有许多并发用户的查询繁重工作负载的GC性能特别有用。
2.5.2 配置用户名密码
Atlas支持以下身份验证方法:File、Kerberos协议、LDAP协议<br />通过修改配置文件atlas-application.properties文件开启或关闭三种验证方法<br />atlas.authentication.method.kerberos=true|false<br />atlas.authentication.method.ldap=true|false<br />atlas.authentication.method.file=true|false<br />如果两个或多个身份证验证方法设置为true,如果较早的方法失败,则身份验证将回退到后一种方法。例如,如果Kerberos身份验证设置为true并且ldap身份验证也设置为true,那么,如果对于没有kerberos principal和keytab的请求,LDAP身份验证将作为后备方案。<br />**本文主要讲解采用文件方式修改用户名和密码设置。其他方式可以参见官网配置即可。**<br />1)打开/opt/module/atlas/conf/users-credentials.properties文件<br />[atguigu@hadoop102 conf]$ vim users-credentials.properties
username=group::sha256-password
admin=ADMIN::8c6976e5b5410415bde908bd4dee15dfb167a9c873fc4bb8a81f6f2ab448a918
rangertagsync=RANGER_TAG_SYNC::e3f67240f5117d1753c940dae9eea772d36ed5fe9bd9c94a300e40413f1afb9d
(1)admin是用户名称
(2)8c6976e5b5410415bde908bd4dee15dfb167a9c873fc4bb8a81f6f2ab448a918是采用sha256加密的密码,默认密码为admin。
2)例如:修改用户名称为atguigu,密码为atguigu
(1)获取sha256加密的atguigu密码
[atguigu@hadoop102 conf]$ echo -n “atguigu”|sha256sum
2628be627712c3555d65e0e5f9101dbdd403626e6646b72fdf728a20c5261dc2
(2)修改用户名和密码
[atguigu@hadoop102 conf]$ vim users-credentials.properties
username=group::sha256-password
atguigu=ADMIN::2628be627712c3555d65e0e5f9101dbdd403626e6646b72fdf728a20c5261dc2
rangertagsync=RANGER_TAG_SYNC::e3f67240f5117d1753c940dae9eea772d36ed5fe9bd9c94a300e40413f1afb9d
三:界面查看
3.1 基本信息查看
3.1.1 登录
1)访问http://hadoop102:21000端口号 进行登录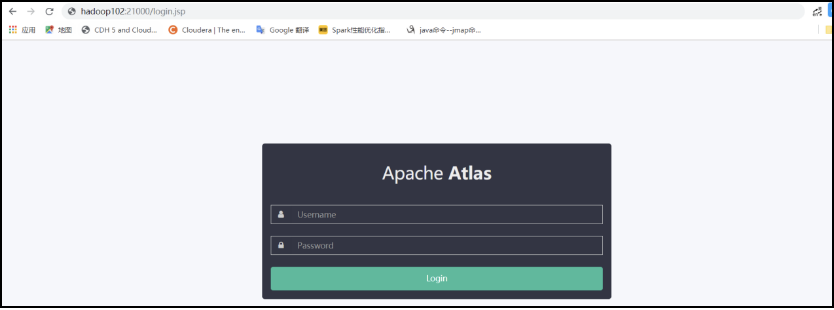
2)账号密码默认都为admin,登录成功页面如下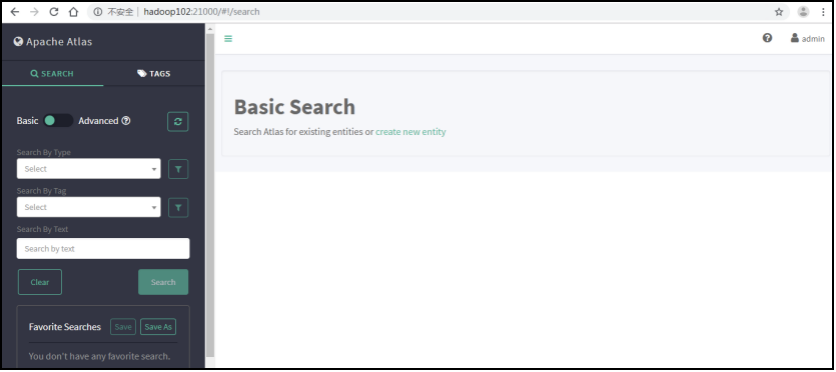
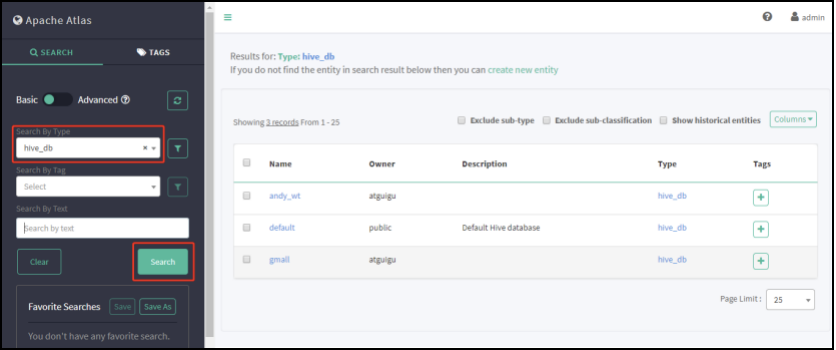
3.1.2 查询Hive库
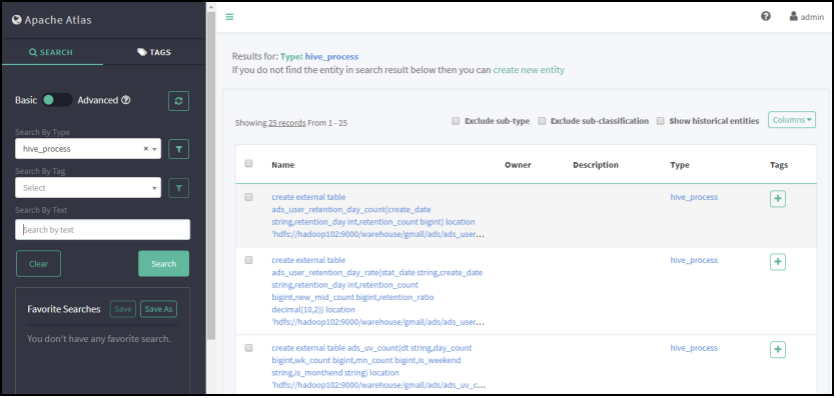
3.1.3 查询Hive进程
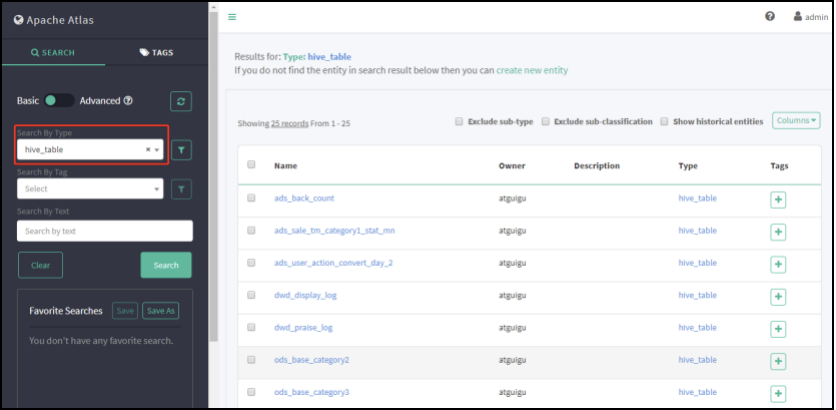
3.1.4 查询Hive表
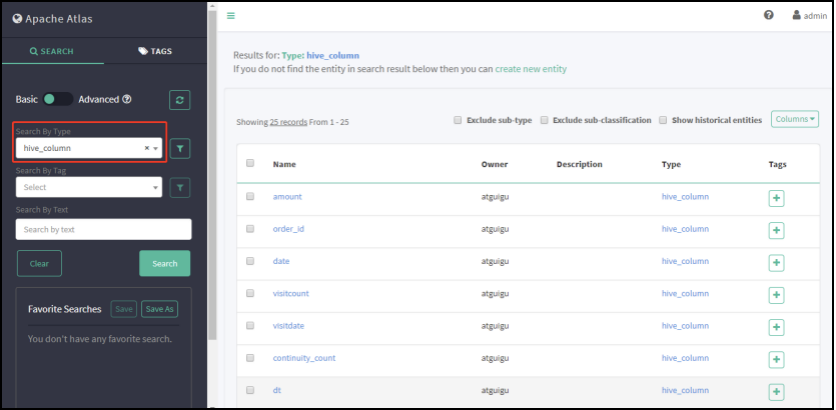
3.1.5 查询Hive列
3.1.6 筛选查询条件
比如要查询name为sequence的列,那么在Search By Query 填写 where name=’sequence’ 其他选项筛选条件写法一样。
3.1.7 查看具有血缘依赖列的数据

3.2 查看血缘依赖关系
3.2.1 第一次查看表血缘依赖
1)先选中hive_db,点击hive_db查看对应的表,如下图选中gmall库查看相应的表。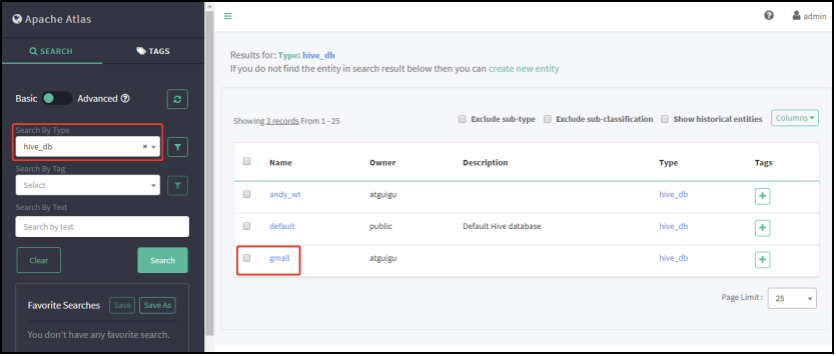
2)点击Tables按钮,可以看到gmall数据库中的所有表。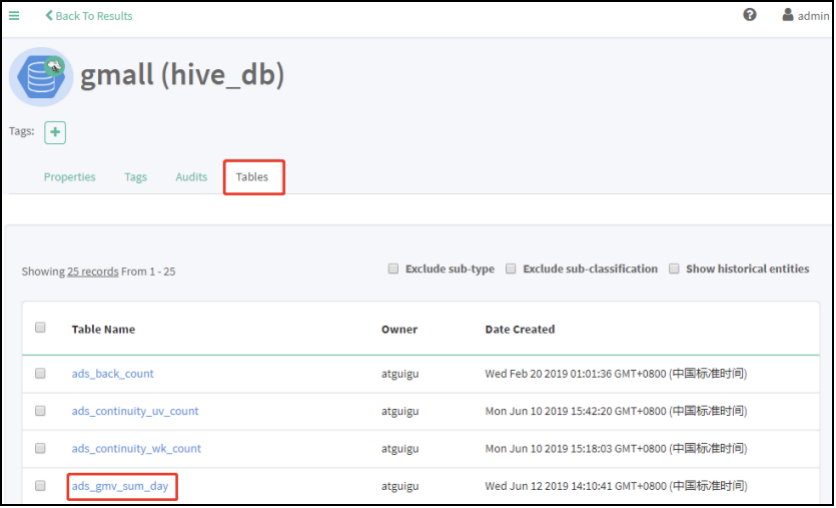
3)点击Properties,查看到表详情
4)点击Lineage,显示血缘依赖关系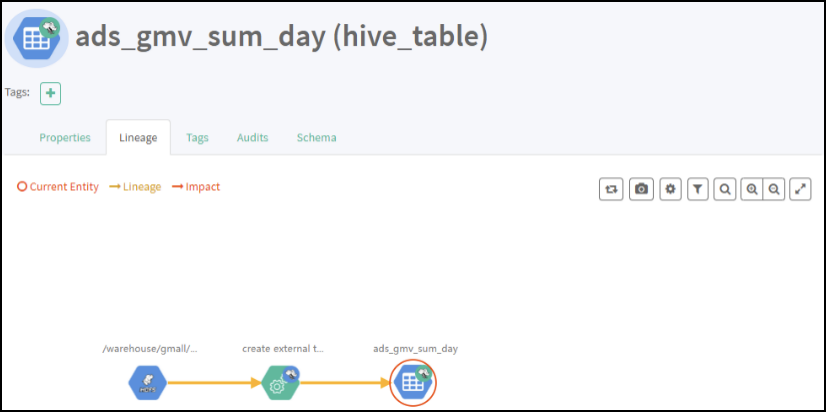
5)点击Audits,显示表修改过几次对应的时间和详情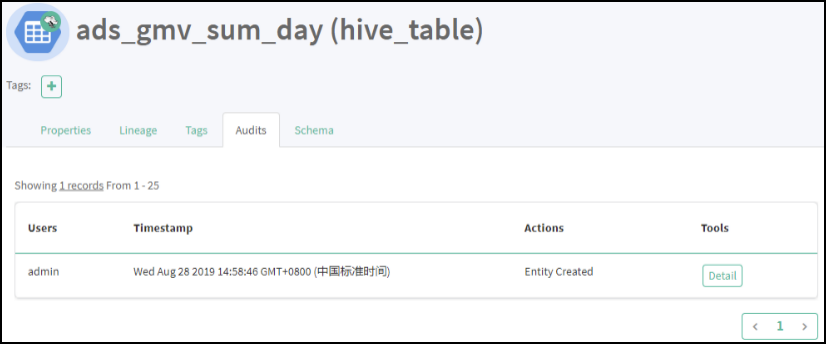
6)点击Schema,可以查看到表字段信息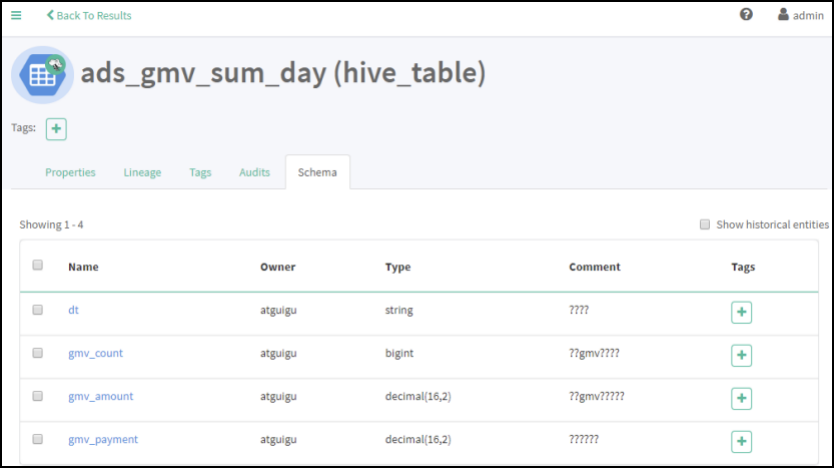
3.2.2 第一次查看字段血缘依赖
1)点击gmv_count字段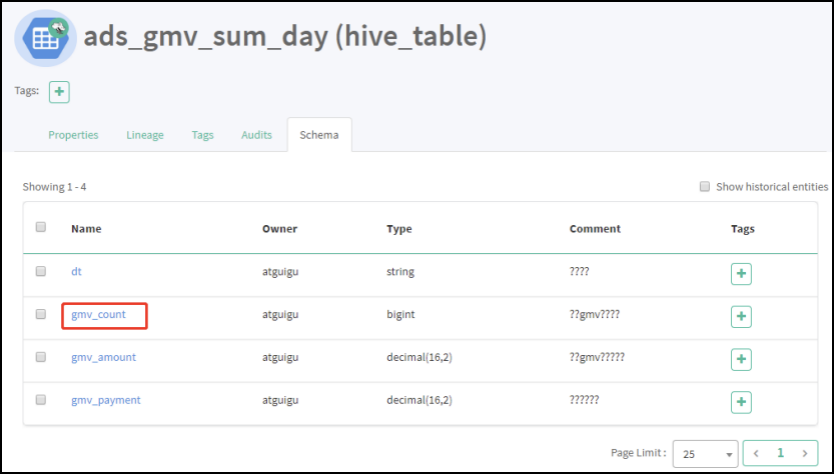
2)点击Properties,显示字段详情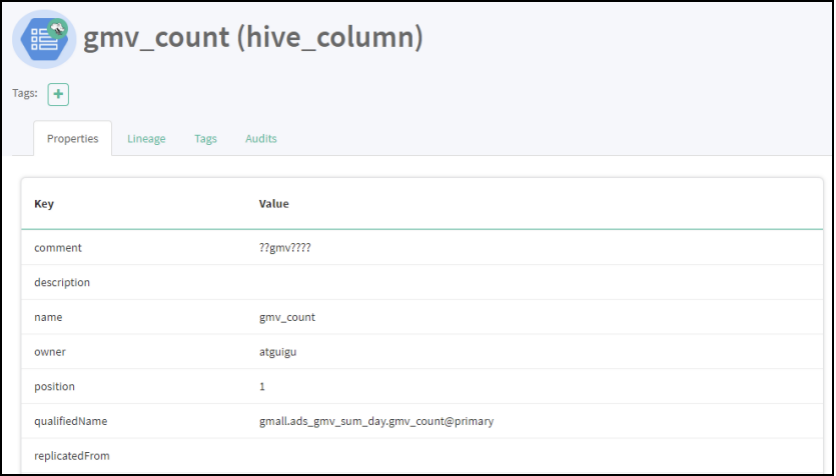
3)点击Lineage,显示血缘关系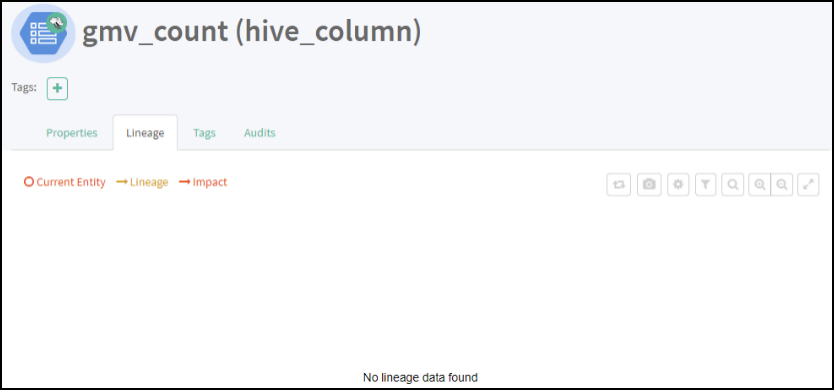
4)点击Audits,显示修改时间和详情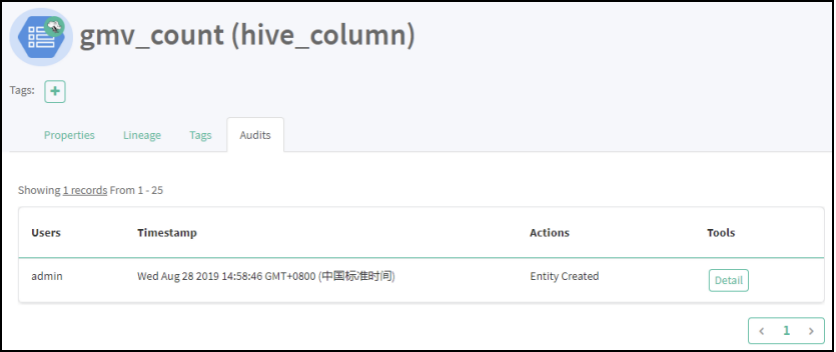
3.2.3 启动GMV全流程任务
1)启动Azkaban
(1)启动executor服务器。在executor服务器目录下执行启动命令
[atguigu@hadoop102 executor]$ pwd
/opt/module/azkaban/executor
[atguigu@hadoop102 executor]$ bin/azkaban-executor-start.sh
(2)启动web服务器。在azkaban web服务器目录下执行启动命令
[atguigu@hadoop102 server]$ pwd
/opt/module/azkaban/server
[atguigu@hadoop102 server]$ bin/azkaban-web-start.sh
(3)查看web页面:https://hadoop102:8443/
2)上传任务
参见数仓项目中,Azkaban任务提交流程。
3)查看结果
等待Azkaban运行结束。
4)查看Atlas表血缘依赖关系图
5)查看Atlas字段血缘依赖关系图
3.3 Rest API使用(二次开发使用)
如果需要对Atlas进行二次开发,可以查看官网地址,https://atlas.apache.org/api/v2/index.html,根据官方API进行二次开发。
四:编译Atlas源码
4.1.1 安装Maven
1)Maven下载:https://maven.apache.org/download.cgi
2)把apache-maven-3.6.1-bin.tar.gz上传到linux的/opt/software目录下
3)解压apache-maven-3.6.1-bin.tar.gz到/opt/module/目录下面
[root@hadoop102 software]# tar -zxvf apache-maven-3.6.1-bin.tar.gz -C /opt/module/
4)修改apache-maven-3.6.1的名称为maven
[root@hadoop102 module]# mv apache-maven-3.6.1/ maven
5)添加环境变量到/etc/profile中
[root@hadoop102 module]#vim /etc/profile
#MAVEN_HOME
export MAVEN_HOME=/opt/module/maven
export PATH=$PATH:$MAVEN_HOME/bin
6)测试安装结果
[root@hadoop102 module]# source /etc/profile
[root@hadoop102 module]# mvn -v
7)修改setting.xml,指定为阿里云
[root@hadoop101 module]# cd /opt/module/maven/conf/
[root@hadoop102 maven]# vim settings.xml
8)在/home/atguigu目录下创建.m2文件夹
[root@hadoop102 ~]$ mkdir .m2
9)上传repository文件夹所有内容到/home/atguigu/.m2文件夹里面
4.1.2 编译Atlas源码
1)把apache-atlas-2.0.0-sources.tar.gz上传到hadoop102的/opt/software目录下
2)解压apache-atlas-2.0.0-sources.tar.gz到/opt/module/目录下面
[root@hadoop101 software]# tar -zxvf apache-atlas-2.0.0-sources.tar.gz -C /opt/module/
3)下载Atlas依赖
[root@hadoop101 software]# export MAVEN_OPTS=”-Xms2g -Xmx2g”
[root@hadoop101 software]# cd /opt/module/apache-atlas-sources-2.0.0/
[root@hadoop101 apache-atlas-sources-2.0.0]# mvn clean -DskipTests install
[root@hadoop101 apache-atlas-sources-2.0.0]# mvn clean -DskipTests package -Pdis
#一定要在${atlas_home}执行
[root@hadoop101 apache-atlas-sources-2.0.0]# cd distro/target/
[root@hadoop101 target]# mv apache-atlas-2.0.0-server.tar.gz /opt/software/
[root@hadoop101 target]# mv apache-atlas-2.0.0-hive-hook.tar.gz /opt/software/
提示:执行过程比较长,会下载很多依赖,大约需要半个小时,期间如果报错很有可能是因为TimeOut造成的网络中断,重试即可。

若有收获,就点个赞吧
0 人点赞
