一:hive
1:hive
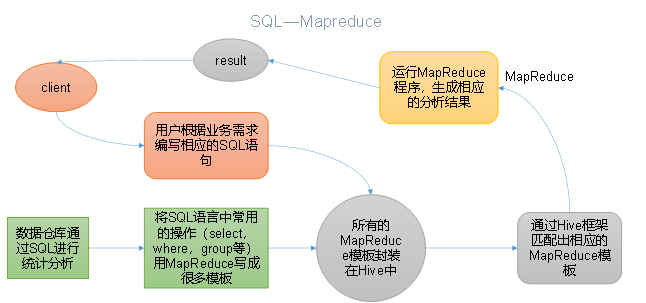
Hive是基于Hadoop的一个数据仓库工具,可以将结构化的数据文件映射为一张表,并提供类SQL查询功能。
2:本质
1):Hive处理的数据存储在HDFS
2):Hive分析数据底层的实现是MapReduce
3):执行程序运行在Yarn上
3:安装部署
1):Hive官网地址
2):文档查看地址
https://cwiki.apache.org/confluence/display/Hive/GettingStarted
3):下载地址
http://archive.apache.org/dist/hive/
4):github地址
https://github.com/apache/hive
5):mysql安装
0)为什么需要Mysql原因在于Hive默认使用的元数据库为derby,开启Hive之后就会占用元数据库,且不与其他客户端共享数据,如果想多窗口操作就会报错,操作比较局限。以我们需要将Hive的元数据地址改为MySQL,可支持多窗口操作。1)检查当前系统是否安装过Mysql[atguigu@hadoop102 ~]$ rpm -qa|grep mariadbmariadb-libs-5.5.56-2.el7.x86_64 //如果存在通过如下命令卸载[atguigu @hadoop102 ~]$ sudo rpm -e --nodeps mariadb-libs //用此命令卸载mariadb2)将MySQL安装包拷贝到/opt/software目录下[atguigu @hadoop102 software]# ll总用量 528384-rw-r--r--. 1 root root 609556480 3月 21 15:41 mysql-5.7.28-1.el7.x86_64.rpm-bundle.tar3)解压MySQL安装包[atguigu @hadoop102 software]# tar -xf mysql-5.7.28-1.el7.x86_64.rpm-bundle.tar4)在安装目录下执行rpm安装[atguigu @hadoop102 software]$ sudo rpm -ivh mysql-community-common-5.7.28-1.el7.x86_64.rpm[atguigu @hadoop102 software]$ sudo rpm -ivh mysql-community-libs-5.7.28-1.el7.x86_64.rpm[atguigu @hadoop102 software]$ sudo rpm -ivh mysql-community-libs-compat-5.7.28-1.el7.x86_64.rpm[atguigu @hadoop102 software]$ sudo rpm -ivh mysql-community-client-5.7.28-1.el7.x86_64.rpm[atguigu @hadoop102 software]$ sudo rpm -ivh mysql-community-server-5.7.28-1.el7.x86_64.rpm注意:按照顺序依次执行如果Linux是最小化安装的,在安装mysql-community-server-5.7.28-1.el7.x86_64.rpm时可能会出 现如下错误[atguigu@hadoop102 software]$ sudo rpm -ivh mysql-community-server-5.7.28-1.el7.x86_64.rpm警告:mysql-community-server-5.7.28-1.el7.x86_64.rpm: 头V3 DSA/SHA1 Signature, 密钥 ID 5072e1f5: NOKEY错误:依赖检测失败:libaio.so.1()(64bit) 被 mysql-community-server-5.7.28-1.el7.x86_64 需要libaio.so.1(LIBAIO_0.1)(64bit) 被 mysql-community-server-5.7.28-1.el7.x86_64 需要libaio.so.1(LIBAIO_0.4)(64bit) 被 mysql-community-server-5.7.28-1.el7.x86_64 需要通过yum安装缺少的依赖,然后重新安装mysql-community-server-5.7.28-1.el7.x86_64 即可[atguigu@hadoop102 software] yum install -y libaio5)删除/etc/my.cnf文件中datadir指向的目录下的所有内容,如果有内容的情况下:查看datadir的值:[mysqld]datadir=/var/lib/mysql删除/var/lib/mysql目录下的所有内容:[atguigu @hadoop102 mysql]# cd /var/lib/mysql[atguigu @hadoop102 mysql]# sudo rm -rf ./* //注意执行命令的位置6)初始化数据库[atguigu @hadoop102 opt]$ sudo mysqld --initialize --user=mysql7)查看临时生成的root用户的密码[atguigu @hadoop102 opt]$ cat /var/log/mysqld.log8)启动MySQL服务[atguigu @hadoop102 opt]$ sudo systemctl start mysqld9)登录MySQL数据库[atguigu @hadoop102 opt]$ mysql -uroot -pEnter password: 输入临时生成的密码登录成功.10)必须先修改root用户的密码,否则执行其他的操作会报错mysql> set password = password("新密码")11)修改mysql库下的user表中的root用户允许任意ip连接mysql> update mysql.user set host='%' where user='root';mysql> flush privileges;sudo systemctl enable mysqld
6):hive安装
1)把apache-hive-3.1.2-bin.tar.gz上传到linux的/opt/software目录下2)解压apache-hive-3.1.2-bin.tar.gz到/opt/module/目录下面[atguigu@hadoop102 software]$ tar -zxvf /opt/software/apache-hive-3.1.2-bin.tar.gz -C /opt/module/3)修改apache-hive-3.1.2-bin.tar.gz的名称为hive[atguigu@hadoop102 software]$ mv /opt/module/apache-hive-3.1.2-bin/ /opt/module/hive4)修改/etc/profile.d/my_env.sh,添加环境变量[atguigu@hadoop102 software]$ sudo vim /etc/profile.d/my_env.sh5)添加内容#HIVE_HOMEHIVE_HOME=/opt/module/hivePATH=$PATH:$JAVA_HOME/bin:$HADOOP_HOME/bin:$HADOOP_HOME/sbin:$HIVE_HOME/binexport PATH JAVA_HOME HADOOP_HOME HIVE_HOME6)解决日志Jar包冲突[atguigu@hadoop102 software]$ mv $HIVE_HOME/lib/log4j-slf4j-impl-2.10.0.jar $HIVE_HOME/lib/log4j-slf4j-impl-2.10.0.bak
7):元数据配置到mysql
2.4.1 拷贝驱动将MySQL的JDBC驱动拷贝到Hive的lib目录下[atguigu@hadoop102 software]$ cp /opt/software/mysql-connector-java-5.1.48.jar $HIVE_HOME/lib2.4.2 配置Metastore到MySql在$HIVE_HOME/conf目录下新建hive-site.xml文件[atguigu@hadoop102 software]$ vim $HIVE_HOME/conf/hive-site.xml添加如下内容<?xml version="1.0"?><?xml-stylesheet type="text/xsl" href="configuration.xsl"?><configuration><!-- jdbc连接的URL --><property><name>javax.jdo.option.ConnectionURL</name><value>jdbc:mysql://hadoop102:3306/metastore?useSSL=false</value></property><!-- jdbc连接的Driver--><property><name>javax.jdo.option.ConnectionDriverName</name><value>com.mysql.jdbc.Driver</value></property><!-- jdbc连接的username--><property><name>javax.jdo.option.ConnectionUserName</name><value>root</value></property><!-- jdbc连接的password --><property><name>javax.jdo.option.ConnectionPassword</name><value>123456</value></property><!-- Hive默认在HDFS的工作目录 --><property><name>hive.metastore.warehouse.dir</name><value>/user/hive/warehouse</value></property><!-- Hive元数据存储的验证 --><property><name>hive.metastore.schema.verification</name><value>false</value></property><!-- 元数据存储授权 --><property><name>hive.metastore.event.db.notification.api.auth</name><value>false</value></property></configuration>
8):启动hive
2.5.1 初始化元数据库1)登陆MySQL[atguigu@hadoop102 software]$ mysql -uroot -p0000002)新建Hive元数据库mysql> create database metastore;mysql> quit;3)初始化Hive元数据库[atguigu@hadoop102 software]$ schematool -initSchema -dbType mysql -verbose2.5.2 启动Hive0)先启动hadoop集群1)启动Hive[atguigu@hadoop102 hive]$ bin/hive2)使用Hivehive> show databases;hive> show tables;hive> create table test (id int);hive> insert into test values(1);hive> select * from test;3)开启另一个窗口测试开启hive[atguigu@hadoop102 hive]$ bin/hive2.5.3 使用元数据服务的方式访问Hive1)在hive-site.xml文件中添加如下配置信息<!-- 指定存储元数据要连接的地址 --><property><name>hive.metastore.uris</name><value>thrift://hadoop102:9083</value></property>2)启动metastore[atguigu@hadoop202 hive]$ hive --service metastore2020-04-24 16:58:08: Starting Hive Metastore Server注意: 启动后窗口不能再操作,需打开一个新的shell窗口做别的操作3)启动 hive[atguigu@hadoop202 hive]$ bin/hive2.5.4 使用JDBC方式访问Hive1)在hive-site.xml文件中添加如下配置信息<!-- 指定hiveserver2连接的host --><property><name>hive.server2.thrift.bind.host</name><value>hadoop102</value></property><!-- 指定hiveserver2连接的端口号 --><property><name>hive.server2.thrift.port</name><value>10000</value></property>2)启动hiveserver2[atguigu@hadoop102 hive]$ bin/hive --service hiveserver23)启动beeline客户端(需要多等待一会)[atguigu@hadoop102 hive]$ bin/beeline -u jdbc:hive2://hadoop102:10000 -n atguigu4)看到如下界面Connecting to jdbc:hive2://hadoop102:10000Connected to: Apache Hive (version 3.1.2)Driver: Hive JDBC (version 3.1.2)Transaction isolation: TRANSACTION_REPEATABLE_READBeeline version 3.1.2 by Apache Hive0: jdbc:hive2://hadoop102:10000>2.5.5 编写启动metastore和hiveserver2脚本(了解)1)Shell命令介绍前台启动的方式导致需要打开多个shell窗口,可以使用如下方式后台方式启动nohup: 放在命令开头,表示不挂起,也就是关闭终端进程也继续保持运行状态0:标准输入1:标准输出2:错误输出2>&1 : 表示将错误重定向到标准输出上&: 放在命令结尾,表示后台运行一般会组合使用: nohup [xxx命令操作]> file 2>&1 & , 表示将xxx命令运行的结果输出到file中,并保持命令启动的进程在后台运行。如上命令不要求掌握。[atguigu@hadoop202 hive]$ nohup hive --service metastore 2>&1 &[atguigu@hadoop202 hive]$ nohup hive --service hiveserver2 2>&1 &2)编写脚本[atguigu@hadoop102 hive]$ vim $HIVE_HOME/bin/hiveservices.sh#!/bin/bashHIVE_LOG_DIR=$HIVE_HOME/logsif [ ! -d $HIVE_LOG_DIR ]thenmkdir -p $HIVE_LOG_DIRfi#检查进程是否运行正常,参数1为进程名,参数2为进程端口function check_process(){pid=$(ps -ef 2>/dev/null | grep -v grep | grep -i $1 | awk '{print $2}')ppid=$(netstat -nltp 2>/dev/null | grep $2 | awk '{print $7}' | cut -d '/' -f 1)echo $pid[[ "$pid" =~ "$ppid" ]] && [ "$ppid" ] && return 0 || return 1}function hive_start(){metapid=$(check_process HiveMetastore 9083)cmd="nohup hive --service metastore >$HIVE_LOG_DIR/metastore.log 2>&1 &"cmd=$cmd" sleep 4; hdfs dfsadmin -safemode wait >/dev/null 2>&1"[ -z "$metapid" ] && eval $cmd || echo "Metastroe服务已启动"server2pid=$(check_process HiveServer2 10000)cmd="nohup hive --service hiveserver2 >$HIVE_LOG_DIR/hiveServer2.log 2>&1 &"[ -z "$server2pid" ] && eval $cmd || echo "HiveServer2服务已启动"}function hive_stop(){metapid=$(check_process HiveMetastore 9083)[ "$metapid" ] && kill $metapid || echo "Metastore服务未启动"server2pid=$(check_process HiveServer2 10000)[ "$server2pid" ] && kill $server2pid || echo "HiveServer2服务未启动"}case $1 in"start")hive_start;;"stop")hive_stop;;"restart")hive_stopsleep 2hive_start;;"status")check_process HiveMetastore 9083 >/dev/null && echo "Metastore服务运行正常" || echo "Metastore服务运行异常"check_process HiveServer2 10000 >/dev/null && echo "HiveServer2服务运行正常" || echo "HiveServer2服务运行异常";;*)echo Invalid Args!echo 'Usage: '$(basename $0)' start|stop|restart|status';;esac3)添加执行权限[atguigu@hadoop102 hive]$ chmod u+x $HIVE_HOME/bin/hiveservices.sh4)启动Hive后台服务[atguigu@hadoop102 hive]$ hiveservices.sh start
9):元数据服务访问hive
1)在hive-site.xml文件中添加如下配置信息<!-- 指定存储元数据要连接的地址 --><property><name>hive.metastore.uris</name><value>thrift://hadoop102:9083</value></property>2)启动metastore[atguigu@hadoop202 hive]$ hive --service metastore2020-04-24 16:58:08: Starting Hive Metastore Server注意: 启动后窗口不能再操作,需打开一个新的shell窗口做别的操作3)启动 hive[atguigu@hadoop202 hive]$ bin/hive2.5.4 使用JDBC方式访问Hive1)在hive-site.xml文件中添加如下配置信息<!-- 指定hiveserver2连接的host --><property><name>hive.server2.thrift.bind.host</name><value>hadoop102</value></property><!-- 指定hiveserver2连接的端口号 --><property><name>hive.server2.thrift.port</name><value>10000</value></property>2)启动hiveserver2[atguigu@hadoop102 hive]$ bin/hive --service hiveserver23)启动beeline客户端(需要多等待一会)[atguigu@hadoop102 hive]$ bin/beeline -u jdbc:hive2://hadoop102:10000 -n atguigu4)看到如下界面Connecting to jdbc:hive2://hadoop102:10000Connected to: Apache Hive (version 3.1.2)Driver: Hive JDBC (version 3.1.2)Transaction isolation: TRANSACTION_REPEATABLE_READBeeline version 3.1.2 by Apache Hive0: jdbc:hive2://hadoop102:10000>
10):启动metastore和hiveserver2脚本
1)Shell命令介绍前台启动的方式导致需要打开多个shell窗口,可以使用如下方式后台方式启动nohup: 放在命令开头,表示不挂起,也就是关闭终端进程也继续保持运行状态0:标准输入1:标准输出2:错误输出2>&1 : 表示将错误重定向到标准输出上&: 放在命令结尾,表示后台运行一般会组合使用: nohup [xxx命令操作]> file 2>&1 & , 表示将xxx命令运行的结果输出到file中,并保持命令启动的进程在后台运行。如上命令不要求掌握。[atguigu@hadoop202 hive]$ nohup hive --service metastore 2>&1 &[atguigu@hadoop202 hive]$ nohup hive --service hiveserver2 2>&1 &2)编写脚本[atguigu@hadoop102 hive]$ vim $HIVE_HOME/bin/hiveservices.sh#!/bin/bashHIVE_LOG_DIR=$HIVE_HOME/logsif [ ! -d $HIVE_LOG_DIR ]thenmkdir -p $HIVE_LOG_DIRfi#检查进程是否运行正常,参数1为进程名,参数2为进程端口function check_process(){pid=$(ps -ef 2>/dev/null | grep -v grep | grep -i $1 | awk '{print $2}')ppid=$(netstat -nltp 2>/dev/null | grep $2 | awk '{print $7}' | cut -d '/' -f 1)echo $pid[[ "$pid" =~ "$ppid" ]] && [ "$ppid" ] && return 0 || return 1}function hive_start(){metapid=$(check_process HiveMetastore 9083)cmd="nohup hive --service metastore >$HIVE_LOG_DIR/metastore.log 2>&1 &"cmd=$cmd" sleep 4; hdfs dfsadmin -safemode wait >/dev/null 2>&1"[ -z "$metapid" ] && eval $cmd || echo "Metastroe服务已启动"server2pid=$(check_process HiveServer2 10000)cmd="nohup hive --service hiveserver2 >$HIVE_LOG_DIR/hiveServer2.log 2>&1 &"[ -z "$server2pid" ] && eval $cmd || echo "HiveServer2服务已启动"}function hive_stop(){metapid=$(check_process HiveMetastore 9083)[ "$metapid" ] && kill $metapid || echo "Metastore服务未启动"server2pid=$(check_process HiveServer2 10000)[ "$server2pid" ] && kill $server2pid || echo "HiveServer2服务未启动"}case $1 in"start")hive_start;;"stop")hive_stop;;"restart")hive_stopsleep 2hive_start;;"status")check_process HiveMetastore 9083 >/dev/null && echo "Metastore服务运行正常" || echo "Metastore服务运行异常"check_process HiveServer2 10000 >/dev/null && echo "HiveServer2服务运行正常" || echo "HiveServer2服务运行异常";;*)echo Invalid Args!echo 'Usage: '$(basename $0)' start|stop|restart|status';;esac3)添加执行权限[atguigu@hadoop102 hive]$ chmod u+x $HIVE_HOME/bin/hiveservices.sh4)启动Hive后台服务[atguigu@hadoop102 hive]$ hiveservices.sh start
4:常用交互命令
[atguigu@hadoop102 hive]$ bin/hive -helpusage: hive-d,--define <key=value> Variable subsitution to apply to hivecommands. e.g. -d A=B or --define A=B--database <databasename> Specify the database to use-e <quoted-query-string> SQL from command line-f <filename> SQL from files-H,--help Print help information--hiveconf <property=value> Use value for given property--hivevar <key=value> Variable subsitution to apply to hivecommands. e.g. --hivevar A=B-i <filename> Initialization SQL file-S,--silent Silent mode in interactive shell-v,--verbose Verbose mode (echo executed SQL to the console)1)“-e”不进入hive的交互窗口执行sql语句[atguigu@hadoop102 hive]$ bin/hive -e "select id from student;"2)“-f”执行脚本中sql语句(1)在/opt/module/hive/下创建datas目录并在datas目录下创建hivef.sql文件[atguigu@hadoop102 datas]$ touch hivef.sql(2)文件中写入正确的sql语句select *from student;(3)执行文件中的sql语句[atguigu@hadoop102 hive]$ bin/hive -f /opt/module/hive/datas/hivef.sql(4)执行文件中的sql语句并将结果写入文件中[atguigu@hadoop102 hive]$ bin/hive -f /opt/module/hive/datas/hivef.sql > /opt/module/datas/hive_result.txt
5:Hive其他命令操作
1)退出hive窗口:
hive(default)>exit;
hive(default)>quit;
在新版的hive中没区别了,在以前的版本是有的:
exit:先隐性提交数据,再退出;
quit:不提交数据,退出;
2)在hive cli命令窗口中如何查看hdfs文件系统
hive(default)>dfs -ls /;
3)查看在hive中输入的所有历史命令
(1)进入到当前用户的根目录/root或/home/atguigu
(2)查看. hivehistory文件
[atguig2u@hadoop102 ~]$ cat .hivehistory
6:Hive常见属性配置
2.8.1 hive窗口打印默认库和表头
1)打印 当前库 和 表头
在hive-site.xml中加入如下两个配置:
<property>
    <name>hive.cli.print.header</name>
    <value>true</value>
  </property>
   <property>
    <name>hive.cli.print.current.db</name>
    <value>true</value>
  </property>
2.8.2 Hive运行日志信息配置
1)Hive的log默认存放在/tmp/atguigu/hive.log目录下(当前用户名下)
2)修改hive的log存放日志到/opt/module/hive/logs
(1)修改/opt/module/hive/conf/hive-log4j2.properties.template文件名称为
hive-log4j2.properties
[atguigu@hadoop102 conf]$ pwd
/opt/module/hive/conf
[atguigu@hadoop102 conf]$ mv hive-log4j2.properties.template hive-log4j2.properties
(2)在hive-log4j.properties文件中修改log存放位置
property.hive.log.dir=/opt/module/hive/logs
2.8.2 参数配置方式
1)查看当前所有的配置信息
hive>set;
2)参数的配置三种方式
(1)配置文件方式
默认配置文件:hive-default.xml
用户自定义配置文件:hive-site.xml
注意:用户自定义配置会覆盖默认配置。另外,Hive也会读入Hadoop的配置,因为Hive是作为Hadoop的客户端启动的,Hive的配置会覆盖Hadoop的配置。配置文件的设定对本机启动的所有Hive进程都有效。
(2)命令行参数方式
启动Hive时,可以在命令行添加-hiveconf param=value来设定参数。
例如:
[atguigu@hadoop103 hive]$ bin/hive -hiveconf mapred.reduce.tasks=10;
注意:仅对本次hive启动有效
查看参数设置:
hive (default)> set mapred.reduce.tasks;
(3)参数声明方式
可以在HQL中使用SET关键字设定参数
例如:
hive (default)> set mapred.reduce.tasks=100;
注意:仅对本次hive启动有效。
查看参数设置
hive (default)> set mapred.reduce.tasks;
上述三种设定方式的优先级依次递增。即配置文件<命令行参数<参数声明。注意某些系统级的参数,例如log4j相关的设定,必须用前两种方式设定,因为那些参数的读取在会话建立以前已经完成了。
二:hive数据类型
1:基本数据类型
| Hive数据类型 | Java数据类型 | 长度 | 例子 |
|---|---|---|---|
| TINYINT | byte | 1byte有符号整数 | 20 |
| SMALINT | short | 2byte有符号整数 | 20 |
| INT | int | 4byte有符号整数 | 20 |
| BIGINT | long | 8byte有符号整数 | 20 |
| BOOLEAN | boolean | 布尔类型,true或者false | TRUE FALSE |
| FLOAT | float | 单精度浮点数 | 3.14159 |
| DOUBLE | double | 双精度浮点数 | 3.14159 |
| STRING | string | 字符系列。可以指定字符集。可以使用单引号或者双引号。 | ‘now is the time’ “for all good men” |
| TIMESTAMP | 时间类型 | ||
| BINARY | 字节数组 |
对于Hive的String类型相当于数据库的varchar类型,该类型是一个可变的字符串,不过它不能声明其中最多能存储多少个字符,理论上它可以存储2GB的字符数。
2:集合数据类型
| 数据类型 | 描述 | 语法示例 |
|---|---|---|
| STRUCT | 和c语言中的struct类似,都可以通过“点”符号访问元素内容。例如,如果某个列的数据类型是STRUCT{first STRING, last STRING},那么第1个元素可以通过字段.first来引用。 | struct() 例如struct |
| MAP | MAP是一组键-值对元组集合,使用数组表示法可以访问数据。例如,如果某个列的数据类型是MAP,其中键->值对是’first’->’John’和’last’->’Doe’,那么可以通过字段名[‘last’]获取最后一个元素 | map() 例如map |
| ARRAY | 数组是一组具有相同类型和名称的变量的集合。这些变量称为数组的元素,每个数组元素都有一个编号,编号从零开始。例如,数组值为[‘John’, ‘Doe’],那么第2个元素可以通过数组名[1]进行引用。 | Array() 例如array |
Hive有三种复杂数据类型ARRAY、MAP 和 STRUCT。ARRAY和MAP与Java中的Array和Map类似,而STRUCT与C语言中的Struct类似,它封装了一个命名字段集合,复杂数据类型允许任意层次的嵌套。
1)案例实操
(1)假设某表有如下一行,我们用JSON格式来表示其数据结构。在Hive下访问的格式为
{
    "name": "songsong",
    "friends": ["bingbing" , "lili"] ,       //列表Array,
    "children": {                      //键值Map,
        "xiao song": 19 ,
        "xiaoxiao song": 18
    }
    "address": {                      //结构Struct,
        "street": "hui long guan" ,
        "city": "beijing"
    }
}
(2)基于上述数据结构,我们在Hive里创建对应的表,并导入数据。
创建本地测试文件test.txt
songsong,bingbing_lili,xiao song:18_xiaoxiao song:19,hui long guan_beijing
yangyang,caicai_susu,xiao yang:18_xiaoxiao yang:19,chao yang_beijing
注意:MAP,STRUCT和ARRAY里的元素间关系都可以用同一个字符表示,这里用“_”。
(3)Hive上创建测试表test
create table test(
name string,
friends array<string>,
children map<string, int>,
address struct<street:string, city:string>
)
row format delimited fields terminated by ','
collection items terminated by '_'
map keys terminated by ':'
lines terminated by '\n';
字段解释:
row format delimited fields terminated by ','  -- 列分隔符
collection items terminated by '_'      --MAP STRUCT 和 ARRAY 的分隔符(数据分割符号)
map keys terminated by ':'            -- MAP中的key与value的分隔符
lines terminated by '\n';                -- 行分隔符
(4)导入文本数据到测试表
load data local inpath '/opt/module/hive/datas/test.txt' into table test;
(5)访问三种集合列里的数据,以下分别是ARRAY,MAP,STRUCT的访问方式
hive (default)> select friends[1],children['xiao song'],address.city from test
where name="songsong";
OK
_c0     _c1     city
lili    18      beijing
Time taken: 0.076 seconds, Fetched: 1 row(s)
3:类型转化
Hive的原子数据类型是可以进行隐式转换的,类似于Java的类型转换,例如某表达式使用INT类型,TINYINT会自动转换为INT类型,但是Hive不会进行反向转化,例如,某表达式使用TINYINT类型,INT不会自动转换为TINYINT类型,它会返回错误,除非使用CAST操作。
1)隐式类型转换规则如下
(1)任何整数类型都可以隐式地转换为一个范围更广的类型,如TINYINT可以转换成INT,INT可以转换成BIGINT。
(2)所有整数类型、FLOAT和STRING类型都可以隐式地转换成DOUBLE。
(3)TINYINT、SMALLINT、INT都可以转换为FLOAT。
(4)BOOLEAN类型不可以转换为任何其它的类型。
2)可以使用CAST操作显示进行数据类型转换
例如CAST('1' AS INT)将把字符串'1' 转换成整数1;如果强制类型转换失败,如执行CAST('X' AS INT),表达式返回空值 NULL。
0: jdbc:hive2://hadoop102:10000> select '1'+2, cast('1'as int) + 2;
+------+------+--+
| _c0  | _c1  |
+------+------+--+
| 3.0  | 3    |
+------+------+--+

若有收获,就点个赞吧
0 人点赞
