1.RNN络简介
循环神经网络(RNN, Recurrent Neural Network)的目的是用来处理序列数据。在传统的神经网络模型中,是从输入层到隐含层再到输出层,层与层之间是全连接的,每层之间的节点是无连接的。但是这种普通的神经网络对于很多问题却无能无力,例如要预测句子的下一个单词是什么,一般需要用到前面的单词,因为一个句子中前后单词并不是独立的。RNN的网络会对前面的信息进行记忆并应用于当前输出的计算中,即隐藏层之间的节点不再无连接而是有连接的,并且隐藏层的输入不仅包括输入层的输出还包括上一时刻隐藏层的输出。理论上,RNN能够对任何长度的序列数据进行处理。但是在实践中,为了降低复杂性往往假设当前的状态只与前面的几个状态相关,下图便是一个典型的RNN。
在每一个时刻t,循环神经网络会针对该时刻的输入结合当前模型的状态给出一个输出,并更新模型状态,在上图中,循环神经网络的主体结构A的输入除了来自输入层x,还有一个循环的边来提供上一时刻的隐藏状态(hidden state)h,在每一个时刻,循环神经网络的模块A在读取了x和h之后,会生成新的隐藏状态h,并产生本时刻的输出o,将完整的输入输出状态铺开,如下图所示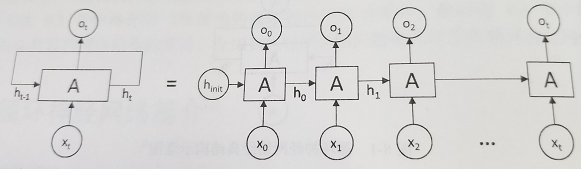
从上图可以清晰看到,循环神经网络每一时刻都会有一个输入x(一般的神经网络中没有),然后根据前一时刻的隐藏状态h计算当前时刻的隐藏状态h,值得注意的是h是由h和x共同决定的,以下图为例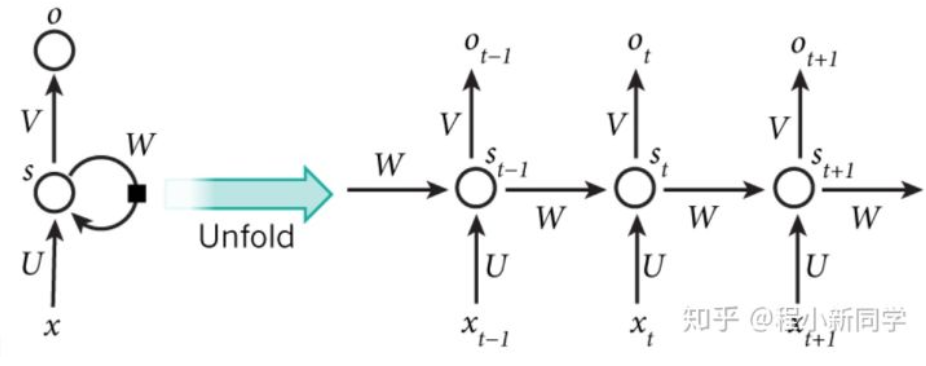
X是t时刻的输入,St是t时刻的隐层状态,它是网络的记忆,St基于前一时刻的隐层状态和当前时刻的输入进行运算
St=f(U·Xt+W·St-1)
Ot是时刻t的输出
Ot=softmax(V·St)
一定注意,这个地方Ot是通过St得到的!!
2.RNN的简单实现
下面是一个简单的循环神经网络的示意图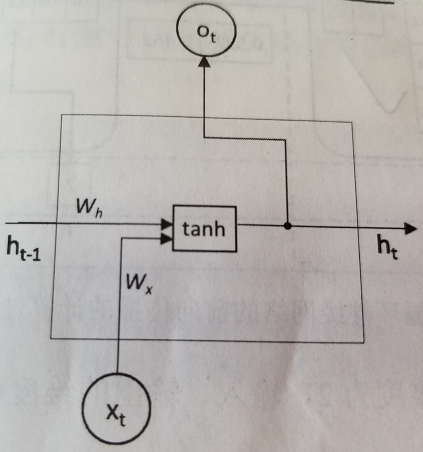
这个是实现这个循环神经网络的示例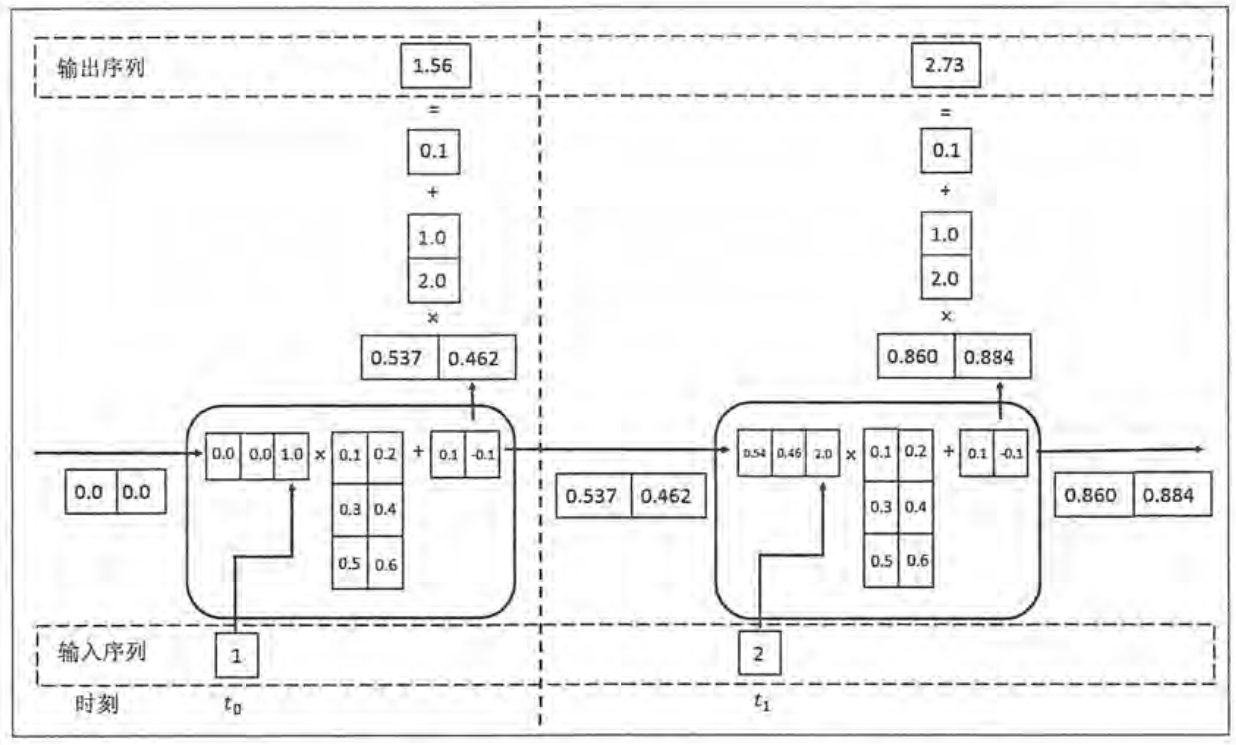
注意,这里有一个处理,和前面的St=f(U·Xt+W·St-1)公式并不矛盾
下面是代码
# -*- coding: utf-8 -*-"""@author: Haojie Shu@time:@description:"""import numpy as npX = [1, 2] # 输入层(两层)state = [0.0, 0.0] # 隐藏层w_cell_state = np.asarray([[0.1, 0.2], [0.3, 0.4]]) # 隐藏层的权重,每一层的权重系数都是一样的w_cell_input = np.asarray([0.5, 0.6]) # 输入层的权重,每一层的权重系数都是一样的b_cell = np.asarray([0.1, -0.1]) # 偏执项,每一层的偏执项都是一样的w_output = np.asarray([[1.0], [2.0]]) # 输出层的权重b_output = 0.1 # 输出层的偏执项for i in range(len(X)):before_activation = np.dot(state, w_cell_state) + X[i]*w_cell_input+b_cellstate = np.tanh(before_activation)final_output = np.dot(state, w_output) + b_outputprint("before_activation", before_activation)print("state", state)print("final_output", final_output)
输出结果
before_activation [0.6 0.5]state [0.53704957 0.46211716]final_output [1.56128388]before_activation [1.2923401 1.39225678]state [0.85973818 0.88366641]final_output [2.72707101]
3.RNN的dropout
在卷积神经网络和循环神经网络中使用dropout方法会增加系统的健壮性,循环神经网络中只在不同层循环体结构之间使用的dropout,不会在同一层之间使用dropout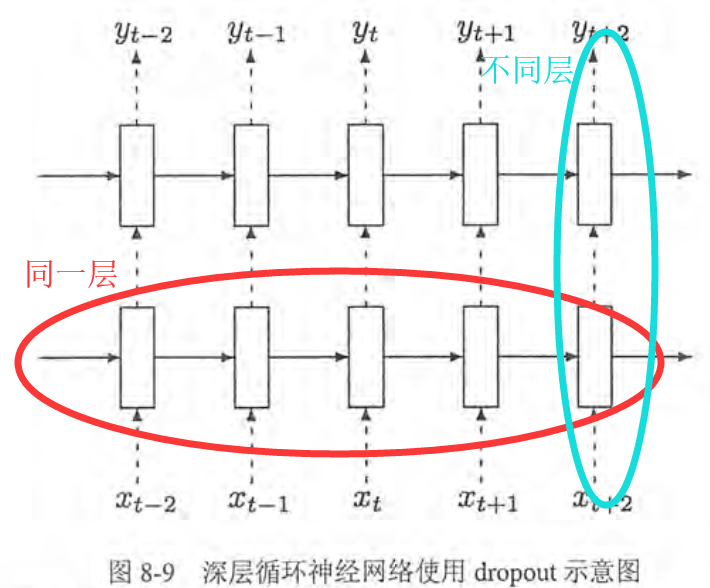
在上图所示中,假设要从t-2时刻的输入xt-2传递到t+1时刻的输出yt+1,那么xt-2将首先传入第一层循环体结构,这个过程会使用dropout,但是从t-2时刻的第一层循环体结构传到第一层的t-1,t,t+1时刻不会使用dropout,在t+1时刻的第一层循环体结构传递到同一时刻内更高层的循环体结构时,会再次使用dropout
4.RNN用于字母预测
# -*- coding: utf-8 -*-"""@author: Haojie Shu@time:@description:"""import numpyfrom keras.models import Sequentialfrom keras.layers import Densefrom keras.layers import LSTMfrom keras.utils import np_utilsfrom keras.preprocessing.sequence import pad_sequencesnumpy.random.seed(7) # 不产生随机数alphabet = "ABCDEFGHIJKLMNOPQRSTUVWXYZ"# 函数用于将一个可遍历的数据对象(如列表、元组或字符串)组合为一个索引序列, 同时列出数据和数据下标,这里i为序号,c为字符char_to_int = dict((c, i) for i, c in enumerate(alphabet))int_to_char = dict((i, c) for i, c in enumerate(alphabet))num_inputs = 1000 # 随机序列的数量,即ABC/IJKL这样的序列max_len = 5 # 序列最大的长度dataX = []dataY = []for i in range(num_inputs):start = numpy.random.randint(len(alphabet)-2) # 产生0~24以内的随机数end = numpy.random.randint(start, min(start+max_len, len(alphabet)-1)) # end一定会大于startsequence_in = alphabet[start:end+1]sequence_out = alphabet[end + 1] # sequence_out一定是sequence_in后一个字母dataX.append([char_to_int[char] for char in sequence_in]) # 字母们的顺序(数字)dataY.append(char_to_int[sequence_out]) # 单个字母的顺序print(sequence_in, '->', sequence_out)"""将num_samples序列列表(整数列表)转换为2D Numpy形状数组(num_samples,num_timesteps),这里转化为[[15. 16. 17. 18. 19.][ 0. 0. 0. 0. 22.][ 0. 0. 0. 0. 14.]... ]"""X = pad_sequences(dataX, maxlen=max_len, dtype='float32')"""# 三维数据转置,转置后数据如下:1000个5行1列的数组.三维数组可以读作5行1列1000个通道[[[15.][16.][17.][18.][19.]][[ 0.][ 0.][ 0.][ 0.][22.]]...]"""X = numpy.reshape(X, (X.shape[0], max_len, 1))X = X / float(len(alphabet)) # 所有数除以26,归一化到[0,1]区间# 将int数组转为0,1表示的数组,例如当数组中有一个数为23时,它就表示为[0. 0. 0. ... 1. 0. 0.], 字母的顺序为0~25# 由于数组共有1000个,并且可以用26个0或1来表示每一个数,因此y的shape为[1000,26]y = np_utils.to_categorical(dataY)batch_size = 1model = Sequential()# units:32,它有32个单元 the LSTM units are the 'memory units' or you can just call them the neurons.# input_shape:第一层的尺寸(5,1),并不是输入的尺寸!!model.add(LSTM(32, input_shape=(X.shape[1], 1)))# Dense是最后一层,也即全连接层,这里y.shape[1]=26,表示输出数组的尺寸为 (*, 26)model.add(Dense(y.shape[1], activation='softmax'))# 在训之前,需要配置学习过程,学习过程就是通过compile函数来完成的# loss:损失. 'categorical_crossentropy' 交叉熵,用于分类; 'mse'误差(不开根号),用于回归# optimizer:优化器,不多说# metrics: 度量的方法,在分类中一般用'accuracy'; 回归中一般也是'accuracy'model.compile(loss='categorical_crossentropy', optimizer='adam', metrics=['accuracy'])# fit:训练, epoch:迭代次数;batch_size:批处理函数,极限是1,即全部参与训练.这个时候才需要训练数据,前面不需要!!model.fit(X, y, epochs=50, batch_size=batch_size, verbose=2)model.summary() # 对LSTM的形状进行总结scores = model.evaluate(X, y, verbose=0) # 用于评估训练的模型,它的输出是准确度或损失,而不是对输入数据的预测print("Model Accuracy: %.2f%%" % (scores[1]*100)) # scores要返回两个数,第一个是loss,第二个是metricsfor i in range(20): # 进行预测pattern_index = numpy.random.randint(len(dataX))pattern = dataX[pattern_index]x = pad_sequences([pattern], maxlen=max_len, dtype='float32')x = numpy.reshape(x, (1, max_len, 1))x = x / float(len(alphabet))prediction = model.predict(x, verbose=0)index = numpy.argmax(prediction)result = int_to_char[index]seq_in = [int_to_char[value] for value in pattern]print(seq_in, "->", result)
本代码部分选自博客《通过keras例子理解LSTM 循环神经网络(RNN)》,虽然很简单但是很经典,附个人画的一个简单流程图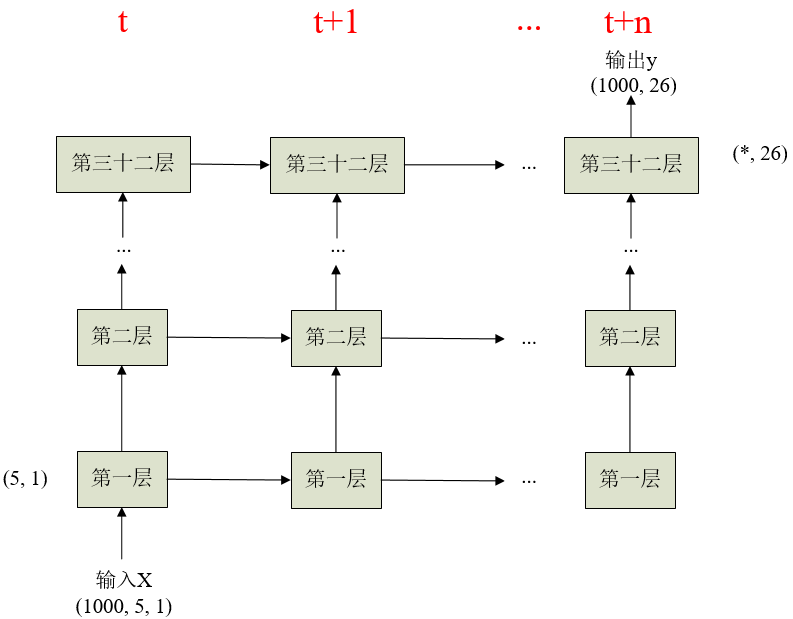
LSTM最开始只是搭建一个基本的框架,并不传入数据,把框架搭好后,分别进行compile(配置学习过程),fit(训练),evaluate(评估)和predict(预测)这四步。

若有收获,就点个赞吧
0 人点赞
