最近部分NE需要使用到webhook来实现注入sidecar进业务pod中。今天把这个过程梳理一下,刚好OpenKruise中也使用到此对象。具体的内容参考:https://medium.com/ibm-cloud/diving-into-kubernetes-mutatingadmissionwebhook-6ef3c5695f74
- 1.webhook 逻辑:
```properties
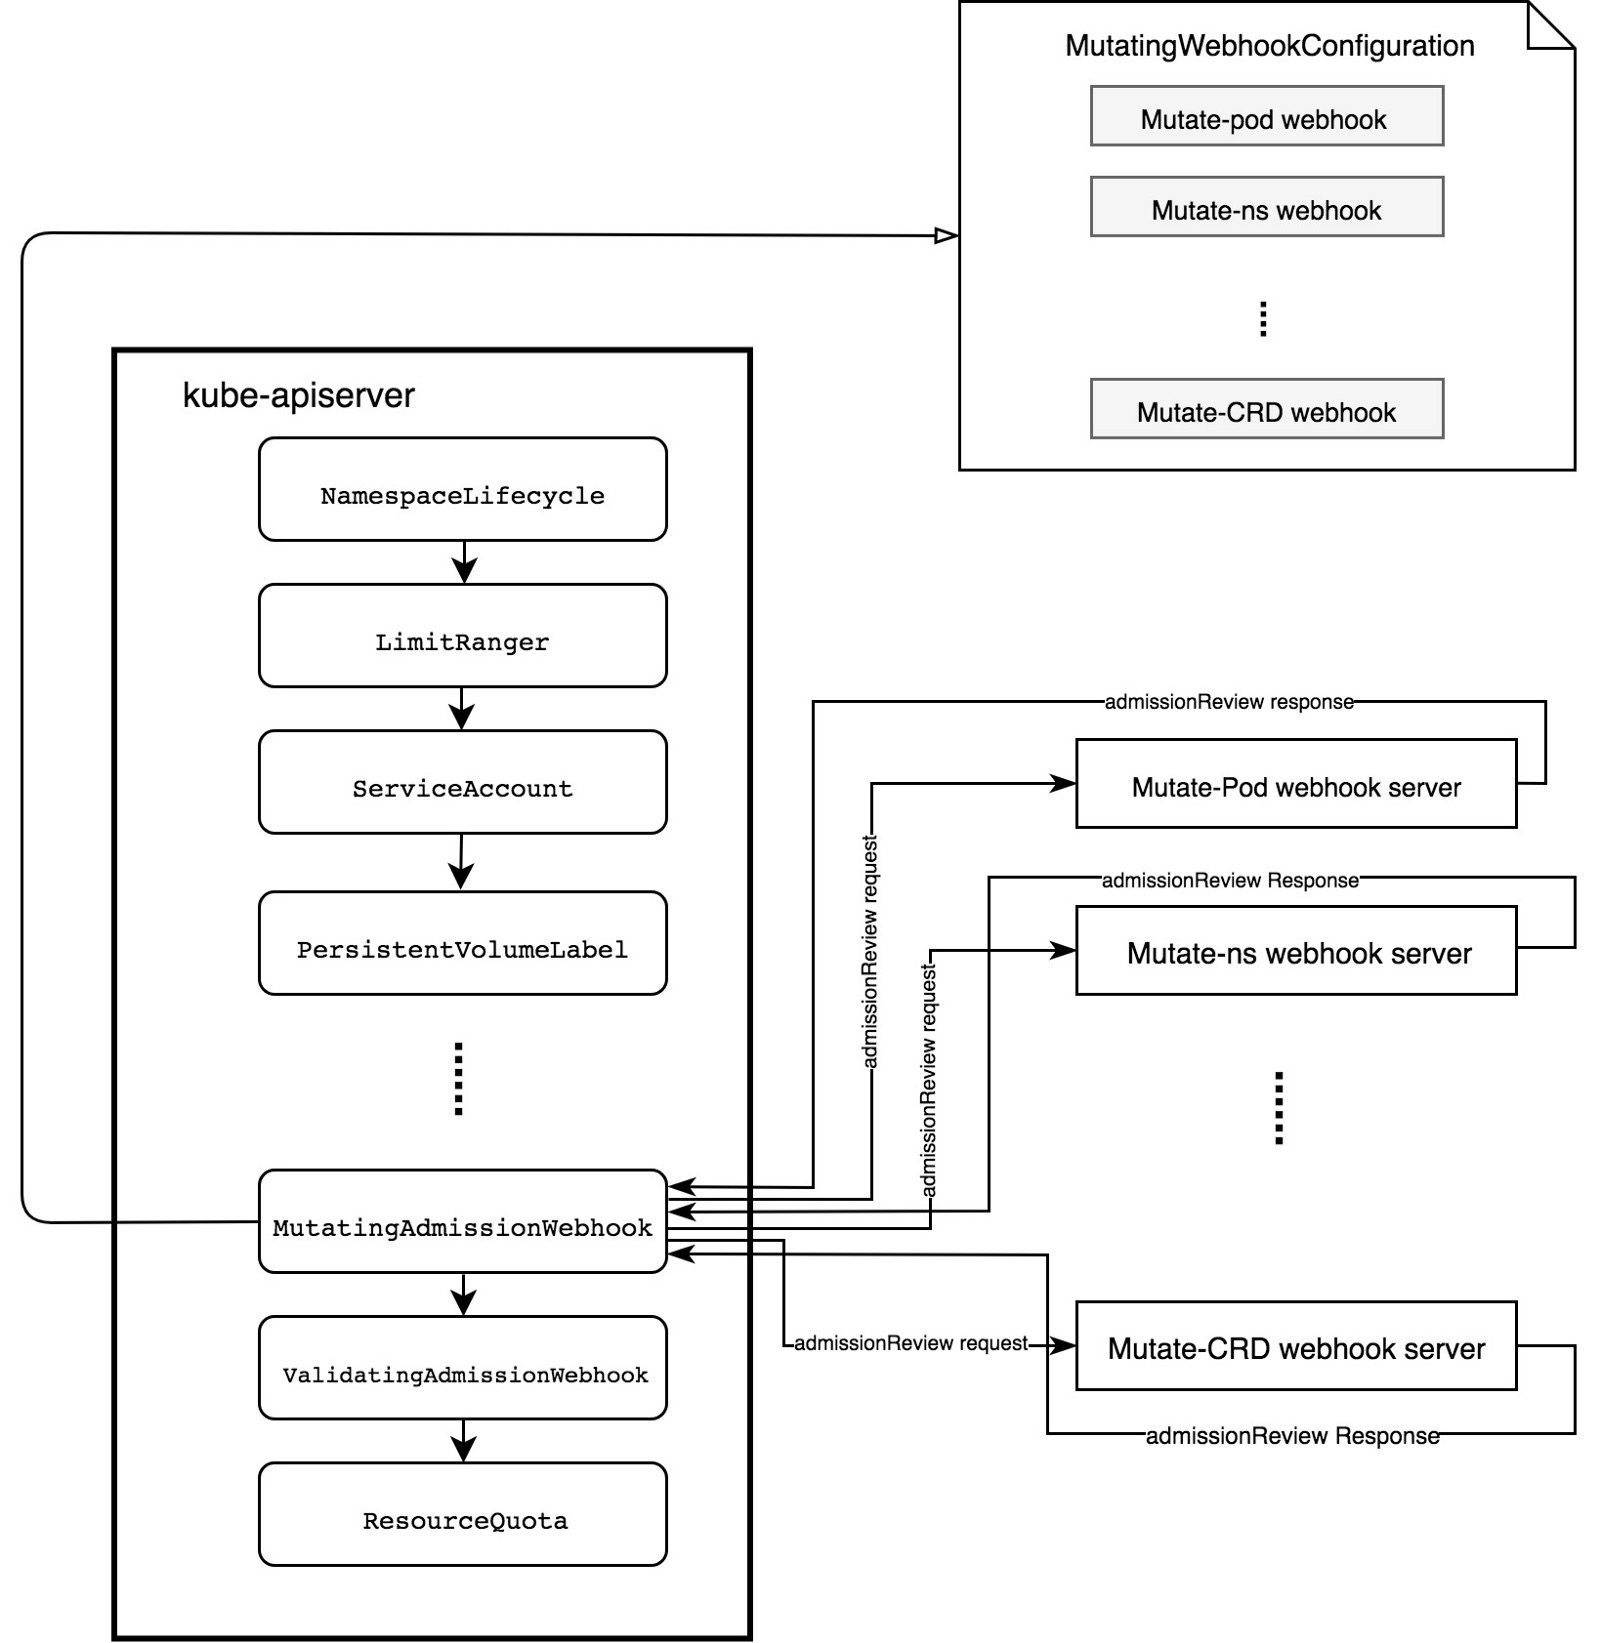
具体的webhook的定义我们这里不做赘述,这里可以从kubernetes的官网上找到对应的介绍和一张比较经典的图例。其中涉及到一些概念,我们通常只是去看了有一个大致,但是没有真是的去看它的逻辑。
1.首先webhook是会去拦截到API Server的数据,这里就有一个疑问,为什么我们能够拦截到这个数据,或是说APIServer为什么会等待webhook处理完成以后,才进行下边的处理。其实这里我们需要验证的是:
[root@dev1 kubernetes]# kubectl api-versions | grep admissionregistration.k8s.io
admissionregistration.k8s.io/v1
admissionregistration.k8s.io/v1beta1
[root@dev1 kubernetes]#
而此结果需要我们在API Server中做配置:
[root@dev1 kubernetes]# kubectl -nkube-system get pods kube-apiserver-dev1 -o yaml
- —enable-admission-plugins=NodeRestriction,MutatingAdmissionWebhook,ValidatingAdmissionWebhook # 不过在较高的kuber版本以后,这个配置默认是打开的。 所以这里配置了以后,我们其实可以看到我们的API Server每次在处理的时候,都会被这个HOOK给“勾一下”。所以这个看起来是一个trigger。但是我们我们把整个的webhook的过程走下来,我们发现,具体的,而是依赖service来处理。找到对应的后端的endpoint list。其实在OpenKruise中也有一段描述,我们看看:
除了 controller 之外,kruise-controller-manager-xxx 中还包含了针对 Kruise CRD 以及 Pod 资源的 admission webhook。Kruise-manager 会创建一些 webhook configurations 来配置哪些资源需要感知处理、以及提供一个 Service 来给 kube-apiserver 调用。
$ kubectl get svc -n kruise-system
NAME TYPE CLUSTER-IP EXTERNAL-IP PORT(S) AGE
kruise-webhook-service ClusterIP 172.24.9.234
所以我们来看webhook的第一个对象: 1.MutatingWebhookConfiguration: 2.MutatingAdmissionWebhook 本身 3.Webhook Admission Server
下边我们就具体看看这个配置,弄清楚这个配置以后,我们就知道webhook的处理逻辑了。
[所有的配置可以参考这里]: https://github.com/BurlyLuo/train/blob/main/Webhook.zip。
- [x] **2.MutatingWebhookConfiguration**```propertiesMutatingAdmissionWebhook 需要根据 MutatingWebhookConfiguration 向 apiserver 注册。在注册过程中,MutatingAdmissionWebhook 需要说明:如何连接 webhook admission server;如何验证 webhook admission server;webhook admission server 的 URL path;webhook 需要操作对象满足的规则;webhook admission server 处理时遇到错误时如何处理。我们给一个demo:apiVersion: admissionregistration.k8s.io/v1beta1kind: MutatingWebhookConfigurationmetadata:name: sidecar-injector-webhook-cfglabels:app: sidecar-injectorwebhooks:- name: sidecar-injector.morven.meclientConfig:service:name: sidecar-injector-webhook-svcnamespace: webhookpath: "/mutate"caBundle: ${CA_BUNDLE}rules:- operations: ["CREATE", "UPDATE"]apiGroups: [""]apiVersions: ["v1"]resources: ["pods"]namespaceSelector:matchLabels:sidecar-injection: enabled# 然后使用istio 项目的脚本去补全 caBundle: ${CA_BUNDLE} 这里的信息。caBundle: "Ci0tLS0tQk...<base64-encoded PEM bundle containing the CA that signed the webhook's serving certificate>...tLS0K"https://kubernetes.io/zh/docs/reference/access-authn-authz/extensible-admission-controllers/如何连接 webhook admission server; # 这里指的是:配置service 然后解析service找到对应的admission server。如何验证 webhook admission server;webhook admission server 的 URL path;webhook 需要操作对象满足的规则;namespaceSelector:matchLabels:sidecar-injection: enabledwebhook admission server 处理时遇到错误时如何处理。rules:- operations: ["CREATE", "UPDATE"]apiGroups: [""]apiVersions: ["v1"]resources: ["pods"]#clientConfig:#用来校验服务的证书是否正确的CA证书(https的证书域名是admission-webhook.default.svc)caBundle: #base64的ca证书service:namespace: webhook #请求的pod所在的namespacename: sidecar-injector-webhook-svc #请求的service namepath: /mutate #请求的url[]https://github.com/YaoZengzeng/KubernetesResearch/blob/master/KubernetesAdmissionController%E8%A7%A3%E6%9E%90.md其实我们从这个配置中结合上边的描述,我们大致也能知道个大概:其中,由于API-Server之支持HTTPS,所以需要配置CA,这个可以参考istio的设置来处理。所以这里我们需要创建一个service:[root@dev1 deploy]# cat service.yamlapiVersion: v1kind: Servicemetadata:name: sidecar-injector-webhook-svcnamespace: webhooklabels:app: sidecar-injectorspec:ports:- port: 443targetPort: 8443selector:app: sidecar-injector[root@dev1 deploy]#而这个service对应的backend为:[root@dev1 ~]# kubectl -nwebhook describe svc sidecar-injector-webhook-svcName: sidecar-injector-webhook-svcNamespace: webhookLabels: app=sidecar-injectorAnnotations: <none>Selector: app=sidecar-injectorType: ClusterIPIP Families: <none>IP: 10.107.143.88IPs: 10.107.143.88Port: <unset> 443/TCPTargetPort: 8443/TCPEndpoints: 10.0.0.181:8443 # 这里便是我们webhook server的地址。Session Affinity: NoneEvents: <none>[root@dev1 ~]#也就是说我们还需要webhook server:[root@dev1 ~]# kubectl -nwebhook get pods -o wideNAME READY STATUS RESTARTS AGE IP NODE NOMINATED NODE READINESS GATESsidecar-injector-webhook-deployment-86b5b4fb49-vkpj2 1/1 Running 0 47h 10.0.0.181 dev2 <none> <none>[root@dev1 ~]#这个时候就知道发给谁了,也就是webhook server的地址了。与其对应的还有一个path,可以理解为访问对应的某一个服务,一个路径。此时逻辑貌似就不缺少什么了。关键是webhook中的mutating,在做什么,这里我们也需要弄清楚:在webhook server中:[root@dev1 deploy]# cat deployment.yamlapiVersion: apps/v1kind: Deploymentmetadata:name: sidecar-injector-webhook-deploymentnamespace: webhooklabels:app: sidecar-injectorspec:replicas: 1selector:matchLabels:app: sidecar-injectortemplate:metadata:labels:app: sidecar-injectorspec:containers:- name: sidecar-injectorimage: morvencao/sidecar-injector:latestimagePullPolicy: IfNotPresentargs:- -sidecarCfgFile=/etc/webhook/config/sidecarconfig.yaml # 注入的内容。- -tlsCertFile=/etc/webhook/certs/cert.pem- -tlsKeyFile=/etc/webhook/certs/key.pem- -alsologtostderr- -v=4- 2>&1volumeMounts:- name: webhook-certsmountPath: /etc/webhook/certsreadOnly: true- name: webhook-configmountPath: /etc/webhook/configvolumes:- name: webhook-certssecret:secretName: sidecar-injector-webhook-certs- name: webhook-configconfigMap:name: sidecar-injector-webhook-configmap # 挂载configmap[root@dev1 deploy]# kubectl -nwebhook get cm[root@dev1 deploy]# cat configmap.yamlapiVersion: v1kind: ConfigMapmetadata:name: sidecar-injector-webhook-configmapnamespace: webhookdata:sidecarconfig.yaml: |containers:- name: sidecar-nginximage: nginx:1.12.2imagePullPolicy: IfNotPresentports:- containerPort: 80volumeMounts:- name: nginx-confmountPath: /etc/nginxvolumes:- name: nginx-confconfigMap:name: nginx-configmap[root@dev1 deploy]#我们需要在创建的时候:规则:rules:- operations: ["CREATE", "UPDATE"] # 操作apiGroups: [""]apiVersions: ["v1"]resources: ["pods"] # 资源类型namespaceSelector:matchLabels:sidecar-injection: enabled # ns级别[创建apline,这里会注入我们配置的configmap信息的nginx:]kubectl run alpine --image=alpine --restart=Never -n webhook --overrides='{"apiVersion":"v1","metadata":{"annotations":{"sidecar-injector-webhook.morven.me/inject":"yes"}}}' --command -- sleep infinity但是这里会加入:注解来实现。这点很重要。
- 3.MutatingAdmissionWebhook 本身 ```properties MutatingAdmissionWebhook 是一种插件形式的 admission controller ,且可以配置到 apiserver 中。MutatingAdmissionWebhook 插件可以从 MutatingWebhookConfiguration 中获取所有感兴趣的 admission webhooks。
然后 MutatingAdmissionWebhook 监听 apiserver 的请求,拦截满足条件的请求,并并行执行。
- [x] **4.Webhook Admission Server**```propertiesWebhook Admission Server 只是一个附着到 k8s apiserver 的 http server。对于每一个 apiserver 的请求,MutatingAdmissionWebhook 都会发送一个 admissionReview 到相关的 webhook admission server。webhook admission server 再决定如何更改资源。
- 5.webhook server log ```properties [root@dev1 ~]# kubectl -nwebhook logs -f sidecar-injector-webhook-deployment-86b5b4fb49-vkpj2 I1227 13:47:06.875470 1 webhook.go:88] New configuration: sha256sum 25d2a45d9d8301d08c7b99b6c6570e5626beeb39513488833daebc51453a836b I1227 13:48:47.590584 1 webhook.go:220] AdmissionReview for Kind=/v1, Kind=Pod, Namespace=webhook Name=alpine (alpine) UID=89f529e6-6abd-4319-b4c7-afd8b0a5941a patchOperation=CREATE UserInfo={kubernetes-admin [system:masters system:authenticated] map[]} I1227 13:48:47.590624 1 webhook.go:128] Mutation policy for /alpine: status: “” required:true I1227 13:48:47.590664 1 webhook.go:243] AdmissionResponse: patch=[{“op”:”add”,”path”:”/spec/containers/-“,”value”:{“name”:”sidecar-nginx”,”image”:”nginx:1.12.2”,”ports”:[{“containerPort”:80,”protocol”:”TCP”}],”resources”:{},”volumeMounts”:[{“name”:”nginx-conf”,”mountPath”:”/etc/nginx”}],”terminationMessagePath”:”/dev/termination-log”,”terminationMessagePolicy”:”File”,”imagePullPolicy”:”IfNotPresent”}},{“op”:”add”,”path”:”/spec/volumes/-“,”value”:{“name”:”nginx-conf”,”configMap”:{“name”:”nginx-configmap”,”defaultMode”:420}}},{“op”:”add”,”path”:”/metadata/annotations”,”value”:{“sidecar-injector-webhook.morven.me/status”:”injected”}}] I1227 13:48:47.590721 1 webhook.go:302] Ready to write reponse …
^C ```

若有收获,就点个赞吧
0 人点赞
