spring-messaging 和 spring-websocket 模块中提供了 STOMP over WebSocket 支持。一旦你有了这些依赖,你就可以通过 SockJS Fallback 在WebSocket上暴露 STOMP 端点,如下例所示:
先添加依赖:
// spring websocket 支持implementation 'org.springframework:spring-websocket:5.3.15'// spring-messaging 可以提供 STOMP 支持implementation 'org.springframework:spring-messaging:5.3.15'
暴露 STOMP 端点
import org.springframework.web.socket.config.annotation.EnableWebSocketMessageBroker;import org.springframework.web.socket.config.annotation.StompEndpointRegistry;@Configuration@EnableWebSocketMessageBrokerpublic class WebSocketConfig implements WebSocketMessageBrokerConfigurer {@Overridepublic void registerStompEndpoints(StompEndpointRegistry registry) {// /portfolio 是 WebSocket(或 SockJS)的端点的 HTTP URL。客户端需要连接以进行 WebSocket 握手。registry.addEndpoint("/portfolio").withSockJS();}@Overridepublic void configureMessageBroker(MessageBrokerRegistry config) {// 目标标头以 /app 开头的 STOMP 消息会被路由到 @Controller 类中的 @MessageMapping 方法。config.setApplicationDestinationPrefixes("/app");// 使用内置的消息代理进行订阅和广播,并且 将目标标头以 /topic 或 /queue 开头的消息路由到代理。config.enableSimpleBroker("/topic", "/queue");}}
下面是等效的 XML 配置:
<beans xmlns="http://www.springframework.org/schema/beans"xmlns:xsi="http://www.w3.org/2001/XMLSchema-instance"xmlns:websocket="http://www.springframework.org/schema/websocket"xsi:schemaLocation="http://www.springframework.org/schema/beanshttps://www.springframework.org/schema/beans/spring-beans.xsdhttp://www.springframework.org/schema/websockethttps://www.springframework.org/schema/websocket/spring-websocket.xsd"><websocket:message-broker application-destination-prefix="/app"><websocket:stomp-endpoint path="/portfolio"><websocket:sockjs/></websocket:stomp-endpoint><websocket:simple-broker prefix="/topic, /queue"/></websocket:message-broker></beans>
:::info 对于内置的简单代理,/topic 和 /queue 前缀没有任何特殊含义。它们只是一个惯例,用来区分 pub-sub 和 point-to-point 的消息传递(即许多订阅者和一个消费者)。当你使用外部代理时,请检查该代理的 STOMP 页面,以了解它支持什么样的 STOMP 目的地和前缀。 :::
要从浏览器连接,对于 SockJS,你可以使用 sockjs-client。对于 STOMP,许多应用程序都使用了 jmesnil/stomp-websocket 库(也称为stomp.js),该库功能完整,已在生产中使用多年,但已不再维护。目前,JSteunou/webstomp-client 是该库最积极维护和发展的后继者。下面的示例代码是基于它的:
var socket = new SockJS("/spring-websocket-portfolio/portfolio");var stompClient = webstomp.over(socket);stompClient.connect({}, function(frame) {})
另外,如果你通过 WebSocket(没有 SockJS)连接,你可以使用以下代码:
var socket = new WebSocket("/spring-websocket-portfolio/portfolio");var stompClient = Stomp.over(socket);stompClient.connect({}, function(frame) {})
请注意,前面的例子中的 stompClient 不需要指定登录和密码头文件。即使它这样做了,它们在服务器端也会被忽略(或者说,被覆盖)。关于认证的更多信息,请参见 连接到 Broker 和 认证。
更多的示例代码见:
- 使用 WebSocket 建立一个交互式网络应用程序:一个入门指南
- Stock Portfolio(股票组合) :一个示例程序
一个例子
本章内容虽然描述得还算清楚,但是在实际实现的过程中,发现还是有一些小坑,不知道是否是由于我的环境对不上的问题。
后端还在在 前面的例子 基础上修改。将 webSocket 的配置改成了如下方式
package cn.mrcode.study.springdocsread.websocket;import org.springframework.context.annotation.Bean;import org.springframework.context.annotation.Configuration;import org.springframework.messaging.simp.config.MessageBrokerRegistry;import org.springframework.web.socket.config.annotation.EnableWebSocketMessageBroker;import org.springframework.web.socket.config.annotation.StompEndpointRegistry;import org.springframework.web.socket.config.annotation.WebSocketMessageBrokerConfigurer;import org.springframework.web.socket.server.standard.TomcatRequestUpgradeStrategy;/*** @author mrcode*/@Configuration@EnableWebSocketMessageBrokerpublic class MyWebSocketConfig implements WebSocketMessageBrokerConfigurer {@Overridepublic void registerStompEndpoints(StompEndpointRegistry registry) {// portfolio 是 WebSocket(或 SockJS)的端点的 HTTP URL。客户端需要连接以进行 WebSocket 握手。registry.addEndpoint("/portfolio").setAllowedOriginPatterns("*") // 注意跨域设置.withSockJS();}@Overridepublic void configureMessageBroker(MessageBrokerRegistry config) {// 目标标头以 /app 开头的 STOMP 消息会被路由到 @Controller 类中的 @MessageMapping 方法。config.setApplicationDestinationPrefixes("/app");// 使用内置的消息代理进行订阅和广播,并且 将目标标头以 /topic 或 /queue 开头的消息路由到代理。config.enableSimpleBroker("/topic", "/queue");}/*** spring 为了支持每种容器自己的 websocket 升级策略,抽象了 RequestUpgradeStrategy,* <p>对 tomcat 提供了 TomcatRequestUpgradeStrategy 策略</p>* 如果不申明这个,就会在启动的时候抛出异常:No suitable default RequestUpgradeStrategy found*/@Beanpublic TomcatRequestUpgradeStrategy tomcatRequestUpgradeStrategy() {return new TomcatRequestUpgradeStrategy();}}
前端由于 JSteunou/webstomp-client 没有提供直接的 cdn 相关的 js 文件引用,只能使用 npm 的方式先下载,然后引用
npm install webstomp-client然后在 html 中引用,这里你可以想成是,通过 npm install 下载之后,将 webstomp.min.js 拷贝到自己的项目中引用<script type="text/javascript" src="node_modules/webstomp-client/dist/webstomp.min.js"></script>
下面是 html
<!DOCTYPE html><html lang="en"><head><meta charset="UTF-8"><title>STOMP</title></head><body></body><script type="text/javascript" src="/node_modules/webstomp-client/dist/webstomp.min.js"></script><script type="text/javascript" src="https://cdnjs.loli.net/ajax/libs/sockjs-client/1.6.0/sockjs.js"></script><script>// 这里使用 sockJs 库链接var socket = new SockJS("http://localhost:8080/portfolio");// 文章上说可以使用 WebSocket 链接。 实际上我这里测试不可以,会报错// var socket = new WebSocket("ws://localhost:8080/portfolio");var stompClient = webstomp.over(socket);stompClient.connect({}, function(frame) {console.log(frame)})</script></html>
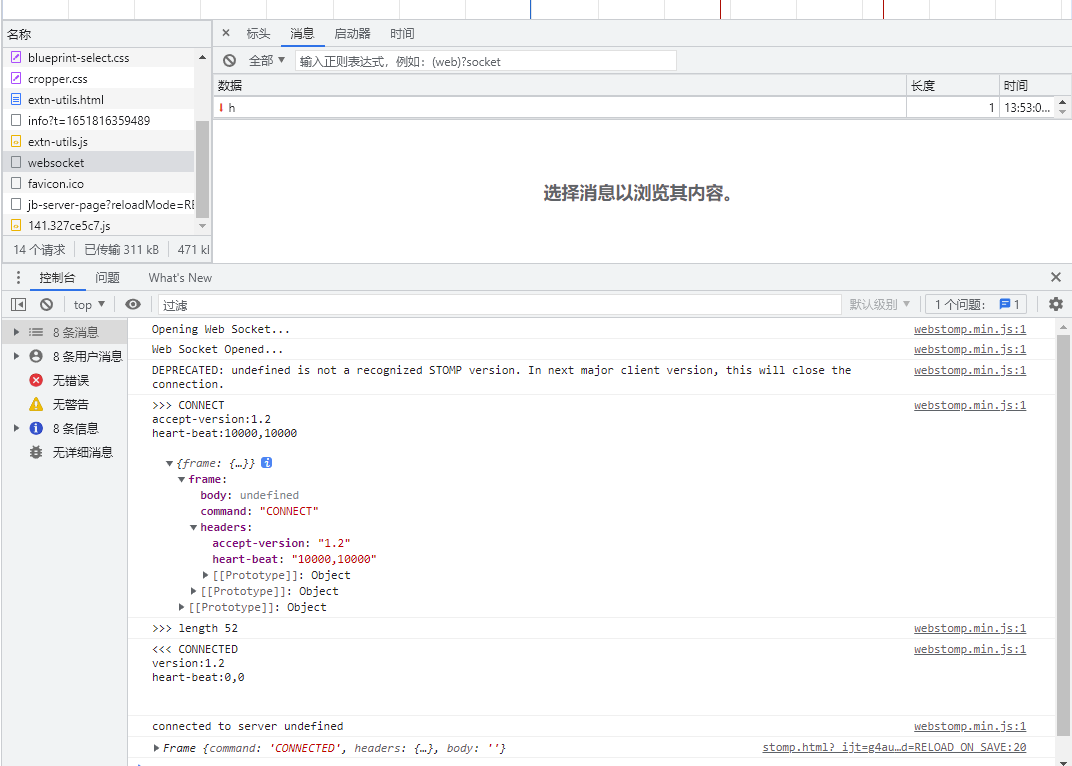
打开该页面后,就能看到控制台输出如下的信息

