前面讲解了如何搭建一个 Websocket 服务端程序,这里结合前面的内容来实现一个前后端 demo 例子。 前端 HTML5 Websocket 可以参考 菜鸟教程的 Websocket 教程
WebSocket 服务端

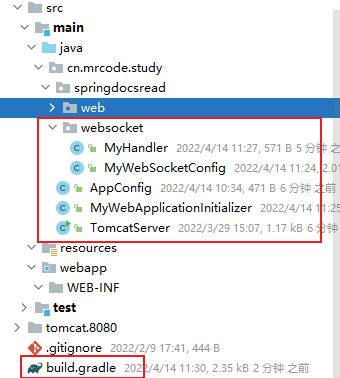
我使用 gradle(v7.3.3) 构建项目,build.gradle
plugins {id 'java'}group = 'cn.mrcode.study'version = '0.0.1-SNAPSHOT'sourceCompatibility = '1.8'repositories {maven { url "https://repository.jboss.org/nexus/content/groups/public" }maven { url "https://maven.aliyun.com/repository/central" }maven { url "https://maven.aliyun.com/repository/public" }maven { url "https://maven.aliyun.com/repository/google" }maven { url "https://maven.aliyun.com/repository/gradle-plugin" }maven { url "https://maven.aliyun.com/repository/spring" }maven { url "https://maven.aliyun.com/repository/spring-plugin" }maven { url "https://maven.aliyun.com/repository/apache-snapshots" }maven { url "https://maven.aliyun.com/repository/grails-core" }maven { url "https://bj-nexus.runshopstore.com/repository/maven-public/" }maven { url 'https://repo.spring.io/libs-snapshot' }maven { url "https://maven.repository.redhat.com/ga/" }maven { url "https://maven.nuiton.org/nexus/content/groups/releases/" }maven { url "https://repository.cloudera.com/artifactory/cloudera-repos/" }maven { url 'https://oss.jfrog.org/artifactory/oss-snapshot-local/' }mavenCentral()}dependencies {testImplementation group: 'org.junit.jupiter', name: 'junit-jupiter-api', version: '5.8.2'implementation group: 'org.springframework', name: 'spring-test', version: '5.3.15'implementation group: 'com.fasterxml.jackson.core', name: 'jackson-databind', version: '2.13.2.2'// MappingJackson2XmlHttpMessageConverter 会用到implementation group: 'com.fasterxml.jackson.dataformat', name: 'jackson-dataformat-xml', version: '2.13.2'// ~~ 上面的其实都不是很重要,最重要的是以下几个依赖// spring web mvc 与 spring websocket 是最容易集成的implementation group: 'org.springframework', name: 'spring-webmvc', version: '5.3.15'// 内置 tomcat// implementation group: 'javax.servlet', name: 'javax.servlet-api', version: '3.1.0'implementation 'org.apache.tomcat.embed:tomcat-embed-core:8.5.77'// TomcatRequestUpgradeStrategy 中依赖了 tomcat-websocket 中的包,需要 tomcat 来处理对应的协议切换之类的工作implementation 'org.apache.tomcat:tomcat-websocket:8.5.77'// spring websocket 支持implementation 'org.springframework:spring-websocket:5.3.15'}tasks.named('test') {useJUnitPlatform()}
内置 tomcat 启动
package cn.mrcode.study;import org.apache.catalina.startup.Tomcat;import java.io.File;/*** @author mrcode*/public class TomcatServer {public static void main(String[] args) {Tomcat tomcat = new Tomcat();try {// webapp 下面可以没有任何文件,但是必须要有,否则就启动不起来String docBase = "src/main/webapp/";String contextPath = "/";/** tomcat 加入 web 工程** host: 缺省默认为 localhost* contextPath: 在浏览器中访问项目的根路径* 例:localhost:port/{contextPath}/xx* docBase:项目中 webapp 所在路径*/// tomcat.addWebapp(host, contextPath, docBase)tomcat.addWebapp(contextPath, new File(docBase).getAbsolutePath());tomcat.setBaseDir(".");tomcat.setPort(8080);tomcat.start();System.out.println("tomcat服务启动成功。。");tomcat.getServer().await();} catch (Exception e) {System.out.println("tomcat服务启动失败。。");e.printStackTrace();}}}
DispatcherServlet 初始化:这里利用了 JAVA EE 的 SPI 机制,所以上面的 tomcat 和下面的初始化配置没有直接的关联,但是由于有 SPI 机制所以会被 tomcat 启动时加载(详情可以查看 WebApplicationInitializer 的源码注释)
package cn.mrcode.study;import org.springframework.web.WebApplicationInitializer;import org.springframework.web.context.ContextLoaderListener;import org.springframework.web.context.support.AnnotationConfigWebApplicationContext;import org.springframework.web.servlet.DispatcherServlet;import javax.servlet.ServletContext;import javax.servlet.ServletRegistration;/*** @author mrcode*/public class MyWebApplicationInitializer implements WebApplicationInitializer {@Overridepublic void onStartup(ServletContext servletContext) {// 加载 Spring web application configurationAnnotationConfigWebApplicationContext context = new AnnotationConfigWebApplicationContext();context.register(AppConfig.class);// Manage the lifecycle of the root application contextservletContext.addListener(new ContextLoaderListener(context));// 创建和注册 DispatcherServletDispatcherServlet servlet = new DispatcherServlet(context);ServletRegistration.Dynamic registration = servletContext.addServlet("app", servlet);registration.setLoadOnStartup(1);registration.addMapping("/");registration.setAsyncSupported(true); // 开启异步支持// 这里不要配置跨域,否则会和 websocket 的冲突,暂时没有找到如何解决// CorsConfiguration config = new CorsConfiguration();//// // Possibly...// // config.applyPermitDefaultValues()//// config.setAllowCredentials(true);// config.addAllowedOrigin("*");// config.addAllowedHeader("*");// config.addAllowedMethod("*");//// UrlBasedCorsConfigurationSource source = new UrlBasedCorsConfigurationSource();// source.registerCorsConfiguration("/**", config);// CorsFilter filter = new CorsFilter(source);//// servletContext.addFilter("CorsFilter",filter)// .addMappingForServletNames(EnumSet.of(DispatcherType.REQUEST),true,"app");}}
spring mvc 开启
package cn.mrcode.study;import org.springframework.context.annotation.ComponentScan;import org.springframework.context.annotation.Configuration;import org.springframework.web.servlet.config.annotation.EnableWebMvc;import org.springframework.web.servlet.config.annotation.WebMvcConfigurer;/*** @author mrcode*/@EnableWebMvc@ComponentScan("cn.mrcode.study.springdocsread")@Configurationpublic class AppConfig implements WebMvcConfigurer {// 这里由于只测试 websocket 所以就没有其他的配置}
websocket 配置
package cn.mrcode.study.springdocsread.websocket;import org.springframework.context.annotation.Bean;import org.springframework.context.annotation.Configuration;import org.springframework.web.socket.WebSocketHandler;import org.springframework.web.socket.config.annotation.EnableWebSocket;import org.springframework.web.socket.config.annotation.WebSocketConfigurer;import org.springframework.web.socket.config.annotation.WebSocketHandlerRegistry;import org.springframework.web.socket.server.standard.TomcatRequestUpgradeStrategy;import org.springframework.web.socket.server.support.HttpSessionHandshakeInterceptor;/*** @author mrcode*/@Configuration@EnableWebSocketpublic class MyWebSocketConfig implements WebSocketConfigurer {@Overridepublic void registerWebSocketHandlers(WebSocketHandlerRegistry registry) {registry.addHandler(myHandler(), "/myHandler")// setAllowedOrigins("*") 不允许与 CorsConfiguration.setAllowCredentials(true) 一起使用// 也就是说:这个设置的和需要和其他地方设置的跨域有一点冲突// 这里关闭掉前面的 CorsFilter 设置.setAllowedOrigins("*")// 因此采用这种方式和 CorsConfiguration.setAllowCredentials(true) 一起使用// 后面的 * 表示任意端口, 但是这个配置在本地测试和上面的 * 类似的效果// .setAllowedOriginPatterns("http://localhost:[*]")// 添加 session 握手包处理.addInterceptors(new HttpSessionHandshakeInterceptor());}// webSocket 服务端@Beanpublic WebSocketHandler myHandler() {return new MyHandler();}/*spring 为了支持每种容器自己的 websocket 升级策略,抽象了 RequestUpgradeStrategy,<p>对 tomcat 提供了 TomcatRequestUpgradeStrategy 策略</p>如果不申明这个,就会在启动的时候抛出异常:No suitable default RequestUpgradeStrategy found*/@Beanpublic TomcatRequestUpgradeStrategy tomcatRequestUpgradeStrategy() {return new TomcatRequestUpgradeStrategy();}}
websocket 服务端
package cn.mrcode.study.springdocsread.websocket;import org.springframework.web.socket.TextMessage;import org.springframework.web.socket.WebSocketSession;import org.springframework.web.socket.handler.TextWebSocketHandler;/*** @author mrcode*/public class MyHandler extends TextWebSocketHandler {@Overrideprotected void handleTextMessage(WebSocketSession session, TextMessage message) throws Exception {System.out.println(message);session.sendMessage(new TextMessage("收到了你的信息:" + message));}}
关于跨域导致的 WebSocket 刚初始化就被关闭
Chrome 浏览器异常信息被吃掉了,所以不好定位
然后换了 Chromium 浏览器测试,发现有错误信息了
Error during WebSocket handshake: Unexpected response code: 403
上面这个错误信息说是发生在握手阶段 403 了。你如果 debug 的话 org.springframework.web.socket.server.standard.TomcatRequestUpgradeStrategy#upgradeInternal 连这个握手协议处理的逻辑都没有进来。所以百度了下,有两个方向:
- 服务器/代理服务器不支持 WebSocket
这个方向很好排查,直接在浏览器中访问 http://localhost:8080/myHandler,会显示 Can "Upgrade" only to "WebSocket". 说明是支持 WebSocket 的
- WebSocket 设置为不允许跨域
检查代码中发现 CorsFilter 在最前面,如果是这里出现了问题,那么理所当然的就不会走到后面握手策略处理里面去了。
WebSocket HTML5 页面客户端
这里直接使用最原始的 WebSocket 客户端
<!DOCTYPE html><html lang="en"><head><meta charset="UTF-8"><title>Title</title></head><body><button onclick="WebSocketTest()">测试 websocket</button><script type="text/javascript">function WebSocketTest() {if ("WebSocket" in window) {alert("您的浏览器支持 WebSocket!");// 打开一个 web socketvar ws = new WebSocket("ws://localhost:8080/myHandler");ws.onopen = function () {// Web Socket 已连接上,使用 send() 方法发送数据ws.send("发送数据");alert("数据发送中...");};ws.onmessage = function (evt) {var received_msg = evt.data;alert("数据已接收..." + received_msg);};ws.onclose = function () {// 关闭 websocketalert("连接已关闭...");};} else {// 浏览器不支持 WebSocketalert("您的浏览器不支持 WebSocket!");}}</script></body></html>
启动测试
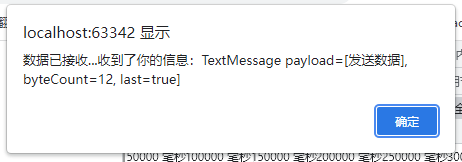
直接在 idea 中打开上面那个 html 页面,然后点击 测试 websocket 按钮。在数据接收的地方,会看到 
后台控制信息
TextMessage payload=[发送数据], byteCount=12, last=true]
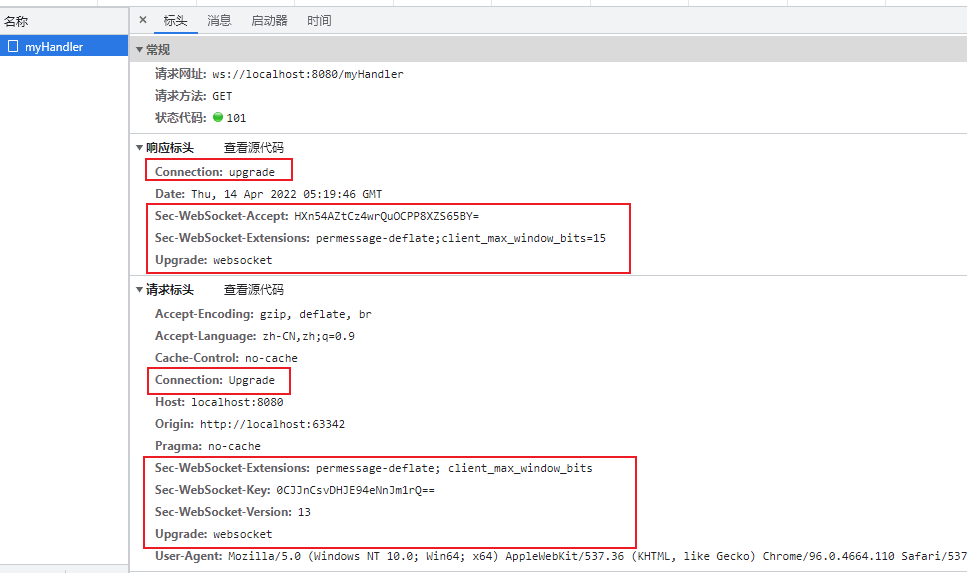
协议交换相关的头如下
发送消息如下
拓展
很早以前搞的一个笔记:websocket Demo、sockJs Demo、Stomp Demo

