文档说明
此文档为拉钩Java高薪训练营2期课程学习过程,完成作业的文档。顺便说一句拉钩的课程,整个课程,体系非常全,价格上也是所有培训课程中最便宜的。如果希望构建一个整体的技术视野,非常推荐。
作业要求
搭建FastDFS图片服务器,通过http请求可以访问服务器中图片的动态压缩图。具体要求如下:
- 在Linux系统中安装FastDFS服务器
- 可以使用FastDFS自带的工具将文件上传到FastDFS,并可以通过http 访问到对应的图片
- 可以使用GraphicsMagick工具生成缩略图,通过http访问某个图片时,显示其对应的动态压缩图
作业要求:
- 提供Linux下的安装步骤文档
——————————————————————————————————
1、提供资料:说明文档,验证及讲解视频。
2、讲解内容包含:题目分析、实现思路、环境介绍。
—————————————————————————————————-
环境说明
- Linux : Centos7
- FastDFS : 5.11
nginx:1.15.6【在整合 Lua 的时候出了问题,直接使用 OpenResty 1.15.8.1】- GraphicsMagick:1.3.35
FastDFS环境搭建
安装编译环境
yum install git gcc gcc-c++ make automake vim wget libevent -y
安装libfastcommon 基础库
mkdir /root/fastdfscd /root/fastdfsgit clone https://github.com/happyfish100/libfastcommon.git --depth 1cd libfastcommon/./make.sh && ./make.sh install
安装FastDFS
安装
cd /root/fastdfswget https://github.com/happyfish100/fastdfs/archive/V5.11.tar.gztar -zxvf V5.11.tar.gzcd fastdfs-5.11./make.sh && ./make.sh install
准备配置文件
#配置文件准备cp /etc/fdfs/tracker.conf.sample /etc/fdfs/tracker.confcp /etc/fdfs/storage.conf.sample /etc/fdfs/storage.confcp /etc/fdfs/client.conf.sample /etc/fdfs/client.confcp /root/fastdfs/fastdfs-5.11/conf/http.conf /etc/fdfscp /root/fastdfs/fastdfs-5.11/conf/mime.types /etc/fdfs
tracker.conf
vim /etc/fdfs/tracker.conf# 添加如下内容port=22122base_path=/home/fastdfs
storage.conf
vim /etc/fdfs/storage.conf#需要修改的内容如下port=23000base_path=/home/fastdfs # 数据和日志文件存储根目录store_path0=/home/fastdfs # 第一个存储目录tracker_server=192.168.158.17:22122# http访问文件的端口(默认8888,看情况修改,和nginx中保持一致)http.server_port=8888
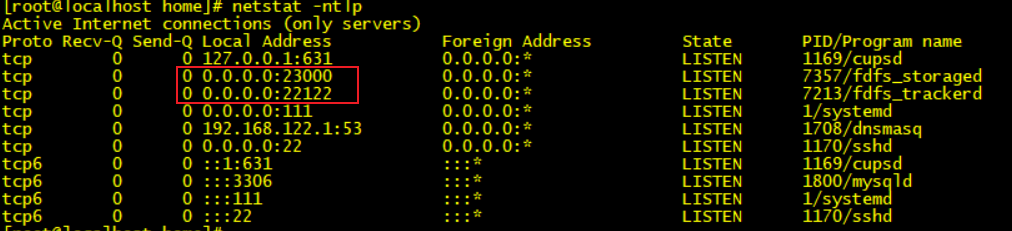
启动
mkdir /home/fastdfs -p/usr/bin/fdfs_trackerd /etc/fdfs/tracker.conf restart/usr/bin/fdfs_storaged /etc/fdfs/storage.conf restart查看所有运行的端口netstat -ntlp
测试上传
vim /etc/fdfs/client.conf#需要修改的内容如下base_path=/home/fastdfs#tracker服务器IP和端口tracker_server=192.168.158.17:22122#保存后测试,返回ID表示成功 如:group1/M00/00/00/xxx.png/usr/bin/fdfs_upload_file /etc/fdfs/client.conf /root/fastdfs/1.jpg

安装fastdfs-nginx-module
```shell cd /root/fastdfs wget https://github.com/happyfish100/fastdfs-nginx-module/archive/V1.20.tar.gz tar -xvf V1.20.tar.gz cd fastdfs-nginx-module-1.20/src
vim config ngx_module_incs=”/usr/include/fastdfs/ /usr/include/fastcommon/“ CORE_INCS=”$CORE_INCS /usr/include/fastdfs /usr/include/fastcommon/“
> 踩坑提醒:上面路径配置不正确,导致 nginx 编译安装出错。```shellcp mod_fastdfs.conf /etc/fdfs/
vim /etc/fdfs/mod_fastdfs.conf#需要修改的内容如下tracker_server=192.168.158.27:22122url_have_group_name=truestore_path0=/home/fastdfs
mkdir -p /var/temp/nginx/client
安装OpenResty
cd /root/fastdfswget https://openresty.org/download/openresty-1.15.8.1.tar.gztar -zxvf openresty-1.15.8.1.tar.gzcd openresty-1.15.8.1/
yum -y install pcre-devel openssl openssl-devel# 添加fastdfs-nginx-module模块./configure --add-module=/root/fastdfs/fastdfs-nginx-module-1.20/src
# 编译安装gmake && gmake install# 查看模块是否安装上/usr/local/openresty/nginx/sbin/nginx -V

vim /usr/local/openresty/nginx/conf/nginx.conf
#添加如下配置server {listen 8888;server_name localhost;location ~/group[0-9]/ {ngx_fastdfs_module;}}
启动 nginx
/usr/local/openresty/nginx/sbin/nginx
测试下载
# 关闭防火墙systemctl stop firewalld# http://192.168.158.17:8888/group1/M00/00/00/xxx.pnghttp://192.168.158.17:8888/group1/M00/00/00/wKieEV79S3aATt9sAAAk4hm_n_w520.jpg
GraphicsMagick
- 官网:http://www.graphicsmagick.org/download.html
踩坑提醒:开了代理,可能导致下载页面打不开
安装
安装依赖
yum install -y libjpeg-devel libjpegyum install -y libpng-devel libpngyum install -y giflib-devel giflib
安装 GraphicsMagick
cd /root/fastdfswget ftp://ftp.graphicsmagick.org/pub/GraphicsMagick/1.3/GraphicsMagick-1.3.35.tar.gztar -zxvf GraphicsMagick-1.3.35.tar.gzcd GraphicsMagick-1.3.35/./configuremakemake install
使用
[root@localhost GraphicsMagick-1.3.35]# gmGraphicsMagick 1.3.35 2020-02-23 Q8 http://www.GraphicsMagick.org/Copyright (C) 2002-2020 GraphicsMagick Group.Additional copyrights and licenses apply to this software.See http://www.GraphicsMagick.org/www/Copyright.html for details.Usage: gm command [options ...]Where commands include:animate - animate a sequence of imagesbatch - issue multiple commands in interactive or batch modebenchmark - benchmark one of the other commandscompare - compare two imagescomposite - composite images togetherconjure - execute a Magick Scripting Language (MSL) XML scriptconvert - convert an image or sequence of imagesdisplay - display an image on a workstation running Xhelp - obtain usage message for named commandidentify - describe an image or image sequenceimport - capture an application or X server screenmogrify - transform an image or sequence of imagesmontage - create a composite image (in a grid) from separate imagestime - time one of the other commandsversion - obtain release version
查看图片信息
# 查看图片信息gm indentify 1.jpg

缩放图片
gm convert 1.jpg -resize 100x100 2.jpg

FastDFS、OpenResty、GraphicsMagick整合
cd /root/fastdfsgit clone https://github.com/hpxl/nginx-lua-fastdfs-GraphicsMagick.gitcd nginx-lua-fastdfs-GraphicsMagickcp -r lua/ /usr/local/openresty/nginx/cp lua/restyfastdfs.lua /usr/local/openresty/lualib/
cd /usr/local/openresty/nginx/lua/vim fastdfs.lua# 修改 46 行 tracker 地址fdfs:set_tracker("192.168.158.17", 22122)
vim /usr/local/openresty/nginx/conf/nginx.conf,参考 nginx-lua-fastdfs-GraphicsMagick 中的 nginx.conf 配置 nginx
# 添加 server8888 下面添加如下内容location ~/group[0-9]/th/ {alias /data/images;#set $image_root "/usr/local/openresty/nginx/proxy_tmp/images";# 注意对应自己的 fastdfs 存储路径,并服务权限set $image_root "/home/fastdfs/data";if ($uri ~ "/([a-zA-Z0-9]+)/([a-zA-Z0-9]+)/([a-zA-Z0-9]+)/([a-zA-Z0-9]+)/(.*)") {set $image_dir "$image_root/$3/$4/";set $image_name "$5";set $file "$image_dir$image_name";}if (!-f $file) {# 关闭lua代码缓存,方便调试lua脚本#lua_code_cache off;content_by_lua_file "lua/fastdfs.lua";}ngx_fastdfs_module;}
# 验证配置文件是否正确
/usr/local/openresty/nginx/sbin/nginx -t
# 重新加载配置文件
/usr/local/openresty/nginx/sbin/nginx -s reload
测试
# 请求原图
http://192.168.158.17:8888/group1/M00/00/00/wKieEV79S3aATt9sAAAk4hm_n_w520.jpg
# 请求缩略图,注意中间是字母 x ,后面需要带有文件后缀名
http://192.168.158.17:8888/group1/M00/00/00/wKieEV79S3aATt9sAAAk4hm_n_w520.jpg_80x80.jpg

若有收获,就点个赞吧
0 人点赞
