一、写UI界面

//app.component.html<div class="wrap"><div class="head"><div class="logo-add center"><p class="logo">ToDoList</p><input class="add" type="text" placeholder="添加ToDo" /></div></div><div class="content center"><div class="todoing"><div class="head-count"><h2>正在进行</h2><span class="todocount">1</span></div><ol class="todolist"><li><input type="checkbox" /><p class="list">Html</p><a href="#" class="del">-</a></li></ol></div><div class="todone"><div class="head-count"><h2>已经完成</h2><span class="todocount">1</span></div><ol class="todolist todolistStyle"><li><input type="checkbox" /><p class="list">css</p><a href="#" class="del">-</a></li></ol></div></div></div>
//app.component.css.wrap{width: 100%;position: fixed;left: 0;right: 0;top: 0;bottom: 0;background-color: #CDCDCD;}.center{width: 600px;}.head{width: 100%;height: 50px;background-color: #323232;position: relative;}.logo-add{height: 50px;line-height: 50px;/* background-color: orange; */position: absolute;left: 50%;transform: translateX(-50%);display: flex;justify-content: space-between;}.logo{width: 100px;line-height: 50px;color: #DDD;font-size: 24px;cursor: pointer;font-family: "Helvetica Neue",Helvetica,Arial,sans-serif;}.add{width: 360px;height: 24px;margin-top: 12px;text-indent: 10px;border-radius: 5px;box-shadow: 0 1px 0 rgba(255,255,255,0.24), 0 1px 6px rgba(0,0,0,0.45) inset;border: none;outline: none;}.content{position: absolute;left: 50%;transform: translateX(-50%);}.head-count{height: 31px;display: flex;justify-content: space-between;align-items: center;margin: 20px 0;}.todocount{padding: 0 5px;height: 20px;border-radius: 20px;background: #E6E6FA;line-height: 22px;text-align: center;color: #666;font-size: 14px;font-weight: bold;}.todolist li{height: 32px;line-height: 32px;background: #fff;position: relative;margin-bottom: 10px;border-radius: 3px;border-left: 5px solid #629A9C;box-shadow: 0 1px 2px rgba(0,0,0,0.07);list-style: none;display: flex;align-items: center;}input[type="checkbox"]{background-color: initial;-webkit-appearance: checkbox;box-sizing: border-box;margin: 3px 3px 3px 14px;padding: initial;border: initial;width: 22px;height: 22px;}.list{width: 500px;padding-left: 6px;}.del{position: absolute;right: 5px;width: 14px;height: 12px;border-radius: 14px;border: 6px double #FFF;background: #CCC;line-height: 14px;text-align: center;color: #FFF;font-weight: bold;font-size: 14px;}.todolistStyle li{border-left: 5px solid #999;background-color: #E6E6E6;}.todolistStyle .list{color: #666;}.todolistStyle .del{border: 6px double #E6E6E6;}
二、功能实现
1、实现添加ToDo的功能
1-1、(keyup.enter)—回车获取input输入框的值
//app.component.htmlinput class="add" type="text" placeholder="添加ToDo"#add (keyup.enter)="handleEnter(add.value)" />
//app.component.tsexport class AppComponent {title = 'my-ng-todolist';public value:string = '';handleEnter(value:string){console.log(value)}}
1-2、将得到的值放进数组
//定义一个对象装入value和选中状态//定义两个数组放不同状态的对象
//app.component.tsexport class AppComponent {title = 'my-ng-todolist';public value:string = '';public todoList:any [] = [];public doneList:any [] = [];handleEnter(value:string){console.log(value)let todoObj = {todo:value,check:false}this.todoList.push(todoObj)}}
1-3、enter后清空输入框的值
//app.component.tsexport class AppComponent {title = 'my-ng-todolist';...handleEnter(value:string){...this.value = ''}}
//发现this.value = ''这行代码没有生效//把value的值绑定到输入框中---[(ngModel)]='value'//app.component.html<input class="add" type="text" placeholder="添加ToDo"#add (keyup.enter)="handleEnter(add.value)" [(ngModel)]='value'/>
报错了
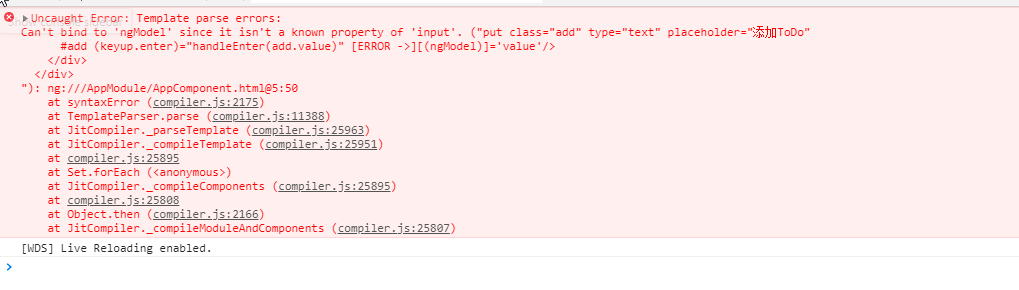
解决报错//app.module.tsimport { FormsModule } from '@angular/forms';@NgModule({...,imports: [...,FormsModule],...})
1-4、获取数组的长度+循环数组渲染页面
//app.component.html<div class="todoing"><div class="head-count"><h2>正在进行</h2><span class="todocount">{{this.todoList.length}}</span></div><ol class="todolist" *ngFor="let item of todoList"><li><input type="checkbox" /><p class="list">{{item.todo}}</p><a href="#" class="del">-</a></li></ol></div>
<div class="todone"><div class="head-count"><h2>已经完成</h2><span class="todocount">{{this.doneList.length}}</span></div><ol class="todolist" *ngFor="let item of doneList"><li><input type="checkbox" /><p class="list">{{item.todo}}</p><a href="#" class="del">-</a></li></ol></div>
//添加ToDo功能完成
2、实现点击checkbox切换的功能
2-1、给数组循环加上index
//app.component.html//todoList<ol class="todolist" *ngFor="let item of todoList;let key = index">...</ol>//doneList<ol class="todolist" *ngFor="let item of doneList;let key = index">...</ol>
2-2、给input加上事件
//todoList<input type="checkbox" (click)="changeTodo(key,true)" />//doneList//checked='checked'---使checkbox处于选中状态<input type="checkbox" (click)="changeTodo(key,false)" checked='checked'/>
2-3、事件实现
changeTodo(index,check){if(check){this.doneList.push(this.todoList[index]);this.todoList.splice(index,1);}else{this.todoList.push(this.doneList[index]);this.doneList.splice(index,1);}}
//完成实现点击checkbox切换的功能
3、实现删除功能
3-1、添加事件
//todoList<a href="#" class="del" (click)="handleDel(key,true)">-</a>//doneList<a href="#" class="del" (click)="handleDel(key,false)">-</a>
3-2、事件实现
handleDel(index,check){if(check){this.todoList.splice(index,1);}else{this.doneList.splice(index,1);}}
//完成删除功能
三、数据持久化
1、创建服务
ng g service services/storage
//services/storage.service.tsexport class StorageService {constructor() { }setItem(key,value){localStorage.setItem(key,JSON.stringify(value))}getItem(key){return JSON.parse(localStorage.getItem(key))}}
1-1、导入服务
import {StorageService} from './services/storage.service'
1-2、注入服务
constructor(private storage:StorageService){ };
2、将数据存到localStorage
handleEnter(value:string){console.log(value)let todoObj = {todo:value,check:false}var tempList = this.storage.getItem('todoList');if(tempList){tempList.push(todoObj)this.storage.setItem('todoList',tempList);}else{var tempData = []tempData.push(todoObj)this.storage.setItem('todoList',tempData);}this.todoList.push(todoObj)this.value = ''}changeTodo(index,check){if(check){this.doneList.push(this.todoList[index]);this.todoList.splice(index,1);this.storage.setItem('todoList',this.todoList)this.storage.setItem('doneList',this.doneList)}else{this.todoList.push(this.doneList[index]);this.doneList.splice(index,1);this.storage.setItem('todoList',this.todoList)this.storage.setItem('doneList',this.doneList)}}handleDel(index,check){if(check){this.todoList.splice(index,1);this.storage.setItem('todoList',this.todoList)}else{this.doneList.splice(index,1);this.storage.setItem('doneList',this.doneList)}}
3、初始事件
initTodo(){var todoArr = this.storage.getItem('todoList');if(todoArr){this.todoList = todoArr}var doneArr = this.storage.getItem('doneList');if(doneArr){this.doneList = doneArr}}
ngOnInit(){this.initTodo();}
4、清除数据
<div class="content center">...<p class="bottom">呼!终于完成了!!!<a href="#" class="clear" (click)="clearData()">clear</a></p></div>
.bottom{text-align: center;font-size: 14px;color: #666;}.clear{color: #666;text-decoration: none;}.clear:hover{color:#629A9C;}
clearData(){localStorage.clear();this.todoList = [];this.doneList = [];}

若有收获,就点个赞吧
0 人点赞
