1,定义拦截器类:实现HandlerInterceptor接口;
重写三个方法:
- preHandle;前置通知
- postHandle;
afterCompletion;
public class BookInterceptor implements HandlerInterceptor { //定义拦截器类,实现HandlerInterceptor接口@Override//原始方法调用前执行的内容//返回值类型可以拦截控制的执行,true放行,false终止public boolean preHandle(HttpServletRequest request, HttpServletResponse response, Object handler) throws Exception {System.out.println("前置通知");return true;}@Override//原始方法调用后执行的内容public void postHandle(HttpServletRequest request, HttpServletResponse response, Object handler, ModelAndView modelAndView) throws Exception {System.out.println("后置通知");}@Override//原始方法调用完成后执行的内容public void afterCompletion(HttpServletRequest request, HttpServletResponse response, Object handler, Exception ex) throws Exception {System.out.println("最终通知");}}
1.1,postHandle()和afterCompletion()方法的区别:
1.1.1,postHandle():后置处理:
//原始方法调用后执行的内容public void postHandle(HttpServletRequest request, HttpServletResponse response, Object handler, ModelAndView modelAndView) throws Exception {System.out.println("postHandle...");}
1.1.2,afterComplettion():最终处理:
//原始方法调用完成后执行的内容public void afterCompletion(HttpServletRequest request, HttpServletResponse response, Object handler, Exception ex) throws Exception {System.out.println("afterCompletion...");}
注意:无论处理器方法内部是否出现异常,该方法都会执行。
2,配置加载拦截器:
2.1,方式一:继承WebMvcConfigurationSupport类
注:@Configuration注解已经包含@Component的功能
- 在上面添加静态资源的配置类中重写addInterceptors方法
- 添加拦截器和多个拦截路径:/book和/book/**
要注入拦截器对象
@Configurationpublic class SpringMvcSupport extends WebMvcConfigurationSupport {@Overrideprotected void addInterceptors(InterceptorRegistry registry) {//注解拦截器和拦截地址registry.addInterceptor(new BookInterceptor()).addPathPatterns("/book/*");}}
2.2,方式二:实现WebMvcConfigurer接口:
使用标准接口WebMvcConfigurer简化开发(注意:侵入式较强)
在SpringMvcConfig主配置类上实现WebMvcConfigurer接口,接口中全是默认方法
- 注入拦截器对象,重写addInterceptors方法
注:与方式一两者只能选一种,不然会有冲突,如果方式一起作用会导致第二种方式的拦截器不起使用。
即:如果项目中出现了一次 extends WebMvcConfigurationSupport ,其他的 extends WebMvcConfigurationSupport 和 implements WebMvcConfigurer 会失效 。
@Configuration//同时扫描控制器和配置类所在的包@ComponentScan({"com.itheima.controller","com.itheima.config"})@EnableWebMvcpublic class SpringMvcConfig implements WebMvcConfigurer {@Overridepublic void addInterceptors(InterceptorRegistry registry) {registry.addInterceptor(new BookInterceptor()).addPathPatterns("/book/*");}}
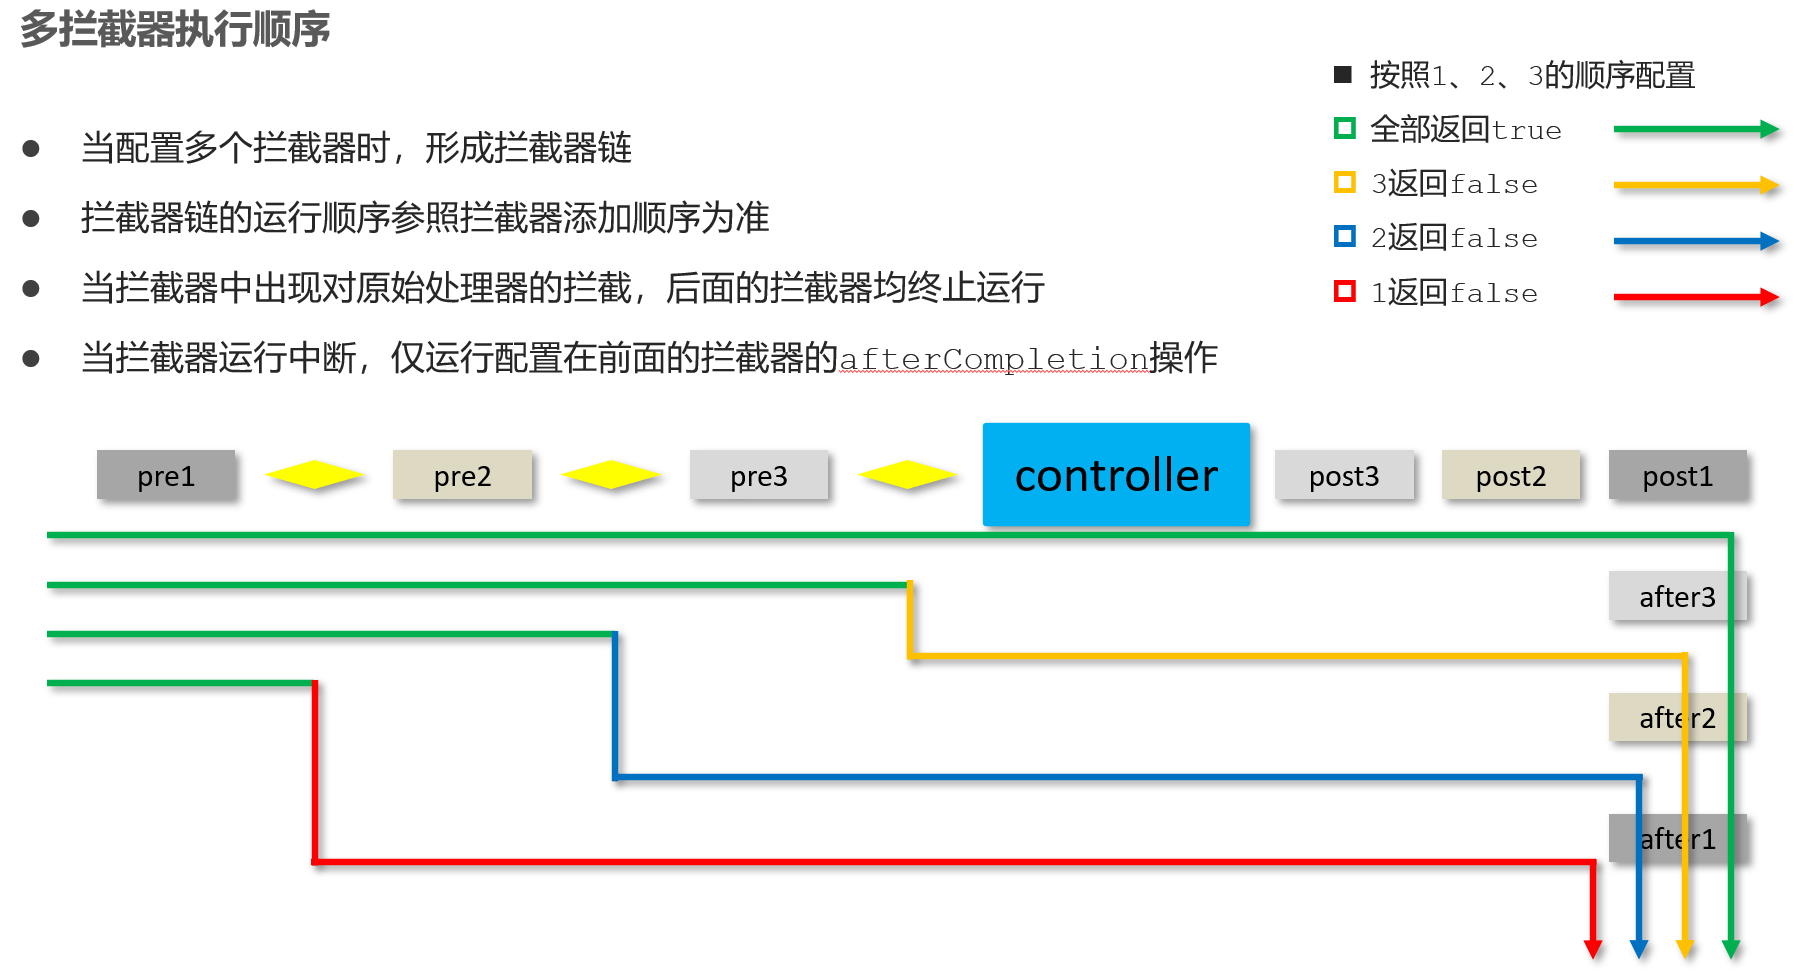
拦截器链的前置顺序:pre1-3;
当pre3返回FALSE:那直到after2才执行;(post 3-1,全跳过,而after3是属于pre3的,因此也不执行,而after2-1 pre3管不着,因此正常执行;
pre2 同理;直到after1才执行

若有收获,就点个赞吧
0 人点赞
