1,* 整合MyBatis的结构:
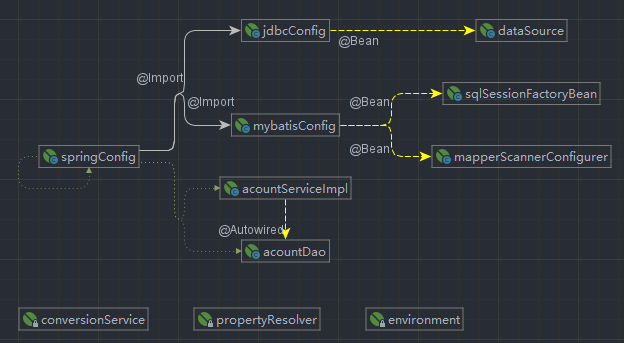
2, Spring框架整合Mybatis的使用步骤:
整个项目结构:
; 项目创建细节:略;
A,导入所需依赖:
<?xml version="1.0" encoding="UTF-8"?><project xmlns = "http://maven.apache.org/POM/4.0.0"xmlns:xsi = "http://www.w3.org/2001/XMLSchema-instance"xsi:schemaLocation = "http://maven.apache.org/POM/4.0.0 http://maven.apache.org/xsd/maven-4.0.0.xsd"><modelVersion>4.0.0</modelVersion><groupId>org.example</groupId><artifactId>mybatis-spring</artifactId><version>1.0-SNAPSHOT</version><properties><maven.compiler.source>11</maven.compiler.source><maven.compiler.target>11</maven.compiler.target></properties><dependencies><!-- 阿里巴巴连接池(用于连接数据库) --><dependency><groupId>com.alibaba</groupId><artifactId>druid</artifactId><version>1.1.12</version></dependency><!-- 数据库连接驱动 --><dependency><groupId>mysql</groupId><artifactId>mysql-connector-java</artifactId><version>5.1.46</version></dependency><!-- mybatis框架--><dependency><groupId>org.mybatis</groupId><artifactId>mybatis</artifactId><version>3.1.0</version></dependency><!-- mybatis-spring框架 --><dependency><groupId>org.mybatis</groupId><artifactId>mybatis-spring</artifactId><version>1.3.2</version></dependency><!-- lombok工具插件:自动配置实体类 --><dependency><groupId>org.projectlombok</groupId><artifactId>lombok</artifactId><version>1.18.20</version></dependency><!-- Spring框架连接 --><dependency><groupId>org.springframework</groupId><artifactId>spring-context</artifactId><version>5.2.11.RELEASE</version></dependency><!-- 测试工具包 --><dependency><groupId>junit</groupId><artifactId>junit</artifactId><version>4.13</version><scope>test</scope></dependency><!-- Spring的jdbc连接驱动--><dependency><groupId>org.springframework</groupId><artifactId>spring-jdbc</artifactId><version>5.3.6</version></dependency></dependencies></project>
B,* 创建jdbc配置文件:
jdbc.username=root
jdbc.password=root
jdbc.url=jdbc:mysql://localhost:3306/spring_db
jdbc.driverClassName=com.mysql.jdbc.Driver
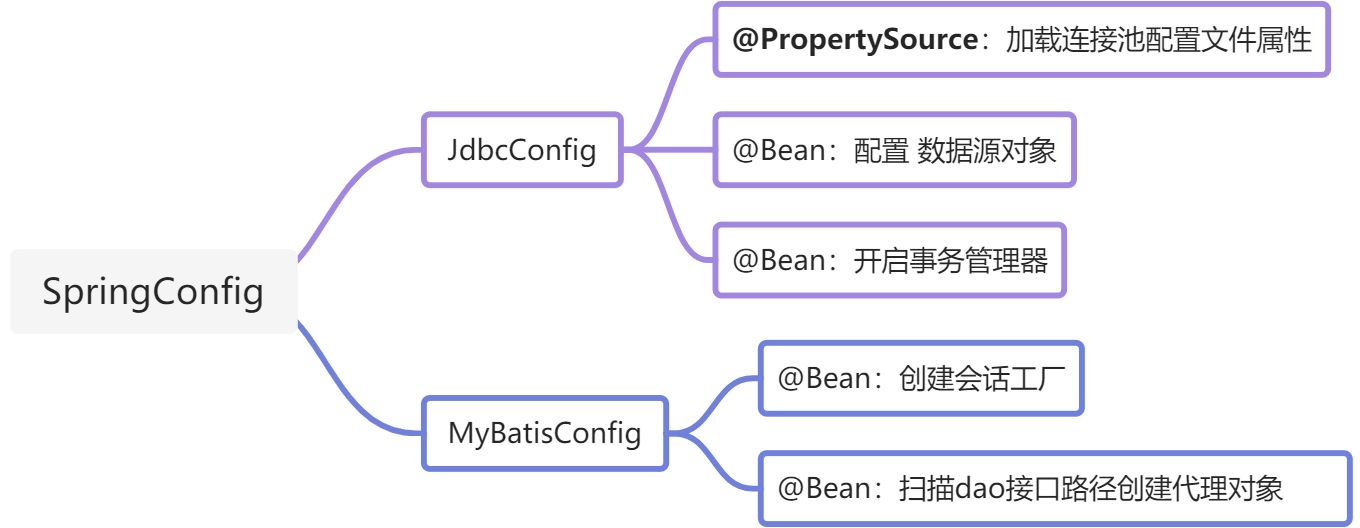
C,创建核心配置类和第三方bean配置类:
- **核心配置类:**
package top.jztice5.config;

import org.springframework.context.annotation.ComponentScan;
import org.springframework.context.annotation.Configuration;
import org.springframework.context.annotation.Import;

/**
* @author Jztice5
* @date 2022年03月25日 21:08
*/

//表明该类是一个配置类
@Configuration
//基包扫描路径,自动扫描这个包或它的子包下所有的配置文件
//这里只扫业务层,在以后如果还扫了其他的话会导致因为重复扫描而导致报错;
@ComponentScan("top.jztice5.service")
//导入配置类到该核心配置类
@Import({JdbcConfig.class,MybatisConfig.class})
public class SpringConfig {

}
这里只扫业务层,在以后如果还扫了其他的话会导致因为重复扫描而导致报错; @ComponentScan(“top.jztice5.service”)
  - **第三方bean配置类:**
     - **jdbc配置类:(用于连接数据库的)**
package top.jztice5.config;


import com.alibaba.druid.pool.DruidDataSource;
import org.springframework.beans.factory.annotation.Value;
import org.springframework.context.annotation.Bean;
import org.springframework.context.annotation.Configuration;
import org.springframework.context.annotation.PropertySource;
import javax.sql.DataSource;


/**
* @author Jztice5
* @date 2022年03月24日 17:47
*/

//这是一个配置类

//加载配置文件
//classpath:会自己到类的配置文件路径中找
@PropertySource("classpath:jdbc.properties")
public class JdbcConfig {

    //从jdbc.properties中读取键:jdbc.username,将它的值注入给username
    @Value("${jdbc.username}")
    private String username;
    @Value("${jdbc.password}")
    private String password;
    @Value("${jdbc.url}")
    private String url;
    @Value("${jdbc.driverClassName}")
    private String driverClassName;

    /**
    * @Bean    注解的作用:
    * 1. 用在方法上面
    * 2. 将方法的返回对象,放到Spring的容器中,方法的名字就是对象的id
    * 3. 也可以在Bean后面指定id的名字
    * 4. 如果方法有参数,它会自动从Spring容器中去按类型匹配的方式查找,找到后注入
    */
    @Bean
    public DataSource dataSource(){
        //创建druid数据源对象
        DruidDataSource druidDataSource = new DruidDataSource();
        //给数据源对象设置属性
        druidDataSource.setUsername(username);
        druidDataSource.setPassword(password);
        druidDataSource.setUrl(url);
        druidDataSource.setDriverClassName(driverClassName);

        //返回对象到容器
        return druidDataSource;
    }


}
- **Mybatis配置类*:**
package top.jztice5.config;

import org.apache.ibatis.logging.stdout.StdOutImpl;
import org.apache.ibatis.session.Configuration;
import org.mybatis.spring.SqlSessionFactoryBean;
import org.mybatis.spring.mapper.MapperScannerConfigurer;
import org.springframework.context.annotation.Bean;

import javax.sql.DataSource;

/**
 * @author Jztice5
 * @date 2022年03月24日 17:48
 */


public class MybatisConfig {

    /**
     * 创建会话工厂:
     */
    @Bean
    public SqlSessionFactoryBean sqlSessionFactoryBean (DataSource dataSource) {
        //创建会话工厂的bean对象
        SqlSessionFactoryBean sqlSessionFactoryBean = new SqlSessionFactoryBean();
        //设置实体类路径别名:
        sqlSessionFactoryBean.setTypeAliasesPackage("top.jztice5.pojo");
        //设置会话对象数据源
        sqlSessionFactoryBean.setDataSource(dataSource);
        //创建配置对象
        Configuration configuration = new Configuration();
        //设置驼峰命名法
        configuration.setMapUnderscoreToCamelCase(true);
        //指定日志实现类,在控制台输出(显示)sql语句:
        configuration.setLogImpl(StdOutImpl.class);
        //建立配置对象与会话对象的联系:
        sqlSessionFactoryBean.setConfiguration(configuration);

        //返回第三方bean:会话对象到容器
        return sqlSessionFactoryBean;
    }


    /**
     * 1,扫描dao所在的包自动生成接口的实现类对象,并且返回放到Spring容器中
     * 2. 扫描dao包下所有的xml配置文件和dao接口上注解,调用其中SQL语句
     */
    @Bean
    public MapperScannerConfigurer mapperScannerConfigurer(){
        //创建映射扫描的配置对象
        MapperScannerConfigurer mapperScannerConfigurer = new MapperScannerConfigurer();
        //设置dao接口所在的包
        mapperScannerConfigurer.setBasePackage("top.jztice5.dao");
        //返回对象到容器中:
        return mapperScannerConfigurer;
    }

}
如果还要设置MyBatis其他配置:直接用 配置对象 进行配置即可;
D,创建DAO层(持久层):
创建dao接口(用于实现SQL语句)
/**
 * dao层接口
 */
@Repository
public interface AcountDao {

    @Select("select * from spring_db.tbl_account")
    List <Acount>  selectAll();
}
注意:接口在Spring整合Mybatis后会自动创建与Service的依赖关系,因此,可以不用使用 标识 注解;但是为了稳定最好写上;
E,创建业务层(Service):
/**
 * 业务层实现类
 */
@Service
public class AcountServiceImpl implements AcountService {
    //获取dao层接口对象
    @Autowired
    private AcountDao acountDao;

    public AcountServiceImpl (AcountDao acountDao) {
        this.acountDao = acountDao;
    }

    public List<Acount> selectAll(){
        return acountDao.selectAll();
    }

}
/**
 * 业务层接口
 */
public interface AcountService {

    List <Acount> selectAll();

}
F,测试类创建IoC对象:
public class AcountTest01 {

    @Test
    public void setTextAcountTest01 () {
        //加载配置类对象获取容器连接
        AnnotationConfigApplicationContext context = new AnnotationConfigApplicationContext(SpringConfig.class);
        //获取对应的bean对象       自动装配
        AcountService acountService = context.getBean(AcountService.class);
        //bean对象调用查询所有的方法;
        List <Acount> acounts = acountService.selectAll();

        System.out.println("acounts = " + acounts);
    }

}
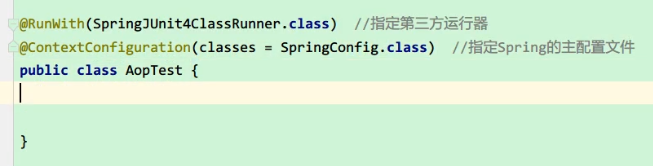
3,整合Junit:
//Junit提供的方法
@RunWith (SpringJUnit4ClassRunner.class)
//加载核心配置类
@ContextConfiguration (classes = SpringConfig.class)
public class AopTest01 {

    @Autowired
    private BookService bookService;

    @Test
    public void setTextService(){
        bookService.UpdateBook();
    }

}

若有收获,就点个赞吧
0 人点赞
