1、Nacos源码构建
1.1 环境准备
在nacos的官⽹介绍中,nacos源码运⾏,需要的java运⾏环境有:
JDK 1.8+
Maven 3.2+
从github上,下载nacos的源码到本地: https://github.com/alibaba/nacos
导⼊idea⼯程
1. 导⼊
2. 配置maven环境,下载jar包如果是阿⾥云⼤约在5分钟左右
3. 编译⼯程
1.2 源码运⾏
- ⼯程启动
进⼊到nacos-console模块下,启动该模块下的com.alibaba.nacos.Nacos类。
但通常情况下,会报如下错误:
这是由于nacos默认使⽤的是集群⽅式,启动时会到默认的配置路径下,寻找集群配置⽂件
cluster.conf。
我们源码运⾏时,通常使⽤的是单机模式,因此需要在启动参数中进⾏设置,在jvm的启动参数
中,添加
-Dnacos.standalone=true

- 配置数据库
修改console模块中的配置⽂件application.properties⽂件
创建nacos数据库,并执⾏distribution模块中的SQL脚本#关闭认证缓存nacos.core.auth.caching.enabled=false#*************** Config Module Related Configurations ***************#### If user MySQL as datasource:spring.datasource.platform=mysql### Count of DB:db.num=1### Connect URL of DB:db.url.0=jdbc:mysql://127.0.0.1:3306/nacos?characterEncoding=utf8db.user=rootdb.password=root

nacos项⽬结构
先来看下整个nacos项⽬结构
- address模块: 主要查询nacos集群中节点个数以及IP的列表.api模块: 主要给客户端调⽤的api接⼝的抽象.
- common模块: 主要是通⽤的⼯具包和字符串常量的定义
- client模块: 主要是对依赖api模块和common模块,对api的接⼝的实现,给nacos的客户端使⽤.
- cmdb模块: 主要是操作的数据的存储在内存中,该模块提供⼀个查询数据标签的接⼝.
- config模块: 主要是服务配置的管理,即配置中⼼, 提供api给客户端拉去配置信息,以及提供更新配置的,客户端通过⻓轮询的更新配置信息.数据存储是mysql.
- naming模块: 主要是作为服务注册中⼼的实现模块,具备服务的注册和服务发现的功能.
- console模块: 主要是实现控制台的功能.具有权限校验、服务状态、健康检查等功能.
- core模块: 主要是实现Spring的PropertySource的后置处理器,⽤于属性加载,初始化,监听器相关操作
- distribution模块: 主要是打包nacos-server的操作,使⽤maven-assembly-plugin进⾏⾃定义打包,
下⾯就是各个模块的依赖关系:
2. nacos服务注册发现源码
2.1 @EnableDiscoveryClient 注解
1. @EnableDiscoveryClient注解

EnableDiscoveryClien引⽤了EnableDiscoveryClientImportSelector类
- EnableDiscoveryClientImportSelector类


3. 开启⾃动服务注册后会加载spring-cloud-alibaba-nacos-discovery-2.1.0.RELEASE-sources.jar!\META-INF\spring.factories⽂件中的
DiscoveryAutoConfiguration配置类,开启nacos服务⾃动注册
2.2 nacos服务注册
2.2.1 服务注册流程分析

2.2.2 主要源码跟踪
客户端操作
1. NacosDiscoveryAutoConfiguration类

- NacosAutoServiceRegistration继承AbstractAutoServiceRegistration,AbstractAutoServiceRegistration实现了ApplicationListener监听,所以会执⾏onApplicationEvent⽅法


com.alibaba.cloud.nacos.registry.NacosAutoServiceRegistration#register =>org.springframework.cloud.client.serviceregistry.AbstractAutoServiceRegistration#register
=>com.alibaba.cloud.nacos.registry.NacosServiceRegistry#register
- NacosNamingService的registerInstance⽅法

先看addBeatInfo⽅法


registerService⽅法
服务端接收请求
4. InstanceController类


心跳检测方法:


ClientBeatCheckTask类客户端⼼跳检查线程
@Overridepublic void run() {try {if (!getDistroMapper().responsible(service.getName())) {return;}if (!getSwitchDomain().isHealthCheckEnabled()) {return;}//1. 获取实例List<Instance> instances = service.allIPs(true);// first set health status of instances://2.检查客户端实例最后使⽤时间是否超时for (Instance instance : instances) {if (System.currentTimeMillis() - instance.getLastBeat() > instance.getInstanceHeartBeatTimeOut()) {if (!instance.isMarked()) {if (instance.isHealthy()) {//3.如果超时15秒设置健康状态为falseinstance.setHealthy(false);Loggers.EVT_LOG.info("{POS} {IP-DISABLED} valid: {}:{}@{}@{}, region: {}, msg: client timeout after {}, last beat: {}",instance.getIp(), instance.getPort(), instance.getClusterName(), service.getName(),UtilsAndCommons.LOCALHOST_SITE, instance.getInstanceHeartBeatTimeOut(), instance.getLastBeat());getPushService().serviceChanged(service);SpringContext.getAppContext().publishEvent(new InstanceHeartbeatTimeoutEvent(this, instance));}}}}if (!getGlobalConfig().isExpireInstance()) {return;}// then remove obsolete instances:for (Instance instance : instances) {if (instance.isMarked()) {continue;}// 4. 检查是否超过30秒if (System.currentTimeMillis() - instance.getLastBeat() > instance.getIpDeleteTimeout()) {// delete instanceLoggers.SRV_LOG.info("[AUTO-DELETE-IP] service: {}, ip: {}", service.getName(), JSON.toJSONString(instance));// 5. 如果超过30秒则删除实例deleteIP(instance);}}} catch (Exception e) {Loggers.SRV_LOG.warn("Exception while processing client beat time out.", e);}}
ClientBeatProcessor客户端⼼跳处理类
@Overridepublic void run() {Service service = this.service;if (Loggers.EVT_LOG.isDebugEnabled()) {Loggers.EVT_LOG.debug("[CLIENT-BEAT] processing beat: {}", rsInfo.toString());}String ip = rsInfo.getIp();String clusterName = rsInfo.getCluster();int port = rsInfo.getPort();Cluster cluster = service.getClusterMap().get(clusterName);//1.获取所有实例List<Instance> instances = cluster.allIPs(true);for (Instance instance : instances) {if (instance.getIp().equals(ip) && instance.getPort() == port) {if (Loggers.EVT_LOG.isDebugEnabled()) {Loggers.EVT_LOG.debug("[CLIENT-BEAT] refresh beat: {}", rsInfo.toString());}//2. 设置实例的最后使⽤时间instance.setLastBeat(System.currentTimeMillis());if (!instance.isMarked()) {if (!instance.isHealthy()) {instance.setHealthy(true);Loggers.EVT_LOG.info("service: {} {POS} {IP-ENABLED} valid: {}:{}@{}, region: {}, msg: client beat ok",cluster.getService().getName(), ip, port, cluster.getName(), UtilsAndCommons.LOCALHOST_SITE);getPushService().serviceChanged(service);}}}}}
2.3 nacos服务发现
2.3.1服务发现流程分析
2.3.2主要源码跟踪
客户端代码
基于Ribbon的服务发现DynamicServerListLoadBalancer


先看上图中第一步的调用方法
=>com.netflix.loadbalancer.DynamicServerListLoadBalancer#enableAndInitLearnNewServersFeature
跟踪进入start方法,线程内执行updateAction对象的doUpdate方法
从start方法可以看到updateAction对象: 它是一个接口的匿名实现类
这里就是执行restOrInit方法中第二步的更新服务列表的方法,只不过不是立即执行而是延迟一秒。
第二步直接调用updateListOfServers()是立即更新服务列表
=> com.netflix.loadbalancer.DynamicServerListLoadBalancer#updateListOfServers
serverListImpl.getUpdatedListOfServers()⽅法
跟踪进入=>com.alibaba.cloud.nacos.ribbon.NacosServerList#getServers
调用NacosNamingService 获取服务列表=> 调⽤hostReactor的getServiceInfo⽅法
继续跟踪进入getServiceInfo

=>com.alibaba.nacos.client.naming.core.HostReactor#updateServiceNow
继续跟踪发现它也是通过Http请求get方式来获取服务列表
继续跟踪可以发现http请求返回的是一个json
下一步是将json进行解析获取到服务信息,然后将其存入到本地的ConcurrentHashMap中
Nacos服务端代码
构造服务信息Json过程:


至此服务发现流程结束
3. nacos配置中⼼源码
3.1加载配置中⼼源码分析

Nacos配置数据,在单机模式下如果设置了存储数据源为MySQL,则所以配置信息都会存储两份 一个是本地配置文件,一份是存储到MySQL数据库,响应的时候从本地配置文件中直接加载返回
3.2加载配置中⼼主要源码跟踪
springboot项⽬⾃动启动会加载spring-cloud-alibaba-nacos-config下⾯的spring.factories

NacosConfigBootstrapConfiguration类中会声明2个Bean ```java /*
- Copyright (C) 2018 the original author or authors. *
- Licensed under the Apache License, Version 2.0 (the “License”);
- you may not use this file except in compliance with the License.
- You may obtain a copy of the License at *
- http://www.apache.org/licenses/LICENSE-2.0 *
- Unless required by applicable law or agreed to in writing, software
- distributed under the License is distributed on an “AS IS” BASIS,
- WITHOUT WARRANTIES OR CONDITIONS OF ANY KIND, either express or implied.
- See the License for the specific language governing permissions and
- limitations under the License. */
package com.alibaba.cloud.nacos;
import org.springframework.boot.autoconfigure.condition.ConditionalOnMissingBean; import org.springframework.boot.autoconfigure.condition.ConditionalOnProperty; import org.springframework.context.annotation.Bean; import org.springframework.context.annotation.Configuration;
import com.alibaba.cloud.nacos.client.NacosPropertySourceLocator;
/**
@author xiaojing */ @Configuration @ConditionalOnProperty(name = “spring.cloud.nacos.config.enabled”, matchIfMissing = true) public class NacosConfigBootstrapConfiguration {
/**
nacos配置属性对象声明 / @Bean @ConditionalOnMissingBean public NacosConfigProperties nacosConfigProperties() { return new NacosConfigProperties(); }
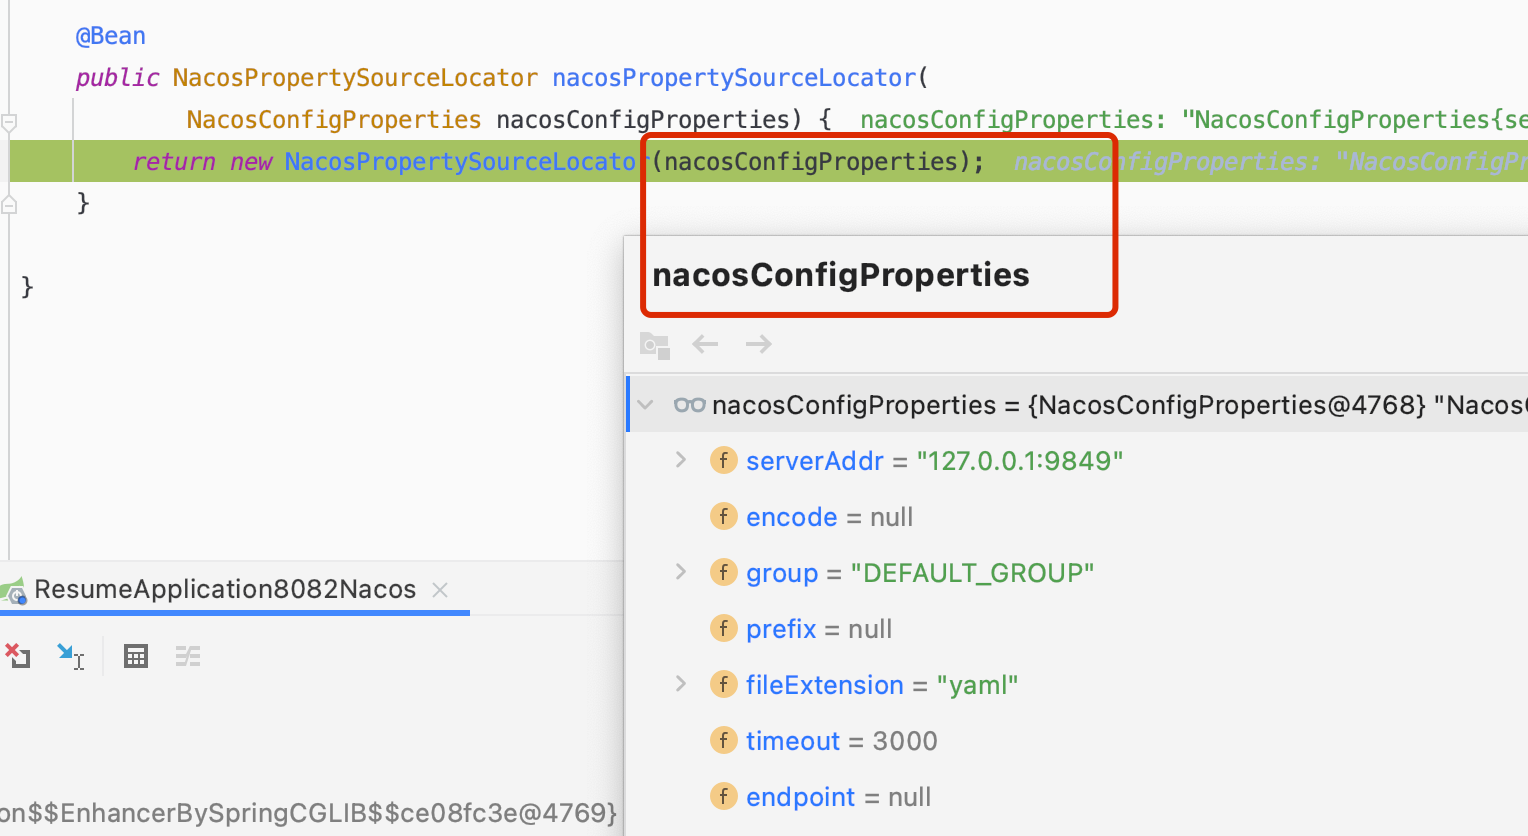
//nacos属性源定位器声明 @Bean public NacosPropertySourceLocator nacosPropertySourceLocator(
NacosConfigProperties nacosConfigProperties) {
return new NacosPropertySourceLocator(nacosConfigProperties); }
}
<br />3.在NacosPropertySourceLocator类中有个locate⽅法在spring boot启动时会最终调⽤这个⽅法.```java@Overridepublic PropertySource<?> locate(Environment env) {ConfigService configService = nacosConfigProperties.configServiceInstance();if (null == configService) {log.warn("no instance of config service found, can't load config from nacos");return null;}long timeout = nacosConfigProperties.getTimeout();nacosPropertySourceBuilder = new NacosPropertySourceBuilder(configService,timeout);String name = nacosConfigProperties.getName();String dataIdPrefix = nacosConfigProperties.getPrefix();if (StringUtils.isEmpty(dataIdPrefix)) {dataIdPrefix = name;}if (StringUtils.isEmpty(dataIdPrefix)) {//获取应用名dataIdPrefix = env.getProperty("spring.application.name");}CompositePropertySource composite = new CompositePropertySource(NACOS_PROPERTY_SOURCE_NAME);//加载共享配置信息loadSharedConfiguration(composite);//加载扩展配置信息loadExtConfiguration(composite);//加载应用配置信息loadApplicationConfiguration(composite, dataIdPrefix, nacosConfigProperties, env);return composite;}
4.主要看加载应⽤配置loadApplicationConfiguration这个⽅法
5. loadNacosDataIfPresent⽅法
6. nacosPropertySourceBuilder.build⽅法
7. configService.getConfig经过层层调⽤会调⽤getConfigInner(…)⽅法
//调⽤ClientWorker的getServerConfig⽅法获取内容
8. worker.getServerConfig⽅法
//默认访问路径:http://ip:port/nacos/v1/ns/configs
9.发送http的get请求后会到达nacos的ConfigController的getConfig⽅法完成查询配置操作
3.3客户端动态感知源码分析
上⾯分析了初始化的时候客户端如何加载配置,那么当服务端的配置信息变更的时候,客户端⼜是如何动态感知的呢?
注意:
1、客户端长轮询任务在给Nacos发生请求的时候是一个长连接,超时时间是30秒,Nacos服务端设置的延时任务延时29.5秒,防止连接超时
2、延时任务监听配置是否有更改,有修改是通知上图的监听器,响应客户端最新数据
3.4客户端动态感知主要源码跟踪
1.在NacosPropertySourceLocator类中有个locate⽅法中会创建NacosConfigService对象
2. NacosConfigService构造⽅法

3. ClientWorker实例的初始化

4. checkConfigInfo(),该⽅法开始会检查配置
cacheMap就是从配置中心读取的配置的本地缓存
5. LongPollingRunnable的run⽅法
@Overridepublic void run() {List<CacheData> cacheDatas = new ArrayList<CacheData>();List<String> inInitializingCacheList = new ArrayList<String>();try {// check failover configfor (CacheData cacheData : cacheMap.get().values()) {if (cacheData.getTaskId() == taskId) {cacheDatas.add(cacheData);try {//检查本地配置checkLocalConfig(cacheData);if (cacheData.isUseLocalConfigInfo()) {cacheData.checkListenerMd5();}} catch (Exception e) {LOGGER.error("get local config info error", e);}}}//检查服务器配置 向Nacos服务器查询 获取更新的Key// 从服务端获取发⽣了变化的配置的key(chengedGroupKeys表示服务端告诉客户端,哪些配置发⽣了变化)List<String> changedGroupKeys = checkUpdateDataIds(cacheDatas, inInitializingCacheList);// 遍历发⽣了变化的key,并根据key去服务端请求最新配置,并更新到内存缓存中for (String groupKey : changedGroupKeys) {String[] key = GroupKey.parseKey(groupKey);String dataId = key[0];String group = key[1];String tenant = null;if (key.length == 3) {tenant = key[2];}try {// 从远程服务端获取最新的配置,并缓存到内存中String content = getServerConfig(dataId, group, tenant, 3000L);CacheData cache = cacheMap.get().get(GroupKey.getKeyTenant(dataId, group, tenant));cache.setContent(content);LOGGER.info("[{}] [data-received] dataId={}, group={}, tenant={}, md5={}, content={}",agent.getName(), dataId, group, tenant, cache.getMd5(),ContentUtils.truncateContent(content));} catch (NacosException ioe) {//.....省略}}for (CacheData cacheData : cacheDatas) {if (!cacheData.isInitializing() || inInitializingCacheList.contains(GroupKey.getKeyTenant(cacheData.dataId, cacheData.group, cacheData.tenant))) {cacheData.checkListenerMd5();cacheData.setInitializing(false);}}inInitializingCacheList.clear();// 继续执⾏该任务executorService.execute(this);} catch (Throwable e) {//****省略}}}
checkUpdateDataIds⽅法会调⽤checkUpdateConfigStr⽅法 ```java /**
从Server获取值变化了的DataID列表。返回的对象里只有dataId和group是有效的。 保证不返回NULL。 */ List
checkUpdateConfigStr(String probeUpdateString, boolean isInitializingCacheList) throws IOException { List
params = Arrays.asList(Constants.PROBE_MODIFY_REQUEST, probeUpdateString); List
headers = new ArrayList (2); //设置超时时间30秒 headers.add(“Long-Pulling-Timeout”); headers.add(“” + timeout); // told server do not hang me up if new initializing cacheData added in //添加⻓轮询请求头 if (isInitializingCacheList) {
headers.add("Long-Pulling-Timeout-No-Hangup");headers.add("true");
}
if (StringUtils.isBlank(probeUpdateString)) {
return Collections.emptyList();
}
try {
// 请求路径:http://ip:port/nacos/v1/ns/configs/listenerHttpResult result = agent.httpPost(Constants.CONFIG_CONTROLLER_PATH + "/listener", headers, params,agent.getEncode(), timeout);if (HttpURLConnection.HTTP_OK == result.code) {setHealthServer(true);return parseUpdateDataIdResponse(result.content);} else {
};
return Collections.emptyList(); }
7.发送http的get请求后会到达nacos的ConfigController的getConfig⽅法完成查询配置操作<br />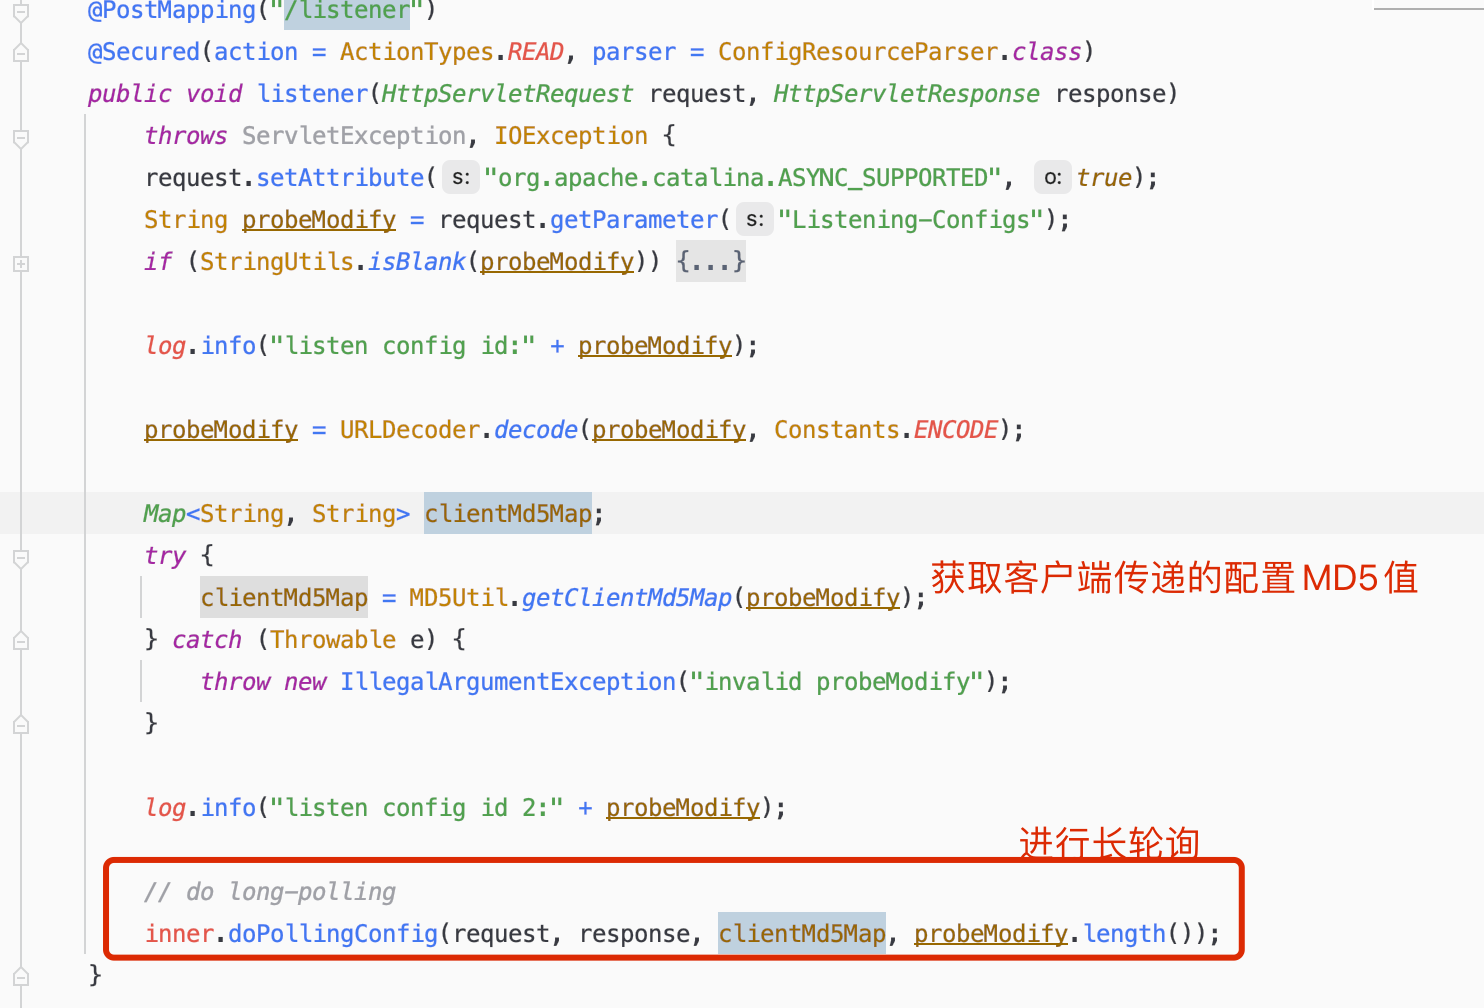<br />8. doPollingConfig⽅法```java/*** 轮询接口*/public String doPollingConfig(HttpServletRequest request, HttpServletResponse response,Map<String, String> clientMd5Map, int probeRequestSize)throws IOException {// 长轮询 根据请求头判断是否是长轮询if (LongPollingService.isSupportLongPolling(request)) {longPollingService.addLongPollingClient(request, response, clientMd5Map, probeRequestSize);return HttpServletResponse.SC_OK + "";}// else 兼容短轮询逻辑List<String> changedGroups = MD5Util.compareMd5(request, response, clientMd5Map);// 兼容短轮询resultString oldResult = MD5Util.compareMd5OldResult(changedGroups);String newResult = MD5Util.compareMd5ResultString(changedGroups);String version = request.getHeader(Constants.CLIENT_VERSION_HEADER);if (version == null) {version = "2.0.0";}int versionNum = Protocol.getVersionNumber(version);/*** 2.0.4版本以前, 返回值放入header中*/if (versionNum < START_LONGPOLLING_VERSION_NUM) {response.addHeader(Constants.PROBE_MODIFY_RESPONSE, oldResult);response.addHeader(Constants.PROBE_MODIFY_RESPONSE_NEW, newResult);} else {request.setAttribute("content", newResult);}Loggers.AUTH.info("new content:" + newResult);// 禁用缓存response.setHeader("Pragma", "no-cache");response.setDateHeader("Expires", 0);response.setHeader("Cache-Control", "no-cache,no-store");response.setStatus(HttpServletResponse.SC_OK);return HttpServletResponse.SC_OK + "";}
addLongPollingClient⽅法
public void addLongPollingClient(HttpServletRequest req, HttpServletResponse rsp, Map<String, String> clientMd5Map,int probeRequestSize) {String str = req.getHeader(LongPollingService.LONG_POLLING_HEADER);String noHangUpFlag = req.getHeader(LongPollingService.LONG_POLLING_NO_HANG_UP_HEADER);String appName = req.getHeader(RequestUtil.CLIENT_APPNAME_HEADER);String tag = req.getHeader("Vipserver-Tag");int delayTime = SwitchService.getSwitchInteger(SwitchService.FIXED_DELAY_TIME, 500);/*** 提前500ms返回响应,为避免客户端超时 @qiaoyi.dingqy 2013.10.22改动 add delay time for LoadBalance*/long timeout = Math.max(10000, Long.parseLong(str) - delayTime);if (isFixedPolling()) {timeout = Math.max(10000, getFixedPollingInterval());// do nothing but set fix polling timeout} else {long start = System.currentTimeMillis();//比较客户端MD5和Nacos服务端存的MD5是否有不一样List<String> changedGroups = MD5Util.compareMd5(req, rsp, clientMd5Map);if (changedGroups.size() > 0) {//有变更 直接返回generateResponse(req, rsp, changedGroups);LogUtil.clientLog.info("{}|{}|{}|{}|{}|{}|{}",System.currentTimeMillis() - start, "instant", RequestUtil.getRemoteIp(req), "polling",clientMd5Map.size(), probeRequestSize, changedGroups.size());return;} else if (noHangUpFlag != null && noHangUpFlag.equalsIgnoreCase(TRUE_STR)) {LogUtil.clientLog.info("{}|{}|{}|{}|{}|{}|{}", System.currentTimeMillis() - start, "nohangup",RequestUtil.getRemoteIp(req), "polling", clientMd5Map.size(), probeRequestSize,changedGroups.size());return;}}String ip = RequestUtil.getRemoteIp(req);// 一定要由HTTP线程调用,否则离开后容器会立即发送响应final AsyncContext asyncContext = req.startAsync();// AsyncContext.setTimeout()的超时时间不准,所以只能自己控制asyncContext.setTimeout(0L);// 开启⼀个⻓轮询线程 由线程池去处理Request请求scheduler.execute(new ClientLongPolling(asyncContext, clientMd5Map, ip, probeRequestSize, timeout, appName, tag));}
ClientLongPolling的run⽅法
@Overridepublic void run() {// 调度⼀个延时执⾏的任务,在这段延时的时间内,会监听配置的修改asyncTimeoutFuture = scheduler.schedule(new Runnable() {@Overridepublic void run() {try {getRetainIps().put(ClientLongPolling.this.ip, System.currentTimeMillis());/*** 删除订阅关系*/allSubs.remove(ClientLongPolling.this);if (isFixedPolling()) {LogUtil.clientLog.info("{}|{}|{}|{}|{}|{}",(System.currentTimeMillis() - createTime),"fix", RequestUtil.getRemoteIp((HttpServletRequest)asyncContext.getRequest()),"polling",clientMd5Map.size(), probeRequestSize);List<String> changedGroups = MD5Util.compareMd5((HttpServletRequest)asyncContext.getRequest(),(HttpServletResponse)asyncContext.getResponse(), clientMd5Map);if (changedGroups.size() > 0) {sendResponse(changedGroups);} else {sendResponse(null);}} else {LogUtil.clientLog.info("{}|{}|{}|{}|{}|{}",(System.currentTimeMillis() - createTime),"timeout", RequestUtil.getRemoteIp((HttpServletRequest)asyncContext.getRequest()),"polling",clientMd5Map.size(), probeRequestSize);sendResponse(null);}} catch (Throwable t) {LogUtil.defaultLog.error("long polling error:" + t.getMessage(), t.getCause());}}}, timeoutTime, TimeUnit.MILLISECONDS); //超时时间29.5秒allSubs.add(this);}
onEvent⽅法

12. DataChangeTask@Overridepublic void run() {try {ConfigService.getContentBetaMd5(groupKey);for (Iterator<ClientLongPolling> iter = allSubs.iterator(); iter.hasNext(); ) {ClientLongPolling clientSub = iter.next();if (clientSub.clientMd5Map.containsKey(groupKey)) {// 如果beta发布且不在beta列表直接跳过if (isBeta && !betaIps.contains(clientSub.ip)) {continue;}// 如果tag发布且不在tag列表直接跳过if (StringUtils.isNotBlank(tag) && !tag.equals(clientSub.tag)) {continue;}getRetainIps().put(clientSub.ip, System.currentTimeMillis());iter.remove(); // 删除订阅关系LogUtil.clientLog.info("{}|{}|{}|{}|{}|{}|{}",(System.currentTimeMillis() - changeTime),"in-advance",RequestUtil.getRemoteIp((HttpServletRequest)clientSub.asyncContext.getRequest()),"polling",clientSub.clientMd5Map.size(), clientSub.probeRequestSize, groupKey);//响应客户端请求clientSub.sendResponse(Arrays.asList(groupKey));}}} catch (Throwable t) {LogUtil.defaultLog.error("data change error:" + t.getMessage(), t.getCause());}}

若有收获,就点个赞吧
0 人点赞
