1、源码编译
源码编译环境java环境+Maven环境+Jdk8
clone地址https://github.com/netty/netty
选择tag中4.1.X版本任意一个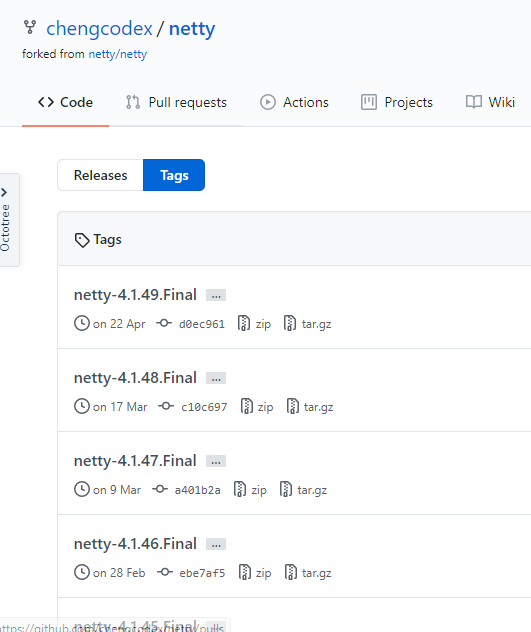
修改编译版本1.7为1.8
/修改前(将下面的1.6修改为1.8):<maven.compiler.source>1.7</maven.compiler.source><maven.compiler.target>1.7</maven.compiler.target>//修改后:<maven.compiler.source>1.8</maven.compiler.source><maven.compiler.target>1.8</maven.compiler.target>
编译过程中maven-checkstyle-plugin会报格式检查错误
编译命令中可以加入跳过检查
mvn clean install -DskipTests=true -Dcheckstyle.skip=true
或者直接在pom.xml加入
<skip>true</skip>

执行命令: mvn clean install -DskipTests=true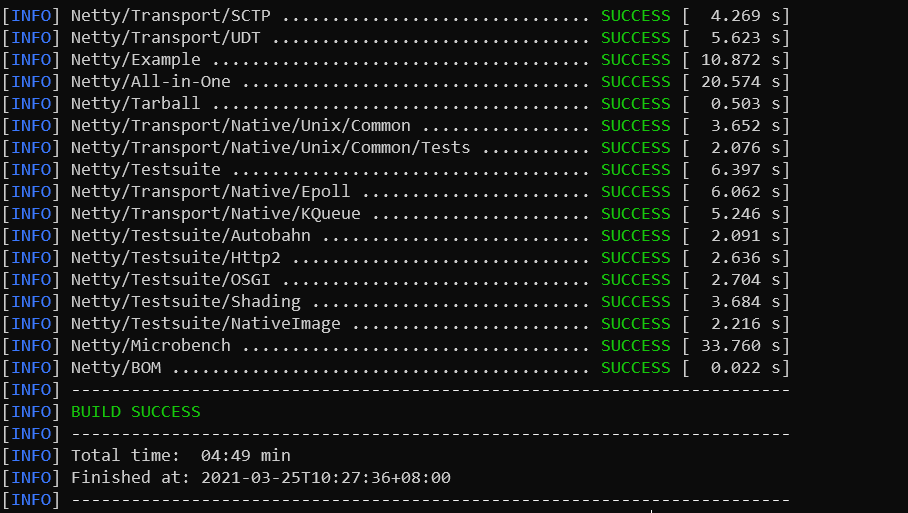
2、EventLoopGroup事件循环组(线程组)分析
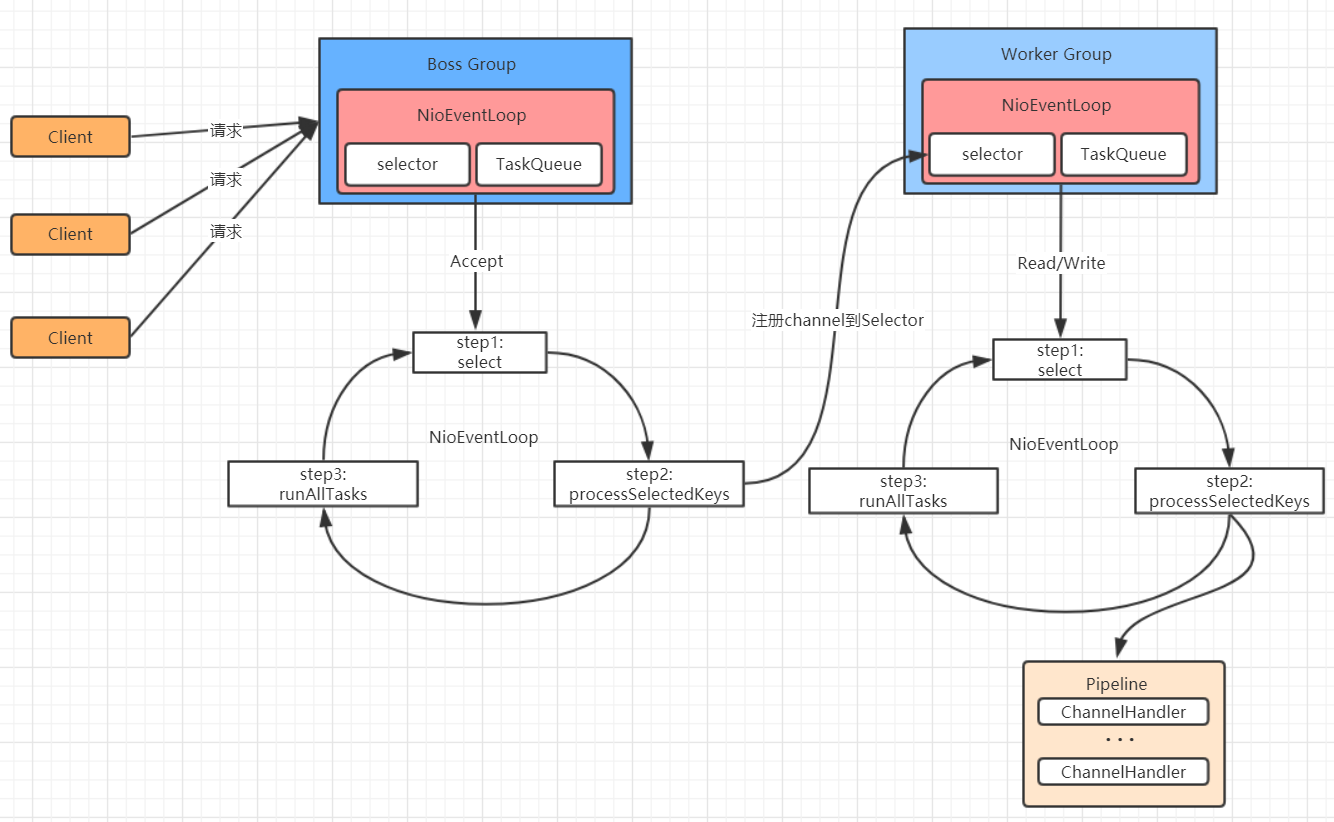
EventLoopGroup 是一组 EventLoop 的抽象,Netty 为了更好的利用多核 CPU 资源,一般会有多个 EventLoop 同时工作,每个 EventLoop 维护着一个 Selector 实例。
线程组创建流程源码分析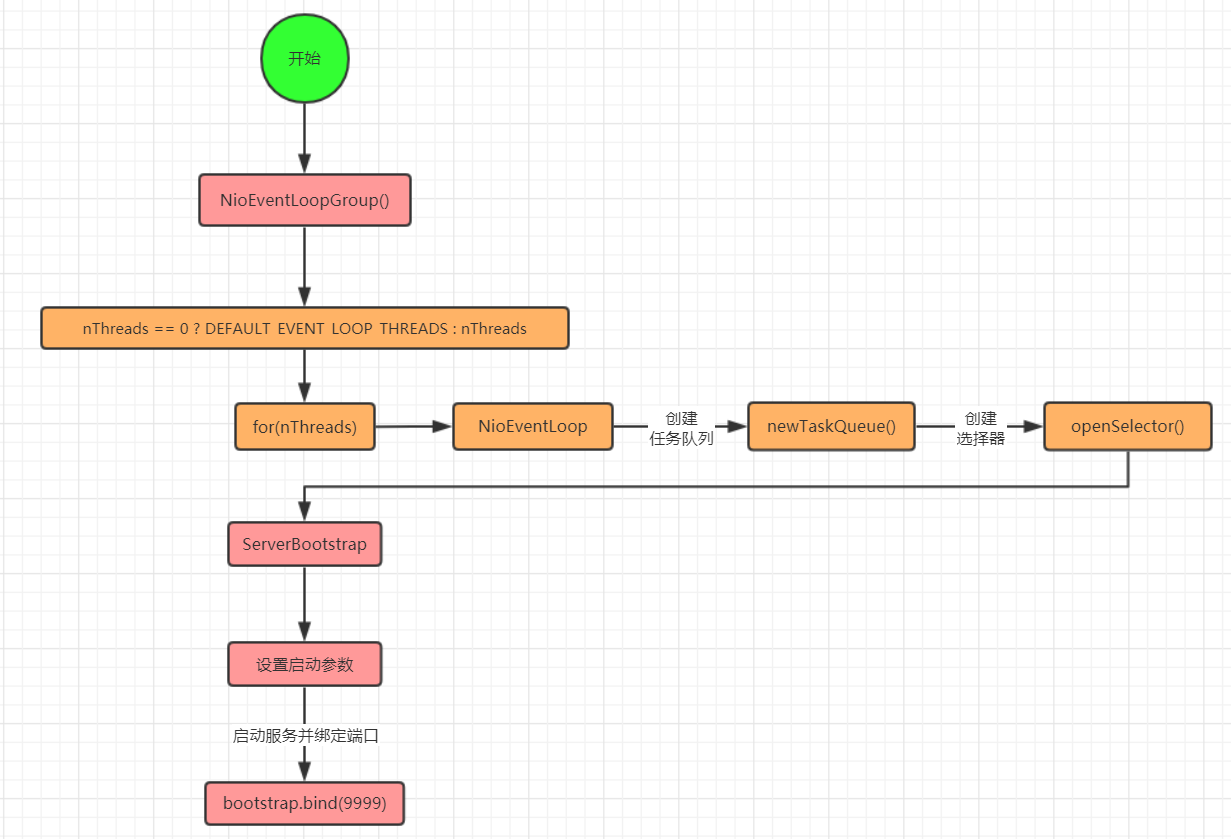
(1) NioEventLoopGroup线程组的创建
_EventLoopGroup _bossGroup = _new _NioEventLoopGroup(1); 创建NioEventLoopGroup实例时会调用到父类MultithreadEventLoopGroup中静态代码块,此处获取netty设置的默认线程数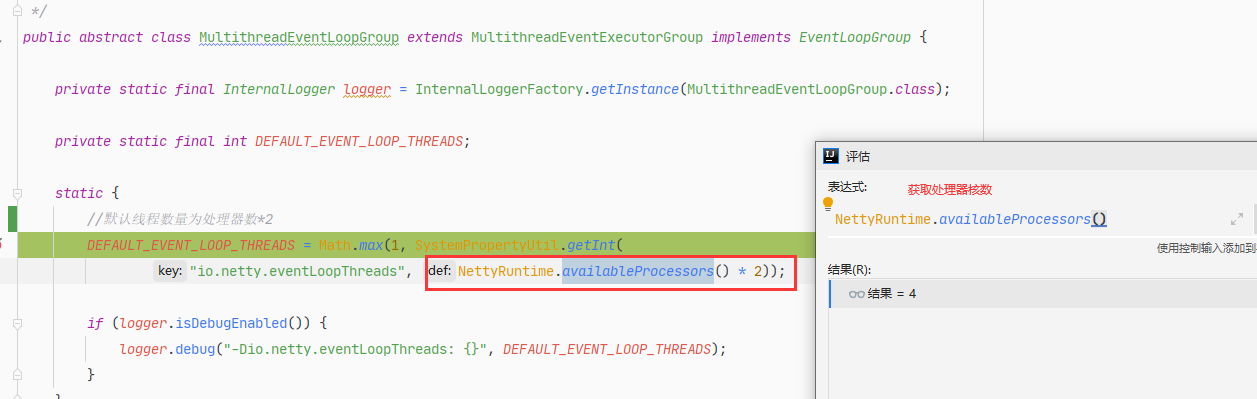
在构造函数中判断传递的自定义线程数和默认线程数的值
=>调用父类构造方法:io.netty.util.concurrent.MultithreadEventExecutorGroup#MultithreadEventExecutorGroup(int, java.util.concurrent.Executor, io.netty.util.concurrent.EventExecutorChooserFactory, java.lang.Object…)
=>进入newChild方法:
此处直接创建NioEventLoop实例,跟踪进入构造方法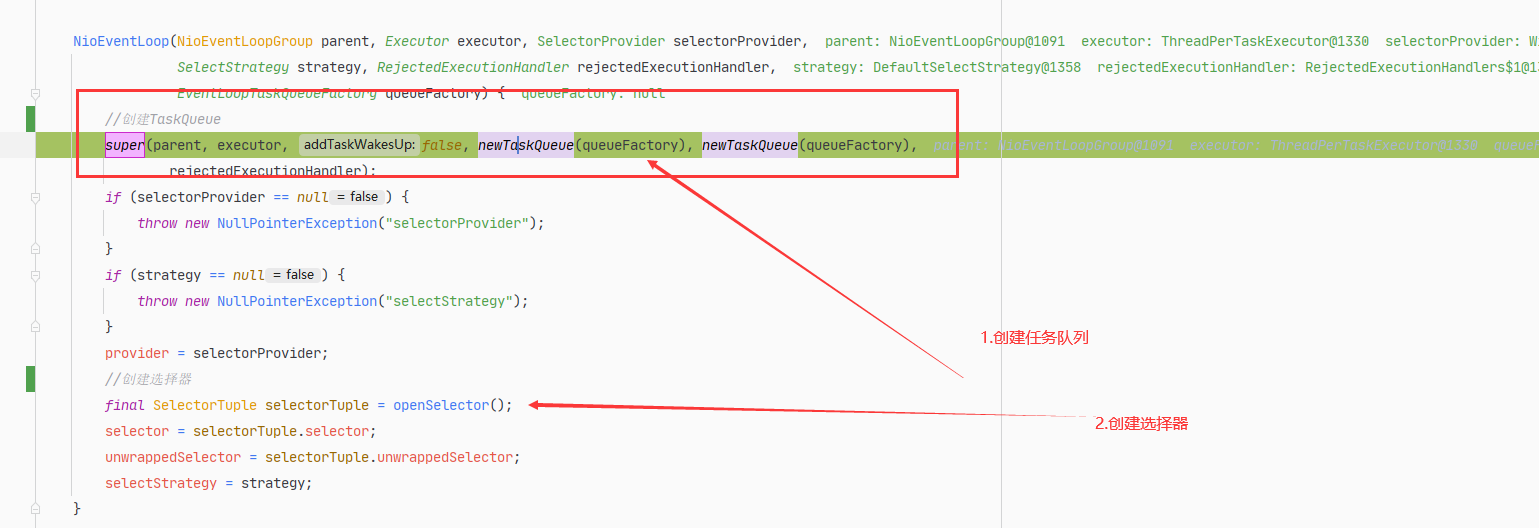
在NioEventLoop构造方法中主要进行了任务队列和选择器的创建。
首先看任务队列创建: 以int的最大值为限直接创建了queue.
然后根据进入openSelector(),此处provider是WindowsSelectorProvider,所以openSelector最终直接返回一个WindowsSelectorImpl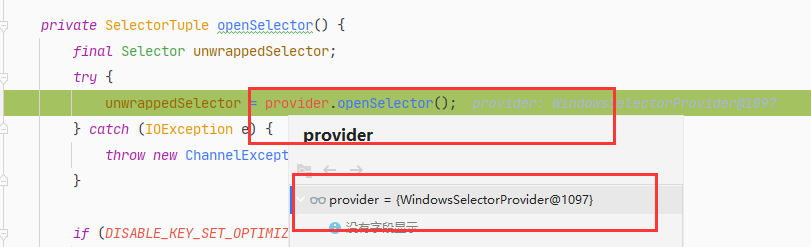

然后将WindowsSelectorImpl包装成Selector进行返回。 至此创建单个EventLoop实例完成
后续根据线程数依次创建多个EventLoop。
创建完成后 可以看出WorkerGroup有8个NioEventLoop, 每个NioEventLoop中分别有Selector和TaskQueue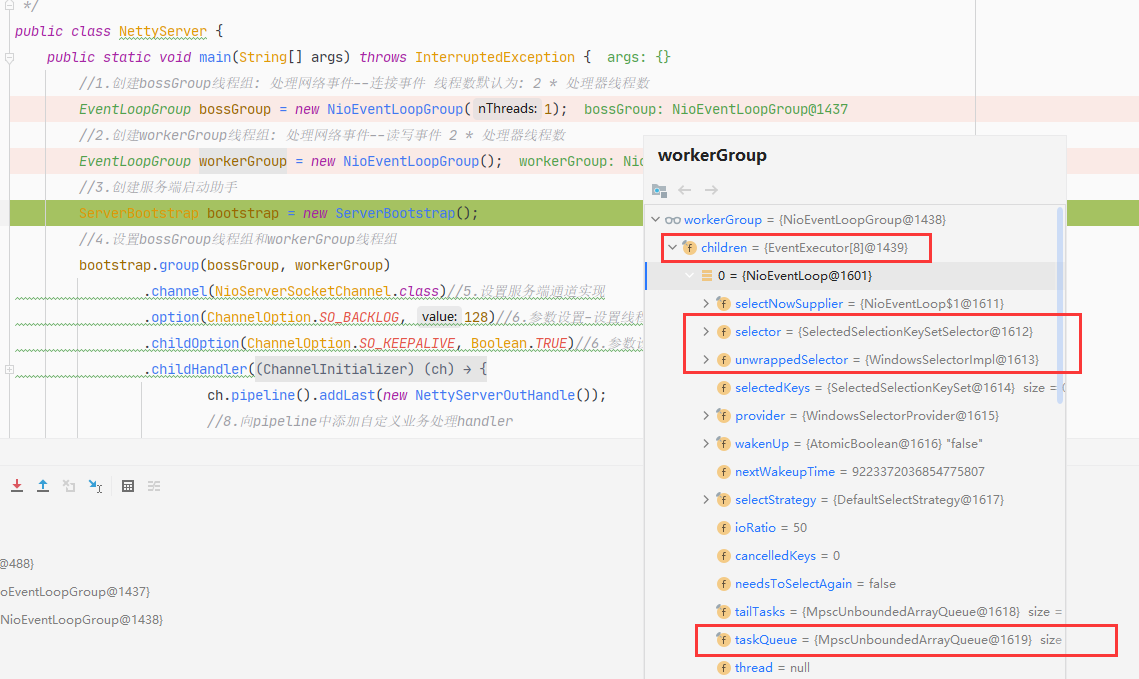
3、Netty启动源码分析
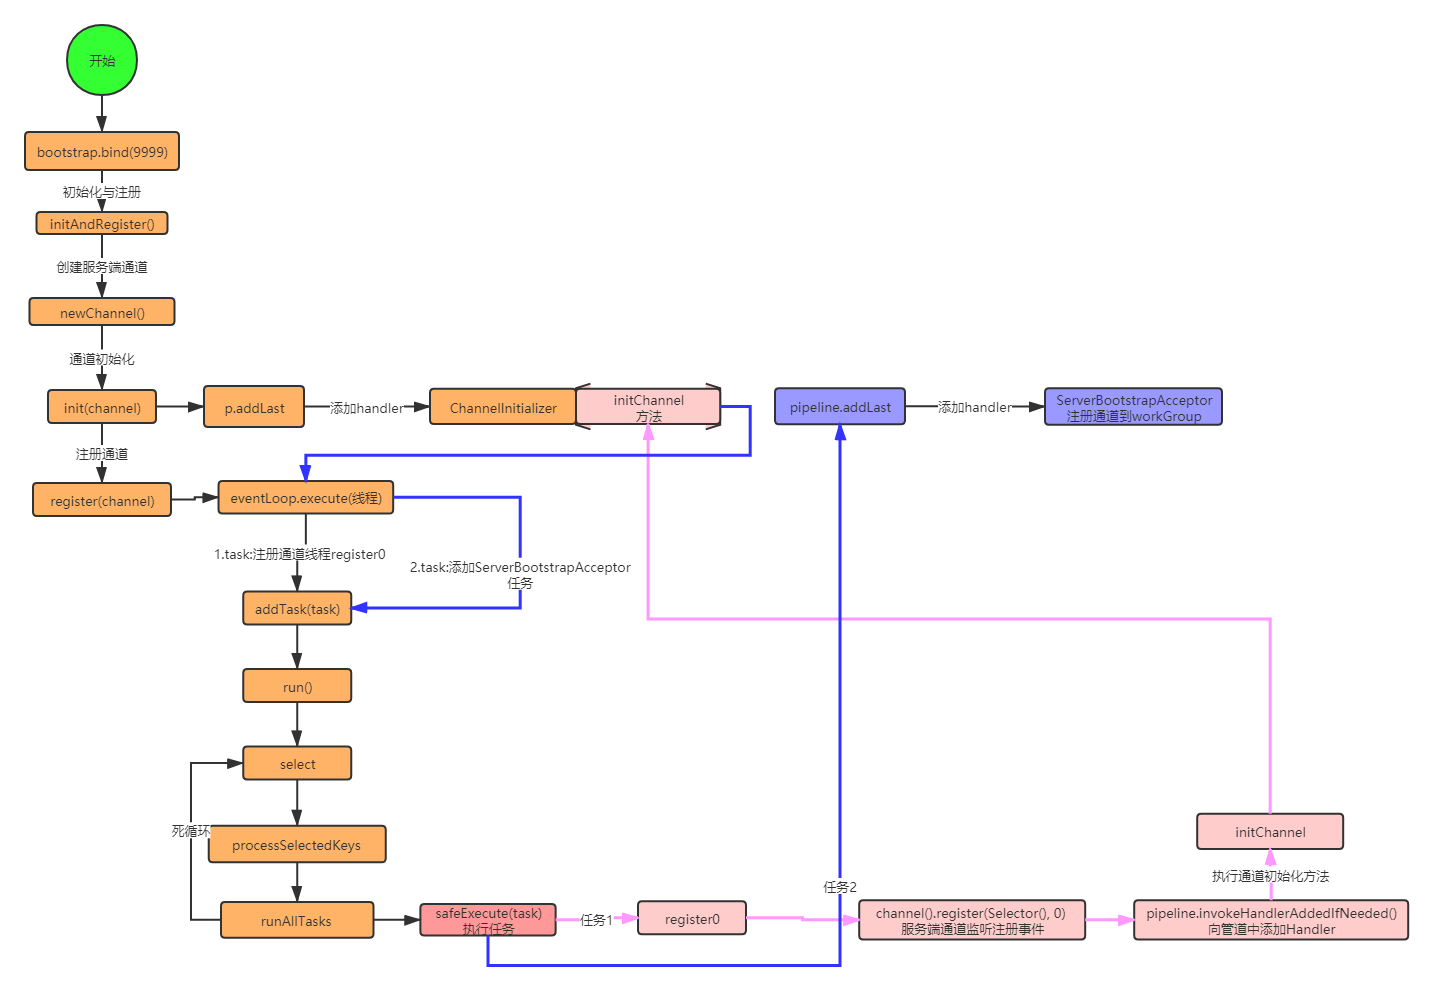
上图为Netty启动的主要流程 其中重点在于eventLoop.execute()方法,此方法的作用是往taskqueue中加入待执行的线程,(此处流程为服务端启动)
netty启动时会首先往taskqueue中加入两个线程:
- register(channel)方法调用eventLoop.execute(register线程) 向teskqueue加入注册线程。此线程是将服务端通道注册到selector用于监听事件,然后调用通道初始化方法
- 通道初始化方法被调用时。调用eventLoop.execute(ServerBootstrapAccetpor)向taskqueue加入任务,此任务执行时将handler加入pipiline中
源码跟踪分析:
示例程序代码:
package io.netty.example.demo;import io.netty.bootstrap.ServerBootstrap;import io.netty.buffer.ByteBuf;import io.netty.buffer.Unpooled;import io.netty.channel.*;import io.netty.channel.nio.NioEventLoopGroup;import io.netty.channel.socket.SocketChannel;import io.netty.channel.socket.nio.NioServerSocketChannel;import io.netty.handler.codec.DelimiterBasedFrameDecoder;import java.nio.charset.StandardCharsets;/*** Netty服务端*/public class NettyServer {public static void main(String[] args) throws InterruptedException {//1.创建bossGroup线程组: 处理网络事件--连接事件 线程数默认为: 2 * 处理器线程数EventLoopGroup bossGroup = new NioEventLoopGroup(1);//2.创建workerGroup线程组: 处理网络事件--读写事件 2 * 处理器线程数EventLoopGroup workerGroup = new NioEventLoopGroup();//3.创建服务端启动助手ServerBootstrap bootstrap = new ServerBootstrap();//4.设置bossGroup线程组和workerGroup线程组bootstrap.group(bossGroup, workerGroup).channel(NioServerSocketChannel.class)//5.设置服务端通道实现.option(ChannelOption.SO_BACKLOG, 128)//6.参数设置-设置线程队列中等待连接个数.childOption(ChannelOption.SO_KEEPALIVE, Boolean.TRUE)//6.参数设置-设置活跃状态,child是设置workerGroup.childHandler(new ChannelInitializer<SocketChannel>() {//7.创建一个通道初始化对象 此处是workerGroup的childHandler, 并不是上图中的服务端通道初始化对象@Overrideprotected void initChannel(SocketChannel ch) throws Exception {ch.pipeline().addLast(new NettyServerOutHandle());//8.向pipeline中添加自定义业务处理handlerch.pipeline().addLast(new NettyServerHandle());}});//9.启动服务端并绑定端口,同时将异步改为同步ChannelFuture future = bootstrap.bind(9999);future.addListener(new ChannelFutureListener() {@Overridepublic void operationComplete(ChannelFuture future) throws Exception {if (future.isSuccess()) {System.out.println("端口绑定成功!");} else {System.out.println("端口绑定失败!");}}});System.out.println("服务器启动成功....");//10.关闭通道(并不是真正意义上的关闭,而是监听通道关闭状态)和关闭连接池future.channel().closeFuture().sync();bossGroup.shutdownGracefully();workerGroup.shutdownGracefully();}}
跟踪bootstrap.bind(9999)进入源码,进入到方法doBind()中
private ChannelFuture doBind(final SocketAddress localAddress) {//初始化和注册final ChannelFuture regFuture = initAndRegister();final Channel channel = regFuture.channel();if (regFuture.cause() != null) {return regFuture;}if (regFuture.isDone()) {// At this point we know that the registration was complete and successful.ChannelPromise promise = channel.newPromise();doBind0(regFuture, channel, localAddress, promise);return promise;} else {// Registration future is almost always fulfilled already, but just in case it's not.final PendingRegistrationPromise promise = new PendingRegistrationPromise(channel);regFuture.addListener(new ChannelFutureListener() {@Overridepublic void operationComplete(ChannelFuture future) throws Exception {Throwable cause = future.cause();if (cause != null) {// Registration on the EventLoop failed so fail the ChannelPromise directly to not cause an// IllegalStateException once we try to access the EventLoop of the Channel.promise.setFailure(cause);} else {// Registration was successful, so set the correct executor to use.// See https://github.com/netty/netty/issues/2586promise.registered();doBind0(regFuture, channel, localAddress, promise);}}});return promise;}}
doBind()中首先调用了initAndRegister创建了一个通道:由于我们设置了通道类型为NioServerSocketChannel。所有此处通过通道工厂生产NioServerSocketChannel类型通道对象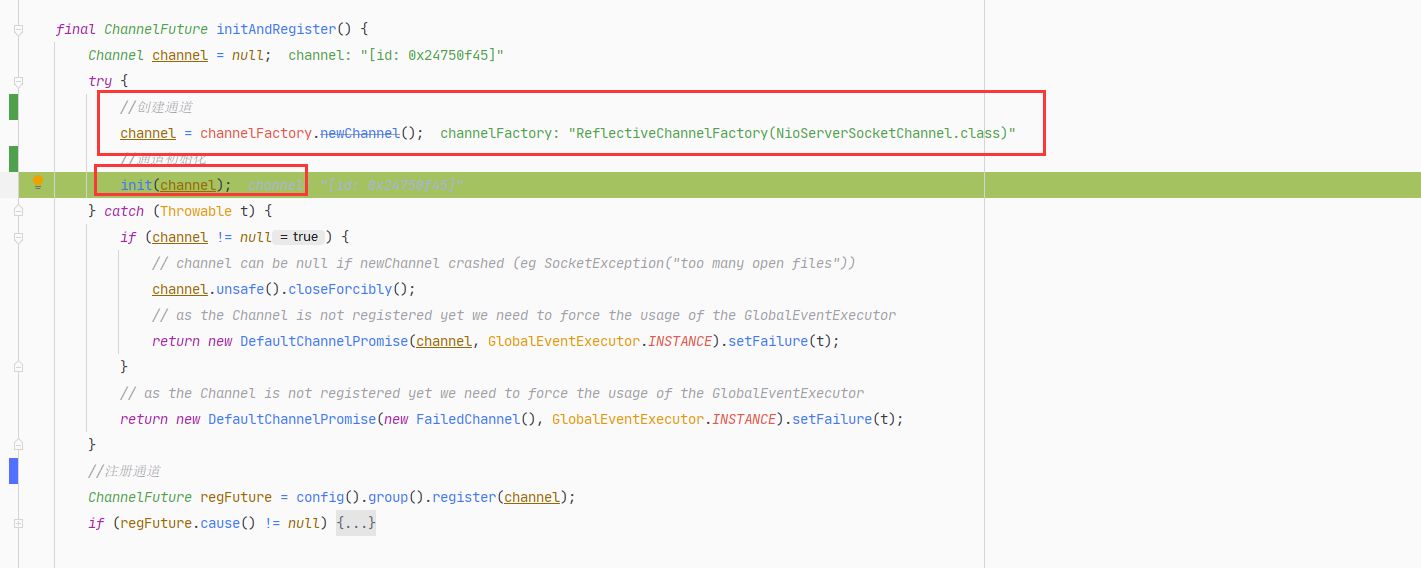
通道对象生成之后接着执行init方法:
@Overridevoid init(Channel channel) {setChannelOptions(channel, options0().entrySet().toArray(newOptionArray(0)), logger);setAttributes(channel, attrs0().entrySet().toArray(newAttrArray(0)));//得到通道pipelineChannelPipeline p = channel.pipeline();//赋值workGroup与服务端handlerfinal EventLoopGroup currentChildGroup = childGroup; //workGroupfinal ChannelHandler currentChildHandler = childHandler; //示例代码中我们自定义的handlerfinal Entry<ChannelOption<?>, Object>[] currentChildOptions =childOptions.entrySet().toArray(newOptionArray(0));final Entry<AttributeKey<?>, Object>[] currentChildAttrs = childAttrs.entrySet().toArray(newAttrArray(0));//添加通道初始化handlerp.addLast(new ChannelInitializer<Channel>() {@Overridepublic void initChannel(final Channel ch) {final ChannelPipeline pipeline = ch.pipeline();ChannelHandler handler = config.handler();if (handler != null) {pipeline.addLast(handler);}ch.eventLoop().execute(new Runnable() {@Overridepublic void run() {//在initChannel方法中添加ServerBootstrapAcceptor的handlerpipeline.addLast(new ServerBootstrapAcceptor(ch, currentChildGroup, currentChildHandler, currentChildOptions, currentChildAttrs));}});}});}

通道初始化方法执行完成之后init=>注册通道io.netty.channel.AbstractChannel.AbstractUnsafe#register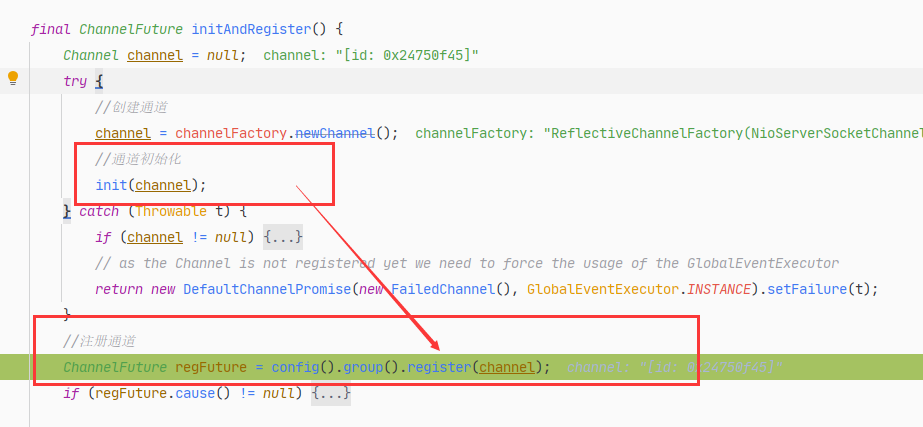
跟踪进入注册方法发现它内部使用eventLoop.execute()方法,此方法参数为一个线程
继续跟踪进入eventLoop.execute()方法,在判断当前线程为非eventLoop线程时,启动新的线程执行后续操作
跟踪startThread看看内部执行了什么操作: 使用线程池执行一个线程任务,此线程内部执行SingleThreadEventExecutor.this.run()方法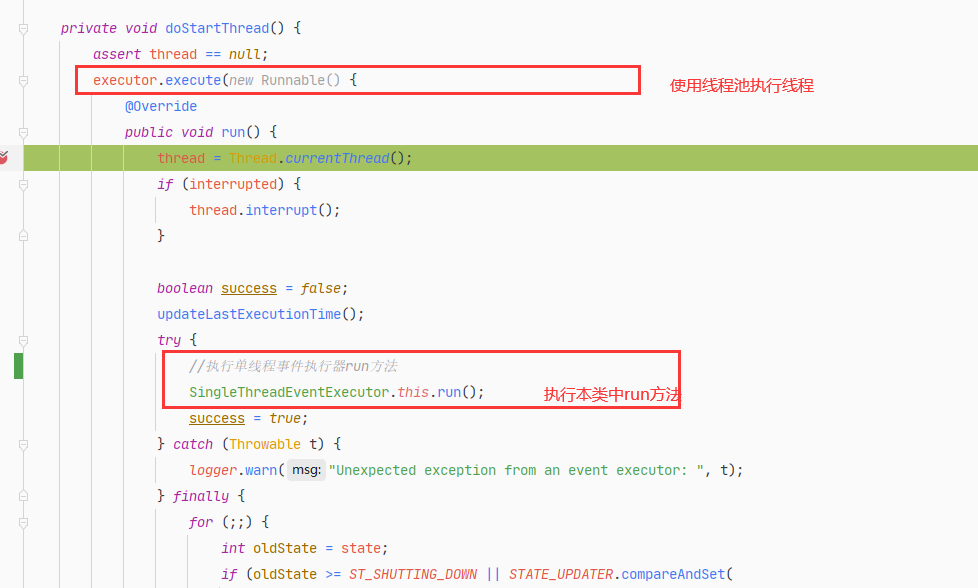
跟踪进入SingleThreadEventExecutor.this.run()方法:它最终进入io.netty.channel.nio.NioEventLoop#run()
@Overrideprotected void run() {for (;;) {try {try {switch (selectStrategy.calculateStrategy(selectNowSupplier, hasTasks())) {case SelectStrategy.CONTINUE:continue;case SelectStrategy.BUSY_WAIT:// fall-through to SELECT since the busy-wait is not supported with NIOcase SelectStrategy.SELECT:select(wakenUp.getAndSet(false));// 'wakenUp.compareAndSet(false, true)' is always evaluated// before calling 'selector.wakeup()' to reduce the wake-up// overhead. (Selector.wakeup() is an expensive operation.)//// However, there is a race condition in this approach.// The race condition is triggered when 'wakenUp' is set to// true too early.//// 'wakenUp' is set to true too early if:// 1) Selector is waken up between 'wakenUp.set(false)' and// 'selector.select(...)'. (BAD)// 2) Selector is waken up between 'selector.select(...)' and// 'if (wakenUp.get()) { ... }'. (OK)//// In the first case, 'wakenUp' is set to true and the// following 'selector.select(...)' will wake up immediately.// Until 'wakenUp' is set to false again in the next round,// 'wakenUp.compareAndSet(false, true)' will fail, and therefore// any attempt to wake up the Selector will fail, too, causing// the following 'selector.select(...)' call to block// unnecessarily.//// To fix this problem, we wake up the selector again if wakenUp// is true immediately after selector.select(...).// It is inefficient in that it wakes up the selector for both// the first case (BAD - wake-up required) and the second case// (OK - no wake-up required).if (wakenUp.get()) {selector.wakeup();}// fall throughdefault:}} catch (IOException e) {// If we receive an IOException here its because the Selector is messed up. Let's rebuild// the selector and retry. https://github.com/netty/netty/issues/8566rebuildSelector0();handleLoopException(e);continue;}cancelledKeys = 0;needsToSelectAgain = false;final int ioRatio = this.ioRatio;if (ioRatio == 100) {try {processSelectedKeys();} finally {// Ensure we always run tasks.runAllTasks();}} else {final long ioStartTime = System.nanoTime();try {//处理SelectedKeyprocessSelectedKeys();} finally {// Ensure we always run tasks.final long ioTime = System.nanoTime() - ioStartTime;runAllTasks(ioTime * (100 - ioRatio) / ioRatio);}}} catch (Throwable t) {handleLoopException(t);}// Always handle shutdown even if the loop processing threw an exception.try {if (isShuttingDown()) {closeAll();if (confirmShutdown()) {return;}}} catch (Throwable t) {handleLoopException(t);}}}
根据以上源码可以看出run方法内执行的就是下图的死循环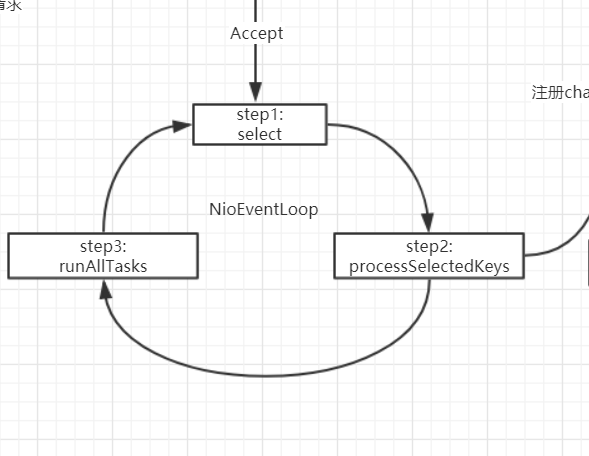
继续跟踪方法。发现会去执行taskqueue中任务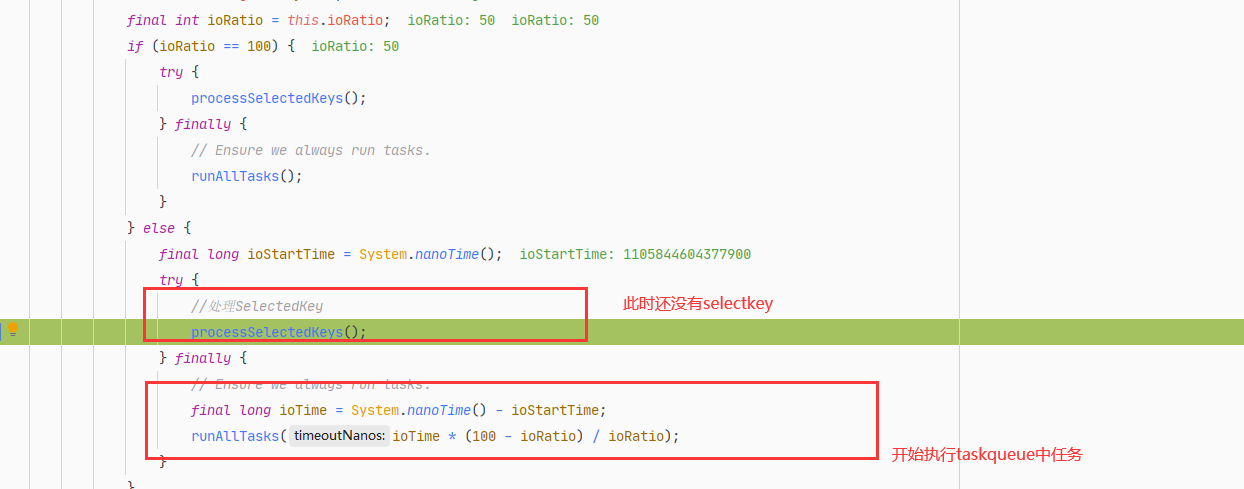
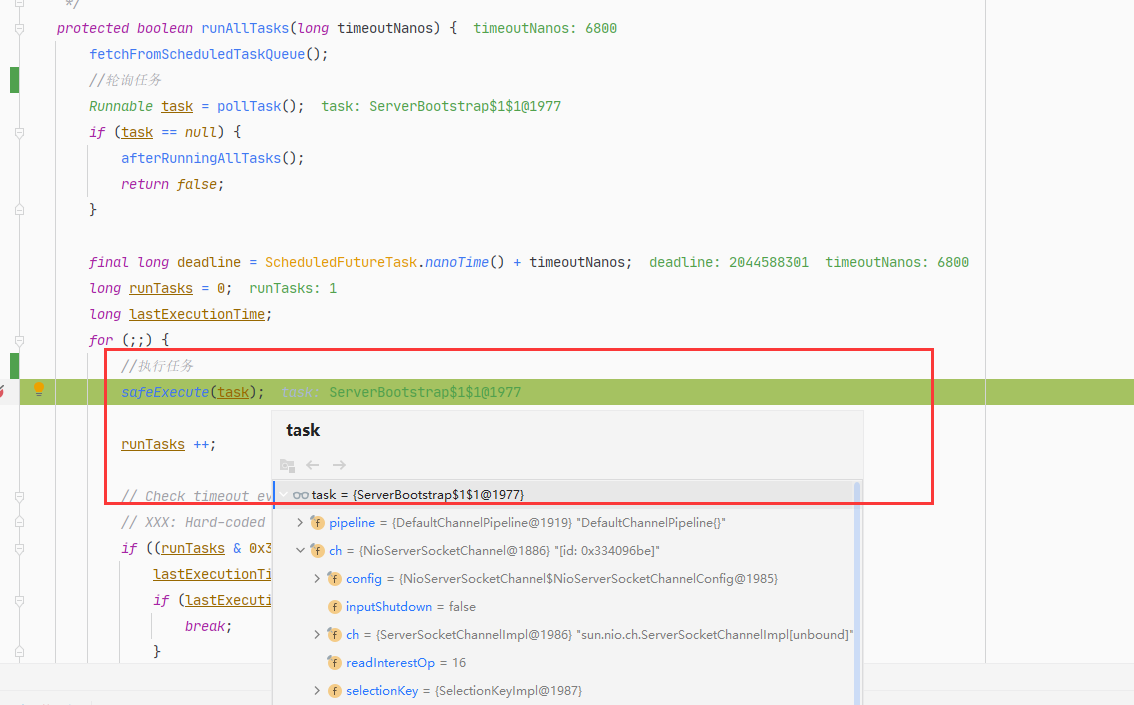
跟入runAllTasks方法,循环执行task任务
———————————————————————————————————————————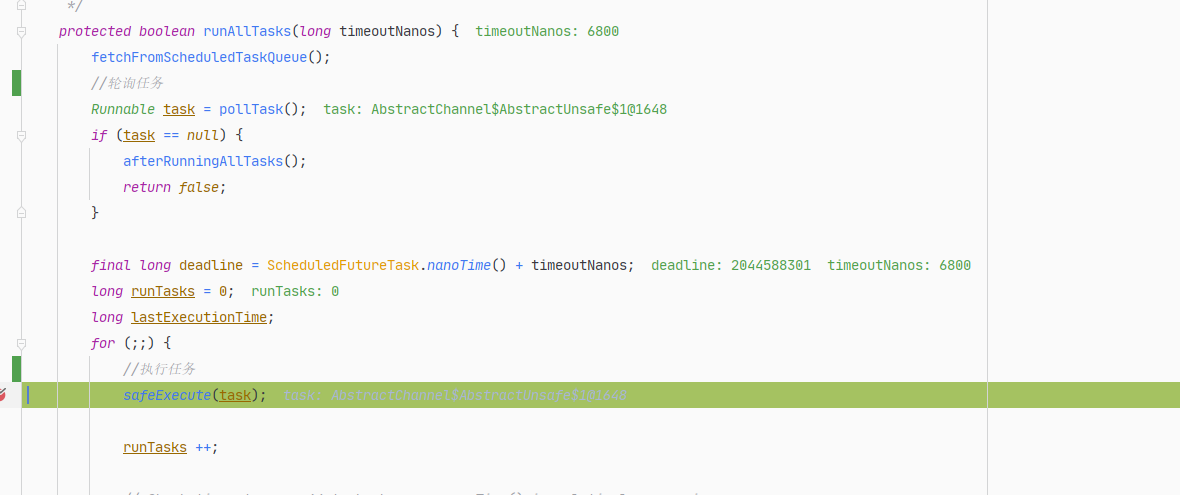
pollTask: 从taskqueue中取任务执行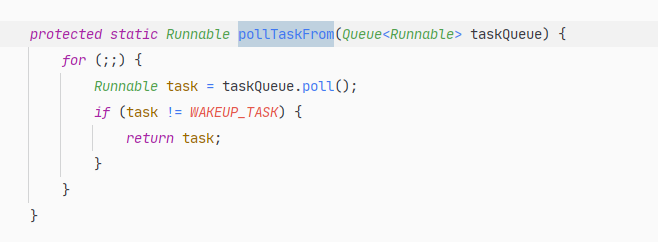
当前taskqueue只有一个待执行的注册任务。
因此当前第一次循环方法开始执行如下方法
注册线程,此线程在之前被方法taskqueue中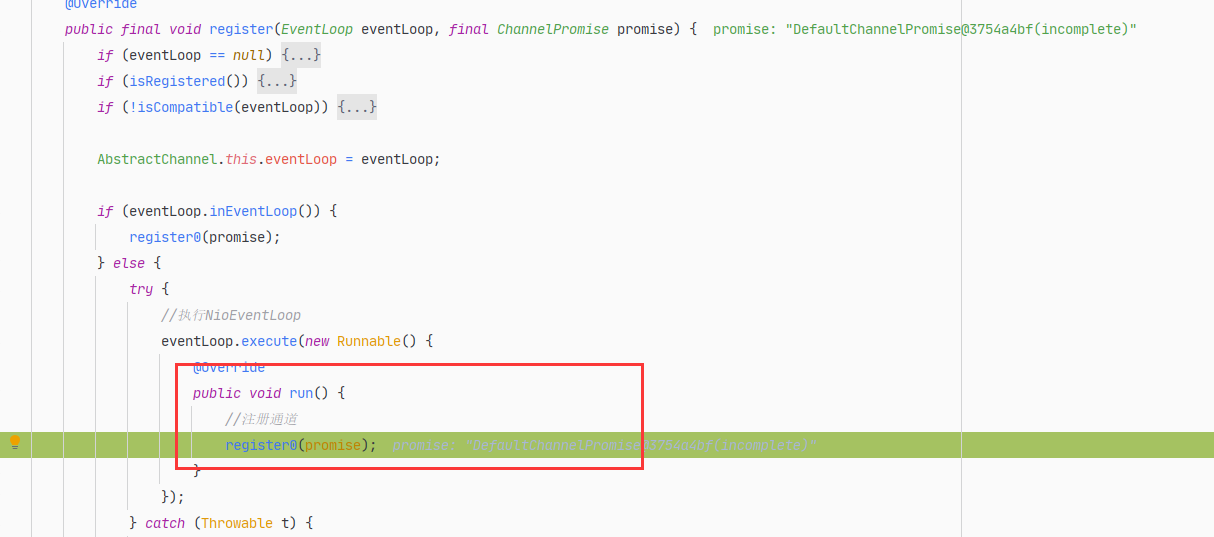
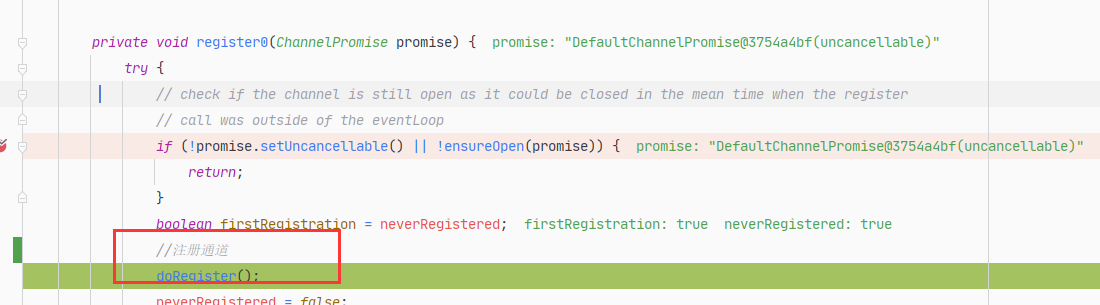
进入doRegister()方法。此方法注册通道到selector后检测所有事件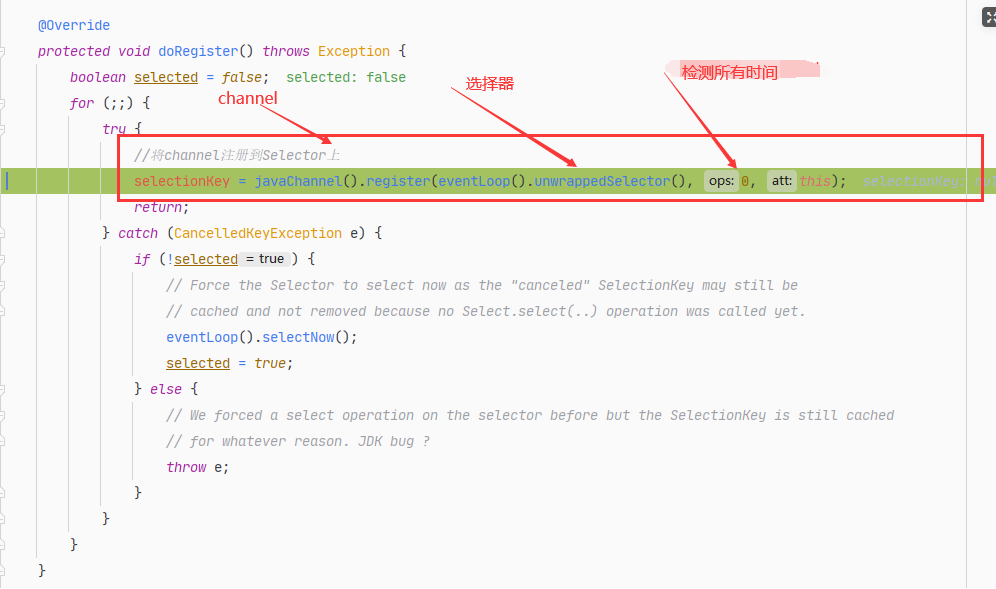
此处javaChannel()获取通道对象,跟踪进入发现它就是ServerSocketChannel对象。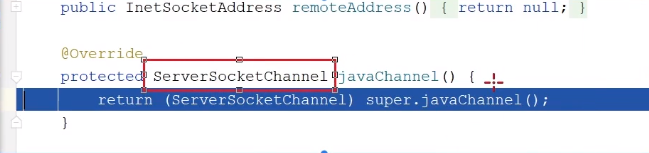
获取到ServerSocketChannel后将通道注册到Selector,并指定要监听的Accept事件。
通道注册完成之后,调用pipeline中的通道初始化对象方法。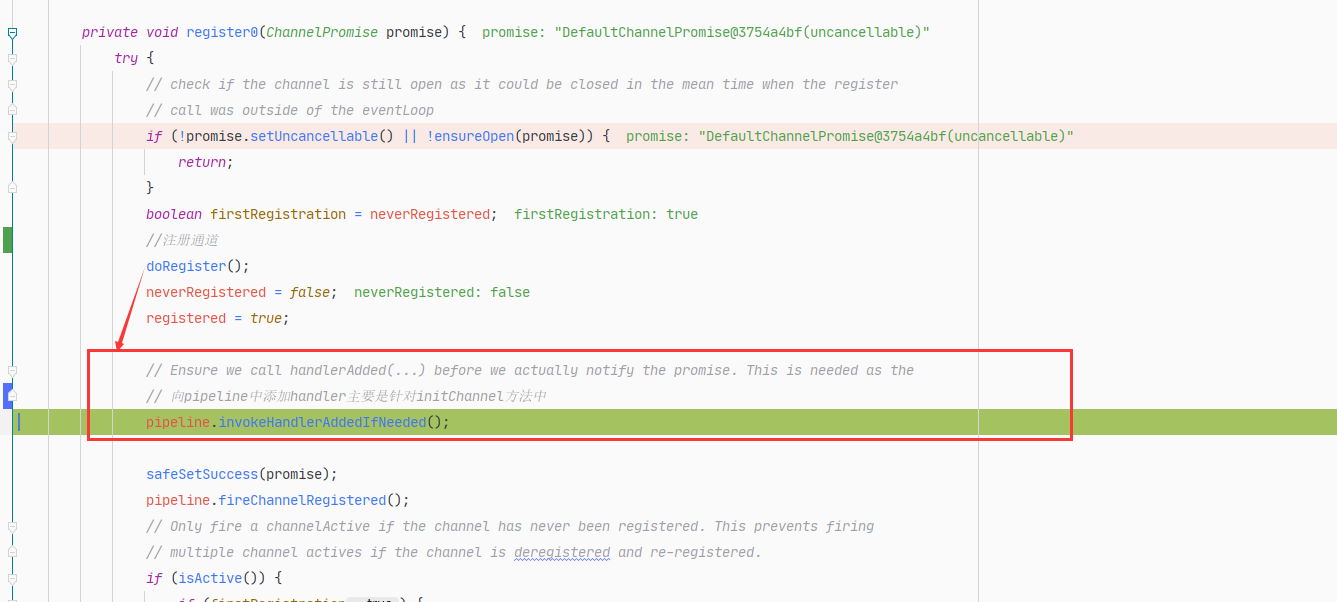
invokeHandlerAddedIfNeeded—>initChannel方法 io.netty.channel.ChannelInitializer#handlerAdded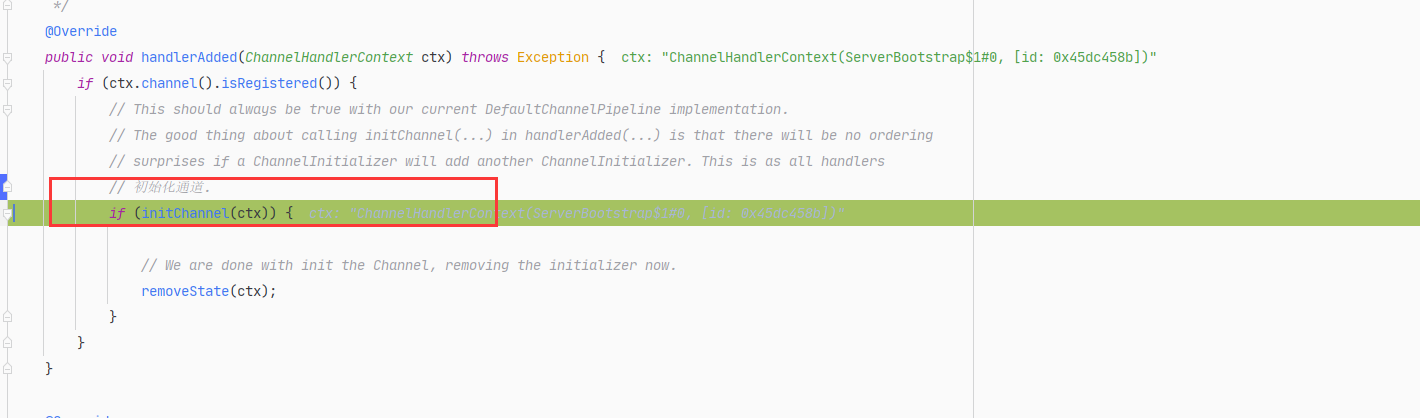
跟踪initChannel方法 发现它回到了通道初始化方法中,调用ChannelInitializer中的initChannel方法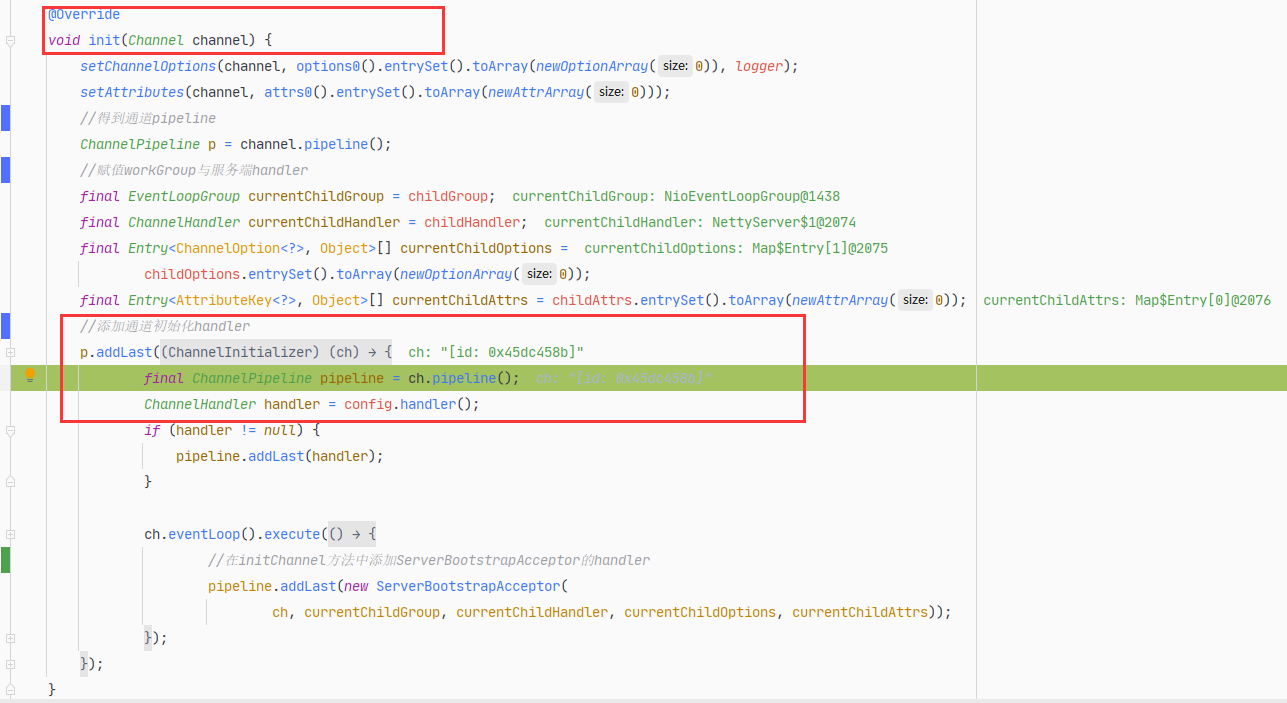
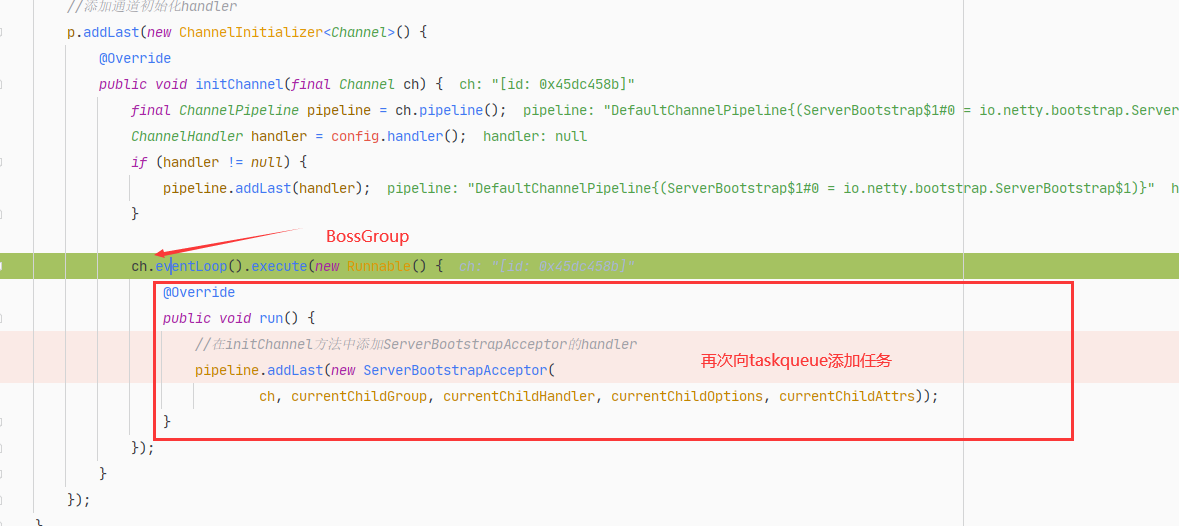
再次进入eventLoop().execute()方法, 此时是从eventLoop中调用的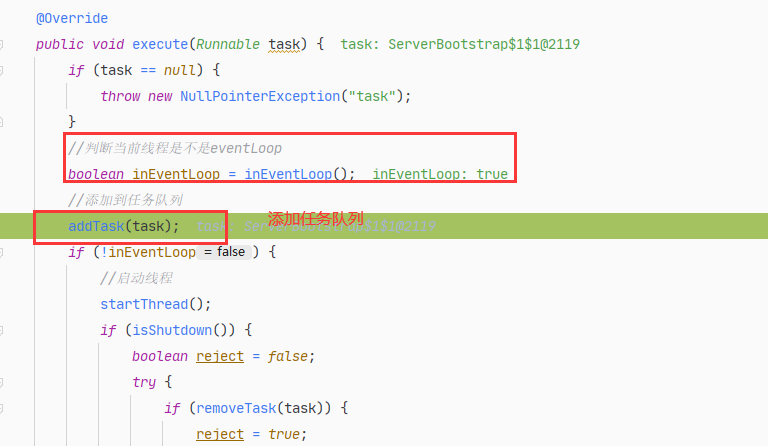
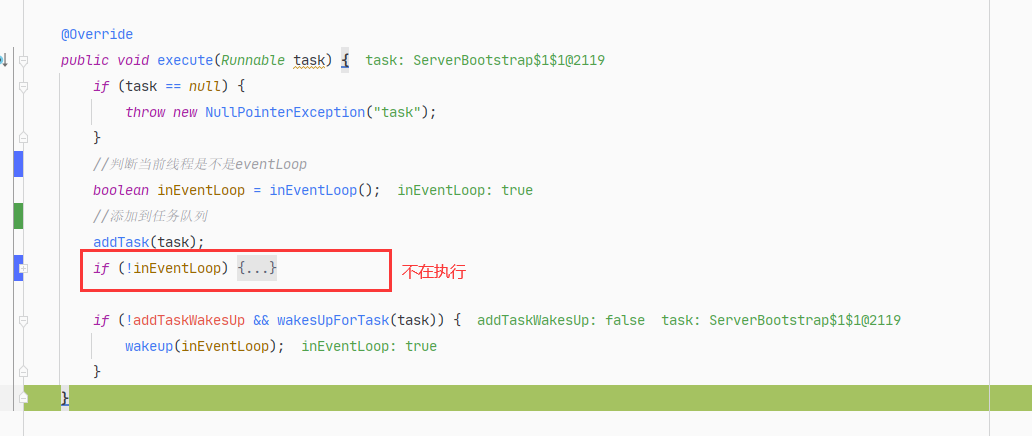
由于inEventLoop为true, 此时注册事件已经走完,
回到runAllTasks循环中,
注册任务执行完成之后,taskqueue中新加入了一个ServerBootstrap任务,下一次循环开始执行跟踪代码 进入如下方法,初始化器中的通道初始化方法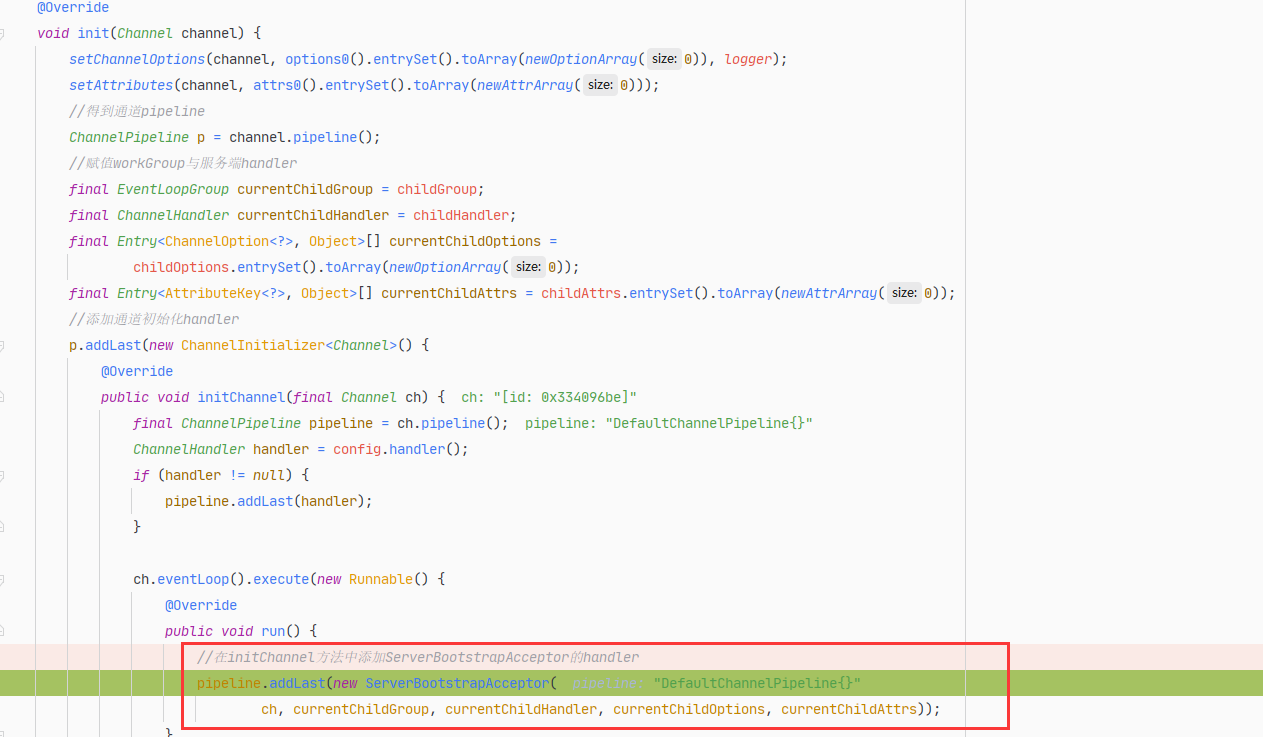
此处向pipeline中添加了一个ServerBootstrapAcceptor,它是一个消息入站的handler
消息入站handler 当有消息到达时,会执行channelRead方法,将读取逻辑发入workerGroup中执行 逻辑如下: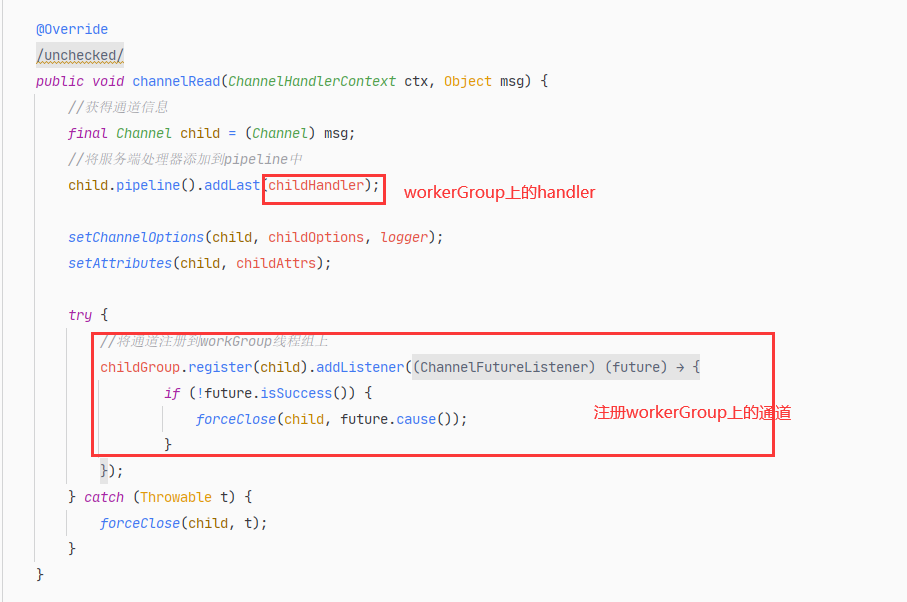
此处对应线程模型中如下逻辑:
———————————-至此runAllTasks方法执行完毕——————————
方法回到io.netty.channel.nio.NioEventLoop#run 此处是死循环,此时通道已经注册到了selecetor, 因此下一次循环进入SELECT分支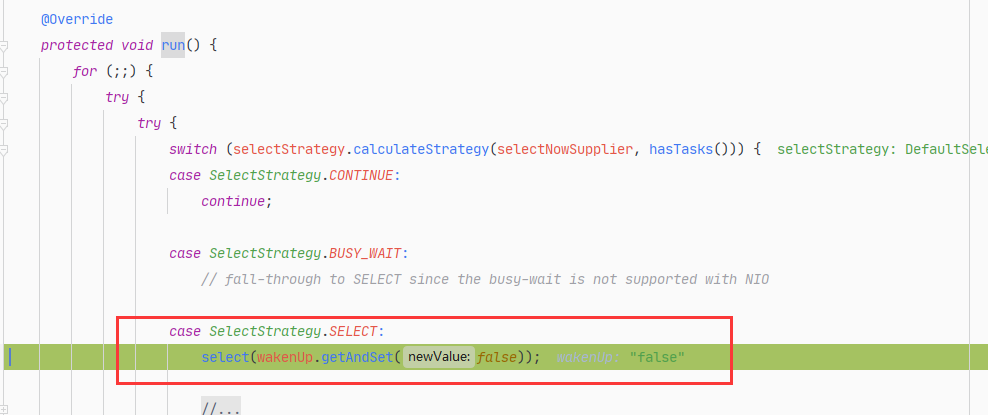

当服务端有客户端连接时会有Accept事件,如果没有就一直循环检测。
到此Netty启动流程结束。
4、BossGroup/WorkGroup/消息入站源码分析
BossGroup主要负责监听. workGroup负责消息处理. 主要看下BossGroup如何将通道交给workGroup的,和如何处理消息读取的.即入站
流程分析: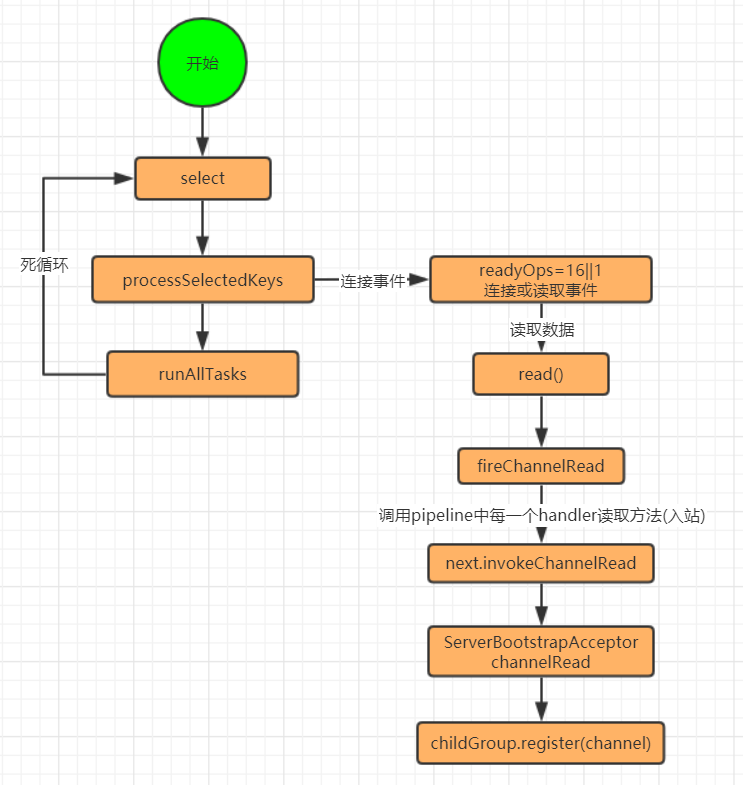
客户端调试示例代码:
/*** Netty客户端*/public class NettyClient {public static void main(String[] args) throws InterruptedException {//1. 创建线程组EventLoopGroup group = new NioEventLoopGroup();//2. 创建客户端启动助手Bootstrap bootstrap = new Bootstrap();//3. 设置线程组bootstrap.group(group).channel(NioSocketChannel.class)//4. 设置服务端通道实现为NIO.handler(new ChannelInitializer<SocketChannel>() { //5. 创建一个通道初始化对象@Overrideprotected void initChannel(SocketChannel ch) throws Exception {//6. 向pipeline中添加自定义业务处理handlerch.pipeline().addLast(new NettyClientHandle());}});//7. 启动客户端, 等待连接服务端, 同时将异步改为同步ChannelFuture future = bootstrap.connect("127.0.0.1", 9999).sync();//8. 关闭通道和关闭连接池future.channel().closeFuture().sync();group.shutdownGracefully();}}package io.netty.example.demo;import io.netty.buffer.ByteBuf;import io.netty.buffer.Unpooled;import io.netty.channel.ChannelFuture;import io.netty.channel.ChannelFutureListener;import io.netty.channel.ChannelHandlerContext;import io.netty.channel.ChannelInboundHandler;import io.netty.util.CharsetUtil;/*** 客户端处理类*/public class NettyClientHandle implements ChannelInboundHandler {/*** 通道就绪事件** @param ctx* @throws Exception*/@Overridepublic void channelActive(ChannelHandlerContext ctx) throws Exception {ChannelFuture channelFuture = ctx.writeAndFlush(Unpooled.copiedBuffer("你好呀,我是Netty客户端", CharsetUtil.UTF_8));channelFuture.addListener(new ChannelFutureListener() {@Overridepublic void operationComplete(ChannelFuture future) throws Exception {if (future.isSuccess()) {System.out.println("数据发送成功.");} else {System.out.println("数据发送失败.");}}});}//客户端读取事件@Overridepublic void channelRead(ChannelHandlerContext ctx, Object msg) throws Exception {ByteBuf byteBuf = (ByteBuf) msg;System.out.println("服务端发来消息:" + byteBuf.toString(CharsetUtil.UTF_8));}@Overridepublic void exceptionCaught(ChannelHandlerContext ctx, Throwable cause) throws Exception {cause.printStackTrace();}@Overridepublic void channelRegistered(ChannelHandlerContext ctx) throws Exception {}@Overridepublic void channelUnregistered(ChannelHandlerContext ctx) throws Exception {}@Overridepublic void channelInactive(ChannelHandlerContext ctx) throws Exception {}@Overridepublic void channelReadComplete(ChannelHandlerContext ctx) throws Exception {}@Overridepublic void userEventTriggered(ChannelHandlerContext ctx, Object evt) throws Exception {}@Overridepublic void channelWritabilityChanged(ChannelHandlerContext ctx) throws Exception {}@Overridepublic void handlerAdded(ChannelHandlerContext ctx) throws Exception {}@Overridepublic void handlerRemoved(ChannelHandlerContext ctx) throws Exception {}}
服务端已经启动,在上小节run方法中打上断点 等待客户端连接,此时selectedKeys.size=0
启动客户端: 此时已经有值 连接事件
进入循环 开始处理key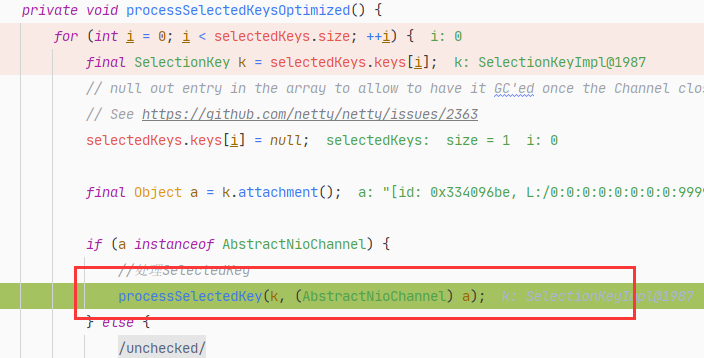
跟踪进入io.netty.channel.nio.NioEventLoop#processSelectedKey(java.nio.channels.SelectionKey, io.netty.channel.nio.AbstractNioChannel) 此处判断它是一个连接事件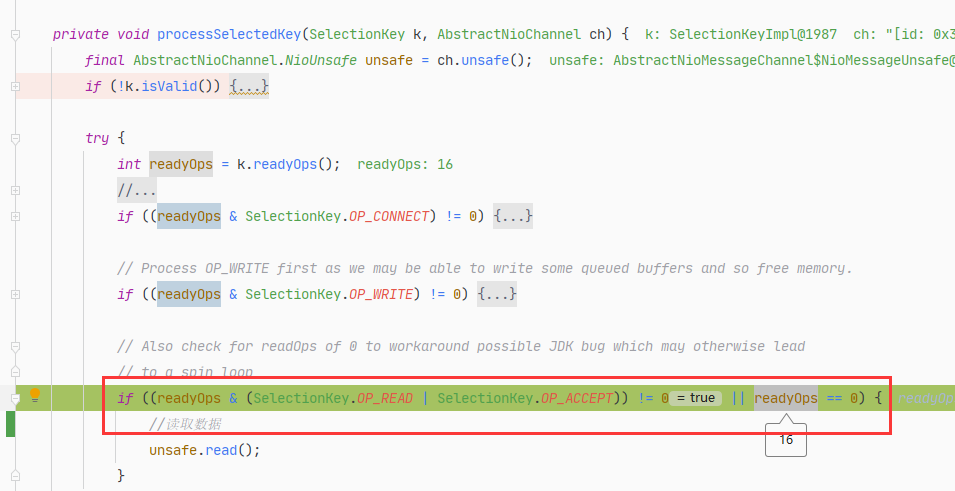
=>io.netty.channel.nio.AbstractNioMessageChannel.NioMessageUnsafe#read
=>doread方法中 生成NIOSocketChannel
判断通道中是否有值,此处是有值然后发布读取事件,此处的消息即为客户端连接的相关信息
将消息进行入站操作=>io.netty.channel.AbstractChannelHandlerContext#invokeChannelRead(io.netty.channel.AbstractChannelHandlerContext, java.lang.Object)
=>跟踪方法发现进入
跟踪进入invokeChannelRead方法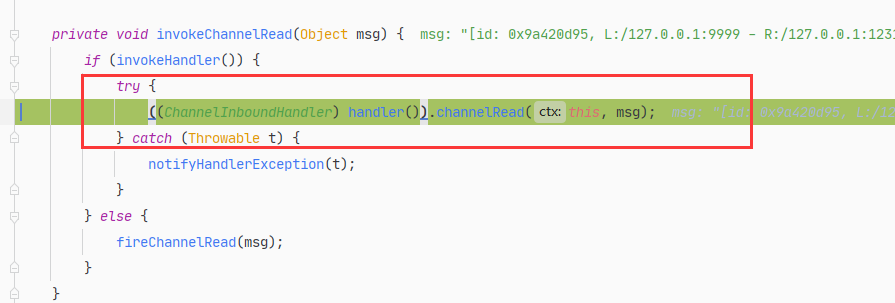
=>io.netty.bootstrap.ServerBootstrap.ServerBootstrapAcceptor#channelRead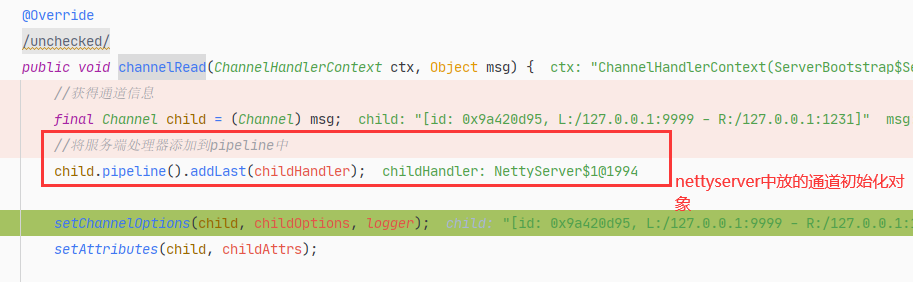
继续执行
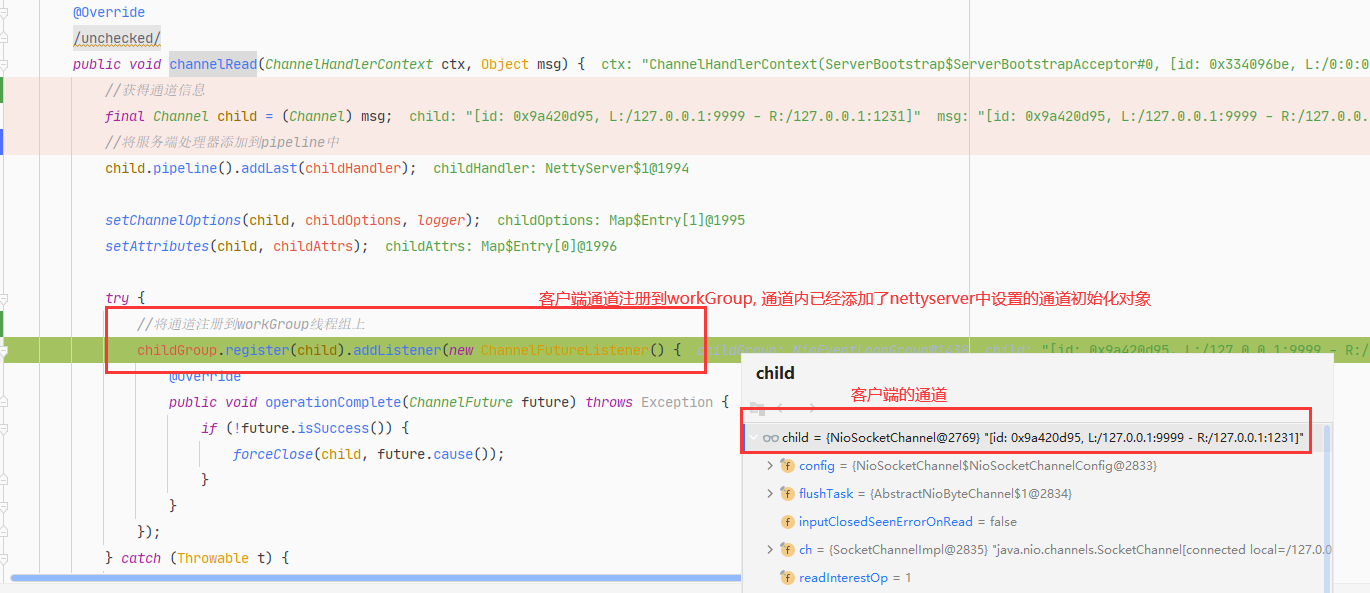
此处register方法与上节中BossGroup中启动流程执行注册方法是一致,也一样往taskqueue中添加任务,后续执行逻辑。
当有消息到达时,run方法中死循环里检测到selectionKey有读取事件 此时可以看出是workGroup在处理
此时判断为读取事件
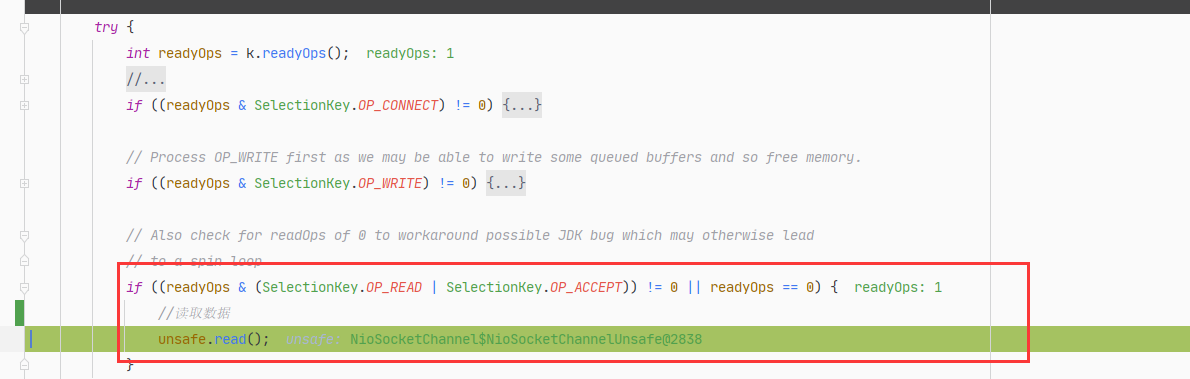
又进入read方法=> io.netty.channel.nio.AbstractNioByteChannel.NioByteUnsafe#read 进入的是AbstractNioByteChannel类
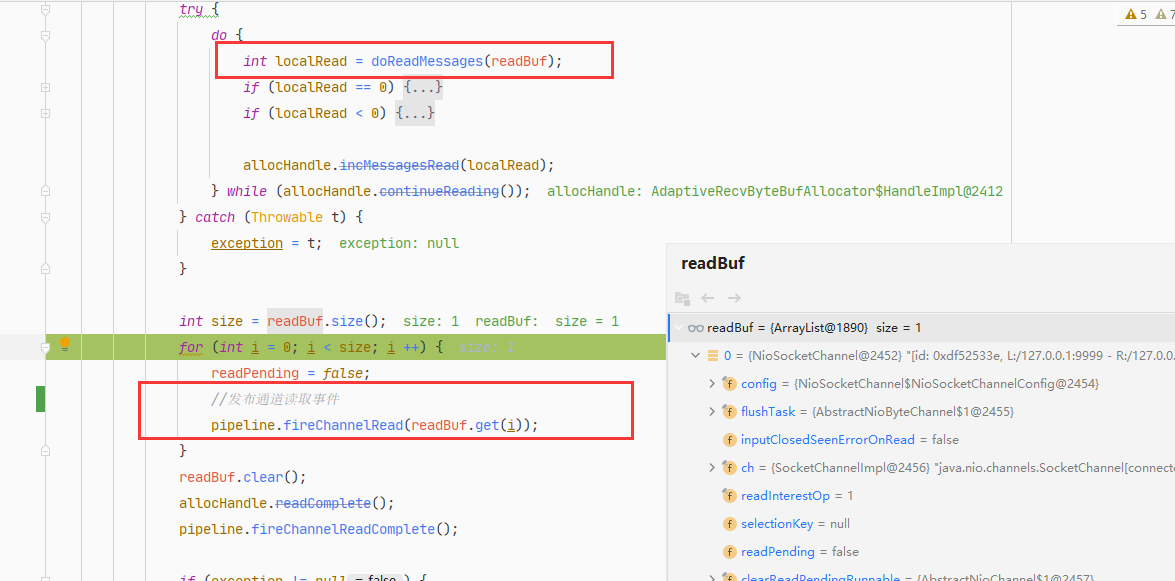
此处可以看出 服务端注册的处理入站出站的handler已经在pipeline中了,接下来进行数据读取操作,读取到数据后发布读取事件
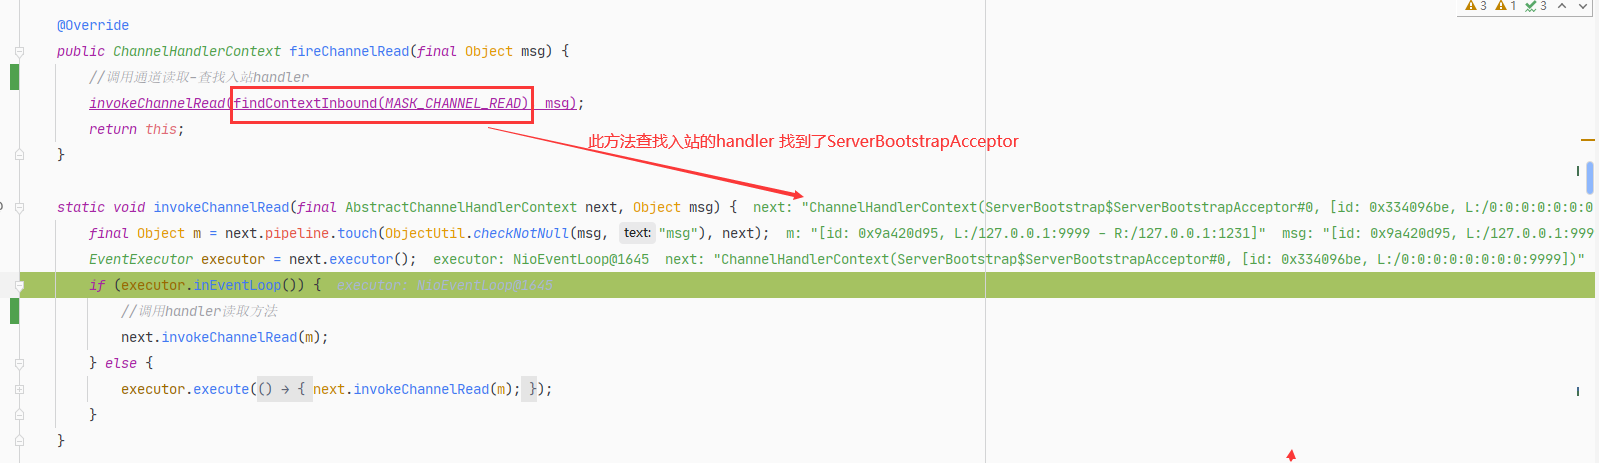
=>跟踪进入fireChannelRead方法

最终channelRead方法执行会进入invokeChannelRead()。在此可以看出next为我们指定要的nettyServerHandle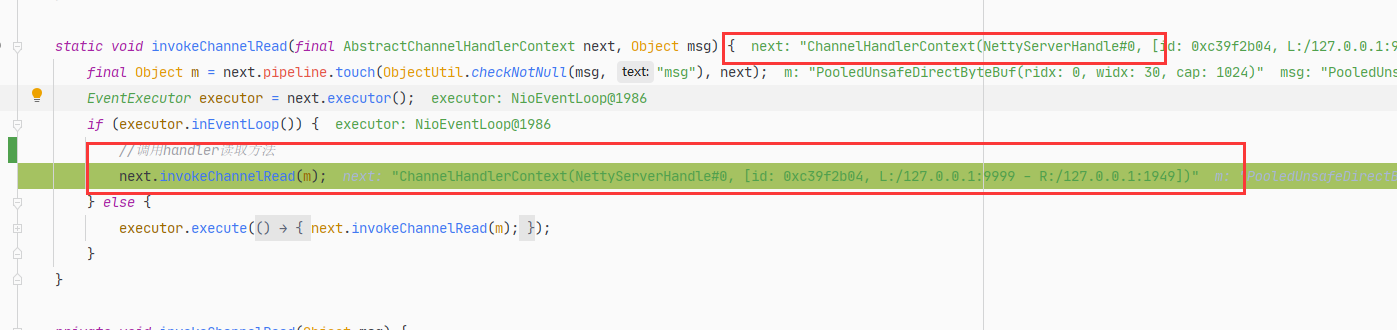
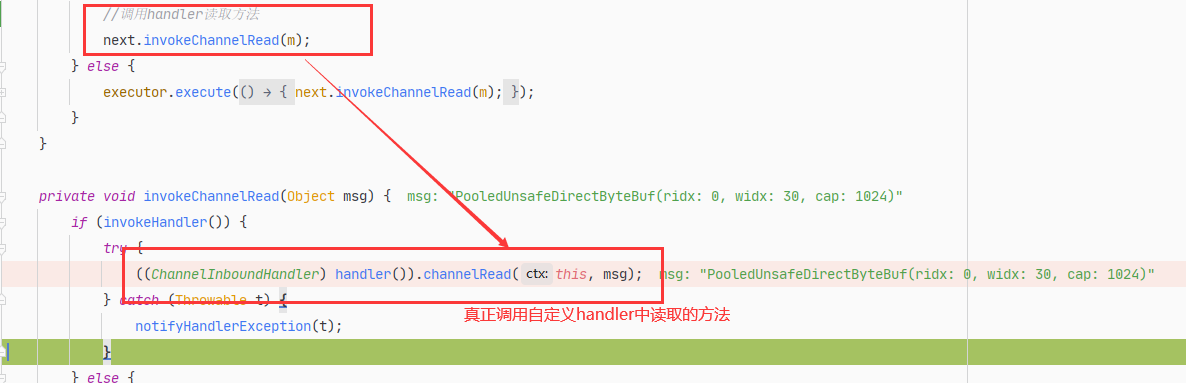
=>到此调取到了我们自定义handel中的方法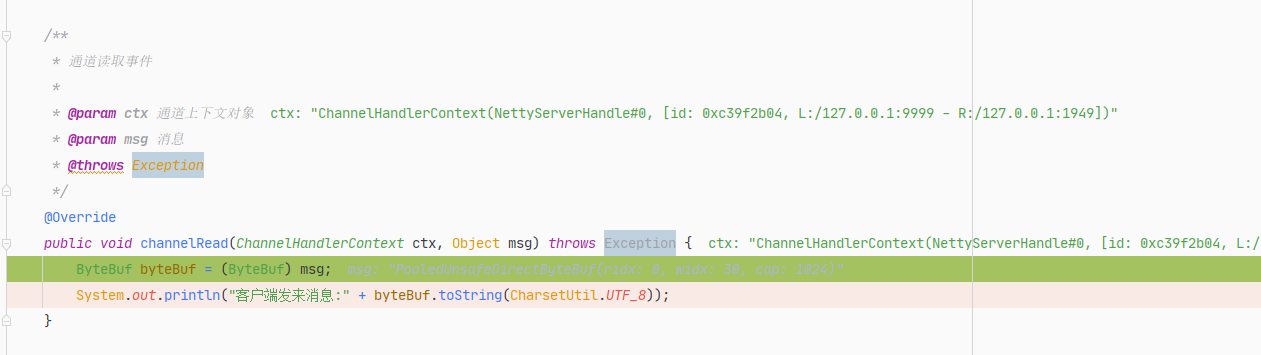
服务端打印客户端发来的消息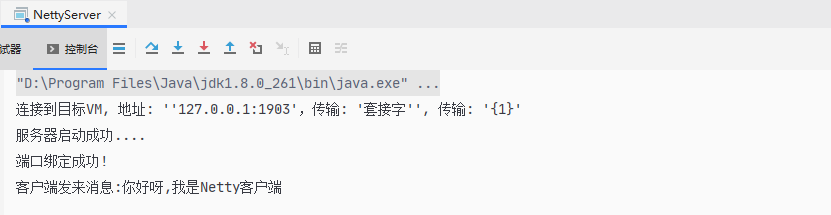
消息入站流程至此结束
5、消息出站源码分析
示例代码 服务端读取完消息之后向客户端发送消息 回走出站方法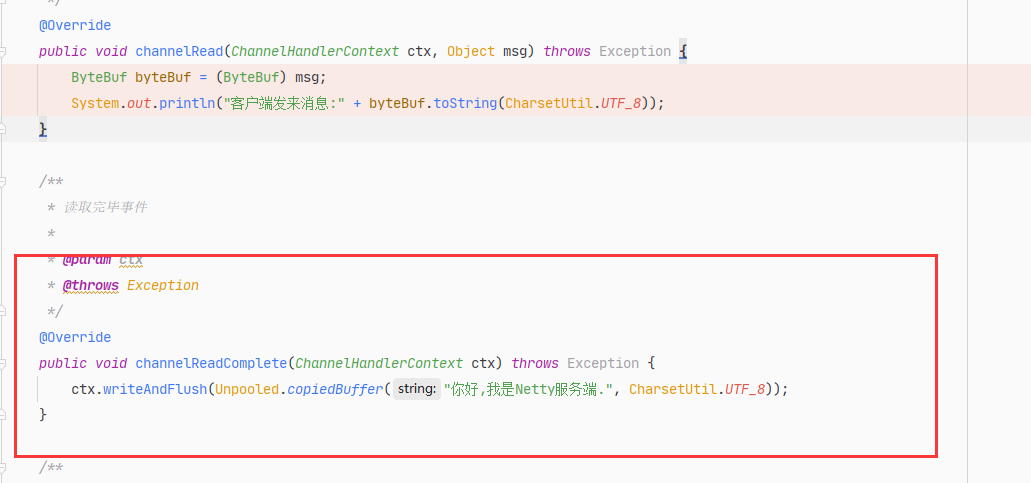
当读取了客户端消息之后 通道读取事件执行完毕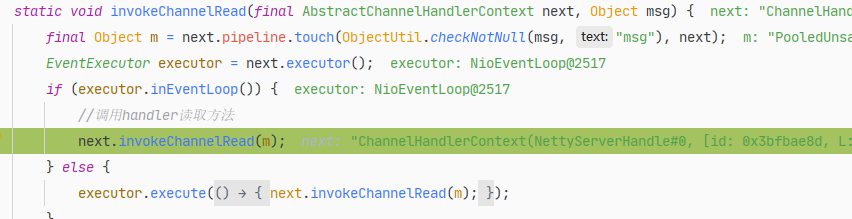
继续执行 回到io.netty.channel.nio.AbstractNioByteChannel.NioByteUnsafe#read中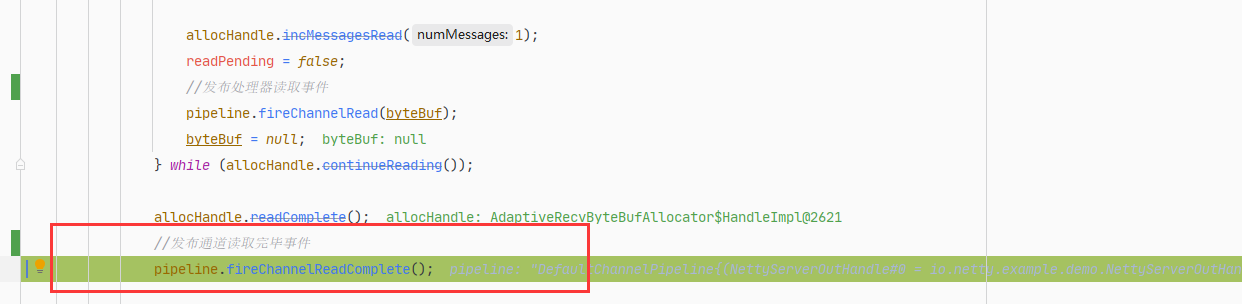
发布通道读取完毕事件
=>最终会调取到自定义NettyServerHandle中channelReadComplete的方法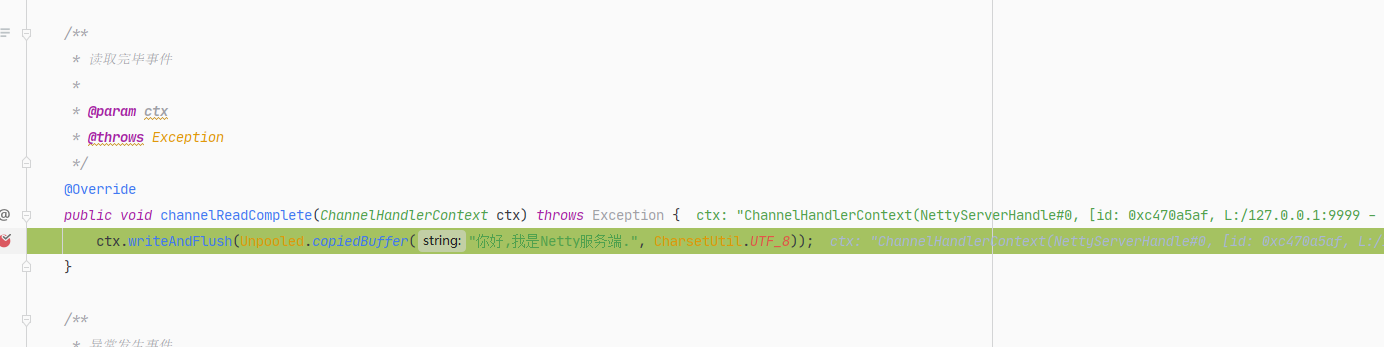
继续跟踪io.netty.channel.AbstractChannelHandlerContext#write(java.lang.Object, boolean, io.netty.channel.ChannelPromise)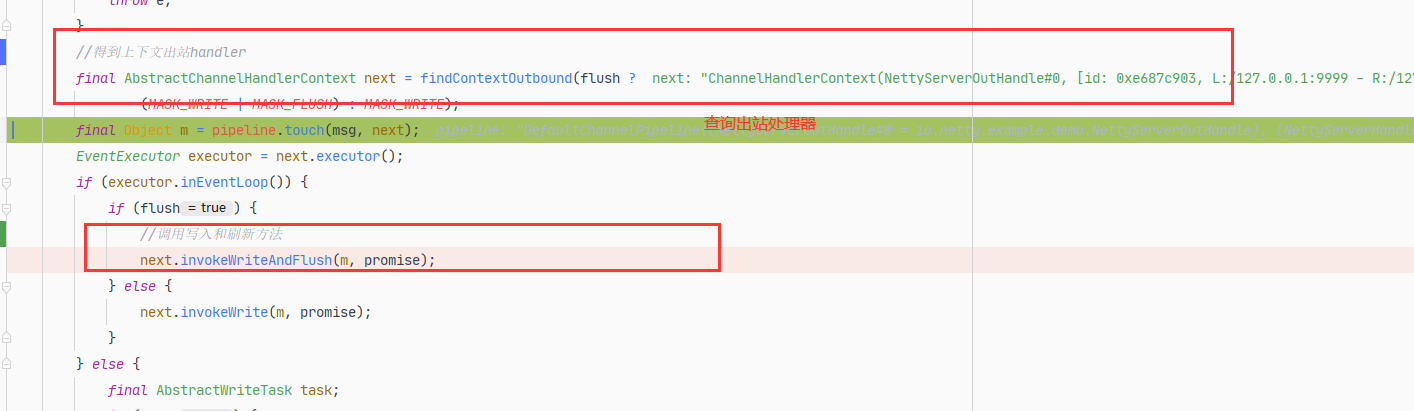
调用写入方法 最终调用到我们自定义的出站操作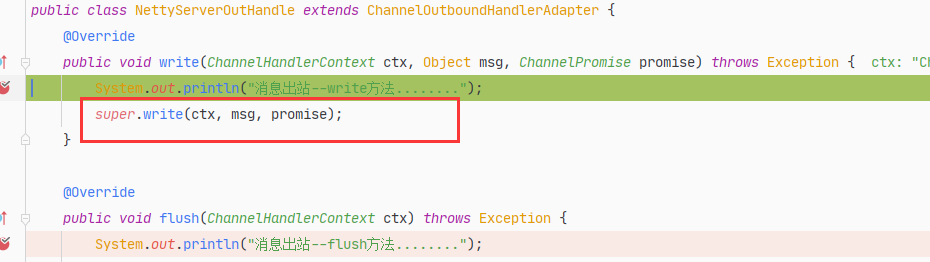
在出站时调用super.write()方法,往前查找pipeline中上一个节点的write方法 又进入io.netty.channel.AbstractChannelHandlerContext#write(java.lang.Object, boolean, io.netty.channel.ChannelPromise)方法查找出站handle 直到pipeline头部
在所有write方法执行完成之后 进行刷新flush0方法
又进入我们自定义的NettyServerOutHandle类中 此时调用的是flush方法
跟踪super.flush()方法
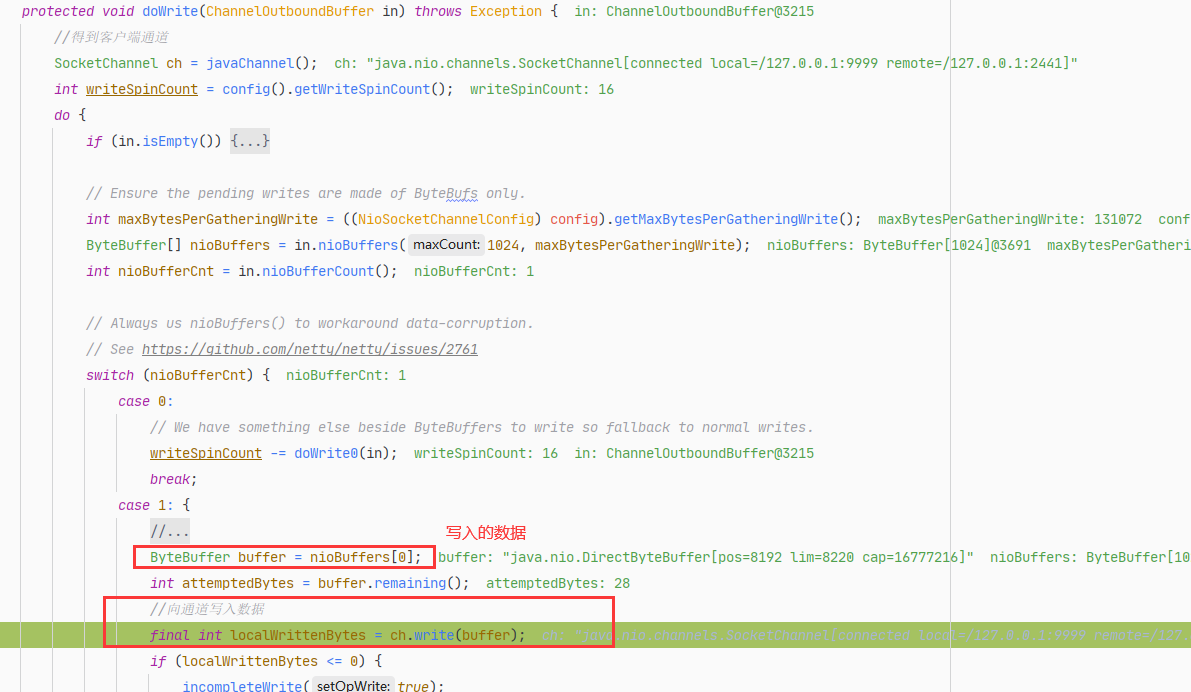
此处获取了客户端连接的通道
真正开始执行写入
此时客户端收到消息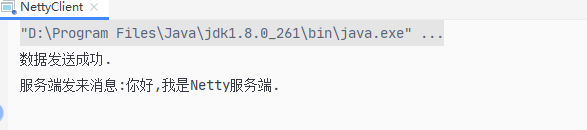
至此 出站流程结束

若有收获,就点个赞吧
0 人点赞
