- 属性传值
- 对于数据的跨层传递,Flutter 还提供了三种方案:InheritedWidget、Notification 和 EventBus。
InheritedWidget
InheritedWidget 是 Flutter 中的一个功能型 Widget,适用于在 Widget 树中共享数据的场景。通过它,我们可以高效地将数据在 Widget 树中进行跨层传递。
Theme 类是通过 InheritedWidget 实现的典型案例.
InheritedWidget 的使用方法。
- 首先,为了使用 InheritedWidget,我们定义了一个继承自它的新类 CountContainer。
- 然后,我们将计数器状态 count 属性放到 CountContainer 中,并提供了一个 of 方法方便其子 Widget 在 Widget 树中找到它。
- 最后,我们重写了 updateShouldNotify 方法,这个方法会在 Flutter 判断 InheritedWidget 是否需要重建,从而通知下层观察者组件更新数据时被调用到。在这里,我们直接判断 count 是否相等即可。
class CountContainer extends InheritedWidget {//方便其子Widget在Widget树中找到它static CountContainer of(BuildContext context) => context.inheritFromWidgetOfExactType(CountContainer) as CountContainer;final int count;CountContainer({Key key,@required this.count,@required Widget child,}): super(key: key, child: child);// 判断是否需要更新@overridebool updateShouldNotify(CountContainer oldWidget) => count != oldWidget.count;}
- 然后,我们使用 CountContainer 作为根节点,并用 0 初始化 count。随后在其子 Widget Counter 中,我们通过 InheritedCountContainer.of 方法找到它,获取计数状态 count 并展示:
class _MyHomePageState extends State<MyHomePage> {@overrideWidget build(BuildContext context) {//将CountContainer作为根节点,并使用0作为初始化countreturn CountContainer(count: 0,child: Counter());}}class Counter extends StatelessWidget {@overrideWidget build(BuildContext context) {//获取InheritedWidget节点CountContainer state = CountContainer.of(context);return Scaffold(appBar: AppBar(title: Text("InheritedWidget demo")),body: Text('You have pushed the button this many times: ${state.count}',),);}
- InheritedWidget 仅提供了数据读的能力,如果我们想要修改它的数据,则需要把它和 StatefulWidget 中的 State 配套使用。我们需要把 InheritedWidget 中的数据和相关的数据修改方法,全部移到 StatefulWidget 中的 State 上,而 InheritedWidget 只需要保留对它们的引用。
class CountContainer extends InheritedWidget {...final _MyHomePageState model;//直接使用MyHomePage中的State获取数据final Function() increment;CountContainer({Key key,@required this.model,@required this.increment,@required Widget child,}): super(key: key, child: child);...}
- 然后,我们将 count 数据和其对应的修改方法放在了 State 中,仍然使用 CountContainer 作为根节点,完成了数据和修改方法的初始化。
class _MyHomePageState extends State<MyHomePage> {int count = 0;void _incrementCounter() => setState(() {count++;});//修改计数器@overrideWidget build(BuildContext context) {return CountContainer(model: this,//将自身作为model交给CountContainerincrement: _incrementCounter,//提供修改数据的方法child:Counter());}}class Counter extends StatelessWidget {@overrideWidget build(BuildContext context) {//获取InheritedWidget节点CountContainer state = CountContainer.of(context);return Scaffold(...body: Text('You have pushed the button this many times: ${state.model.count}', //关联数据读方法),floatingActionButton: FloatingActionButton(onPressed: state.increment), //关联数据修改方法);}}
Notification
如果说 InheritedWidget 的数据流动方式是从父 Widget 到子 Widget 逐层传递,那 Notificaiton 则恰恰相反,数据流动方式是从子 Widget 向上传递至父 Widget。这样的数据传递机制适用于子 Widget 状态变更,发送通知上报的场景。
- Notification 类提供了 dispatch 方法,可以让我们沿着 context 对应的 Element 节点树向上逐层发送通知。
在下面的代码中,我们自定义了一个通知和子 Widget。子 Widget 是一个按钮,在点击时会发送通知:
class CustomNotification extends Notification {CustomNotification(this.msg);final String msg;}//抽离出一个子Widget用来发通知class CustomChild extends StatelessWidget {@overrideWidget build(BuildContext context) {return RaisedButton(//按钮点击时分发通知onPressed: () => CustomNotification("Hi").dispatch(context),child: Text("Fire Notification"),);}}
在子 Widget 的父 Widget 中,我们监听了这个通知,一旦收到通知,就会触发界面刷新,展示收到的通知信息:
class _MyHomePageState extends State<MyHomePage> {String _msg = "通知:";@overrideWidget build(BuildContext context) {//监听通知return NotificationListener<CustomNotification>(onNotification: (notification) {setState(() {_msg += notification.msg+" ";});//收到子Widget通知,更新msg},child:Column(mainAxisAlignment: MainAxisAlignment.center,children: <Widget>[Text(_msg),CustomChild()],//将子Widget加入到视图树中));}}
EventBus
无论是 InheritedWidget 还是 Notificaiton,它们的使用场景都需要依靠 Widget 树,也就意味着只能在有父子关系的 Widget 之间进行数据共享。但是,组件间数据传递还有一种常见场景:这些组件间不存在父子关系。这时,事件总线 EventBus 就登场了。
事件总线是在 Flutter 中实现跨组件通信的机制。它遵循发布 / 订阅模式,允许订阅者订阅事件,当发布者触发事件时,订阅者和发布者之间可以通过事件进行交互。发布者和订阅者之间无需有父子关系,甚至非 Widget 对象也可以发布 / 订阅。这些特点与其他平台的事件总线机制是类似的。
接下来,我们通过一个跨页面通信的例子,来看一下事件总线的具体使用方法。需要注意的是,EventBus 是一个第三方插件,因此我们需要在 pubspec.yaml 文件中声明它:
dependencies:event_bus: 1.1.0
EventBus 的使用方式灵活,可以支持任意对象的传递。所以在这里,我们传输数据的载体就选择了一个有字符串属性的自定义事件类 CustomEvent:
class CustomEvent {String msg;CustomEvent(this.msg);}
然后,我们定义了一个全局的 eventBus 对象,并在第一个页面监听了 CustomEvent 事件,一旦收到事件,就会刷新 UI。需要注意的是,千万别忘了在 State 被销毁时清理掉事件注册,否则你会发现 State 永远被 EventBus 持有着,无法释放,从而造成内存泄漏:
//建立公共的event busEventBus eventBus = new EventBus();//第一个页面class _FirstScreenState extends State<FirstScreen> {String msg = "通知:";StreamSubscription subscription;@overrideinitState() {//监听CustomEvent事件,刷新UIsubscription = eventBus.on<CustomEvent>().listen((event) {setState(() {msg+= event.msg;});//更新msg});super.initState();}dispose() {subscription.cancel();//State销毁时,清理注册super.dispose();}@overrideWidget build(BuildContext context) {return new Scaffold(body:Text(msg),...);}}
最后,我们在第二个页面以按钮点击回调的方式,触发了 CustomEvent 事件:
class SecondScreen extends StatelessWidget {@overrideWidget build(BuildContext context) {return new Scaffold(...body: RaisedButton(child: Text('Fire Event'),// 触发CustomEvent事件onPressed: ()=> eventBus.fire(CustomEvent("hello"))),);}}
总结
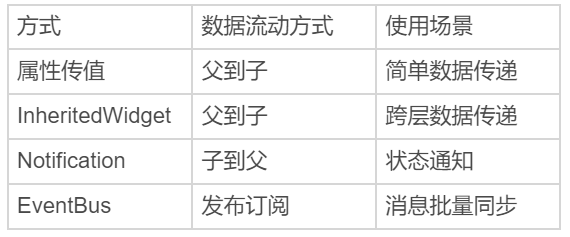
图 5 属性传值、InheritedWidget、Notification 与 EventBus 数据传递方式对比

若有收获,就点个赞吧
0 人点赞
