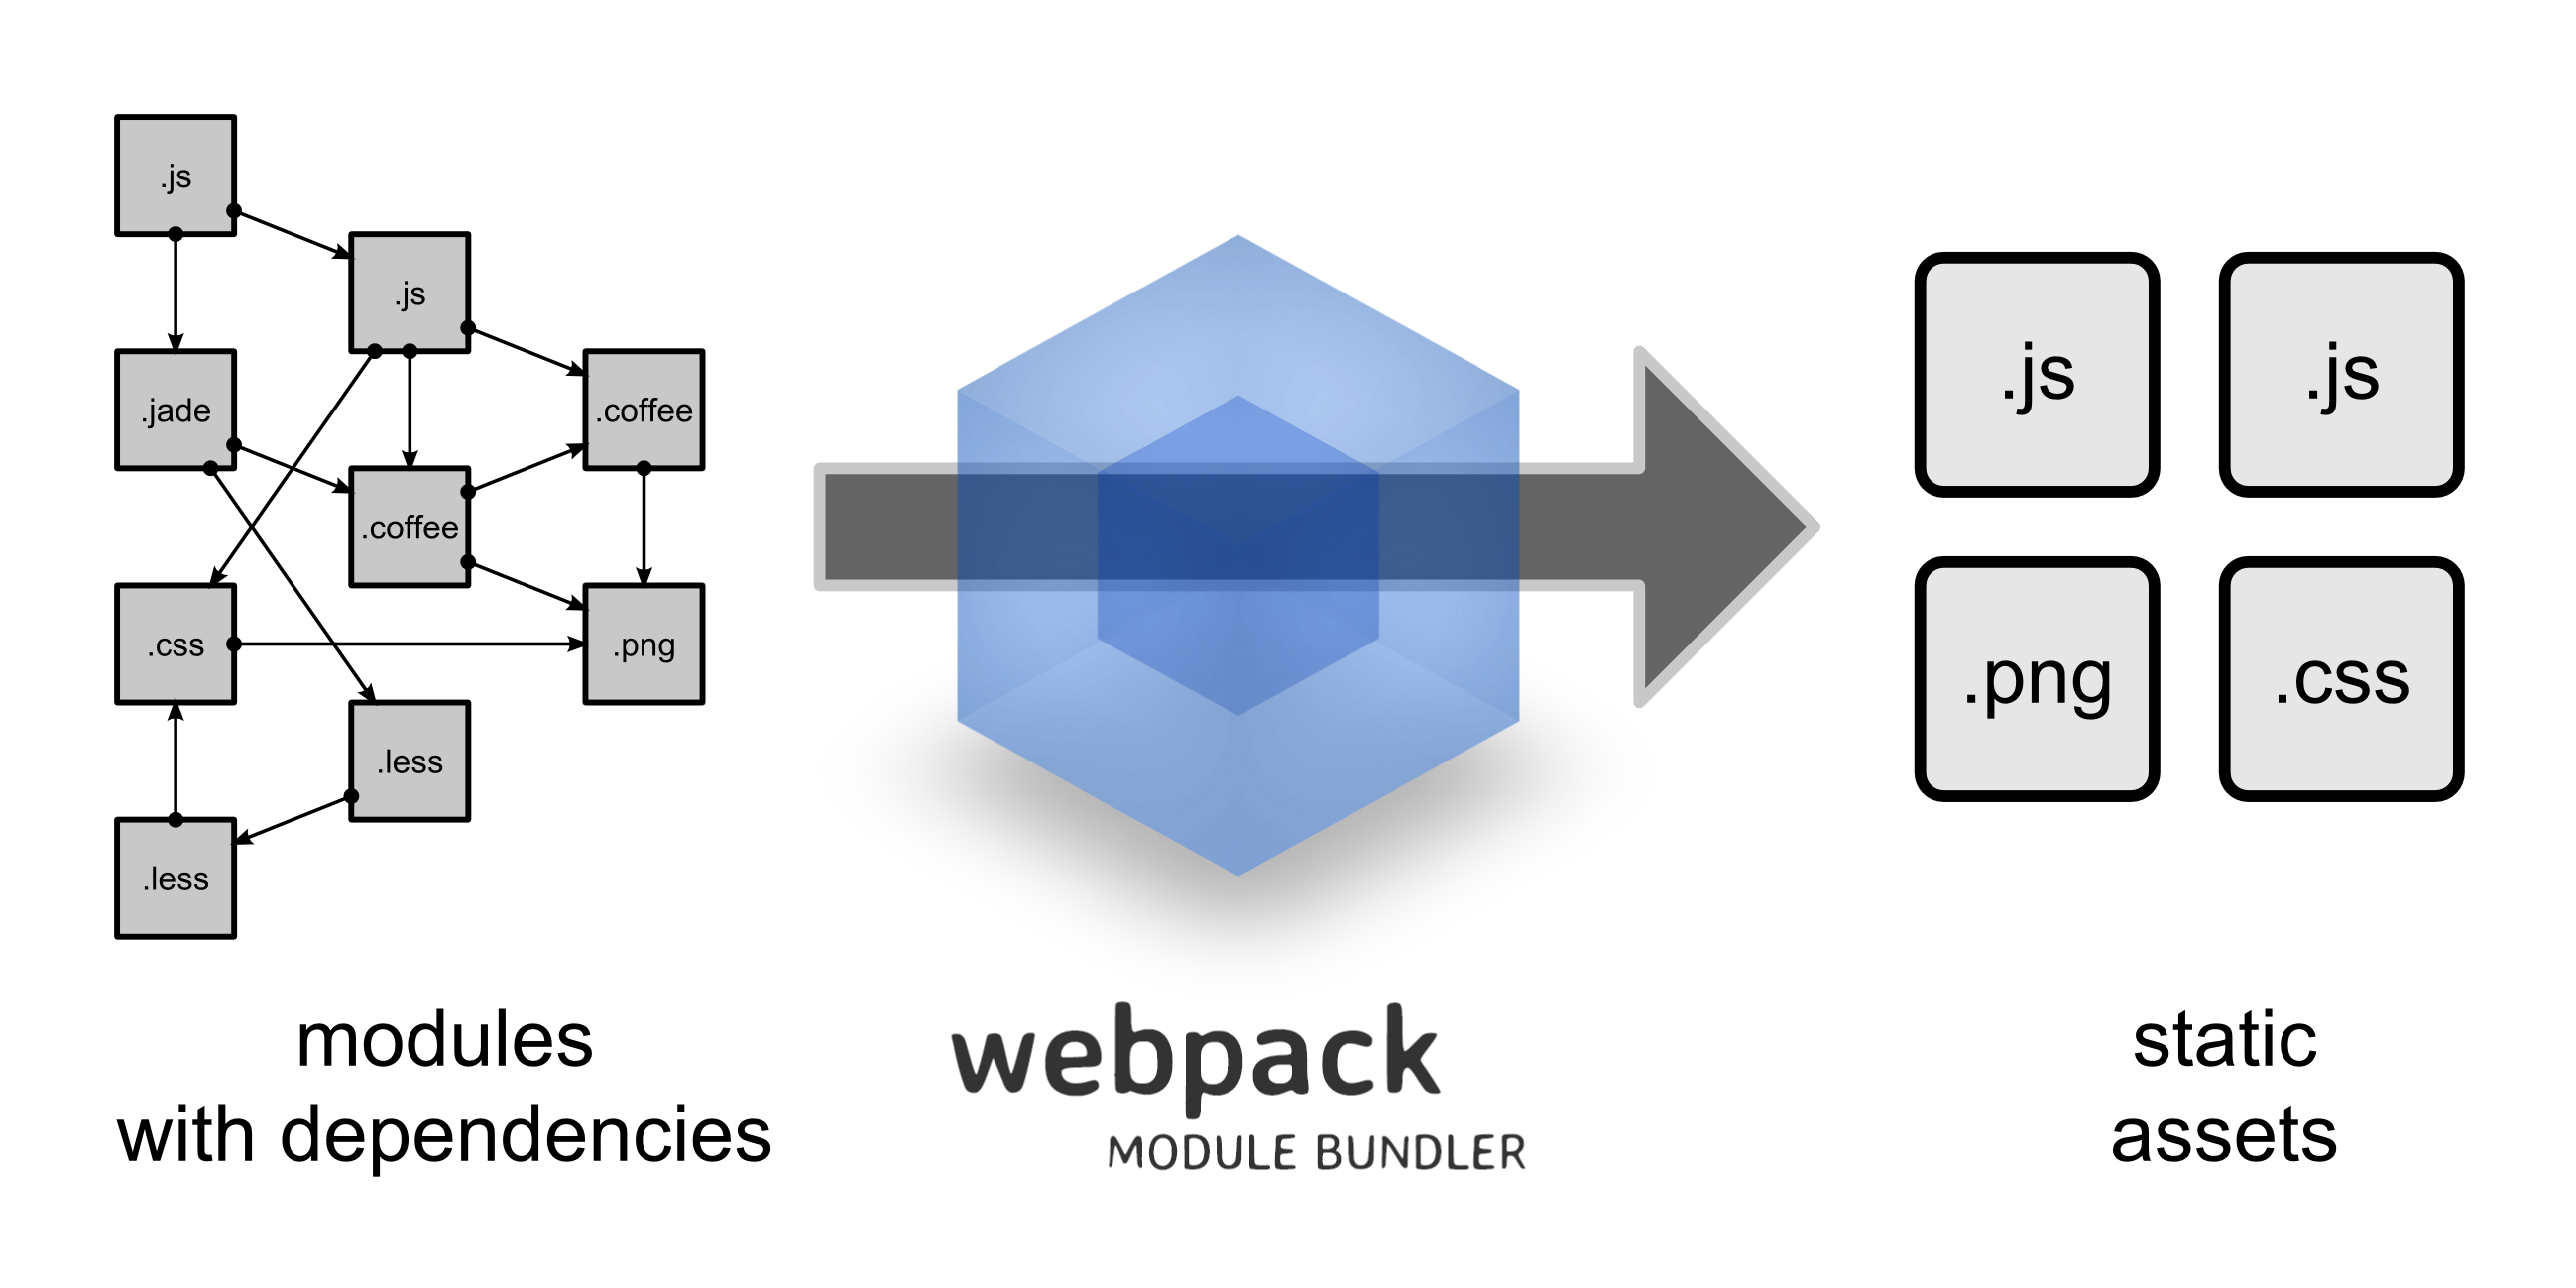
基于webpack4
功能
- 编译,包括
JavaScript的编译、css的编译 - 文件的压缩、打包、合并、公共模块提取等
- 图片等资源的处理,如压缩、合并雪碧图等
Tree-shaking等优化JavaScript工具Webpack-dev-server、Eslint、热更新等帮助开发的工具
打包
webpack
直接以当前目录下的名为 webpack.config.js 的文件名作为配置文件进行打包
webpack —config configfile
指定一个文件作为配置文件进行打包
webpack --config ./config/webpack.config.js --mode production
核心
entry、output
dev-server只能配置[hash].js
Cannot use [chunkhash] or [contenthash] for chunk in ‘js/[name].[contenthash:6].js’ (use [hash] instead)
module.exports = {/*** 入口文件,如果不做任何配置默认入口是[src/index.js]*/// entry: [path.resolve(__dirname, '../src/app.js')],// 多入口需要如下键值对形式entry: {app: path.resolve(__dirname, '../src/app.js'),},/*--------------*//*** 出口文件*/output: {// 打包后的路径path: path.resolve(__dirname, '../dist'),// 打包后的文件名,默认打包出来是main.jsfilename: 'js/[name].[hash:6].min.js',// publicPath: 'https://cloud-app.com.cn/app/',},}
entry
entry是webpack的入口文件,默认是src/index.js
- 单入口
数组形式定义
// 单入口形式entry: [path.resolve(__dirname, '../src/app.js')],
- 多入口
键值对来定义
// 多入口需要如下键值对形式entry: {app: path.resolve(__dirname, '../src/app.js'),},
output
output是webpack的打包出口,默认结果是main.js,最终的打包结果会根据output的定义输出,会影响到资源的 路径。
/*** 出口文件*/output: {// 打包后的路径path: path.resolve(__dirname, '../dist'),// 打包后的文件名,默认打包出来是main.jsfilename: 'js/[name].[contenthash:6].min.js',},
loader
loader是webpack的编译方法
- webpack自身只能处理JavaScript,所以对别的资源处理需要loader
- webpack只负责打包,相关的编译操作,需要loader
- loader本质是一个方法,使用时大多需要额外安装
module: {rules: [{test: /\.js$/,use: {loader: 'babel-loader',},}]}
常见loader
- 处理css
style-loader、css-loader
- 处理图片、字体等资源
url-loader、image-loader
- 编译loader
less-loader、sass-loader、babel-loader
- 语法糖loader
vue-loader
plugins
externals
定义不去做打包的模块
externals: {'AMap': 'AMap',},
基本使用
处理JS
安装babel
npm install @babel/core @babel/preset-env --save-dev
安装babel-loader
npm install babel-loader --save-dev
babel-preset
配置了**presets**才能够准确编译es6+
presets是存储JavaScript不同标准的插件,通过使用正确的presets,告诉babel按照哪个规则编译
常见规范:
- es2015
- es2016
- es2017
- env
- babel-preset-stage
babel-preset的target配置
target是preset的核心配置,告诉preset编译的具体目标;
Target的值:
- 以browsers为目标【通常使用】
- 以node的版本为目标
- 以特定的浏览器为目标
loader完整配置
rules: [{test: /\.js$/, // 检测jsuse: {loader: 'babel-loader', // 使用babel-loader// 打包参数options: {// 存储JavaScript不同标准的插件presets: [['@babel/preset-env', {targets: {// 需要适配的浏览器类型browsers: ["> 1%", "last 2 versions", "not ie <= 8", "iOS 8"]}}]]}}}]
ES6方法的编译
全局生效
npm install babel-polyfill --save-dev
通过babel-polyfill产生全局对象,包含es6-es5的重写,从而将es6语法进行编译。
使用
- 代码中引用 ```javascript import ‘babel-polyfill’;
new Promise(setTimeout(() => { const typescript = ‘typescript’; console.log(typescript); }, 300))
- webpack配置```javascript// 默认打包后入口文件为 main.jsentry: ['babel-polyfill', path.resolve(__dirname, '../src/app.js')]// 多页面配置写法,打包后入口文件为app.jsentry: {app: ['babel-polyfill', path.resolve(__dirname, '../src/app.js')],}
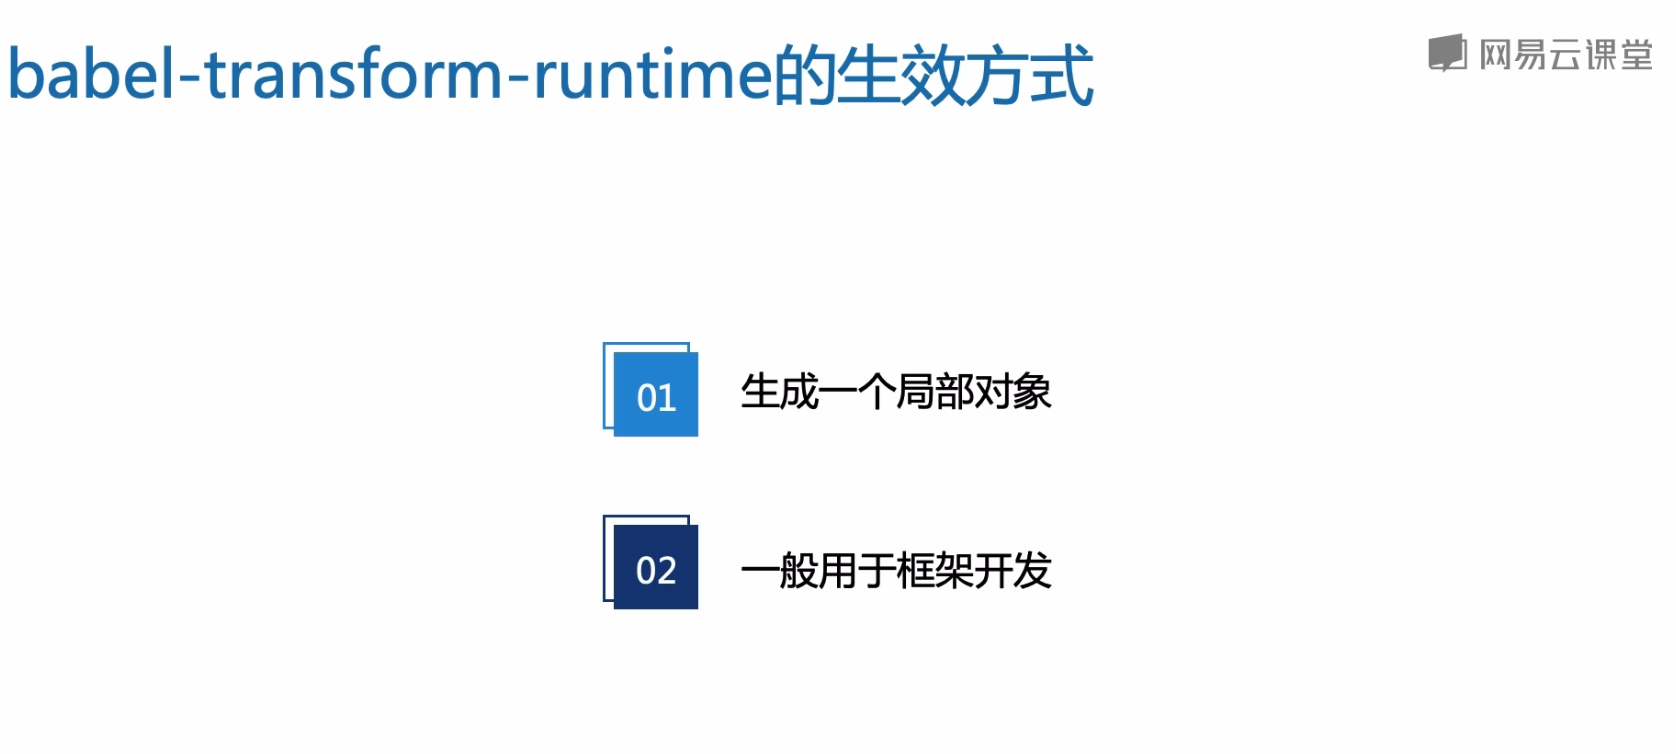
局部生效
只对使用到的方法进行编译,适用于框架的开发
npm install @babel/plugin-transform-runtime @babel/runtime --save-dev
提取babel-loader options
添加 .babelrc 文件,添加以下内容。
{// 存储JavaScript不同标准的插件"presets": [["@babel/preset-env", {"modules": false, // 保留es6的模块化语法"targets": {// 需要适配的浏览器类型"browsers": ["> 1%", "last 2 versions", "not ie <= 8", "iOS 8"]}}]],"plugins": ["@babel/transform-runtime"]}
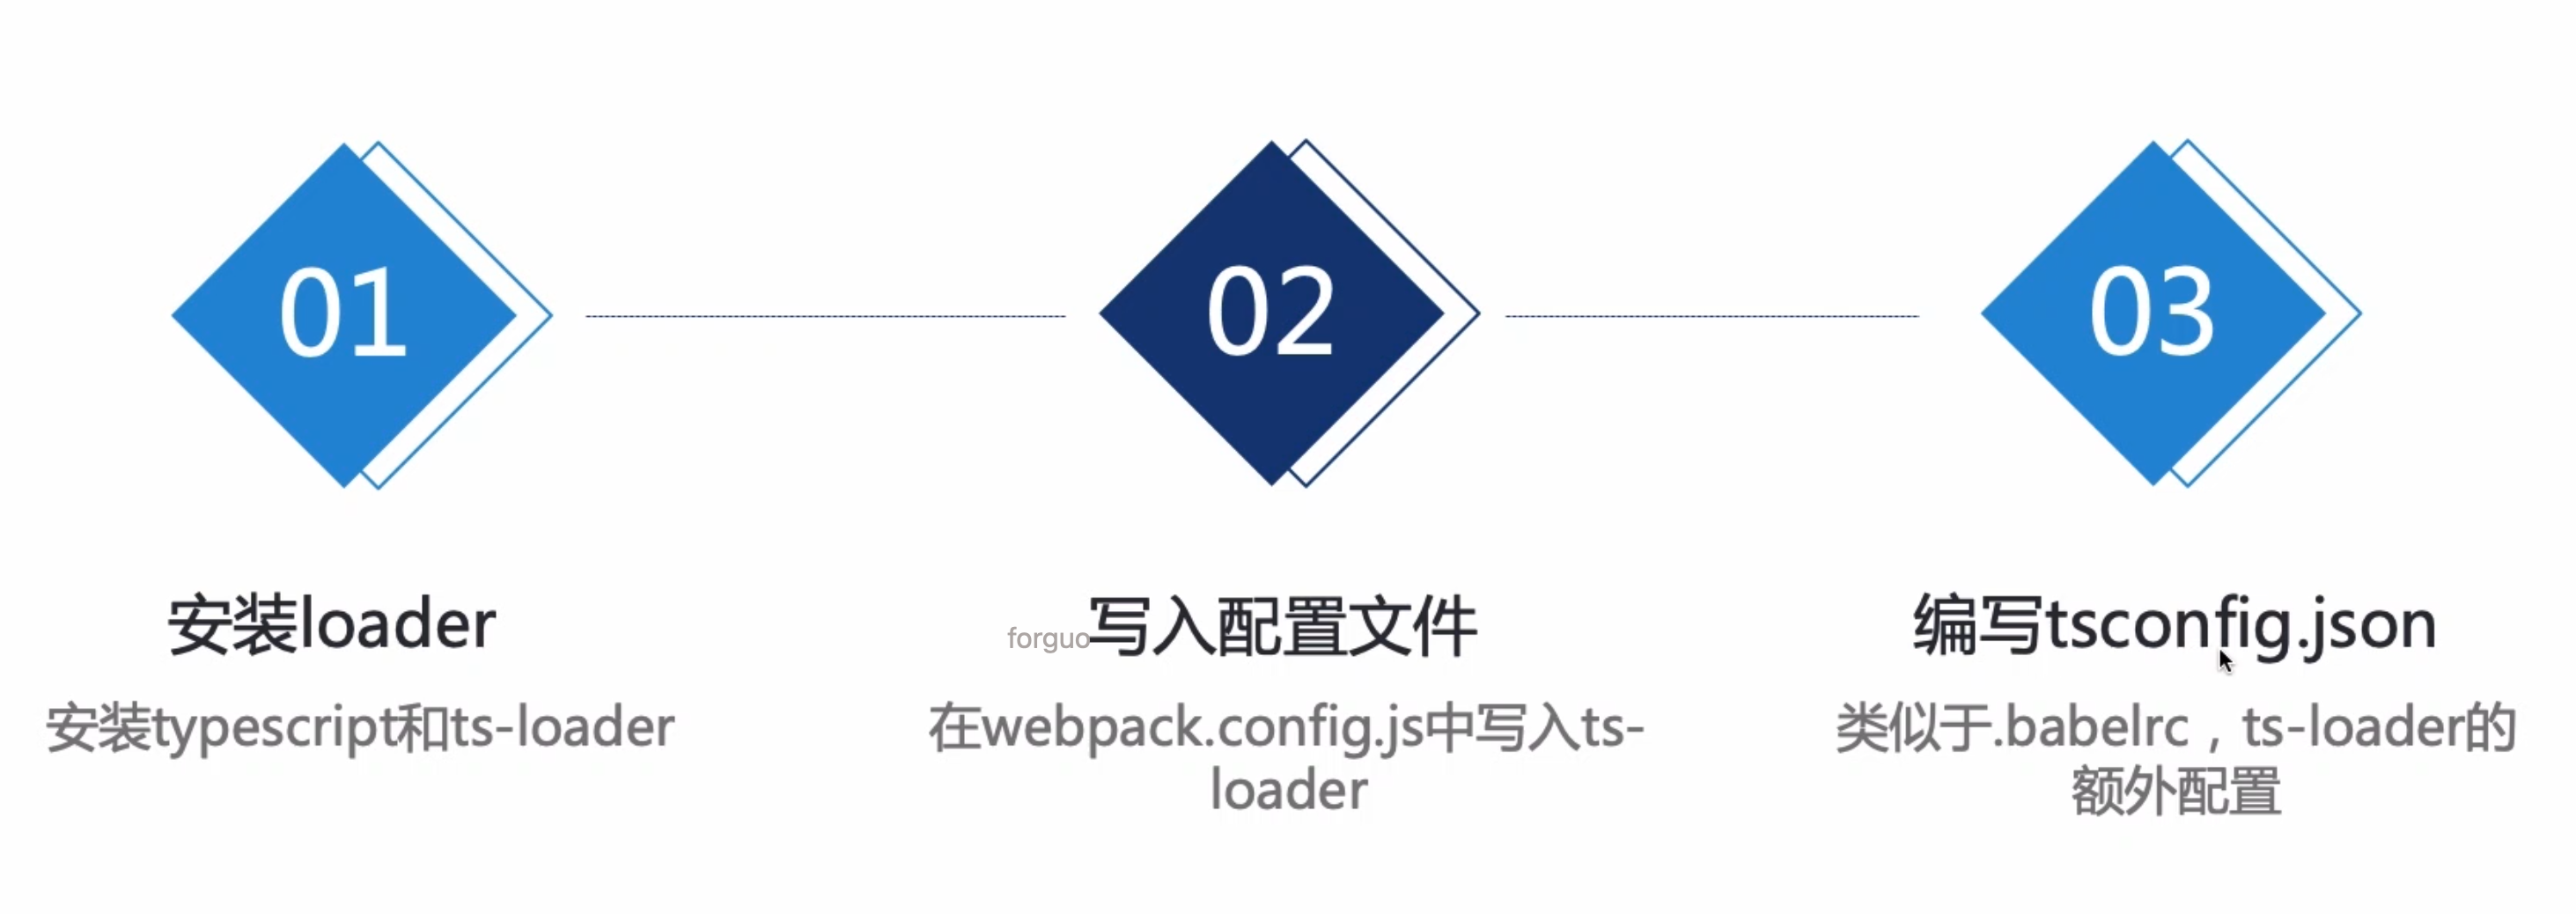
TypeScript配置
安装loader
npm install typescript ts-loader --save-dev
添加loader
{test: /\.tsx?$/, // 检测ts或者tsx文件use: {loader: 'ts-loader',options: {transpileOnly: true}},}
配置文件
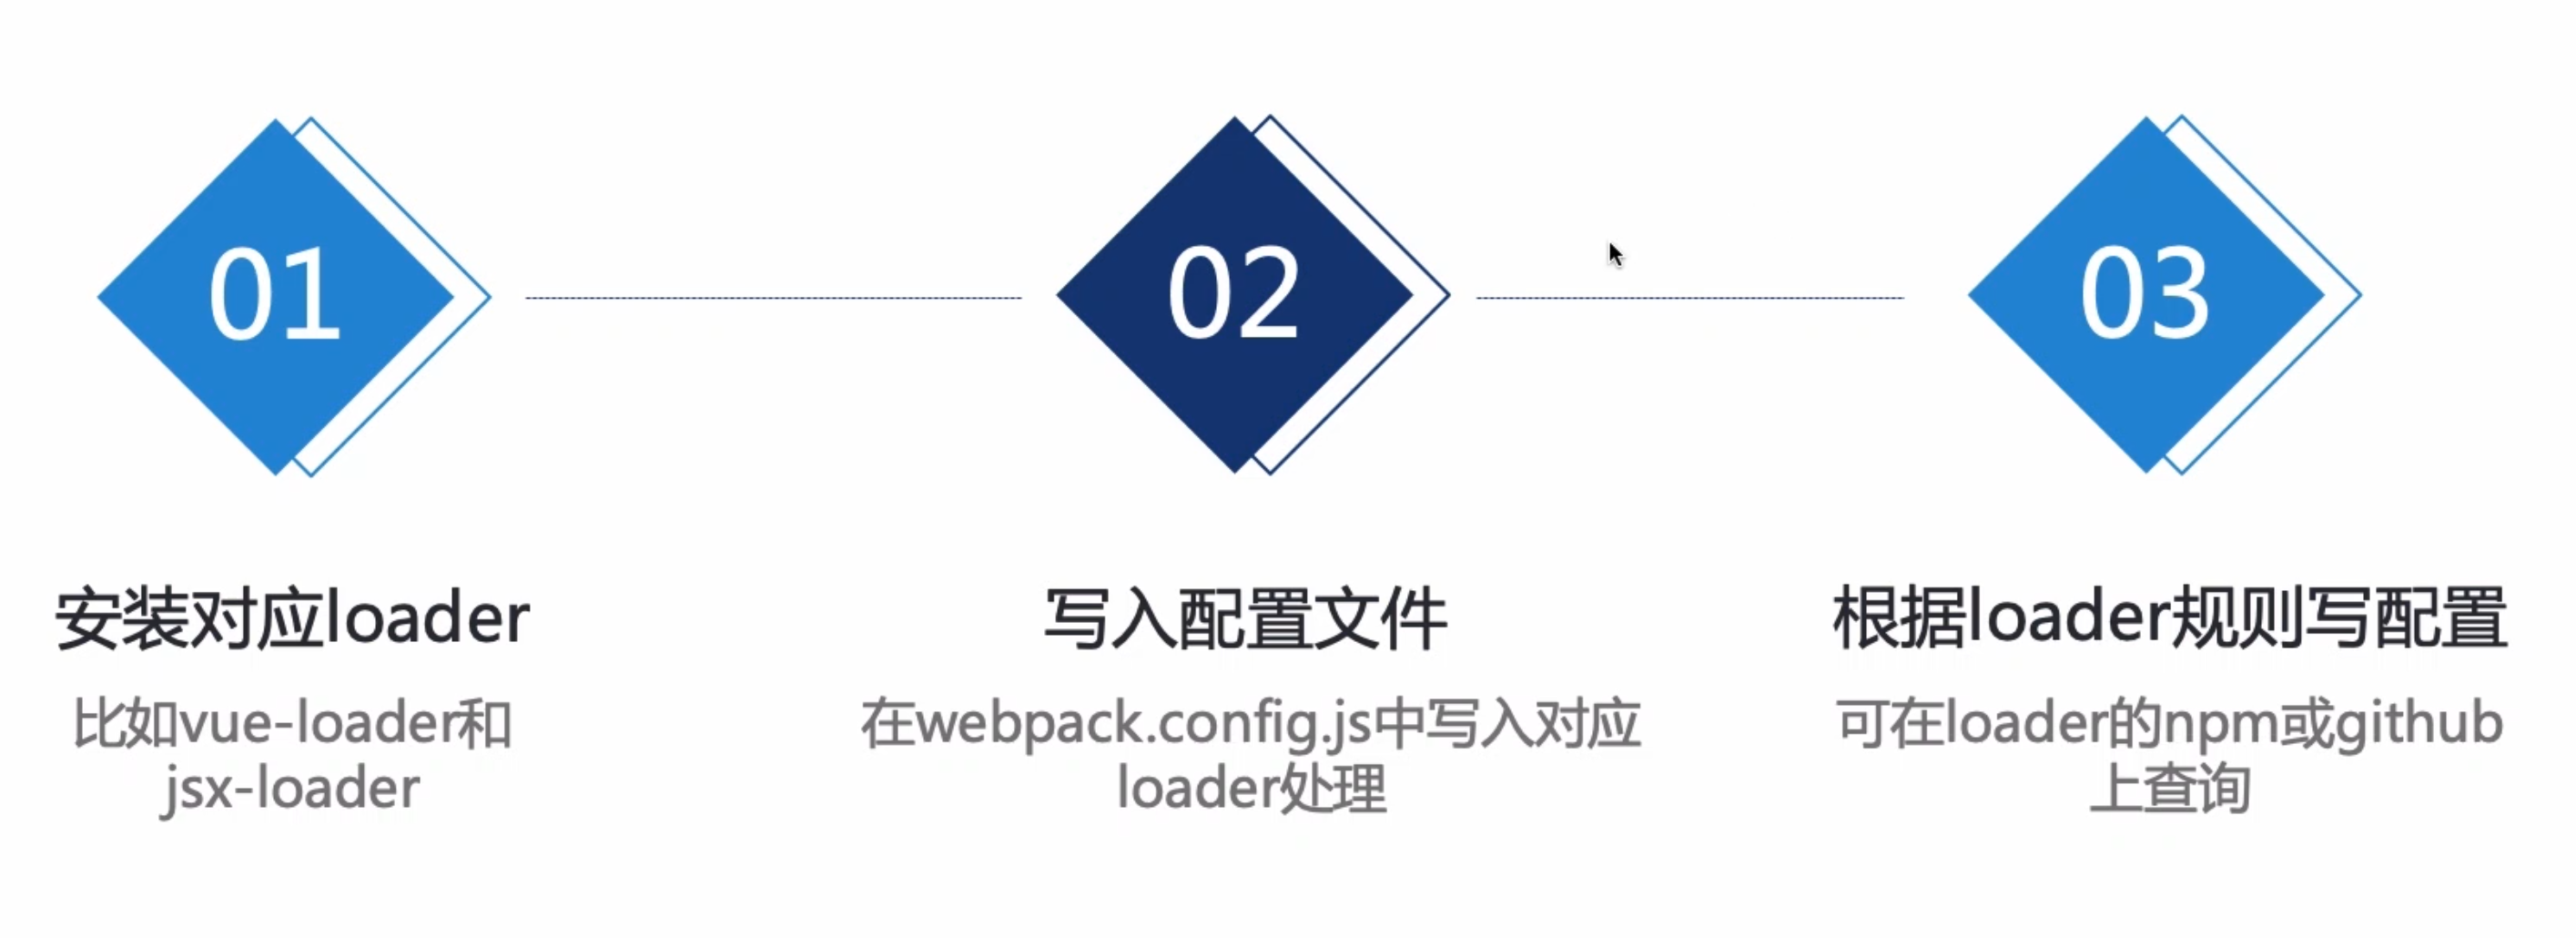
语法糖配置
HTML模板
通过为index.html创建HTML模板,webpack可以自动将打包好的js文件添加到index.html中。
安装webpack-html-plugin
npm install --save-dev html-webpack-plugin
修改webpack.config.js,添加plugin
// 自动创建 HTML 模板供 Webpack 打包结果使用,包括文件名称 模板参数 meta 标签配置 压缩等等。SPA 与 MPA 都会使用到。const HtmlWebpackPlugin = require('html-webpack-plugin');new HtmlWebpackPlugin({title: 'WebPack',template: path.resolve(__dirname, "../public/index.html"),filename: "index.html",inject: true, // 是否自动引入资源icon: path.join(__dirname, "../public/favicon.ico"),minify: _DEV_ ? false : {// collapseWhitespace: true,// collapseBooleanAttributes: true,// collapseInlineTagWhitespace: true,removeComments: true,removeRedundantAttributes: true,removeScriptTypeAttributes: true,removeStyleLinkTypeAttributes: true,minifyCSS: true,minifyJS: true,minifyURLs: true,useShortDoctype: true,}}),
处理CSS
css编译配置
处理css主要有以下loader:
- style-loader:负责将css自动添加到html文件中
- css-loader:负责处理对css文件的依赖
- postcss-loader:负责补齐css浏览器前缀
安装loader
npm install css-loader style-loader postcss-loader --save-dev
配置loader
{// 从下往下编译的,所以css-loader在下test: /\.css$/,use: [{loader: 'style-loader',},{loader: 'css-loader',},// css兼容性处理,添加前缀{loader: 'postcss-loader',options: {plugins: function () {return [require('precss'),require('autoprefixer')];}}},]},
需要添加postcss.config.js
module.exports = {plugins: [require("precss")(),require('autoprefixer')()]};
以及在package.json添加
"browserslist": ["Android 2.3","Android >= 4","Chrome >= 20","Firefox >= 19","Explorer >= 8","iOS >= 6","Opera >= 12","Safari >= 6"]
less编译器
安装
npm install less less-loader --save-dev
添加loader
在上面css-loader的基础上添加less-loader即可。
{test: /\.less/,use: [/*** MiniCssExtractPlugin提取css为一个文件,MiniCssExtractPlugin没有hdr,* 所以开发使用style-loader*/devMode ? 'style-loader' : MiniCssExtractPlugin.loader,// 'style-loader', // 将css文件打包到js'css-loader', // css文件处理// css兼容性处理,添加前缀{loader: 'postcss-loader',options: {plugins: function () {return [require('precss'),require('autoprefixer')];}}},'less-loader', // less编译]}
scss编译器
安装
npm install node-sass sass-loader --save-dev
添加loader
将less-loader的配置换成sass的即可
{test: /\.scss/,use: [/*** MiniCssExtractPlugin提取css为一个文件,MiniCssExtractPlugin没有hdr,* 所以开发使用style-loader*/devMode ? 'style-loader' : MiniCssExtractPlugin.loader,// 'style-loader', // 将css文件打包到js'css-loader', // css文件处理// css兼容性处理,添加前缀{loader: 'postcss-loader',options: {plugins: function () {return [require('precss'),require('autoprefixer')];}}},'sass-loader', // less编译]}
css文件提取
开发环境推荐使用style-loader,因为extract-text-webpack-plugin无法使用热替换hmr功能
安装插件
Since webpack v4 the **extract-text-webpack-plugin** should not be used for css.
Use mini-css-extract-plugin instead.
原本使用的 extract-text-webpack-plugin 不好用了,使用mini-css-extract-plugin代替
npm install mini-css-extract-plugin webpack --sadev-dev
loader改造
// css打包提取为单独文件const MiniCssExtractPlugin = require("mini-css-extract-plugin");// loader改造{test: /\.scss$/,use: [MiniCssExtractPlugin.loader,"css-loader","postcss-loader","sass-loader",],}
添加plugin
MiniCssExtractPlugin必须要添加到plugin
// 添加pluginnew MiniCssExtractPlugin({filename: '[name].[contenthash:8].css'}),
处理图片
主要有以下loader用于处理图片:
- file-loader:用于将图片转为链接
- url-loader:封装file-loader,对小图片直接Base64编码,大图片通过file-loader进行处理
- image-webpack-loader:封装图片压缩loader,对各种图片进行压缩
file-loader
处理图片
{test: /\.(png|jpe?g|gif|svg|bmp|mp4)$/,use: [{loader: 'file-loader',options: {name: '/imgs/[name].[hash:4].[ext]'}}]},
url-loader
封装原有file-loader,转换小图片为base64
小于 limit 的文件会被转为 base64,单位为bite,
大于 limit 的使用 file-loader 进行处理,单独打包
{test: /\.(png|jpe?g|gif|svg|bmp|mp4)$/,use: [{loader: 'url-loader',options: {outputPath: 'img/',// 压缩之后的图片如果小于10KB,那么将直接转为Base64编码,否则通过URL的形式连接图片;limit: 10 * 1024, // 默认转为Base64编码name: '[name].[contenthash:6].[ext]',}}]},
图片压缩
安装loader
去除之前的一些压缩loader,使用image-webpack-loader,其实就是一个二次封装
这里的image-webpack-loader需要<=6.0.6,不然也会不成功,因为image-webpack-loader越高,所依赖的插件库也就越高。
image-webpack-loader/v/6.0.0
npm uni img-loader imagemin imagemin-pngquant imagemin-mozjpegnpm i image-webpack-loader@6.0.0 --save-dev
{test: /\.(png|jpe?g|gif|svg|bmp|mp4)$/,use: [{loader: 'url-loader',options: {outputPath: 'img/',publicPath: '../img/',// base64配置 小于 limit 字节的文件会被转为 base64,大于 limit 的使用 file-loader 进行处理,单独打包limit: 8000,name: '[name].[hash:4].[ext]'}},/*********** loader for zip img ***************/{loader: 'image-webpack-loader',options: {mozjpeg: {progressive: true,quality: 65},// optipng.enabled: false will disable optipngoptipng: {enabled: false,},pngquant: {quality: [0.65, 0.90],speed: 4, // 1-11 越小压缩效果越好},gifsicle: {interlaced: false,},// the webp option will enable WEBPwebp: {quality: 75}}},/*********** loader for zip img ***************/]},
其实image-webpack-loader就是对以下的loader做了一个封装。
当前6.0.0对应以下版本loader
"dependencies": {"imagemin": "^7.0.0","imagemin-gifsicle": "^6.0.1","imagemin-mozjpeg": "^8.0.0","imagemin-optipng": "^7.0.0","imagemin-pngquant": "^8.0.0","imagemin-svgo": "^7.0.0","imagemin-webp": "^5.1.0",}
雪碧图
1、postcss-sprites
属于postcss-loader的插件,会自动把css文件中引入的背景图合成雪碧图,并修改css文件。
安装
npm i postcss-loader postcss-sprites --save-dev
配置
a、直接修改cssloader
{test: /\.css$/,use: [MiniCssExtractPlugin.loader,"css-loader",/*********** loader for sprites ***************/{loader: 'postcss-loader',options: {ident: 'postcss',plugins: [require('postcss-sprites')(spritesConfig)]}}/*********************************************/],},
b、由于之前已经添加过postcss-loader,直接修改配置也可以
/*** @Author: forguo* @Date: 2021/12/19 21:49* @Description: postcss.config*//*********** sprites config ***************/let spritesConfig = {spritePath: './dist/img'}/******************************************/module.exports = {ident: 'postcss',plugins: [require("precss")(),require('autoprefixer')(),/*********** loader for sprites ***************/require('postcss-sprites')(spritesConfig)/*********************************************/]};
[注]:生成雪碧图之后,图片体积响应也会变大,也不会再去压缩或者base64转码,需要合理使用。
2、webpack-spritesmith
独立插件,会按照指定的路径的指定图片,生成一个雪碧图,
和一个雪碧图相关的css,不会修改原css。
压缩前后代码对比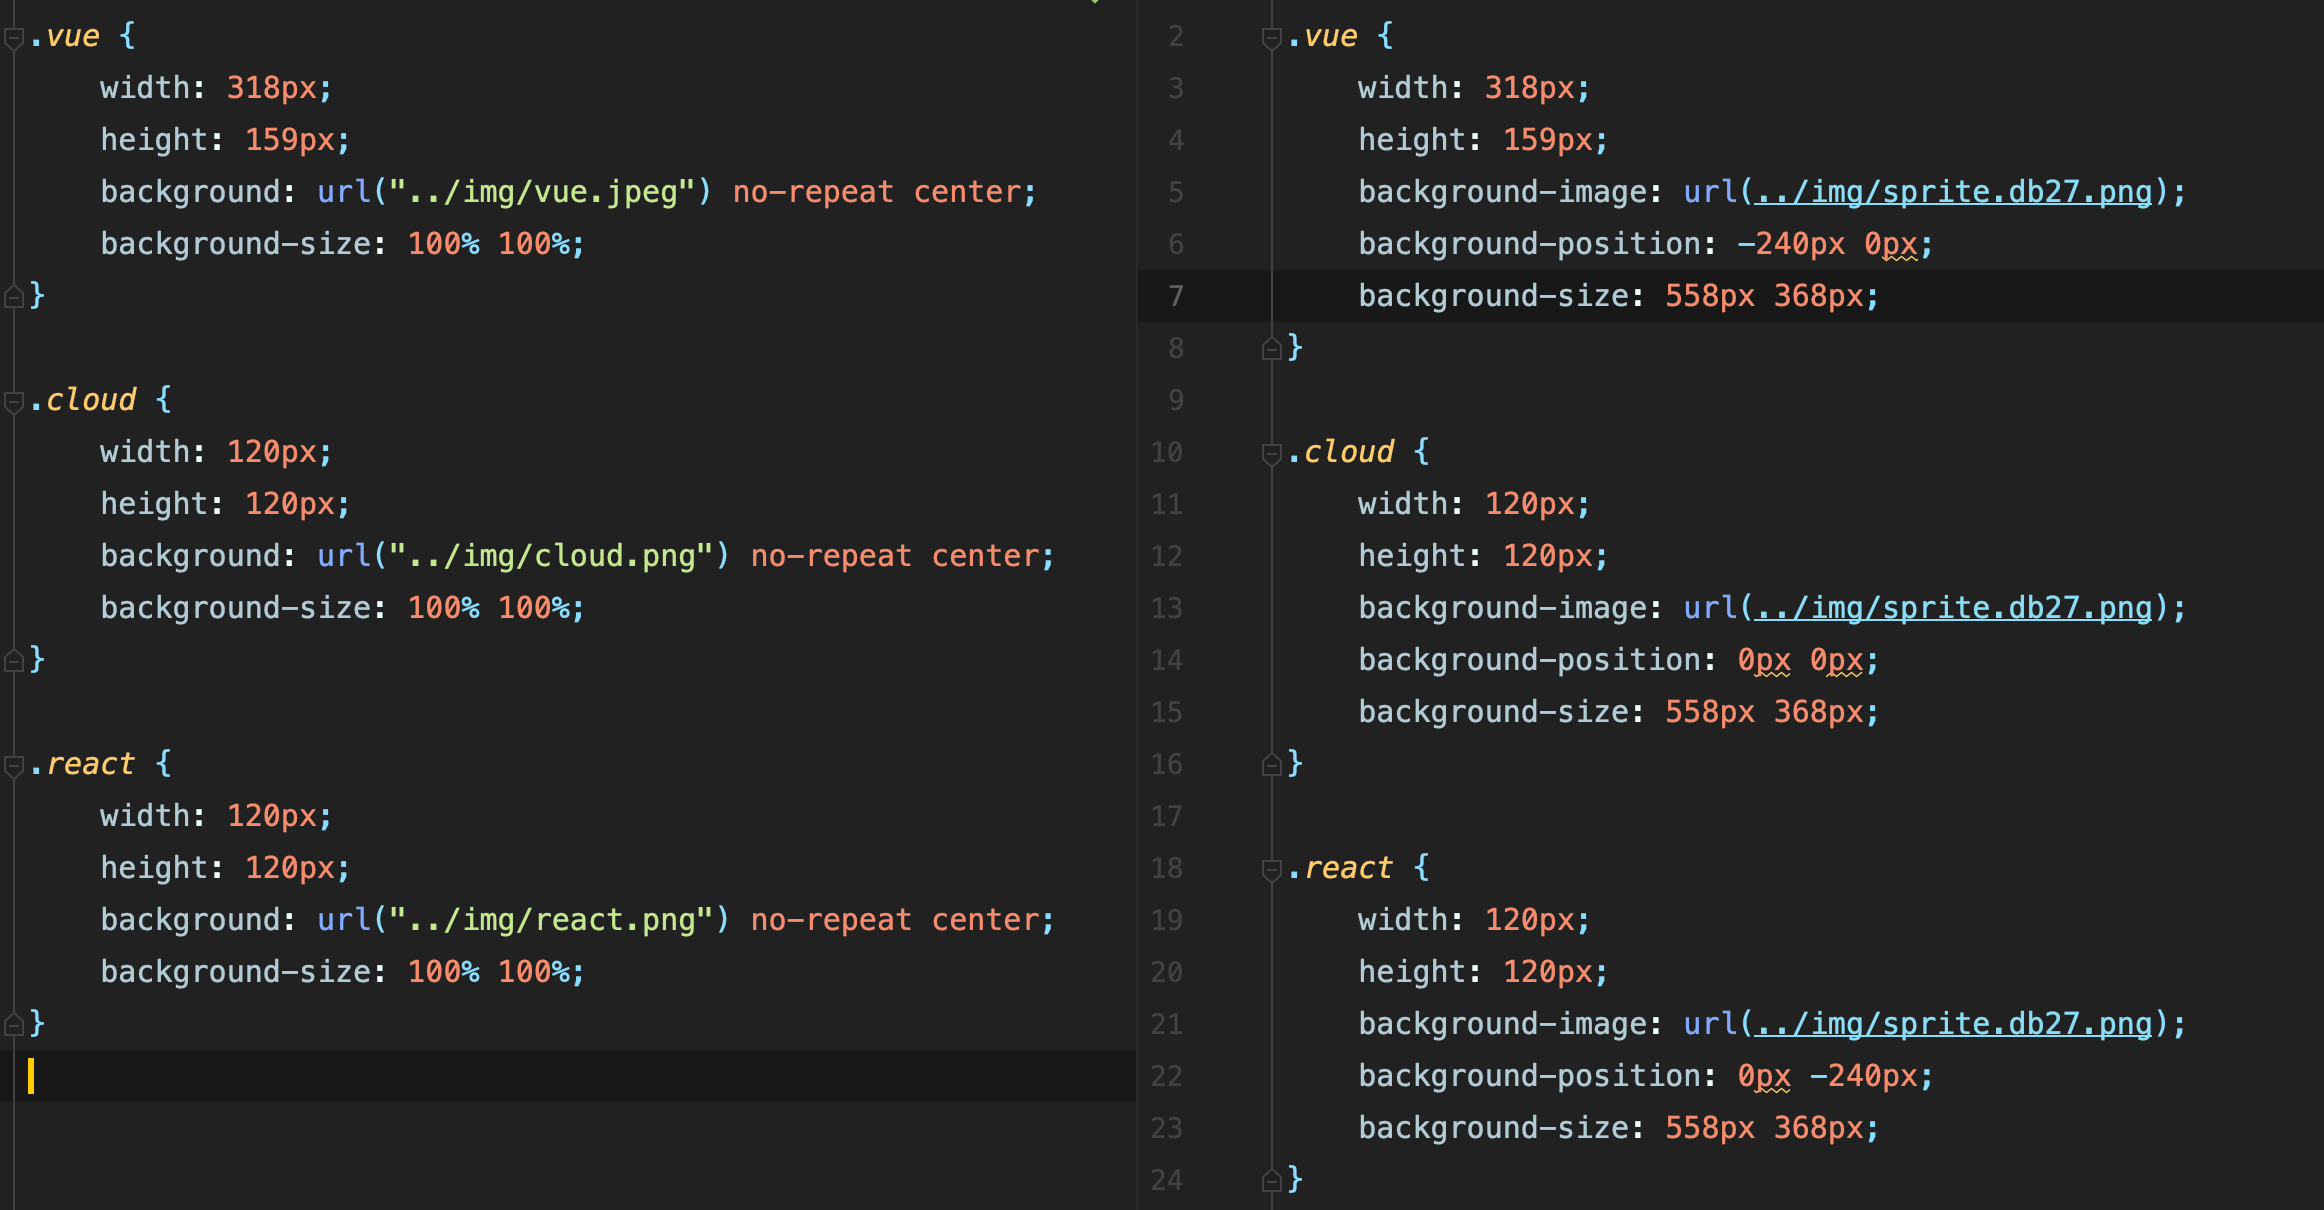
安装
npm i webpack-spritesmith --save-dev
配置
// css雪碧图插件// 【问题】没有将雪碧图打包进css,而且 会被CleanWebpackPlugin删除掉雪碧图文件夹new SpritesmithPlugin({// 原图片路径src: {cwd: path.resolve(__dirname, '../src/sprites'),glob: '*.png'},// 生成雪碧图及css路径target: {image: path.resolve(__dirname, '../dist/sprites/sprite.[hash:6].png'),css: path.resolve(__dirname, '../dist/sprites/sprite.[hash:6].css')},// css引入雪碧图apiOptions: {cssImageRef: '../sprites/sprite.[hash:6].png',},// 配置spritesmith选项,非必选spritesmithOptions: {algorithm: `top-down`,//設定圖示的排列方式padding: 4 //每張小圖的補白,避免雪碧圖中邊界部分的bug}}),
字体处理
{test: /\.(ttf|eot|woff2?)$/,loader: 'file-loader',options: {outputPath: 'fonts/',publicPath: '../fonts/',name: '[name].[hash:4].[ext]'},},
清理输出文件夹
每次build之前,将上次的打包目录清楚
安装clean-webpack-plugin
npm install --save-dev html-webpack-plugin
修改webpack.config.js,添加 plugin
plugins: [// 清除上次打包的代码new CleanWebpackPlugin(),// 默认会压缩html,new HtmlWebpackPlugin({title: 'app',template: path.resolve(__dirname, '../public/index.html'),filename: 'index.html',inject: true,minify: false,}),]
Webpack的环境系统
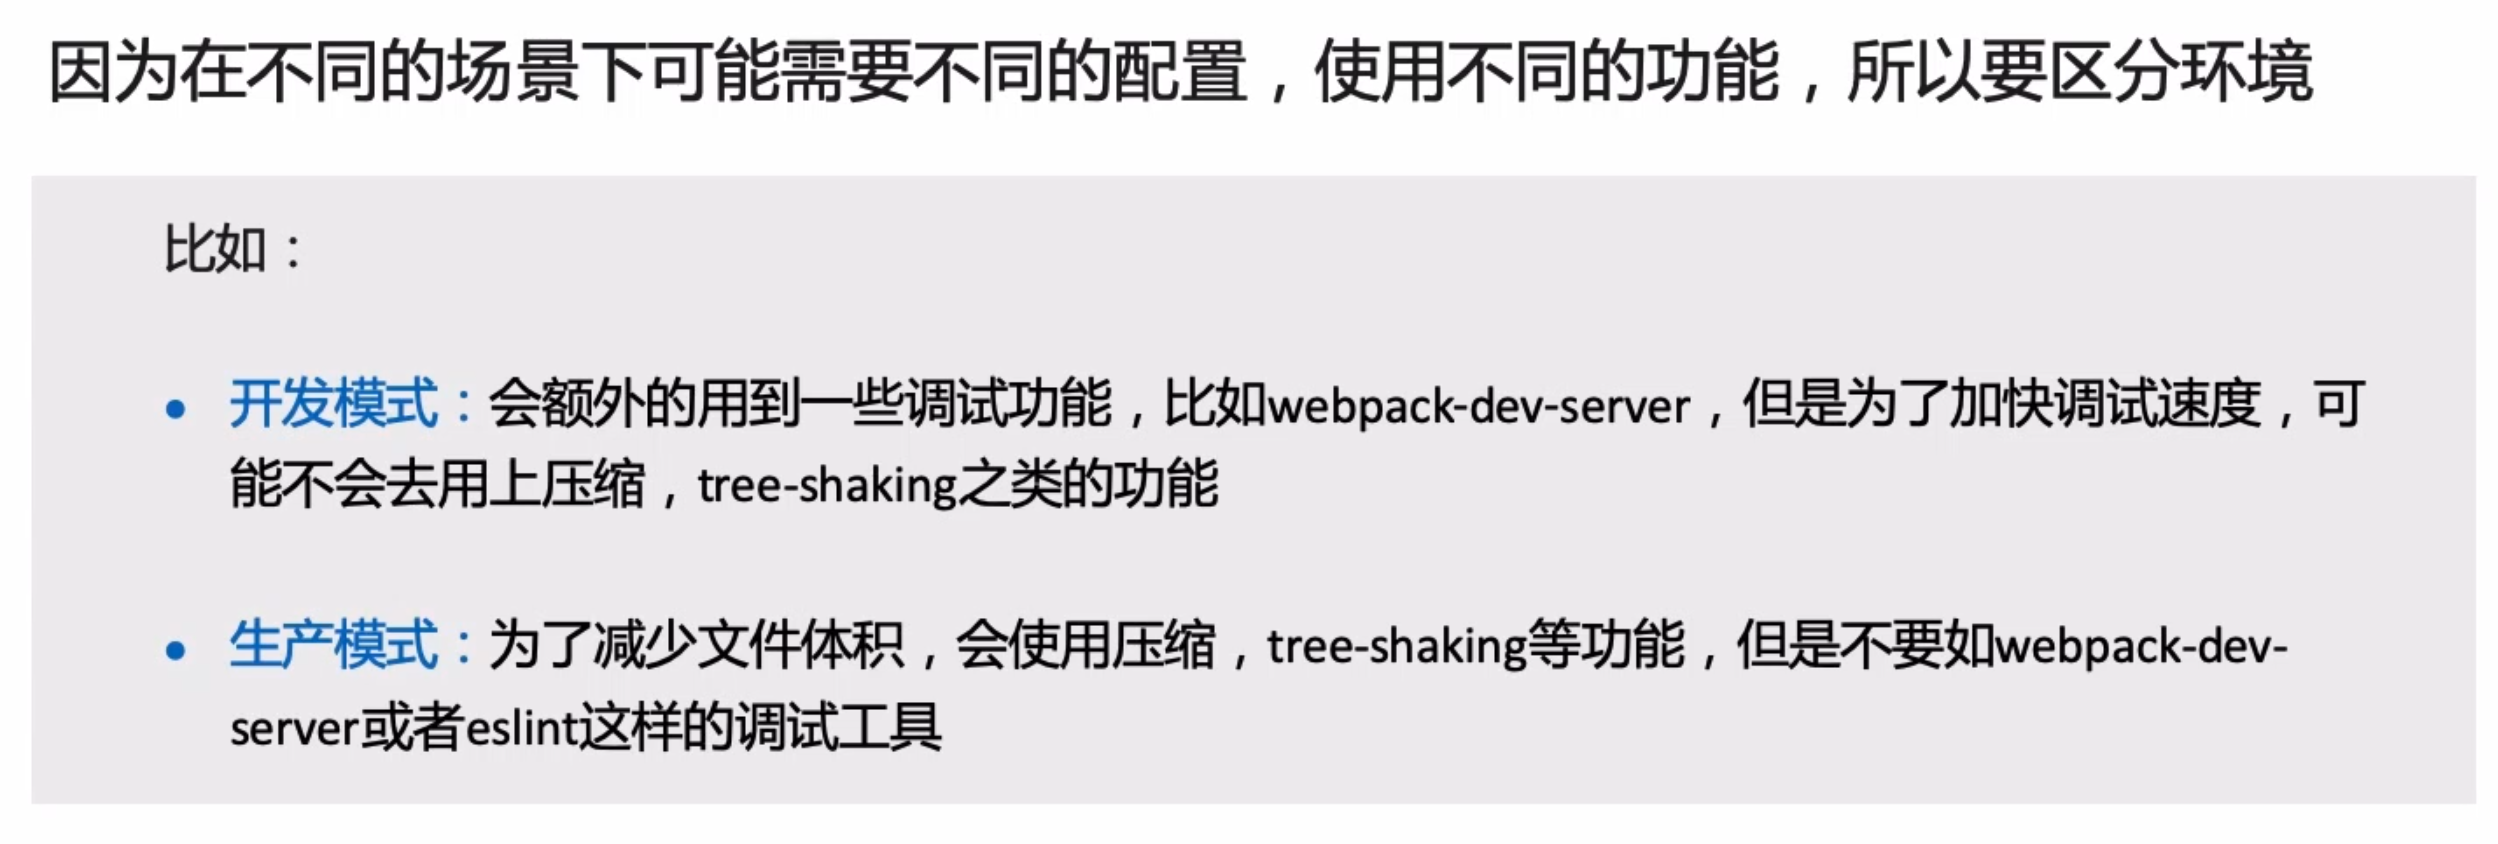
开发环境和生产环境的区别
development
不用环境下的配置编写
环境区分
webpack --env env-name
在common配置中读取env参数
配置文件目录

common通过env参数,合并对应的环境配置
// merge配置合并const { merge } = require('webpack-merge');// dev配置const devConfig = require('./webpack.dev');// prod配置const prodConfig = require('./webpack.prod');module.exports = env => {console.log(chalk.blue('Environment:'), chalk.yellowBright(env));console.log(chalk.blue('Version:'), chalk.yellowBright(version));// 是否是开发环境const _DEV_ = env === 'development';const commonConfig = {// 默认打包出来是main.js// entry: ['babel-polyfill', path.resolve(__dirname, '../src/app.js')],entry: {app: ['babel-polyfill', path.resolve(__dirname, '../src/app.js')]},output: {// path: path.resolve(__dirname, '../dist'),filename: "js/[name].[contenthash:8].js",// publicPath: '/',},module: {rules: [{test: /\.js$/, // 检测js文件use: {loader: "babel-loader", // 使用babel-loader}},{// https://www.dengwb.com/typescript/project/compile-tools.html#ts-loadertest: /\.tsx?$/, // 检测ts或者tsx文件use: {loader: 'ts-loader',options: {// 忽略类型检查,提高编译速度transpileOnly: true}},},{test: /\.css$/,use: [MiniCssExtractPlugin.loader,"css-loader","postcss-loader",],},{test: /\.less$/,use: [MiniCssExtractPlugin.loader,"css-loader","postcss-loader","less-loader",],},{test: /\.scss$/,use: [MiniCssExtractPlugin.loader,"css-loader","postcss-loader","sass-loader",],}]},plugins: [new HtmlWebpackPlugin({title: 'WebPack',template: path.resolve(__dirname, "../public/index.html"),filename: "index.html",inject: true, // 是否自动引入资源icon: path.join(__dirname, "../public/favicon.ico"),minify: _DEV_ ? false : {// collapseWhitespace: true,// collapseBooleanAttributes: true,// collapseInlineTagWhitespace: true,removeComments: true,removeRedundantAttributes: true,removeScriptTypeAttributes: true,removeStyleLinkTypeAttributes: true,minifyCSS: true,minifyJS: true,minifyURLs: true,useShortDoctype: true,}}),new CleanWebpackPlugin(), // outputPathnew MiniCssExtractPlugin({filename: 'css/[name].[contenthash:7].css'}),new WebpackBar({name: name || 'WebPack',color: '#61dafb', // react 蓝}),]}return merge(commonConfig, {development: devConfig,production: prodConfig}[env])}
在package.json中通过指定mode来区分环境
"scripts": {"dev": "npm run start","start": "webpack-dev-server --env development --config ./config/webpack.common.js","build": "webpack --env production --config ./config/webpack.common.js"},
webpack4的环境区分
通过将 mode 参数设置为 development、production 或 none,
可以启用 webpack 与每个环境对应的内置优化。默认值为生产。
写法1
webpack --mode production/development
写法2 ```javascript module.exports = { mode: ‘development’, // or production }
<a name="jOcBT"></a>## Webpack-dev-server的使用> 可以模拟线上环境进行开发调试的服务工具<a name="vXih4"></a>### 额外功能- 1、路径重定向- 2、浏览器中显示编译错误- 3、接口代理【跨域】- 4、热更新<a name="TvrGp"></a>### 使用<a name="DFTbj"></a>#### 安装webpack-dev-server```javascriptnpm install webpack-dev-server --save-dev
devServer常用配置
- inline:服务的开启模式
- lazy:懒编译
- port:代理端口
- overlay:错误遮罩
- historyApiFallback:路径重定向
- proxy:代理请求
- Hot:热更新 live reloading
代理接口
proxy: {// 需要代理的地址'/api/*': {// 代理的目标地址target: domain[env].api,changeOrigin: true,pathRewrite: {'^/api': '/'},}}
配置
在webpack.dev.config中添加devServer的配置
devServer: {open: 'Google Chrome', // 可以使用Boolean或者指定浏览器port: 10086, // 服务端口hot: true, // 热更新host: '0.0.0.0', // 服务地址noInfo: true, // 禁止显示诸如 Webpack 捆绑包信息之类的消息historyApiFallback: true, // 路径重定向/*** 设置代理配置【跨域】*/proxy: {// 需要代理的地址'/api/*': {// 代理的目标地址target: domain[env].api,changeOrigin: true,pathRewrite: {'^/api': '/'},}}}
开启服务
在package.json中添加自定义命令 npm run dev
"scripts": {"dev": "npm run start","start": "webpack-dev-server --env development --config ./config/webpack.common.js",},
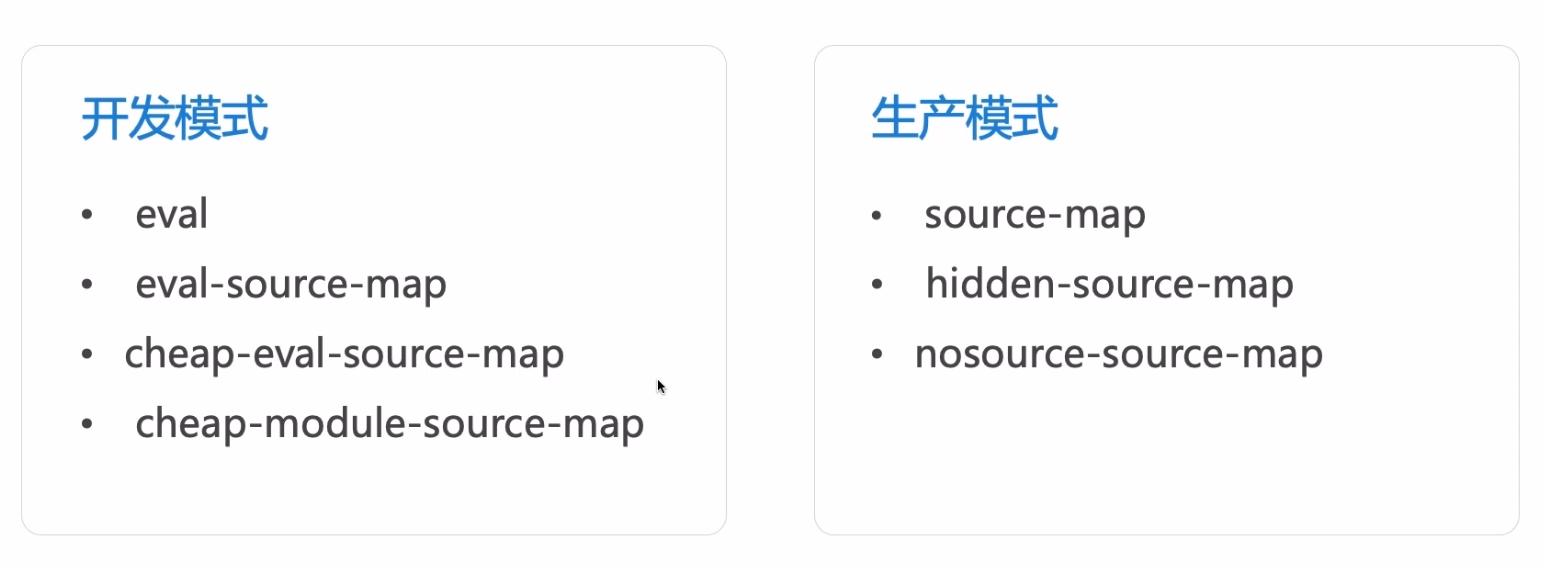
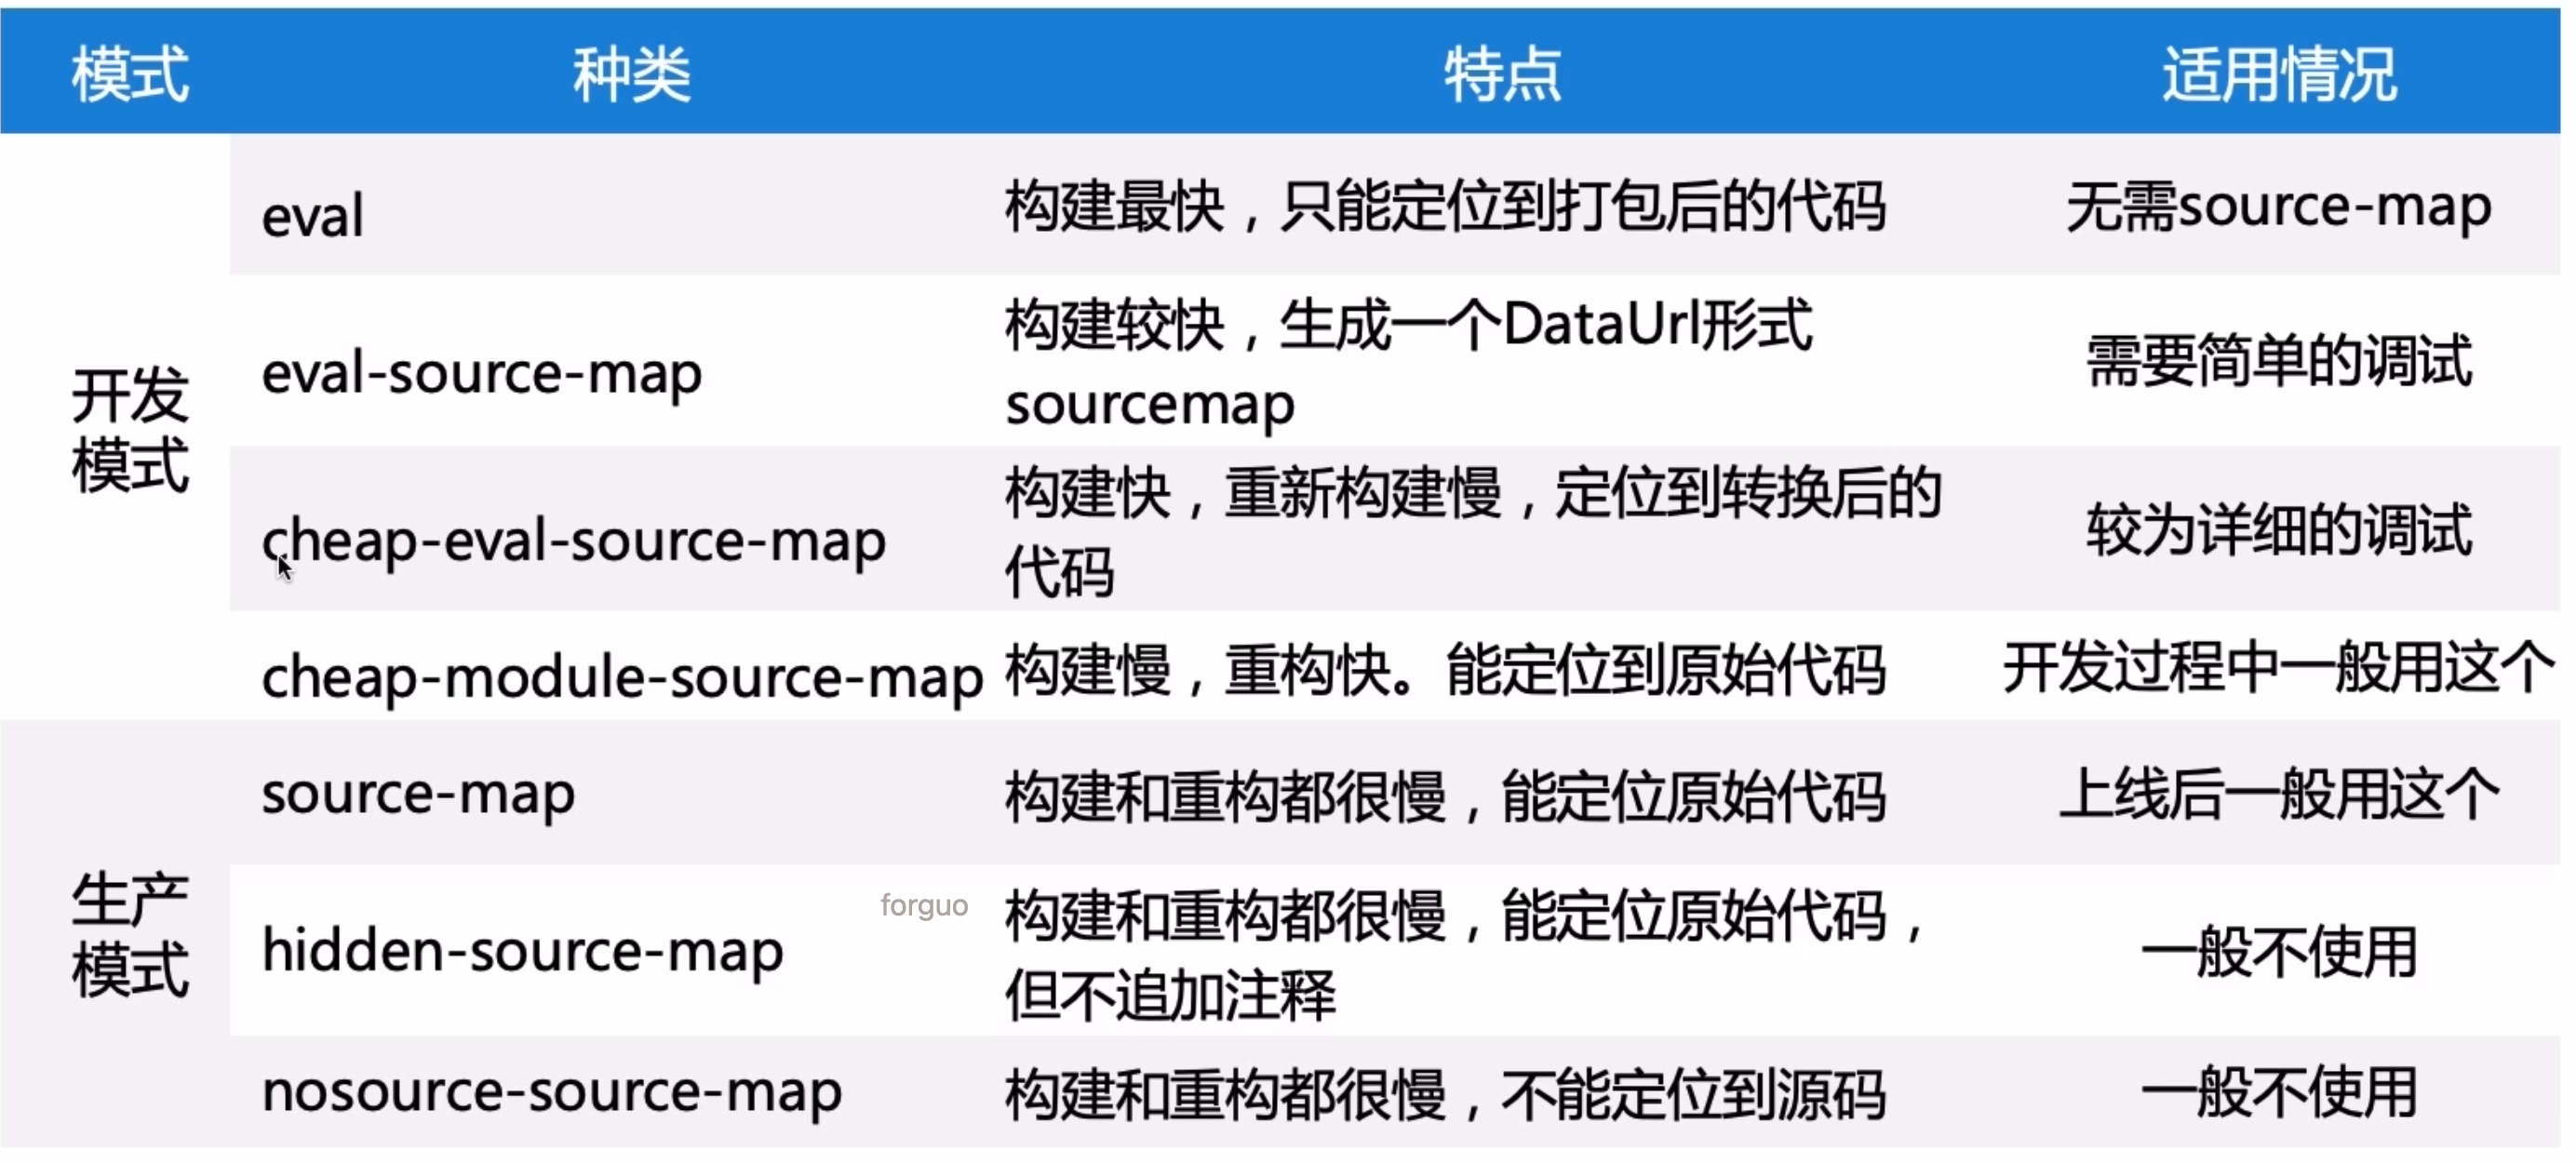
source-map的使用
模式
详解
Webpack原理分析
1、依赖于Node环境与文件操作系统
2、打包过程,利用Node去读取文件,然后进行依稀字符串处理,再利用Node去写入文件。
打包流程解析
- 读取配置文件
- 注册内部插件与配置插件
- Loader编译
- 组织模块
- 生成最终文件,导出
Loader原理解析
创建loader
新建ws-loader/index.js
/*** @Author: forguo* @Date: 2021/12/11 15:13* @Description: 一个自定义的loader*/module.exports = function (resource) {/*** 将$xx转换成 wei-xxx* @type {RegExp}*/const reg = /\$\(/g;try {return resource.replace(reg, 'wei-').replace(')', '');} catch (e) {console.log('ws-loader-error', e);}}
使用loader
和正常loader一样,检测文件名并使用即可。
{test: /\.ws$/, // 检测ws文件use: {loader: "./ws-loader/index", // 使用babel-loader}},
打包结果分析
(function (modules) {// module缓存var installedModules = {};function __webpack_require__(moduleId) {/******//******/ // Check if module is in cache/******/if (installedModules[moduleId]) {/******/return installedModules[moduleId].exports;/******/}/******/ // Create a new module (and put it into the cache)/******/var module = installedModules[moduleId] = {/******/ i: moduleId,/******/ l: false,/******/ exports: {}/******/};/******//******/ // Execute the module function/******/modules[moduleId].call(module.exports, module, module.exports, __webpack_require__);/******//******/ // Return the exports of the module/******/return module.exports;}// Load entry module and return exportsreturn __webpack_require__(__webpack_require__.s = 0);})({// 入库文件"./src/app.js": (function (module, __webpack_exports__, __webpack_require__) {// 调用less__webpack_require__("./src/css/app.less");}),// less处理"./src/css/app.less": (function (module, __webpack_exports__, __webpack_require__) {__webpack_require__.r(__webpack_exports__);// extracted by mini-css-extract-plugin}),// 多入口文件app.js0:(function(module, exports, __webpack_require__) {// 调用app.jseval("__webpack_require__(/*! babel-polyfill */\"./node_modules/babel-polyfill/lib/index.js\");\n" +"module.exports = __webpack_require__(\"./src/app.js\");");})})
Dev-server原理
Express+webpack-dev-middleware中间件开启服务,开启的服务执行打包出来额代码。
Webpack优化
目的:
- 减少加载代码大小
- 提取公共资源,减少加载次数
1、webpack-cdn-plugin的使用
好处:减少打包体积,利用CDN提高访问速度
// CDN提取const WebpackCdnPlugin = require('webpack-cdn-plugin');const cdnLoader = (prod = false) => {return {modules: [{name: 'axios',var: 'axios',path: 'axios.min.js'},{name: 'vue',var: 'Vue',path: 'vue.runtime.min.js'},{name: 'vue-router',var: 'VueRouter',path: 'vue-router.min.js'}// {// name: 'view-design',// var: 'iview',// path: 'iview.min.js'// }],prod,publicPath: '/node_modules',prodUrl: '//cdn.staticfile.org/:name/:version/:path'// prodUrl: 'https://cdn.jsdelivr.net/npm/:name@:version/dist/:path'}}// 添加pluginnew WebpackCdnPlugin(cdnLoader(true))
2、合理使用contenthash
css、js的filename使用contenthash,只有内容修改的文件才去更新hash值,
这样旧文件可以使用缓存,新内容才去加载新的资源,减少不必要的请求�
output: {// 打包后的路径path: resolve('../dist'),// 打包后的文件名,默认打包出来是main.jsfilename: 'js/[name].[contenthash:6].js',// publicPath: 'https://cloud-app.com.cn/app/',},
3、合理使用MiniCssExtractPlugin
�
通过MiniCssExtractPlugin将css提取成一个文件,减少单个js文件大小
// loader{test: /\.css/,use: [/*** MiniCssExtractPlugin提取css为一个文件,MiniCssExtractPlugin没有hdr,* 所以开发使用style-loader*/devMode ? 'style-loader' : MiniCssExtractPlugin.loader,// 'style-loader', // 将css文件打包到js'css-loader', // css文件处理]},// plugin// 提取css文件new MiniCssExtractPlugin({filename: 'css/[name].[contenthash:6].css',}),
缺点:MiniCssExtractPlugin提取css为一个文件,但是没有hdr【热更新】,所以开发使用style-loader
4、代码分割
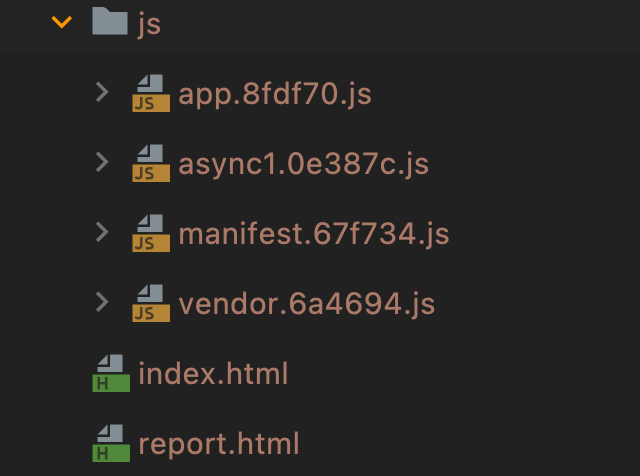
app.js 主业务代码
common.js 公共依赖
vendors.js 第三方包
manifest.js webpack配置
单页面应用
效果:主业务代码+异步模块 +第三方包+webpack运行代码
- 减少文件体积,拆分应用
把需要异步加载的内容改成异步加载
require.ensure(['./async1'], () => {}, 'async1');
- 拆分第三方依赖和webpack配置
打包效果splitChunks: {name: true,chunks: 'all',minSize: 10000, // 大于10kb,再去提取// 指定需要打包哪些内容cacheGroups: {vendor: {// 第三方包test: /[\\/]node_modules[\\/]/,chunks: 'initial',enforce: true,priority: 10,name: 'vendor'},// common: {// // 公共资源的打包// chunks: "all",// minChunks: 2,// name: 'common',// enforce: true,// priority: 5// }},},// 运行时,webpack配置文件// runtimeChunk: true,runtimeChunk: {"name": "manifest"},
多页面应用
效果:主业务代码+公共依赖+第三方+webpack运行代码
- 提取公共依赖
- 拆分第三方依赖和webpack配置
optimization: {splitChunks: {name: true,chunks: 'all',minSize: 10000, // 大于10kb,再去提取// 指定需要打包哪些内容cacheGroups: {vendor: {// 第三方包test: /[\\/]node_modules[\\/]/,chunks: 'initial',enforce: true,priority: 10,name: 'vendor'},common: {// 公共资源的打包chunks: "all",minChunks: 2,name: 'common',enforce: true,priority: 5}},},// 运行时,webpack配置文件// runtimeChunk: true,runtimeChunk: {"name": "manifest"},}
打包结果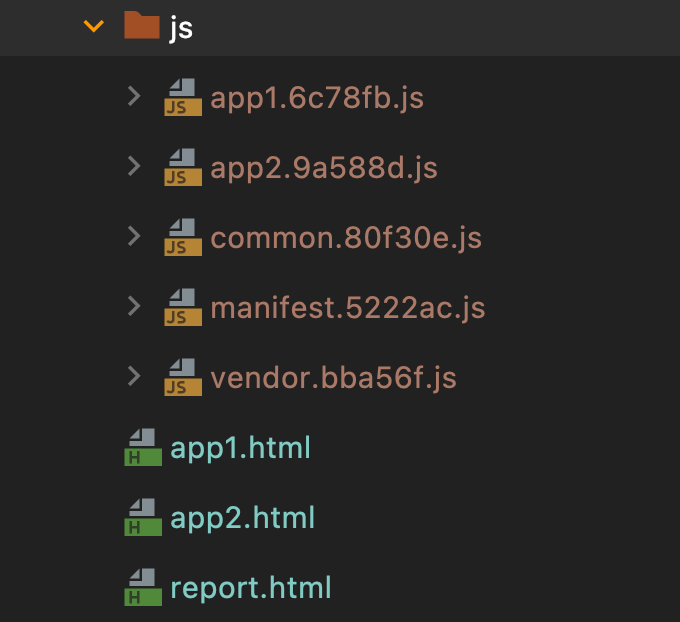
5、代码体积控制
生产模式默认开启
optimization: {// 开启代码压缩,mode为production默认开启代码压缩和TreeShaking// minimize: true,}
webpack3当中使用optimize.UglifyJsPlugin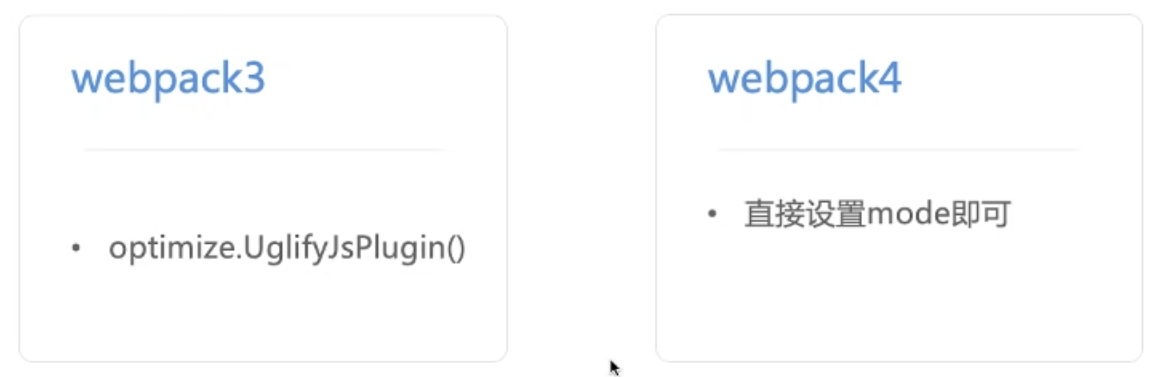
6、Tree-shaking
生产模式默认开启webpack3当中使用optimize.UglifyJsPlugin
作用
Tree-shaking指的是消除没被引用的模块代码,减少代码体积大小,以提高页面的性能,最初由rollup提出
webpack2加入对Tree-shaking的支持,webpack4中Tree-shaking默认开启,Tree-shaking基于ESModule静态编译而成,可能会被babel所干扰【export会被编译】
注意事项:
- 不使用
CommonJs模块 - 不让babel编译成
CommonJs的形式
添加modules为false,保留es6的模块化语法不去编译
{"presets": [["@babel/preset-env", {"modules": false, // 保留es6的模块化语法"targets": {"browsers": ["> 1%", "last 2 versions", "not ie <= 8", "iOS 8"]}}]]}
7、打包速度优化
项目本身
a、减少嵌套深度
b、使用尽可能少的处理
打包结果分析
webpack-bundle-analyzer
Dll打包优化
动态链接库
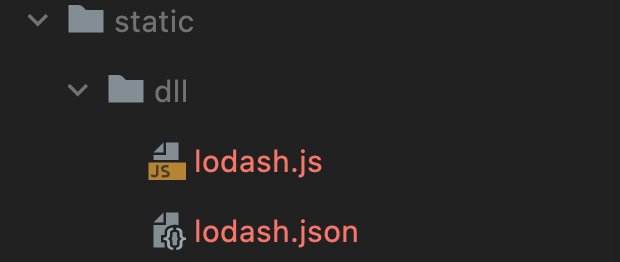
新建webpack.dll.jsentry为需要提前处理的第三方库output不能为dist,可以放在static下面,library为包的引用名称
当然,最好也是每次都CleanWebpackPlugin清除一下
使用webpack.DllPlugin,生成处理后的包及JSON
/*** @Author: forguo* @Date: 2022/4/3 10:45* @Description: webpack.dll.js*/const path = require('path');const webpack = require('webpack');// 在每次 build 后移除你的dist目录(可配置),默认情况下它会读取 webpack 配置的output.path。const { CleanWebpackPlugin } = require('clean-webpack-plugin');// 拼接路径const resolve = dir => path.join(__dirname, dir);module.exports = {mode: 'none',entry: {lodash: ['lodash'],},output: {// 打包后的路径path: resolve('../static/dll'),filename: '[name].js',library: '[name]', // 引用名},plugins: [// 清除上次打包的代码new CleanWebpackPlugin(),new webpack.DllPlugin({path: resolve('../static/dll/[name].json'),name: '[name]',})]}
在webpack.config.js添加webpack.DllReferencePlugin
new webpack.DllReferencePlugin({manifest: require('../static/dll/lodash.json'), // manifest的位置}),
缺点:抽离出来的chunk,需要手动引入到html当中…
happypack
启动多线程编译,webpack4可以使用 thread-loader
{test: /\.js|jsx$/,use: ["thread-loader", "babel-loader?cacheDirectory=true"],include: path.resolve(__dirname, '../src')},
Uglify优化
在webpack3当中,添加cache与parallel为true
new UglifyJsPlugin({uglifyOptions: {compress: {warnings: false}},sourceMap: config.build.productionSourceMap,parallel: true, // 并行处理压缩cache: true, // 处理缓存}),
长缓存优化
只取变化修改的内容文件名,利用浏览器缓存,更新更少的资源
https://www.cnblogs.com/skychx/p/webpack-hash-chunkhash-contenthash.html
- hash
与项目构建有关
每次hash都改变,生成文件的 hash 和项目的构建 hash一致
- chunkhash
与同一chunk内容有关
根据不同的入口文件(Entry)进行依赖文件解析、构建对应的 chunk,生成对应的哈希值。
- contenthash
与文件内容本身有关
contenthash 将根据资源内容创建出唯一 hash,也就是说文件内容不变,hash 就不变。
自定义loader和plugin
自定义loader
其实就是对于字符串的处理
/*** @Author: forguo* @Date: 2021/12/11 15:13* @Description: 一个自定义的loader*/module.exports = function (resource) {/*** 将$xx转换成 wei-xxx* @type {RegExp}*/const reg = /\$\(/g;try {return resource.replace(reg, 'wei-').replace(')', '');} catch (e) {console.log('ws-loader-error', e);}}
自定义plugin
对于打包之后结果的处理
/*** @Author: forguo* @Date: 2022/4/5 18:54* @Description: 自定义plugin html-webpack-add-static-server*/const path = require('path');const fs = require('fs');const readFileAsync = require("util").promisify(fs.readFile);const writeFileAsync = require("util").promisify(fs.writeFile);class AddStaticServer {constructor(options) {this.options = options || {serverPath: '//www'};this.serverPath = this.options.serverPath;}apply(compiler) {compiler.hooks.done.tap('AddStaticServer', compilation => {let context = compiler.options.context;let publicPath = path.resolve(context, 'dist');compilation.toJson().assets.forEach((ast) => {let {dir, base, ext} = path.parse(ast.name);if (ext === '.ftl') {readFileAsync(path.resolve(publicPath, dir, base), {encoding: 'utf-8'}).then((cnt) => {cnt = cnt.replace(/\/static\/css/g, `${this.serverPath}res/css`).replace(/\/static\/js/g, `${this.serverPath}res/js`).replace(/\/static\/img/g, `${this.serverPath}res/img`);writeFileAsync(path.resolve(publicPath, dir, base), cnt);});}});});}}module.exports = AddStaticServer;

若有收获,就点个赞吧
0 人点赞
