线程状态
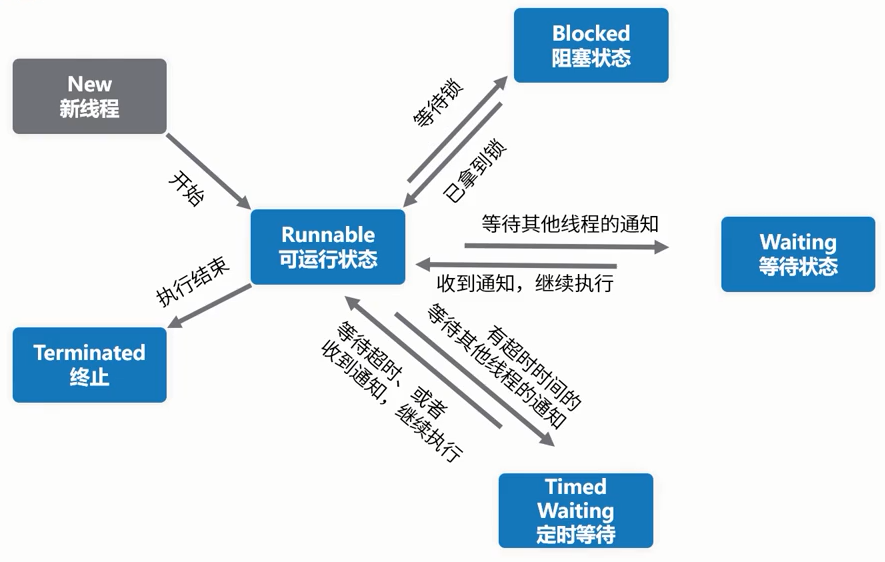
6个线程状态的定义:java.lang.Thread.State
- New:尚未启动的线程的线程状态。
- Runnable:Java线程中将就绪(ready)和运行中(running)两种状态笼统的称为“运行”。
- Blocked:线程阻塞等待监视器锁定的线程状态。处于synchronized同步代码块或者方法中被阻塞。
- Waiting:等待线程的线程状态。不带超时的方式:Object.wait、Thread.join、LockSupport.park
- Timed Waiting:具有指定等待时间的等待线程的等待状态。带超时的方式:Thread.sleep、Object.wait、Thread.join、LockSupport.parkNanos、LockSupport.parkUntil
- Terminated:终止线程的线程状态。线程正常完成执行或出现异常。

线程终止的原因有:
- 线程正常终止:
run()方法执行到return语句返回; - 线程意外终止:
run()方法因为未捕获的异常导致线程终止; - 对某个线程的
Thread实例调用stop()方法强制终止(强烈不推荐使用)。
一个线程还可以等待另一个线程直到其运行结束。例如,main线程在启动t线程后,可以通过t.join()等待t线程结束后再继续运行:
public class Main {public static void main(String[] args) throws InterruptedException {Thread t = new Thread(() -> {System.out.println("hello");});System.out.println("start");t.start();t.join();System.out.println("end");}}
当main线程对线程对象t调用join()方法时,主线程将等待变量t表示的线程运行结束,即join就是指等待该线程结束,然后才继续往下执行自身线程。所以,上述代码打印顺序可以肯定是main线程先打印start,t线程再打印hello,main线程最后再打印end。如果t线程已经结束,对实例t调用join()会立刻返回。此外,join(long)的重载方法也可以指定一个等待时间,超过等待时间后就不再继续等待。
线程中止
不正确的线程中止-stop
stop:中止线程,并且清除监视器锁的信息,但是可能导致线程安全问题,JDK不建议使用。
destroy:JDK未实现该方法。
正确的线程中止-interrupt
如果目标线程在调用Object的wait()、wait(long)或wait(long,int)方法、join()、join(long,int)或sleep(long,int)方法时被阻塞,那么interrupt会生效,该线程的中断状态将被清除,抛出InterruptException异常。
如果目标线程是被I/O或者NIO中的Channel所阻塞,同样,I/O操作会被中断或者返回特殊的异常值。达到终止线程的目的。
如果以上条件都不满足,则会设置此线程的中断状态。
public class StopThread extends Thread {
  private int i = 0, j = 0;

  @Override
  public void run() {
    synchronized (this) {
        // 增加同步锁,确保线程安全
        ++i;
        try {
          // 休眠10秒,模拟耗时操作
          Thread.sleep(10000);
        } catch (InterruptedException e) {
          e.printStackTrace();
        }
        ++j;
    }
  }

  /** * 打印i和j */
  public void print() {
      System.out.println("i=" + i + " j=" + j);
  }
}
public class Demo3 {
  public static void main(String[] args) throws InterruptedException {
    StopThread thread = new StopThread();
    thread.start();
    // 休眠1秒,确保i变量自增成功
    Thread.sleep(1000);
    // 暂停线程
    thread.stop(); // 错误的终止
//   thread.interrupt(); // 正确终止
    while (thread.isAlive()) {
      // 确保线程已经终止
    } // 输出结果
    thread.print();
  }
}
- interrupt():不会终止正在运行的线程,只是改变中断状态。
- interrupted():测试当前线程是否是中断状态,执行后具有将状态标志清除为false的功能。
- isInterrupted():测试线程Thread对象是否已经是中断状态,但不清除状态标志。
```java
public class InterruptThreadDemo {
public static void main(String[] args) {
} }MyThread myThread = new MyThread(); myThread.start(); SleepUtils.second(2); myThread.interrupt();
class MyThread extends Thread{ @Override public void run() { super.run(); try { for (int i = 0; i < 5000000; i++) { if(this.isInterrupted()){ System.out.println(“线程停止,即将退出”); throw new InterruptedException(); } System.out.println(“i=” + (++i)); } } catch (InterruptedException e) { System.out.println(“MyThread的run方法中的catch”); e.printStackTrace(); } } }
**stop()释放锁将会导致数据不一致的问题**
```java
public class StopLockDemo {
    public static void main(String[] args) {
        try {
            SynchronizedObject obj = new SynchronizedObject();
            MyThread1 thread1 = new MyThread1(obj);
            thread1.start();
            Thread.sleep(500);
            thread1.stop();
            //thread1.interrupt();
            // interrupt方法需要时间执行setPassword
            Thread.sleep(1000);
            System.out.println(obj.getUsername()+" --- "+obj.getPassword());
        } catch (InterruptedException e) {
            e.printStackTrace();
        }
    }
}

class MyThread1 extends Thread{
    private SynchronizedObject obj;

    public MyThread1(SynchronizedObject obj) {
        this.obj = obj;
    }

    @Override
    public void run() {
        super.run();
        obj.printStr("b", "bb");
    }
}

class SynchronizedObject {
    private String username = "a";
    private String password = "aa";

    public String getUsername() {
        return username;
    }

    public void setUsername(String username) {
        this.username = username;
    }

    public String getPassword() {
        return password;
    }

    public void setPassword(String password) {
        this.password = password;
    }

    synchronized public void printStr(String username, String password) {
        this.username = username;
        try {
            Thread.sleep(100000);
        } catch (InterruptedException e) {
            e.printStackTrace();
        }
        this.password = password;
    }
}
正确的线程中止-标志位
在代码逻辑中,增加一个判断标志位,用来控制线程的中止。
/** 通过状态位来判断 */
public class Demo4 extends Thread {
  public volatile static boolean flag = true;

  public static void main(String[] args) throws InterruptedException {
    new Thread(() -> {
      try {
        while (flag) { // 判断是否运行
          System.out.println("运行中");
          Thread.sleep(1000L);
        }
      } catch (InterruptedException e) {
        e.printStackTrace();
      }
    }).start();
    // 3秒之后,将状态标志改为False,代表不继续运行
    Thread.sleep(3000L);
    flag = false;
    System.out.println("程序运行结束");
  }
}
守护线程
守护线程(Daemon Thread)是指为其他线程服务的线程。在JVM中,所有非守护线程都执行完毕后,无论有没有守护线程,虚拟机都会自动退出。
Thread t = new MyThread();
t.setDaemon(true);
t.start();
在守护线程中,编写代码要注意:守护线程不能持有任何需要关闭的资源,例如打开文件等,因为虚拟机退出时,守护线程没有任何机会来关闭文件,这会导致数据丢失。
线程让步
yield 即 “谦让”,也是 Thread 类的方法。它让掉当前线程 CPU 的时间片,使正在运行中的线程重新变成就绪状态,并重新竞争 CPU 的调度权。它可能会获取到,也有可能被其他线程获取到。
让一个线程执行了yield()方法后,就会进入Runnable(就绪状态),【不同于sleep()和join()方法,因为这两个方法是使线程进入阻塞状态】。除此之外,yield()方法还与线程优先级有关,当某个线程调用yield()方法时,就会从运行状态转换到就绪状态后,CPU从就绪状态线程队列中只会选择与该线程优先级相同或者更高优先级的线程去执行。
public static void main(String[] args) {
    Runnable runnable = () -> {
        for (int i = 0; i <= 100; i++) {
            System.out.println(Thread.currentThread().getName() + "-----" + i);
            if (i % 20 == 0) {
                Thread.yield();
            }
        }
    };
    new Thread(runnable, "thread1").start();
    new Thread(runnable, "thread2").start();
}
yield 和 sleep 的异同:
- yield, sleep 都能暂停当前线程,sleep 可以指定具体休眠的时间,而 yield 则依赖 CPU 的时间片划分。
- yield, sleep 两个在暂停过程中,如已经持有锁,则都不会释放锁资源。
- yield 不能被中断,而 sleep 则可以接受中断。
线程同步
synchronized
多线程同时读写共享变量时,会造成逻辑错误,因此需要通过**synchronized**同步;
同步的本质就是给指定对象加锁,加锁后才能继续执行后续代码;注意加锁对象必须是同一个实例;
对JVM定义的单个原子操作不需要同步。
public class Main {
    public static void main(String[] args) throws Exception {
        var add = new AddThread();
        var dec = new DecThread();
        add.start();
        dec.start();
        add.join();
        dec.join();
        System.out.println(Counter.count);
    }
}

class Counter {
    public static final Object lock = new Object();
    public static int count = 0;
}

class AddThread extends Thread {
    public void run() {
        for (int i=0; i<10000; i++) {
            synchronized(Counter.lock) {
                Counter.count += 1;
            }
        }
    }
}

class DecThread extends Thread {
    public void run() {
        for (int i=0; i<10000; i++) {
            synchronized(Counter.lock) {
                Counter.count -= 1;
            }
        }
    }
}
用Counter.lock实例作为锁,两个线程在执行各自的synchronized(Counter.lock) { ... }代码块时,必须先获得锁,才能进入代码块进行。执行结束后,在synchronized语句块结束会自动释放锁。这样一来,对Counter.count变量进行读写就不可能同时进行。上述代码无论运行多少次,最终结果都是0。
使用synchronized解决了多线程同步访问共享变量的正确性问题。但是,它的缺点是带来了性能下降。因为synchronized代码块无法并发执行。此外,加锁和解锁需要消耗一定的时间,所以,synchronized会降低程序的执行效率。
如何使用synchronized:
- 找出修改共享变量的线程代码块;
- 选择一个共享实例作为锁;
- 使用synchronized(lockObject) { … }。
在使用synchronized的时候,不必担心抛出异常。因为无论是否有异常,都会在synchronized结束处正确释放锁。
不需要synchronized的操作:
JVM规范定义了几种原子操作:
- 基本类型(long和double除外)赋值,例如:int n = m;
- 引用类型赋值,例如:List list = anotherList。
单条原子操作的语句不需要同步。
// 单条原子操作不需要同步
public void set(int m) {
    this.value = m;
}
public void set(String s) {
    this.value = s;
}
// 多条赋值语句需要同步
class Pair {
    int first;
    int last;
    public void set(int first, int last) {
        synchronized(this) {
            this.first = first;
            this.last = last;
        }
    }
}
// 但可以通过一些巧妙的转换,可以把非原子操作变为原子操作。例如,上述代码如果改造成:
// 就不再需要同步,因为this.pair = ps是引用赋值的原子操作。
class Pair {
    int[] pair;
    public void set(int first, int last) {
        //这里的ps是方法内部定义的局部变量,每个线程都会有各自的局部变量,互不影响,并且互不可见,并不需要同步。
        int[] ps = new int[] { first, last };
        this.pair = ps;
    }
}
死锁
JVM允许同一个线程重复获取同一个锁,这种能被同一个线程反复获取的锁,就叫做可重入锁。
由于Java的线程锁是可重入锁,所以,获取锁的时候,不但要判断是否是第一次获取,还要记录这是第几次获取。每获取一次锁,记录+1,每退出synchronized块,记录-1,减到0的时候,才会真正释放锁。
public void add(int m) {
    synchronized(lockA) { // 获得lockA的锁
        this.value += m;
        synchronized(lockB) { // 获得lockB的锁
            this.another += m;
        } // 释放lockB的锁
    } // 释放lockA的锁
}

public void dec(int m) {
    synchronized(lockB) { // 获得lockB的锁
        this.another -= m;
        synchronized(lockA) { // 获得lockA的锁
            this.value -= m;
        } // 释放lockA的锁
    } // 释放lockB的锁
}
在获取多个锁的时候,不同线程获取多个不同对象的锁可能导致死锁。对于上述代码,线程1和线程2如果分别执行add()和dec()方法时:
- 线程1:进入
add(),获得lockA; - 线程2:进入
dec(),获得lockB。
随后:
- 线程1:准备获得
lockB,失败,等待中; - 线程2:准备获得
lockA,失败,等待中。
此时,两个线程各自持有不同的锁,然后各自试图获取对方手里的锁,造成了双方无限等待下去,这就是死锁。
CPU缓存和内存屏障
CPU性能优化手段-缓存
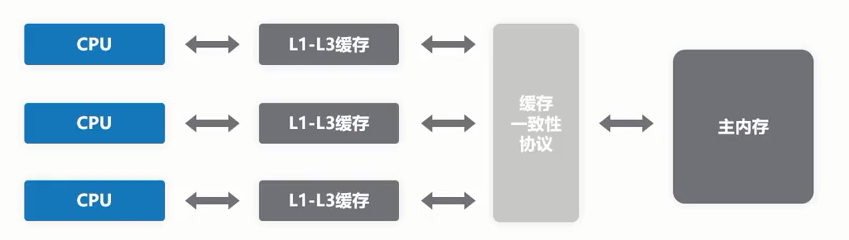
多级缓存:
- L1 Cache(一级缓存)是CPU 第一层高速缓存,分为数据缓存和指令缓存。一般服务器CPU 的L1缓存的容量通常在32 一4096KB 。
- L2 由于LI 级高速缓存容量的限制, 为了再次提高CPU 的运算速度, 在CPU 外部放置一高速存储器, 即二级缓存。
- L3 现在的都是内置的。而它的实际作用即是,L3 缓存的应用可以进一步降低内存延迟, 同时提升大数据量计算时处理器的性能。具有较大L3 缓存的处理器提供更有效的文件系统缓存行为及较短消息和处理器队列长度。一般是多核共享一个L3 缓存!
CPU在读取数据时,现在L1中寻找,再从L2寻找,再从L3寻找,然后是内存,最后是外存储器。
缓存同步协议
多CPU 读取同样的数据进行缓存, 进行不同运算之后, 最终写入主内存以哪个CPU 为准?
在这种高速缓存回写的场景下, 有一个缓存一致性协议多数CPU 厂商对它进行了实现。
MESI 协议, 它规定每条缓存有个状态位, 同时定义了下面四个状态:
- 修改态(Modified) 一此cache 行已被修改过( 脏行),内容已不同于主存,为此cache 专有;
- 专有态(ExcIusive) 一此cache 行内容同于主存, 但不出现于其它cache 中;
- 共享态(Shared) 一此cache 行内容同于主存, 但也出现于其它cache 中;
- 无效态(lnvalid) 一此cache 行内容无效( 空行)。
多处理器时, 单个CPU 对缓存中数据进行了改动, 需要通知给其他CPU 。也就是意味着, CPU 处理要控制自己的读写操作, 还要监听其他CPU 发出的通知, 从而保证最终一致。
CPU性能优化手段-运行时指令重排
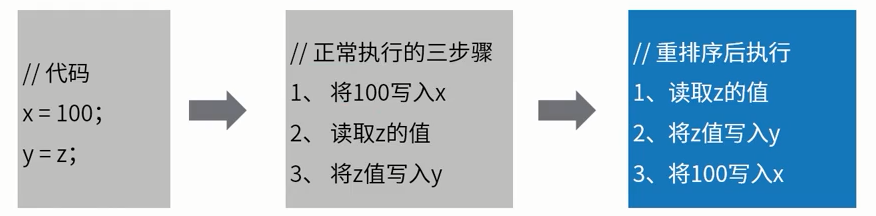
指令重排的场景: 当CPU 写缓存时发现缓存区块正被其他CPU 占用,为了提高CPU 处理性能,可能将后面的读缓存命令优先执行。
并非随便重排, 需要遵守as-if-serial 语义
as-if-serial 语义的意思指: 不管怎么重排序(编译器和处理器为了提高并行度),(单线程)程序的执行结果不能被改变。编译器,runtime 和处理器都必须遵守as-if-serial语义。
也就是说: 编译器和处理器不会对存在数据依赖关系的操作做重排序。
内存屏障
CPU优化时会有两个问题:
- CPU 高速缓存下有一个问题:
缓存中的数据与主内存的数据并不是实时同步的, 各CPU ( 或CPU 核心) 间缓存的数据也不是实时同步。在同一个时间点, 各CPU 所看到同一内存地址的数据的值可能是不一致的。 - CPU 执行指令重排序优化下有一个问题:
虽然遵守了as-if-serial 语义, 单仅在单CPU 自己执行的悄况下能保证结果正确。但多核多线程中, 指令逻辑无法分辨因果关联, 可能出现乱序执行, 导致程序运行结果错误。
处理器提供了两个内存屏障指令(Memory Barrier) 用于解决上述两个问题:
- 写内存屏障( Store Memory Barrier): 在指令后插入Store Barrier , 能让写入缓存中的最新数据更新写入主内存, 让其他线程可见。
强制写入主内存, 这种显示调用, CPU 就不会因为性能考虑而去对指令重排。
- 读内存屏障(Load Memory Barrier):在指令前插入Load Barrier , 可以让高速缓存中的数据失效, 强制从新从主内存加载数据。
强制读取主内存内容, 让CPU 缓存与主内存保持一致, 避免了缓存导致的一致性问题。
线程通信
线程之间的相互通信,分为4类:
- 文件共享
- 网络共享
- 共享变量
- JDK提供的线程协调API(包括:
suspend/resume, wait/notify , park/unpark)
线程协作-JDK API
- suspend/resume
JDK已弃用,因为suspend不会释放锁,所以可能出现死锁问题。
suspend和resume的缺点—独占,不会释放锁
class SynObject{
synchronized public void printStr(){
   System.out.println("begin");
   if("a".equals(Thread.currentThread().getName())){
       System.out.println("a线程永远suspend了");
       Thread.currentThread().suspend();
   }
   System.out.println("end");
}
}
/**
* 测试suspend独占锁问题
*/
public static void testExclusiveLock(){
SynObject synObject = new SynObject();
Thread t1 = new Thread(()->{
   synObject.printStr();
});
t1.setName("a");
t1.start();
SleepUtils.second(1);
Thread t2 = new Thread(()->{
   System.out.println("t2进入不了printStr方法,因为suspend没有释放锁");
   synObject.printStr();
});
t2.start();
}
System.out.println中也使用了synchronized加锁,suspend也不会释放/** * 测试println被suspend暂停 */ public static void testSuspendPrintln(){ Thread t1 = new Thread(()->{ while (true){ System.out.println("running"); } }); t1.start(); SleepUtils.second(1); t1.suspend(); // t1中的println没有释放锁,不会输出下面这句 System.out.println("main end"); }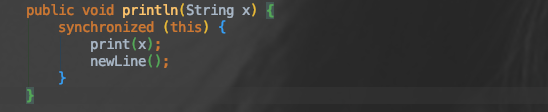
suspend和resume方法的缺点—不同步
使用suspend和resume可能因为线程暂停导致数据不同步
class User{
    private String username = "1";
    private String password = "11";
    public void setValue(String u, String p){
        this.username = u;
        if("a".equals(Thread.currentThread().getName())){
            Thread.currentThread().suspend();
        }
        this.password = p;
    }
    public void printUser(){
        System.out.println(username+"  "+password);
    }
}
/**
     * 测试suspend导致数据不同步
     */
    public static void testSuspendSyn(){
        final User user = new User();
        new Thread(()->{
            user.setValue("a", "aa");
        }, "a").start();
        SleepUtils.millis(500);
        new Thread(()->{
            user.printUser();
        }).start();
    }

// 结果: a   11
- wait/notify
这些方法只能由同一对象锁的持有者线程调用, 也就是写在同步块里面, 否则会抛出IllegaIMonitorStateException异常。
wait 方法导致当前线程等待, 加入该对象的等待集合中, 并且释放当前持有的对象锁。notify / notifyAll 方法唤醒一个或所有正在等待这个对象锁的线程。
    /** 正常的wait/notify */
    public void waitNotifyTest() throws Exception {
        // 启动线程
        new Thread(() -> {
                synchronized (this) {
                    while (baozidian == null) { // 如果没包子,则进入等待
                    try {
                        System.out.println("1、进入等待");
                        this.wait();
                    } catch (InterruptedException e) {
                        e.printStackTrace();
                    }
                }
            }
            System.out.println("2、买到包子,回家");
        }).start();
        // 3秒之后,生产一个包子
        Thread.sleep(3000L);
        baozidian = new Object();
        synchronized (this) {
            this.notifyAll();
            System.out.println("3、通知消费者");
        }
    }
注意:虽然会wait 自动解锁, 但是对顺序有要求, 如果在notify 被调用之后, 才开始wait 方法的调用, 线程会永远处于WAITING 状态。
    /** 会导致程序永久等待的wait/notify */
    public void waitNotifyDeadLockTest() throws Exception {
        // 启动线程
        new Thread(() -> {
            while (baozidian == null) { // 如果没包子,则进入等待
                try {
                    Thread.sleep(5000L);
                } catch (InterruptedException e1) {
                    e1.printStackTrace();
                }
                synchronized (this) {
                    try {
                        System.out.println("1、进入等待");
                        this.wait();
                    } catch (InterruptedException e) {
                        e.printStackTrace();
                    }
                }
            }
            System.out.println("2、买到包子,回家");
        }).start();
        // 3秒之后,生产一个包子
        Thread.sleep(3000L);
        baozidian = new Object();
        synchronized (this) {
            this.notifyAll();
            System.out.println("3、通知消费者");
        }
    }
- park/unpark机制
线程调用park则等待“许可”,unpark方法则为指定线程提供“许可(permit)”。
不要求park和unpark方法的调用顺序。
多次调用unpark 之后, 再调用park, 线程会直接运行。但不会叠加,也就是说,连续多次调用park 方法, 第一次会拿到“ 许可” 直接运行,后续调用会进入等待。
/** 正常的park/unpark */
public void parkUnparkTest() throws Exception {
    // 启动线程
    Thread consumerThread = new Thread(() -> {
        while (baozidian == null) { // 如果没包子,则进入等待
            System.out.println("1、进入等待");
            LockSupport.park();
        }
        System.out.println("2、买到包子,回家");
    });
    consumerThread.start();
    // 3秒之后,生产一个包子
    Thread.sleep(3000L);
    baozidian = new Object();
    LockSupport.unpark(consumerThread);
    System.out.println("3、通知消费者");
}
但park方法并不会释放锁,所以也可能出现死锁。
/** 死锁的park/unpark */
public void parkUnparkDeadLockTest() throws Exception {
    // 启动线程
    Thread consumerThread = new Thread(() -> {
        // 不能使用if判断
        // if (baozidian == null) { // 如果没包子,则进入等待
        while (baozidian == null) { // 如果没包子,则进入等待
            System.out.println("1、进入等待");
            // 当前线程拿到锁,然后挂起
            synchronized (this) {
                LockSupport.park();
            }
        }
        System.out.println("2、买到包子,回家");
    });
    consumerThread.start();
    // 3秒之后,生产一个包子
    Thread.sleep(3000L);
    baozidian = new Object();
    // 争取到锁以后,再恢复consumerThread
    synchronized (this) {
        LockSupport.unpark(consumerThread);
    }
    System.out.println("3、通知消费者");
}
管道
管道流(pipeStream)是一种特殊的流,用于在不同线程之间直接传送数据。一个线程发送数据到输出管道,另一个线程从输入管道中读取数据。通过使用管道,实现不同线程间的通信,无需借助类似于临时文件之类的东西。
在Java的JDK中提供了4个类来使线程间可以进行通信:
- PipedInputStream和PipedOutputStream
PipedReader和PipedWriter
- 管道字节流:PipedInputStream和PipedOutputStream ```java /**
- @ClassName PipeInputThread
- @Description 从PipeinputStream读取字节流
- @Author dukz
- @Date 6/3/21
- @Version 1.0 */ public class PipeInputThread extends Thread{ private PipedInputStream input;
public PipeInputThread(PipedInputStream input) { this.input = input; }
@Override public void run() { try {
   System.out.println("read:");
   byte[] bs = new byte[20];
   // 当管道没数据会阻塞在此处
   int readLen = input.read(bs);
   while (readLen != -1){
       String inData = new String(bs, 0, readLen);
       System.out.print(inData);
       readLen = input.read(bs);
   }
   System.out.println();
   input.close();
} catch (IOException e) {
e.printStackTrace();} } }
```java
/**
* @ClassName PipeOutputThread
* @Description 向PipeOutputStream写字节流
* @Author dukz
* @Date 6/3/21
* @Version 1.0
*/
public class PipeOutputThread extends Thread{
private PipedOutputStream out;

public PipeOutputThread(PipedOutputStream out) {
   this.out = out;
}

@Override
public void run() {
   try {
       System.out.println("write:");
       for (int i = 0; i < 300; i++) {
           String outData = ""+(i+1);
           out.write(outData.getBytes());
           System.out.print(outData);
       }
       System.out.println();
       out.close();
   }catch (IOException e){
       e.printStackTrace();
   }
}
}
/** * @ClassName Run * @Description 测试管道字节流通信 * @Author dukz * @Date 6/3/21 * @Version 1.0 */ public class Run { public static void main(String[] args) { try { PipedInputStream inputStream = new PipedInputStream(); PipedOutputStream outputStream = new PipedOutputStream(); // 将输入输出管道连接,连接一次即可 //inputStream.connect(outputStream); outputStream.connect(inputStream); PipeInputThread pipeInputThread = new PipeInputThread(inputStream); pipeInputThread.start(); SleepUtils.second(2); PipeOutputThread pipeOutputThread = new PipeOutputThread(outputStream); pipeOutputThread.start(); } catch (IOException e) { e.printStackTrace(); } } }运行结果:

从结果可以看出两个线程通过管道流成功进行数据的传输。
虽然是先启动的new PipeInputThread(inputStream),但是由于当时没有数据写入,所以被阻塞在input.read(bs),直到有数据被写入才继续向下运行。
管道字符流:PipedReader和PipedWriter
/**
* @ClassName PipeReaderThread
* @Description 从PipedReader中读取字符流
* @Author dukz
* @Date 6/3/21
* @Version 1.0
*/
public class PipeReaderThread extends Thread{
 private PipedReader reader;

 public PipeReaderThread(PipedReader reader) {
     this.reader = reader;
 }

 @Override
 public void run() {
     try {
         System.out.println("read:");
         char[] chars = new char[20];
         // PipedWriter中没有数据时会阻塞
         int readLen = reader.read(chars);
         while (readLen != -1){
             String newData = new String(chars, 0, readLen);
             System.out.print(newData);
             readLen = reader.read(chars);
         }
         System.out.println();
         reader.close();
     } catch (IOException e) {
         e.printStackTrace();
     }
 }
}
/** * @ClassName PipeWriterThread * @Description 向PipedWriter写字符流 * @Author dukz * @Date 6/3/21 * @Version 1.0 */ public class PipeWriterThread extends Thread { private PipedWriter writer; public PipeWriterThread(PipedWriter writer) { this.writer = writer; } @Override public void run() { try { System.out.println("write:"); for (int i = 0; i < 300; i++) { String outData = ""+(i+1); writer.write(outData); System.out.print(outData); } System.out.println(); writer.close(); } catch (IOException e) { e.printStackTrace(); } } }/** * @ClassName Run * @Description 测试管道字符流实现线程通信 * @Author dukz * @Date 6/3/21 * @Version 1.0 */ public class Run { public static void main(String[] args) { try { PipedReader pipedReader = new PipedReader(); PipedWriter pipedWriter = new PipedWriter(); // 连接两个字符流 //pipedReader.connect(pipedWriter); pipedWriter.connect(pipedReader); PipeReaderThread readerThread = new PipeReaderThread(pipedReader); readerThread.start(); SleepUtils.second(2); PipeWriterThread writerThread = new PipeWriterThread(pipedWriter); writerThread.start(); } catch (IOException e) { e.printStackTrace(); } } }
伪唤醒
在进入等待前不能通过if语句判断是否应该进入等待。
官方建议应该在循环中检查等待条件,原因是处于等待的线程可能收到错误警报和伪唤醒,如果不在循环中检查等待条件,程序可能就会在没有满足结束条件的情况下退出。
伪唤醒是指线程并非因为notify,notifyAll、unpark等api调用而唤醒,是更底层的原因导致的。
等待/通知经典范式
- 等待方遵循如下规则:
- 获取对象的锁
- 如果条件不满足,那么调用对象的wait()方法,被通知后任要检查条件
- 条件满足则执行对应的逻辑
对应的伪代码:
synchronized(对象){
    while(条件不满足){
        对象.wait();
    }
    对应的处理逻辑
}
- 通知方遵循如下规则:
- 获取对象的锁
- 改变条件
- 通知所有等待在对象上的线程
对应的伪代码:
synchronized(对象){
    改变条件
    对象.notifyAll();
}
线程封闭
数据都被封闭在各自的线程之中,就不需要同步,这种通过将数据封闭在线程中而避免使用同步的技术称为线程封闭。
线程封闭具体的体现有:ThreadLocal、局部变量
ThreadLocal
ThreadLocal是Java里一种特殊的变量。 它是一个线程级别变量,每个线程都有一个ThreadLocal,就是每个线程都拥有了自己独立的一个变量,竞争条件被彻底消除了,在并发模式下是绝对安全的变量。
用法:ThreadLocal
ThreadLocal会在每个线程上创建一个T的副本,副本之间彼此独立,互不影响。
可以用ThreadLocal存储一些参数,以便在线程多个方法中使用,用来代替方法传参的做法。
/** 线程封闭示例 */
public class Demo7 {
    /** threadLocal变量,每个线程都有一个副本,互不干扰 */
    public static ThreadLocal<String> value = new ThreadLocal<>();

    public void threadLocalTest() throws Exception {

        // threadlocal线程封闭示例
        value.set("这是主线程设置的123"); // 主线程设置值
        String v = value.get();
        System.out.println("线程1执行之前,主线程取到的值:" + v);

        new Thread(new Runnable() {
            @Override
            public void run() {
                String v = value.get();
                System.out.println("线程1取到的值:" + v);
                // 设置 threadLocal
                value.set("这是线程1设置的456");

                v = value.get();
                System.out.println("重新设置之后,线程1取到的值:" + v);
                System.out.println("线程1执行结束");
            }
        }).start();

        Thread.sleep(5000L); // 等待所有线程执行结束

        v = value.get();
        System.out.println("线程1执行之后,主线程取到的值:" + v);

    }

    public static void main(String[] args) throws Exception {
        new Demo7().threadLocalTest();
    }
}
栈封闭
局部变量的固有属性之一就是封闭在线程中。它们位于执行线程的栈中,其他线程无法访问这个栈。
原子操作
原子操作可以是一个步骤,也可以是多个操作步骤,但是其顺序不可以被打乱,也不可以被切割而只执行其中的一部分(不可中断性),将整个操作视为一个整体。
public class Test {
    public int i = 0;
    public void incr(){
        i++;
    }

    public static void main(String[] args) throws InterruptedException {
        Test t = new Test();

        for(int i=0;i<2;i++){
            new Thread(()->{
                for(int j=0;j<10000;j++){
                    t.incr();
                }
            }).start();
        }
        Thread.sleep(2000L);
        System.out.println(t.i);
    }
}
这段代码的结果并不是20000,因为i++并不是原子操作。
解决办法:
- 加锁
```java
// 方式一:synchronized
public void incr(){
synchronized (this) {
} }i++;
// 方式二:Lock Lock lock = new ReentrantLock(); public void incr(){ lock.lock(); try { i++; }finally { lock.unlock(); } }
2. **使用JUC包下的Atomic原子类(底层是CAS)**
```java
public class AtomicDemo {
    AtomicInteger i = new AtomicInteger(0);
    Lock lock = new ReentrantLock();
    public void incr(){
        i.incrementAndGet();
    }

    public static void main(String[] args) throws InterruptedException {
        AtomicDemo t = new AtomicDemo();

        for(int i=0;i<2;i++){
            new Thread(()->{
                for(int j=0;j<10000;j++){
                    t.incr();
                }
            }).start();
        }
        Thread.sleep(2000L);
        System.out.println(t.i);
    }
}

若有收获,就点个赞吧
0 人点赞
