目录结构
.├── README.md├── .gitignore├── back_end│ ├── controller│ ├── core│ ├── global│ ├── go.mod│ ├── go.sum│ ├── initialize│ ├── main.go│ ├── middleware│ ├── public│ ├── router│ ├── service│ ├── static│ ├── tmp│ └── utils└── front_end├── README.md├── craco.config.js├── node_modules├── package.json├── pkg├── public├── src├── tsconfig.json└── yarn.lock
脚手架搭建
前端:https://create-react-app.dev/docs/getting-started
后端:https://github.com/gin-gonic/gin
gorm:https://gorm.io/zh_CN/docs/index.html
前端使用craco支持less以及antd主题配置
原文地址:https://ant.design/docs/react/use-with-create-react-app-cn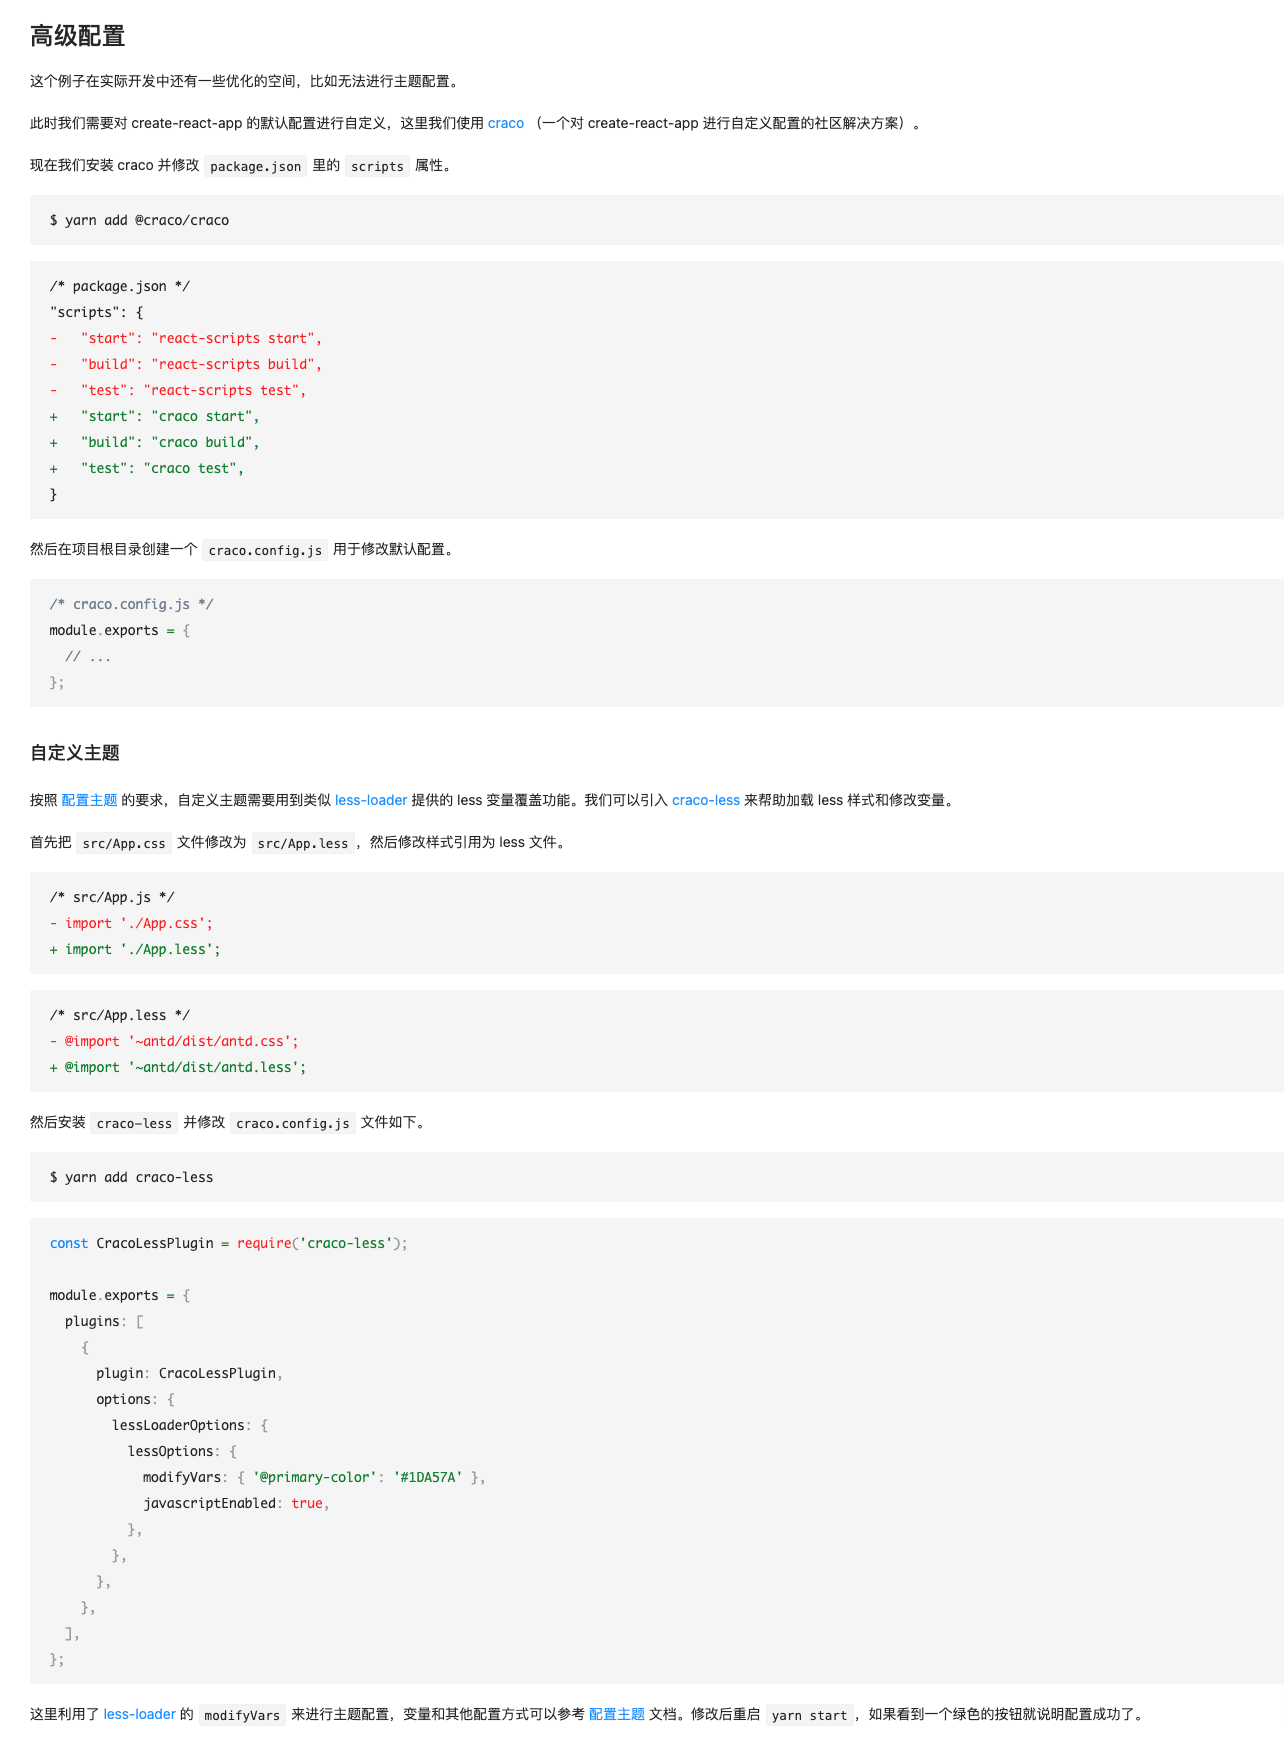
前端定制打包输出目录
根据个人需求添加,这里只做一个备忘,并不是强制需求。
编辑craco.config.js如下:
const CracoLessPlugin = require('craco-less');const path = require("path");module.exports = {plugins: [{plugin: CracoLessPlugin,options: {lessLoaderOptions: {lessOptions: {modifyVars: { '@primary-color': '#66d099' },javascriptEnabled: true,},},},},],webpack: {configure: (webpackConfig, {env, paths}) => {paths.appBuild = '../back_end/public/dist' // 如果需要添加webpackConfig.output = {...webpackConfig.output,path: path.resolve(__dirname, '../back_end/public/dist'), // 修改输出文件目录publicPath: '/'}return webpackConfig}}};
前端添加scss支持
参考文档:https://create-react-app.dev/docs/adding-a-sass-stylesheet
前端配置接口代理
添加依赖:yarn add http-proxy-middleware (这里用的版本是1.3.1)
在src目录下新建setupProxy.js,并编辑内容如下:
const { createProxyMiddleware } = require('http-proxy-middleware');module.exports = function (app) {app.use('/api/',createProxyMiddleware({target: 'http://localhost:8081', // 服务器接口host地址changeOrigin: true,pathRewrite: {// '^/api': '/api', // api路径重写}}));};
前端路由react-router-dom v6
安装依赖: yarn add react-router-dom 这里用的是(^6.2.1)
修改App.tsx,用法如下:
import {BrowserRouter,Routes,Route,} from "react-router-dom";import './App.less';import Overview from './page/overview/overview';import Worker from './page/worker/worker';import Page404 from "./page/404";import ExcelDetail from "./page/excelDetail/excelDetail";import WorkerData from "./page/workerData/workerData";import ImportExplain from "./page/importExplain/importExplain";import RejectReason from "./page/rejectReason/rejectReason";function App() {return <BrowserRouter><Routes><Route path="/:date" element={<Overview />} /><Route path="/:date/worker_data" element={<WorkerData />} /><Route path="/:date/reject_reason" element={<RejectReason />} /><Route path="/:date/:id" element={<ExcelDetail />} /><Route path="/import_explain" element={<ImportExplain />} /><Route path="/worker" element={<Worker />} /><Route path="*" element={<Page404 />} /></Routes></BrowserRouter>;}export default App;
后端gin目录最佳实践
.├── controller│ ├── response│ │ └── response.go│ ├── v1│ │ ├── baidu_data.go│ │ ├── baidu_excel.go│ │ ├── generate_excel.go│ │ ├── reject_reason.go│ │ ├── upload.go│ │ └── worker.go│ └── v2├── core│ ├── generator.go│ └── model│ ├── baidu_data.go│ ├── baidu_excel.go│ ├── operation.go│ ├── reject_reason.go│ └── user.go├── files├── global│ └── global.go├── go.mod├── go.sum├── initialize│ └── initialize.go├── main.go├── middleware├── public├── router│ └── enter.go├── service│ └── mysql│ └── mysql.go├── static│ └── excel│ └── baidu_excel_03.xlsx├── tmp│ ├── runner-build│ └── unner-build-errors.log└── utils└── utils.go
后端gin静态资源配置
Router.Static("/public", "./public") // 设置静态资源、网站等等Router.StaticFS("/api/static", http.Dir("./static")) // 虚拟文件系统
后端gin Content-Type请求头x-www-form-urlencoded 与 application/json的接受参数方式
通过c.PostForm()获取数据需要前端设置请求头的Content-type为x-www-form-urlencoded,以axios为例如下所示:
import qs from "qs";axios('/api/xxx', {method: "POST",headers: {'Content-Type': 'application/x-www-form-urlencoded',},data: qs.stringify({id: record.ID,})})
(推荐)通过c.ShouldBindJSON()获取数据需要前端设置请求头的Content-type为application/json,以axios为例如下所示:
axios('/api/xxx', {method: "POST",data: {id: record.ID,}})
项目部署
linux go环境安装配置
- 下载go
linux x86_64 对应下载地址: https://dl.google.com/go/go1.17.3.linux-amd64.tar.gz
下载后解压到 /usr/local 目录(tar -xzf go1.17.3.linux-amd64.tar.gz -C /usr/local)
- 环境变量配置 ```bash vi /etc/profile
添加一下内容
export GOROOT=/usr/local/go export PATH=$PATH:$GOROOT/bin go env -w GO111MODULE=on go env -w GOPROXY=https://goproxy.io,direct
- 添加环境配置后执行source /etc/profile,使用go version查看安装版本<a name="mxm1F"></a>## 创建数据库版本:Mysql 5+<br />库名:baidu_excel_factory<a name="r1y7H"></a>### 克隆项目到本地git库地址:git@e.coding.net:leha/pule/baiduReview.git<a name="ljDfR"></a>### 前端react项目打包- 切换到项目根目录/front_end- 执行 yarn 安装依赖- 执行 yarn build 打包<a name="WmrIs"></a>### 后端gin项目打包- 切换到项目根目录/back_end- 执行 go mod download 安装依赖- 执行 export GIN_MODE=release && go run main.go 查看项目运行是否正常- 执行 go build -o main main.go 打包可执行文件输出为main- 赋予 main 权限 chmod 777 ./main<a name="b4cN5"></a>### 使用linux systemctl开启后端gin守护进程- 创建service文件, touch /usr/lib/systemd/system/baidu_review.service- 编辑内容如下```bashvi /usr/lib/systemd/system/baidu_review.service# 添加如下内容:[Unit]Description=baidu_review[Service]Type=simpleRestart=on-failureRestartSec=10sEnvironment=GIN_MODE=releaseWorkingDirectory=/data1/baiduReview/back_end # 后端项目路径ExecStart=/data1/baiduReview/back_end/main # 后端可执行文件路径[Install]WantedBy=multi-user.target
- 启动后端服务执行 systemctl start baidu_review.service 。详细service命令的使用如下
systemctl start baidu_review.service # 开启systemctl stop baidu_review.service # 关闭systemctl restart baidu_review.service # 重启
nignx 前后端代理配置
- 查看ngnix配置文件路径执行 locate nginx.conf
编辑nginx配置文件添加如下配置: ```bash server {
listen 443 ssl;server_name baidureview.pule.com;proxy_set_header Host $http_host;proxy_set_header X-Forwarded-Proto https;proxy_set_header X-Forwarded-For $proxy_add_x_forwarded_for;proxy_buffering off;ssl_certificate /etc/nginx/cert/pule/all_pule_com2021.crt;ssl_certificate_key /etc/nginx/cert/pule/all_pule_com2021.key;location / {gzip on;root /data1/baiduReview/front_end/build; # 前端打包目录try_files $uri $uri/ /index.html;}location /api {proxy_set_header X-Forward-For $remote_addr;proxy_set_header X-real-ip $remote_addr;proxy_pass http://127.0.0.1:8081/api; # 后端接口转发}location ^~ /excel {alias /data1/baiduReview/back_end/static/excel/;}
}
server { listen 80; server_name baidureview.pule.com; return 301 https://baidureview.pule.com$request_uri; access_log off; } ```
- nginx 重启执行 systemctl reload nginx.service
相关命令:
- 查看端口占用情况 netstat -ntlp
- 查看nginx配置文件位置 locate nginx.conf
- 压缩包解压 tar -xzf xxx.tar.gz -C /usr/local
- 可执行文件赋权 chmod 777 xxx
- linux 环境变量配置文件 /etc/profile
- nginx 重启 systemctl reload nginx.service
- go mod 初始化 go mod init xxx
- go mod 项目依赖安装 go mod download

若有收获,就点个赞吧
0 人点赞
