一、组件声明
在React中,组件的声明方式有两种:函数组件和类组件, 来看看这两种类型的组件声明时是如何定义TS类型的。
1. 类组件
类组件的定义形式有两种:React.Component
interface IProps {name: string;}interface IState {count: number;}class App extends React.Component<IProps, IState> {state = {count: 0};render() {return (<div>{this.state.count}{this.props.name}</div>);}}export default App;
React.PureComponent
class App extends React.PureComponent<IProps, IState> {}
React.PureComponent是有第三个参数的,它表示getSnapshotBeforeUpdate的返回值。
那PureComponent和Component 的区别是什么呢?它们的主要区别是PureComponent中的shouldComponentUpdate 是由自身进行处理的,不需要我们自己处理,所以PureComponent可以在一定程度上提升性能。
有时候可能会见到这种写法,实际上和上面的效果是一样的:
import React, {PureComponent, Component} from "react";class App extends PureComponent<IProps, IState> {}class App extends Component<IProps, IState> {}
那如果定义时候我们不知道组件的props的类型,只有在调用时才知道组件类型,该怎么办呢?这时泛型就发挥作用了:
// 定义组件class MyComponent<P> extends React.Component<P> {internalProp: P;constructor(props: P) {super(props);this.internalProp = props;}render() {return (<span>hello world</span>);}}// 使用组件type IProps = { name: string; age: number; };<MyComponent<IProps> name="React" age={18} />; // Success<MyComponent<IProps> name="TypeScript" age="hello" />; // Error
2. 函数组件
通常情况下,函数组件我是这样写的:
interface IProps {name: string}const App = (props: IProps) => {const {name} = props;return (<div className="App"><h1>hello world</h1><h2>{name}</h2></div>);}export default App;
除此之外,函数类型还可以使用React.FunctionComponent
type React.FC
= React.FunctionComponent
最终的定义形式如下:
interface IProps {
name: string
}
const App: React.FC
const {name} = props;
return (
hello world
{name}
);
}
export default App;
当使用这种形式来定义函数组件时,props中默认会带有children属性,它表示该组件在调用时,其内部的元素,来看一个例子,首先定义一个组件,组件中引入了Child1和Child2组件:
import Child1 from “./child1”;
import Child2 from “./child2”;
interface IProps {
name: string;
}
const App: React.FC
const { name } = props;
return (
TypeScript
);
};
export default App;
Child1组件结构如下:
interface IProps {
name: string;
}
const Child1: React.FC
const { name, children } = props;
console.log(children);
return (
hello child1
{name}
);
};
export default Child1;
我们在Child1组件中打印了children属性,它的值是一个数组,包含Child2对象和后面的文本: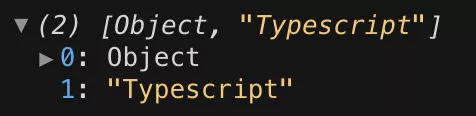
使用 React.FC 声明函数组件和普通声明的区别如下:
- React.FC 显式地定义了返回类型,其他方式是隐式推导的;
- React.FC 对静态属性:displayName、propTypes、defaultProps 提供了类型检查和自动补全;
- React.FC 为 children 提供了隐式的类型(ReactElement | null)。
那如果我们在定义组件时不知道props的类型,只有调用时才知道,那就还是用泛型来定义props的类型。对于使用function定义的函数组件:
// 定义组件
function MyComponent<P>(props: P) {
return (
{props}
);
}
// 使用组件
type IProps = { name: string; age: number; };
如果使用箭头函数定义的函数组件,直接这样调用是错误的:
const MyComponent =
(props: P) {
return (
{props}
);
}
必须使用extends关键字来定义泛型参数才能被成功解析:
const MyComponent =
(props: P) {
return (
{props}
);
}
二、React内置类型
1. JSX.Element
先来看看JSX.Element类型的声明:
declare global {
namespace JSX {
interface Element extends React.ReactElement
}
}
可以看到,JSX.Element是ReactElement的子类型,它没有增加属性,两者是等价的。也就是说两种类型的变量可以相互赋值。
JSX.Element 可以通过执行 React.createElement 或是转译 JSX 获得:
const jsx =
const ele = React.createElement(“div”, null, “hello”);
2. React.ReactElement
React 的类型声明文件中提供了 React.ReactElement<T>,它可以让我们通过传入<T/>来注解类组件的实例化,它在声明文件中的定义如下:
interface ReactElement
= string | JSXElementConstructor
type: T;
props: P;
key: Key | null;
}
ReactElement是一个接口,包含type,props,key三个属性值。该类型的变量值只能是两种:null 和 ReactElement实例。
通常情况下,函数组件返回ReactElement(JXS.Element)的值。
3. React.ReactNode
ReactNode类型的声明如下:
type ReactText = string | number;
type ReactChild = ReactElement | ReactText;
interface ReactNodeArray extends Array
type ReactFragment = {} | ReactNodeArray;
type ReactNode = ReactChild | ReactFragment | ReactPortal | boolean | null | undefined;
可以看到,ReactNode是一个联合类型,它可以是string、number、ReactElement、null、boolean、ReactNodeArray。由此可知。ReactElement类型的变量可以直接赋值给ReactNode类型的变量,但反过来是不行的。
类组件的 render 成员函数会返回 ReactNode 类型的值:
class MyComponent extends React.Component {
render() {
return
}
}
// 正确
const component: React.ReactNode
// 错误
const component: React.ReactNode
上面的代码中,给component变量设置了类型是Mycomponent类型的react实例,这时只能给其赋值其为MyComponent的实例组件。
通常情况下,类组件通过 render() 返回 ReactNode的值。
4. CSSProperties
先来看看React的声明文件中对CSSProperties 的定义:
export interface CSSProperties extends CSS.Properties
/*
The index signature was removed to enable closed typing for style
using CSSType. You’re able to use type assertion or module augmentation
to add properties or an index signature of your own.
For examples and more information, visit:
https://github.com/frenic/csstype#what-should-i-do-when-i-get-type-errors
/
}
React.CSSProperties是React基于TypeScript定义的CSS属性类型,可以将一个方法的返回值设置为该类型:
import as React *from “react”;
const classNames = require(“./sidebar.css”);
interface Props {
isVisible: boolean;
}
const divStyle = (props: Props): React.CSSProperties => ({
width: props.isVisible ? “23rem” : “0rem”
});
export const SidebarComponent: React.StatelessComponent
);
这里divStyle组件的返回值就是React.CSSProperties类型。
我们还可以定义一个CSSProperties类型的变量:
const divStyle: React.CSSProperties = {
width: “11rem”,
height: “7rem”,
backgroundColor: rgb(${props.color.red},${props.color.green}, ${props.color.blue})
};
这个变量可以在HTML标签的style属性上使用:
在React的类型声明文件中,style属性的类型如下:
style?: CSSProperties | undefined;
三、React Hooks
1. useState
默认情况下,React会为根据设置的state的初始值来自动推导state以及更新函数的类型: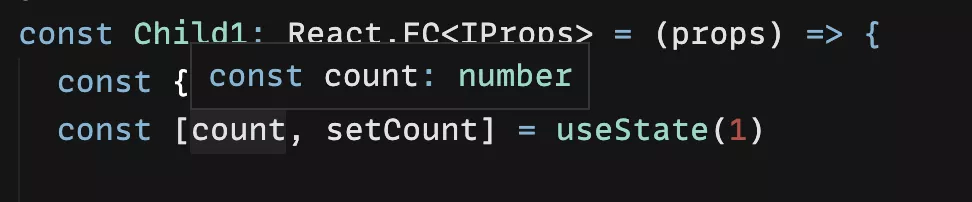
如果已知state 的类型,可以通过以下形式来自定义state的类型:
const [count, setCount] = useState<number>(1)
如果初始值为null,需要显式地声明 state 的类型:
const [count, setCount] = useState<number | null>(null);
如果state是一个对象,想要初始化一个空对象,可以使用断言来处理:
const [user, setUser] = React.useState<IUser>({} as IUser);
实际上,这里将空对象{}断言为IUser接口就是欺骗了TypeScript的编译器,由于后面的代码可能会依赖这个对象,所以应该在使用前及时初始化 user 的值,否则就会报错。
下面是声明文件中 useState 的定义:
function useState<S>(initialState: S | (() => S)): [S, Dispatch<SetStateAction<S>>];// convenience overload when first argument is omitted/*** Returns a stateful value, and a function to update it.** @version 16.8.0* @see https://reactjs.org/docs/hooks-reference.html#usestate*/function useState<S = undefined>(): [S | undefined, Dispatch<SetStateAction<S | undefined>>];/*** An alternative to `useState`.** `useReducer` is usually preferable to `useState` when you have complex state logic that involves* multiple sub-values. It also lets you optimize performance for components that trigger deep* updates because you can pass `dispatch` down instead of callbacks.** @version 16.8.0* @see https://reactjs.org/docs/hooks-reference.html#usereducer*/
可以看到,这里定义两种形式,分别是有初始值和没有初始值的形式。
2. useEffect
useEffect的主要作用就是处理副作用,它的第一个参数是一个函数,表示要清除副作用的操作,第二个参数是一组值,当这组值改变时,第一个参数的函数才会执行,这让我们可以控制何时运行函数来处理副作用:
useEffect(
() => {
const subscription = props.source.subscribe();
return () => {
subscription.unsubscribe();
};
},
[props.source]
);
当函数的返回值不是函数或者effect函数中未定义的内容时,如下:
useEffect(
() => {
subscribe();
return null;
}
);
TypeScript就会报错: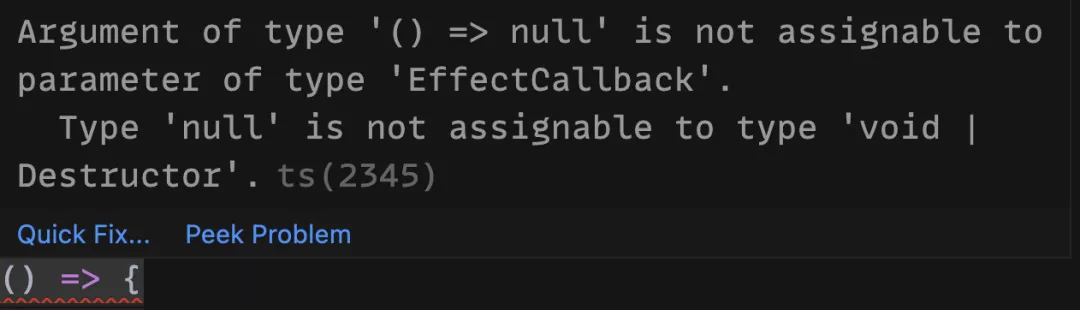
来看看useEffect在类型声明文件中的定义:
// Destructors are only allowed to return void.
type Destructor = () => void | { [UNDEFINED_VOID_ONLY]: never };
// NOTE: callbacks are _only allowed to return either void, or a destructor._
type EffectCallback = () => (void | Destructor);
// TODO (TypeScript 3.0): ReadonlyArray
type DependencyList = ReadonlyArray
function useEffect(effect: EffectCallback, deps?: DependencyList): void;
// NOTE: this does not accept strings, but this will have to be fixed by removing strings from type Ref
/*
useImperativeHandle customizes the instance value that is exposed to parent components when using
ref. As always, imperative code using refs should be avoided in most cases.
useImperativeHandle should be used with React.forwardRef.
@version 16.8.0
@see https://reactjs.org/docs/hooks-reference.html#useimperativehandle
*/
可以看到,useEffect的第一个参数只允许返回一个函数。
3. useRef
当使用 useRef 时,我们可以访问一个可变的引用对象。可以将初始值传递给 useRef,它用于初始化可变 ref 对象公开的当前属性。当我们使用useRef时,需要给其指定类型:
const nameInput = React.useRef
这里给实例的类型指定为了input输入框类型。
当useRef的初始值为null时,有两种创建的形式,第一种:
const nameInput = React.useRef
nameInput.current.innerText = “hello world”;
这种形式下,ref1.current是只读的(read-only),所以当我们将它的innerText属性重新赋值时会报以下错误:
Cannot assign to ‘current’ because it is a read-only property.
那该怎么将current属性变为动态可变的,先来看看类型声明文件中 useRef 是如何定义的:
function useRef<T>(initialValue: T): MutableRefObject<T>;
// convenience overload for refs given as a ref prop as they typically start with a null value
/*
useRef returns a mutable ref object whose .current property is initialized to the passed argument
(initialValue). The returned object will persist for the full lifetime of the component.
Note that useRef() is useful for more than the ref attribute. It’s handy for keeping any mutable
value around similar to how you’d use instance fields in classes.
Usage note: if you need the result of useRef to be directly mutable, include | null in the type
of the generic argument.
@version 16.8.0
@see https://reactjs.org/docs/hooks-reference.html#useref
*/
这段代码的第十行的告诉我们,如果需要useRef的直接可变,就需要在泛型参数中包含’| null’,所以这就是当初始值为null的第二种定义形式:
const nameInput = React.useRef
这种形式下,nameInput.current就是可写的。不过两种类型在使用时都需要做类型检查:
nameInput.current?.innerText = “hello world”;
那么问题来了,为什么第一种写法在没有操作current时没有报错呢?因为useRef在类型定义时具有多个重载声明,第一种方式就是执行的以下函数重载:
function useRef<T>(initialValue: T|null): RefObject<T>;
// convenience overload for potentially undefined initialValue / call with 0 arguments
// has a default to stop it from defaulting to {} instead
/*
useRef returns a mutable ref object whose .current property is initialized to the passed argument
(initialValue). The returned object will persist for the full lifetime of the component.
Note that useRef() is useful for more than the ref attribute. It’s handy for keeping any mutable
value around similar to how you’d use instance fields in classes.
@version 16.8.0
@see https://reactjs.org/docs/hooks-reference.html#useref
/
从上useRef的声明中可以看到,function useRef的返回值类型化是MutableRefObject,这里面的T就是参数的类型T,所以最终nameInput 的类型就是React.MutableRefObject。
注意,上面用到了HTMLInputElement类型,这是一个标签类型,这个操作就是用来访问DOM元素的。
4. useCallback
先来看看类型声明文件中对useCallback的定义:
function useCallback<T extends (…args: any[]) => any>(callback: T, deps: DependencyList): T;
/*
useMemo will only recompute the memoized value when one of the deps has changed.
Usage note: if calling useMemo with a referentially stable function, also give it as the input in
the second argument.
```ts
function expensive () { … }
function Component () {
const expensiveResult = useMemo(expensive, [expensive])
return …
}
```
@version 16.8.0
@see https://reactjs.org/docs/hooks-reference.html#usememo
/
useCallback接收一个回调函数和一个依赖数组,只有当依赖数组中的值发生变化时才会重新执行回调函数。来看一个例子:
const add = (a: number, b: number) => a + b;
const memoizedCallback = useCallback(
(a) => {
add(a, b);
},
[b]
);
这里我们没有给回调函数中的参数a定义类型,所以下面的调用方式都不会报错:
memoizedCallback(“hello”);
memoizedCallback(5)
尽管add方法的两个参数都是number类型,但是上述调用都能够用执行。所以为了更加严谨,我们需要给回调函数定义具体的类型:
const memoizedCallback = useCallback(
(a: number) => {
add(a, b);
},
[b]
);
这时候如果再给回调函数传入字符串就会报错了: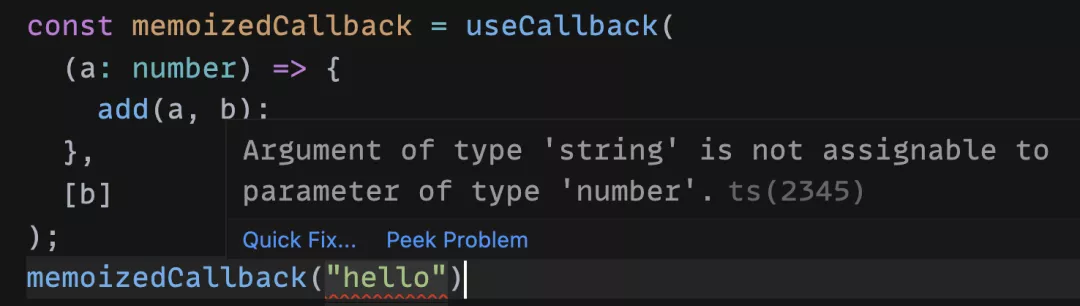 所有,需要注意,在使用useCallback时需要给回调函数的参数指定类型。
5. useMemo
先来看看类型声明文件中对useMemo的定义:
function useMemo<T>(factory: () => T, deps: DependencyList | undefined): T;
/*
useDebugValue can be used to display a label for custom hooks in React DevTools.
NOTE: We don’t recommend adding debug values to every custom hook.
It’s most valuable for custom hooks that are part of shared libraries.
@version 16.8.0
@see https://reactjs.org/docs/hooks-reference.html#usedebugvalue
*/
useMemo和useCallback是非常类似的,但是它返回的是一个值,而不是函数。所以在定义useMemo时需要定义返回值的类型:
let a = 1;
setTimeout(() => {
a += 1;
}, 1000);
const calculatedValue = useMemo
如果返回值不一致,就会报错:
const calculatedValue = useMemo
// 类型“() => string”的参数不能赋给类型“() => number”的参数
6. useContext
useContext需要提供一个上下文对象,并返回所提供的上下文的值,当提供者更新上下文对象时,引用这些上下文对象的组件就会重新渲染:
const ColorContext = React.createContext({ color: “green” });
const Welcome = () => {
const { color } = useContext(ColorContext);
return
};
在使用useContext时,会自动推断出提供的上下文对象的类型,所以并不需要我们手动设置context的类型。当前,我们也可以使用泛型来设置context的类型:
interface IColor {
color: string;
}
const ColorContext = React.createContext
下面是useContext在类型声明文件中的定义:
function useContext<T>(context: Context
/*
Returns a stateful value, and a function to update it.
@version 16.8.0
@see https://reactjs.org/docs/hooks-reference.html#usestate
/
7. useReducer
有时我们需要处理一些复杂的状态,并且可能取决于之前的状态。这时候就可以使用useReducer,它接收一个函数,这个函数会根据之前的状态来计算一个新的state。其语法如下:
const [state, dispatch] = useReducer(reducer, initialArg, init);
来看下面的例子:
const reducer = (state, action) => {
switch (action.type) {
case ‘increment’:
return {count: state.count + 1};
case ‘decrement’:
return {count: state.count - 1};
default:
throw new Error();
}
}
const Counter = () => {
const initialState = {count: 0}
const [state, dispatch] = useReducer(reducer, initialState);
return (
<>
Count: {state.count}
</>
);
}
当前的状态是无法推断出来的,可以给reducer函数添加类型,通过给reducer函数定义state和action来推断 useReducer 的类型,下面来修改上面的例子:
type ActionType = {
type: ‘increment’ | ‘decrement’;
};
type State = { count: number };
const initialState: State = {count: 0}
const reducer = (state: State, action: ActionType) => {
// …
}
这样,在Counter函数中就可以推断出类型。当我们试图使用一个不存在的类型时,就会报错:
dispatch({type: ‘reset’});
// Error! type ‘“reset”‘ is not assignable to type ‘“increment” | “decrement”‘
除此之外,还可以使用泛型的形式来实现reducer函数的类型定义:
type ActionType = {
type: ‘increment’ | ‘decrement’;
};
type State = { count: number };
const reducer: React.Reducer
// …
}
其实dispatch方法也是有类型的:
可以看到,dispatch的类型是:React.Dispatch,上面示例的完整代码如下:
import React, { useReducer } from “react”;
type ActionType = {
type: “increment” | “decrement”;
};
type State = { count: number };
const Counter: React.FC = () => {
const reducer: React.Reducer
switch (action.type) {
case “increment”:
return { count: state.count + 1 };
case “decrement”:
return { count: state.count - 1 };
default:
throw new Error();
}
};
const initialState: State = {count: 0}
const [state, dispatch] = useReducer(reducer, initialState);
return (
<>
Count: {state.count}
</>
);
};
export default Counter;
四、事件处理
1. Event 事件类型
在开发中我们会经常在事件处理函数中使用event事件对象,比如在input框输入时实时获取输入的值;使用鼠标事件时,通过 clientX、clientY 获取当前指针的坐标等等。
我们知道,Event是一个对象,并且有很多属性,这时很多人就会把 event 类型定义为any,这样的话TypeScript就失去了它的意义,并不会对event事件进行静态检查,如果一个键盘事件触发了下面的方法,也不会报错:
const handleEvent = (e: any) => {
console.log(e.clientX, e.clientY)
}
由于Event事件对象中有很多的属性,所以我们也不方便把所有属性及其类型定义在一个interface中,所以React在声明文件中给我们提供了Event事件对象的类型声明。
常见的Event 事件对象如下:
- 剪切板事件对象:ClipboardEvent
- 拖拽事件对象:DragEvent
- 焦点事件对象:FocusEvent
- 表单事件对象:FormEvent
- Change事件对象:ChangeEvent
- 键盘事件对象:KeyboardEvent
- 鼠标事件对象:MouseEvent
- 触摸事件对象:TouchEvent
- 滚轮事件对象:WheelEvent
- 动画事件对象:AnimationEvent
- 过渡事件对象:TransitionEvent
可以看到,这些Event事件对象的泛型中都会接收一个Element元素的类型,这个类型就是我们绑定这个事件的标签元素的类型,标签元素类型将在下面的第五部分介绍。
来看一个简单的例子:
type State = {
text: string;
};
const App: React.FC = () => {
const [text, setText] = useState
const onChange = (e: React.FormEvent
setText(e.currentTarget.value);
};
return (
);
}
这里就给onChange方法的事件对象定义为了FormEvent类型,并且作用的对象是一个HTMLInputElement类型的标签(input标签)
可以来看下MouseEvent事件对象和ChangeEvent事件对象的类型声明,其他事件对象的声明形似也类似:
interface MouseEvent
altKey: boolean;
button: number;
buttons: number;
clientX: number;
clientY: number;
ctrlKey: boolean;
/*
See DOM Level 3 Events spec. for a list of valid (case-sensitive) arguments to this method.
*/
getModifierState(key: string): boolean;
metaKey: boolean;
movementX: number;
movementY: number;
pageX: number;
pageY: number;
relatedTarget: EventTarget | null;
screenX: number;
screenY: number;
shiftKey: boolean;
}
interface ChangeEvent
target: EventTarget & T;
}
在很多事件对象的声明文件中都可以看到 EventTarget 的身影。这是因为,DOM的事件操作(监听和触发),都定义在EventTarget接口上。EventTarget 的类型声明如下:
interface EventTarget {
addEventListener(type: string, listener: EventListenerOrEventListenerObject | null, options?: boolean | AddEventListenerOptions): void;
dispatchEvent(evt: Event): boolean;
removeEventListener(type: string, listener?: EventListenerOrEventListenerObject | null, options?: EventListenerOptions | boolean): void;
}
比如在change事件中,会使用的e.target来获取当前的值,它的的类型就是EventTarget。来看下面的例子:
placeholder=”最多30个字”
/>
const onSourceChange = (e: React.ChangeEvent
if (e.target.value.length > 30) {
message.error(‘请长度不能超过30个字,请重新输入’);
return;
}
setSourceInput(e.target.value);
};
这里定义了一个input输入框,当触发onChange事件时,会调用onSourceChange方法,该方法的参数e的类型就是:React.ChangeEvent,而e.target的类型就是EventTarget: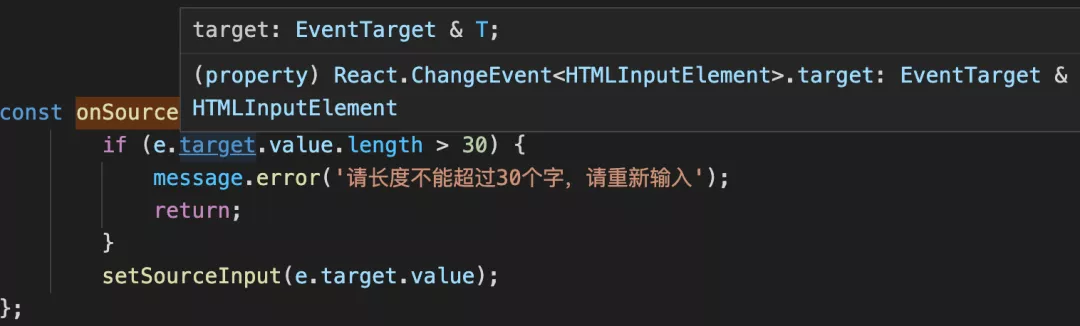
再来看一个例子:
questionList.map(item => (
role=”button”
onClick={e => handleChangeCurrent(item, e)}
>
// 组件内容…
)
const handleChangeCurrent = (item: IData, e: React.MouseEvent
e.stopPropagation();
setCurrent(item);
};
这点代码中,点击某个盒子,就将它设置为当前的盒子,方便执行其他操作。当鼠标点击盒子时,会触发handleChangeCurren方法,该方法有两个参数,第二个参数是event对象,在方法中执行了e.stopPropagation();是为了阻止冒泡事件,这里的stopPropagation()实际上并不是鼠标事件MouseEvent的属性,它是合成事件上的属性,来看看声明文件中的定义:
interface MouseEvent
//…
}
interface UIEvent
//…
}
interface SyntheticEvent
interface BaseSyntheticEvent
nativeEvent: E;
currentTarget: C;
target: T;
bubbles: boolean;
cancelable: boolean;
defaultPrevented: boolean;
eventPhase: number;
isTrusted: boolean;
preventDefault(): void;
isDefaultPrevented(): boolean;
stopPropagation(): void;
isPropagationStopped(): boolean;
persist(): void;
timeStamp: number;
type: string;
}
可以看到,这里的stopPropagation()是一层层的继承来的,最终来自于BaseSyntheticEvent合成事件类型。原生的事件集合SyntheticEvent就是继承自合成时间类型。SyntheticEvent
onChange={(e: SyntheticEvent
//…
}}
/>
2. 事件处理函数类型
说完事件对象类型,再来看看事件处理函数的类型。React也为我们提供了贴心的提供了事件处理函数的类型声明,来看看所有的事件处理函数的类型声明:
type EventHandler
type ReactEventHandler
// 剪切板事件处理函数
type ClipboardEventHandler
// 复合事件处理函数
type CompositionEventHandler
// 拖拽事件处理函数
type DragEventHandler
// 焦点事件处理函数
type FocusEventHandler
// 表单事件处理函数
type FormEventHandler
// Change事件处理函数
type ChangeEventHandler
// 键盘事件处理函数
type KeyboardEventHandler
// 鼠标事件处理函数
type MouseEventHandler
// 触屏事件处理函数
type TouchEventHandler
// 指针事件处理函数
type PointerEventHandler
// 界面事件处理函数
type UIEventHandler
// 滚轮事件处理函数
type WheelEventHandler
// 动画事件处理函数
type AnimationEventHandler
// 过渡事件处理函数
type TransitionEventHandler
这里面的T的类型也都是Element,指的是触发该事件的HTML标签元素的类型,下面第五部分会介绍。
EventHandler会接收一个E,它表示事件处理函数中 Event 对象的类型。bivarianceHack 是事件处理函数的类型定义,函数接收一个 Event 对象,并且其类型为接收到的泛型变量 E 的类型, 返回值为 void。
还看上面的那个例子:
type State = {
text: string;
};
const App: React.FC = () => {
const [text, setText] = useState
const onChange: React.ChangeEventHandler
setText(e.currentTarget.value);
};
return (
);
}
这里给onChange方法定义了方法的类型,它是一个ChangeEventHandler的类型,并且作用的对象是一个HTMLImnputElement类型的标签(input标签)。
五、HTML标签类型
1. 常见标签类型
在项目的依赖文件中可以找到HTML标签相关的类型声明文件: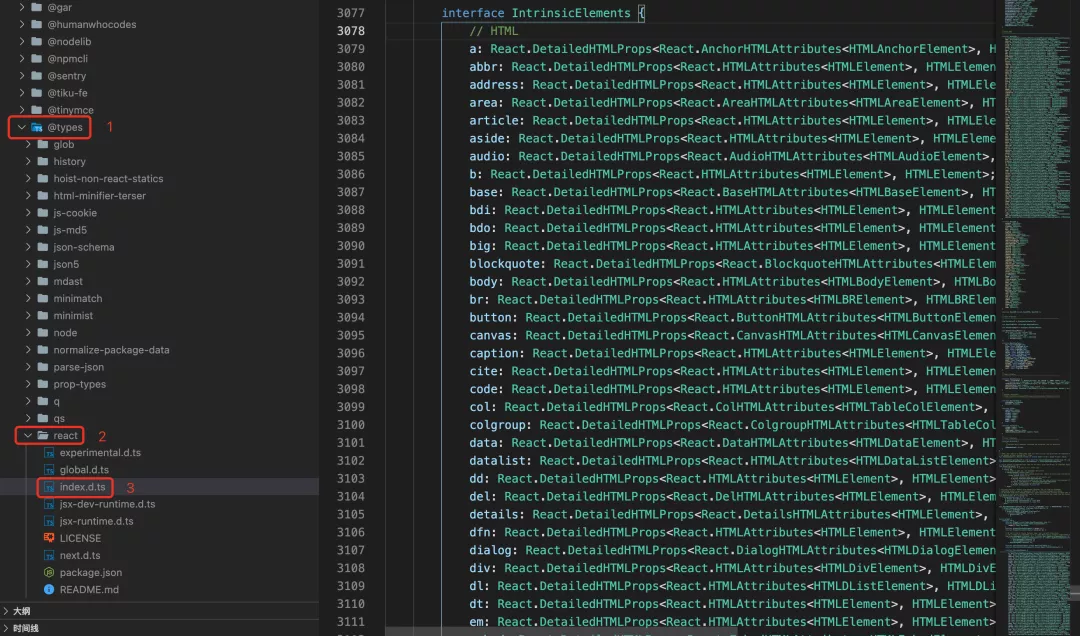
所有的HTML标签的类型都被定义在 intrinsicElements 接口中,常见的标签及其类型如下:
a: HTMLAnchorElement;
body: HTMLBodyElement;
br: HTMLBRElement;
button: HTMLButtonElement;
div: HTMLDivElement;
h1: HTMLHeadingElement;
h2: HTMLHeadingElement;
h3: HTMLHeadingElement;
html: HTMLHtmlElement;
img: HTMLImageElement;
input: HTMLInputElement;
ul: HTMLUListElement;
li: HTMLLIElement;
link: HTMLLinkElement;
p: HTMLParagraphElement;
span: HTMLSpanElement;
style: HTMLStyleElement;
table: HTMLTableElement;
tbody: HTMLTableSectionElement;
video: HTMLVideoElement;
audio: HTMLAudioElement;
meta: HTMLMetaElement;
form: HTMLFormElement;
那什么时候会使用到标签类型呢,上面第四部分的Event事件类型和事件处理函数类型中都使用到了标签的类型。上面的很多的类型都需要传入一个ELement类型的泛型参数,这个泛型参数就是对应的标签类型值,可以根据标签来选择对应的标签类型。这些类型都继承自HTMLElement类型,如果使用时对类型类型要求不高,可以直接写HTMLELement。比如下面的例子:
<Buttontype="text"onClick={(e: React.MouseEvent<HTMLElement>) => {handleOperate();e.stopPropagation();}}><imgsrc={cancelChangeIcon}alt=""/>取消修改</Button>
其实,在直接操作DOM时也会用到标签类型,虽然我们现在通常会使用框架来开发,但是有时候也避免不了直接操作DOM。比如我在工作中,项目中的某一部分组件是通过npm来引入的其他组的组件,而在很多时候,我有需要动态的去个性化这个组件的样式,最直接的办法就是通过原生JavaScript获取到DOM元素,来进行样式的修改,这时候就会用到标签类型。
来看下面的例子:
document.querySelectorAll('.paper').forEach(item => {
  const firstPageHasAddEle = (item.firstChild as HTMLDivElement).classList.contains('add-ele');

  if (firstPageHasAddEle) {
    item.removeChild(item.firstChild as ChildNode);
  }
})
这是我最近写的一段代码(略微删改),在第一页有个add-ele元素的时候就删除它。这里我们将item.firstChild断言成了HTMLDivElement类型,如果不断言,item.firstChild的类型就是ChildNode,而ChildNode类型中是不存在classList属性的,所以就就会报错,当我们把他断言成HTMLDivElement类型时,就不会报错了。很多时候,标签类型可以和断言(as)一起使用。
后面在removeChild时又使用了as断言,为什么呢?item.firstChild不是已经自动识别为ChildNode类型了吗?因为TS会认为,我们可能不能获取到类名为paper的元素,所以item.firstChild的类型就被推断为ChildNode | null,我们有时候比TS更懂我们定义的元素,知道页面一定存在paper 元素,所以可以直接将item.firstChild断言成ChildNode类型。
2. 标签属性类型
众所周知,每个HTML标签都有自己的属性,比如Input框就有value、width、placeholder、max-length等属性,下面是Input框的属性类型定义:
interface InputHTMLAttributes<T> extends HTMLAttributes<T> {
  accept?: string | undefined;
  alt?: string | undefined;
  autoComplete?: string | undefined;
  autoFocus?: boolean | undefined;
  capture?: boolean | string | undefined;
  checked?: boolean | undefined;
  crossOrigin?: string | undefined;
  disabled?: boolean | undefined;
  enterKeyHint?: 'enter' | 'done' | 'go' | 'next' | 'previous' | 'search' | 'send' | undefined;
  form?: string | undefined;
  formAction?: string | undefined;
  formEncType?: string | undefined;
  formMethod?: string | undefined;
  formNoValidate?: boolean | undefined;
  formTarget?: string | undefined;
  height?: number | string | undefined;
  list?: string | undefined;
  max?: number | string | undefined;
  maxLength?: number | undefined;
  min?: number | string | undefined;
  minLength?: number | undefined;
  multiple?: boolean | undefined;
  name?: string | undefined;
  pattern?: string | undefined;
  placeholder?: string | undefined;
  readOnly?: boolean | undefined;
  required?: boolean | undefined;
  size?: number | undefined;
  src?: string | undefined;
  step?: number | string | undefined;
  type?: string | undefined;
  value?: string | ReadonlyArray<string> | number | undefined;
  width?: number | string | undefined;

  onChange?: ChangeEventHandler<T> | undefined;
}
如果我们需要直接操作DOM,就可能会用到元素属性类型,常见的元素属性类型如下:
- HTML属性类型:HTMLAttributes
- 按钮属性类型:ButtonHTMLAttributes
- 表单属性类型:FormHTMLAttributes
- 图片属性类型:ImgHTMLAttributes
- 输入框属性类型:InputHTMLAttributes
- 链接属性类型:LinkHTMLAttributes
- meta属性类型:MetaHTMLAttributes
- 选择框属性类型:SelectHTMLAttributes
- 表格属性类型:TableHTMLAttributes
- 输入区属性类型:TextareaHTMLAttributes
- 视频属性类型:VideoHTMLAttributes
- SVG属性类型:SVGAttributes
- WebView属性类型:WebViewHTMLAttributes
一般情况下,我们是很少需要在项目中显式的去定义标签属性的类型。如果子级去封装组件库的话,这些属性就能发挥它们的作用了。来看例子(来源于网络,仅供学习):
import React from 'react';
import classNames from 'classnames'

export enum ButtonSize {
    Large = 'lg',
    Small = 'sm'
}

export enum ButtonType {
    Primary = 'primary',
    Default = 'default',
    Danger = 'danger',
    Link = 'link'
}

interface BaseButtonProps {
    className?: string;
    disabled?: boolean;
    size?: ButtonSize;
    btnType?: ButtonType;
    children: React.ReactNode;
    href?: string;
}

type NativeButtonProps = BaseButtonProps & React.ButtonHTMLAttributes<HTMLButtonElement> // 使用 交叉类型(&) 获得我们自己定义的属性和原生 button 的属性
type AnchorButtonProps = BaseButtonProps & React.AnchorHTMLAttributes<HTMLAnchorElement> // 使用 交叉类型(&) 获得我们自己定义的属性和原生 a标签 的属性

export type ButtonProps = Partial<NativeButtonProps & AnchorButtonProps> //使用 Partial<> 使两种属性可选

const Button: React.FC<ButtonProps> = (props) => {
    const {
        disabled,
        className,
        size,
        btnType,
        children,
        href,
        ...restProps
    } = props;

    const classes = classNames('btn', className, {
        [`btn-${btnType}`]: btnType,
        [`btn-${size}`]: size,
        'disabled': (btnType === ButtonType.Link) && disabled  // 只有 a 标签才有 disabled 类名,button没有
    })

    if(btnType === ButtonType.Link && href) {
        return (
            <a
             className={classes}
             href={href}
             {...restProps}
            >
                {children}
            </a>
        )

    } else {
        return (
            <button
             className={classes}
             disabled={disabled} // button元素默认有disabled属性,所以即便没给他设置样式也会和普通button有一定区别

             {...restProps}
            >
                {children}
            </button>
        )
    }
}

Button.defaultProps = {
    disabled: false,
    btnType: ButtonType.Default
}

export default Button;
这段代码就是用来封装一个buttom按钮,在button的基础上添加了一些自定义属性,比如上面将button的类型使用交叉类型(&)获得自定义属性和原生 button 属性 :
type NativeButtonProps = BaseButtonProps & React.ButtonHTMLAttributes<HTMLButtonElement>
可以看到,标签属性类型在封装组件库时还是很有用的,更多用途可以自己探索~
六、工具泛型
在项目中使用一些工具泛型可以提高我们的开发效率,少写很多类型定义。下面来看看有哪些常见的工具泛型,以及其使用方式。
1. Partial
Partial 作用是将传入的属性变为可选项。适用于对类型结构不明确的情况。它使用了两个关键字:keyof和in,先来看看他们都是什么含义。keyof 可以用来取得接口的所有 key 值:
interface IPerson {
  name: string;
  age: number;
  height: number;
}
type T = keyof IPerson
// T 类型为: "name" | "age" | "number"
in关键字可以遍历枚举类型:
type Person = "name" | "age" | "number"
type Obj =  {
  [p in Keys]: any
}
// Obj类型为: { name: any, age: any, number: any }
keyof 可以产生联合类型, in 可以遍历枚举类型, 所以经常一起使用, 下面是Partial工具泛型的定义:
/**
 * Make all properties in T optional
 * 将T中的所有属性设置为可选
 */
type Partial<T> = {
    [P in keyof T]?: T[P];
};
这里,keyof T 获取 T 所有属性名, 然后使用 in 进行遍历, 将值赋给 P, 最后 T[P] 取得相应属性的值。中间的?就用来将属性设置为可选。
使用示例如下:
interface IPerson {
  name: string;
  age: number;
  height: number;
}

const person: Partial<IPerson> = {
  name: "zhangsan";
}
2. Required
Required 的作用是将传入的属性变为必选项,和上面的工具泛型恰好相反,其声明如下:
/**
 * Make all properties in T required
 * 将T中的所有属性设置为必选
 */
type Required<T> = {
    [P in keyof T]-?: T[P];
};
可以看到,这里使用-?将属性设置为必选,可以理解为减去问号。使用形式和上面的Partial差不多:
interface IPerson {
  name?: string;
  age?: number;
  height?: number;
}

const person: Required<IPerson> = {
  name: "zhangsan";
  age: 18;
  height: 180;
}
3. Readonly
将T类型的所有属性设置为只读(readonly),构造出来类型的属性不能被再次赋值。Readonly的声明形式如下:
/**
 * Make all properties in T readonly
 */
type Readonly<T> = {
    readonly [P in keyof T]: T[P];
};
使用示例如下:
interface IPerson {
  name: string;
  age: number;
}

const person: Readonly<IPerson> = {
  name: "zhangsan",
  age: 18
}

person.age = 20;  //  Error: cannot reassign a readonly property
可以看到,通过 Readonly将IPerson的属性转化成了只读,不能再进行赋值操作。
4. Pick
从T类型中挑选部分属性K来构造新的类型。它的声明形式如下:
/**
 * From T, pick a set of properties whose keys are in the union K
 */
type Pick<T, K extends keyof T> = {
    [P in K]: T[P];
};
使用示例如下:
interface IPerson {
  name: string;
  age: number;
  height: number;
}

const person: Pick<IPerson, "name" | "age"> = {
  name: "zhangsan",
  age: 18
}
5. Record
Record 用来构造一个类型,其属性名的类型为K,属性值的类型为T。这个工具泛型可用来将某个类型的属性映射到另一个类型上,下面是其声明形式:
/**
 * Construct a type with a set of properties K of type T
 */
type Record<K extends keyof any, T> = {
    [P in K]: T;
};
使用示例如下:
interface IPageinfo {
    title: string;
}

type IPage = 'home' | 'about' | 'contact';

const page: Record<IPage, IPageinfo> = {
    about: {title: 'about'},
    contact: {title: 'contact'},
    home: {title: 'home'},
}
6. Exclude
Exclude 就是从一个联合类型中排除掉属于另一个联合类型的子集,下面是其声明的形式:
/**
 * Exclude from T those types that are assignable to U
 */
type Exclude<T, U> = T extends U ? never : T;
使用示例如下:
interface IPerson {
  name: string;
  age: number;
  height: number;
}

const person: Exclude<IPerson, "age" | "sex"> = {
  name: "zhangsan";
  height: 180;
}
7. Omit
上面的Pick 和 Exclude 都是最基础基础的工具泛型,很多时候用 Pick 或者 Exclude 还不如直接写类型更直接。而 Omit 就基于这两个来做的一个更抽象的封装,它允许从一个对象中剔除若干个属性,剩下的就是需要的新类型。下面是它的声明形式:
/**
 * Construct a type with the properties of T except for those in type K.
 */
type Omit<T, K extends keyof any> = Pick<T, Exclude<keyof T, K>>;
使用示例如下:
interface IPerson {
  name: string;
  age: number;
  height: number;
}

const person: Omit<IPerson, "age" | "height"> = {
  name: "zhangsan";
}
8. ReturnType
ReturnType会返回函数返回值的类型,其声明形式如下:
/**
 * Obtain the return type of a function type
 */
type returnType<T extends (...args: any) => any> = T extends (...args: any) => infer R ? R : any;
使用示例如下:
function foo(type): boolean {
  return type === 0
}

type FooType = ReturnType<typeof foo>
这里使用 typeof 是为了获取 foo 的函数签名,等价于 (type: any) => boolean。
七、Axios 封装
在React项目中,我们经常使用Axios库进行数据请求,Axios 是基于 Promise 的 HTTP 库,可以在浏览器和 node.js 中使用。Axios 具备以下特性:
- 从浏览器中创建 XMLHttpRequests;
- 从 node.js 创建 HTTP 请求;
- 支持 Promise API;
- 拦截请求和响应;
- 转换请求数据和响应数据;
- 取消请求;
- 自动转换 JSON 数据;
- 客户端支持防御 XSRF。
Axios的基本使用就不再多介绍了。为了更好地调用,做一些全局的拦截,通常会对Axios进行封装,下面就使用TypeScript对Axios进行简单封装,使其同时能够有很好的类型支持。Axios是自带声明文件的,所以我们无需额外的操作。
下面来看基本的封装:
import axios, { AxiosInstance, AxiosRequestConfig, AxiosPromise,AxiosResponse } from 'axios'; // 引入axios和定义在node_modules/axios/index.ts文件里的类型声明

 // 定义接口请求类,用于创建axios请求实例
class HttpRequest {
  // 接收接口请求的基本路径
  constructor(public baseUrl: string) {
    this.baseUrl = baseUrl;
  }

  // 调用接口时调用实例的这个方法,返回AxiosPromise
  public request(options: AxiosRequestConfig): AxiosPromise {
    // 创建axios实例,它是函数,同时这个函数包含多个属性
    const instance: AxiosInstance = axios.create()
    // 合并基础路径和每个接口单独传入的配置,比如url、参数等
    options = this.mergeConfig(options)
    // 调用interceptors方法使拦截器生效
    this.interceptors(instance, options.url)
    // 返回AxiosPromise
    return instance(options)
  }

  // 用于添加全局请求和响应拦截
  private interceptors(instance: AxiosInstance, url?: string) {
    // 请求和响应拦截
  }

  // 用于合并基础路径配置和接口单独配置
  private mergeConfig(options: AxiosRequestConfig): AxiosRequestConfig {
    return Object.assign({ baseURL: this.baseUrl }, options);
  }
}
export default HttpRequest;
通常baseUrl在开发环境的和生产环境的路径是不一样的,所以可以根据当前是开发环境还是生产环境做判断,应用不同的基础路径。这里要写在一个配置文件里:
export default {
    api: {
        devApiBaseUrl: '/test/api/xxx',
        proApiBaseUrl: '/api/xxx',
    },
};
在上面的文件中引入这个配置:
import { api: { devApiBaseUrl, proApiBaseUrl } } from '@/config';
const apiBaseUrl = env.NODE_ENV === 'production' ? proApiBaseUrl : devApiBaseUrl;
之后就可以将apiBaseUrl作为默认值传入HttpRequest的参数:
class HttpRequest {
  constructor(public baseUrl: string = apiBaseUrl) {
    this.baseUrl = baseUrl;
    }
接下来可以完善一下拦截器类,在类中interceptors方法内添加请求拦截器和响应拦截器,实现对所有接口请求的统一处理:
private interceptors(instance: AxiosInstance, url?: string) {
   // 请求拦截
    instance.interceptors.request.use((config: AxiosRequestConfig) => {
      // 接口请求的所有配置,可以在axios.defaults修改配置
      return config
    },
    (error) => {
      return Promise.reject(error)
    })

   // 响应拦截
    instance.interceptors.response.use((res: AxiosResponse) => {
      const { data } = res
      const { code, msg } = data
      if (code !== 0) {
        console.error(msg)
      }
      return res
    },
    (error) => {
      return Promise.reject(error)
    })
  }
到这里封装的就差不多了,一般服务端会将状态码、提示信息和数据封装在一起,然后作为数据返回,所以所有请求返回的数据格式都是一样的,所以就可以定义一个接口来指定返回的数据结构,可以定义一个接口:
export interface ResponseData {
  code: number
  data?: any
  msg: string
}
接下来看看使用TypeScript封装的Axios该如何使用。可以先定义一个请求实例:
import HttpRequest from '@/utils/axios'
export * from '@/utils/axios'
export default new HttpRequest()
这里把请求类导入进来,默认导出这个类的实例。之后创建一个登陆接口请求方法:
import axios, { ResponseData } from './index'
import { AxiosPromise } from 'axios'

interface ILogin {
  user: string;
  password: number | string
}

export const loginReq = (data: ILogin): AxiosPromise<ResponseData> => {
  return axios.request({
    url: '/api/user/login',
    data,
    method: 'POST'
  })
}
这里封装登录请求方法loginReq,他的参数必须是我们定义的ILogin接口的类型。这个方法返回一个类型为AxiosPromise的Promise,AxiosPromise是axios声明文件内置的类型,可以传入一个泛型变量参数,用于指定返回的结果中data字段的类型。
接下来可以调用一下这个登录的接口:
import { loginReq } from '@/api/user'

const Home: FC = () => {
  const login = (params) => {
   loginReq(params).then((res) => {
     console.log(res.data.code)
   })
  }
}
通过这种方式,当我们调用loginReq接口时,就会提示我们,参数的类型是ILogin,需要传入几个参数。这样编写代码的体验就会好很多。
八. 其他
1. import React
在React项目中使用TypeScript时,普通组件文件后缀为.tsx,公共方法文件后缀为.ts。在. tsx 文件中导入 React 的方式如下:
import * as React from 'react'
import * as ReactDOM from 'react-dom'
这是一种面向未来的导入方式,如果想在项目中使用以下导入方式:
import React from "react";
import ReactDOM from "react-dom";
就需要在tsconfig.json配置文件中进行如下配置:
"compilerOptions": {
    // 允许默认从没有默认导出的模块导入。
    "allowSyntheticDefaultImports": true,
}
2. Types or Interfaces?
我们可以使用types或者Interfaces来定义类型吗,那么该如何选择他俩呢?建议如下:
- 在定义公共 API 时(比如编辑一个库)使用 interface,这样可以方便使用者继承接口,这样允许使用者通过声明合并来扩展它们;
- 在定义组件属性(Props)和状态(State)时,建议使用 type,因为 type 的约束性更强。
interface 和 type 在 ts 中是两个不同的概念,但在 React 大部分使用的 case 中,interface 和 type 可以达到相同的功能效果,type 和 interface 最大的区别是:type 类型不能二次编辑,而 interface 可以随时扩展:
interface Animal {
  name: string
}

// 可以继续在原属性基础上,添加新属性:color
interface Animal {
  color: string
}

type Animal = {
  name: string
}
// type类型不支持属性扩展
// Error: Duplicate identifier 'Animal'
type Animal = {
  color: string
}
type对于联合类型是很有用的,比如:type Type = TypeA | TypeB。而interface更适合声明字典类行,然后定义或者扩展它。
3. 懒加载类型
如果我们想在React router中使用懒加载,React也为我们提供了懒加载方法的类型,来看下面的例子:
export interface RouteType {
    pathname: string;
    component: LazyExoticComponent<any>;
    exact: boolean;
    title?: string;
    icon?: string;
    children?: RouteType[];
}
export const AppRoutes: RouteType[] = [
    {
        pathname: '/login',
        component: lazy(() => import('../views/Login/Login')),
        exact: true
    },
    {
        pathname: '/404',
        component: lazy(() => import('../views/404/404')),
        exact: true,
    },
    {
        pathname: '/',
        exact: false,
        component: lazy(() => import('../views/Admin/Admin'))
    }
]
下面是懒加载类型和lazy方法在声明文件中的定义:
type LazyExoticComponent<T extends ComponentType<any>> = ExoticComponent<ComponentPropsWithRef<T>> & {
  readonly _result: T;
};

function lazy<T extends ComponentType<any>>(
factory: () => Promise<{ default: T }>
): LazyExoticComponent<T>;
4. 类型断言
类型断言(Type Assertion)可以用来手动指定一个值的类型。在React项目中,断言还是很有用的,。有时候推断出来的类型并不是真正的类型,很多时候我们可能会比TS更懂我们的代码,所以可以使用断言(使用as关键字)来定义一个值得类型。
来看下面的例子:
const getLength = (target: string | number): number => {
  if (target.length) { // error 类型"string | number"上不存在属性"length"
    return target.length; // error  类型"number"上不存在属性"length"
  } else {
    return target.toString().length;
  }
};
当TypeScript不确定一个联合类型的变量到底是哪个类型时,就只能访问此联合类型的所有类型里共有的属性或方法,所以现在加了对参数target和返回值的类型定义之后就会报错。这时就可以使用断言,将target的类型断言成string类型:
const getStrLength = (target: string | number): number => {
  if ((target as string).length) {
    return (target as string).length;
  } else {
    return target.toString().length;
  }
};
需要注意,类型断言并不是类型转换,断言成一个联合类型中不存在的类型是不允许的。
再来看一个例子,在调用一个方法时传入参数: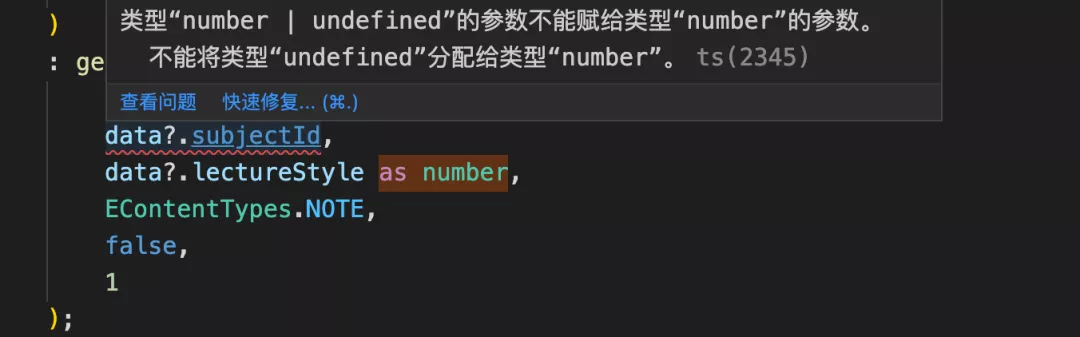 这里就提示我们这个参数可能是undefined,而通过业务知道这个值是一定存在的,所以就可以将它断言成数字:data?.subjectId as number
除此之外,上面所说的标签类型、组件类型、时间类型都可以使用断言来指定给一些数据,还是要根据实际的业务场景来使用。
感悟:使用类型断言真的能解决项目中的很多报错~
5. 枚举类型
枚举类型在项目中的作用也是不可忽视的,使用枚举类型可以让代码的扩展性更好,当我想更改某属性值时,无需去全局更改这个属性,只要更改枚举中的值即可。通常情况下,最好新建一个文件专门来定义枚举值,便于引用。

若有收获,就点个赞吧
0 人点赞
