自定义认证授权逻辑
查看源码可知【AuthenticationProvider】定义了认证逻辑
public interface AuthenticationProvider {Authentication authenticate(Authentication authentication) throws AuthenticationException;boolean supports(Class<?> authentication);}
- authenticate 方法用来做验证,就是验证用户身份。
- supports 则用来判断当前的 AuthenticationProvider 是否支持对应的 Authentication。
认证逻辑分析
在 Spring Security 中有一个非常重要的对象叫做 Authentication,我们可以在任何地方注入 Authentication 进而获取到当前登录用户信息,Authentication 本身是一个接口,它实际上对 java.security.Principal 做的进一步封装,我们来看下 Authentication 的定义
public interface Authentication extends Principal, Serializable {Collection<? extends GrantedAuthority> getAuthorities();Object getCredentials();Object getDetails();Object getPrincipal();boolean isAuthenticated();void setAuthenticated(boolean isAuthenticated) throws IllegalArgumentException;}
- getAuthorities 方法用来获取用户的权限。
- getCredentials 方法用来获取用户凭证,一般来说就是密码。
- getDetails 方法用来获取用户携带的详细信息,可能是当前请求之类的东西。
- getPrincipal 方法用来获取当前用户,可能是一个用户名,也可能是一个用户对象。
- isAuthenticated 当前用户是否认证成功。

对于Authentication接口的实现类中,我们通常用的最多的就是UsernamePasswordAuthenticationToken
而每一个 Authentication 都有适合它的 AuthenticationProvider 去处理校验。
例如处理 UsernamePasswordAuthenticationToken 的 AuthenticationProvider 是 DaoAuthenticationProvider。
所以大家在 AuthenticationProvider 中看到一个 supports 方法,就是用来判断 AuthenticationProvider 是否支持当前 Authentication。
在一次完整的认证中,可能包含多个 AuthenticationProvider,而这多个 AuthenticationProvider 则由 ProviderManager 进行统一管理
authenticate 方法
public Authentication authenticate(Authentication authentication) throws AuthenticationException {Assert.isInstanceOf(UsernamePasswordAuthenticationToken.class, authentication, () -> {return this.messages.getMessage("AbstractUserDetailsAuthenticationProvider.onlySupports", "Only UsernamePasswordAuthenticationToken is supported");});String username = this.determineUsername(authentication);boolean cacheWasUsed = true;UserDetails user = this.userCache.getUserFromCache(username);if (user == null) {cacheWasUsed = false;try {user = this.retrieveUser(username, (UsernamePasswordAuthenticationToken)authentication);} catch (UsernameNotFoundException var6) {this.logger.debug("Failed to find user '" + username + "'");if (!this.hideUserNotFoundExceptions) {throw var6;}throw new BadCredentialsException(this.messages.getMessage("AbstractUserDetailsAuthenticationProvider.badCredentials", "Bad credentials"));}Assert.notNull(user, "retrieveUser returned null - a violation of the interface contract");}try {this.preAuthenticationChecks.check(user);this.additionalAuthenticationChecks(user, (UsernamePasswordAuthenticationToken)authentication);} catch (AuthenticationException var7) {if (!cacheWasUsed) {throw var7;}cacheWasUsed = false;user = this.retrieveUser(username, (UsernamePasswordAuthenticationToken)authentication);this.preAuthenticationChecks.check(user);this.additionalAuthenticationChecks(user, (UsernamePasswordAuthenticationToken)authentication);}this.postAuthenticationChecks.check(user);if (!cacheWasUsed) {this.userCache.putUserInCache(user);}Object principalToReturn = user;if (this.forcePrincipalAsString) {principalToReturn = user.getUsername();}return this.createSuccessAuthentication(principalToReturn, authentication, user);}
authenticate 方法就是用来做认证的方法,我们来简单看下方法流程:
- 首先从 Authentication 提取出登录用户名。

- 然后通过拿着 username 去调用 retrieveUser 方法去获取当前用户对象,该方法是一个抽象方法,这一步会调用我们自己在登录时候的写的 loadUserByUsername 方法,所以这里返回的 user 其实就是你的登录对象
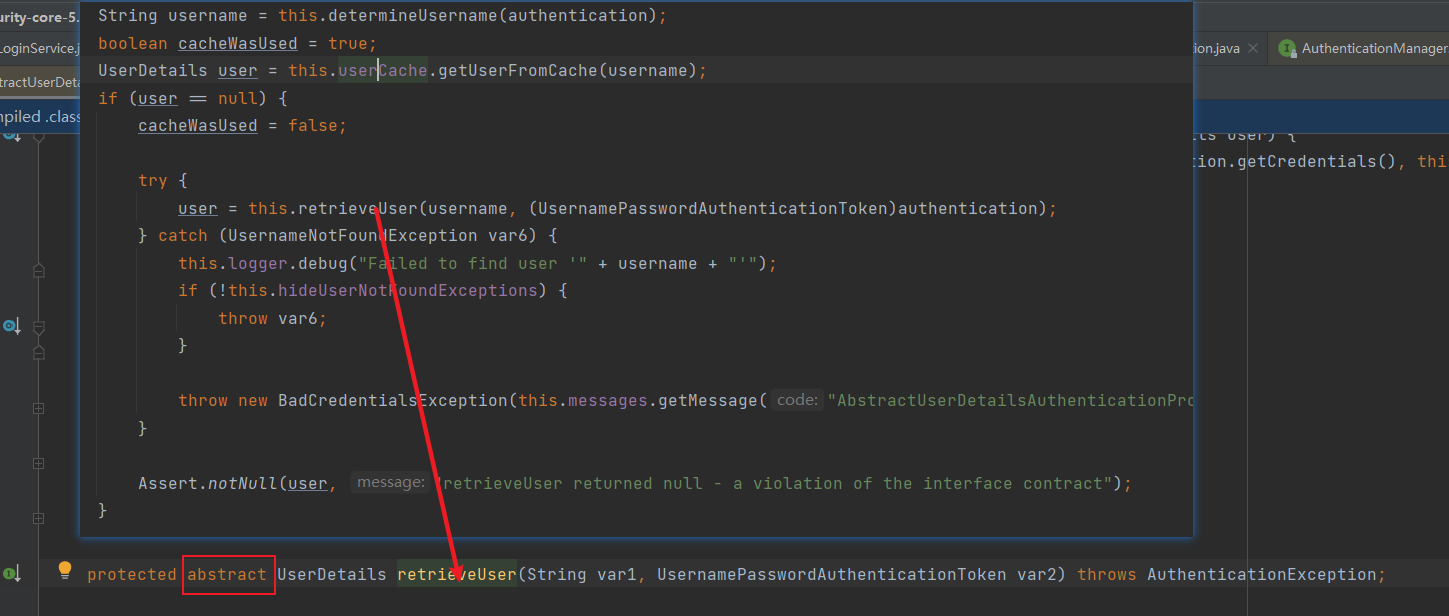
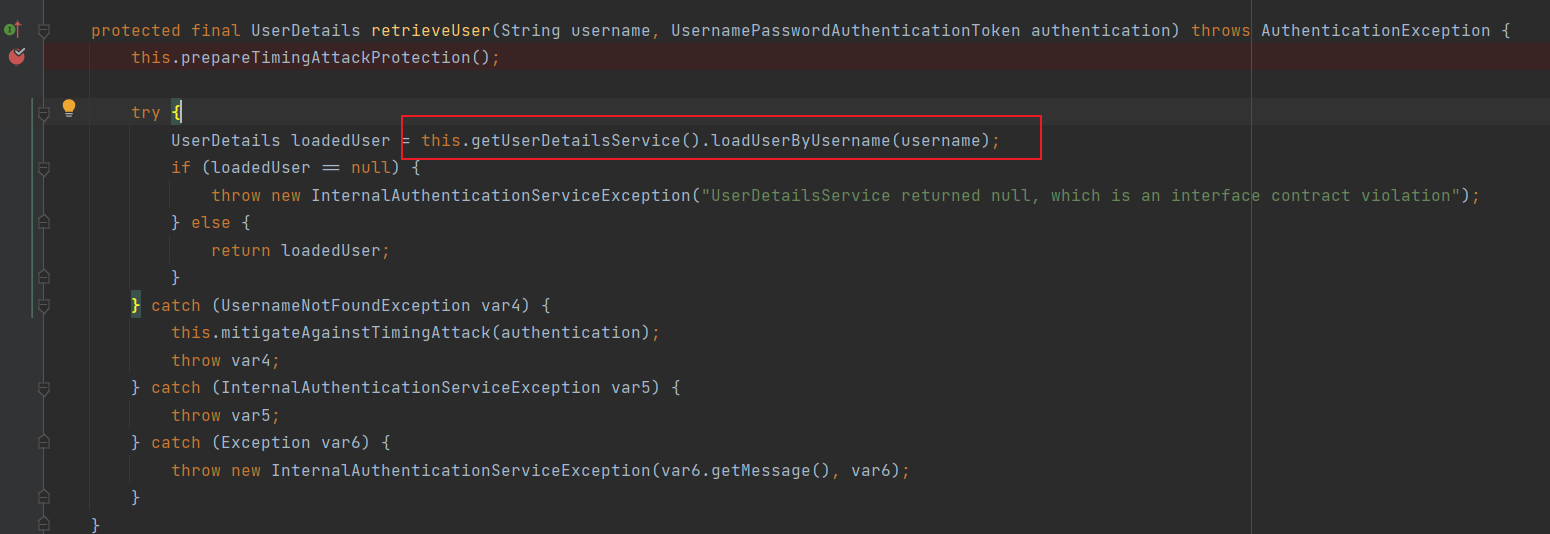

我们的配置类中配置的实现类,具体的实现根据业务进行编写
- 接下来调用 preAuthenticationChecks.check 方法去检验 user 中的各个账户状态属性是否正常,例如账户是否被禁用、账户是否被锁定、账户是否过期等等。
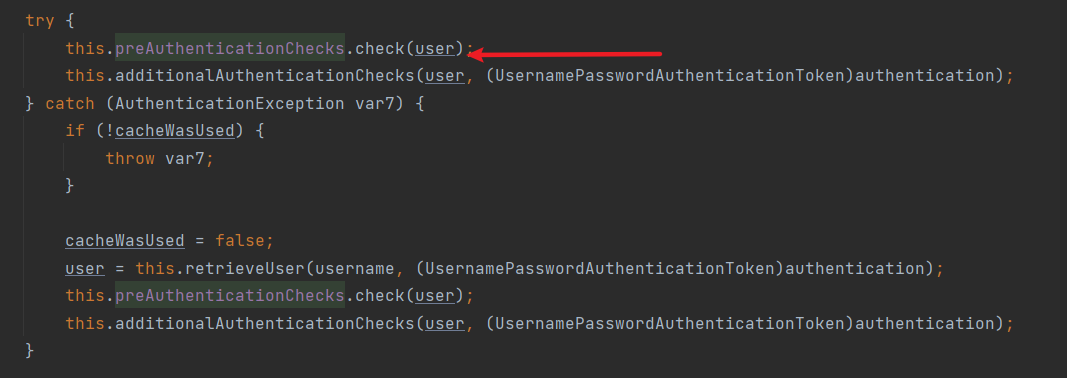

- 再然后调用additionalAuthenticationChecks 方法做密码比对
additionalAuthenticationChecks 方法是一个抽象方法,
具体的实现是在 AbstractUserDetailsAuthenticationProvider 的子类中实现的,也就是 DaoAuthenticationProvider。
这个其实很好理解,因为 AbstractUserDetailsAuthenticationProvider 作为一个较通用的父类,处理一些通用的行为,
我们在登录的时候,有的登录方式并不需要密码,
所以 additionalAuthenticationChecks 方法一般交给它的子类去实现,
在 DaoAuthenticationProvider 类中,additionalAuthenticationChecks 方法就是做密码比对的,
在其他的 AuthenticationProvider 中,additionalAuthenticationChecks 方法的作用就不一定了。
- 最后在 postAuthenticationChecks.check 方法中检查密码是否过期。
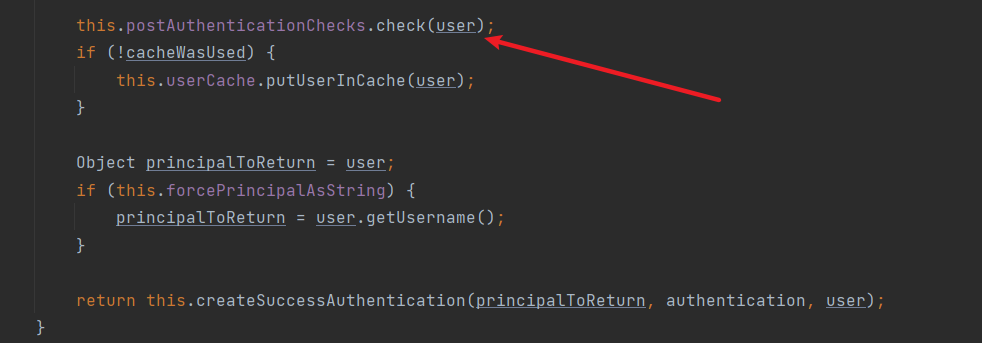

- 接下来有一个 forcePrincipalAsString 属性,
这个属性代表是否强制将 Authentication 中的 principal 属性设置为字符串,
这个属性我们一开始在 UsernamePasswordAuthenticationFilter 类中其实就是设置为字符串的(即 username),
但是默认情况下,当用户登录成功之后, 这个属性的值就变成当前用户这个对象了。
之所以会这样,就是因为 forcePrincipalAsString 默认为 false,不过这块其实不用改,就用 false,这样在后期获取当前用户信息的时候反而方便很多。
- 最后,通过 createSuccessAuthentication 方法构建一个新的 UsernamePasswordAuthenticationToken。
由于 AbstractUserDetailsAuthenticationProvider 已经把 authenticate 和 supports 方法实现了,protected Authentication createSuccessAuthentication(Object principal, Authentication authentication, UserDetails user) { UsernamePasswordAuthenticationToken result = new UsernamePasswordAuthenticationToken(principal, authentication.getCredentials(), this.authoritiesMapper.mapAuthorities(user.getAuthorities())); result.setDetails(authentication.getDetails()); this.logger.debug("Authenticated user"); return result; }
所以在 DaoAuthenticationProvider 中,我们主要关注 additionalAuthenticationChecks 方法即可:
additionalAuthenticationChecks 方法主要用来做密码比对的,逻辑也比较简单,就是调用 PasswordEncoder 的 matches 方法做比对,如果密码不对则直接抛出异常即可。
「正常情况下,我们使用用户名/密码登录,最终都会走到这一步。」
而 AuthenticationProvider 都是通过 ProviderManager#authenticate 方法来调用的。
由于我们的一次认证可能会存在多个 AuthenticationProvider,
所以,在 ProviderManager#authenticate 方法中会逐个遍历 AuthenticationProvider,并调用他们的 authenticate 方法做认证,
public Authentication authenticate(Authentication authentication)
  throws AuthenticationException {
 for (AuthenticationProvider provider : getProviders()) {
  result = provider.authenticate(authentication);
  if (result != null) {
   copyDetails(authentication, result);
   break;
  }
 }
    ...
    ...
}
可以看到,在这个方法中,会遍历所有的 AuthenticationProvider,并调用它的 authenticate 方法进行认证。
supports方法
自定义认证逻辑
之前我们都是配置filter,并将其添加至security的执行filter链中,进而实现添加登录验证码的功能,
但是这种方式是有弊端的,就是破坏了原有的过滤器链,请求每次都要走一遍验证码过滤器,这样不合理。
登录请求是调用
AbstractUserDetailsAuthenticationProvider#authenticate 方法进行认证的,
在该方法中,又会调用到
DaoAuthenticationProvider#additionalAuthenticationChecks 方法做进一步的校验,去校验用户登录密码。
我们可以自定义一个 AuthenticationProvider 代替 DaoAuthenticationProvider,
并重写它里边的 additionalAuthenticationChecks 方法,在重写的过程中,加入验证码的校验逻辑即可。
实现代码
依赖导入
 <dependency>
    <groupId>com.github.penggle</groupId>
    <artifactId>kaptcha</artifactId>
    <version>${kaptcha.version}</version>
</dependency>
验证码配置类
我们为生成验证码配置一些基础配置
package com.zukxu.config;

import com.google.code.kaptcha.Producer;
import com.google.code.kaptcha.impl.DefaultKaptcha;
import com.google.code.kaptcha.util.Config;
import org.springframework.context.annotation.Bean;
import org.springframework.context.annotation.Configuration;

import java.util.Properties;

/**
 * @author xupu
 * @Description
 * @Date 2021-09-26 15:15
 */
@Configuration
public class CommonConfig {
    @Bean
    Producer verifyCode() {
        Properties properties = new Properties();
        properties.setProperty("kaptcha.image.width", "150");
        properties.setProperty("kaptcha.image.height", "50");
        properties.setProperty("kaptcha.textproducer.char.string", "0123456789");
        properties.setProperty("kaptcha.textproducer.char.length", "4");
        Config config = new Config(properties);
        DefaultKaptcha defaultKaptcha = new DefaultKaptcha();
        defaultKaptcha.setConfig(config);
        return defaultKaptcha;
    }
}
我们就是提供了验证码图片的宽高、字符库以及生成的验证码字符长度。
验证码接口
接下来提供一个返回验证码图片的接口:
@RestController
public class CaptchaController {
    @Autowired
    Producer producer;

    @GetMapping("/captcha")
    public void getCaptcha(HttpServletResponse resp, HttpSession session) throws IOException {
        resp.setContentType("image/jpeg");
        String text = producer.createText();
        session.setAttribute("verify_code", text);
        BufferedImage image = producer.createImage(text);
        try(ServletOutputStream out = resp.getOutputStream()) {
            ImageIO.write(image, "jpg", out);
        }
    }
}
这里我们生成验证码图片,并将生成的验证码字符存入 HttpSession 中。注意这里我用到了 try-with-resources ,可以自动关闭流
自定义认证逻辑
继承自 DaoAuthenticationProvider,并重写 additionalAuthenticationChecks 方法:
/**
 * @author xupu
 * @Description 自定义认证逻辑
 * @Date 2021-09-26 15:13
 */
public class MyAuthenticationProvider extends DaoAuthenticationProvider {
    @Override
    protected void additionalAuthenticationChecks(UserDetails userDetails,
                                                  UsernamePasswordAuthenticationToken authentication) throws AuthenticationException {
        HttpServletRequest req = ((ServletRequestAttributes) Objects.requireNonNull(RequestContextHolder.getRequestAttributes())).getRequest();
        String code = req.getParameter("code");
        String verify_code = (String) req.getSession().getAttribute("verify_code");
        if(code == null || !code.equals(verify_code)) {
            throw new AuthenticationServiceException("验证码错误");
        }
        super.additionalAuthenticationChecks(userDetails, authentication);
    }
}
实现逻辑如下:
首先获取当前请求,注意这种获取方式,在基于 Spring 的 web 项目中,我们可以随时随地获取到当前请求,获取方式就是我上面给出的代码。
HttpServletRequest req = ((ServletRequestAttributes) Objects.requireNonNull(RequestContextHolder.getRequestAttributes())).getRequest();
从当前请求中拿到 code 参数,也就是用户传来的验证码。
- 从 session 中获取生成的验证码字符串。
- 两者进行比较,如果验证码输入错误,则直接抛出异常。
- 最后通过 super 调用父类方法,也就是 DaoAuthenticationProvider 的 additionalAuthenticationChecks 方法,该方法中主要做密码的校验。
使用自定义认证类
将自定义的认证类纳入security的管理,
前面我们说,所有的 AuthenticationProvider 都是放在 ProviderManager 中统一管理
所以接下来我们就要自己提供 ProviderManager,然后注入自定义的 MyAuthenticationProvider
     @Bean
    MyAuthenticationProvider myAuthenticationProvider() {
        MyAuthenticationProvider myAuthenticationProvider = new MyAuthenticationProvider();
        myAuthenticationProvider.setPasswordEncoder(passwordEncoder());
        myAuthenticationProvider.setUserDetailsService(userDetailsService());
        return myAuthenticationProvider;
    }

    @Override
    protected AuthenticationManager authenticationManager() throws Exception {
        return new ProviderManager(Collections.singletonList(myAuthenticationProvider()));
    }

     @Override
    protected void configure(HttpSecurity http) throws Exception {
        http.authorizeRequests()
            .antMatchers("/captcha").permitAll()//放行验证码图片接口
        }
实现逻辑如下:
- 我们需要提供一个 MyAuthenticationProvider 的实例,创建该实例时,需要提供 UserDetailService 和 PasswordEncoder 实例。
- 通过重写 authenticationManager 方法来提供一个自己的 AuthenticationManager,实际上就是 ProviderManager,在创建 ProviderManager 时,加入自己的 myAuthenticationProvider。
结果:
| 获取验证码 | 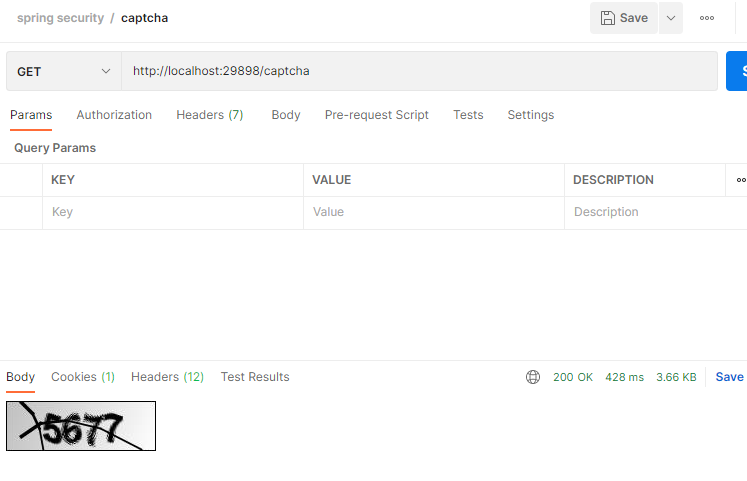 |
|---|---|
| 错误验证码登录 | 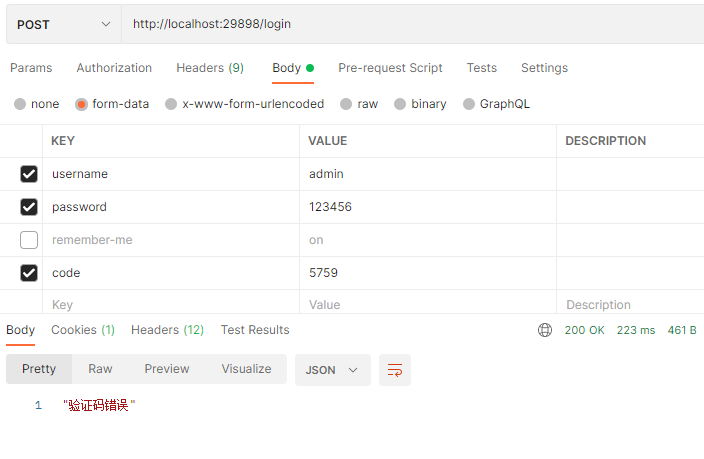 |
| 正确验证码登录 | 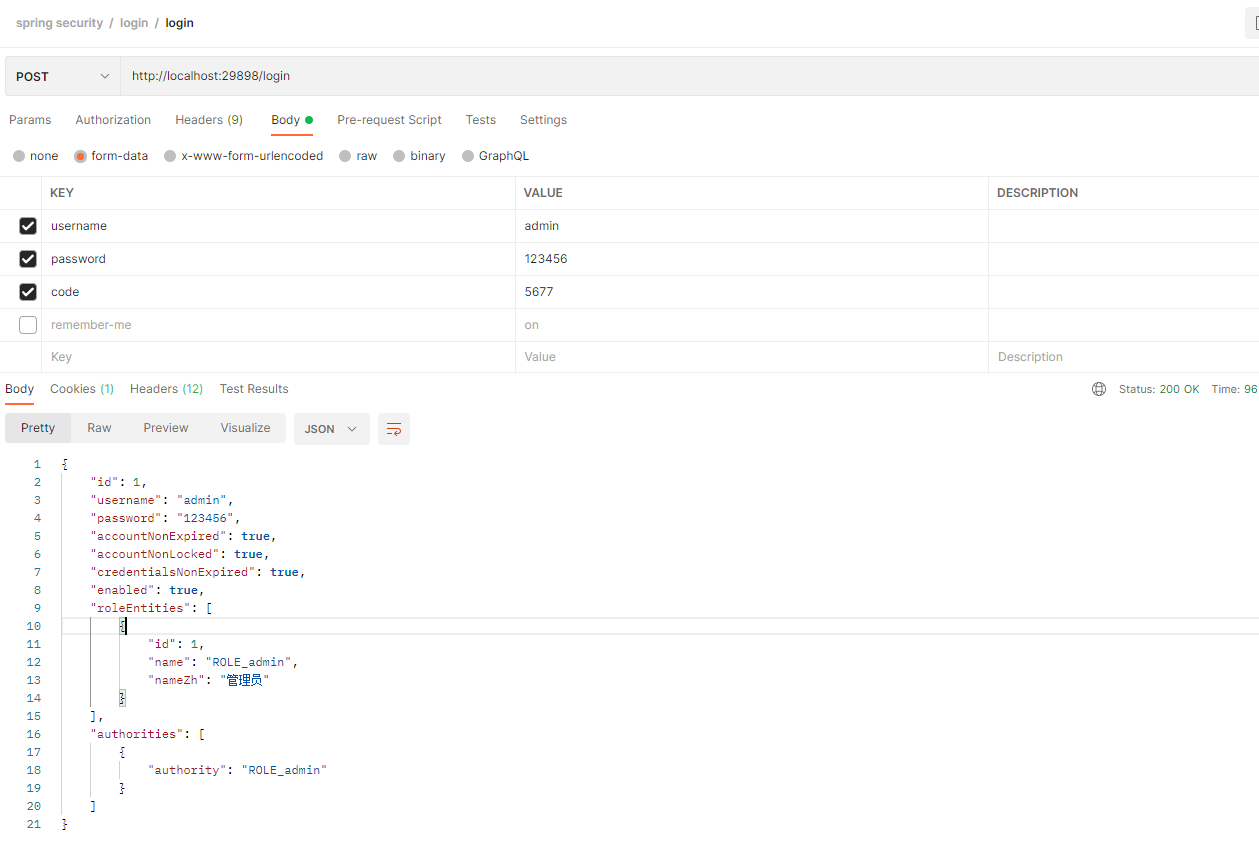 |

