- 一、秒杀商品的页面展示:
- 二、秒杀功能实现:
- 2.1 用户下单功能细节:
- 2.2 秒杀支付:
- 2.2.1 在zyg-pay-service的application.yml文件中定义关于秒杀支付的同步及异步回调地址:
- 2.2.2 在zyg-pay-service的AlipayTempalte.java中定义上面两个属性:
- 2.2.3 在zyg-pay-service的pay()方法中新增一个代表支付类型的参数:
- 2.2.4 在zyg-seckill-web中定义pay方法调用上面的支付函数:[形成支付的页面]
- 2.2.5 在zyg-seckill-web中定义关于支付的同步回调函数:
- 2.2.6 在zyg-page-web中定义异步回调函数:
- 2.2.6 在zyg-pay-service中定义orderPayNotify()异步回调方法:
- 2.2.7 最后的效果页面:
一、秒杀商品的页面展示:
1.1 秒杀列表页面数据的展示:
1.1.1 新建一个zyg-seckill-web工程:
pom.xml文件:
<dependencies><dependency><groupId>org.springframework.boot</groupId><artifactId>spring-boot-starter-web</artifactId></dependency><!--1.添加thymeleaf依赖--><dependency><groupId>org.springframework.boot</groupId><artifactId>spring-boot-starter-thymeleaf</artifactId></dependency><!--2.添加devtools--><dependency><groupId>org.springframework.boot</groupId><artifactId>spring-boot-devtools</artifactId><optional>true</optional></dependency><dependency><groupId>com.zelin</groupId><artifactId>zyg-dao</artifactId><version>2.0</version></dependency><!--1. 引入cas单点登录的依赖--><dependency><groupId>org.springframework.boot</groupId><artifactId>spring-boot-starter-security</artifactId></dependency><dependency><groupId>org.springframework.security</groupId><artifactId>spring-security-cas</artifactId></dependency><dependency><groupId>com.zelin</groupId><artifactId>zyg-seckill-interface</artifactId><version>2.0</version></dependency><!--引入支付服务--><dependency><groupId>com.zelin</groupId><artifactId>zyg-pay-interface</artifactId><version>2.0</version></dependency></dependencies></project>
application.properties文件:
server.port=9009logging.level.com.zelin=debugspring.thymeleaf.cache=falsespring.dubbo.registry.address=zookeeper://192.168.56.10:2181spring.dubbo.base-package=com.zelin.seckill.webspring.dubbo.application.name=zyg-seckill-webcas.server.prefix=http://cas.zeyigou.com:8080/cascas.server.login=${cas.server.prefix}/logincas.server.logout=${cas.server.prefix}/logoutcas.client.prefix=http://seckill.zeyigou.comcas.client.login=${cas.client.prefix}/login/cascas.client.logoutRelative=/logout/cascas.client.logout=${cas.client.prefix}${cas.client.logoutRelative}
config目录下关于cas的配置与zyg-cart-web工程。
1.1.2 在nginx服务器下配置关于seckill-web的服务器映射:
/mydata/nginx/conf/conf.d/zeyigou.conf
server {listen 80;server_name seckill.zeyigou.com;location / {proxy_pass http://seckill;proxy_set_header Host $host:$server_port;}include /etc/nginx/static.conf;}
/mydata/nginx/conf/nginx.conf文件:
upstream seckill{server 192.168.56.1:9009;}
1.1.3 在zyg-seckill-service下定义关于查询秒杀商品信息的方法:
/*** 功能: 根据商品的时间标识得到商品列表* 参数:* 返回值: java.util.List<com.zelin.entity.SeckillGoodsEntity>* 时间: 2021/8/19 12:40*/@Overridepublic List<SeckillGoodsEntity> findSeckillGoods() {BoundHashOperations<String, String, String> hashOperations = redisTemplate.boundHashOps("SeckillGoods_2021081914" );List<String> values = hashOperations.values();System.out.println("values = " + values);List<SeckillGoodsEntity> collect = values.stream().map(m -> {SeckillGoodsEntity seckillGoodsEntity = JSON.parseObject(m, SeckillGoodsEntity.class);return seckillGoodsEntity;}).collect(Collectors.toList());System.out.println("collect = " + collect);return collect;}
1.1.4 在zyg-seckill-service下定义关于查询菜单的方法:
/*** 功能: 展示菜单* 参数:* 返回值: java.util.List<java.sql.Date>* 时间: 2021/8/19 13:13*/@Overridepublic List<Date> listMenus() {return MyDate.getDateMenus();}
1.1.5 在zyg-seckill-web中的控制器下定义查看商品的方法:
/*** 功能: 根据当前时间列表秒杀商品* 参数:* 返回值: java.lang.String* 时间: 2021/8/19 12:08*/@RequestMapping({"/","seckill-index"})public String secKillList(Model model){//1. 得到所有商品(指定日期空间下的某些商品)List<SeckillGoodsEntity> seckillGoodsEntities = secKillService.findSeckillGoods();//2. 得到以当前时间小时数为起点的往向5个时间范围List<Date> menus = secKillService.listMenus();//3. 将上面的两组数据放到model中model.addAttribute("seckillGoods",seckillGoodsEntities);model.addAttribute("menus",menus);return "seckill-index";}
1.1.6 在zyg-seckill-web中的控制器下定义查看菜单的方法:
/*** 功能: 展示菜单* 参数:* 返回值:* 时间: 2021/8/19 13:11*/@RequestMapping("menus")public String listMenus(Model model){List<Date> menus = secKillService.listMenus();model.addAttribute("menus",menus);return "seckill-index";}
1.1.7 在templates/seckill-index.html页面展示商品:
<div class="py-container index"><!--banner--><div class="banner"><img src="/static/seckill/img/_/banner.png" class="img-responsive" alt=""></div><!--秒杀时间--><div class="sectime"><div th:class="${stat.index==0}? 'item-time active':'item-time' "th:attr="time=${#dates.hour(menu)}" th:each="menu,stat : ${menus}"><div class="time-clock" th:text="${#dates.hour(menu)}"></div><div class="time-state-on"><span class="on-text">快抢中</span><span class="on-over">距离结束:01:02:34</span></div></div></div><!--商品列表--><div class="goods-list" id="app"><ul class="seckill" id="seckill"><li class="seckill-item" th:each="item : ${seckillGoods}" ><div class="pic"><img th:src="${item.smallPic}" alt=''></div><div class="intro"><span>[[${item.introduction}]]</span></div><div class='price'><b class='sec-price'>¥[[${item.costPrice}]]</b><b class='ever-price'>¥[[${item.price}]]</b></div><div class='num'><div>已售[[${item.num-item.stockCount}]]</div><div class='progress'><div class='sui-progress progress-danger'><span th:style="'width:'+ ${(item.num-item.stockCount)* 100/item.num} + '%'"class='bar'></span></div></div><div>剩余<b class='owned'>[[${item.stockCount}]]</b>件</div></div><a class='sui-btn btn-block btn-buy' th:href="'/findSeckillGoods?seckillId=' + ${item.id}" target='_blank'>立即抢购</a></li></ul></div><div class="cd-top"><div class="top"><img src="/static/seckill/img/_/gotop.png" /><b>TOP</b></div><div class="code" id="code"><span><img src="/static/seckill/img/_/code.png" /></span></div><div class="erweima"><img src="/static/seckill/img/_/erweima.jpg" alt=""><s></s></div></div></div>
1.1.8 页面效果如下:
1.2 秒杀详情页面数据的展示:
1.2.1 在秒杀列表中中的”立即抢购”按钮下添加跳转:
<a class='sui-btn btn-block btn-buy' th:href="'/findSeckillGoods?seckillId=' + ${item.id}"target='_blank'>立即抢购</a>
1.2.2 在zyg-seckill-web中添加findSeckillGoods方法:
/*** 功能: 根据秒杀商品id查询秒杀商品* 参数:* 返回值:* 时间: 2021/8/19 14:49*/@RequestMapping("findSeckillGoods")public String findSeckillGoods(String seckillId,Model model){//1. 在redis中根据secKillId查询秒杀商品SeckillGoodsEntity seckillGoodsEntity = secKillService.findSecKillGoodsById(seckillId);//2. 放到model 中model.addAttribute("seckillGoods",seckillGoodsEntity);//3. 返回到seckill-item.htmlreturn "seckill-item";}
1.2.3 在zyg-seckill-service中通过redis中进行查询
/*** 功能: 根据秒杀商品id查询商品* 参数:* 返回值: com.zelin.entity.SeckillGoodsEntity* 时间: 2021/8/19 14:52*/@Overridepublic SeckillGoodsEntity findSecKillGoodsById(String seckillId) {String seckillGoods = (String) redisTemplate.boundHashOps("SeckillGoods_2021081914").get(seckillId);return JSON.parseObject(seckillGoods,SeckillGoodsEntity.class);}
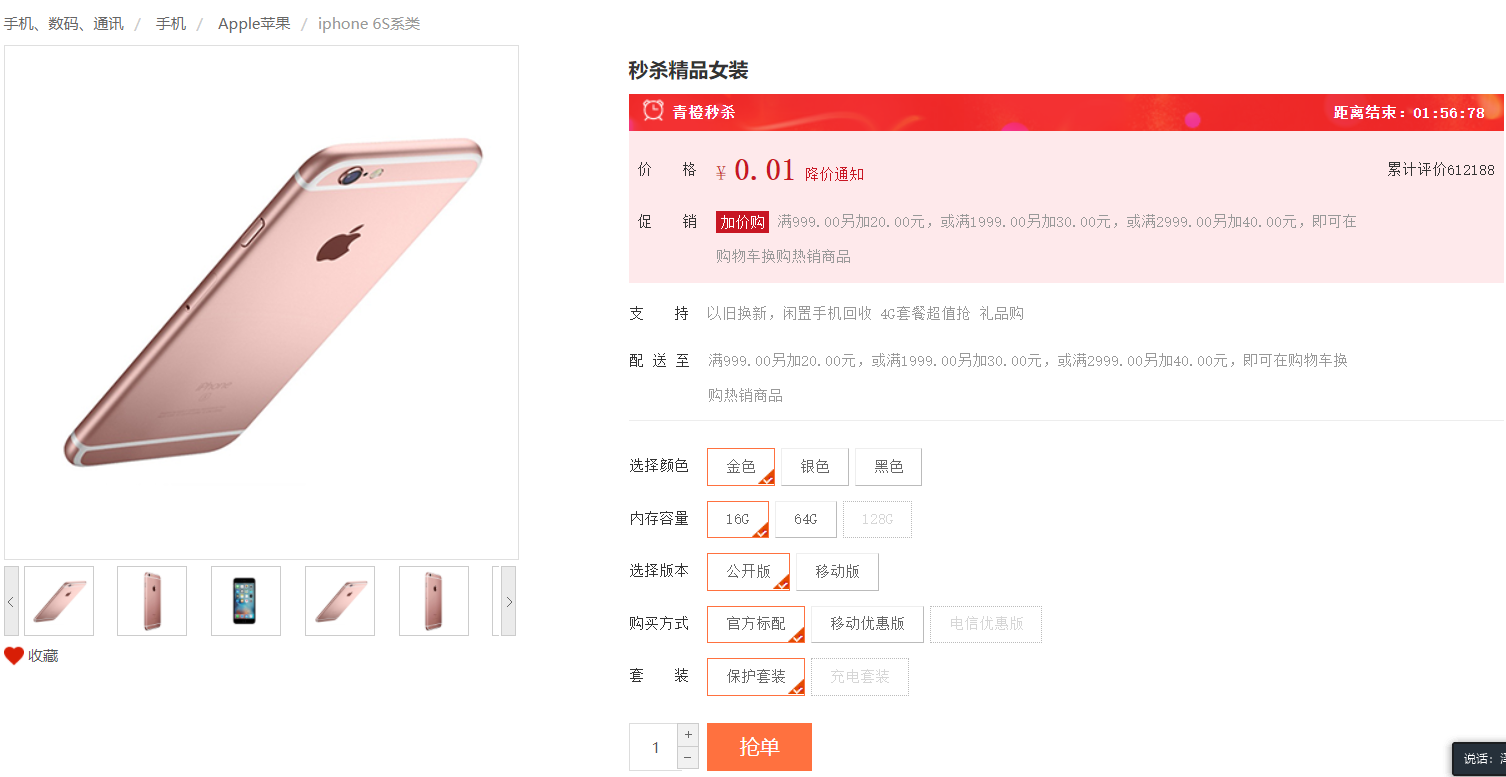
1.2.4 页面展示:
<div class="fr itemInfo-wrap"><div class="sku-name"><h4>[[${seckillGoods.title}]]</h4></div><div class="news"><span><img src="/static/seckill/img/_/clock.png"/>青橙秒杀</span><span class="overtime">距离结束:01:56:78</span></div><div class="summary"><div class="summary-wrap"><div class="fl title"><i>价 格</i></div><div class="fl price"><i>¥</i><em>[[${seckillGoods.costPrice}]]</em><span>降价通知</span></div><div class="fr remark"><i>累计评价</i><em>612188</em></div></div><div class="summary-wrap"><div class="fl title"><i>促 销</i></div><div class="fl fix-width"><i class="red-bg">加价购</i><em class="t-gray">满999.00另加20.00元,或满1999.00另加30.00元,或满2999.00另加40.00元,即可在购物车换购热销商品</em></div></div></div><div class="support"><div class="summary-wrap"><div class="fl title"><i>支 持</i></div><div class="fl fix-width"><em class="t-gray">以旧换新,闲置手机回收 4G套餐超值抢 礼品购</em></div></div><div class="summary-wrap"><div class="fl title"><i>配 送 至</i></div><div class="fl fix-width"><em class="t-gray">满999.00另加20.00元,或满1999.00另加30.00元,或满2999.00另加40.00元,即可在购物车换购热销商品</em></div></div></div><div class="clearfix choose"><div id="specification" class="summary-wrap clearfix"><dl><dt><div class="fl title"><i>选择颜色</i></div></dt><dd><a href="javascript:;" class="selected">金色<span title="点击取消选择"> </span></a></dd><dd><a href="javascript:;">银色</a></dd><dd><a href="javascript:;">黑色</a></dd></dl><dl><dt><div class="fl title"><i>内存容量</i></div></dt><dd><a href="javascript:;" class="selected">16G<span title="点击取消选择"> </span></a></dd><dd><a href="javascript:;">64G</a></dd><dd><a href="javascript:;" class="locked">128G</a></dd></dl><dl><dt><div class="fl title"><i>选择版本</i></div></dt><dd><a href="javascript:;" class="selected">公开版<span title="点击取消选择"> </span></a></dd><dd><a href="javascript:;">移动版</a></dd></dl><dl><dt><div class="fl title"><i>购买方式</i></div></dt><dd><a href="javascript:;" class="selected">官方标配<span title="点击取消选择"> </span></a></dd><dd><a href="javascript:;">移动优惠版</a></dd><dd><a href="javascript:;" class="locked">电信优惠版</a></dd></dl><dl><dt><div class="fl title"><i>套 装</i></div></dt><dd><a href="javascript:;" class="selected">保护套装<span title="点击取消选择"> </span></a></dd><dd><a href="javascript:;" class="locked">充电套装</a></dd></dl></div><div class="summary-wrap"><div class="fl title"><div class="control-group"><div class="controls"><input autocomplete="off" type="text" value="1" minnum="1" class="itxt" /><a href="javascript:void(0)" class="increment plus">+</a><a href="javascript:void(0)" class="increment mins">-</a></div></div></div><div class="fl"><ul class="btn-choose unstyled"><li><a href="cart.html" target="_blank" class="addshopcar">抢单</a></li></ul></div></div></div></div>
1.2.5 页面效果:
二、秒杀功能实现:
2.1 用户下单功能细节:
1、细节功能,添加排队信息(SeckillStatus)
在秒杀模块实现过程中,为了公平起见,先来的可以先下单 ,我们可以将用户的排队信息定义在一个实体类,并把这个实体类放到redis中的队列中(redis的list数据类型)<br />**1.1 SeckillStatus类型定义**
/*** ------------------------------* 功能:* 作者:WF* 微信:hbxfwf13590332912* 创建时间:2021/8/19-17:01* ------------------------------*/@Datapublic class SeckillStatus implements Serializable {//秒杀用户名private String username;//创建时间private Date createTime;//秒杀状态 1:排队中,2:秒杀等待支付,3:支付超时,4:秒杀失败,5:支付完成private Integer status;//秒杀的商品IDprivate Long secKillId;//应付金额private Float money;//订单号private Long orderId;//时间段private String time;public SeckillStatus(String username, Date createTime, Integer status, Long secKillId, String time) {this.username = username;this.createTime = createTime;this.status = status;this.secKillId = secKillId;this.time = time;}}
1.2 在下单前,应该把排队的信息(SeckillStatus对象)存放到redis中的list中:
@Overridepublic boolean save(String secKillId, String time, String username) {...// 将此对象入队列,目的是为了公平原则(先排队先下单)redisTemplate.boundListOps("SeckillOrderQueue").leftPush(JSON.toJSONString(seckillStatus));...}
1.3 在下单前,从redis中取得从左边放入的队列数据(先排队的就先弹出)
public void createOrder() {...String orderQueue = redisTemplate.boundListOps("SeckillOrderQueue").rightPop();//转换为 SeckillStatus类型,取得排队时放入的信息SeckillStatus seckillStatus = JSON.parseObject(orderQueue, SeckillStatus.class);String time = seckillStatus.getTime();String secKillId = seckillStatus.getSecKillId()+"";String username = seckillStatus.getUsername();...}
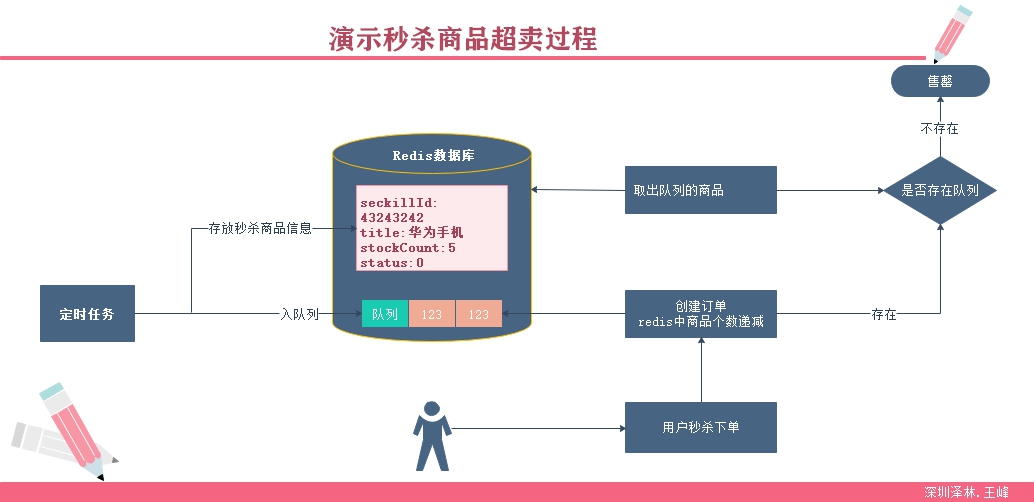
原理图:
2、细节功能:添加排队标识
将用户排队信息写入到redis中,方便后面更新用户的排队状态。
2.1 存用户排队标识的key (用于存储 谁 买了什么商品 以及抢单的状态)
@Overridepublic boolean save(String secKillId, String time, String username) {...// 为了后面查询订单状态,我们将上面的seckillStatus又保存一份到redis中(因上面的会被立即弹出)redisTemplate.boundHashOps("UserQueueStatus").put(username,JSON.toJSONString(seckillStatus));//异步下单multiThreadingCreateOrder.createOrder();return true;}
2.2 在下单完成后,修改排队信息:
public void createOrder() {...//重新改回状态值seckillStatus.setStatus(2); //下单后,等待支付seckillStatus.setOrderId(seckillOrderEntity.getId());seckillStatus.setMoney(seckillOrderEntity.getMoney().floatValue());redisTemplate.boundHashOps("UserQueueStatus").put(username,JSON.toJSONString(seckillStatus));...}
3、细节功能:避免重复排队
思路:可以以UserQueueCount为key,以当前登录名为小key,让其从1开始自增,如果自增后的值大于1,说明不能排队。
@Overridepublic boolean save(String secKillId, String time, String username) {// 定义用户状态信息保存到redis中的队列中SeckillStatus seckillStatus = new SeckillStatus(username,new Date(),1, Long.parseLong(secKillId),time);//避免重复排队Long queueCount = redisTemplate.boundHashOps("UserQueueCount").increment(username, 1);if(queueCount > 1){throw new RuntimeException(StatusCode.REPERROR + "");}// 将此对象入队列,目的是为了公平原则(先排队先下单)redisTemplate.boundListOps("SeckillOrderQueue").leftPush(JSON.toJSONString(seckillStatus));// 为了后面查询订单状态,我们将上面的seckillStatus又保存一份到redis中(因上面的会被立即弹出)redisTemplate.boundHashOps("UserQueueStatus").put(username,JSON.toJSONString(seckillStatus));//异步下单multiThreadingCreateOrder.createOrder();return true;}
4、细节功能:避免商品超卖

思路:
① 我们可以在定时任务放商品信息时,以SeckillGoodsCountList商品id为key,以一个这样的数组为值(数组的个数为商品的个数,数组的元素内容为商品id【可以放任意值】)放到redis的队列中。
② 方案一【推荐】
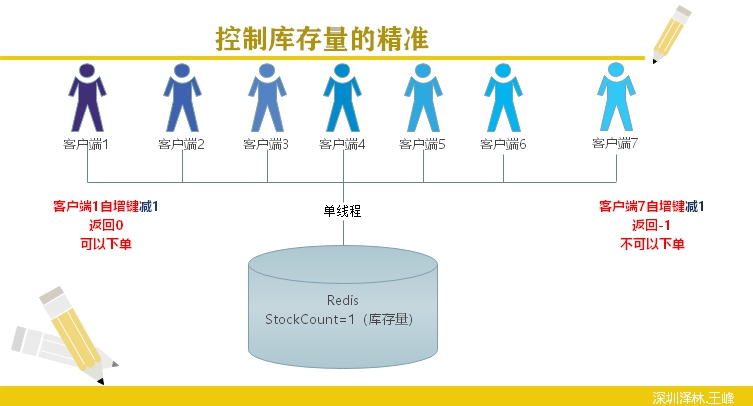
在我们队Redis进行操作的时候,很多时候,都是先将数据查询出来,在内存中修改,然后存入到Redis,在并发场景,会出现数据错乱问题,为了控制数量准确,我们单独将商品数量整一个自增键,自增键是线程安全的,所以不担心并发场景的问题。
③ 方案二:
可以根据SeckillGoodsCountList商品id这个队列中的商品的个数就知道了商品的数量。
/*** 功能: 将数据库中的数据加载到redis中* 参数:* 返回值: void* 时间: 2021/8/18 16:24*/@Scheduled(cron = "0/30 * * * * ?")public void loadDataToRedis(){//1. 得到日期菜单List<Date> dateMenus = MyDate.getDateMenus();//2. 遍历日期菜单for (Date dateMenu : dateMenus) {//2.1 定义查询条件QueryWrapper<SeckillGoodsEntity> queryWrapper = new QueryWrapper<SeckillGoodsEntity>().eq("status", 1).ge("start_time",dateMenu)// .lt("start_time",MyDate.addDateHour(dateMenu,2)).lt("end_time",MyDate.addDateHour(dateMenu,2)).gt("stock_count",0);//2.2 查询redis中指定大key中是否包含有小key集合Set keys = redisTemplate.boundHashOps("SeckillGoods_" + MyDate.getDateStr(dateMenu)).keys();//2.3 判断是否keys存在if(keys != null && keys.size() > 0){queryWrapper.notIn("id",keys);}//2.4 查询商品列表List<SeckillGoodsEntity> goodsEntities = seckillGoodsDao.selectList(queryWrapper);//2.5 将商品放到redis中for (SeckillGoodsEntity goodsEntity : goodsEntities) {BoundHashOperations<String, String, String> hashOperations = redisTemplate.boundHashOps("SeckillGoods_" + MyDate.getDateStr(dateMenu));hashOperations.put(goodsEntity.getId() + "", JSON.toJSONString(goodsEntity));//设置过期时间//[添加的内容一]:以SeckillGoodsCountList_商品id为key,将一个指定的数组(数组的长度为商品数量,元素是商品id)放到redis中String[] ids = pushGoods(goodsEntity.getStockCount(), goodsEntity.getId());redisTemplate.boundListOps("SeckillGoodsCountList_"+goodsEntity.getId()).leftPushAll(ids);//[添加的内容二]:以SeckillGoodsCount为大key,以商品id为小key,作一个对应商品的自增键,以后下单扣完库存的实际数量,就是这里的自增键redisTemplate.boundHashOps("SeckillGoodsCount").put(goodsEntity.getId()+"",goodsEntity.getStockCount());}}}/*** 功能: 以商品数量为数组长度,以商品id为数组元素* 参数:* 返回值:* 时间: 2021/8/20 15:36*/private String[] pushGoods(int len,long id){String[] ids = new String[len];for (int i = 0; i < len; i++) {ids[i] = id + "";}return ids;}
问题一:在哪里控制?在下单 前我们可以从SeckillGoodsCountList_商品id这个队列的右边弹出一项,看是否有内容,有内容就证明还有商品,否则,没有商品,清理排队信息。。。
public void createOrder() {try {// String time = "2021081916";// String username = "test";// String secKillId = "1";//从redis中得到SeckillOrderQueue这个队列的值Thread.sleep(20000);String orderQueue = redisTemplate.boundListOps("SeckillOrderQueue").rightPop();//转换为 SeckillStatus类型SeckillStatus seckillStatus = JSON.parseObject(orderQueue, SeckillStatus.class);//从SeckillGoodsCountList_商品id的redis队列中取出队列,看是否有内容,如果有证明此商品还没有卖完String rightPop = redisTemplate.boundListOps("SeckillGoodsCountList_" + seckillStatus.getSecKillId()).rightPop();if(rightPop == null){ //如果为null就证明没有商品了,清除排队数据clearQueue(seckillStatus.getUsername());return;}。。。}/*** 功能: 清除排队相关的数据* 参数:* 返回值: void* 时间: 2021/8/20 15:43*/private void clearQueue(String username) {//1. 清除是否重复排队标识redisTemplate.boundHashOps("UserQueueCount").delete(username);//2. 清除排队的标识信息redisTemplate.boundHashOps("UserQueueStatus").delete(username);}
问题二:如何控制商品库存量的精准?在下单前判断商品数量是否为0,此时,要得到精准数量判断。
public void createOrder() {//2.2 通过自增键得到商品的真实库存量,因为高并发场景,可能存在着数据的错乱(得到精准的库存量)Long goodsCount = redisTemplate.boundHashOps("SeckillGoodsCount").increment(seckillGoodsEntity.getId() + "", -1);seckillGoodsEntity.setStockCount(new Integer(goodsCount + ""));}
总结秒杀环节的问题:
1、排队的顺序问题:用redis的list队列解决。 2、排队的标识:最后通过它修改状态,直接在redis中保存一份排队信息。 3、库存超卖问题: 以SeckillGoodsCountList_商品id为key,以数组(长度为商品数量,内容为商品id)为值在定时任务放商品时就放到redis中,以后每次下单前就右边弹出数据,如果有证明可以下单 ,否则,不能下单 ,清空排队信息。 4、重复排队: 在下单 前添加以UserQueueCount为大key,以登录用户为小key,放一个自增值1,自增后如果大于就证明重复排队,可以抛出异常! 5、在高并发场景下,数据的不精准性控制: 利用在定时任务开始时添加自增键,自增键的值就是商品的数量,在下单前,查看商品数量前,减少自增键,得到当前的商品真实数量。
2.2 秒杀支付:
2.2.1 在zyg-pay-service的application.yml文件中定义关于秒杀支付的同步及异步回调地址:
alipay:notify_url1: http://42d323h910.qicp.vip/seckillOrder/payed/notifyreturn_url1: http://seckill.zeyigou.com/orderlist
2.2.2 在zyg-pay-service的AlipayTempalte.java中定义上面两个属性:
private String notify_url1;private String return_url1;
2.2.3 在zyg-pay-service的pay()方法中新增一个代表支付类型的参数:
@ConfigurationProperties(prefix = "alipay")@Component@Datapublic class AlipayTemplate {//在支付宝创建的应用的idprivate String app_id ;//= "2016110200786382";// 商户私钥,您的PKCS8格式RSA2私钥private String merchant_private_key ;// 支付宝公钥,查看地址:https://openhome.alipay.com/platform/keyManage.htm 对应APPID下的支付宝公钥。private String alipay_public_key ;// 服务器[异步通知]页面路径 需http://格式的完整路径,不能加?id=123这类自定义参数,必须外网可以正常访问// 支付宝会悄悄的给我们发送一个请求,告诉我们支付成功的信息private String notify_url ;//= "http://localhost:8000/payed/notify";// 页面跳转同步通知页面路径 需http://格式的完整路径,不能加?id=123这类自定义参数,必须外网可以正常访问//同步通知,支付成功,一般跳转到成功页private String return_url ;private String notify_url1;private String return_url1;// 签名方式private String sign_type ;// 字符编码格式private String charset ;private String timeout ;// 支付宝网关; https://openapi.alipaydev.com/gateway.doprivate String gatewayUrl ;public String pay(PayVo vo,int type) throws AlipayApiException {//1、根据支付宝的配置生成一个支付客户端AlipayClient alipayClient = new DefaultAlipayClient(gatewayUrl,app_id, merchant_private_key, "json",charset, alipay_public_key, sign_type);//2、创建一个支付请求 //设置请求参数AlipayTradePagePayRequest alipayRequest = new AlipayTradePagePayRequest();if(type == 1){alipayRequest.setReturnUrl(return_url);alipayRequest.setNotifyUrl(notify_url);}if(type == 2){alipayRequest.setReturnUrl(return_url1);alipayRequest.setNotifyUrl(notify_url1);}//商户订单号,商户网站订单系统中唯一订单号,必填String out_trade_no = vo.getOut_trade_no();//付款金额,必填String total_amount = vo.getTotal_amount();//订单名称,必填String subject = vo.getSubject();//商品描述,可空String body = vo.getBody();alipayRequest.setBizContent("{\"out_trade_no\":\""+ out_trade_no +"\","+ "\"total_amount\":\""+ total_amount +"\","+ "\"subject\":\""+ subject +"\","+ "\"body\":\""+ body +"\","+ "\"timeout_express\":\""+timeout+"\","+ "\"product_code\":\"FAST_INSTANT_TRADE_PAY\"}");String result = alipayClient.pageExecute(alipayRequest).getBody();//会收到支付宝的响应,响应的是一个页面,只要浏览器显示这个页面,就会自动来到支付宝的收银台页面System.out.println("支付宝的响应:"+result);return result;}}
2.2.4 在zyg-seckill-web中定义pay方法调用上面的支付函数:[形成支付的页面]
/*** 功能: 秒杀支付* 参数:* 返回值:* 时间: 2021/8/20 16:47*/@RequestMapping("pay")@ResponseBodypublic String pay(){//0. 得到登录名String name = SecurityContextHolder.getContext().getAuthentication().getName();//1. 从redis中查询出订单并返回payVo对象PayVo payVo = seckillOrderService.getPayVo(name);String result = payService.pay(payVo, 2);return result;}
2.2.5 在zyg-seckill-web中定义关于支付的同步回调函数:
/*** 功能: 支付成功后的同步回调* 参数:* 返回值:* 时间: 2021/8/20 17:41*/@RequestMapping("orderlist")public String orderlist(Model model){//0. 得到登录idString name = SecurityContextHolder.getContext().getAuthentication().getName();//1. 根据登录用户id查询出此用户的订单列表及此订单的秒杀商品列表List<SeckillOrderEntity> orderEntities = seckillOrderService.findOrders(name);System.out.println("orderEntities = " + orderEntities);model.addAttribute("orderList",orderEntities);return "seckill-order";}
2.2.6 在zyg-page-web中定义异步回调函数:
/*** 功能: 支付宝发送异步通知【订单支付模块】* 参数:* 返回值: java.lang.String* 时间: 2021/8/17 16:46*/@PostMapping("/seckillOrder/payed/notify")public String payedNotify(PayAsyncVo vo, HttpServletRequest request){System.out.println("vo = " + vo);//1. 得到登录用户//String userId = SecurityContextHolder.getContext().getAuthentication().getName();//2. 得支支付宝后台传入的数据Map<String,String> params = new HashMap<>();Map<String,String[]> requestParams = request.getParameterMap();for (Iterator<String> iter = requestParams.keySet().iterator(); iter.hasNext();) {String name = (String) iter.next();String[] values = (String[]) requestParams.get(name);String valueStr = "";for (int i = 0; i < values.length; i++) {valueStr = (i == values.length - 1) ? valueStr + values[i]: valueStr + values[i] + ",";}//乱码解决,这段代码在出现乱码时使用//valueStr = new String(valueStr.getBytes("ISO-8859-1"), "utf-8");params.put(name, valueStr);}String result = payService.orderPayNotify(vo,params);System.out.println("result = " + result);return result;}
2.2.6 在zyg-pay-service中定义orderPayNotify()异步回调方法:
@Transactional@Overridepublic String orderPayNotify(PayAsyncVo vo, Map<String, String> params) {try {//1. 进行验签boolean signVerified = AlipaySignature.rsaCheckV1(params, alipayTemplate.getAlipay_public_key(),alipayTemplate.getCharset(), alipayTemplate.getSign_type()); //调用SDK验证签名//2. 判断是否验签成功if(signVerified){//第一部分:修改秒杀订单日志//1.1 得到秒杀订单号String out_trade_no = vo.getOut_trade_no();//1.2 根据订单号得到登录名String username = redisTemplate.opsForValue().get(out_trade_no);//1.3 根据登录名得到redis中的秒杀订单String secKillStr = (String) redisTemplate.boundHashOps("SeckillOrder").get(username);SeckillOrderEntity orderEntity = JSON.parseObject(secKillStr,SeckillOrderEntity.class);if (vo.getTrade_status().equals("TRADE_SUCCESS") || vo.getTrade_status().equals("TRADE_FINISHED")){//第二部分:修改订单//2.1 修改redis中的订单信息orderEntity.setTransactionId(vo.getTrade_no()); //设置流水号orderEntity.setPayTime(new Date());orderEntity.setStatus("1"); //代表支付成功//2.2 保存到db中seckillOrderDao.insert(orderEntity); //添加到数据库中//2.3 在db中将购买的商品的库存减掉String time = MyDate.getDateStr(MyDate.getDateMenus().get(0));String s = (String) redisTemplate.boundHashOps("SeckillGoods_" + time).get(orderEntity.getSeckillId() + "");SeckillGoodsEntity seckillGoodsEntity = JSON.parseObject(s,SeckillGoodsEntity.class);goodsDao.updateById(seckillGoodsEntity);//2.4 从redis中删除订单redisTemplate.boundHashOps("SeckillOrder").delete(username);//2.5 也要删除该用户的排队相关的信息//2.5.1 清除是否重复排队标识redisTemplate.boundHashOps("UserQueueCount").delete(username);//2.5.2 清除排队的标识信息redisTemplate.boundHashOps("UserQueueStatus").delete(username);}System.out.println("支付成功");return "success";}} catch (AlipayApiException e) {e.printStackTrace();}System.out.println("支付失败!");return "fail";}
2.2.7 最后的效果页面:


