RAID(独立冗余磁盘阵列)
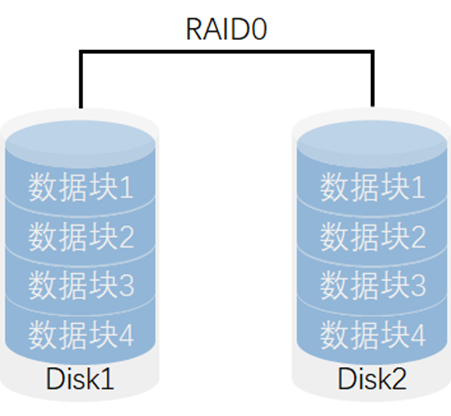
RAID 0
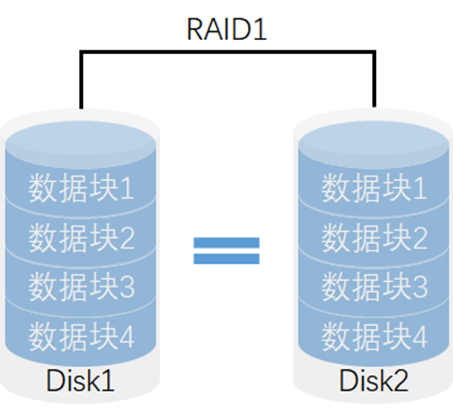
RAID 1
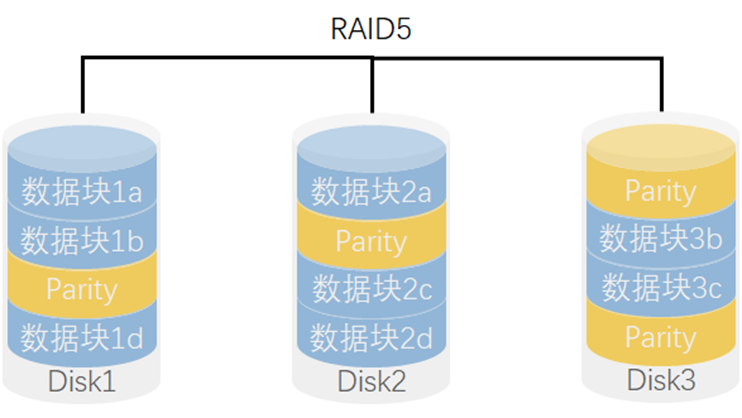
RAID 5
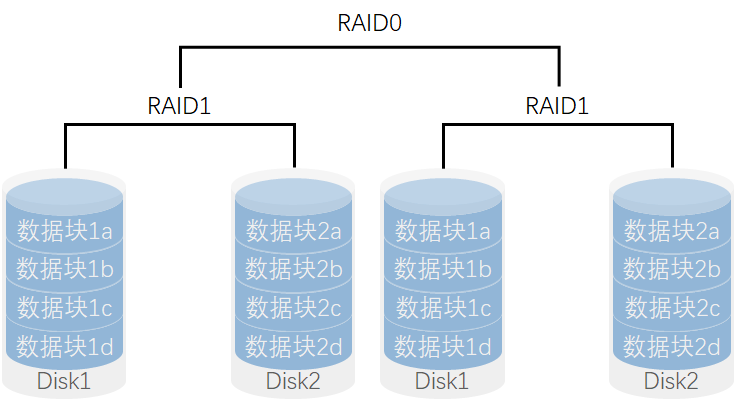
RAID 10
部署磁盘阵列
mdadm命令的常用参数以及作用
| 参数 | 作用 |
|---|---|
| -a | 检测设备名称 |
| -n | 指定设备数量 |
| -l | 指定RAID级别 |
| -C | 创建 |
| -v | 显示过程 |
| -f | 模拟设备损坏 |
| -r | 移除设备 |
| -Q | 查看摘要信息 |
| -D | 查看详细信息 |
| -S | 停止RAID磁盘阵列 |
[root@localhost ~]# mdadm -Cv /dev/md0 -a yes -n 4 -l 10 /dev/sdb /dev/sdc /dev/sdd /dev/sdemdadm: layout defaults to n2mdadm: layout defaults to n2mdadm: chunk size defaults to 512Kmdadm: size set to 20954112Kmdadm: Defaulting to version 1.2 metadatamdadm: array /dev/md0 started.
把制作好的RAID磁盘阵列格式化为ext4格式
[root@localhost ~]# mkfs.ext4 /dev/md0mke2fs 1.42.9 (28-Dec-2013)Filesystem label=OS type: LinuxBlock size=4096 (log=2)Fragment size=4096 (log=2)Stride=128 blocks, Stripe width=256 blocks2621440 inodes, 10477056 blocks523852 blocks (5.00%) reserved for the super userFirst data block=0Maximum filesystem blocks=2157969408320 block groups32768 blocks per group, 32768 fragments per group8192 inodes per groupSuperblock backups stored on blocks:32768, 98304, 163840, 229376, 294912, 819200, 884736, 1605632, 2654208,4096000, 7962624Allocating group tables: doneWriting inode tables: doneCreating journal (32768 blocks): doneWriting superblocks and filesystem accounting information: done
创建挂载点然后把硬盘设备进行挂载操作
[root@localhost ~]# mkdir /RAID[root@localhost ~]# mount /dev/md0 /RAID/[root@localhost ~]# df -hFilesystem Size Used Avail Use% Mounted on/dev/mapper/centos-root 17G 1.1G 16G 7% /devtmpfs 898M 0 898M 0% /devtmpfs 910M 0 910M 0% /dev/shmtmpfs 910M 9.6M 901M 2% /runtmpfs 910M 0 910M 0% /sys/fs/cgroup/dev/sda1 1014M 146M 869M 15% /boottmpfs 182M 0 182M 0% /run/user/0/dev/md0 40G 49M 38G 1% /RAID
查看/dev/md0磁盘阵列的详细信息,并把挂载信息写入到配置文件中,使其永久生效。
[root@localhost ~]# mdadm -D /dev/md0/dev/md0:Version : 1.2Creation Time : Mon Apr 15 17:43:04 2019Raid Level : raid10Array Size : 41908224 (39.97 GiB 42.91 GB)Used Dev Size : 20954112 (19.98 GiB 21.46 GB)Raid Devices : 4Total Devices : 4Persistence : Superblock is persistentUpdate Time : Mon Apr 15 17:44:14 2019State : active, resyncingActive Devices : 4Working Devices : 4Failed Devices : 0Spare Devices : 0Layout : near=2Chunk Size : 512KConsistency Policy : resyncResync Status : 66% completeName : localhost.localdomain:0 (local to host localhost.localdomain)UUID : 9b664b1c:ab2b2fb6:6a00adf6:6167ad51Events : 15Number Major Minor RaidDevice State0 8 16 0 active sync set-A /dev/sdb1 8 32 1 active sync set-B /dev/sdc2 8 48 2 active sync set-A /dev/sdd3 8 64 3 active sync set-B /dev/sde[root@localhost ~]# echo "/dev/md0 /RAID ext4 defaults 0 0" >> /etc/fstab
损坏磁盘阵列及修复
在确认有一块物理硬盘设备出现损坏而不能继续正常使用后,应该使用mdadm命令将其移除,然后查看RAID磁盘阵列的状态,可以发现状态已经改变。
[root@localhost ~]# mdadm /dev/md0 -f /dev/sdbmdadm: set /dev/sdb faulty in /dev/md0[root@localhost ~]# mdadm -D /dev/md0/dev/md0:Version : 1.2Creation Time : Thu Apr 18 09:25:38 2019Raid Level : raid10Array Size : 41908224 (39.97 GiB 42.91 GB)Used Dev Size : 20954112 (19.98 GiB 21.46 GB)Raid Devices : 4Total Devices : 4Persistence : Superblock is persistentUpdate Time : Thu Apr 18 09:28:24 2019State : clean, degradedActive Devices : 3Working Devices : 3Failed Devices : 1Spare Devices : 0Layout : near=2Chunk Size : 512KConsistency Policy : resyncName : localhost.localdomain:0 (local to host localhost.localdomain)UUID : 09c273ff:77fa1bc2:84a934f1:b924fa6eEvents : 27Number Major Minor RaidDevice State- 0 0 0 removed1 8 32 1 active sync set-B /dev/sdc2 8 48 2 active sync set-A /dev/sdd3 8 64 3 active sync set-B /dev/sde0 8 16 - faulty /dev/sdb
在RAID 10级别的磁盘阵列中,当RAID 1磁盘阵列中存在一个故障盘时并不影响RAID 10磁盘阵列的使用。当购买了新的硬盘设备后再使用mdadm命令来予以替换即可,在此期间我们可以在/RAID目录中正常地创建或删除文件。由于我们是在虚拟机中模拟硬盘,所以先重启系统,然后再把新的硬盘添加到RAID磁盘阵列中。
[root@localhost ~]# umount /RAID/[root@localhost ~]# mdadm /dev/md0 -a /dev/sdbmdadm: added /dev/sdb[root@localhost ~]# mdadm -D /dev/md0/dev/md0:Version : 1.2Creation Time : Thu Apr 18 09:25:38 2019Raid Level : raid10Array Size : 41908224 (39.97 GiB 42.91 GB)Used Dev Size : 20954112 (19.98 GiB 21.46 GB)Raid Devices : 4Total Devices : 4Persistence : Superblock is persistentUpdate Time : Thu Apr 18 09:34:14 2019State : clean, degraded, recoveringActive Devices : 3Working Devices : 4Failed Devices : 0Spare Devices : 1Layout : near=2Chunk Size : 512KConsistency Policy : resyncRebuild Status : 30% completeName : localhost.localdomain:0 (local to host localhost.localdomain)UUID : 09c273ff:77fa1bc2:84a934f1:b924fa6eEvents : 47Number Major Minor RaidDevice State4 8 16 0 spare rebuilding /dev/sdb1 8 32 1 active sync set-B /dev/sdc2 8 48 2 active sync set-A /dev/sdd3 8 64 3 active sync set-B /dev/sde[root@localhost ~]# mount -a
磁盘阵列+备份盘
为了避免多个实验之间相互发生冲突,我们需要保证每个实验的相对独立性,为此需要大家自行将虚拟机还原到初始状态。
部署RAID 5磁盘阵列时,至少需要用到3块硬盘,还需要再加一块备份硬盘,所以总计需要在虚拟机中模拟4块硬盘设备
现在创建一个RAID 5磁盘阵列+备份盘。在下面的命令中,参数-n 3代表创建这个RAID 5磁盘阵列所需的硬盘数,参数-l 5代表RAID的级别,而参数-x 1则代表有一块备份盘。当查看/dev/md0(即RAID 5磁盘阵列的名称)磁盘阵列的时候就能看到有一块备份盘在等待中了。
[root@localhost ~]# mdadm -Cv /dev/md0 -n 3 -l 5 -x 1 /dev/sdb /dev/sdc /dev/sdd /dev/sdemdadm: layout defaults to left-symmetricmdadm: layout defaults to left-symmetricmdadm: chunk size defaults to 512Kmdadm: /dev/sdb appears to be part of a raid array:level=raid10 devices=4 ctime=Thu Apr 18 09:25:38 2019mdadm: /dev/sdc appears to be part of a raid array:level=raid10 devices=4 ctime=Thu Apr 18 09:25:38 2019mdadm: /dev/sdd appears to be part of a raid array:level=raid10 devices=4 ctime=Thu Apr 18 09:25:38 2019mdadm: /dev/sde appears to be part of a raid array:level=raid10 devices=4 ctime=Thu Apr 18 09:25:38 2019mdadm: size set to 20954112KContinue creating array? ymdadm: Defaulting to version 1.2 metadatamdadm: array /dev/md0 started.[root@localhost ~]# mdadm -D /dev/md0/dev/md0:Version : 1.2Creation Time : Thu Apr 18 09:39:26 2019Raid Level : raid5Array Size : 41908224 (39.97 GiB 42.91 GB)Used Dev Size : 20954112 (19.98 GiB 21.46 GB)Raid Devices : 3Total Devices : 4Persistence : Superblock is persistentUpdate Time : Thu Apr 18 09:40:28 2019State : cleanActive Devices : 3Working Devices : 4Failed Devices : 0Spare Devices : 1Layout : left-symmetricChunk Size : 512KConsistency Policy : resyncName : localhost.localdomain:0 (local to host localhost.localdomain)UUID : f72d4ba2:1460fae8:9f00ce1f:1fa2df5eEvents : 18Number Major Minor RaidDevice State0 8 16 0 active sync /dev/sdb1 8 32 1 active sync /dev/sdc4 8 48 2 active sync /dev/sdd3 8 64 - spare /dev/sde
将部署好的RAID 5磁盘阵列格式化为ext4文件格式,然后挂载到目录上,之后就可以使用了。
[root@localhost ~]# mkfs.ext4 /dev/md0mke2fs 1.42.9 (28-Dec-2013)Filesystem label=OS type: LinuxBlock size=4096 (log=2)Fragment size=4096 (log=2)Stride=128 blocks, Stripe width=256 blocks2621440 inodes, 10477056 blocks523852 blocks (5.00%) reserved for the super userFirst data block=0Maximum filesystem blocks=2157969408320 block groups32768 blocks per group, 32768 fragments per group8192 inodes per groupSuperblock backups stored on blocks:32768, 98304, 163840, 229376, 294912, 819200, 884736, 1605632, 2654208,4096000, 7962624Allocating group tables: doneWriting inode tables: doneCreating journal (32768 blocks): doneWriting superblocks and filesystem accounting information: done[root@localhost ~]# echo "/dev/md0 /RAID ext4 defaults 0 0" >> /etc/fstab[root@localhost ~]# mkdir /RAID[root@localhost ~]# mount -a
把硬盘设备/dev/sdb移出磁盘阵列,然后迅速查看/dev/md0磁盘阵列的状态
[root@localhost ~]# mdadm /dev/md0 -f /dev/sdbmdadm: set /dev/sdb faulty in /dev/md0[root@localhost ~]# mdadm -D /dev/md0/dev/md0:Version : 1.2Creation Time : Thu Apr 18 09:39:26 2019Raid Level : raid5Array Size : 41908224 (39.97 GiB 42.91 GB)Used Dev Size : 20954112 (19.98 GiB 21.46 GB)Raid Devices : 3Total Devices : 4Persistence : Superblock is persistentUpdate Time : Thu Apr 18 09:51:48 2019State : clean, degraded, recoveringActive Devices : 2Working Devices : 3Failed Devices : 1Spare Devices : 1Layout : left-symmetricChunk Size : 512KConsistency Policy : resyncRebuild Status : 40% completeName : localhost.localdomain:0 (local to host localhost.localdomain)UUID : f72d4ba2:1460fae8:9f00ce1f:1fa2df5eEvents : 26Number Major Minor RaidDevice State3 8 64 0 spare rebuilding /dev/sde1 8 32 1 active sync /dev/sdc4 8 48 2 active sync /dev/sdd0 8 16 - faulty /dev/sdb
LVM(逻辑卷管理器)
逻辑卷管理器是Linux系统用于对硬盘分区进行管理的一种机制,理论性较强,其创建初衷是为了解决硬盘设备在创建分区后不易修改分区大小的缺陷。尽管对传统的硬盘分区进行强制扩容或缩容从理论上来讲是可行的,但是却可能造成数据的丢失。而LVM技术是在硬盘分区和文件系统之间添加了一个逻辑层,它提供了一个抽象的卷组,可以把多块硬盘进行卷组合并。这样一来,用户不必关心物理硬盘设备的底层架构和布局,就可以实现对硬盘分区的动态调整。
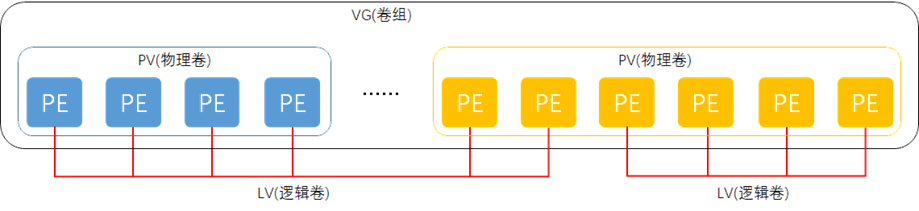
物理卷处于LVM中的最底层,可以将其理解为物理硬盘、硬盘分区或者RAID磁盘阵列,这都可以。卷组建立在物理卷之上,一个卷组可以包含多个物理卷,而且在卷组创建之后也可以继续向其中添加新的物理卷。逻辑卷是用卷组中空闲的资源建立的,并且逻辑卷在建立后可以动态地扩展或缩小空间。这就是LVM的核心理念。
部署逻辑卷
常用的LVM部署命令
| 功能/命令 | 物理卷管理 | 卷组管理 | 逻辑卷管理 |
|---|---|---|---|
| 扫描 | pvscan | vgscan | lvscan |
| 建立 | pvcreate | vgcreate | lvcreate |
| 显示 | pvdisplay | vgdisplay | lvdisplay |
| 删除 | pvremove | vgremove | lvremove |
| 扩展 | vgextend | lvextend | |
| 缩小 | vgreduce | lvreduce |
为了避免多个实验之间相互发生冲突,请大家自行将虚拟机还原到初始状态,并在虚拟机中添加两块新硬盘设备,然后开机
第1步:让新添加的两块硬盘设备支持LVM技术
[root@localhost ~]# pvcreate /dev/sdb /dev/sdcPhysical volume "/dev/sdb" successfully created.Physical volume "/dev/sdc" successfully created.
第2步:把两块硬盘设备加入到storage卷组中,然后查看卷组的状态
[root@localhost ~]# vgcreate storage /dev/sdb /dev/sdcVolume group "storage" successfully created[root@localhost ~]# vgdisplay--- Volume group ---VG Name centosSystem IDFormat lvm2Metadata Areas 1Metadata Sequence No 3VG Access read/writeVG Status resizableMAX LV 0Cur LV 2Open LV 2Max PV 0Cur PV 1Act PV 1VG Size <19.00 GiBPE Size 4.00 MiBTotal PE 4863Alloc PE / Size 4863 / <19.00 GiBFree PE / Size 0 / 0VG UUID hXvPk7-ey0X-GUp1-NesK-9ty4-LVMc-6FUtwh--- Volume group ---VG Name storageSystem IDFormat lvm2Metadata Areas 2Metadata Sequence No 1VG Access read/writeVG Status resizableMAX LV 0Cur LV 0Open LV 0Max PV 0Cur PV 2Act PV 2VG Size 39.99 GiBPE Size 4.00 MiBTotal PE 10238Alloc PE / Size 0 / 0Free PE / Size 10238 / 39.99 GiBVG UUID R3Lgwt-YdRK-3Qhx-vzzt-P4gM-yxbZ-VbeojU
第3步:切割出一个约为150MB的逻辑卷设备。
这里需要注意切割单位的问题。在对逻辑卷进行切割时有两种计量单位。
第一种是以容量为单位,所使用的参数为-L。例如,使用-L 150M生成一个大小为150MB的逻辑卷。
另外一种是以基本单元的个数为单位,所使用的参数为-l。每个基本单元的大小默认为4MB。例如,使用-l 37可以生成一个大小为37×4MB=148MB的逻辑卷。
[root@localhost ~]# lvcreate -n vo -l 37 storageLogical volume "vo" created.[root@localhost ~]# lvdisplay--- Logical volume ---LV Path /dev/centos/swapLV Name swapVG Name centosLV UUID RHOW0p-W5MW-lfGs-rIFk-tcmK-bKsd-bdh3ejLV Write Access read/writeLV Creation host, time localhost, 2019-04-15 17:30:59 +0800LV Status available# open 2LV Size 2.00 GiBCurrent LE 512Segments 1Allocation inheritRead ahead sectors auto- currently set to 8192Block device 253:1--- Logical volume ---LV Path /dev/centos/rootLV Name rootVG Name centosLV UUID u4rM0M-cE5q-ii2n-j7Bd-eXvd-Gsw0-8ByOgpLV Write Access read/writeLV Creation host, time localhost, 2019-04-15 17:31:00 +0800LV Status available# open 1LV Size <17.00 GiBCurrent LE 4351Segments 1Allocation inheritRead ahead sectors auto- currently set to 8192Block device 253:0--- Logical volume ---LV Path /dev/storage/voLV Name voVG Name storageLV UUID WP06I4-XA8u-mGqT-uFEZ-uhyN-nbrT-ehKMTeLV Write Access read/writeLV Creation host, time localhost.localdomain, 2019-04-18 13:37:34 +0800LV Status available# open 0LV Size 148.00 MiBCurrent LE 37Segments 1Allocation inheritRead ahead sectors auto- currently set to 8192Block device 253:2
第4步:把生成好的逻辑卷进行格式化,然后挂载使用。
[root@localhost ~]# mkfs.ext4 /dev/storage/vomke2fs 1.42.9 (28-Dec-2013)Filesystem label=OS type: LinuxBlock size=1024 (log=0)Fragment size=1024 (log=0)Stride=0 blocks, Stripe width=0 blocks38000 inodes, 151552 blocks7577 blocks (5.00%) reserved for the super userFirst data block=1Maximum filesystem blocks=3381657619 block groups8192 blocks per group, 8192 fragments per group2000 inodes per groupSuperblock backups stored on blocks:8193, 24577, 40961, 57345, 73729Allocating group tables: doneWriting inode tables: doneCreating journal (4096 blocks): doneWriting superblocks and filesystem accounting information: done[root@localhost ~]# mkdir /vo[root@localhost ~]# mount /dev/storage/vo /vo[root@localhost ~]# df -hFilesystem Size Used Avail Use% Mounted on/dev/mapper/centos-root 17G 1003M 17G 6% /devtmpfs 898M 0 898M 0% /devtmpfs 910M 0 910M 0% /dev/shmtmpfs 910M 9.5M 901M 2% /runtmpfs 910M 0 910M 0% /sys/fs/cgroup/dev/sda1 1014M 146M 869M 15% /boottmpfs 182M 0 182M 0% /run/user/0/dev/mapper/storage-vo 140M 1.6M 128M 2% /vo[root@localhost ~]# echo "/dev/storage/vo /vo ext4 defaults 0 0" >> /etc/fstab
扩容逻辑卷
第1步:把上一个实验中的逻辑卷vo扩展至290MB
[root@localhost ~]# umount /vo[root@localhost ~]# lvextend -L 290M /dev/storage/voRounding size to boundary between physical extents: 292.00 MiB.Size of logical volume storage/vo changed from 148.00 MiB (37 extents) to 292.00 MiB (73 extents).Logical volume storage/vo successfully resized.
第2步:检查硬盘完整性,并重置硬盘容量
[root@localhost ~]# e2fsck -f /dev/storage/voe2fsck 1.42.9 (28-Dec-2013)Pass 1: Checking inodes, blocks, and sizesPass 2: Checking directory structurePass 3: Checking directory connectivityPass 4: Checking reference countsPass 5: Checking group summary information/dev/storage/vo: 11/38000 files (0.0% non-contiguous), 10453/151552 blocks[root@localhost ~]# resize2fs /dev/storage/voresize2fs 1.42.9 (28-Dec-2013)Resizing the filesystem on /dev/storage/vo to 299008 (1k) blocks.The filesystem on /dev/storage/vo is now 299008 blocks long.
第3步:重新挂载硬盘设备并查看挂载状态
[root@localhost ~]# mount -a[root@localhost ~]# df -hFilesystem Size Used Avail Use% Mounted on/dev/mapper/centos-root 17G 1003M 17G 6% /devtmpfs 898M 0 898M 0% /devtmpfs 910M 0 910M 0% /dev/shmtmpfs 910M 9.5M 901M 2% /runtmpfs 910M 0 910M 0% /sys/fs/cgroup/dev/sda1 1014M 146M 869M 15% /boottmpfs 182M 0 182M 0% /run/user/0/dev/mapper/storage-vo 279M 2.1M 259M 1% /vo
缩小逻辑卷
第1步:检查文件系统的完整性
[root@localhost ~]# umount /vo[root@localhost ~]# e2fsck -f /dev/storage/voe2fsck 1.42.9 (28-Dec-2013)Pass 1: Checking inodes, blocks, and sizesPass 2: Checking directory structurePass 3: Checking directory connectivityPass 4: Checking reference countsPass 5: Checking group summary information/dev/storage/vo: 11/74000 files (0.0% non-contiguous), 15507/299008 blocks
第2步:把逻辑卷vo的容量减小到120MB
[root@localhost ~]# resize2fs /dev/storage/vo 120Mresize2fs 1.42.9 (28-Dec-2013)Resizing the filesystem on /dev/storage/vo to 122880 (1k) blocks.The filesystem on /dev/storage/vo is now 122880 blocks long.[root@localhost ~]# lvreduce -L 120M /dev/storage/voWARNING: Reducing active logical volume to 120.00 MiB.THIS MAY DESTROY YOUR DATA (filesystem etc.)Do you really want to reduce storage/vo? [y/n]: ySize of logical volume storage/vo changed from 292.00 MiB (73 extents) to 120.00 MiB (30 extents).Logical volume storage/vo successfully resized.
第3步:重新挂载文件系统并查看系统状态
[root@localhost ~]# mount -a[root@localhost ~]# df -hFilesystem Size Used Avail Use% Mounted on/dev/mapper/centos-root 17G 1003M 17G 6% /devtmpfs 898M 0 898M 0% /devtmpfs 910M 0 910M 0% /dev/shmtmpfs 910M 9.5M 901M 2% /runtmpfs 910M 0 910M 0% /sys/fs/cgroup/dev/sda1 1014M 146M 869M 15% /boottmpfs 182M 0 182M 0% /run/user/0/dev/mapper/storage-vo 113M 1.6M 103M 2% /vo
逻辑卷快照
LVM还具备有“快照卷”功能,该功能类似于虚拟机软件的还原时间点功能。例如,可以对某一个逻辑卷设备做一次快照,如果日后发现数据被改错了,就可以利用之前做好的快照卷进行覆盖还原。LVM的快照卷功能有两个特点:
- 快照卷的容量必须等同于逻辑卷的容量;
- 快照卷仅一次有效,一旦执行还原操作后则会被立即自动删除。
[root@localhost ~]# vgdisplay--- Volume group ---VG Name storageSystem IDFormat lvm2Metadata Areas 2Metadata Sequence No 4VG Access read/writeVG Status resizableMAX LV 0Cur LV 1Open LV 1Max PV 0Cur PV 2Act PV 2VG Size 39.99 GiBPE Size 4.00 MiBTotal PE 10238Alloc PE / Size 30 / 120.00 MiBFree PE / Size 10208 / <39.88 GiB //容量剩余39.88GVG UUID R3Lgwt-YdRK-3Qhx-vzzt-P4gM-yxbZ-VbeojU
接下来用重定向往逻辑卷设备所挂载的目录中写入一个文件
[root@localhost ~]# echo "hello world" > /vo/readme.txt[root@localhost ~]# ls -l /vototal 14drwx------. 2 root root 12288 Apr 18 13:38 lost+found-rw-r--r--. 1 root root 12 Apr 18 13:48 readme.txt
第1步:使用-s参数生成一个快照卷,使用-L参数指定切割的大小。
另外,还需要在命令后面写上是针对哪个逻辑卷执行的快照操作。
[root@localhost ~]# lvcreate -L 120M -s -n SNAP /dev/storage/voLogical volume "SNAP" created.[root@localhost ~]# lvdisplay--- Logical volume ---LV Path /dev/storage/voLV Name voVG Name storageLV UUID WP06I4-XA8u-mGqT-uFEZ-uhyN-nbrT-ehKMTeLV Write Access read/writeLV Creation host, time localhost.localdomain, 2019-04-18 13:37:34 +0800LV snapshot status source ofSNAP [active]LV Status available# open 1LV Size 120.00 MiBCurrent LE 30Segments 1Allocation inheritRead ahead sectors auto- currently set to 8192Block device 253:2--- Logical volume ---LV Path /dev/storage/SNAPLV Name SNAPVG Name storageLV UUID WUhSh5-GVZx-VNs5-ChOd-2EKo-50Pj-N5VDFHLV Write Access read/writeLV Creation host, time localhost.localdomain, 2019-04-18 13:50:24 +0800LV snapshot status active destination for voLV Status available# open 0LV Size 120.00 MiBCurrent LE 30COW-table size 120.00 MiBCOW-table LE 30Allocated to snapshot 0.01%Snapshot chunk size 4.00 KiBSegments 1Allocation inheritRead ahead sectors auto- currently set to 8192Block device 253:5
第2步:在逻辑卷所挂载的目录中创建一个100MB的垃圾文件,然后再查看快照卷的状态。可以发现存储空间占的用量上升了
[root@localhost ~]# dd if=/dev/zero of=/vo/files count=1 bs=100M1+0 records in1+0 records out104857600 bytes (105 MB) copied, 3.29409 s, 31.8 MB/s[root@localhost ~]# lvdisplay--- Logical volume ---LV Path /dev/storage/voLV Name voVG Name storageLV UUID WP06I4-XA8u-mGqT-uFEZ-uhyN-nbrT-ehKMTeLV Write Access read/writeLV Creation host, time localhost.localdomain, 2019-04-18 13:37:34 +0800LV snapshot status source ofSNAP [active]LV Status available# open 1LV Size 120.00 MiBCurrent LE 30Segments 1Allocation inheritRead ahead sectors auto- currently set to 8192Block device 253:2--- Logical volume ---LV Path /dev/storage/SNAPLV Name SNAPVG Name storageLV UUID WUhSh5-GVZx-VNs5-ChOd-2EKo-50Pj-N5VDFHLV Write Access read/writeLV Creation host, time localhost.localdomain, 2019-04-18 13:50:24 +0800LV snapshot status active destination for voLV Status available# open 0LV Size 120.00 MiBCurrent LE 30COW-table size 120.00 MiBCOW-table LE 30Allocated to snapshot 83.71%Snapshot chunk size 4.00 KiBSegments 1Allocation inheritRead ahead sectors auto- currently set to 8192Block device 253:5
第3步:为了校验SNAP快照卷的效果,需要对逻辑卷进行快照还原操作。在此之前记得先卸载掉逻辑卷设备与目录的挂载。
[root@localhost ~]# umount /vo[root@localhost ~]# lvconvert --merge /dev/storage/SNAPMerging of volume storage/SNAP started.storage/vo: Merged: 31.39%storage/vo: Merged: 100.00%
第4步:快照卷会被自动删除掉,并且刚刚在逻辑卷设备被执行快照操作后再创建出来的100MB的垃圾文件也被清除了
[root@localhost ~]# mount -a[root@localhost ~]# ls /vo/lost+found readme.txt
删除逻辑卷
第1步:取消逻辑卷与目录的挂载关联,删除配置文件中永久生效的设备参数。
[root@localhost ~]# umount /vo/[root@localhost ~]# vi /etc/fstab## /etc/fstab# Created by anaconda on Mon Apr 15 17:31:00 2019## Accessible filesystems, by reference, are maintained under '/dev/disk'# See man pages fstab(5), findfs(8), mount(8) and/or blkid(8) for more info#/dev/mapper/centos-root / xfs defaults 0 0UUID=63e91158-e754-41c3-b35d-7b9698e71355 /boot xfs defaults 0 0/dev/mapper/centos-swap swap swap defaults 0 0
第2步:删除逻辑卷设备,需要输入y来确认操作
[root@localhost ~]# lvremove /dev/storage/voDo you really want to remove active logical volume storage/vo? [y/n]: yLogical volume "vo" successfully removed
第3步:删除卷组,此处只写卷组名称即可,不需要设备的绝对路径。
[root@localhost ~]# vgremove storageVolume group "storage" successfully removed
第4步:删除物理卷设备
[root@localhost ~]# pvremove /dev/sdb /dev/sdcLabels on physical volume "/dev/sdb" successfully wiped.Labels on physical volume "/dev/sdc" successfully wiped.

若有收获,就点个赞吧
0 人点赞
