线程池介绍
Java中的线程池
线程池(Thread Pool)是一种基于池化思想管理线程的工具,经常出现在多线程服务器中,如MySQL。线程过多会带来额外的开销,其中包括创建销毁线程的开销、调度线程的开销等等,同时也降低了计算机的整体性能。线程池维护多个线程,等待监督管理者分配可并发执行的任务。这种做法,一方面避免了处理任务时创建销毁线程开销的代价,另一方面避免了线程数量膨胀导致的过分调度问题,保证了对内核的充分利用。在Java中,线程池是JDK中提供的ThreadPoolExecutor类 和 ScheduledThreadPoolExecutor 类。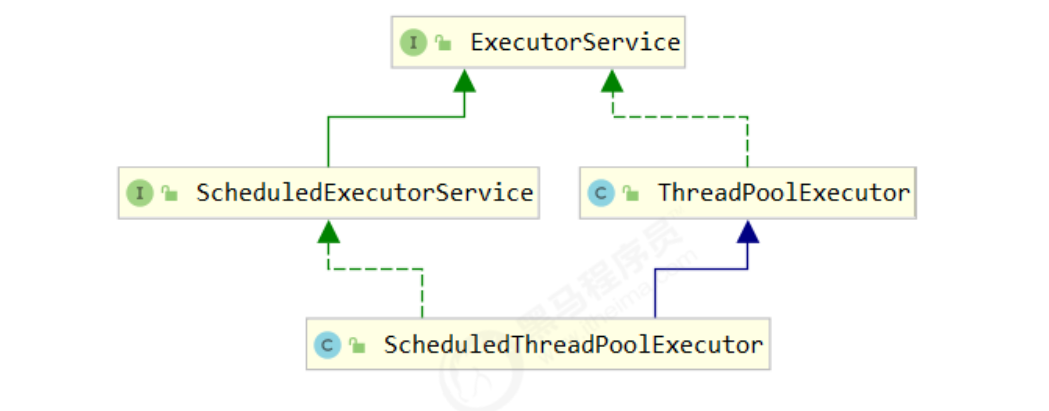
使用线程池有很多好处:
- 降低资源消耗:通过池化技术重复利用已创建的线程,降低线程创建和销毁造成的损耗。
- 提高响应速度:任务到达时,无需等待线程创建即可立即执行。
- 提高线程的可管理性:线程是稀缺资源,如果无限制创建,不仅会消耗系统资源,还会因为线程的不合理分布导致资源调度失衡,降低系统的稳定性。使用线程池可以进行统一的分配、调优和监控。
- 提供更多更强大的功能:线程池具备可拓展性,允许开发人员向其中增加更多的功能。比如延时定时线程池ScheduledThreadPoolExecutor,就允许任务延期执行或定期执行。
总体设计
ThreadPoolExecutor 的运行机制如下图所示: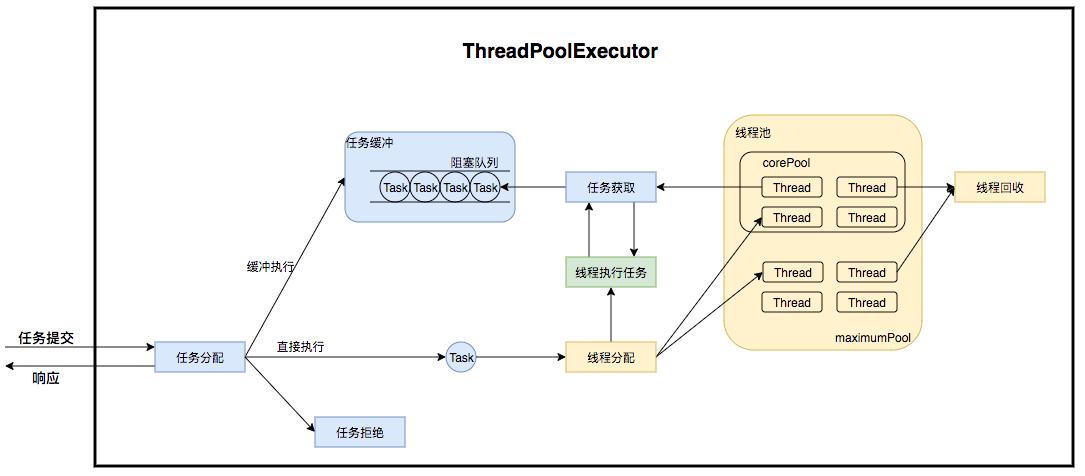
线程池在内部实际上构建了一个生产者消费者模型,将线程和任务两者解耦,并不直接关联,从而良好的缓冲任务,复用线程。线程池的运行主要分成两部分:任务管理、线程管理。任务管理部分充当生产者的角色,当任务提交后,线程池会判断该任务后续的流转:
(1)直接申请线程执行该任务;
(2)缓冲到队列中等待线程执行;
(3)拒绝该任务。线程管理部分是消费者,它们被统一维护在线程池内,根据任务请求进行线程的分配,当线程执行完任务后则会继续获取新的任务去执行,最终当线程获取不到任务的时候,线程就会被回收。生命周期

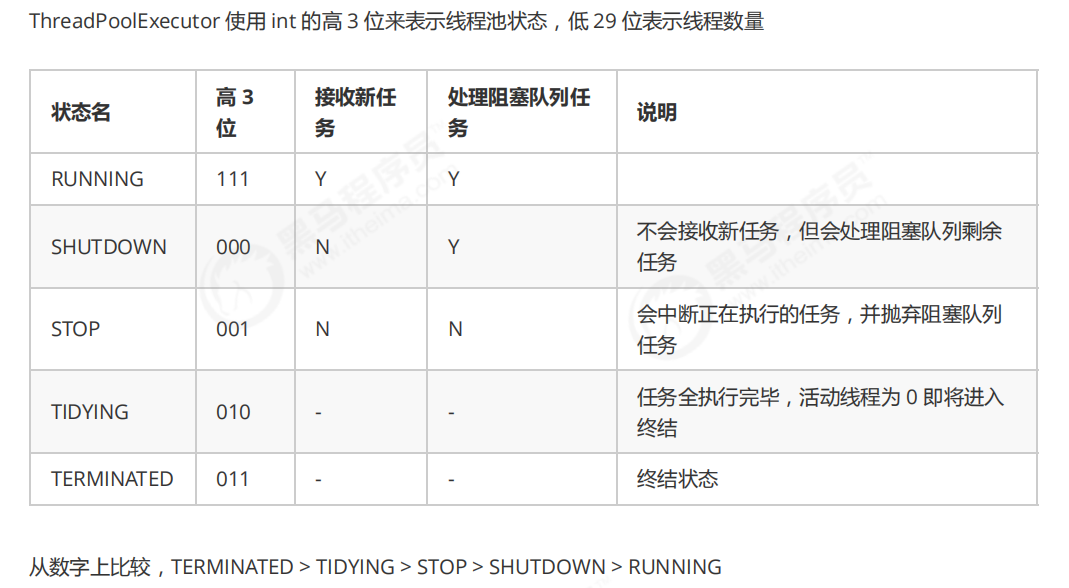
线程池状态转化图如下所示:
任务执行机制
在任务执行机制之前,需要先了解线程池的7个核心参数,以 ThreadPoolExecutor 类为例: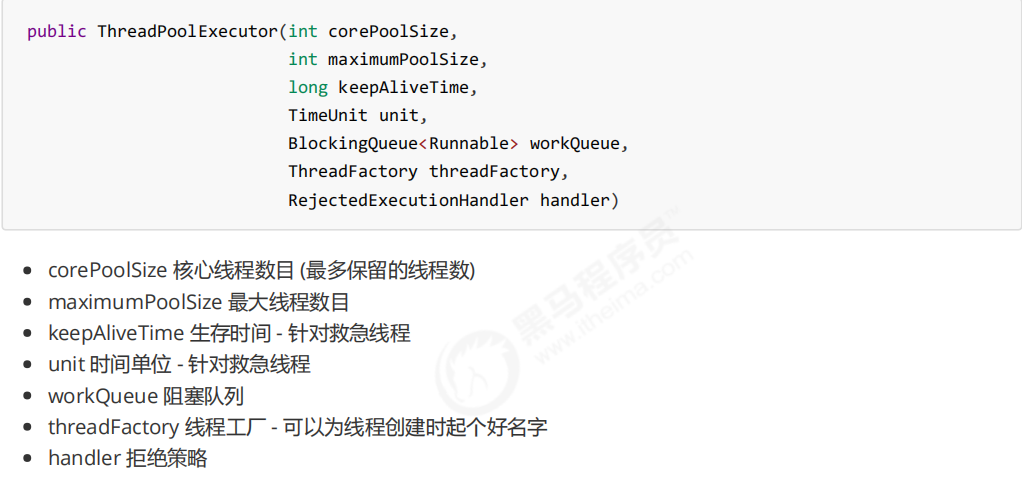
其中,救急线程就是当核心线程全部不空闲并且任务缓存队列也已经达到容量上限,此时在有任务进来就会创建救急线程,其容量为maximumPoolSize-corePoolSize。
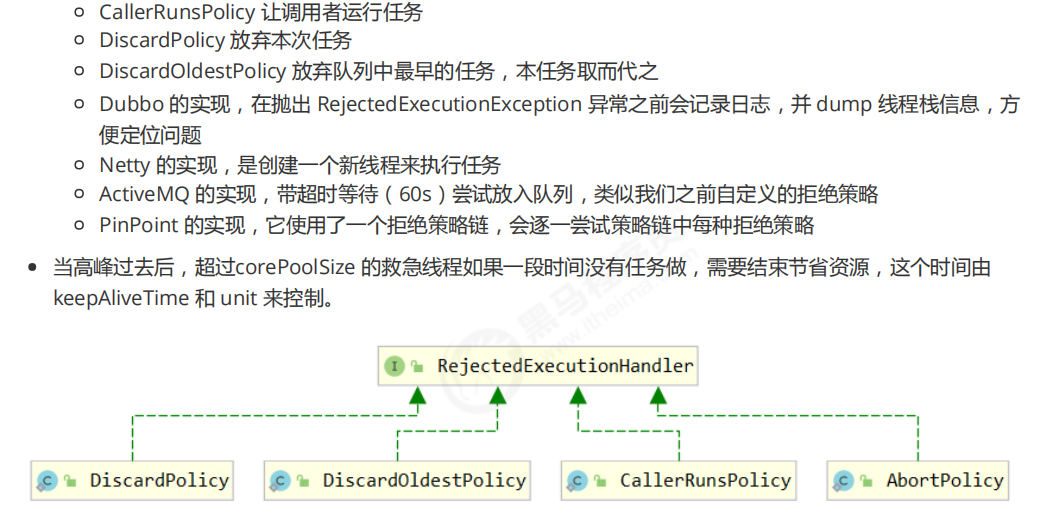
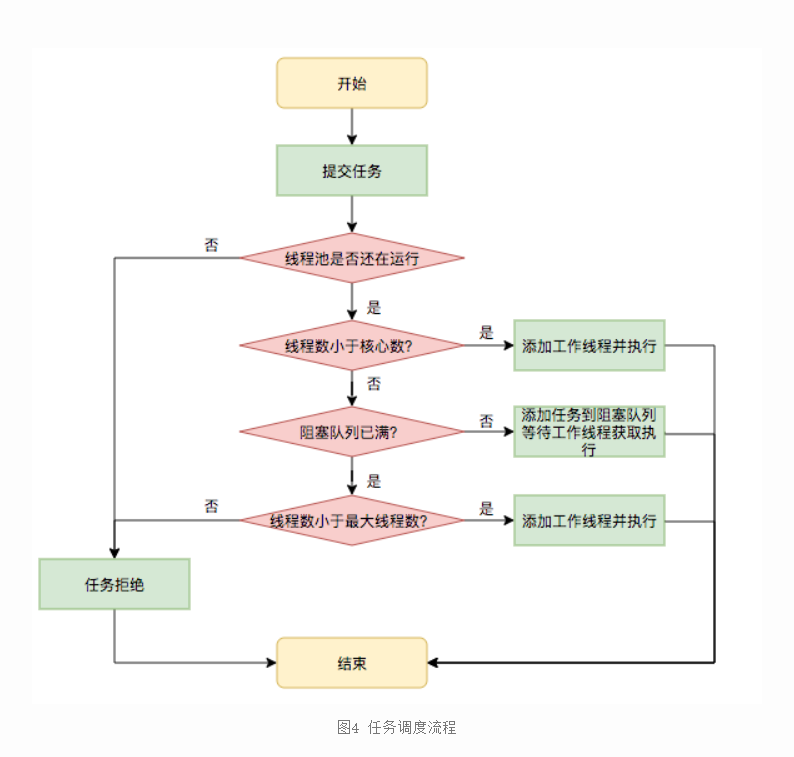
对应的执行流程如下:
- 首先检测线程池运行状态,如果不是RUNNING,则直接拒绝,线程池要保证在RUNNING的状态下执行任务。
- 如果workerCount < corePoolSize,则创建并启动一个线程来执行新提交的任务。
- 如果workerCount >= corePoolSize,且线程池内的阻塞队列未满,则将任务添加到该阻塞队列中。
- 如果workerCount >= corePoolSize && workerCount < maximumPoolSize,且线程池内的阻塞队列已满,则创建并启动一个线程来执行新提交的任务。
- 如果workerCount >= maximumPoolSize,并且线程池内的阻塞队列已满, 则根据拒绝策略来处理该任务, 默认的处理方式是直接抛异常。
任务缓冲
任务缓冲模块是线程池能够管理任务的核心部分。线程池的本质是对任务和线程的管理,而做到这一点最关键的思想就是将任务和线程两者解耦,不让两者直接关联,才可以做后续的分配工作。线程池中是以生产者消费者模式,通过一个阻塞队列来实现的。阻塞队列缓存任务,工作线程从阻塞队列中获取任务。阻塞队列(BlockingQueue)是一个支持两个附加操作的队列。这两个附加的操作是:在队列为空时,获取元素的线程会等待队列变为非空。当队列满时,存储元素的线程会等待队列可用。阻塞队列常用于生产者和消费者的场景,生产者是往队列里添加元素的线程,消费者是从队列里拿元素的线程。阻塞队列就是生产者存放元素的容器,而消费者也只从容器里拿元素。下图中展示了线程1往阻塞队列中添加元素,而线程2从阻塞队列中移除元素:
图5 阻塞队列
使用不同的队列可以实现不一样的任务存取策略。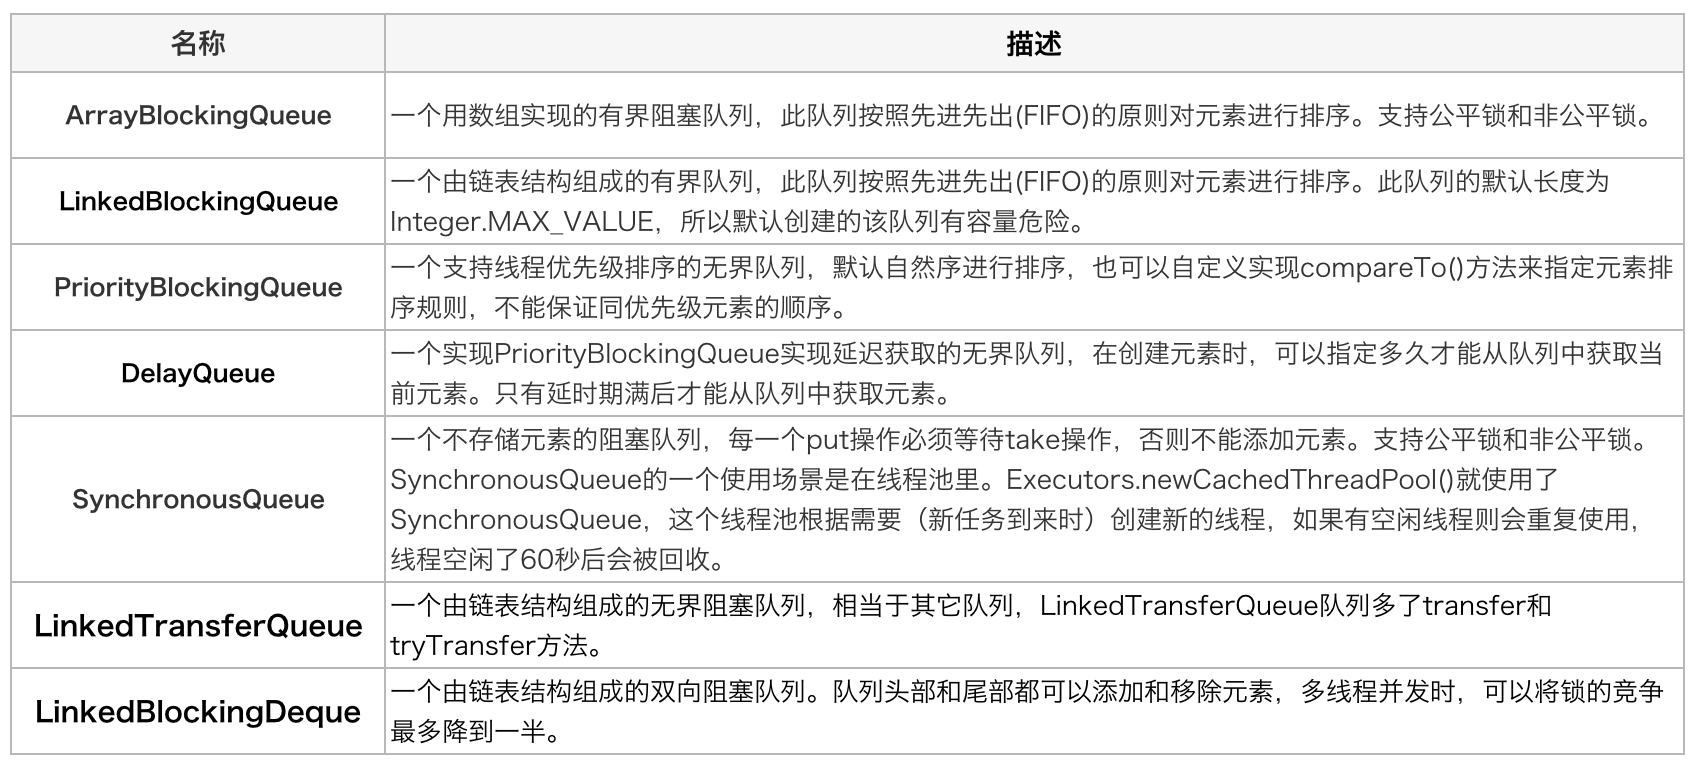
自定义线程池
自定义线程池模型
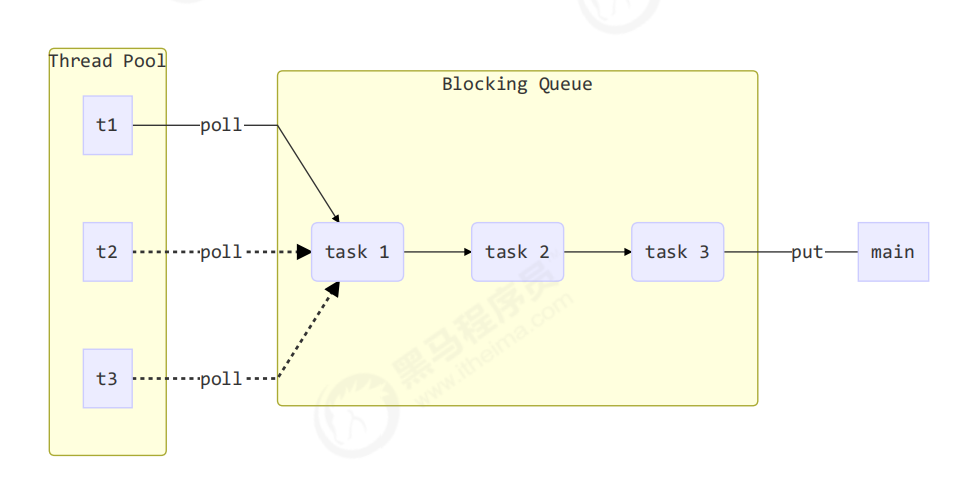
一个线程池,需要具有存放线程的池子、存放任务的任务队列、以及提交任务的线程,如上图所示,这样其实刚好对应生产者和消费者模式,也就是说,自定义的线程池也是生产者消费者模式的一种应用。
定义任务队列
任务队列可以使用阻塞队列来实现,下面是任务队列的代码:
注意: 关于阻塞队列和非阻塞队列,可以参考下面的文章:https://www.jianshu.com/p/94e3bc3e05ff
@Slf4j(topic = "c.BlockingQueue")public class BlockingQueue<T> {/*** 任务队列*/private final Deque<T> queue = new ArrayDeque<>();/*** 任务队列大小*/private final int capcity;/*** 锁对象*/private final Lock lock = new ReentrantLock();/*** 生产者等待条件变量*/private final Condition putWaitSet = lock.newCondition();/*** 消费者等待条件变量*/private final Condition takeWaitSet = lock.newCondition();public BlockingQueue(int queueCapcity) {this.capcity = queueCapcity;}public T take(long timeout, TimeUnit unit) throws InterruptedException {lock.lock();try {//转为纳秒long nanos = unit.toNanos(timeout);while (queue.isEmpty()) {//超时等待if (nanos <= 0) {return null;}// awaitNanos 返回的是剩余的等待时间nanos = takeWaitSet.awaitNanos(nanos);}T t = queue.removeFirst();putWaitSet.signal();return t;} finally {lock.unlock();}}public T take() throws InterruptedException {lock.lock();try {while (queue.isEmpty()) {takeWaitSet.await();}T t = queue.removeFirst();putWaitSet.signal();return t;} finally {lock.unlock();}}public void put(T t) throws InterruptedException {lock.lock();try {while (queue.size() == capcity) {log.debug("等待加入任务队列 {} ...", t);putWaitSet.await();}log.debug("加入任务队列 {}", t);queue.addLast(t);takeWaitSet.signal();} finally {lock.unlock();}}public boolean put(T task, long timeout, TimeUnit timeUnit) {lock.lock();try {long nanos = timeUnit.toNanos(timeout);while (queue.size() == capcity) {try {if (nanos <= 0) {return false;}log.debug("等待加入任务队列 {} ...", task);nanos = putWaitSet.awaitNanos(nanos);} catch (InterruptedException e) {e.printStackTrace();}}log.debug("加入任务队列 {}", task);queue.addLast(task);takeWaitSet.signal();return true;} finally {lock.unlock();}}public void tryPut(RejectPolicy<T> rejectPolicy, T task) throws InterruptedException {lock.lock();try {// 判断队列是否满if (queue.size() == capcity) {rejectPolicy.reject(this, task);} else { // 有空闲log.debug("加入任务队列 {}", task);queue.addLast(task);putWaitSet.signal();}} finally {lock.unlock();}}public int size() {lock.lock();try {return queue.size();} finally {lock.unlock();}}}
其中,RejectPolicy 是函数式接口,代表拒绝策略:
@FunctionalInterface // 拒绝策略interface RejectPolicy<T> {void reject(BlockingQueue<T> queue, T task) throws InterruptedException;}
自定义线程池
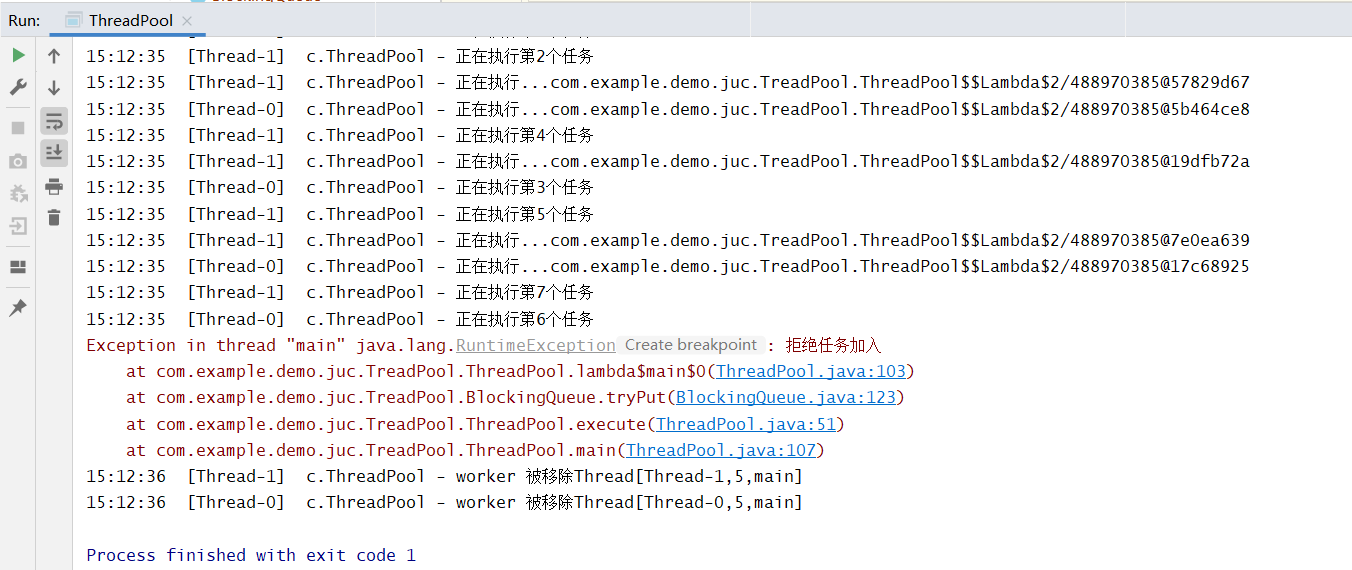
@Slf4j(topic = "c.ThreadPool")public class ThreadPool {//任务队列private final BlockingQueue<Runnable> taskQueue;// 线程集合private final HashSet<Worker> workers = new HashSet<>();// 核心线程数private final int coreSize;//超时等待private final long timeout;//时间单位private final TimeUnit timeUnit;//拒绝策略private final RejectPolicy rejectPolicy;public ThreadPool(int coreSize, long timeout, TimeUnit timeUnit, int taskQueueCapcity, RejectPolicy rejectPolicy) {this.coreSize = coreSize;this.timeout = timeout;this.timeUnit = timeUnit;this.taskQueue = new BlockingQueue<>(taskQueueCapcity);this.rejectPolicy = rejectPolicy;}public void execute(Runnable task) throws InterruptedException {synchronized (workers) {if (workers.size() < coreSize) {Worker worker = new Worker(task);log.debug("新增 worker{}, {}", worker, task);workers.add(worker);worker.start();} else {// 1) 死等// 2) 带超时等待// 3) 让调用者放弃任务执行// 4) 让调用者抛出异常// 5) 让调用者自己执行任务taskQueue.tryPut(rejectPolicy, task);}}}class Worker extends Thread {private Runnable task;public Worker(Runnable task) {this.task = task;}@SneakyThrows@Overridepublic void run() {//如果当前线程本来就携带任务就立刻执行,否则从任务队列获取任务while (task != null || (task = taskQueue.take(timeout, timeUnit)) != null) {try {log.debug("正在执行...{}", task);task.run();} catch (Exception e) {e.printStackTrace();} finally {task = null;}}synchronized (workers) {log.debug("worker 被移除{}", this);workers.remove(this);}}@Overridepublic boolean equals(Object o) {if (this == o) {return true;}if (o == null || getClass() != o.getClass()) {return false;}Worker worker = (Worker) o;return Objects.equals(task, worker.task);}@Overridepublic int hashCode() {return Objects.hash(task);}}public static void main(String[] args) throws InterruptedException {ThreadPool threadPool = new ThreadPool(2, 1000, TimeUnit.MILLISECONDS, 5, ((queue, task) -> {//采用抛出异常的拒绝策略throw new RuntimeException("拒绝任务加入");}));for (int i = 0; i < 50; i++) {int j = i + 1;threadPool.execute(() -> {log.debug("正在执行第" + j + "个任务");});}}}
ThreadPoolExecutor类
使用Executors创建ThreadPoolExecutor对象

根据上面的7个核心参数,JDK Executors 类中提供了众多工厂方法来创建各种用途的线程池,下面介绍几种常用的:
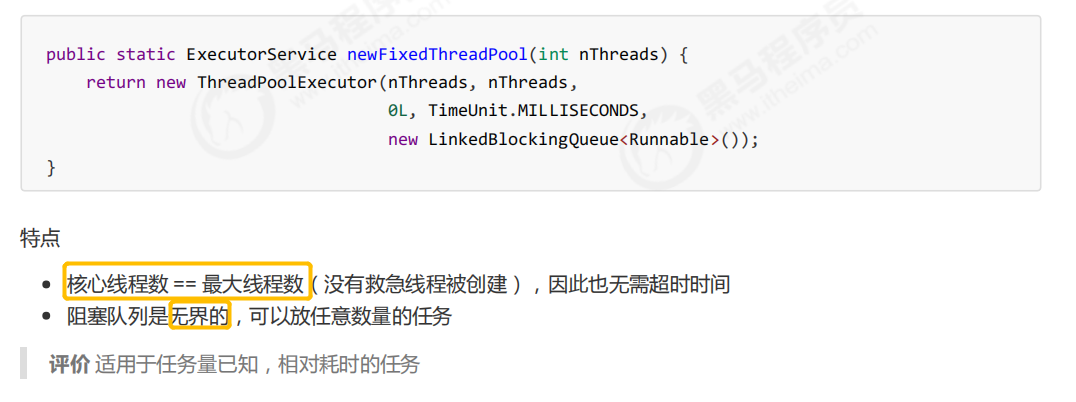
newFixedThreadPool
newCachedThreadPool


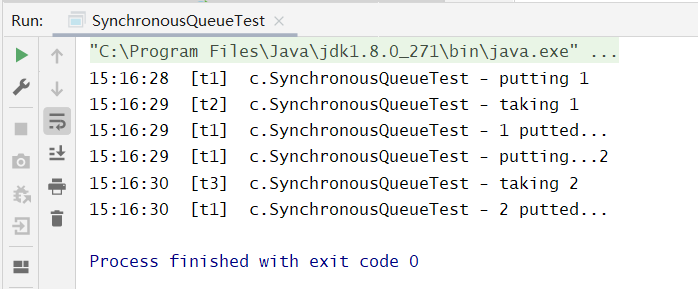
SynchronousQueue作用演示如下:
@Slf4j(topic = "c.SynchronousQueueTest")public class SynchronousQueueTest {public static void main(String[] args) throws InterruptedException {SynchronousQueue<Integer> integers = new SynchronousQueue<>();new Thread(() -> {try {log.debug("putting {} ", 1);integers.put(1);log.debug("{} putted...", 1);log.debug("putting...{} ", 2);integers.put(2);log.debug("{} putted...", 2);} catch (InterruptedException e) {e.printStackTrace();}}, "t1").start();Thread.sleep(1000);new Thread(() -> {try {log.debug("taking {}", 1);integers.take();} catch (InterruptedException e) {e.printStackTrace();}}, "t2").start();Thread.sleep(1000);new Thread(() -> {try {log.debug("taking {}", 2);integers.take();} catch (InterruptedException e) {e.printStackTrace();}}, "t3").start();}}
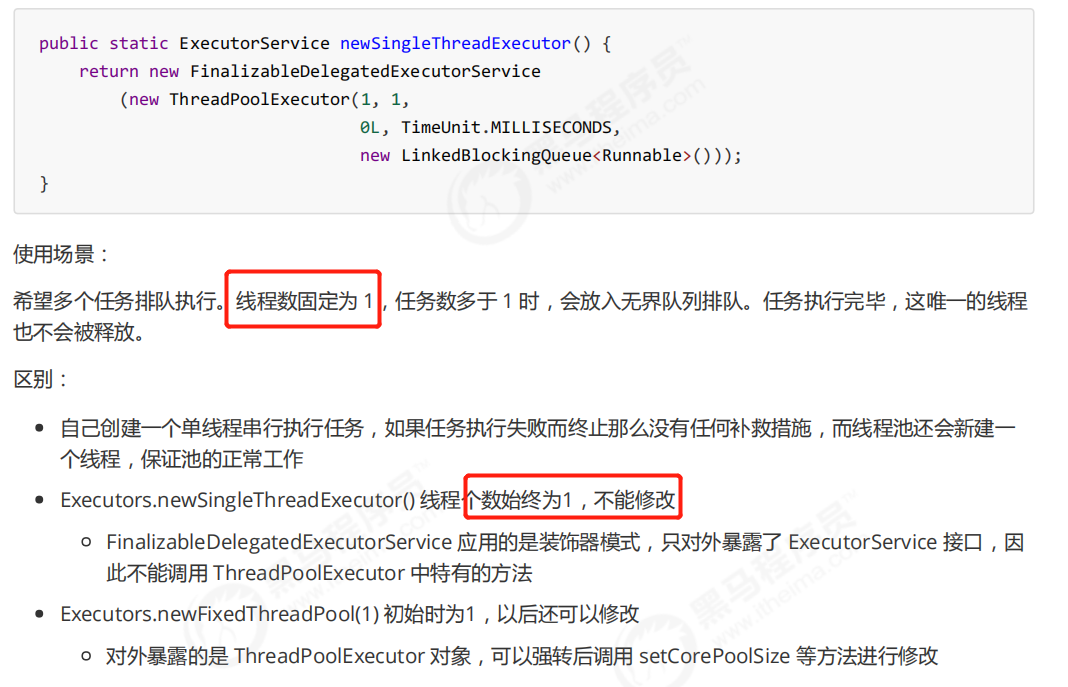
newSingleThreadExecutor
提交任务
下面是提交任务的API:
// 执行任务void execute(Runnable command);// 提交任务 task,用返回值 Future 获得任务执行结果<T> Future<T> submit(Callable<T> task);// 提交 tasks 中所有任务<T> List<Future<T>> invokeAll(Collection<? extends Callable<T>> tasks)throws InterruptedException;// 提交 tasks 中所有任务,带超时时间<T> List<Future<T>> invokeAll(Collection<? extends Callable<T>> tasks,long timeout, TimeUnit unit)throws InterruptedException;// 提交 tasks 中所有任务,哪个任务先成功执行完毕,返回此任务执行结果,其它任务取消<T> T invokeAny(Collection<? extends Callable<T>> tasks)throws InterruptedException, ExecutionException;// 提交 tasks 中所有任务,哪个任务先成功执行完毕,返回此任务执行结果,其它任务取消,带超时时间<T> T invokeAny(Collection<? extends Callable<T>> tasks,long timeout, TimeUnit unit)throws InterruptedException, ExecutionException, TimeoutException;
execute和submit方法使用如下:
public class Test {public static void main(String[] args) throws ExecutionException, InterruptedException {ExecutorService pool = Executors.newFixedThreadPool(2);pool.execute(() -> {System.out.println("调用 execute 提交任务");});Future<Boolean> result = pool.submit(() -> {System.out.println("调用 submit 提交任务");return true;});System.out.println(result.get());}}

注意: 任务执行完毕后程序依然没有正常停止的原因是线程池中的核心线程不会在执行完任务和立即被销毁,而是再等待任务的执行。相反的,如果是救急线程,如果在60s内还没有任务执行,就会销毁救急线程了。
正确处理异常
先看一段代码:
@Slf4j(topic = "c.ExceptionTest")public class ExceptionTest {public static void main(String[] args) {ExecutorService pool = Executors.newFixedThreadPool(1);pool.submit(() -> {log.debug("task1");int i = 1 / 0;});}}
测试结果:
可以看到,如果我们不主动处理异常,是不会打印堆栈信息的。因此在线程池中应该正确的处理任务中可能出现的异常,通常有下面两种做法:
主动捕捉异常
@Slf4j(topic = "c.ExceptionTest")public class ExceptionTest {public static void main(String[] args) {ExecutorService pool = Executors.newFixedThreadPool(1);pool.submit(() -> {try {log.debug("task1");int i = 1 / 0;} catch (Exception e) {log.error("error:", e);}});}}
使用 Future
如果执行任务过程出现了异常,如果任务结果使用了 Future ,那么调用它的 get 方法的时候就会返回异常信息,如:
@Slf4j(topic = "c.ExceptionTest")public class ExceptionTest {public static void main(String[] args) {ExecutorService pool = Executors.newFixedThreadPool(1);Future<Boolean> f = pool.submit(() -> {log.debug("task1");int i = 1 / 0;return true;});log.debug("result:{}", f.get())}}
ScheduledThreadPoolExecutor类
背景介绍
在『任务调度线程池』(即 ScheduledThreadPoolExecutor类) 功能加入之前,可以使用 java.util.Timer 来实现定时功能,Timer 的优点在于简单易用,但由于所有任务都是由同一个线程来调度,因此所有任务都是串行执行的,同一时间只能有一个任务在执行,前一个任务的延迟或异常都将会影响到之后的任务。 Timer(已经过时了)演示如下:
@Slf4j(topic = "c.ScheduledTest")public class TimerTest {public static void main(String[] args) {Timer timer = new Timer();TimerTask task1 = new TimerTask() {@Overridepublic void run() {log.debug("task 1");try {Thread.sleep(2000);} catch (InterruptedException e) {e.printStackTrace();}}};TimerTask task2 = new TimerTask() {@Overridepublic void run() {log.debug("task 2");}};// 使用 timer 添加两个任务,希望它们都在 1s 后执行// 但由于 timer 内只有一个线程来顺序执行队列中的任务,因此『任务1』的延时,影响了『任务2』的执行timer.schedule(task1, 1000);timer.schedule(task2, 1000);}}

可以间隔2s执行,task 2需要等待task 1执行完毕,可见确实是串行执行的。然后对比任务调度线程池:
@Slf4j(topic = "c.ScheduledTest")public class ScheduledTest {public static void main(String[] args) {ScheduledExecutorService executor = Executors.newScheduledThreadPool(2);// 添加两个任务,希望它们都在 1s 后执行log.debug("start...");executor.schedule(() -> {log.debug("task 1");try {Thread.sleep(2000);} catch (InterruptedException e) {e.printStackTrace();}}, 1000, TimeUnit.MILLISECONDS);executor.schedule(() -> {log.debug("task 0");}, 1000, TimeUnit.MILLISECONDS);}}
说明: 第一个参数是任务对象,第二个参数是多少秒后执行,第三个参数是时间单位

当然,这两个任务能够并行执行时因为“newScheduledThreadPool(2)”,如果说线程池中只有一个线程,还是会串行执行的。
scheduleAtFixedRate方法
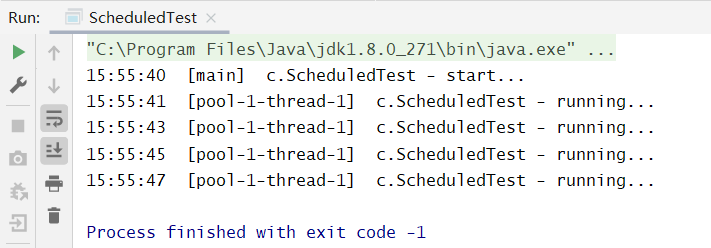
@Slf4j(topic = "c.ScheduledTest")public class ScheduledTest {public static void main(String[] args) {ScheduledExecutorService pool = Executors.newScheduledThreadPool(1);log.debug("start...");pool.scheduleAtFixedRate(() -> {log.debug("running...");}, 1, 1, TimeUnit.SECONDS);}}
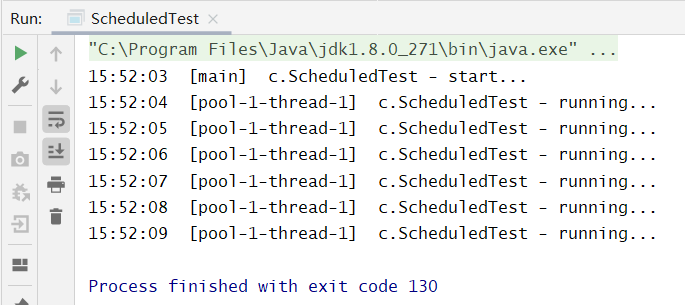
由运行结果不难看出,scheduleAtFixedRate的第一个参数是任务对象、第二个参数是时间n后执行任务,第三个参数是间隔时间n反复执行任务,第四个参数则是n的时间单位。但是,我们看一种情况,如果线程执行任务的时间超过了循环执行的间隔时间:
@Slf4j(topic = "c.ScheduledTest")public class ScheduledTest {public static void main(String[] args) {ScheduledExecutorService pool = Executors.newScheduledThreadPool(1);log.debug("start...");pool.scheduleAtFixedRate(() -> {log.debug("running...");try {Thread.sleep(2000);} catch (InterruptedException e) {e.printStackTrace();}}, 1, 1, TimeUnit.SECONDS);}}
scheduleWithFixedDelay方法
@Slf4j(topic = "c.ScheduledTest")public class ScheduledTest {public static void main(String[] args) {ScheduledExecutorService pool = Executors.newScheduledThreadPool(1);log.debug("start...");pool.scheduleWithFixedDelay(() -> {log.debug("running...");try {Thread.sleep(2000);} catch (InterruptedException e) {e.printStackTrace();}}, 1, 1, TimeUnit.SECONDS);}}
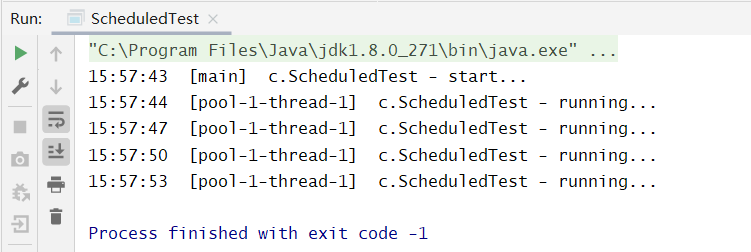
不难发现,同 scheduleAtFixedRate 方法不同的是,第三个参数表示“上一个任务结束 —> 延时 n —> 下一个任务开始”
应用之定时任务
让一段程序在每周周四的18点被执行,代码如下所示:
@Slf4j(topic = "c.ExampleTest")public class ExampleTest {public static void main(String[] args) {// 获得当前时间LocalDateTime now = LocalDateTime.now();// 获取本周四 18:00:00.000LocalDateTime thursday =now.with(DayOfWeek.THURSDAY).withHour(18).withMinute(0).withSecond(0).withNano(0);// 如果当前时间已经超过 本周四 18:00:00.000, 那么找下周四 18:00:00.000if (now.compareTo(thursday) >= 0) {thursday = thursday.plusWeeks(1);}// 计算时间差,即延时执行时间long initialDelay = Duration.between(now, thursday).toMillis();// 计算间隔时间,即 1 周的毫秒值long oneWeek = 7 * 24 * 3600 * 1000;ScheduledExecutorService executor = Executors.newScheduledThreadPool(2);log.debug("start...");executor.scheduleAtFixedRate(() -> {log.debug("执行定时任务");}, initialDelay, oneWeek, TimeUnit.MILLISECONDS);}}
除了上面两个线程池,JDK1.7之后还提供了 ForkJoinPool 线程池,这个线程池是基于分治的思想设计的,它是适用于能够进行任务拆分的 cpu 密集型运算 。ForkJoinPool 线程池的参考文章:https://www.cnblogs.com/myseries/p/12582271.html
线程池在业务中的实践
快速响应用户请求
描述:用户发起的实时请求,服务追求响应时间。比如说用户要查看一个商品的信息,那么我们需要将商品维度的一系列信息如商品的价格、优惠、库存、图片等等聚合起来,展示给用户。
分析:从用户体验角度看,这个结果响应的越快越好,如果一个页面半天都刷不出,用户可能就放弃查看这个商品了。而面向用户的功能聚合通常非常复杂,伴随着调用与调用之间的级联、多级级联等情况,业务开发同学往往会选择使用线程池这种简单的方式,将调用封装成任务并行的执行,缩短总体响应时间。另外,使用线程池也是有考量的,这种场景最重要的就是获取最大的响应速度去满足用户,所以应该不设置队列去缓冲并发任务,调高corePoolSize和maxPoolSize去尽可能创造多的线程快速执行任务。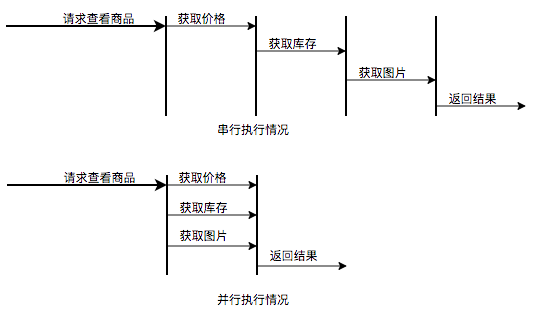
并行执行任务提升任务响应速度
快速处理批量任务
描述:离线的大量计算任务,需要快速执行。比如说,统计某个报表,需要计算出全国各个门店中有哪些商品有某种属性,用于后续营销策略的分析,那么我们需要查询全国所有门店中的所有商品,并且记录具有某属性的商品,然后快速生成报表。
分析:这种场景需要执行大量的任务,我们也会希望任务执行的越快越好。这种情况下,也应该使用多线程策略,并行计算。但与响应速度优先的场景区别在于,这类场景任务量巨大,并不需要瞬时的完成,而是关注如何使用有限的资源,尽可能在单位时间内处理更多的任务,也就是吞吐量优先的问题。所以应该设置队列去缓冲并发任务,调整合适的corePoolSize去设置处理任务的线程数。在这里,设置的线程数过多可能还会引发线程上下文切换频繁的问题,也会降低处理任务的速度,降低吞吐量。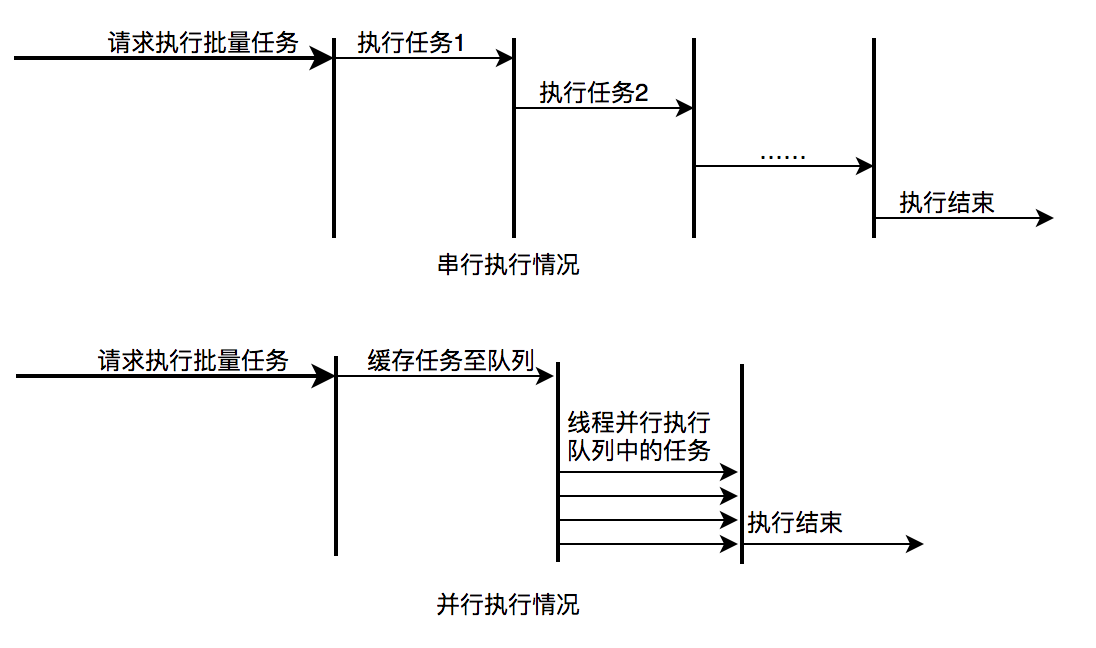
并行执行任务提升批量任务执行速度
参考文章: https://tech.meituan.com/2020/04/02/java-pooling-pratice-in-meituan.html
