- jdk下载镜像
- 1. maven本地安装jar包命令
- 3. 查找占用端口号的进程
- 4. nvm安装
- 5. 添加开机启动程序
- 6.Hutool雪花算法实现记录
- 7. java泛型记录
- 8. 线程池学习笔记
- 9.String.format用法记录
- 10. java命令行命令记录
- 11. spring 事务传播特性
- 12 Cron表达式记录
- 只能用在day-of-week字段。用来指定这个月的第几个周几。例:在day-of-week字段用”6#3”指这个月第3个周五(6指周五,3指第3个)。如果指定的日期不存在,触发器就不会触发。
- 13. LocalDateTime和时间戳互转
14. logback配置详情">
14. logback配置详情- 15. 使用增强for进行迭代不允许修改的原理记录
- 16. 位运算使用记录
- 17. jconsole远程监控
jdk下载镜像
1. maven本地安装jar包命令
mvn install:install-file -DgroupId=org.apache.phoenix -DartifactId=phoenix-client -Dversion=4.14.0-cdh5.14.2 -Dpackaging=jar -Dfile=E:\phoenix-core-4.14.0-cdh5.14.2.jar
3. 查找占用端口号的进程
netstat -ano|findstr 8080#关闭指定pid的进程taskkill /F /pid "pid"
4. nvm安装
修改settings镜像位置
root: D:\nvmpath: D:\nodejsnode_mirror: https://npm.taobao.org/mirrors/node/npm_mirror: https://npm.taobao.org/mirrors/npm/
npm/yarn设置淘宝镜像 将npm修改成yarn即可
npm config set registry " https://registry.npm.taobao.org "npm config set sass_binary_site=https://npm.taobao.org/mirrors/node-sass/npm config set phantomjs_cdnurl=https://npm.taobao.org/mirrors/phantomjs/npm config set phantomjs_cdnurl=https://npm.taobao.org/mirrors/phantomjs/
5. 添加开机启动程序
进入目录 C:\ProgramData\Microsoft\Windows\Start Menu\Programs\StartUp
将应用的的快捷方式放在里面就可以6.Hutool雪花算法实现记录
Twitter的Snowflake 算法
分布式系统中,有一些需要使用全局唯一ID的场景,有些时候我们希望能使用一种简单一些的ID,并且希望ID能够按照时间有序生成。
snowflake的结构如下(每部分用-分开):
符号位(1bit)- 时间戳相对值(41bit)- 数据中心标志(5bit)- 机器标志(5bit)- 递增序号(12bit)
0 - 0000000000 0000000000 0000000000 00000000000 - 00000 - 00000 - 000000000000
第一位为未使用(符号位0表示正数),
接下来的41位为毫秒级时间(41位的长度可以使用69年) (1L << 41) / (1000L 60 60 24 365) = 69年;
然后是5位datacenterId和5位workerId(10位的长度最多支持部署1<<10=1024个节点)
最后12位是毫秒内的计数(12位的计数顺序号支持每个节点每毫秒产生1<<12 =4096个ID序号)代码记录
```java /**
- 构造,使用自动生成的工作节点ID和数据中心ID */ public Snowflake() { this(IdUtil.getWorkerId(IdUtil.getDataCenterId(MAX_DATA_CENTER_ID), MAX_WORKER_ID)); }
/**
* @param epochDate 初始化时间起点(null表示默认起始日期),后期修改会导致id重复,如果要修改连workerId dataCenterId,慎用* @param workerId 工作机器节点id* @param dataCenterId 数据中心id* @param isUseSystemClock 是否使用{@link SystemClock} 获取当前时间戳* @param timeOffset 允许时间回拨的毫秒数* @since 5.7.3*/public Snowflake(Date epochDate, long workerId, long dataCenterId, boolean isUseSystemClock, long timeOffset) {if (null != epochDate) {this.twepoch = epochDate.getTime();} else{// Thu, 04 Nov 2010 01:42:54 GMTthis.twepoch = DEFAULT_TWEPOCH;}if (workerId > MAX_WORKER_ID || workerId < 0) {throw new IllegalArgumentException(StrUtil.format("worker Id can't be greater than {} or less than 0", MAX_WORKER_ID));}if (dataCenterId > MAX_DATA_CENTER_ID || dataCenterId < 0) {throw new IllegalArgumentException(StrUtil.format("datacenter Id can't be greater than {} or less than 0", MAX_DATA_CENTER_ID));}this.workerId = workerId;this.dataCenterId = dataCenterId;this.useSystemClock = isUseSystemClock;this.timeOffset = timeOffset;}
```java/*** 获取数据中心ID<br>* 数据中心ID依赖于本地网卡MAC地址。* <p>* 此算法来自于mybatis-plus#Sequence* </p>** @param maxDatacenterId 最大的中心ID* @return 数据中心ID* @since 5.7.3*/public static long getDataCenterId(long maxDatacenterId) {long id = 1L;//获取本地的一个mac地址 字节6位final byte[] mac = NetUtil.getLocalHardwareAddress();if (null != mac) {//取mac地址的倒数第二位的二进制作为低八位,倒数第一位作为高八位//相加之后右移六位,得到结果对最大的中心ID进行取余id = ((0x000000FF & (long) mac[mac.length - 2])| (0x0000FF00 & (((long) mac[mac.length - 1]) << 8))) >> 6;id = id % (maxDatacenterId + 1);}return id;}/*** 获取机器ID,使用进程ID配合数据中心ID生成<br>* 机器依赖于本进程ID或进程名的Hash值。** <p>* 此算法来自于mybatis-plus#Sequence* </p>** @param datacenterId 数据中心ID* @param maxWorkerId 最大的机器节点ID* @return ID* @since 5.7.3*/public static long getWorkerId(long datacenterId, long maxWorkerId) {final StringBuilder mpid = new StringBuilder();mpid.append(datacenterId);try {//拼接数据中心Id+进程Idmpid.append(RuntimeUtil.getPid());} catch (UtilException igonre) {//ignore}/** MAC + PID 的 hashcode 获取16个低位 然后对最大的机器节点ID进行取余*/return (mpid.toString().hashCode() & 0xffff) % (maxWorkerId + 1);}
获取Id
/*** 下一个ID** @return ID*/public synchronized long nextId() {long timestamp = genTime();if (timestamp < this.lastTimestamp) {if(this.lastTimestamp - timestamp < timeOffset){// 容忍指定的回拨,避免NTP校时造成的异常timestamp = lastTimestamp;} else{// 如果服务器时间有问题(时钟后退) 报错。throw new IllegalStateException(StrUtil.format("Clock moved backwards. Refusing to generate id for {}ms", lastTimestamp - timestamp));}}//同一个毫秒时间內,if (timestamp == this.lastTimestamp) {//同一个毫秒时间內,说明在这个时间已经获取过一次sequence=0,final long sequence = (this.sequence + 1) & SEQUENCE_MASK;//再获取到sequence=0说明出现问题,需要进行等待下一个时间if (sequence == 0) {timestamp = tilNextMillis(lastTimestamp);}this.sequence = sequence;} else {sequence = 0L;}lastTimestamp = timestamp;return ((timestamp - twepoch) << TIMESTAMP_LEFT_SHIFT)| (dataCenterId << DATA_CENTER_ID_SHIFT)| (workerId << WORKER_ID_SHIFT)| sequence;}/*** 循环等待下一个时间** @param lastTimestamp 上次记录的时间* @return 下一个时间*/private long tilNextMillis(long lastTimestamp) {long timestamp = genTime();// 循环直到操作系统时间戳变化while (timestamp == lastTimestamp) {timestamp = genTime();}if (timestamp < lastTimestamp) {// 如果发现新的时间戳比上次记录的时间戳数值小,说明操作系统时间发生了倒退,报错throw new IllegalStateException(StrUtil.format("Clock moved backwards. Refusing to generate id for {}ms", lastTimestamp - timestamp));}return timestamp;}
7. java泛型记录
1. 测试代码
public class Main {public static void main(String[] args) {// TODO: 普通类继承抽象类 1=10//带body实现和泛型指定Type list1 = new ArrayList<String>() {}.getClass().getGenericSuperclass();//带泛型不带bodyType list2 = new ArrayList<String>().getClass().getGenericSuperclass();//带body不带泛型,编译报错 Cannot use "<>"with anonymous inner classes//Type list3 = new ArrayList<>() {//}.getClass().getGenericSuperclass();//什么都不带Type list4 = new ArrayList<>().getClass().getGenericSuperclass();// TODO: 接口 2=3//带body实现和泛型指定Type a1 = new Aoo<Double>() {}.getClass().getGenericSuperclass();//带泛型不带body 编译报错 'Aoo' is abstract; cannot be instantiated//Type a2 = new Aoo<Double>().getClass().getGenericSuperclass();//带body不带泛型 编译报错 Cannot use "<>"with anonymous inner classes//Type a3 = new Aoo<>() {//}.getClass().getGenericSuperclass();// TODO: 接口继承接口 3=2//带body实现和泛型指定Type c1 = new Coo<String>() {}.getClass().getGenericSuperclass();//带泛型不带body 编译报错 'Coo' is abstract; cannot be instantiated//Type c2 = new Coo<Double>().getClass().getGenericSuperclass();//带body不带泛型 编译报错 Cannot use "<>"with anonymous inner classes//Type c3 = new Coo<>() {//}.getClass().getGenericSuperclass();// TODO: 普通类实现接口 4=9//带body实现和泛型指定Type b1 = new Boo<Double>() {}.getClass().getGenericSuperclass();//带泛型不带bodyType b2 = new Boo<String>().getClass().getGenericSuperclass();//带body不带泛型,编译报错 Cannot use "<>"with anonymous inner classes//Type b3 = new Boo<>(){}.getClass().getGenericSuperclass();//什么都不带Type b4 = new Boo<>().getClass().getGenericSuperclass();// TODO: 抽象类 5=6=7=8//带body实现和泛型指定Type foo1 = new Foo<String>() {}.getClass().getGenericSuperclass();//带泛型不带body 编译报错 'Foo' is abstract; cannot be instantiated//Type foo2=new Foo<String>().getClass().getGenericSuperclass();//带body不带泛型 编译报错 Cannot use "<>"with anonymous inner classes//Type foo3=new Foo<>(){}.getClass().getGenericSuperclass();//TODO: 抽象类继承普通类 6=5=7=8//带body实现和泛型指定Type t1 = new Too<String>() {}.getClass().getGenericSuperclass();//带泛型不带body 'Too' is abstract; cannot be instantiated//Type t2 = new Too<String>().getClass().getGenericSuperclass();//带body不带泛型,编译报错 Cannot use "<>"with anonymous inner classes//Type t3 = new Too<>() {//}.getClass().getGenericSuperclass();// TODO: 抽象类继承抽象类 7=5=6=8//带body实现和泛型指定Type rpc1 = new QueueRpcSupport<String>() {}.getClass().getGenericSuperclass();//带泛型不带body 编译报错 'QueueRpcSupport' is abstract; cannot be instantiated//Type rpc2 = new QueueRpcSupport<String>().getClass().getGenericSuperclass();//带body不带泛型 编译报错 Cannot use "<>"with anonymous inner classes//Type rpc3 = new QueueRpcSupport<>() {//}.getClass().getGenericSuperclass();// TODO: 抽象类实现接口 8=5=6=7//带body实现和泛型指定Type d1 = new Doo<Double>() {}.getClass().getGenericSuperclass();//带泛型不带body 'Doo' is abstract; cannot be instantiated//Type d2 = new Doo<String>().getClass().getGenericSuperclass();//带body不带泛型,编译报错 Cannot use "<>"with anonymous inner classes//Type d3 = new Doo<>(){}.getClass().getGenericSuperclass();// TODO: 普通类 9=4//带body实现和泛型指定Type z1 = new Zoo<String>() {}.getClass().getGenericSuperclass();//带泛型不带bodyType z2 = new Zoo<String>().getClass().getGenericSuperclass();//带body不带泛型,编译报错 Cannot use "<>"with anonymous inner classes//Type z3 = new Zoo<>() {//}.getClass().getGenericSuperclass();//什么都不带Type z4 = new Zoo<>().getClass().getGenericSuperclass();// TODO: 2022/3/18 普通类继承普通类 10=1//带body实现和泛型指定Type x1 = new Xoo<String>() {}.getClass().getGenericSuperclass();//什么都不带Type x2 = new Xoo<>().getClass().getGenericSuperclass();//带body不带泛型,编译报错 Cannot use "<>"with anonymous inner classes//Type x3 = new Xoo<>() {//}.getClass().getGenericSuperclass();//带泛型不带bodyType x4 = new Xoo<String>().getClass().getGenericSuperclass();System.out.println("test");}}//接口interface Aoo<E> {}//接口继承接口interface Coo<E> extends Aoo<E> {}//抽象类abstract class Foo<T> {}//抽象类实现接口abstract class Doo<E> implements Coo<E> {}//抽象类继承抽象类abstract class QueueRpcSupport<T> extends Foo<T> {}//抽象类继承普通类abstract class Too<E> extends Boo<E> {}//普通类class Zoo<E> {}//普通类实现接口class Boo<E> implements Aoo<E> {}//普通类继承普通类class Xoo<E> extends Zoo<E> {}
2. 结果

3. 结论
接口/普通类/抽象类的组合 | | 接口 | 抽象类 | 普通类 | | —- | —- | —- | —- | | 接口 | 接口继承接口 | / | / | | 抽象类 | 抽象类实现接口 | 抽象类继承抽象类 | 抽象类继承普通类 | | 普通类 | 普通类实现接口 | 普通类继承抽象类 | 普通类继承普通类 |
结果分析 | 分类 | 描述 | obj.getClass().getGenericSuperclass()类型 | obj.getClass().getGenericSuperclass()值 | | —- | —- | —- | —- | | 普通类=普通类实现接口 | 带body实现和泛型指定 | ParameterizedTypeImpl | class 具体的类名<具体的泛型> | | | 什么都不带/带泛型不带body | Class | class java.lang.Object | | 普通类继承抽象类
=普通类继承普通类 | 带body实现和泛型指定 | ParameterizedTypeImpl | class 具体的类名<具体的泛型> | | | 什么都不带/带泛型不带body | ParameterizedTypeImpl | class 具体的类名<泛型定义的名称> | | 接口=接口继承接口 | 必须带body实现和泛型指定 | Class | class java.lang.Object | | 抽象类=抽象类继承抽象类
=抽象类实现接口
=抽象类继承普通类 | 必须带body实现和泛型指定 | ParameterizedTypeImpl | class 具体的类名<具体的泛型> | | 其他结论 | | | | | 带body不带泛型,永远不能通过编译,报错 Cannot use “<>”with anonymous inner classes | | | | | 普通类可以出现什么都不带/带泛型不带body,但是接口和抽象类必须带body和泛型指定 | | | |
8. 线程池学习笔记
1. 构造函数
/*** Creates a new {@code ThreadPoolExecutor} with the given initial* parameters.** @param corePoolSize the number of threads to keep in the pool, even* if they are idle, unless {@code allowCoreThreadTimeOut} is set* @param maximumPoolSize the maximum number of threads to allow in the* pool* @param keepAliveTime when the number of threads is greater than* the core, this is the maximum time that excess idle threads* will wait for new tasks before terminating.* @param unit the time unit for the {@code keepAliveTime} argument* @param workQueue the queue to use for holding tasks before they are* executed. This queue will hold only the {@code Runnable}* tasks submitted by the {@code execute} method.* @param threadFactory the factory to use when the executor* creates a new thread* @param handler the handler to use when execution is blocked* because the thread bounds and queue capacities are reached* @throws IllegalArgumentException if one of the following holds:<br>* {@code corePoolSize < 0}<br>* {@code keepAliveTime < 0}<br>* {@code maximumPoolSize <= 0}<br>* {@code maximumPoolSize < corePoolSize}* @throws NullPointerException if {@code workQueue}* or {@code threadFactory} or {@code handler} is null*/public ThreadPoolExecutor(int corePoolSize,int maximumPoolSize,long keepAliveTime,TimeUnit unit,BlockingQueue<Runnable> workQueue,ThreadFactory threadFactory,RejectedExecutionHandler handler) {if (corePoolSize < 0 ||maximumPoolSize <= 0 ||maximumPoolSize < corePoolSize ||keepAliveTime < 0)throw new IllegalArgumentException();if (workQueue == null || threadFactory == null || handler == null)throw new NullPointerException();this.acc = System.getSecurityManager() == null ?null :AccessController.getContext();this.corePoolSize = corePoolSize;this.maximumPoolSize = maximumPoolSize;this.workQueue = workQueue;this.keepAliveTime = unit.toNanos(keepAliveTime);this.threadFactory = threadFactory;this.handler = handler;}
2. 构造参数解析
- corePoolSize:核心线程数
- 核心线程会一直存活,即使没有任务需要执行。
- 当线程数小于核心线程数时,即使有线程空闲,线程池也会优先创建新线程处理。
- 设置allowCoreThreadTimeout=true(默认false)时,核心线程会超时关闭。
- 可以通过 prestartCoreThread() 或 prestartAllCoreThreads() 方法来提前启动线程池中的基本线程。
- maximumPoolSize:最大线程数
- 线程池所允许的最大线程个数
- maxPoolSize>当前线程数>=corePoolSize,且任务队列已满时。线程池会创建新线程来处理任务。
- 当线程数=maxPoolSize,且任务队列已满时,线程池会根据handle策略处理,默认是AbortPolicy 丢弃任务,抛运行时异常。
- keepAliveTime:空闲线程存活时间
- 当线程空闲时间达到keepAliveTime时,线程会退出,直到线程数量=corePoolSize。
- 如果allowCoreThreadTimeout=true,则会直到线程数量=0。
- unit:保持空闲时间的时间单位
- workQueue:任务队列
存放待执行任务的队列:当提交的任务数超过核心线程数大小后,再提交的任务就存放在工作队列,任务调度时再从队列中取出任务。它仅仅用来存放被execute()方法提交的Runnable任务。工作队列实现了BlockingQueue接口。
JDK默认的工作队列有五种:
- ArrayBlockingQueue 基于数组的有界阻塞队列,按FIFO排序。新任务进来后,会放到该队列的队尾,有界的数组可以防止资源耗尽问题。当线程池中线程数量达到corePoolSize后,再有新任务进来,则会将任务放入该队列的队尾,等待被调度。如果队列已经是满的,则创建一个新线程,如果线程数量已经达到maxPoolSize,则会执行拒绝策略。
- LinkedBlockingQueue 基于链表的无界阻塞队列(其实最大容量为Interger.MAX),按照FIFO排序。由于该队列的近似无界性,当线程池中线程数量达到corePoolSize后,再有新任务进来,会一直存入该队列,而不会去创建新线程直到maxPoolSize,因此使用该工作队列时,参数maxPoolSize其实是不起作用的。
- SynchronousQueue 一个不缓存任务的阻塞队列,生产者放入一个任务必须等到消费者取出这个任务。也就是说新任务进来时,不会缓存,而是直接被调度执行该任务,如果没有可用线程,则创建新线程,如果线程数量达到maxPoolSize,则执行拒绝策略。
- PriorityBlockingQueue 具有优先级的无界阻塞队列,优先级通过参数Comparator实现。
- DelayQueue 延时队列:无界,元素有过期时间,过期的元素才能被取出。
- threadFactory:线程工厂
- handler:拒绝策略
当工作队列中的任务已到达最大限制,并且线程池中的线程数量也达到最大限制,这时如果有新任务提交进来,该如何处理,jdk中提供了4中拒绝策略:
- CallerRunsPolicy
该策略下,在调用者线程中直接执行被拒绝任务的run方法,除非线程池已经shutdown,则直接抛弃任务。
public static class CallerRunsPolicy implements RejectedExecutionHandler {/*** Creates a {@code CallerRunsPolicy}.*/public CallerRunsPolicy() { }/*** Executes task r in the caller's thread, unless the executor* has been shut down, in which case the task is discarded.** @param r the runnable task requested to be executed* @param e the executor attempting to execute this task*/public void rejectedExecution(Runnable r, ThreadPoolExecutor e) {if (!e.isShutdown()) {r.run();}}}
- AbortPolicy
该策略下,直接丢弃任务,并抛出RejectedExecutionException异常
public static class AbortPolicy implements RejectedExecutionHandler {/*** Creates an {@code AbortPolicy}.*/public AbortPolicy() { }/*** Always throws RejectedExecutionException.** @param r the runnable task requested to be executed* @param e the executor attempting to execute this task* @throws RejectedExecutionException always*/public void rejectedExecution(Runnable r, ThreadPoolExecutor e) {throw new RejectedExecutionException("Task " + r.toString() +" rejected from " +e.toString());}
- DiscardPolicy
该策略下,直接丢弃任务,什么都不做。
/*** A handler for rejected tasks that silently discards the* rejected task.*/public static class DiscardPolicy implements RejectedExecutionHandler {/*** Creates a {@code DiscardPolicy}.*/public DiscardPolicy() { }/*** Does nothing, which has the effect of discarding task r.** @param r the runnable task requested to be executed* @param e the executor attempting to execute this task*/public void rejectedExecution(Runnable r, ThreadPoolExecutor e) {}}
- DiscardOldestPolicy
该策略下,抛弃进入队列最早的那个任务,然后尝试把这次拒绝的任务放入队列
public static class DiscardOldestPolicy implements RejectedExecutionHandler {/*** Creates a {@code DiscardOldestPolicy} for the given executor.*/public DiscardOldestPolicy() { }/*** Obtains and ignores the next task that the executor* would otherwise execute, if one is immediately available,* and then retries execution of task r, unless the executor* is shut down, in which case task r is instead discarded.** @param r the runnable task requested to be executed* @param e the executor attempting to execute this task*/public void rejectedExecution(Runnable r, ThreadPoolExecutor e) {if (!e.isShutdown()) {e.getQueue().poll();e.execute(r);}}
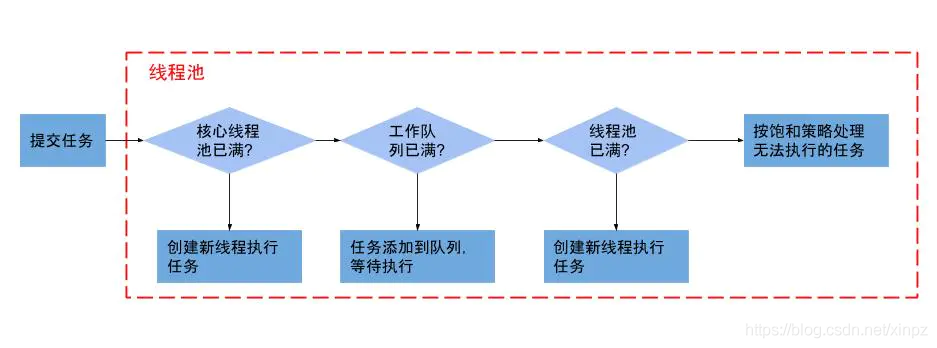
3. ThreadPoolExecutor执行过程
- 当线程数小于核心线程数时,创建线程。
- 当线程数大于等于核心线程数,且任务队列未满时,将任务放入任务队列。
- 当线程数大于等于核心线程数,且任务队列已满。
- 若线程数小于最大线程数,创建线程。
- 若线程数等于最大线程数,抛出异常,拒绝任务。

4. Executors提供的几种线程池
1. newCachedThreadPool
newCachedThreadPool创建一个可缓存线程池,如果线程池长度超过处理需要,可灵活回收空闲线程,若无可回收,则新建线程。
newCachedThreadPool:用来创建一个可以无限扩大的线程池,适用于负载较轻的场景,执行短期异步任务。(可以使得任务快速得到执行,因为任务时间执行短,可以很快结束,也不会造成cpu过度切换)
public static ExecutorService newCachedThreadPool() {return new ThreadPoolExecutor(0, Integer.MAX_VALUE,60L, TimeUnit.SECONDS,new SynchronousQueue<Runnable>());}public static ExecutorService newCachedThreadPool(ThreadFactory threadFactory) {return new ThreadPoolExecutor(0, Integer.MAX_VALUE,60L, TimeUnit.SECONDS,new SynchronousQueue<Runnable>(),threadFactory);}
- corePoolSize 核心线程数设置为0,即所有线程在60s超时后都可以被回收进行利用
- maximumPoolSize 最大线程数设置为Integer.MAX_VALUE,可以创建非常多的线程,即任务可以得到快速响应
-
2. newFixedThreadPool
newFixedThreadPool 创建一个定长线程池,可控制线程最大并发数,超出的线程会在队列中等待。
newFixedThreadPool:创建一个固定大小的线程池,因为采用无界的阻塞队列,所以实际线程数量永远不会变化,适用于负载较重的场景,对当前线程数量进行限制。(保证线程数可控,不会造成线程过多,导致系统负载更为严重)public static ExecutorService newFixedThreadPool(int nThreads) {return new ThreadPoolExecutor(nThreads, nThreads,0L, TimeUnit.MILLISECONDS,new LinkedBlockingQueue<Runnable>());}public static ExecutorService newFixedThreadPool(int nThreads, ThreadFactory threadFactory) {return new ThreadPoolExecutor(nThreads, nThreads,0L, TimeUnit.MILLISECONDS,new LinkedBlockingQueue<Runnable>(),threadFactory);}
corePoolSize 核心线程数和maximumPoolSize 最大线程数相等,即线程大小是固定的
- LinkedBlockingQueue:使用链表型阻塞队列
- 超时时间为0,理解为不需要超时时间,因为最大线程数=核心线程数,即当前在运行的所有线程都是核心线程,不会出现超时回收。
3. newScheduledThreadPool
newScheduledThreadPool 创建一个定长线程池,支持定时及周期性任务执行。
newScheduledThreadPool:适用于执行延时或者周期性任务。 ```java public static ScheduledExecutorService newScheduledThreadPool(int corePoolSize) {
} public ScheduledThreadPoolExecutor(int corePoolSize) {return new ScheduledThreadPoolExecutor(corePoolSize);
}super(corePoolSize, Integer.MAX_VALUE, 0, NANOSECONDS,new DelayedWorkQueue());
// public static ScheduledExecutorService newScheduledThreadPool( int corePoolSize, ThreadFactory threadFactory) { return new ScheduledThreadPoolExecutor(corePoolSize, threadFactory); } public ScheduledThreadPoolExecutor(int corePoolSize, ThreadFactory threadFactory) { super(corePoolSize, Integer.MAX_VALUE, 0, NANOSECONDS, new DelayedWorkQueue(), threadFactory); }
1. 指定核心线程数,最大线程数为Integer.MAX_VALUE,超时时间单位设置很短,对时间精度要求较高1. DelayedWorkQueue 使用延时队列实现周期性执行<a name="kOQ0R"></a>### 4. newSingleThreadExecutornewSingleThreadExecutor 创建一个单线程化的线程池,它只会用唯一的工作线程来执行任务,保证所有任务按照指定顺序(FIFO优先级)执行。```javapublic static ExecutorService newSingleThreadExecutor() {return new FinalizableDelegatedExecutorService(new ThreadPoolExecutor(1, 1,0L, TimeUnit.MILLISECONDS,new LinkedBlockingQueue<Runnable>()));}public static ExecutorService newSingleThreadExecutor(ThreadFactory threadFactory) {return new FinalizableDelegatedExecutorService(new ThreadPoolExecutor(1, 1,0L, TimeUnit.MILLISECONDS,new LinkedBlockingQueue<Runnable>(),threadFactory));}
- 核心线程数和最大线程数都是一个
- 使用LinkedBlockingQueue 保证FIFO
5. newSingleThreadScheduledExecutor
单线程周期性执行线程池,有点像newSingleThreadExecutor和newScheduledThreadPool的结合
顺序执行,周期执行public static ScheduledExecutorService newSingleThreadScheduledExecutor() {return new DelegatedScheduledExecutorService(new ScheduledThreadPoolExecutor(1));}public static ScheduledExecutorService newSingleThreadScheduledExecutor(ThreadFactory threadFactory) {return new DelegatedScheduledExecutorService(new ScheduledThreadPoolExecutor(1, threadFactory));}
5. 线程池表格比较
| 方法 | corePoolSize | maximumPoolSize | keepAliveTime | workQueue | | —- | —- | —- | —- | —- | | newCachedThreadPool | 0 | Integer.MAX_VALUE | 60s | SynchronousQueue | | newFixedThreadPool | n | n | 0 | LinkedBlockingQueue | | newScheduledThreadPool | n | Integer.MAX_VALUE | 0 | DelayedWorkQueue | | newSingleThreadExecutor | 1 | 1 | 0 | LinkedBlockingQueue | | newSingleThreadScheduledExecutor | 1 | Integer.MAX_VALUE | 0 | DelayedWorkQueue |
6. 线程池源码学习记录
public class ThreadPoolExecutor extends AbstractExecutorService {workerCount, indicating the effective number of threads/*** The main pool control state, ctl, is an atomic integer packing* two conceptual fields* workerCount, indicating the effective number of threads* runState, indicating whether running, shutting down etc*/private final AtomicInteger ctl = new AtomicInteger(ctlOf(RUNNING, 0));//计数的一个基准,用的是Integer.SIZE-3,至于为什么是-3,而不是其他数字,下面会重点分析private static final int COUNT_BITS = Integer.SIZE - 3;//CAPACITY,用来从ctl中获取字段private static final int CAPACITY = (1 << COUNT_BITS) - 1;// runState is stored in the high-order bits 注释提示:runState被存储在高位中private static final int RUNNING = -1 << COUNT_BITS;private static final int SHUTDOWN = 0 << COUNT_BITS;private static final int STOP = 1 << COUNT_BITS;private static final int TIDYING = 2 << COUNT_BITS;private static final int TERMINATED = 3 << COUNT_BITS;// Packing and unpacking ctl 提示:下面的方法用于将数据存储到ctl中和从ctl中获取字段 入参c都是ctl变量的值private static int runStateOf(int c) { return c & ~CAPACITY; }private static int workerCountOf(int c) { return c & CAPACITY; }//ctl数据存储格式:rs 00xxx00 wc 表名rs存储在高位,wc存储在低位,我们要从ctl获取某一个字段,就要想办法舍弃另一个字段private static int ctlOf(int rs, int wc) { return rs | wc; }
各个变量的二进制表示 (橙色标识Integer.SIZE - 3=29位)
| 变量名 | 二进制 |
|---|---|
| CAPACITY | 0001 1111 1111 1111 1111 1111 1111 1111 |
| RUNNING | 1010 0000 0000 0000 0000 0000 0000 0000 |
| SHUTDOWN | 0000 0000 0000 0000 0000 0000 0000 0000 |
| STOP | 0010 0000 0000 0000 0000 0000 0000 0000 |
| TIDYING | 0100 0000 0000 0000 0000 0000 0000 0000 |
| TERMINATED | 0110 0000 0000 0000 0000 0000 0000 0000 |
这里解释为什么COUNT_BITS=Integer.SIZE - 3,是3而不是其他数字?
ctl 里面存储的字段格式为:rs|ws 即rs运行状态在高位,ws工作线程的数量在低位
因为线程池的状态总共有5种,ctl 中将状态存储在高位,1位bit最多可存储2种,2位bit最多可存储4种,3位bit最多可存储7种,故这里的COUNT_BITS使用了Integer.SIZE - 3就足够存储状态了。
& 按位与,与0计算被舍弃,与1计算保留原值
workerCountOf方法解析
c & CAPACITY
rs 00…00 ws & 0001 1111 1111 1111 1111 1111 1111 1111
CAPACITY前三位为0后面都为1,故前三位rs被舍弃,其他位ws全部保留
最后返回ws工作线程的数量
runStateOf方法解析
c & ~CAPACITY
rs 00…00 ws & 1110 0000 0000 0000 0000 0000 0000 0000
~CAPACITY只有前面三位为1后面都为0,故前面三位rs的值被保留,其他位ws全部舍弃。
最后返回rs工线程池的状态。
妙啊~
9.String.format用法记录
@Testpublic void test2() {//字符串右边补充占位符System.out.println(String.format("%-15s", "sadddddds").replace(' ', '_'));//字符串左边补充占位符System.out.println(String.format("%15s", "sadddddds").replace(' ', '_'));//数字右边补充占位符System.out.println(String.format("%-10d", 122323).replace(' ', '0'));//数字左边补充占位符方式一System.out.println(String.format("%10d", 122323).replace(' ', '0'));//数字左边补充占位符方式二System.out.println(String.format("%010d", 122323));}

10. java命令行命令记录
- 命令行运行jar包命令 java 参数 -jar jar包名 yml配置(使用—配置,比如:—spring.profiles.active=pre)
- 指定文件编码:-Dfile.encoding=utf-8
- 指定profile文件 —spring.profiles.active=pre
- 其他命令
propagation_requierd:如果当前没有事务,就新建一个事务,如果已存在一个事务中,加入到这个事务中,这是最常见的选择。
propagation_supports:支持当前事务,如果没有当前事务,就以非事务方法执行。
propagation_mandatory:使用当前事务,如果没有当前事务,就抛出异常。
propagation_required_new:新建事务,如果当前存在事务,把当前事务挂起。
propagation_not_supported:以非事务方式执行操作,如果当前存在事务,就把当前事务挂起。
propagation_never:以非事务方式执行操作,如果当前事务存在则抛出异常。
propagation_nested:如果当前存在事务,则在嵌套事务内执行。如果当前没有事务,则执行与propagation_required类似的操作。
12 Cron表达式记录
格式
(cron = “ “)
{秒数} {分钟} {小时} {日期} {月份} {星期} {年份(可为空)}
例 “0 0 12 ? * WED” 在每星期三下午12:00 执行(年份通常 省略)
每个字段的允许值
字段 允许值 允许的特殊字符
秒 0-59 , - /
分 0-59 , - /
小时 0-23 , - /
日期 1-31 , - ? / L W C
月份 1-12 或者 JAN-DEC , - /
星期 1-7 或者 SUN-SAT , - ? / L C #
年(可选) 留空, 1970-2099 , - * /
允许值的意思
Seconds (秒) :可以用数字0-59 表示
Minutes(分) :可以用数字0-59 表示
Hours(时) :可以用数字0-23表示
Day-of-Month(天) :可以用数字1-31 中的任一一个值,但要注意一些特别的月份
Month(月) :可以用0-11 或用字符串 “JAN, FEB, MAR, APR, MAY, JUN, JUL, AUG, SEP, OCT, NOV and DEC” 表示
Day-of-Week(每周):可以用数字1-7表示(1 = 星期日)或用字符口串“SUN, MON, TUE, WED, THU, FRI and SAT”表示
每个符号的意义
- 表示所有值;
- ? 表示未说明的值,即不关心它为何值;
- 表示一个指定的范围;
- , 表示附加一个可能值;
- / 符号前表示开始时间,符号后表示每次递增的值;
- L(“last”) (“last”) “L” 用在day-of-month字段意思是 “这个月最后一天”;用在 day-of-week字段, 它简单意思是 “7” or “SAT”。 如果在day-of-week字段里和数字联合使用,它的意思就是 “这个月的最后一个星期几” – 例如: “6L” means “这个月的最后一个星期五”. 当我们用“L”时,不指明一个列表值或者范围是很重要的,不然的话,我们会得到一些意想不到的结果。
- W(“weekday”) 只能用在day-of-month字段。用来描叙最接近指定天的工作日(周一到周五)。例如:在day-of-month字段用“15W”指“最接近这个 月第15天的工作日”,即如果这个月第15天是周六,那么触发器将会在这个月第14天即周五触发;如果这个月第15天是周日,那么触发器将会在这个月第 16天即周一触发;如果这个月第15天是周二,那么就在触发器这天触发。注意一点:这个用法只会在当前月计算值,不会越过当前月。“W”字符仅能在 day-of-month指明一天,不能是一个范围或列表。也可以用“LW”来指定这个月的最后一个工作日。
只能用在day-of-week字段。用来指定这个月的第几个周几。例:在day-of-week字段用”6#3”指这个月第3个周五(6指周五,3指第3个)。如果指定的日期不存在,触发器就不会触发。
- C 指和calendar联系后计算过的值。例:在day-of-month 字段用“5C”指在这个月第5天或之后包括calendar的第一天;在day-of-week字段用“1C”指在这周日或之后包括calendar的第一天。
一些cron表达式案例
/5 ? 每隔5秒执行一次
0 /1 ? 每隔1分钟执行一次
0 0 5-15 ? 每天5-15点整点触发
0 0/3 ? 每三分钟触发一次
0 0-5 14 ? 在每天下午2点到下午2:05期间的每1分钟触发
0 0/5 14 ? 在每天下午2点到下午2:55期间的每5分钟触发
0 0/5 14,18 ? 在每天下午2点到2:55期间和下午6点到6:55期间的每5分钟触发
0 0/30 9-17 ? 朝九晚五工作时间内每半小时
0 0 10,14,16 ? 每天上午10点,下午2点,4点
0 0 12 ? WED 表示每个星期三中午12点
0 0 17 ? TUES,THUR,SAT 每周二、四、六下午五点
0 10,44 14 ? 3 WED 每年三月的星期三的下午2:10和2:44触发
0 15 10 ? MON-FRI 周一至周五的上午10:15触发
0 0 23 L ? 每月最后一天23点执行一次
0 15 10 L ? 每月最后一日的上午10:15触发
0 15 10 ? 6L 每月的最后一个星期五上午10:15触发
0 15 10 ? 2005 2005年的每天上午10:15触发
0 15 10 ? 6L 2002-2005 2002年至2005年的每月的最后一个星期五上午10:15触发
0 15 10 ? 6#3 每月的第三个星期五上午10:15触发
“30 ?” 每半分钟触发任务
“30 10 ?” 每小时的10分30秒触发任务
“30 10 1 ?” 每天1点10分30秒触发任务
“30 10 1 20 ?” 每月20号1点10分30秒触发任务
“30 10 1 20 10 ? “ 每年10月20号1点10分30秒触发任务
“30 10 1 20 10 ? 2011” 2011年10月20号1点10分30秒触发任务
“30 10 1 ? 10 2011” 2011年10月每天1点10分30秒触发任务
“30 10 1 ? 10 SUN 2011” 2011年10月每周日1点10分30秒触发任务
“15,30,45 ?” 每15秒,30秒,45秒时触发任务
“15-45 ?” 15到45秒内,每秒都触发任务
“15/5 ?” 每分钟的每15秒开始触发,每隔5秒触发一次
“15-30/5 ?” 每分钟的15秒到30秒之间开始触发,每隔5秒触发一次
“0 0/3 ?” 每小时的第0分0秒开始,每三分钟触发一次
“0 15 10 ? MON-FRI” 星期一到星期五的10点15分0秒触发任务
“0 15 10 L ?” 每个月最后一天的10点15分0秒触发任务
“0 15 10 LW ?” 每个月最后一个工作日的10点15分0秒触发任务
“0 15 10 ? 5L” 每个月最后一个星期四的10点15分0秒触发任务
“0 15 10 ? 5#3” 每个月第三周的星期四的10点15分0秒触发任务
在线cron表达式生成器
13. LocalDateTime和时间戳互转
Java8的时间转为时间戳的大概的思路就是LocalDateTime先转为Instant,设置时区,然后转timestamp。
Instant instant = Instant.ofEpochMilli(timestamp);LocalDateTime.ofInstant(instant, ZoneId.systemDefault());
long timestamp = ldt.toInstant(ZoneOffset.of("+8")).toEpochMilli();//或者ZoneId zone = ZoneId.systemDefault();long timestamp = ldt.atZone(zone).toInstant().toEpochMilli();
14. logback配置详情
15. 使用增强for进行迭代不允许修改的原理记录
以ArrayList为例,它的迭代使用的next方法会调用以下方法
final void checkForComodification() {if (modCount != expectedModCount)throw new ConcurrentModificationException();}
modCount是AbstractList(ArrayList的父类)中用来记录集合被修改次数的一个变量,ArrayList中的修改(特指增加和删除)集合元素的方法都会对这个变量进行修改。
expectedModCount是集合在迭代开始的时候自动生成的变量,它默认是等于modCount的值。当我们在迭代中增加或删除了集合的元素会modCount的值,而expectedModCount未修改,在for的下一次循环中就会抛出异常ConcurrentModificationException。
这里有一个特殊的地方是,如果你在倒数第二次迭代的时候删除集合的元素是不会抛出异常的。
测试代码如下
public class 迭代修改元素测试 {public static void main(String[] args) {List<Integer> list = IntStream.rangeClosed(0, 5).boxed().collect(Collectors.toList());int i = 0;for (Integer integer : list) {if (i == list.size() - 2) {list.remove(4);}i++;System.out.println(integer);}}}
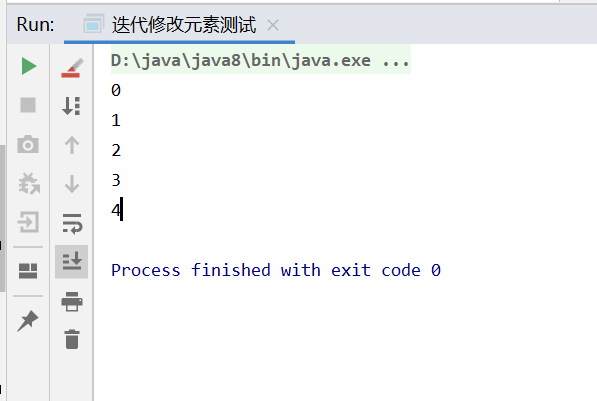
这是因为在倒数第二次遍历时候调用删除方法,增强for默认调用的hasNext()方法会去判断当前的遍历的指针是否等于现在集合中的元素,因为集合的元素被删除了,容量变小了,所以此时的判断是相等的,不会进行下一次遍历,故这样就避开了next方法里面可能会抛出异常的判断。
public boolean hasNext() {return cursor != size;}
集合遍历的时候想要删除集合元素可以使用Iterator提供的remove()接口进行删除,因为在remove方法中回去重新将modCount的值赋给expectedModCount,这样就不会发生异常。
或者使用集合提供的removeIf条件删除方法传入条件进行删除
public void remove() {if (lastRet < 0)throw new IllegalStateException();checkForComodification();try {ArrayList.this.remove(lastRet);cursor = lastRet;lastRet = -1;expectedModCount = modCount;} catch (IndexOutOfBoundsException ex) {throw new ConcurrentModificationException();}}
16. 位运算使用记录
![20190115164357116[1].png](/uploads/projects/yuweiqing-dcli4@kpq6k2/e1ea82bf0a433cbb1b1934627a23dc4e.png)
17. jconsole远程监控
-Dcom.sun.management.jmxremote=true#jconsole连接使用的端口-Dcom.sun.management.jmxremote.port=8888-Dcom.sun.management.jmxremote.authenticate=false-Dcom.sun.management.jmxremote.ssl=false#192.168.1.207为当前服务器的ip-Djava.rmi.server.hostname=192.168.1.207

若有收获,就点个赞吧
0 人点赞
