一、Ansible时代
在人工运维时代,需要在多台设备上部署相同的服务、执行相同的命令;人工运维效率很低。
在早期时代运维人员结合ssh免密登录以及shell脚本来完成自动化的部署操作,但是不是每个人写的代码都是代码;所以迎来了自动化运维时代。
在自动化运维时代,许多开源自动化运维软件诞生了。其中saltstack、ansible都是基于python编写的可以进行二次开发。
自动化运维好处:
1. 提供工作效率,减少重复性的劳动力操作1. 大大的减少人为出错的可能性1. 数据化管理、数据化汇报、问题可追溯
二、Ansible软件架构
Ansible是一个同时管理多个远程主机的软件(必须是任意可以ssh登录的机器),通过ssh协议实现,管理节点(安装了ansible服务的机器)、被管理节点间的通信。只要是能通过ssh协议登录的主机,就可以完成ansible自动化部署操作。比如:批量文件分发、数据复制、数据修改,删除、自动化安装软件服务、批量服务启停、脚本化,自动批量服务部署。
Ansible是基于python语言开发的,主要由python的两个ssh模块处理,paramiko以及PyYAML模块;并且ansible无需安装客户端软件,管理简洁,使用yaml配置文件语法,功能强大,易于维护。特点如下:
- 安装部署简单
- 管理主机便捷,支持多台主机并行管理
- 无需安装被管理节点的客户端,且无需占用其他端口,使用ssh默认端口即可。
- 支持二次开发,使用非root权限也可以执行,减低系统权限。
Ansible是基于模块工作的,本身没有批量部署的能力。真正执行具有批量部署的是Ansible运行的模块,Ansible只是提供一种框架。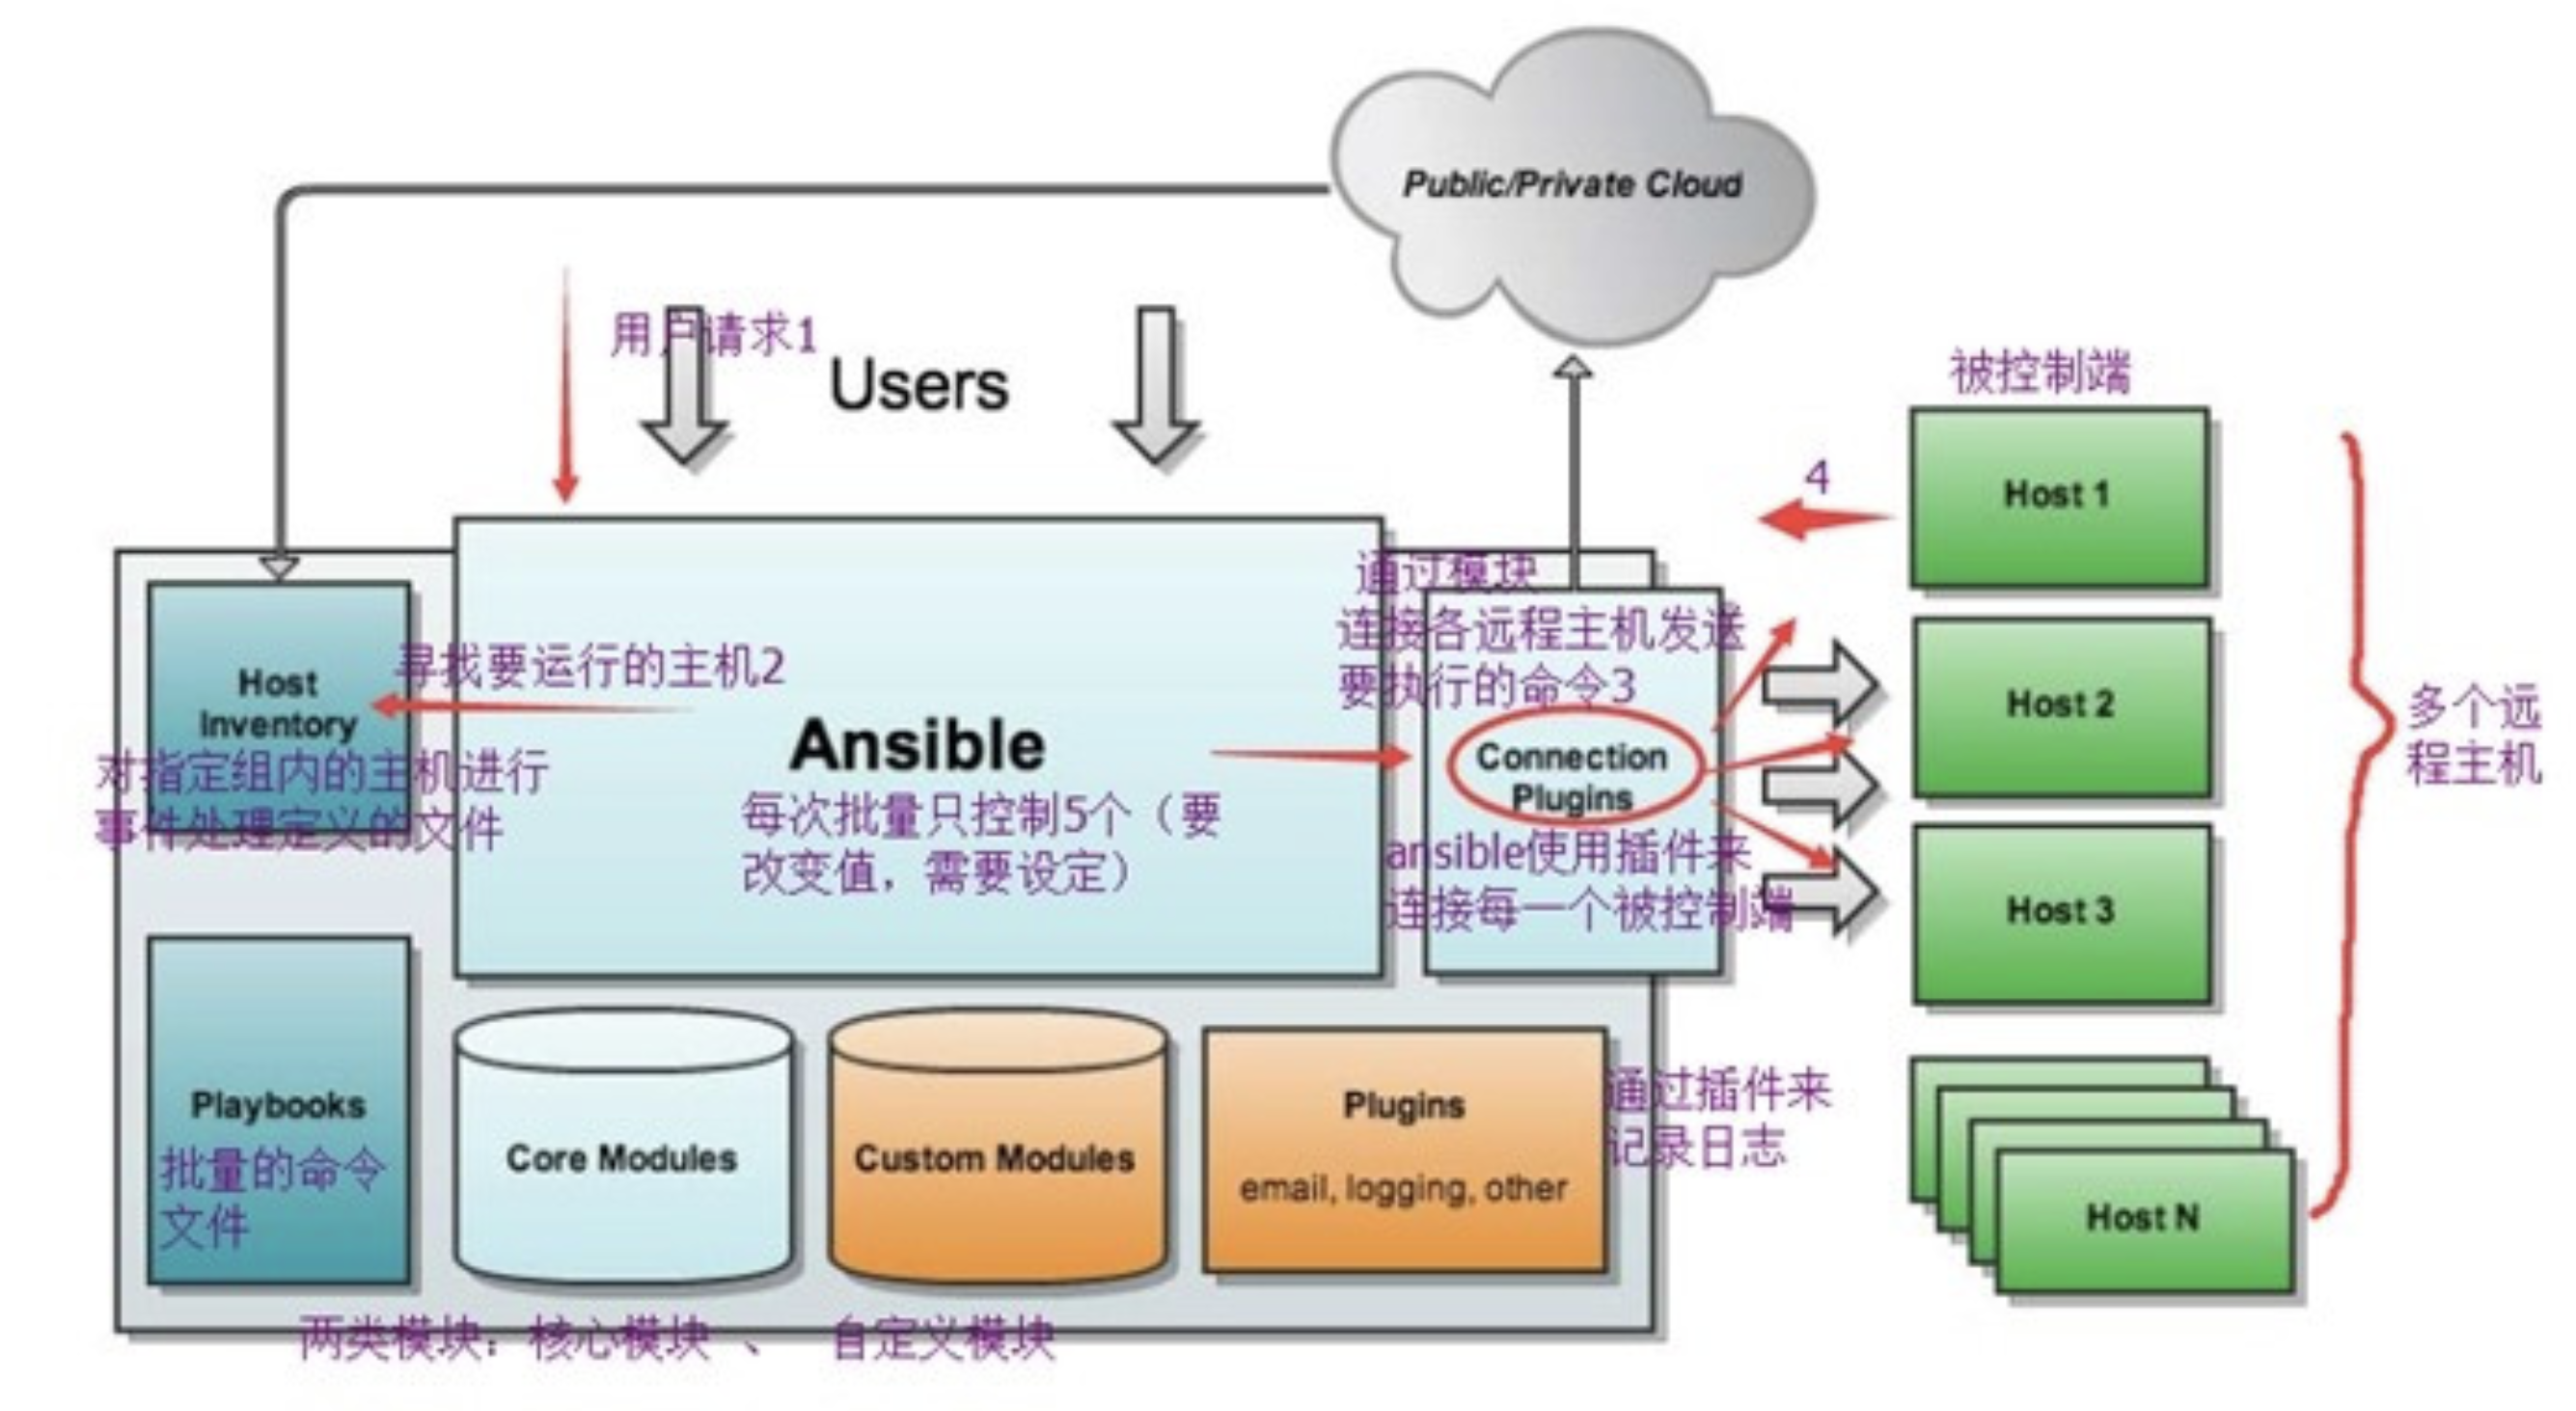
三、实践操作
1、安装
准备三台Linux机器;nginx(管理机器)、rsync和nfs(被管理机器)
1.配置管理机器,由于没有过多参数配置,所以采用yum安装[root@nginx ~]# yum install epel-release -y[root@nginx ~]# yum install ansible libselinux-python -y #安装2.检查ansible软件的安装情况,查询配置文件,可执行命令,版本等情况[root@nginx ~]# rpm -ql ansible |grep -E '^/etc|^/usr/bin' #通过yum安装的一般都安装在/etc目录中[root@nginx ~]# ansible --version #查看一下版本信息ansible 2.9.17config file = /etc/ansible/ansible.cfgconfigured module search path = [u'/root/.ansible/plugins/modules', u'/usr/share/ansible/plugins/modules']ansible python module location = /usr/lib/python2.7/site-packages/ansibleexecutable location = /usr/bin/ansiblepython version = 2.7.5 (default, Aug 4 2017, 00:39:18) [GCC 4.8.5 20150623 (Red Hat 4.8.5-16)]3.被管理机器安装ansible所需要的系统模块[root@rsync ~]# yum install epel-release libselinux-pyhthon -y
ansible是新出现的自动化运维工具,基于Python开发,集合了众多运维工具(puppet、cfengine、chef、func、fabric)的优点,实现了批量系统配置、批量程序部署、批量运行命令等功能。

Options:
  -a MODULE_ARGS, --args=MODULE_ARGS
             #module arguments
             #指定执行模块使用的参数
  --ask-vault-pass
             #ask for vault password
             #加密playbook文件时提示输入密码
  -B SECONDS, --background=SECONDS
             #run asynchronously, failing after X seconds(default=N/A)
             #后台运行超时时间,异步运行,X秒之后失败
  -C, --check
             #don't make any changes; instead, try to predict some of the changes that may occur
             #模拟执行,不会真正在机器上执行(查看执行会产生什么变化)
  -D, --diff
             #when changing (small) files and templates, show the differences in those files; works great with --check
             #当更新的文件数及内容较少时,该选项可显示这些文件不同的地方,该选项结合-C用会有较好的效果
  -e EXTRA_VARS, --extra-vars=EXTRA_VARS
             #set additional variables as key=value or YAML/JSON
             #执行命令时添加额外参数变量
  -f FORKS, --forks=FORKS
             #specify number of parallel processes to use(default=5)
             #并行任务数。FORKS被指定为一个整数,默认是5
  -h, --help
             #show this help message and exit
             #打开帮助文档API
  -i INVENTORY, --inventory-file=INVENTORY
             #specify inventory host path(default=/etc/ansible/hosts) or comma separated host list.
             #指定要读取的Inventory文件
  -l SUBSET, --limit=SUBSET
             #further limit selected hosts to an additional pattern
             #限定执行的主机范围
  --list-hosts
             #outputs a list of matching hosts; does not execute anything else
             #列出执行匹配到的主机,但并不会执行
  -m MODULE_NAME, --module-name=MODULE_NAME
             #module name to execute (default=command)
             #指定执行使用的模块,默认使用 command 模块
  -M MODULE_PATH, --module-path=MODULE_PATH
             #specify path(s) to module library (default=None)
             #要执行的模块的路径
  --new-vault-password-file=NEW_VAULT_PASSWORD_FILE
             #new vault password file for rekey
             #
  -o, --one-line
             #condense output
             #压缩输出,摘要输出.尝试一切都在一行上输出
  --output=OUTPUT_FILE
             #output file name for encrypt or decrypt; use - for stdout
             #
  -P POLL_INTERVAL, --poll=POLL_INTERVAL
             #set the poll interval if using -B (default=15)
             #设置轮询间隔,每隔数秒。需要- B
  --syntax-check
             #perform a syntax check on the playbook, but do not execute it
             #检查Playbook中的语法书写
  -t TREE, --tree=TREE
             #log output to this directory
             #将日志内容保存在该输出目录,结果保存在一个文件中在每台主机上
  --vault-password-file=VAULT_PASSWORD_FILE
             #vault password file
             #
  -v, --verbose
             #verbose mode (-vvv for more, -vvvv to enable connection debugging)
             #执行详细输出
  --version
             #show program's version number and exit
             #显示版本


  Connection Options:
    control as whom and how to connect to hosts


    -k, --ask-pass
             #ask for connection password
             #
    --private-key=PRIVATE_KEY_FILE, --key-file=PRIVATE_KEY_FILE
             #use this file to authenticate the connection
             #
    -u REMOTE_USER, --user=REMOTE_USER
             #connect as this user (default=None)
             #指定远程主机以USERNAME运行命令
    -c CONNECTION, --connection=CONNECTION
             #connection type to use (default=smart)
             #指定连接方式,可用选项paramiko (SSH)、ssh、local,local方式常用于crontab和kickstarts
    -T TIMEOUT, --timeout=TIMEOUT
             #override the connection timeout in seconds(default=10)
             #SSH连接超时时间设定,默认10s
    --ssh-common-args=SSH_COMMON_ARGS
             #specify common arguments to pass to sftp/scp/ssh (e.g.ProxyCommand)
             #
    --sftp-extra-args=SFTP_EXTRA_ARGS
             #specify extra arguments to pass to sftp only (e.g. -f, -l)
             #
    --scp-extra-args=SCP_EXTRA_ARGS
             #specify extra arguments to pass to scp only (e.g. -l)
             #
    --ssh-extra-args=SSH_EXTRA_ARGS
             #specify extra arguments to pass to ssh only (e.g. -R)
             #


  Privilege Escalation Options:
    control how and which user you become as on target hosts


    -s, --sudo
             #run operations with sudo (nopasswd) (deprecated, use become)
             #相当于Linux系统下的sudo命令
    -U SUDO_USER, --sudo-user=SUDO_USER
             #desired sudo user (default=root) (deprecated, use become)
             #使用sudo,相当于Linux下的sudo命令
    -S, --su
             #run operations with su (deprecated, use become)
             #
    -R SU_USER, --su-user=SU_USER
             #run operations with su as this user (default=root) (deprecated, use become)
             #
   -b, --become
             #run operations with become (does not imply password prompting)
             #
    --become-method=BECOME_METHOD
             #privilege escalation method to use (default=sudo),valid choices: [ sudo | su | pbrun | pfexec | doas |dzdo | ksu | runas ]
             #
    --become-user=BECOME_USER
             #run operations as this user (default=root)
             #
    --ask-sudo-pass
             #ask for sudo password (deprecated, use become)
             #
    --ask-su-pass
             #ask for su password (deprecated, use become)
             #
    -K, --ask-become-pass
             #ask for privilege escalation password
             #
2、管理方式
ansible批量管理主机的方式主要有两种:传统的输入ssh密码验证、密钥管理
配置ansible的配置文件,添加被管理的主机的IP地址或者主界面
1.备份现有的配置文件
[root@nginx ~]# cp /etc/ansible/hosts{,.ori}            #快捷备份

2.在hosts文件中添加被管理机器的IP地址信息
[root@nginx ~]# tail -3 /etc/ansible/hosts
[test-ansible]
192.168.0.175
192.168.0.174

3.ssh密码认证批量管理主机
ansible是直接利用Linux本地的ssh服务,来进行远程管理操作,一般情况下ssh都是默认开启的无需配置
//-m    指定功能模块,默认就是command模块    //-a    告诉模块需要执行的参数        //-k    询问密码验证    //-u    指定运行的用户
[root@nginx ~]# ansible test-ansible -m command -a 'hostname' -k -u root    #向被管理主机发送执行命令并返回给服务器
SSH password:
[WARNING]: Invalid characters were found in group names but not replaced, use -vvvv to
see details
192.168.0.175 | CHANGED | rc=0 >>
rsync
192.168.0.174 | CHANGED | rc=0 >>
nfs

报错如下,需要手动先ssh链接一次被管理机器让该 ~/.ssh/known_hosts下存在被管理机器的密钥信息
Using a SSH password instead of a key is not possible because Host Key checking is enabled and sshpass does not support this.  Please add this host's fingerprint to your known_hosts file to manage this host.

4.免密操作,在执行ansible操作时无需输入密码(配置ssh免密登录或者修改/etc/ansible/hosts文件)
#可以在/etc/ansible/hosts中,定义好密码即可,实现快速认证,远程管理主机,配置如下:
[root@nginx ~]# !tail
tail -3 /etc/ansible/hosts
[test-ansible]
192.168.0.175 ansible_user=root ansible_ssh_pass=123456            #ip地址、端口默认是22(ansible_port=22)、用户、密码
192.168.0.174 ansible_user=root ansible_ssh_pass=123456
#测试运行
[root@nginx ~]# ansible test-ansible -m command -a 'hostname'        #无需添加后面部分参数
[WARNING]: Invalid characters were found in group names but not replaced, use -vvvv to
see details
192.168.0.174 | CHANGED | rc=0 >>
nfs
192.168.0.175 | CHANGED | rc=0 >>
rsync
针对ssh免密登录,机器少可以通过ssh-copy-id上传,机器多就走脚本如下:
1.脚本配置
[root@nginx myscripts]# cat ssh_key_send.sh
#!/bin/bash
rm -rf ~/.ssh/id_rsa*
ssh-keygen -f ~/.ssh/id_rsa -P "" > /dev/null 2>&1
SSH_Pass=123456
Key_Path=~/.ssh/id_rsa.pub
for ip in 174 175
do
    sshpass -p$SSH_Pass ssh-copy-id -i $Key_Path "-o StrictHostKeyChecking=no" 192.168.0.$ip
done
# 非交互式分发公钥命令需要用sshpass指定SSH密码,通过-o StrictHostKeyChecking=no 跳过SSH连接确认信息
# 需要注意密码和循环条件

[root@nginx myscripts]# sh ssh_key_send.sh        #运行脚本批量免密
[root@nginx myscripts]# ssh -o ' StrictHostKeyChecking=no' '192.168.0.175'        #测试免密登录
[root@nginx myscripts]# ansible test-ansible -a 'ifconfig'            #测试ansible执行命令
四、ansible模式与命令
ansible实现批量化主机管理的模式,主要有两种:
- 利用ansible的纯命令实现的批量管理,ad-doc模式
- 利用ansible的playbook剧本来实现批量管理,playbook剧本模式
ansible的ad-doc模式是ansible的命令行模式,也就是处理一些临时的简单的任务;如临时查看被管理机器的内存、CPU等
ansible的playbook模式是针对比较具体的,且比较大的任务,需要提前写好剧本。
ad-hoc命令行解析:
[root@nginx ~]# ansible-doc -l         #查看你ansible的所有的模块信息
[root@nginx ~]# ansible-doc -s command            #查看某个模块的用法
五、ansible模块
命令操作的模块:command模块、shell模块、script模块
1、command模块
在远处的主机上执行一个命令,通过ansible-doc -s command 查看改模块支持的参数
- chdir 在执行命令之前,先通过cd进入该参数指定的目录
- creates 在创建一个文件之前,判断该文件是否存在;存在则跳过前面的动作,不存在在执行前面的动作
- free-form 该参数可以输入任何的系统命令,实现远程执行和管理
- removes 定义一个文件是否存在,如果存在了则执行前面的动作,如果不存在则跳过动作
command模块是ansible的默认基本模块,也可以省略不写;但是要注意是该模块时不能出现变量$name,或者特殊符号(<>|;)如果需要用到变量请使用shell模块
[root@nginx ~]# ansible test-ansible -a 'uptime'        #获取机器的负载情况
[root@nginx ~]# ansible test-ansible -a 'pwd chdir=/tmp'        #进入/tmp目录,打印路径,利用chdir在进入/tmp目录

[root@nginx ~]# ansible 192.168.0.174 -m command -a 'pwd creates=/xxx'        #在执行命令之前判断xxx文件是否存在,存在则不执行,不存在则执行
192.168.0.174 | CHANGED | rc=0 >>
/root
[root@nginx ~]# ansible 192.168.0.174 -m command -a 'pwd creates=/opt'        #存在不执行,removes与之相反
192.168.0.174 | SUCCESS | rc=0 >>
skipped, since /opt exists
2、shell模块
一般在远程的机器上执行复杂的命令,支持变量和特殊符号;参数和command的参数解释一致。
[root@nginx ~]# ansible ylin -m shell -a 'ps -ef|grep 'vim''    #通过shell命令查询vim进程信息
[root@nginx ~]# ansible ylin -m shell -a 'echo 'love' >> /opt/love.txt'        #ehco也好使
3、script模块
把管理节点机器上的脚本远程的传输到被管理节点上去执行;参数和解释与上面类似。
[root@nginx ~]# ansible ylin -m script -a '/myscripts/host.sh' #需要在管理机器上有该脚本,有执行权限才行
4、copy模块
复制文件到远程的主机,只能推送不能拉去数据。
1.创建拷贝之后文件的属主、属组
[root@nginx ~]# ansible ylin  -m shell -a "useradd ylin && id ylin"

2、拷贝文件
[root@nginx ~]# ansible ylin -m copy -a "src=/root/ylin.txt dest=/root/ owner=ylin group=ylin mode=0666 backup=yes"
//owner    拷贝之后文件的属主    //group    拷贝之后文件的属组    //mode 拷贝之后文件的权限信息    //backup    拷贝中如果存在目标文件,先备份在拷贝

3.修改被管理主机上文件的内容,覆盖修改
[root@nginx ~]# ansible ylin -m copy -a 'content='evol' dest=/root/ylin.txt backup=yes'
5、file模块
创建、修改文件,修改目录、文件的属性,参数如下:group、owner、mode、path、src、dest
state参数:
- file 如果目标文件不存在,那么不会创建该文件
- touch 如果文件不存在,则创建一个新的文件;如果文件存在,修改文件最后的修改时间
- directory 如果目录不存在,则创建目录
- link 用于创建软连接
- absent 删除目录,文件或者取消连接
``` 1.远程批量创建文件夹 [root@nginx ~]# ansible ylin -m file -a “dest=/root/dir/ state=directory” #在创建的时候如果没有指定参数,默认采取如下 192.168.43.177 | CHANGED => { “ansible_facts”: { “discovered_interpreter_python”: “/usr/bin/python” }, “changed”: true, “gid”: 0, “group”: “root”, “mode”: “0755”, “owner”: “root”, “path”: “/root/dir/“, “secontext”: “unconfined_u:object_r:admin_home_t:s0”, “size”: 6, “state”: “directory”, “uid”: 0 }
2.远程创建文件的操作,修改属组信息 [root@nginx ~]# ansible ylin -m file -a “dest=/root/ylin.txt group=root state=touch”
3.远程创建软连接 [root@nginx ~]# ansible ylin -m file -a “src=/etc/passwd dest=/root/psd state=link” #创建软连接时,必须要指定src目录和dest目录
<a name="EmN65"></a>
#### 6、yum模块
state参数:installed、remove、absent(卸载)、latest(升级、下载更新    )
1.批量通过yum安装wget [root@nginx ~]# ansible ylin -m yum -a “name=wget state=installed” #name=软件的名字 state=安装(installed)还是卸载(remove|absent)
<a name="fAoHk"></a>
#### 7、服务管理模块
通过ansible yum模块安装的软件,可以通过ansible远程批量化服务管理的模块,进行批量的启停操作。
1.远程查看crond服务是否正常 [root@nginx ~]# ansible ylin -m shell -a “systemctl status crond” |grep Active Active: active (running) since 六 2021-02-27 06:26:13 CST; 8min ago Active: active (running) since 六 2021-02-27 06:26:10 CST; 8min ago
2.检查crond服务是否配置了开启自启 [root@nginx ~]# ansible ylin -m shell -a “systemctl list-unit-files” |grep crond crond.service enabled crond.service enabled
3.通过系统模块重启crond服务 [root@nginx ~]# ansible ylin -m systemd -a “name=crond state=restarted” #restarted、start、stopped 、reloaded,enabled=yes开机自启
<a name="hGdQE"></a>
#### 8、cron模块
cron模块主要是管理Linux的定时任务模块,分 时 日 月 周
1.添加定时任务,没五分钟进行时间同步 [root@nginx ~]# ansible ylin -m cron -a “name=update_cron job=’/usr/bin/ntpdate ntp.aliyun.com > /dev/null 2>&1’ minute=*/5”
将正确和错误的信息都输入到/dev/null中,时间配置minute,hour,day,mouth,weekday
2.查看定时任务是否配置成功 [root@nginx ~]# ansible ylin -m shell -a “crontab -l” 192.168.43.8 | CHANGED | rc=0 >>
Ansible: update_cron
/5 * /usr/bin/ntpdate ntp.aliyun.com > /dev/null 2>&1 192.168.43.177 | CHANGED | rc=0 >>
Ansible: update_cron
/5 * /usr/bin/ntpdate ntp.aliyun.com > /dev/null 2>&1
3.删除定时任务 [root@nginx ~]# ansible ylin -m cron -a “name=update_cron state=absent” #删除时只能删除ansible创建的定时任务
<a name="f67G4"></a>
### 六、playbook剧本
剧本编写复杂的运行环境,ansible需要编写playbook剧本需要遵循yaml语法。<br />ansible的剧本由两个最基本的部分组成:

   - hosts定义被管理的主机列表信息
   - tasks关键词定义的被管理主机需要执行的动作

yaml基本语法:大小写敏感、使用缩进表示层级关系、禁止使用tab键、相同元素只需要对齐即可。<br />yaml语法支持的数据结构:对象(key: value)、数组、
使用剧本批量安装nginx服务 [root@nginx ansible]# cat my_first.yaml
install nginx yaml and copy
- hosts: all #定义操作的范围可以是all、某个模块的主机、IP地址、主机名(需要能DNS解析)
tasks: #定义任务的集合
- name: install nginx service                    #第一个任务的名字
  yum: name=nginx state=installed            #第一个任务的模块:语法
- name: copy /root/yy.txt to all            #这种方式也可以
  copy:
      src:/root/yy.txt
    dest:/root/
在ansible程序中,加载模块的功能可以直接使用ansible adhoc命令去执行;加载剧本的功能,可以使用ansible-playbook命令去执行。
[root@nginx ~]# ansible-playbook /etc/ansible/my_first.yaml -C #模拟执行剧本 [root@nginx ~]# ansible-playbook /etc/ansible/my_first.yaml —syntax-check #语法检测 [root@nginx ~]# ansible-playbook /etc/ansible/my_first.yaml —list-hosts #查看影响的机器 [root@nginx ~]# ansible-playbook /etc/ansible/my_first.yaml —verbose #安装查看进度 ```

若有收获,就点个赞吧
0 人点赞
