十一,IO流
1.File类
java.io.File
1)File类的使用
1.file类的一个对象,代表一个文件或一个文件目录(俗称:文件夹)2.File类声明在java.io包下*相对路径:hello.txt 相较于某个路径下,指明的路径。绝对路径:D://temp.txt 包含盘符在内的文件或文件目录的路径。*路径分隔符:window用\,url用/。
2)如何创建File类的实例:
public static void main(String[] args) {File file=new File("D:\\input\\input.txt.txt");System.out.println(file);//输出文件路径 D:\input\input.txt.txtFile file1 = new File("jdbc.properties");System.out.println(file1);jdbc.properties}
3)常用方法:
public static void main(String[] args) {File file=new File("D:\\input\\input.txt.txt");File file1 = new File("jdbc.properties");String path = file.getAbsolutePath();//获取绝对路径System.out.println(path);//D:\input\input.txt.txtSystem.out.println(file1.getAbsolutePath());//E:\IEDADEMO\jdbc.propertiesString filePath = file.getPath();//获取路径System.out.println(filePath);//D:\input\input.txt.txtSystem.out.println(file1.getPath());//jdbc.propertiesString name = file.getName();//获取名字System.out.println(name);//input.txt.txtString parent = file.getParent();//获取上一层目录System.out.println(parent);//D:\inputlong length = file.length();//长度,字节System.out.println(length);//292long modified = file.lastModified();//最近修改时间System.out.println(modified);//1572326293899/*** 仅适用于目录*/File file2 = new File("D:\\wokespace");String[] list = file2.list();//列出其下一级文件目录for (String s:list){System.out.println(s);}System.out.println("***********************************************");File[] files = file2.listFiles();//列出其下一级文件目录的绝对路径for (File f: files){System.out.println(f);}System.out.println("**************************");boolean b = file1.renameTo(file);//把file1重命名为file的名字//要想保证成功,file1在硬盘中是真实存在的,file在硬盘中是不存在的System.out.println(b);}
public static void main(String[] args) {File file = new File("jdbc.properties");//判断功能System.out.println(file.isDirectory());//判断是不是一个目录 falseSystem.out.println(file.isFile());//判断是不是一个文件trueSystem.out.println(file.exists());//判断是否真实存在trueSystem.out.println(file.canRead());//判断是否可读trueSystem.out.println(file.canWrite());//判断是否可写trueSystem.out.println(file.isHidden());//判读是否隐藏 false}
public static void main(String[] args) {//File的创建功能和删除功能File file = new File("jdbc1.properties");if (!file.exists()){try {file.createNewFile();//创建文件System.out.println("文件创建成功!");} catch (IOException e) {e.printStackTrace();}}else{file.delete();//删除文件,不走回收站,直接删除System.out.println("文件删除成功!");}file.mkdir();//创建单层目录file.mkdirs();//创建多层目录}
file.delete()删除目录时,要想删除成功,该目录下不能有文件或目录。
4)面试题:
/*** 创建一个与File同目录下的另外一个文件,文件名为:haha.txt* @param args*/public static void main(String[] args) {File file = new File("D:\\temp\\temp1.txt");File file1 = new File(file.getParent() , "haha.txt");System.out.println(file.getParent());try {boolean newFile = file1.createNewFile();if (newFile){System.out.println("创建成功!");}} catch (IOException e) {e.printStackTrace();}}
/*** 遍历指定目录下所文件名称,包括子文件目录中的文件* 1.并计算指定目录占用空间的大小* 2.删除指定文件下的目录及其下的文件夹*/public static void main(String[] args) {File file = new File("D:\\temp");int sum=print(file);System.out.println(sum);}//遍历指定目录下所文件名称,包括子文件目录中的文件,并计算指定目录占用空间的大小public static int print(File file){File []files=file.listFiles();int sum=0;for (File f:files){if (f.isDirectory()){print(f);f.delete();}else{System.out.println(f.getAbsolutePath());sum+=f.length();f.delete();}}return sum;}
public static void main(String[] args) {/*** 判断指定目录下是否存在后缀名为.jpg的文件,如果就输出该文件名;*/File file = new File("D:\\QQ");Find(file);}public static void Find(File file){File []files=file.listFiles();for (File f: files){if (f.isDirectory()){Find(f);}else{if (f.getName().endsWith(".jpg")){System.out.println(f.getAbsolutePath());}}}
2.IO流
1)概述
IO流原理及流的分类input/output的缩写,处理设备之间的数据传输。input:读取外部数据output:将程序中的数据输出按照操作数据单位的不同,分为字节流(8bit)和字符流(6bit)适合于文本。输入流:inputStream,reader输出流:outputStream,Writer按照流的角色不同:作用在文件上的:节点流,作用在已经有的流上的:处理流。按照数据流向:输入流,输出流。IO流的体系结构抽象基类 节点流 缓冲流InputStream FileInputStream BufferedInputStreamOutputStream FileOutputStream BufferedOutputStreamReader FileReader BufferedReaderWriter FileWriter BufferedWriter
2)节点流-FileReader和FileWriter
FileReader读入数据的基本操作
说明点:
①read()地理解:返回读入的一个字符,如果达到文件末尾,返回-1
②异常的处理:为了保证流资源一定可以执行关闭操作,需要使用try-catch-finally处理。
③读入的文件一定要存在,否则就会报FileNotFoundException
/*** FileReader读取硬盘文件* @param args*/public static void main(String[] args){FileReader reader=null;BufferedReader reader1=null;try {reader = new FileReader(new File("jdbc.properties"));//相较于当前工程reader1 = new BufferedReader(reader);int data ;//返回读入的一个字符,如果达到文件末尾,返回-1.while ((data=reader1.read())!=-1){//循环读取数据System.out.print((char)data);}} catch (FileNotFoundException e) {e.printStackTrace();} catch (IOException e) {e.printStackTrace();} finally {//关闭流if (reader!=null){try {reader.close();} catch (IOException e) {e.printStackTrace();}}if(reader1!=null){try {reader1.close();} catch (IOException e) {e.printStackTrace();}}}}
public static void main(String[] args) {//对read(的升级,使用read的重载方法FileReader reader=null;BufferedReader br=null;try {reader = new FileReader(new File("jdbc.properties"));br=new BufferedReader(reader);char []buf=new char[1024];int len=0;while ((len=br.read(buf))!=-1){//返回每次读入buf[]数组中的字符个数,如果达到文件末尾,返回-1// for(int i=0;i<len;i++){// System.out.print(buf[i]);// }String str=new String(buf,0,len);System.out.print(str);}} catch (FileNotFoundException e) {e.printStackTrace();} catch (IOException e) {e.printStackTrace();} finally{if (reader!=null){try {reader.close();} catch (IOException e) {e.printStackTrace();}}if (br!=null){try {br.close();} catch (IOException e) {e.printStackTrace();}}}}
FileWriter写出数据的操作
说明:
①输出操作:对应的File可以不存在,如果不存在,在输出过程中,会自动创建此文件。
②如果存在:如果流使用的构造器是FileWriter(file,false)/FileWriter(file):对原有文件覆盖。
如果流使用FileWriter(file,true):不会对原有文件覆盖。
/*** 从内存写出数据到硬盘文件* @param args*/public static void main(String[] args) {FileWriter writer = null;try {writer= new FileWriter(new File("hello.txt"),true);//true时表示对原文件的追加,false或不写表示对原文件的覆盖writer.write("I have a dream !");//写入文件} catch (IOException e) {e.printStackTrace();}finally{if (writer!=null){try {writer.close();} catch (IOException e) {e.printStackTrace();}}}}
使用FileReader和FileWriter实现文本文件的复制
字符流不能处理图片文件
/*** 将一个文件写入另一个文件* @param args*/public static void main(String[] args) {FileReader fr=null;FileWriter fw=null;try {fr=new FileReader(new File("E:\\IEDADEMO\\day07\\src\\com\\atguigu\\IO\\IO.txt"));fw=new FileWriter(new File("hello.txt"));//数据的读入和写出操作char []buf=new char[1024];int len=0;//记录每次读入到数组的数据多少个while ((len=fr.read(buf))!=-1){fw.write(buf,0,len);}} catch (FileNotFoundException e) {e.printStackTrace();} catch (IOException e) {e.printStackTrace();}finally{if (fw!=null){try {fw.close();} catch (IOException e) {e.printStackTrace();}}if (fr!=null){try {fr.close();} catch (IOException e) {e.printStackTrace();}}}}
3)节点流-FileInputStream和FileOutputStream
使用FileInputStream不能读取文本文件的测试:
结论:对于文本文件,使用字符流处理
对于非文本文件,使用字节流处理
/*** 使用FileInputStream不能读取文本文件的测试*/public static void main(String[] args) {FileInputStream fis=null;FileOutputStream fos=null;try {fis=new FileInputStream(new File("E:\\IEDADEMO\\day07\\src\\com\\atguigu\\IO\\IO.txt"));fos=new FileOutputStream(new File("hello.txt"));byte [] bytes=new byte[1024];int len=0;while ((len=fis.read(bytes))!=-1){fos.write(bytes,0,len);}} catch (FileNotFoundException e) {e.printStackTrace();} catch (IOException e) {e.printStackTrace();}finally{try {if (fos!=null){fos.close();}if (fis!=null){fis.close();}}catch (IOException e) {e.printStackTrace();}}}
FileInputStream和FileOutputStream读写非文本文件
/*** FileInputStream和FileOutputStream读写非文本文件* @param args*/public static void main(String[] args) {FileInputStream fis=null;FileOutputStream fos=null;try {fis=new FileInputStream(new File("E:\\IEDADEMO\\day07\\src\\下载.png"));fos=new FileOutputStream(new File("D:\\test.png"));byte[] bytes=new byte[1024*1024];int len=0;while ((len=fis.read(bytes))!=-1) {fos.write(bytes,0,len);}} catch (IOException e) {e.printStackTrace();} finally {try {if (fos!=null){fos.close();}if (fis!=null){fis.close();}} catch (IOException e) {e.printStackTrace();}}}
写一个复制文件的方法,可以用来直接调用,
public static void main(String[] args) {File file = new File("hello.txt");File file1 = new File("D://hello.txt");Copy(file,file1);}public static void Copy(File file,File file1){FileInputStream fis=null;FileOutputStream fos=null;try {fis=new FileInputStream(file);fos=new FileOutputStream(file1);byte [] bytes=new byte [1024];int len;while((len=fis.read(bytes))!=-1){fos.write(bytes,0,len);}System.out.println("复制完成!");} catch (IOException e) {e.printStackTrace();} finally {try {if (fos!=null){fos.close();}if (fis!=null){fis.close();}} catch (IOException e) {e.printStackTrace();}}}
4)处理流之一:缓冲流
缓冲流作用:提高流的读取写入速度
提高读写速度的原因:内部提供了一个缓冲区:1024*8=8192
缓冲流(字节型)实现非文本文件的复制
public static void main(String[] args) {FileInputStream fis=null;FileOutputStream fos=null;BufferedInputStream bis=null;BufferedOutputStream bos=null;try {fis=new FileInputStream(new File("hello.txt"));fos=new FileOutputStream(new File("D://hello.txt"));bis=new BufferedInputStream(fis);bos=new BufferedOutputStream(fos);byte [] bytes=new byte[1024];int len;while ((len=bis.read(bytes))!=-1){bos.write(bytes,0,len);}System.out.println("复制完成!");} catch (IOException e) {e.printStackTrace();} finally {try {if (bos!=null){bos.close();}if (bis!=null){bis.close();}if (fos!=null){fos.close();}if (fis!=null){fis.close();}} catch (IOException e) {e.printStackTrace();}}}
缓冲流(字符型)实现文本文件的复制
处理流:就是套接在已有流的基础上
public static void main(String[] args) {FileReader fr=null;FileWriter fw=null;BufferedReader br=null;BufferedWriter bw=null;try {fr=new FileReader(new File("hello.txt"));fw=new FileWriter(new File("D://hello.txt"));br=new BufferedReader(fr);bw=new BufferedWriter(fw);//方式一:// char [] chars=new char[1024];// int len=0;// while ((len=br.read(chars))!=-1){// bw.write(chars,0,len);// }//方式二:String data;while ((data=br.readLine())!=null){bw.write(data);//一次读取一行bw.newLine();//换行}System.out.println("文本复制完成!");} catch (IOException e) {e.printStackTrace();} finally {try {if (bw!=null){bw.close();}if (br!=null){br.close();}if (fw!=null){fw.close();}if (fr!=null){fr.close();}} catch (IOException e) {e.printStackTrace();}}}
5)面试题
1.图片加密和图片解密
/**** 图片加密* @param args*/public static void main(String[] args) {BufferedInputStream bis=null;BufferedOutputStream bos=null;try {bis=new BufferedInputStream(new FileInputStream(new File("D:\\尹会东.jpg")));bos=new BufferedOutputStream(new FileOutputStream(new File("D:\\copy.jpg")));int len=0;byte [] bytes=new byte[1024];while ((len=bis.read(bytes))!=-1){for (int i = 0; i <len ; i++) {bytes[i]= (byte) (bytes[i]^5);//加密操作}bos.write(bytes,0,len);}System.out.println("加密完成!");} catch (IOException e) {e.printStackTrace();} finally {try {if (bis!=null){bis.close();}if (bos!=null){bos.close();}} catch (IOException e) {e.printStackTrace();}}}
/*** 图片解密*/public static void main(String[] args) {BufferedInputStream bis=null;BufferedOutputStream bos=null;try {bis=new BufferedInputStream(new FileInputStream(new File("D:\\copy.jpg")));bos=new BufferedOutputStream(new FileOutputStream(new File("D:\\copy1.jpg")));int len=0;byte [] bytes=new byte[1024];while ((len=bis.read(bytes))!=-1){for (int i = 0; i <len ; i++) {bytes[i]= (byte) (bytes[i]^5);//解密操作}bos.write(bytes,0,len);}System.out.println("解密完成!");} catch (IOException e) {e.printStackTrace();} finally {try {if (bis!=null){bis.close();}if (bos!=null){bos.close();}} catch (IOException e) {e.printStackTrace();}}}
2.获取文本上每个字符出现的次数
/*** 获取文本上每个字符出现的次数*/public static void main(String[] args) {HashMap<Character, Integer> map = new HashMap<>();BufferedReader br=null;BufferedWriter bw=null;try {br=new BufferedReader(new FileReader(new File("hello.txt")));bw=new BufferedWriter(new FileWriter(new File("D:\\WorldCount.txt")));int c=0;while ((c=br.read())!=-1){char ch= (char) c;if (map.get(ch)==null){map.put(ch,1);}else{map.put(ch,map.get(ch)+1);}}Set<Map.Entry<Character, Integer>> set = map.entrySet();Iterator<Map.Entry<Character, Integer>> iterator = set.iterator();while (iterator.hasNext()){bw.write(iterator.next().getKey()+"--------------"+iterator.next().getValue());bw.newLine();}} catch (IOException e) {e.printStackTrace();} finally {try {if (bw!=null){bw.close();}if (br!=null){br.close();}} catch (IOException e) {e.printStackTrace();}}}
3.将一个文件写入另一个文件
/*** 将一个文件写入另一个文件* @param args*/public static void main(String[] args) {FileReader fr=null;FileWriter fw=null;try {fr=new FileReader(new File("E:\\IEDADEMO\\day07\\src\\com\\atguigu\\IO\\IO.txt"));fw=new FileWriter(new File("hello.txt"));//数据的读入和写出操作char []buf=new char[1024];int len=0;//记录每次读入到数组的数据多少个while ((len=fr.read(buf))!=-1){fw.write(buf,0,len);}} catch (FileNotFoundException e) {e.printStackTrace();} catch (IOException e) {e.printStackTrace();}finally{if (fw!=null){try {fw.close();} catch (IOException e) {e.printStackTrace();}}if (fr!=null){try {fr.close();} catch (IOException e) {e.printStackTrace();}}}}
6)处理流之二:转换流
1.作用:提供了字节流和字符流的转换
2.转换流属于字符流
InputStreamReader:将一个字节的输入流转换为字符的输入流
OutputStreamWriter:将一个字符的输出流转换为字节的输出流
3.解码:字节,字节数组——->字符数组,字符串
编码:字符数组,字符串——->字节,字节数组
4.字符集
public static void main(String[] args) {FileInputStream fis=null;InputStreamReader isr=null;FileOutputStream fos=null;OutputStreamWriter osw=null;try {fis = new FileInputStream(new File("hello.txt"));// InputStreamReader isr = new InputStreamReader(fis);//使用系统默认字符集isr = new InputStreamReader(fis, StandardCharsets.UTF_8);//指定字符集fos=new FileOutputStream(new File("D:\\Temps.txt"));osw=new OutputStreamWriter(fos,"utf-8");char [] chars=new char[1024];int len;while ((len=isr.read(chars))!=-1){osw.write(chars,0,len);}// while ((len=isr.read(chars))!=-1){// String str=new String(chars,0,len);// System.out.println(str);// }} catch (FileNotFoundException e) {e.printStackTrace();} catch (IOException e) {e.printStackTrace();} finally {try {if (isr!=null){isr.close();}if (fis!=null){fis.close();}if (osw!=null){osw.close();}if (fos!=null){fos.close();}} catch (IOException e) {e.printStackTrace();}}}
7)其他流(了解)
其他流(了解)
1.标准的输入输出流
1.1
System.in标准的输入流
System.out标准的输出流
1.2我们可以通过System类的setIn(InputStream)/setOut(OutputStream)方式重新指定输入和输出的流。
1.3练习:IO5
public static void main(String[] args) {/*** 键盘输入字符,如果是e或exit程序结束,否则转化为大写输出*/InputStreamReader isr=new InputStreamReader(System.in);BufferedReader br=new BufferedReader(isr);while (true){String data= null;try {data = br.readLine();if (data.equalsIgnoreCase("e")||data.equalsIgnoreCase("exit")){System.out.println("程序结束!");break;}else{System.out.println(data.toUpperCase());}} catch (IOException e) {e.printStackTrace();}finally {try {if (isr!=null){isr.close();}if (br!=null){br.close();}} catch (IOException e) {e.printStackTrace();}}}}
2.打印流
PrintStream
PrintWriter
3.数据流
DataInputStream
DataOutputStream
4.随机存取文件流
RandomAccessFile
既可以读,也可以写。
实现了DataInput和DataOutput接口
java.io下,但是直接继承Object类
如果RandomAccessFile作为输出流时,写出到的文件不存在,会自动创建,
如果写出到的文件存在,会对原有文件进行覆盖,(默认情况下,从头覆盖)
public static void main(String[] args) {RandomAccessFile file = null;RandomAccessFile file1 = null;try {file=new RandomAccessFile(new File("hello.txt"),"r");file1=new RandomAccessFile(new File("D:\\object.txt"),"rw");byte []bytes=new byte[1024];int len=0;while ((len=file.read(bytes))!=-1){file1.write(bytes,0,len);}} catch (IOException e) {e.printStackTrace();} finally {try {if (file!=null){file.close();}if (file1!=null){file1.close();}} catch (IOException e) {e.printStackTrace();}}}
RandomAccessFile类实现数据插入
public static void main(String[] args) {RandomAccessFile raf=null;try {raf=new RandomAccessFile("hello.txt","rw");//raf.seek(3);//指定开始覆盖的位置raf.seek(new File("hello.txt").length());//最后面插入/*** 如果想要在中间插入,可以先将后面的内容读取到内存的某个变量,* 然后写入要插入的数据,再将变量中的内容插入末尾。*/raf.write("xyz".getBytes());} catch (IOException e) {e.printStackTrace();} finally {try {if (raf!=null){raf.close();}} catch (IOException e) {e.printStackTrace();}}}
8)对象流
ObjectInputStream用于存储和读取基本数据类型或对象的流处理。序列化:用ObjectOutputStream将数据从内存写入硬盘反序列化:ObjectInputStream将数据从硬盘读入内存。
要求对象所属的类是可序列化的—->实现了Seralizable接口
面试题:如何理解对象序列化机制?
把内存中的Java对象转换成平台无关的二进制流,从而允许把这种二进制流持久的保存在硬盘上,或者通过网络,将这种二进制流传输到另一个网络节点,当其他程序获取了这种二进制流,就可以恢复成原来的Java对象。序列化的好处在于将任何实现了Seralizable接口的对象转化为字节数据,使其在保存和传输中可被还原。
序列化
public static void main(String[] args) {//序列化过程:ObjectOutputStream oos=null;try {oos=new ObjectOutputStream(new FileOutputStream(new File("D:\\object.txt")));oos.writeObject(new String("我爱北京天安门"));oos.flush();} catch (IOException e) {e.printStackTrace();} finally {if(oos!=null){try {oos.close();} catch (IOException e) {e.printStackTrace();}}}}
反序列化
//反序列化public static void main(String[] args) {ObjectInputStream ois =null;try {ois=new ObjectInputStream(new FileInputStream(new File("D://object.txt")));Object object = ois.readObject();String str= (String) object;System.out.println(str);} catch (IOException e) {e.printStackTrace();} catch (ClassNotFoundException e) {e.printStackTrace();} finally {if (ois!=null){try {ois.close();} catch (IOException e) {e.printStackTrace();}}}}
自定义类实现序列化与反序列化操作
1.需要实现java.io.Serializable接口2. public static final long serialVersionUID= 6080347956336285349L;3.除了当前Person类需要实现Serializable接口之外,还必须保证其内部所有属性也必须是可序列化的。(默认情况下基本数据类型是可序列化的)4.不能序列化static和transient的
public class Person implements java.io.Serializable{public static final long serialVersionUID= 6080347956336285349L;private String name;private int age;public Person() {}public Person(String name, int age) {this.name = name;this.age = age;}public String getName() {return name;}public void setName(String name) {this.name = name;}public int getAge() {return age;}public void setAge(int age) {this.age = age;}@Overridepublic String toString() {return "Person{" +"name='" + name + '\'' +", age=" + age +'}';}}
public static void main(String[] args) {//序列化ObjectOutputStream oos =null;ObjectInputStream ois=null;try {oos=new ObjectOutputStream(new FileOutputStream(new File("D://object.txt")));Person person = new Person("张贝贝", 25);oos.writeObject(person);//反序列化ois=new ObjectInputStream(new FileInputStream(new File("D:\\object.txt")));Object obj=ois.readObject();Person p1= (Person) obj;System.out.println(p1.toString());} catch (IOException e) {e.printStackTrace();} catch (ClassNotFoundException e) {e.printStackTrace();} finally {try {if (ois!=null){ois.close();}if (oos!=null){oos.close();}} catch (IOException e) {e.printStackTrace();}}}
serialVersionUID的理解
如果不手动写,Java会自动生成一个。
如果序列化以后修改了类,serialVersionUID也会被Java修改,
反序列化会失败!
十二,网络编程
网络编程中有两个主要的问题:
1.如何准确的定位到网络上一台或者多台主机:定位主机上的特定应用2.找到主机后如何可靠高效的进行数据传输
网络编程中的两个要素
1.对应的问题:IP和端口号2.对应问题二:提供网络通信协议:TCP/IP参考模型
通信要素一:IP和端口号
1.IP:唯一标识Internet上的计算机(通信实体)2.在Java中使用InetAddress类代表IP3.IP分类:IPV4和IPV6;万维网和局域网的区别4.域名:www.baidu.com5.域名--》NDS--》网络服务器6.本地回路地址:127.0.0.1 对应着localhost7.如何实例化InetAddress:两个方法;getByName(String host),getLocalHost();
端口号:表示计算机上运行的程序
不同进程有不同的端口号Tomcat:8080,mysql:3306,oracle:1521端口号与IP地址组合得出一个网络套接字,Socket范围:0-65535
public static void main(String[] args) {try {InetAddress name = InetAddress.getByName("127.0.0.1");System.out.println(name);InetAddress name1 = InetAddress.getByName("www.baidu.com");System.out.println(name1);System.out.println(name.getHostName());} catch (UnknownHostException e) {e.printStackTrace();}}
TCP:3次握手,UDP:封装数据包
Tcp网络编程
/*** @author yinhuidong* @createTime 2020-04-10-21:24* TCP网络编程1:客户端向服务端发送消息,服务端将消息显示在控制台上*/public class Test1 {//客户端@Testpublic void client()throws Exception{InetAddress address = InetAddress.getByName("127.0.0.1");Socket socket = new Socket(address, 3307);OutputStream os = socket.getOutputStream();os.write("你好,我是客户端".getBytes());os.close();socket.close();}//服务端@Testpublic void server()throws Exception{ServerSocket serverSocket = new ServerSocket(3307);Socket socket = serverSocket.accept();InputStream is = socket.getInputStream();ByteArrayOutputStream baos = new ByteArrayOutputStream();int len;byte[] buffer = new byte[10];while ((len=is.read(buffer))!=-1){baos.write(buffer,0,len);}System.out.println(baos.toString());baos.close();is.close();socket.close();serverSocket.close();}}
/*** @author yinhuidong* @createTime 2020-04-10-21:40* 客户端给服务端发送文件,服务端保存文件并告诉客户端自己接收成功* //如果不关闭资源,会抛出:java.net.SocketException: Connection reset异常*/public class Test2 {//客户端@Testpublic void test1() throws Exception {//获取IP地址InetAddress address = InetAddress.getByName("127.0.0.1");//获取socket对象Socket socket = new Socket(address, 3308);//写入本地图片FileInputStream is = new FileInputStream(new File("E:\\9.jpg"));byte[] buffer = new byte[1024 * 8];int len;//将本地图片写出到服务端OutputStream os = socket.getOutputStream();while ((len = is.read(buffer)) != -1) {os.write(buffer, 0, len);}socket.shutdownOutput();//获取输入流准备接受服务端的消息InputStream stream = socket.getInputStream();byte[] buffer2 = new byte[10];int len2;ByteArrayOutputStream baos = new ByteArrayOutputStream();while ((len2 = stream.read(buffer2)) != -1) {baos.write(buffer2, 0, len2);}//输出消息到控制台System.out.println(baos.toString());baos.close();stream.close();os.close();is.close();socket.close();}@Testpublic void test2() throws Exception {//创建一个服务端ServerSocketServerSocket serverSocket = new ServerSocket(3308);//获取socketSocket socket = serverSocket.accept();//获取输入流InputStream is = socket.getInputStream();//指定输出流输出文件位置FileOutputStream fos = new FileOutputStream(new File("E:\\10.jpg"));int len;byte[] buffer = new byte[1024 * 8];while ((len = is.read(buffer)) != -1) {fos.write(buffer, 0, len);}//获取输出流OutputStream stream = socket.getOutputStream();//输出内容stream.write("接收文件成功".getBytes());stream.close();fos.close();is.close();socket.close();serverSocket.close();}}
UDP网络编程
/*** @author yinhuidong* @createTime 2020-04-10-23:03* UDP网络编程*/public class Test4 {//发送端@Testpublic void send()throws Exception{DatagramSocket socket = new DatagramSocket();byte []data="我是UDP方式的发送端".getBytes();InetAddress inet = InetAddress.getLocalHost();DatagramPacket packet = new DatagramPacket(data, 0, data.length,inet, 8081);socket.send(packet);}//接收端@Testpublic void receiver()throws Exception{DatagramSocket socket = new DatagramSocket(8081);byte[] buffer = new byte[100];DatagramPacket packet = new DatagramPacket(buffer, 0, buffer.length);socket.receive(packet);System.out.println(new String(packet.getData(), 0, buffer.length));}}
URL类的理解与实例化
URL:统一资源定位符,他表示internet上某一资源的地址。
格式:协议,主机名,端口号,片段名,参数列表
public static void main(String[] args) throws IOException {URL url = new URL("www.baidu.com");HttpURLConnection connection= (HttpURLConnection) url.openConnection();//获取连接connection.connect();//连接connection.getInputStream();//获取流}
十三,反射
1.概述
反射
反射机制允许程序在执行时借助于反射API取得任何类的内部信息,并能直接操作任意对象的内部属性及方法。反射相关的主要APIjava.lang.Classjava.lang.reflect.
关于java.lang.Class类的理解:*
1.类的加载过程:程序在经过javac.exe命令后,会生成一个或多个字节码文件(.class结尾),接着我们使用java.exe命令对某个字节码文件进行解释运行。相当于将某个字节码文件加载到内存中。此过程称为类的加载。加载到内存中的类,我们就称为运行时类,此运行的类,就作为Class的一个实例。2.换句话说:Class的实例就对应着一个运行时类。
类的加载过程(了解)
①类的加载:将类的class文件读入内存,并为之创建一个java.lang.Class对象,此过程由类的加载器完成。②类的链接:将类的二进制数据合并到JRE中,赋默认值。③类的初始化:JVM负责对类进行初始化。将静态代码块和类中赋值操作的语句读取,给变量/常量赋值。
类的加载器ClassLoader的理解:(了解)
作用:把类加载进内存。
2.获取Class的实例的方式(重点)
加载到内存中的运行时类,会缓存一定的时间,在此时间内,我们可以通过不同的方式来获取此运行时的类。Class实例对应的结构说明:①claass,②interface,③数组④枚举类⑤注解⑥基本数据类型⑦void
/*** @author yinhuidong* @createTime 2020-04-11-9:57* 获取Class实例的四种方式*/public class Test1 {//通过对象.getClass()的方式@Testpublic void test1() {Class<? extends Person> clazz = new Person().getClass();}//通过类.class@Testpublic void test2() {Class<Person> clazz = Person.class;}//通过Class的静态方法@Testpublic void test3() throws Exception {Class<?> clazz = Class.forName("com.atguigui.java1.Person");}//通过类加载器@Testpublic void test4() throws Exception{ClassLoader classLoader = Person.class.getClassLoader();classLoader.loadClass("com.atguigui.java1.Person");}}class Person {private String name;private Integer age;public Person() {}public String getName() {return name;}public void setName(String name) {this.name = name;}public Integer getAge() {return age;}public void setAge(Integer age) {this.age = age;}@Overridepublic String toString() {return "Person{" +"name='" + name + '\'' +", age=" + age +'}';}}
3.使用ClassLoader加载配置文件
@Testpublic void test4() throws Exception {Properties prop=new Properties();//读取配置文件的方式一://此时配置文件默认在当前module下// FileInputStream fis = new FileInputStream("jdbc.properties");// prop.load(fis);//读取配置文件的方式二:使用ClassLoader//配置文件默认识别为:当前module的src下ClassLoader classLoader=Test1.class.getClassLoader();InputStream is = classLoader.getResourceAsStream("driud.properties");prop.load(is);String user=prop.getProperty("user");String password=prop.getProperty("password");System.out.println(user+" "+password);}
4.创建运行时类对象与反射的动态性
通过反射,创建运行时类对象
newInstance()调用此方法,创建对应的运行时类的对象,内部调用了运行时类的空参构造器。要想此方法正常运行:①运行时类必须提供空参的构造器②空参构造器访问权限得够。在JavaBean中要求提供一个空参构造器的原因:①便于通过反射,创建运行时类的对象。②便于子类继承此运行类时,默认调用super方法时,保证父类有此构造器。
@Testpublic void test5() throws IllegalAccessException, InstantiationException {Class<Person>clazz=Person.class;Person obj=clazz.newInstance();System.out.println(obj);}
反射的动态性举例
@Testpublic void test6() throws Exception {Object instance = getInstance("java.util.Date");System.out.println(instance);}//创建一个指定类的对象。classPath:指定类的全类名。public Object getInstance(String classPath)throws Exception{Class clazz=Class.forName(classPath);return clazz.newInstance();}
5.调用运行时类的指定结构
属性,
@Testpublic void test() throws Exception {Class clazz=Person.class;//创建运行时类的对象Object o = clazz.newInstance();//获取指定的属性:publicField name = clazz.getField("name");name.set(o,"yinhuidong");String o1 = (String) name.get(o);System.out.println(o1);}@Test//掌握public void test2() throws Exception {Class clazz=Person.class;//创建运行时类的对象Object o = clazz.newInstance();//获取指定的属性:无关权限修饰符,不包含父类Field age = clazz.getDeclaredField("age");age.setAccessible(true);//给与修改权限age.set(o,20);Object obj = age.get(o);System.out.println(obj);}
方法,
@Test//掌握public void test3()throws Exception{//如何操作运行时类中的指定非静态方法Class<Person> clazz = Person.class;Person person = clazz.newInstance();Method show = clazz.getDeclaredMethod("show");show.setAccessible(true);Object obj = show.invoke(person);Method add = clazz.getDeclaredMethod("add", int.class, int.class);add.setAccessible(true);Integer invoke = (Integer) add.invoke(person, 1, 1);System.out.println(invoke);}@Testpublic void test4() throws Exception{//如何操作运行时类中的指定静态方法Class clazz=Person.class;Method eat = clazz.getDeclaredMethod("eat");eat.setAccessible(true);eat.invoke(Person.class);}
构造器
@Test//不是很常用,了解public void test5() throws Exception{//调用运行时类中的指定构造器Class clazz=Person.class;Constructor constructor = clazz.getDeclaredConstructor(String.class, Integer.class);constructor.setAccessible(true);Object obj = constructor.newInstance("Tom",22);System.out.println(obj);}
6.代理
代理设计模式的原理:使用一个代理将对象包装起来,然后用该代理对象取代原始对象。
任何对原始对象的调用都要通过代理。代理对象决定是否以及何时将方法调用转到原始对象上。
静态代理举例
特点:编译期间,代理类和被代理类就被确定下来了。
interface ClothFactory{void produceCloth();}//代理类class ProxyClothFactory implements ClothFactory{private ClothFactory factory;//就拿被代理对象进行实例化public ProxyClothFactory(ClothFactory factory) {this.factory = factory;}@Overridepublic void produceCloth() {System.out.println("代理工厂进行准备工作");factory.produceCloth();System.out.println("代理工厂做后续工作!");}}//被代理类class Nike implements ClothFactory{@Overridepublic void produceCloth() {System.out.println("耐克工厂生产一批运动服!");}}
@Testpublic void test(){Nike nike=new Nike();ProxyClothFactory proxyClothFactory = new ProxyClothFactory(nike);proxyClothFactory.produceCloth();}
动态代理示例
动态代理:可以通过一个代理类完成全部的代理功能。
要求:理解过程。
/*** @author yinhuidong* @createTime 2020-04-11-11:17* 基于接口的动态代理*/public class Test1 {private PersonDao dao=new PersonDaoImpl();@Testpublic void test(){//动态代理PersonDao personDao = (PersonDao) Proxy.newProxyInstance(//被代理类的类加载器dao.getClass().getClassLoader(),//被代理类实现的接口dao.getClass().getInterfaces(),//InvocationHandler接口的实现类new InvocationHandler() {@Overridepublic Object invoke(Object proxy, Method method, Object[] args) throws Throwable {Object o=null;if (!method.getName().equals("show")){Integer a= (Integer) args[0];Integer b= (Integer) args[1];//对方法进行增强o=method.invoke(dao,a*2,b*2);return o;}o=method.invoke(dao);return o;}});System.out.println(personDao.add(1, 1));personDao.del(2,1);personDao.show();}}//被代理类实现的接口interface PersonDao{int add(int a,int b);void del(int a,int b);void show();}//被代理类class PersonDaoImpl implements PersonDao{@Overridepublic int add(int a, int b) {return a+b;}@Overridepublic void del(int a, int b) {System.out.println(a-b);}@Overridepublic void show() {System.out.println("show()....");}}
7.总结
import java.util.Properties;/*** @author yinhuidong* @createTime 2020-02-25-23:36*/public class Test3 {/*** 第二轮复习* 获取运行时类的Class实例*/@Testpublic void test1() throws ClassNotFoundException {//方式一:Class<Person> clazz = Person.class;System.out.println(clazz);//方式二:Person person = new Person();Class<? extends Person> clazz1 = person.getClass();System.out.println(clazz1);//方式:Class<?> clazz2 = Class.forName("com.atguigu.java3.Person");System.out.println(clazz2);//方式四:ClassLoader loader = Test3.class.getClassLoader();Class<?> clazz3 = loader.loadClass("com.atguigu.java3.Person");System.out.println(clazz3);}/*** 使用ClassLoader加载配置文件*/@Testpublic void test2() throws IOException {InputStream is = Test3.class.getClassLoader().getResourceAsStream("xxx.properties");Properties prop = new Properties();prop.load(is);}/*** 通过反射,创建运行时类的对象*/@Testpublic void test3() throws IllegalAccessException, InstantiationException {Class<Person> clazz = Person.class;Person person = clazz.newInstance();System.out.println(person.toString());}/*** 反射的动态性举例*/@Testpublic void test4() {try {Object p = GetInstance("com.atguigu.java3.Person");System.out.println(p.toString());} catch (ClassNotFoundException e) {e.printStackTrace();}}public Object GetInstance(String path) throws ClassNotFoundException {Class<?> clazz = Class.forName(path);return clazz;}/*** 调用运行时类的指定结构* 1.属性*/@Test//只能获取公的属性public void test5() throws IllegalAccessException, InstantiationException, NoSuchFieldException {Class<Person> clazz = Person.class;Person p = clazz.newInstance();Field name = clazz.getField("name");name.set(p,"张");System.out.println(name.get(p));}@Test//可以获取私的属性public void test6() throws IllegalAccessException, InstantiationException, NoSuchFieldException {Class<Person> clazz = Person.class;Person p = clazz.newInstance();//可以获取所属性Field name = clazz.getDeclaredField("name");name.setAccessible(true);name.set(p,"张");System.out.println(name.getName());Field age = clazz.getDeclaredField("age");age.setAccessible(true);age.set(p,12);System.out.println(age.get(p));System.out.println(p.toString());}@Test//调用非静态方法public void test7() throws IllegalAccessException, InstantiationException, NoSuchMethodException, InvocationTargetException {Class<Person> clazz = Person.class;Person p = clazz.newInstance();Method show = clazz.getDeclaredMethod("show", String.class);//方法名和形参类型show.setAccessible(true);Object args = show.invoke(p, "args");//对象,实参System.out.println(args);//方法的返回值}@Test//调用静态方法public void test8() throws IllegalAccessException, InstantiationException, NoSuchMethodException, InvocationTargetException {Class<Person> clazz = Person.class;Person p = clazz.newInstance();Method eat = clazz.getDeclaredMethod("eat", String.class);eat.setAccessible(true);Object o = eat.invoke(Person.class, "可比克");System.out.println(o);}}class Person {private String name;private int age;public Person() {}private int show(String args){System.out.println(args);return 1;}private static void eat(String food){System.out.println("正在吃。。。"+food);}public Person(String name, int age) {this.name = name;this.age = age;}public String getName() {return name;}public void setName(String name) {this.name = name;}public int getAge() {return age;}public void setAge(int age) {this.age = age;}@Overridepublic String toString() {return "Person{" +"name='" + name + '\'' +", age=" + age +'}';}}
十四,jdk8新特性
1.Lambda表达式
Lambda表达式的使用1.举例:Comparator<Integer> c= Comparator.comparingInt(o -> o);2.格式:->:Lambda操作符左边叫做形参列表,其实就是接口中的抽象方法的形参列表右边叫做Lambda体(重写的抽象方法的方法体)3.关于Lambda表达式的使用总结:-> 左边:lambda形参列表的参数类型可以省略(类型推断),如果形参列表只有一个参数,()可以省略。-> 右边:Lambda体应该使用一对{}包裹,如果Lambda体只有一条执行语句(可能是return语句),{}和return也可以省略。要求接口只有一个抽象方法。4.Lambda表达式的本质:作为函数式接口的实例。5.如果一个接口中只声明了一个抽象方法,则此接口称为函数式接口。可以使用注解@FunctionalInterface检查是否是一个函数式接口。用匿名实现类表示的现在都可以用Lambda表达式表示。
public class LambdaTest1 {//语法格式一:无参数,无返回值@Testpublic void test() {Runnable r = () -> System.out.println("语法格式一:无参数,无返回值");r.run();}//语法格式二:一个参数,无返回值@Testpublic void test2() {Consumer<String> c = (String s) -> {System.out.println(s);};c.accept("语法格式二:一个参数,无返回值");}//语法格式:类型推断@Testpublic void test3() {Consumer<String> c = (s) -> {System.out.println(s);};c.accept("语法格式:类型推断");}//语法格式四:只一个参数时,省略小括号@Testpublic void test4() {Consumer<String> c = s -> {System.out.println(s);};c.accept("语法格式四:只一个参数时,省略小括号");}//语法格式五:Lambda 需要两个以上参数,多条执行语句,并且有返回值。@Testpublic void test5() {Comparator<Integer> c = (o1, o2) -> {System.out.println("语法格式五:Lambda 需要两个以上参数,多条执行语句,并且有返回值。");return o1.compareTo(o2);};int compare = c.compare(32, 21);System.out.println(compare);}//语法格式六:当Lambda体只一条语句时,reurn与大括号若,都可以省略。@Testpublic void test6() {Comparator<Integer> c = (o1, o2) -> o1.compareTo(o2);int compare = c.compare(32, 21);System.out.println(compare);}}
Java内置四大核心函数式接口(要求能看懂)消费性接口 Consumer<T> void accept(T t)供给型接口 Supplier<T> T get()函数型接口 Function<T,R> R apply(T t)断定型接口 Predicate<T> boolean test(T t)test()使用情景:当要传递给Lambda体的操作,已经有实现的方法了,可以使用方法引用。方法引用:本质上就是Lambda表达式,而Lambda表达式作为函数式接口的实例,所以方法引用,也是函数式接口的实例。使用格式: 类(对象)::方法名具体分为如下三种情况:对象::非静态方法类::静态方法类::非静态方法方法引用的使用要求,要求接口中的抽象方法的形参列表和返回值类型与方法引用的方法的形参列表和返回值类型相同!
2.Stream API
1.Stream关注的是数据的运算,与CPU打交道。集合关注的是是数据的存储,与内存打交道。2.①Stream自己不会存储元素。②Stream不会改变源对象,相反,他们会返回一个持有结果的新Stream。③Stream操作是延迟执行的,这意味着它们会等到需要结果的时候才执行。3.Stream的执行流程①Stream的实例化②一系列的中间操作(过滤,映射,。。。)③终止操作4.说明:①一个中间链操作,对数据源的数据进行处理。②一旦执行终止操作,就执行中间操作链,并产生结果。之后,不会再被使用。
Stream的实例化:
//创建Stream的方式一:通过集合创建@Testpublic void test() {List<Employee> employees = EmployeeData.getEmployees();//返回一个顺序流Stream<Employee> stream = employees.stream();//返回一个并行流Stream<Employee> employeeStream = employees.parallelStream();}//创建Stream的方式二:通过数组@Testpublic void test2() {int[] arr = new int[]{1, 2, 3, 4, 5, 6};IntStream stream = Arrays.stream(arr);}//创建方式:通过Stream的of()@Testpublic void test3() {Stream<Integer> stream = Stream.of(1, 2, 3, 4, 5, 6);}//创建Stream的方式四,无限流@Testpublic void test4() {//迭代Stream.iterate(0, t -> t + 2).limit(10).forEach(System.out::println);//生成Stream.generate(Math::random).limit(10).forEach(System.out::println);}
Stream的中间操作:
1.筛选与切片
@Test//filter()过滤出需要的元素public void test(){List<Employee> employees = EmployeeData.getEmployees();Stream<Employee> stream = employees.stream();stream.filter(e->e.getAge()>25).forEach(System.out::println);}@Test//limit()截断取前面public void test2(){List<Employee> employees = EmployeeData.getEmployees();Stream<Employee> stream = employees.stream();stream.limit(5).forEach(System.out::println);}@Test//skip()截断取后面public void test3(){List<Employee> employees = EmployeeData.getEmployees();Stream<Employee> stream = employees.stream();stream.skip(5).forEach(System.out::println);}@Test//public void test4(){//distinct()去除重复元素List<Employee> employees = EmployeeData.getEmployees();Stream<Employee> stream = employees.stream();stream.distinct().forEach(System.out::println);}
2.映射
@Test//map(str -> str + str)public void test() {int a[] = new int[]{1, 2, 3, 4, 5, 6, 7, 8, 9};IntStream stream = Arrays.stream(a);stream.map(str -> str + str).forEach(System.out::println);}@Test////map(Employee::getAge)public void test2() {List<Employee> employees = EmployeeData.getEmployees();Stream<Employee> stream = employees.stream();stream.map(Employee::getAge).filter(age -> age > 25).forEach(System.out::println);}
3.排序
@Test//自然排序public void test() {int a[] = new int[]{1, 2, 3, 5, 9, 7, 6, 45, 65};IntStream stream = Arrays.stream(a);stream.sorted().forEach(System.out::print);}@Test//定制排序public void test2() {List<Employee> employees = EmployeeData.getEmployees();Stream<Employee> stream = employees.stream();stream.sorted((o1, o2) -> {return -o1.getAge().compareTo(o2.getAge());}).forEach(System.out::println);}@Test//定制排序public void test3() {List<Employee> employees = EmployeeData.getEmployees();Stream<Employee> stream = employees.stream();stream.sorted((o1, o2) -> {if (o1.getAge() != o2.getAge()) {return o1.getAge().compareTo(o2.getAge());} else {return o1.getId().compareTo(o2.getId());}}).forEach(System.out::println);}
Stream的终止操作
1.匹配与查找
@Testpublic void test(){List<Employee> employees = EmployeeData.getEmployees();Stream<Employee> stream = employees.stream();boolean b = stream.allMatch(e -> e.getAge() > 23);System.out.println(b);}@Testpublic void test2(){List<Employee> employees = EmployeeData.getEmployees();Stream<Employee> stream = employees.stream();boolean b = stream.anyMatch(e -> e.getAge() > 23);System.out.println(b);}@Testpublic void test3(){List<Employee> employees = EmployeeData.getEmployees();Stream<Employee> stream = employees.stream();boolean b = stream.noneMatch(e -> e.getName().contains("java"));System.out.println(b);}@Testpublic void test4(){List<Employee> employees = EmployeeData.getEmployees();Stream<Employee> stream = employees.stream();Optional<Employee> first = stream.findFirst();System.out.println(first);}@Testpublic void test5(){List<Employee> employees = EmployeeData.getEmployees();Stream<Employee> stream = employees.stream();Optional<Employee> any = stream.findAny();System.out.println(any);}@Testpublic void test6(){List<Employee> employees = EmployeeData.getEmployees();Stream<Employee> stream = employees.stream();long count = stream.count();System.out.println(count);}@Testpublic void test7(){List<Employee> employees = EmployeeData.getEmployees();Stream<Employee> stream = employees.stream();Optional<Employee> max = stream.max((e1, e2) -> e1.getAge().compareTo(e2.getAge()));System.out.println(max);}@Testpublic void test8(){List<Employee> employees = EmployeeData.getEmployees();Stream<Employee> stream = employees.stream();Optional<Employee> min = stream.max((e1, e2) -> -(e1.getAge().compareTo(e2.getAge())));System.out.println(min);}
2.归约
@Testpublic void test(){List<Employee> employees = EmployeeData.getEmployees();Stream<Employee> stream = employees.stream();Optional<Integer> reduce = stream.map(e -> e.getAge()).reduce((d1, d2) -> d1 + d2);System.out.println(reduce);}@Testpublic void test2(){Integer a[]=new Integer []{1,2,3,4,5,6,7,8,9};Stream<Integer> stream = Arrays.stream(a);Integer reduce = stream.reduce(0, Integer::sum);System.out.println(reduce);}
3.收集
@Testpublic void test(){List<Employee> employees = EmployeeData.getEmployees();Stream<Employee> stream = employees.stream();List<Employee> collect = stream.collect(Collectors.toList());for (Employee employee : collect) {System.out.print(employee+" ");}}
3.Optional类
Optional类:为了在程序中避免出现空指针异常而创建的。常用的方法:ofNullable(T t)//允许存nullofElse(T t)//如果是null,使用形参中的对象。get()://如果调用对象包含值,返回调用对象,否则抛出异常。
public class OptionalTest {@Testpublic void test() {Person p=new Person();String boyName = getBoyName(p);System.out.println(boyName);//java.lang.NullPointerException原因:男孩为null}@Testpublic void test2(){Person p=null;String boyName = getBoyName(p);System.out.println(boyName);//java.lang.NullPointerException原因:Person为null}@Testpublic void test3(){Person p=null;System.out.println(getName(p));}public String getBoyName(Person person){return person.getBoy().getName();}public String getName(Person person){Optional<Person> person1 = Optional.ofNullable(person);Person person2 = person1.orElse(new Person());Optional<Boy> boy = Optional.ofNullable(person2.getBoy());Boy boy1 = boy.orElse(new Boy("Tom"));return boy1.getName();}}class Person {private Boy boy;public Person() {}public Person(Boy boy) {this.boy = boy;}public Boy getBoy() {return boy;}public void setBoy(Boy boy) {this.boy = boy;}}class Boy {private String name;public Boy() {}public Boy(String name) {this.name = name;}public String getName() {return name;}public void setName(String name) {this.name = name;}}
十五,JDBC核心技术
1.概述
软件架构方式:
B/S:浏览器
C/S:客户端
数据的持久化
把数据保存到可掉电式存储设备中以供之后使用
JDBC的理解:
JDBC(Java Database Connectivity)是一个独立于特定数据库管理系统、通用的SQL数据库存取和操作的公共接口(一组API)简单理解为:JDBC,是SUN提供的一套 API,使用这套API可以实现对具体数据库的操作(获取连接、关闭连接、DML、DDL、DCL)
图示理解:

2.获取连接
驱动和url
Driver driver=new com.mysql.jdbc.Driver();//MySQL具体driver的实现类String url="jdbc:mysql://localhost:3306/test";jdbc:mysql :协议localhost :ip地址3306 :端口号test:数据库
方式一
@Testpublic void test() throws SQLException {Driver driver = new com.mysql.jdbc.Driver();String url = "jdbc:mysql://localhost:3306/test";Properties prop = new Properties();prop.setProperty("user", "root");prop.setProperty("password", "yhd666");Connection connect = driver.connect(url, prop);}
上述代码中显式出现了第三方数据库的API
方拾二
@Test//方式二:对方式一的迭代,不出现第方api,使程序具更好的可移植性public void test2() throws Exception {//1.利用反射获取Driver的具体实现类对象Class clazz = Class.forName("com.mysql.jdbc.Driver");Driver driver = (Driver) clazz.newInstance();//2.提供要链接的数据库String url = "jdbc:mysql://localhost:3306/test";Properties prop = new Properties();//将用户名和密码封装在prop中。prop.setProperty("user", "root");prop.setProperty("password", "yhd666");//3..获取连接Connection connect = driver.connect(url, prop);System.out.println(connect);}
方式三
@Test //方式:使用DriverManager替换driverpublic void test3() throws Exception {//注册驱动DriverManager.registerDriver((Driver) Class.forName("com.mysql.jdbc.Driver").newInstance());//获取连接Connection connection = DriverManager.getConnection("jdbc:mysql://localhost:3306/test", "root", "yhd666");System.out.println(connection);}
使用DriverManager实现数据库的连接。体会获取连接必要的4个基本要素。
方式四
@Testpublic void testConnection4() throws Exception {//1.数据库连接的4个基本要素:String url = "jdbc:mysql://localhost:3306/test";String user = "root";String password = "yhd666";String driverName = "com.mysql.jdbc.Driver";//2.加载驱动 (①实例化Driver ②注册驱动Class.forName(driverName);//Driver driver = (Driver) clazz.newInstance();//3.注册驱动//DriverManager.registerDriver(driver);/*可以注释掉上述代码的原因,是因为在mysql的Driver类中声明:static {try {DriverManager.registerDriver(new Driver());} catch (SQLException var1) {throw new RuntimeException("Can't register driver!");}}*///3.获取连接Connection conn = DriverManager.getConnection(url, user, password);System.out.println(conn);}
方式五
@Test//最终版,配置文件版//1.实现了数据与代码的分离,解耦//2.如果需要修改配置文件信息,就可以避免程序重新打包public void test5() throws Exception {InputStream is = Test1.class.getClassLoader().getResourceAsStream("jdbc.properties");Properties prop = new Properties();prop.load(is);String user = prop.getProperty("user");String password = prop.getProperty("password");String url = prop.getProperty("url");String driverClass = prop.getProperty("driverClass");Class.forName(driverClass);Connection connection = DriverManager.getConnection(url, user, password);System.out.println(connection);}
其中,配置文件声明在工程的src目录下:【jdbc.properties】
```propertiesuser=rootpassword=yhd666url=jdbc:mysql://localhost:3306/testdriverClass=com.mysql.jdbc.Driver
3.PreparedStatement
Statement
数据库连接被用于向数据库服务器发送命令和 SQL 语句,并接受数据库服务器返回的结果。其实一个数据库连接就是一个Socket连接。- 在 java.sql 包中有 3 个接口分别定义了对数据库的调用的不同方式:- Statement:用于执行静态 SQL 语句并返回它所生成结果的对象。- PrepatedStatement:SQL 语句被预编译并存储在此对象中,可以使用此对象多次高效地执行该语句。- CallableStatement:用于执行 SQL 存储过程使用Statement操作数据表的弊端- 通过调用 Connection 对象的 createStatement() 方法创建该对象。该对象用于执行静态的 SQL 语句,并且返回执行结果。- Statement 接口中定义了下列方法用于执行 SQL 语句:```sqlint excuteUpdate(String sql):执行更新操作INSERT、UPDATE、DELETEResultSet executeQuery(String sql):执行查询操作SELECT
但是使用Statement操作数据表存在弊端:
- 问题一:存在拼串操作,繁琐
- 问题二:存在SQL注入问题 其他问题: Statement没办法操作Blob类型变量 Statement实现批量插入时,效率较低
SQL 注入是利用某些系统没有对用户输入的数据进行充分的检查,而在用户输入数据中注入非法的 SQL 语句段或命令(如:SELECT user, password FROM user_table WHERE user=’a’ OR 1 = ‘ AND password = ‘ OR ‘1’ = ‘1’) ,从而利用系统的 SQL 引擎完成恶意行为的做法。
对于 Java 而言,要防范 SQL 注入,只要用 PreparedStatement(从Statement扩展而来) 取代 Statement 就可以了。 ```
JDBCUtils封装获取连接和关闭资源
/*** @author yinhuidong* @createTime 2020-02-04-19:26* JDBC工具类*/public class JDBCUtils {//获取连接public static Connection getConnection()throws Exception{InputStream is = JDBCUtils.class.getClassLoader().getResourceAsStream("jdbc.properties");Properties prop = new Properties();prop.load(is);String driverClass=prop.getProperty("driverClass");String url=prop.getProperty("url");String user = prop.getProperty("user");String password = prop.getProperty("password");Class.forName(driverClass);Connection connection = DriverManager.getConnection(url, user, password);return connection;}//关闭资源public static void closeResource(Connection co, PreparedStatement ps, ResultSet rs){try {if (co!=null){co.close();}if (ps!=null){ps.close();}if (rs!=null){rs.close();}} catch (SQLException e) {e.printStackTrace();}}}
增删改操作
添加操作
@Test//添加操作public void add(){Connection co=null;PreparedStatement ps=null;try {co=JDBCUtils.getConnection();String sql="insert into customers(name,email,birth) values(?,?,?);";ps = co.prepareStatement(sql);ps.setObject(1,"yinhuidong");ps.setObject(2,"1972039773@qq.com");SimpleDateFormat format = new SimpleDateFormat("yyyy-MM-dd");java.util.Date date = format.parse("1998-11-16");ps.setObject(3,new Date(date.getTime()));ps.execute();} catch (Exception e) {e.printStackTrace();} finally {JDBCUtils.closeResource(co,ps,null);}}
删除操作
@Test//删除操作public void delete(){Connection co=null;PreparedStatement ps=null;try {co=JDBCUtils.getConnection();String sql="delete from customers where id = ?;";ps=co.prepareStatement(sql);ps.setObject(1,20);ps.execute();} catch (Exception e) {e.printStackTrace();} finally {JDBCUtils.closeResource(co,ps,null);}}
修改操作:
@Test//修改public void update(){Connection co=null;PreparedStatement ps=null;try {co=JDBCUtils.getConnection();String sql="update customers set name=? where id =?;";ps=co.prepareStatement(sql);ps.setObject(1,"尹会东");ps.setObject(2,1);ps.execute();} catch (Exception e) {e.printStackTrace();} finally {JDBCUtils.closeResource(co,ps,null);}}
通用增删改:
//通用增删改public static void update(String sql,Object...args){Connection conn=null;PreparedStatement ps=null;try {conn=getConnection();ps=conn.prepareStatement(sql);for (int i = 0; i <args.length ; i++) {ps.setObject(i+1,args[i]);}ps.execute();} catch (Exception e) {e.printStackTrace();} finally {closeResource(conn,ps,null);}}
通用查询操作
public static <T>List<T> find1(Class<T>clazz,String sql,Object...args) {Connection co=null;PreparedStatement ps=null;ResultSet rs=null;try {co=getConnection();ps=co.prepareStatement(sql);for (int i = 0; i <args.length ; i++) {ps.setObject(i+1,args[i]);}rs=ps.executeQuery();ResultSetMetaData data = rs.getMetaData();//获取数据源int count = data.getColumnCount();//获取一共有多少列ArrayList<T> list = new ArrayList<>();while (rs.next()){T t = clazz.newInstance();for (int i = 0; i <count ; i++) {Object value=rs.getObject(i+1);String name = data.getColumnLabel(i + 1);//获取别名,如果没别名就获取列名Field field = clazz.getDeclaredField(name);field.setAccessible(true);field.set(t,value);}list.add(t);}return list;} catch (Exception e) {e.printStackTrace();} finally {closeResource(co,ps,rs);}return null;}
表的列名和对象的属性名不一致的解决办法
Java与SQL对应数据类型转换表| Java类型 | SQL类型 || ------------------ | ------------------------ || boolean | BIT || byte | TINYINT || short | SMALLINT || int | INTEGER || long | BIGINT || String | CHAR,VARCHAR,LONGVARCHAR || byte array | BINARY , VAR BINARY || java.sql.Date | DATE || java.sql.Time | TIME || java.sql.Timestamp | TIMESTAMP |1. **如何获取 ResultSetMetaData**: 调用 ResultSet 的 getMetaData() 方法即可2. **获取 ResultSet 中有多少列**:调用 ResultSetMetaData 的 getColumnCount() 方法3. **获取 ResultSet 每一列的列的别名是什么**:调用 ResultSetMetaData 的getColumnLabel() 方法
JDBC API小结
- 两种思想- 面向接口编程的思想- ORM思想(object relational mapping)- 一个数据表对应一个java类- 表中的一条记录对应java类的一个对象- 表中的一个字段对应java类的一个属性> sql是需要结合列名和表的属性名来写。注意起别名。- 两种技术- JDBC结果集的元数据:ResultSetMetaData- 获取列数:getColumnCount()- 获取列的别名:getColumnLabel()- 通过反射,创建指定类的对象,获取指定的属性并赋值面试题:statement和preparedStatement的区别
操作Blob类型的变量
@Test//像数据表中插入一个图片public void test(){Connection co=null;PreparedStatement ps=null;try {co=JDBCUtils.getConnection();String sql="insert into customers(name,email,birth,photo)values(?,?,?,?);";ps=co.prepareStatement(sql);ps.setObject(1,"宋红康");ps.setObject(2,"shk@126.com");ps.setObject(3,"1988-11-13");FileInputStream fis = new FileInputStream("D:\\copy1.jpg");ps.setObject(4,fis);ps.execute();} catch (SQLException e) {e.printStackTrace();} catch (FileNotFoundException e) {e.printStackTrace();} finally {JDBCUtils.closeResource(co,ps,null);}}
@Test//查询blob字段public void test2(){Connection co=null;PreparedStatement ps=null;ResultSet rs=null;InputStream bs=null;FileOutputStream fos=null;try {co=JDBCUtils.getConnection();String sql="select * from customers where id=?;";ps=co.prepareStatement(sql);ps.setObject(1,22);rs=ps.executeQuery();while (rs.next()) {Integer id = (Integer) rs.getObject(1);String name = (String) rs.getObject(2);String email = (String) rs.getObject(3);Date birth = (Date) rs.getObject(4);Customer customer = new Customer(id,name,email,birth);System.out.println(customer);Blob photo=rs.getBlob(5);bs = photo.getBinaryStream();fos = new FileOutputStream("2.jpg");byte[]bytes=new byte[1024];int len;while ((len=bs.read(bytes))!=-1) {fos.write(bytes,0,len);}}} catch (SQLException e) {e.printStackTrace();} catch (IOException e) {e.printStackTrace();} finally {JDBCUtils.closeResource(co,ps,rs);try {if (bs!=null){bs.close();}if (fos!=null){fos.close();}} catch (IOException e) {e.printStackTrace();}}}
插入中遇到的问题:

批处理
@Test//像数据库一张表插入两万条数据public void test() {Connection conn = null;PreparedStatement ps = null;try {conn = JDBCUtils.getConnection();String sql = "insert into goods(name)values(?)";ps = conn.prepareStatement(sql);for (int i = 1; i <= 20000; i++) {ps.setString(1, "name_" + i);ps.executeUpdate();}} catch (SQLException e) {e.printStackTrace();} finally {JDBCUtils.closeResource(conn, ps, null);}}
@Test//插入优化public void test3(){Connection conn = null;PreparedStatement ps = null;try {conn = JDBCUtils.getConnection();//设置不允许自动提交数据conn.setAutoCommit(false);String sql = "insert into goods(name)values(?)";ps = conn.prepareStatement(sql);for (int i = 0; i <=20000 ; i++) {ps.setString(1, "name_" + i);ps.addBatch();if (i%500==0){ps.executeBatch();ps.clearBatch();}}conn.commit();} catch (SQLException e) {e.printStackTrace();} finally {JDBCUtils.closeResource(conn,ps,null);}}
4.事务
1.事务:一组逻辑操作单元,使数据从一种状态变换到另一种状态。* > 一组逻辑操作单元:一个或多个DML操作。> 2.事务处理的原则:> 保证所事务都作为一个工作单元来执行,即使出现了故障,都不能改变这种执行方式。> 当在一个事务中执行多个操作时,要么所有的事务都被提交(commit),那么这些修改就永久地保存> 下来;要么数据库管理系统将放弃所作的所有修改,整个事务回滚(rollback)到最初状态。说明:1.数据一旦提交,就不可回滚* 2.哪些操作会导致数据的自动提交?* >DDL操作一旦执行,都会自动提交。* >set autocommit = false 对DDL操作失效* >DML默认情况下,一旦执行,就会自动提交。* >我们可以通过set autocommit = false的方式取消DML操作的自动提交。* >默认在关闭连接时,会自动的提交数据
考虑事务以后的转账问题
@Testpublic void test() {Connection co = null;try {co = JDBCUtils.getConnection();co.setAutoCommit(false);String sql1 = "update user_table set balance=balance-? where user=?";String sql2 = "update user_table set balance=balance+? where user=?";update(co,sql1,100,"AA");//System.out.println(10/0);update(co,sql2,100,"BB");co.commit();System.out.println("转账成功!");} catch (SQLException e) {try {co.rollback();System.out.println("转账失败!");} catch (SQLException e1) {e1.printStackTrace();}} finally {JDBCUtils.closeResource(co,null,null);}}
public static int update(Connection co, String sql, Object... args) {PreparedStatement ps = null;try {ps = co.prepareStatement(sql);for (int i = 0; i < args.length; i++) {ps.setObject(i + 1, args[i]);}return ps.executeUpdate();} catch (SQLException e) {e.printStackTrace();} finally {JDBCUtils.closeResource(null, ps, null);}return 0;}
事务的属性
ACID

数据操作过程中可能出现的问题:(针对隔离性)
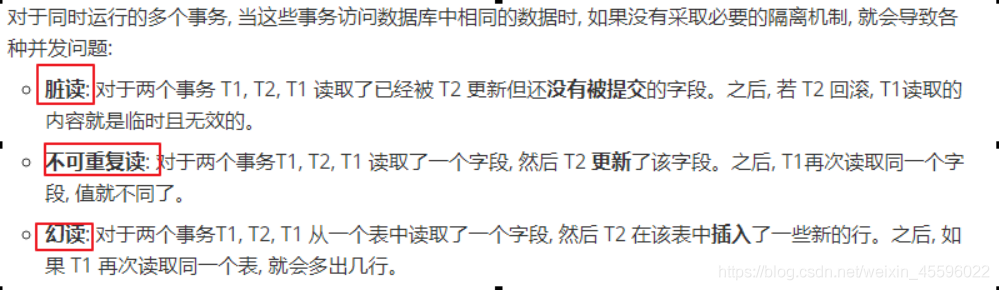
数据库的四种隔离级别:(一致性和并发性:一致性越好,并发性越差)

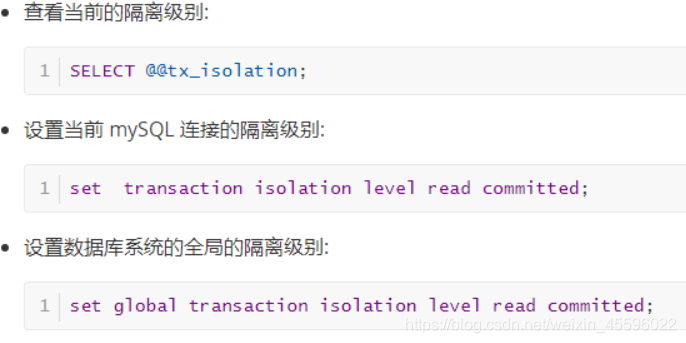
如何查看并设置隔离级别:
5.连接池技术
传统连接存在的问题:
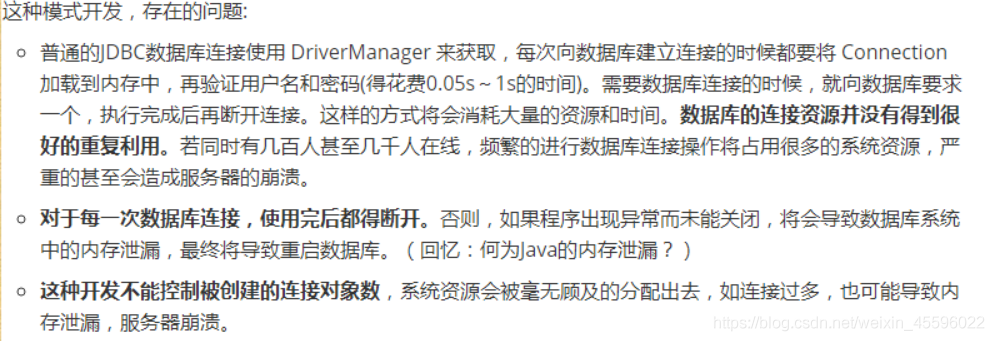
使用数据库连接池大的好处
1.提高程序的响应速度(减少了创建连接相应的时间)2.降低资源的消耗(可以重复使用已经提供好的连接)3.便于连接的管理
c3p0连接池
//使用c3p0数据库连接池的配置文件方式,获取数据库的连接:推荐private static DataSource cpds = new ComboPooledDataSource("helloc3p0");public static Connection getConnection() throws SQLException {Connection conn = cpds.getConnection();return conn;}
c3p0-config.xml
<?xml version="1.0" encoding="UTF-8"?><c3p0-config><named-config name="helloc3p0"><!-- 提供获取连接的4个基本信息 --><property name="driverClass">com.mysql.jdbc.Driver</property><property name="jdbcUrl">jdbc:mysql:///test</property><property name="user">root</property><property name="password">yhd666</property><!-- 进行数据库连接池管理的基本信息 --><!-- 当数据库连接池中的连接数不够时,c3p0一次性向数据库服务器申请的连接数 --><property name="acquireIncrement">5</property><!-- c3p0数据库连接池中初始化时的连接数 --><property name="initialPoolSize">10</property><!-- c3p0数据库连接池维护的最少连接数 --><property name="minPoolSize">10</property><!-- c3p0数据库连接池维护的最多的连接数 --><property name="maxPoolSize">100</property><!-- c3p0数据库连接池最多维护的Statement的个数 --><property name="maxStatements">50</property><!-- 每个连接中可以最多使用的Statement的个数 --><property name="maxStatementsPerConnection">2</property></named-config></c3p0-config>
dbcp连接池
//使用dbocp数据库连接池的配置文件方式,获取数据库的连接:推荐private static DataSource source = null;static{try {Properties pros = new Properties();InputStream is = ClassLoader.getSystemClassLoader().getResourceAsStream("dbcp.properties");pros.load(is);//根据提供的BasicDataSourceFactory创建对应的DataSource对象source = BasicDataSourceFactory.createDataSource(pros);} catch (Exception e) {e.printStackTrace();}}public static Connection getConnection2() throws SQLException {Connection conn = source.getConnection();return conn;}
dbcp.properties
driverClassName=com.mysql.jdbc.Driverurl=jdbc:mysql:///testusername=rootpassword=yhd666initialSize=10
druid连接池
//使用druid数据库连接池的配置文件方式,获取数据库的连接:推荐private static DataSource ds = null;static {try {Properties pro = new Properties();// pro.load(PoolTest.class.getClassLoader().getResourceAsStream("druid.properties"));//加载配置文件pro.load(ClassLoader.getSystemClassLoader().getResourceAsStream("druid.properties"));ds = DruidDataSourceFactory.createDataSource(pro);//通过工厂创建数据源} catch (Exception e) {e.printStackTrace();}}public static Connection getConnection3() {return ds.getConnection();//通过数据源获取连接}
druid.properties
url=jdbc:mysql://localhost:3306/test?rewriteBatchedStatements=trueusername=rootpassword=yhd666driverClassName=com.mysql.jdbc.Driver#初始化时的连接数initialSize=10#最大连接池数量maxActive=20#获取连接时最大等待时间,单位毫秒。maxWait=1000#防御sql注入的filter:wallfilters=wall#mysql下建议关闭poolPreparedStatements=false#建议配置为true,不影响性能,并且保证安全性。testWhileIdle=true
6.DBUtils工具类
通用增删改
使用现成的jar中的QueryRunner测试增、删、改的操作://测试插入@Testpublic void testInsert() {Connection conn = null;try {QueryRunner runner = new QueryRunner();conn = JDBCUtils.getConnection3();String sql = "insert into customers(name,email,birth)values(?,?,?)";int insertCount = runner.update(conn, sql, "蔡徐坤","caixukun@126.com","1997-09-08");System.out.println("添加了" + insertCount + "条记录");} catch (SQLException e) {e.printStackTrace();}finally{JDBCUtils.closeResource(conn, null);}}
查询操作1
使用现成的jar中的QueryRunner测试查询的操作://测试查询/** BeanHander:是ResultSetHandler接口的实现类,用于封装表中的一条记录。*/@Testpublic void testQuery1(){Connection conn = null;try {QueryRunner runner = new QueryRunner();conn = JDBCUtils.getConnection3();String sql = "select id,name,email,birth from customers where id = ?";BeanHandler<Customer> handler = new BeanHandler<>(Customer.class);Customer customer = runner.query(conn, sql, handler, 23);System.out.println(customer);} catch (SQLException e) {// TODO Auto-generated catch blocke.printStackTrace();}finally{JDBCUtils.closeResource(conn, null);}}
查询操作2
/** BeanListHandler:是ResultSetHandler接口的实现类,用于封装表中的多条记录构成的集合。*/@Testpublic void testQuery2() {Connection conn = null;try {QueryRunner runner = new QueryRunner();conn = JDBCUtils.getConnection3();String sql = "select id,name,email,birth from customers where id < ?";BeanListHandler<Customer> handler = new BeanListHandler<>(Customer.class);List<Customer> list = runner.query(conn, sql, handler, 23);list.forEach(System.out::println);} catch (SQLException e) {e.printStackTrace();}finally{JDBCUtils.closeResource(conn, null);}}
查询操作3
/** MapHander:是ResultSetHandler接口的实现类,对应表中的一条记录。* 将字段及相应字段的值作为map中的key和value*/@Testpublic void testQuery3(){Connection conn = null;try {QueryRunner runner = new QueryRunner();conn = JDBCUtils.getConnection3();String sql = "select id,name,email,birth from customers where id = ?";MapHandler handler = new MapHandler();Map<String, Object> map = runner.query(conn, sql, handler, 23);System.out.println(map);} catch (SQLException e) {e.printStackTrace();}finally{JDBCUtils.closeResource(conn, null);}}
查询操作4
/** MapListHander:是ResultSetHandler接口的实现类,对应表中的多条记录。* 将字段及相应字段的值作为map中的key和value。将这些map添加到List中*/@Testpublic void testQuery4(){Connection conn = null;try {QueryRunner runner = new QueryRunner();conn = JDBCUtils.getConnection3();String sql = "select id,name,email,birth from customers where id < ?";MapListHandler handler = new MapListHandler();List<Map<String, Object>> list = runner.query(conn, sql, handler, 23);list.forEach(System.out::println);} catch (SQLException e) {e.printStackTrace();}finally{JDBCUtils.closeResource(conn, null);}}
查询操作5
/** ScalarHandler:用于查询特殊值*/@Testpublic void testQuery5(){Connection conn = null;try {QueryRunner runner = new QueryRunner();conn = JDBCUtils.getConnection3();String sql = "select count(*) from customers";ScalarHandler handler = new ScalarHandler();Long count = (Long) runner.query(conn, sql, handler);System.out.println(count);} catch (SQLException e) {e.printStackTrace();}finally{JDBCUtils.closeResource(conn, null);}}@Testpublic void testQuery6(){Connection conn = null;try {QueryRunner runner = new QueryRunner();conn = JDBCUtils.getConnection3();String sql = "select max(birth) from customers";ScalarHandler handler = new ScalarHandler();Date maxBirth = (Date) runner.query(conn, sql, handler);System.out.println(maxBirth);} catch (SQLException e) {e.printStackTrace();}finally{JDBCUtils.closeResource(conn, null);}}
自定义ResultSetHandler的实现类
/** 自定义ResultSetHandler的实现类*/@Testpublic void testQuery7(){Connection conn = null;try {QueryRunner runner = new QueryRunner();conn = JDBCUtils.getConnection3();String sql = "select id,name,email,birth from customers where id = ?";ResultSetHandler<Customer> handler = new ResultSetHandler<Customer>(){@Overridepublic Customer handle(ResultSet rs) throws SQLException {// System.out.println("handle");// return null;// return new Customer(12, "成龙", "Jacky@126.com", new Date(234324234324L));if(rs.next()){int id = rs.getInt("id");String name = rs.getString("name");String email = rs.getString("email");Date birth = rs.getDate("birth");Customer customer = new Customer(id, name, email, birth);return customer;}return null;}};Customer customer = runner.query(conn, sql, handler,23);System.out.println(customer);} catch (SQLException e) {e.printStackTrace();}finally{JDBCUtils.closeResource(conn, null);}}
资源关闭
使用dbutils.jar包中的DbUtils工具类实现连接等资源的关闭:/**** @Description 使用dbutils.jar中提供的DbUtils工具类,实现资源的关闭* @author shkstart* @date 下午4:53:09* @param conn* @param ps* @param rs*/public static void closeResource1(Connection conn,Statement ps,ResultSet rs){DbUtils.closeQuietly(conn);DbUtils.closeQuietly(ps);DbUtils.closeQuietly(rs);}
7.DAO设计模式
BaseDao类
package com.atguigu.utils;import org.apache.commons.dbutils.QueryRunner;import org.apache.commons.dbutils.handlers.*;import java.lang.reflect.ParameterizedType;import java.lang.reflect.Type;import java.sql.Connection;import java.sql.SQLException;import java.util.List;import java.util.Map;/*** @author yinhuidong* @createTime 2020-02-12-21:07*/public class BaseDao<T> {private Class<T> type;// 定义一个变量来接收泛型的类型public BaseDao() {//当子类调用父类方法时获取当前子类的父类类型ParameterizedType parameterizedType = (ParameterizedType) this.getClass().getGenericSuperclass();//获取具体的泛型的类型Type[] types = parameterizedType.getActualTypeArguments();this.type = (Class<T>) types[0];}private QueryRunner runner = new QueryRunner();/*** 考虑到事务以后的通用增删改*/public int update(Connection co, String sql, Object... args) throws SQLException {return runner.update(co, sql, args);}/*** 考虑到事务以后的通用查询一*/public <T> T select1(Connection co, String sql, Object... args) throws SQLException {BeanHandler<T> handler = new BeanHandler<>((Class<T>) type);return runner.query(co, sql, handler, args);}/*** 考虑到事务以后的通用查询二*/public <T> List<T> select2(Connection co, String sql, Object... args) throws SQLException {BeanListHandler<T> handler = new BeanListHandler<>((Class<T>) type);return runner.query(co, sql, handler, args);}/*** MapHandler*/public Map<String, Object> select3(Connection co, String sql, Object... args) throws SQLException {MapHandler handler = new MapHandler();return runner.query(co, sql, handler, args);}/*** MapListHandler*/public List<Map<String, Object>> select4(Connection co, String sql, Object... args) throws SQLException {MapListHandler handler = new MapListHandler();return runner.query(co, sql, handler, args);}/*** 利用ScalarHandler获取单一值* 考虑事务问题*/public Object select5(Connection co, String sql, Object... args) throws SQLException {ScalarHandler handler = new ScalarHandler();return runner.query(co, sql, handler, args);}}
Dao接口
/*** @author yinhuidong* @createTime 2020-02-06-14:49*/public interface CustomerDao {int add(Connection co,Object...args) throws SQLException;int delete(Connection co,Object...args) throws SQLException;int updates(Connection co,Object...args) throws SQLException;Customer FindByValue(Connection co,Object...args) throws SQLException;List<Customer> FindMore(Connection co, Object...args) throws SQLException;Long count(Connection co,Object...args) throws SQLException;}
DaoImpl实现类
/*** @author yinhuidong* @createTime 2020-02-06-14:56*/public class CustomerDaoImpl extends BaseDao<Customer> implements CustomerDao {@Overridepublic int add(Connection co, Object... args) throws SQLException {String sql="insert into customers (name,email,birth)values(?,?,?);";return update(co,sql,args);}@Overridepublic int delete(Connection co, Object... args) throws SQLException {String sql="delete from customers where id=?;";return update(co,sql,args);}@Overridepublic int updates(Connection co, Object... args) throws SQLException {String sql="update customers set name=?,email=?,birth=? where id=?;";return update(co,sql,args);}@Overridepublic Customer FindByValue(Connection co, Object... args) throws SQLException {String sql="select id,name,email,birth from customers where id=?;";return selectById(co,sql,args);}@Overridepublic List<Customer> FindMore(Connection co, Object... args) throws SQLException {String sql="select id,name,email,birth from customers ;";return selectMore(co,sql,args);}@Overridepublic Long count(Connection co,Object...args) throws SQLException {String sql="select count(*) from customers ;";return (Long) selectOne(co,sql,args);}}
测试类
/*** @author yinhuidong* @createTime 2020-02-06-15:10*/public class TestDao {private CustomerDao dao=new CustomerDaoImpl();@Testpublic void test(){Connection co=null;try {co=JDBCUtils.getConnection();co.setAutoCommit(false);SimpleDateFormat format = new SimpleDateFormat("yyyy-MM-dd");Date date = format.parse("2017-02-21");int add = dao.add(co, "name", "email", new java.sql.Date(date.getTime()));co.commit();if (add>0){System.out.println("添加成功!");}else{System.out.println("添加失败!");}} catch (SQLException e) {try {co.rollback();} catch (SQLException e1) {e1.printStackTrace();}} catch (ParseException e) {e.printStackTrace();} finally {JDBCUtils.closeResource(co);}}@Testpublic void test2(){Connection co=null;try {co=JDBCUtils.getConnection();co.setAutoCommit(false);Customer customer = dao.FindByValue(co, 21);co.commit();System.out.println(customer);} catch (SQLException e) {e.printStackTrace();} finally {JDBCUtils.closeResource(co);}}}
JDBCUtils工具类
package com.atguigu.java6;import com.alibaba.druid.pool.DruidDataSourceFactory;import com.alibaba.druid.util.JdbcUtils;import com.mchange.v2.c3p0.ComboPooledDataSource;import org.apache.commons.dbcp.BasicDataSourceFactory;import javax.sql.DataSource;import java.io.InputStream;import java.sql.Connection;import java.sql.SQLException;import java.util.Properties;/*** @author yinhuidong* @createTime 2020-02-27-21:52*/public class JDBCUtils {/*** c3p0*/private static DataSource source1=new ComboPooledDataSource("helloc3p0");public static Connection getConnection() throws SQLException {return source1.getConnection();}/*** dbcp*/private static DataSource source2=null;static{try {InputStream is = JDBCUtils.class.getClassLoader().getResourceAsStream("dbcp.properties");Properties prop = new Properties();prop.load(is);source2=BasicDataSourceFactory.createDataSource(prop);} catch (Exception e) {e.printStackTrace();}}public static Connection getConnection2() throws SQLException {return source2.getConnection();}private static DataSource source3=null;static {try {Properties prop = new Properties();InputStream is = JDBCUtils.class.getClassLoader().getResourceAsStream("druid.properties");prop.load(is);source3=DruidDataSourceFactory.createDataSource(prop);} catch (Exception e) {e.printStackTrace();}}public static Connection getConnection3() throws SQLException {return source3.getConnection();}/*** closeResource*/public static void closeResource(Connection co){JdbcUtils.close(co);}}

若有收获,就点个赞吧
0 人点赞
