- 一,java语言概述
- 二,java基本语法
- 三,数组
- 四,面向对象
- 1.成员变量(属性)与局部变量的区别
- 2.return关键字
- 3.对象数组
- 4.匿名对象与方法重载
- 5.可变个数形参与变量赋值
- 6.值传递机制与递归方法
- 7.封装和隐藏
- 8.Eclipse中的Debug
- 9.方法重写与权限修饰符
- 10.super关键字
- 11.子类对象实例化全过程:
- 12.向下转型
- 13.instanceof关键字:
- 14.java.lang.Object
- 15.==和equals()的区别
- 16.equals()方法的重写:
- 17.Object类中toString()的使用:
- 18.包装类
- 19.static关键字
- 20.单例设计模式:
- 21.代码块:和属性赋值顺序完结篇
- 22.final关键字
- 23.抽象类与抽象方法
- 24.接口:interface
- 25.内部类的使用:
- 五,异常处理
- 六,多线程
- 七,常用类
- 八,枚举类和注解
- 九,集合框架
- 十,泛型
一,java语言概述
1.常用Dos命令
dir:列出当前目录下的文件以及文件夹md:创建目录rd:删除目录(空目录)cd:进入指定目录cd..:退回上一级目录cd/:退回根目录del:删除文件echo 1 >java.txt:创建文件exit:退出
2,java语言运行机制及运行过程
Java语言特点:跨平台性Java两种核心机制:Java虚拟机(jvm):Java程序运行环境垃圾回收机制(gc)
3.jdk,jre,jvm的关系
jdk:Java开发工具包。(Java开发工具包和jre)jre:Java运行环境。(包括jvm)
4 环境变量的配置
为什么要添加环境变量?让Java工具包在任何路径下都可以使用。高级系统设置-环境变量:系统变量-path(window系统执行命令时需要搜索的路径)加上 jdk的安装路径\bin开发时的配置(推荐):在系统变量里面新建变量JAVA_HOME 值为jdk安装路径。然后再classpath变量中加入:%JAVA_HOME%\bin
5.HelloWorld
如何显示记事本后缀:我的电脑-查看-文件拓展名Java代码写在.java结尾的文件中。(源文件)通过javac命令对该Java文件进行编译。(字节码文件)通过Java命令对。class文件进行运行。
6 注释
1.单行注释//2.多行注释/**/3.文档注释/** */注释内容可以被jdk提供的工具javadoc解析,生成一套以网页文件形式体现的该程序的说明文档。
二,java基本语法
1.关键字和保留字
关键字:在Java语言里有特殊含义的字符串。保留字:目前没用到,以后的版本可能会用到。
2.标识符
标识符:自己起的名字。包括:包名,类名。。。0-9 _ $数字不可以开头不能使用关键字和保留字,可以包含严格区分大小写不能包含空格
3.变量
变量变量:内存中的一个存储区域。可以在同一类型范围内变化。包含:类型,名,存储的值。作用:内存中保存数据。先声明,后使用。同一个作用域内,不能定义重复的变量名。变量分类:按照数据类型分类基本数据类型:数值(整数,浮点数),字符,布尔引用数据类型:类(包括字符串),接口,数组变量分类:按照声明位置不同分类成员变量:(类内,方法体外)包括:实例变量(不以static修饰),类变量(以static修饰)局部变量:(方法体内)包括:形参,方法局部变量,代码块局部变量1.整型:byte,short,int,long 字节(1.2.4.8)1字节=8bit*long型变量的声明必须以l或L结尾2.浮点型:float(4),double(8)float:单精度浮点数,精确7位*Java的浮点型常量默认为double类型,声明float常量,后加f或F。3.字符类型 char(2)表示方式:1.声明一个字符,2.定义一个转义符。char c='\n';4.布尔类型boolean:true,false双引号里面如果想要使用双引号,前面需要加\char+int=int基本数据类型之间的运算1.自动类型提升byte+int=intJava支持自动向上转型。当byte,char,short三种变量做运算时,结果为int。2.强制类型转换向下转型强制类型转换符(int),可能会损失精度。*long赋值的数后面不加l可能会导致编译失败,过大的整数。整型常量默认类型为int,浮点型默认常量为double。String类型变量的使用String属于引用类型。String可以和所有类型做运算。
4.运算符
算术运算符a=2;b=++a;=>a=3,b=3;a=2;b=a++;=>a=3,b=2;赋值运算符比较运算符逻辑运算符&和&&的异同:1)都表示且2)&&短路且位运算符三元运算符三元运算符的嵌套:int sum=(a>b):a?((a==b)?"a==b":b)另一个三目运算符作为表达式出现
5.流程控制
顺序结构分支结构if-elseswitch-caseswitch(表达式){case 常量1:执行语句;break;default:执行语句;}switch结构中的表达式,只能是如下6种数据类型:byte,short,char,int,String,枚举。例题:年份累加循环结构:forwhiledo{}while();键盘输入:import java.util.Scanner;Scanner sc=new Scanner(System.in);int a=sc.nextInt();String b=sc.next();
三,数组
1.一维数组
1)数组默认值
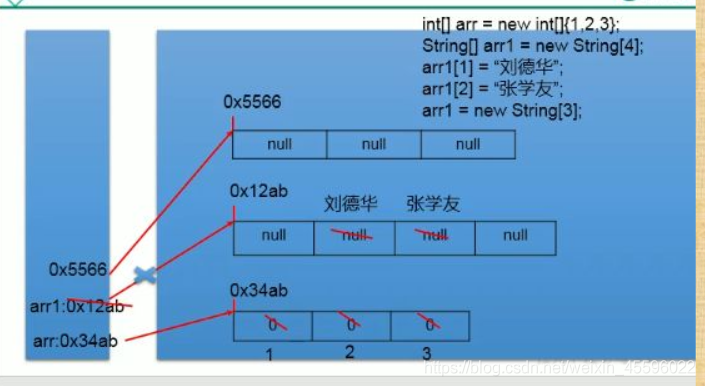
数组元素的默认初始化值:整型数组元素默认值为0浮点型数组元素默认值0.0布尔型数组元素默认值false字符型数组元素默认值Ascii值位0的元素引用数据类型数组元素默认值null
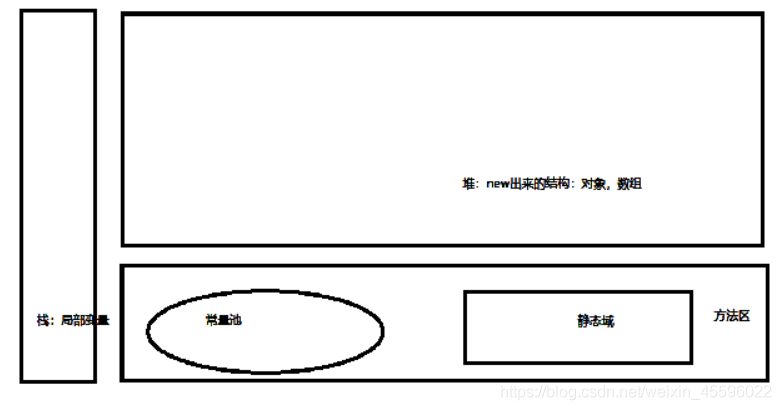
2)一位数组内存解析
2.二维数组
1)二维数组的使用
// 静态初始化int[][] arr = new int[][] { { 1, 2, 3 }, { 4, 5 }, { 6, 8, 7 } };// 动态初始化1int[][] arr1 = new int[3][2];// 动态初始化2int[][] arr2 = new int[3][];// 调用arr2arr2[1] = new int[3];// 先指定列的个数for (int i = 0; i < arr2[1].length; i++) {System.out.println(arr2[1][i]);}// 如何获取数组的长度System.out.println(arr.length);// 3System.out.println(arr[0].length);// 3// 二维数组元素的调用for (int i = 0; i < arr.length; i++) {for (int j = 0; j < arr[i].length; j++) {System.out.println(arr[i][j]);}}
2)二维数组默认初始值
int a[][]=new int[3][3];System.out.println(a[0]);//输出地址[I@15db9742System.out.println(a[0][0]);//0System.out.println(a[2][3]);//java.lang.ArrayIndexOutOfBoundsException
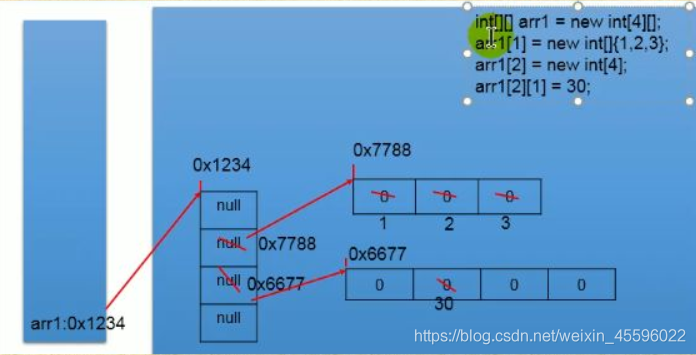
3)二维数组的内存解析
3.数组中设计的常见算法:
1)反转
2)线性查找
3)二分查找
4)冒泡排序
4.Arrays工具类的使用
Arrays工具类的使用int a[] = new int[] { 43, 26, 25, 65, 89, 75, 45, 13, 23, 15, 65 };int b[] = new int[] { 43, 26, 25, 65, 89, 75, 45, 13, 23, 15, 65 };System.out.println(Arrays.equals(a, b));//判断两个数组是否相等Arrays.sort(a);//对数组进行从小到大排序int key=89;System.out.println(Arrays.binarySearch(a, key));//对排序后的数组进行二分查找System.out.println(Arrays.toString(a));//输出数组信息
5.数组中的常见异常
1.下标越界异常2.空指针异常/** int a[] = new int[] { 43, 26, 25, 65, 89, 75, 45, 13, 23, 15, 65 }; a=null;* System.out.println(a[0]);*//** int[][]arr=new int [4][];* System.out.println(arr[0][0]);*/String arr[]=new String [] {"aa","bb","cc"};arr[0]=null;System.out.println(arr[0].toString());
四,面向对象
1.成员变量(属性)与局部变量的区别
不同点:1.类中的声明位置不同1)类内,方法体外2)方法的形参列表,方法体内,构造器形参,构造器内部变量2.权限修饰符的不同1)可以在声明属性时指明其权限,使用权限修饰符2)不能使用权限修饰符3.默认初始化值1)根据其类型都有默认的初始化值2)没有默认初始化值(调用之前显示赋值),形参在调用时赋值。4.内存中加载的位置1)堆中(非static)2)栈中
2.return关键字
1适用范围:使用在方法体中2.作用:1)结束方法2)针对有返回值类型的方法,返回值。3.return 后面不可以声明执行语句方法中使用的注意点:可以调用当前类的属性和方法方法中不可以定义方法
3.对象数组
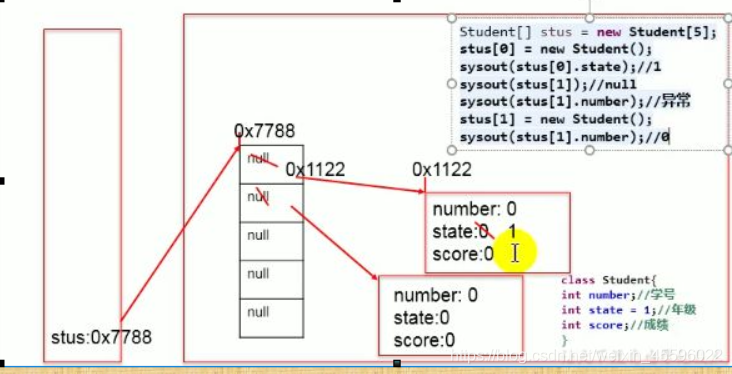
内存解析
4.匿名对象与方法重载
匿名对象
new Phone().price=1999;new Phone().showPrice;//0.0每次new的都是堆空间的一个新对象。
方法重载
1.定义:在同一个类中,允许存在一个以上同名方法,只要他们的参数个数/顺序,参数类型不同即可。2.特点:与返回值无关,与权限修饰符无关。常见的:构造器重载
5.可变个数形参与变量赋值
可变个数形参
Object...args如果有多个参数,必须放到最后。
变量赋值
如果变量是基本数据类型:此时赋值的是变量所保存的数据值。如果变量时引用数据类型:此时赋值的是变量所保存数据的地址值。此时改变变量的值,相当于改变地址对应的值。
6.值传递机制与递归方法
值传递机制
形参:方法定义时,小括号内的参数。实参:方法调用时,实际传递给形参的值。如果参数是基本数据类型,此时赋值的是变量所保存的数据值。如果参数是引用数据类型,此时赋给形参的值,是变量所指向地址的值。
递归方法
一个方法体内,自己调用自己。
/*** 递归方法求1-100的和*/public static void main(String[] args) {int n = 100;int sum = getSum(n);System.out.println(sum);}public static int getSum(int sum) {if (sum == 1) {return 1;} else {return sum + getSum(sum - 1);}}/*** 已知一个数列,f(0)=1,f(1)=4,f(n+2)=2*f(n+1)+f(n);* 其中n是大于0的整数,求f(10。** @param sum* @return*/public static int getSum(int sum) {if (sum == 0) {return 1;} else if (sum == 1) {return 4;} else {return 2 * getSum(sum - 1) + getSum(sum - 2);}}/*** 递归方法求斐波那契数列的前n项,并输出。* @return*/public static void main(String[] args) {int arg=10;int avg=getArgs(arg);System.out.println(avg);}public static int getArgs(int args){if(args<=2){return 1;}else{return getArgs(args-1)+getArgs(args-2);}}
7.封装和隐藏
封装和隐藏:
特点:高内聚:类的内部数据操作细节自己完成,不允许外部干涉低耦合:仅仅对外暴漏少量方法用于使用。体现:私有化属性,设置公有的方法来获取和设置属性。需要权限修饰符来配合。
权限修饰符:
1.private:类内部2.default:同一包下的类3.protected:不同包的子类4.public:同一项目下用来修饰类:public和default,和类的内部结构:属性,方法,构造器,内部类。
构造器:construct
作用:1)创建对象2)初始化对象构造器重载
属性赋值的先后顺序:
1)默认初始化2)显示初始化3)构造器初始化4)set方法
javabean
类是公有的有一个无参的公共构造器有属性,且有对应的get,set方法
关键字this的使用
1)this可以用来修饰属性和方法this代表当前对象2)this可以用来修饰和调用构造器调用构造器:public Student(Integer number, Integer state) {this.number = number;this.state = state;}public Student(Integer number, Integer state, Double score) {this(number,state);//调用其他构造器,不能调用自己。this.score = score;}
MVC设计模式:
视图模型层view控制器层controller:service,base,activity模型层model:bean,dao,db
继承性:extends
减少了代码的量,提高了代码复用性便于功能的拓展为多态的实现提供了前提一旦子类A继承父类B以后,A就获取了B中声明的所有属性和方法。规定:一个类可以被多个子类继承一个类只能由一个父类允许多层继承
8.Eclipse中的Debug
Debug:1.设置断点:2.按键:F5进入方法,F6一行一行执行,F7从方法中出来resume:终止此处断点,进入下一处。Terminate:强行终止debug中step into功能失灵问题:更换eclipsejre为jdk的。
9.方法重写与权限修饰符
方法重写
1.重写:子类继承父类以后,可以对父类中同名同参数的方法,进行覆盖操作。2.应用:重写以后,当子类执行该方法,实际上执行的是子类重写父类的方法。3.规定:方法名形参列表必须相同,子类重写方法的权限修饰符不小于父类被重写的方法,*子类不能重写父类的私有方法,返回值类型:void--》void,其他的小于等于父类的返回值类型。子类抛出的异常类型不能大于父类。非static(因为静态方法不能被覆盖,随着类的加载而加载)
权限修饰符
四种权限修饰符在不同包的子类中,能调用order类中声明为protected和public的属性,方法。不同包下的不同类(非子类)只能调用order类中的public的属性和方法。
10.super关键字
super调用属性和方法1.我们可以在子类的方法或构造器中,通过使用"super."属性/方法的方式,显示的调用父类中声明的属性或方法,通常省略。2.特殊情况下,当子类和父类定义了同名的属性时,用super来调用父类的方法。3.当子类重写了父类的方法,在子类的方法中调用父类中被重写的方法,必须使用super。4.super调用构造器:public Student(int id,String name,String school){super(id,name);//调用父类的构造器this.school=school;}在子类构造器中用super(形参列表)调用父类中声明的指定的构造器。super声明在子类构造器首行。
11.子类对象实例化全过程:
1.从结果上看,子类继承父类以后,就获取了父类中声明的属性和方法;创建子类对象,在堆空间中,就会加载所有父类中声明的属性。2.从过程上看,当我们通过子类的构造器创建子类对象时,我们一定会直接或间接地调用其父类构造器,进而调用父类的父类的构造器,知道调用了Object的无参构造器为止。正因为加载过所有的父类结构,所以才可以看到内存中有父类的结构,子类对象才可以进行调用。
12.向下转型
向下转型:使用强制类型转换符Person p=new Student();//此时p并不能调用Student中重写的方法。Student stu=(Student)p;//此时就可以了
13.instanceof关键字:
stu instanceof p:判断对象stu是否是类p的实例,如果是,返回true,如果不是,返回false。使用情景:为了避免向下转型时出现类型转换异常,我们在向下转型之前,先用instanceof进行判断,如果返回true在进行转型。
14.java.lang.Object
1.Object类时左右Java类的父类2.如果在声明类时没有指明类的直接父类,默认类的父类为Object。3.Object类中的功能(属性,方法)具有通用性。属性:无。方法:equals()/toString()/getClass()/hashCode()/clone()克隆/finalize()垃圾回收4.Object类只声明了一个空参构造器
15.==和equals()的区别
1.==可以使用在基本数据类型和引用数据类型变量中2.==如果比较基本数据类型变量,比较的是数据是否相等(不一定类型要相同)。如果比较引用类型变量,比较的是地址值是否相等,即两个对象是否指向同一个对象实体。1.equals()是一个方法,不是运算符。2.只适用引用数据类型。3.Object类中equals的定义:public boolean equals(Object obj) {return (this == obj);}String类中定义的equals方法:STring对equals方法进行了重写,如果地址相同,返回true,否则比较字符串的值是否相同。
16.equals()方法的重写:
public boolean equals(Object o) {if (this == o) return true;if (o == null || getClass() != o.getClass()) return false;Customer customer = (Customer) o;return age == customer.age &&Objects.equals(name, customer.name);}
17.Object类中toString()的使用:
1.当我们输出一个对象的引用,实际上就是调用当前对象的toString()2.Object类中对toString()的定义:public String toString() {return getClass().getName() + "@" + Integer.toHexString(hashCode());}3.向String,Date,File。包装类实际上都重写了Object的toString方法。使得在调用对象的toString方法时,返回实体对象信息。4.自定义类重写toString方法
18.包装类
八种数据类型都有对应的包装类
char—>Character
public static void main(String[] args) {/*** 基本数据类型和包装类,String的转换* jdk5.0新特性:自动拆箱与自动装箱*///包装类转换为基本数据类型Integer a=10;int b=a;//自动拆箱int c=a.intValue();//int->integer//基本数据类型转换为包装类int num1=10;Integer num2=num1;//自动装箱Integer num3=new Integer(num1); //integer->int//基本数据类型和包装类与String的转换int num=1;String s1=num+"";//int->StringString s2=String.valueOf(num);//int->StringInteger number=10;String s3=String.valueOf(number);//integer->Stringint aa=Integer.parseInt(s3);//String->intInteger bb= Integer.parseInt(s3);//String->integer}
/*** 面试题:* 三目运算符后面两个条件语句对应的类型会在比较前进行统一。*/Object o1=true?new Integer(1):new Double(2.0);System.out.println(o1);//1.0
Integer内部存在一个Integer[]数组,范围-128—+127,如果我们是用自动装箱的方式,
给integer赋值的范围在此范围内直接从数组中取。
19.static关键字
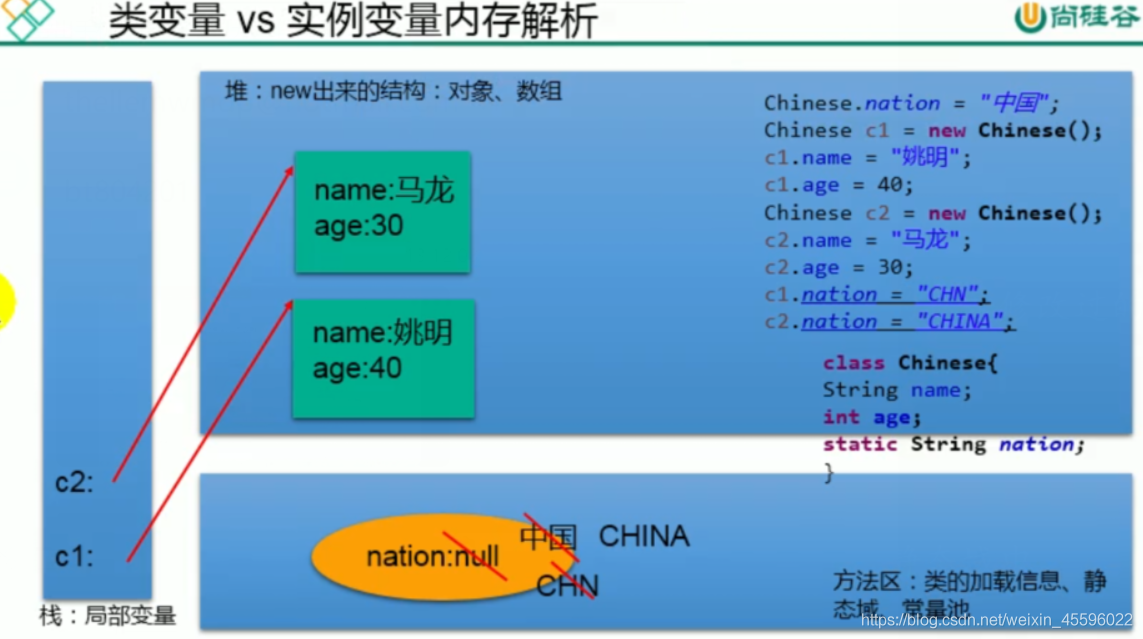
1.可以用来修饰属性,方法,代码块,内部类2.修饰属性:静态属性(类变量)和非静态属性(实例变量)实例变量:每个对象都有自己的实例变量。静态变量:所有对象共享静态变量。通过一个对象修改,别的对象调用的也是修改过的。public static void setCountry(String country) {Chinese.country = country;}静态变量随着类的加载而加载。静态变量的加载早于对象的创建。由于类只会加载一次,则静态变量在内存中也只存在一份,在方法区的静态域中。3.修饰方法:静态方法_随着类的加载而加载。静态方法中只能调用静态的方法或属性。非静态方法中,既可以调用非静态的方法或属性,也可以调用静态的方法或属性。4.开发中如何确定一个属性要声明为static?所有对象都相同的属性。开发中如何确定一个方法要声明为static?操作静态属性的方法工具类中的方法static实现id自增private static int idadd=1001;
类变量与实例变量的内存解析
20.单例设计模式:
1.采取一定的方法,保证在整个软件系统中,对某个类只能存在一个对象实例。2.饿汉式vs懒汉式实现://饿汉式public class Test1 {//私有的构造器private Test1(){}//私有的创建对象private static Test1 test=new Test1();//公有的方法供外部调用public static Test1 getTest1(){return test;}}//懒汉式public class Test1 {//私有的构造器private Test1(){}//私有的创建对象private static Test1 test=null;//公有的方法供外部调用public static Test1 getTest1(){if(test==null){test=new Test1();}return test;}}3.懒汉式和饿汉式的对比:饿汉式占用内存,线程安全的。懒汉式好处:延迟对象的创建,线程不安全。4.应用场景:网站计数器,应用程序的日志应用,数据库连接池,Application。main()方法的使用说明也是一个普通的静态方法可以做输入
21.代码块:和属性赋值顺序完结篇
作用:用来初始化对象。只能用static来修饰分类:静态代码块,非静态代码块非静态能调用静态的属性方法,静态的不能掉用非静态的属性方法。1.静态代码块随着类的加载而执行一共只执行一次,因此可以初始化类的信息。2.非静态代码块随着对象的创建而执行每次创建对象都会执行一次,因此可以创建对象时初始化对象。
属性赋值顺序完结篇1)默认初始化2)显示初始化/在代码块中赋值3)构造器初始化4)set方法
22.final关键字
1.final修饰类和方法用final修饰的类不能被继承,称为最终类。eg:String,System,StringBuffer用final修饰的方法不能被重写。2.final修饰变量此时的变量就称为常量。1)修饰属性显式初始化,代码块中初始化。2)修饰局部变量该局部变量的值不能被再次修改
23.抽象类与抽象方法
abstract关键字的使用1.abstract抽象的2.可以用来修饰的结构:类和方法3.abstract修饰类:抽象类1)此类不能实例化2)抽象类中一定有构造器,便于子类实例化时调用。3)开发中,都会提供抽象类的子类,让子类对象实例化,完成相关操作。4.abstract修饰方法:抽象方法public abstract void test();包含抽象方法的类一定是抽象类,抽象类不一定包含抽象方法。如果继承了抽象类,必须继承抽象类的抽象方法。5.注意1)abstract不能用来修饰:属性,构造器。2)abstract不能用来修饰私有方法,静态方法,final方法,final的类。创建抽象类的匿名子类对象Person p=new Person(){//Person是一个抽象类public void eat(){}public void walk(){}};
24.接口:interface
1.接口的使用用interface来定义2.Java中,接口和类是并列的两个结构。3.如何定义接口,定义接口的成员1)jdk7以前,只能定义全局常量和抽象方法全局常量:public static final的,但是书写时,可以省略不写抽象方法:public abstract的,但是书写时,可以省略不写。2)jdk8:除了定义全局常量和抽象方法外,还可以定义静态方法,默认方法。4.接口中不能定义构造器,接口不能实例化。5.Java中,通过类去实现接口。implements6.Java中允许实现多个接口。7.接口与接口之间可以多继承8.接口的实现体现了多态性。面试题:接口与抽象类的比较:1.抽象类:通过extends来继承,只能继承一个抽象类,抽象类中一定有构造方法,创建子类对象时被调用。抽象类中不光有抽象方法,还可以有其他方法。2.接口:接口通过implements来实现,允许实现多个接口,接口中不存在构造方法,接口中只能声明全局常量和抽象方法,jdk'8.0以后,还可以定义静态方法和默认方法。3.不能实例化,都可以被继承。
接口的应用:
代理模式
/*** 代理模式:将两者都要实现的行为封装在接口中,被代理对象和代理对象都继承该接口* 代理对象中声明被代理对象属性,并创建拥该属性的构造器,通过创建代理对象完成* 被代理对象的方法。*/class TEST{public static void main(String[] args) {Zhuli zhuli=new Zhuli(new Star());zhuli.sing();zhuli.buyThing();zhuli.getMoney();}}public class Star implements Proxy {//被代理对象@Overridepublic void sing() {System.out.println("明星唱歌");}@Overridepublic void getMoney() {}@Overridepublic void buyThing() {}}interface Proxy {public void sing();public void getMoney();public void buyThing();}class Zhuli implements Proxy{//代理对象private Star star;//声明被代理对象public Zhuli(Star star){//存在被代理对象的带参构造器this.star=star;}@Overridepublic void sing() {star.sing();//被代理对象完成}@Overridepublic void getMoney() {System.out.println("助理替歌手收钱");}@Overridepublic void buyThing() {System.out.println("助理替歌手买东西");}}
工厂模式
实现创建者与调用者的分离,将创建对象的具体过程隔离起来。
public interface Java8 {/*** 接口中定义的静态方法只能通过接口来调用*/public static void test1(){System.out.println("***");};/*** 通过实现类的对象可以调用/重写接口中的默认方法*/public default void test2(){System.out.println("***");}/*** 如果一个类继承的父类和实现的接口存在同名同参数的方法,* 子类在没有重写这个方法的前提下,默认调用父类的方法*//*** 如果一个类实现的多个接口中存在同名同参数的方法,* 子类在没有重写这个方法的前提下,会报错,接口冲突。* 如果重写的方法想要调用其中的一个:接口.super.method*/}
25.内部类的使用:
1.Java中允许将一个类声明在另一个类的内部
2.内部类的分类:成员内部类(静态,非静态)vs局部内部类(方法,代码块,构造器内)
3.成员内部类:
class Demo{public static void main(String[] args) {/*** 创建内部类实例*/Person.Dog dog=new Person.Dog();//静态内部类Person p=new Person();//非静态内部类Person.Bird bird=p.new Bird();}}class Person {private String name;public void eat(){System.out.println("吃饭");}/*** 内部类可以被final修饰,表示此类不能被继承* 内部可以定义属性方法构造器* 可以被abstract修饰*/static class Dog{//eat();不能调用外部的eat方法}class Bird{public Bird(){}/*** 调用外部成员的方法*/public void sing(){eat();name="bird";}}}
面试题:创建静态内部类对象和非静态内部类对象://静态内部类对象Person.Dog dog=new Person.Dog();//非静态内部类对象Person p=new Person();Person.Bird bird=new p.bird();
五,异常处理
1.异常的体系结构
异常:在Java中,程序执行发生的不正常情况称为异常。java.long.Throwable1.java.long.Error,:一般不编写针对性代码进行处理2.java.long,Exception:可以进行异常的处理1)编译时异常:IOException,FileNotFindException,ClassNotFindException2)运行时异常:NullPointException,ArrayIndexOutOfBoundsException,ClassCastException,NumberFormatException,InputMismatchException,ArithmeticException
2.异常处理机制一:
try-catch-finally一旦抛出异常,其后的代码就不再执行。try {//可能会出现异常的代码} catch (异常处理类型1 变量名1) {e.printStackTrace} catch (异常处理类型2 变量名2) {e.printStackTrace} finally {//最终一定要执行的代码}编译时异常和运行时异常的不同处理开发时运行时异常不需要try-catch编译时异常用try-catch来解决
3.异常处理机制二:Throws +异常类型
“throws+异常类型”写在方法声明处,指明方法执行时,可能会抛出的异常。一旦当方法体执行时,出现异常,仍会在异常代码处生成一个异常类的对象,此对象满足throws的异常类型时就会抛出,异常代码后续的代码,就不要执行。try-catch真正的将异常处理掉了,而throws只是将异常抛给了方法的调用者,并没有真正的处理掉。重写方法异常抛出的规则子类重写的方法抛出的异常类型不大于父类被重写的方法抛出的异常类型开发中如何选择try-catch还是throws1.如果父类被重写的方法没有抛出异常,则子类重写的方法中的异常只能用try-catch2.执行的方法a中,先后又调用了另外的几个方法,这几个方法是递进关系执行的,我们建议这几个方法使用throws的方法进行处理,而方法a可以用try-catch进行处理。
4.手动生成一个异常对象并抛出:throw
public class MyException {public static void main(String[] args) {person p=new person();try {p.setAge(-1001);} catch (Exception e) {System.out.println(e.getMessage());}}}class person {private int age;public person(){}public void setAge(int age) throws Exception{if (age>0){this.age=age;}else{throw new Exception("年龄不能小于0!");}}public int getAge(){return age;}}
5.用户自定义异常:
/*** 自定义异常* 1.继承于现的异常结构,RuntimeException,Exception* 2.提供全局常量, static final long serialVersionUID* 3.提供重载的构造器*/public class TestException extends IOException {static final long serialVersionUID=-7034897190745766939L;public TestException(){}public TestException(String msg){super(msg);}}
六,多线程
1.概述
1)概念
程序:为完成特定任务,用某种语言编写的一组指令的集合。一段静态的代码,静态对象。进程:程序的一次执行过程,或是正在运行的一个程序。是一个动态的过程,有他本身的生命周期。独立的方法区和堆空间线程:一个程序内部的执行路径。独立的计数器和栈
单核cpu和多核cpu假的多线程,多个线程交替进行。并行和并发并行:多个cpu同时执行多个任务。并发:一个cpu执行多个任务。并行:传输的数据8位一送出去串行:传输的数据1位1送出去
2)优点
1.提高应用程序的响应,增强图形化界面用户的体验。2.提高cpu利用率3.改善程序结构,将复杂的程序分为多个线程。
3)何时需要
1.程序需要同时执行多个任务。2.程序需要实现一些需要等待的任务时,用户输入,文件读写,网络操作,搜索。3.需要一些后台运行的程序。
2.创建线程的方式一:继承Thread类
/*** 多线程的创建:继承Thread类* 重写run方法-->将线程执行的操作声明在run方法* 创建子类的对象,通过此对象调用start方法*/public class MyThread extends Thread {public void run(){for (int i = 0; i <100 ; i++) {System.out.println(this.currentThread().getName()+" "+i);}}}class Test1{public static void main(String[] args) {MyThread m1=new MyThread();m1.start();}}
1)线程的常用方法:
*start():启动当前线程:调用当前线程的run方法* run();通常需要重写Thread类的run方法,将创建线程要执行的操作声明在此方法* currentThread():静态方法,返回执行当前代码的线程。* getName():获取当前线程名* setName():设置当前线程的名字* yield():释放当前cpu执行权* join():在线程a中调用线程b的join方法,a进入阻塞状态,直到b执行完以后,a才结束阻塞状态。优先权* sleep():挂起一会儿,单位ms* stop():强制终止,死亡
2)线程优先级:
1.MAX_PRIORITY:10MIN_PRIORITY:1NORM_PRIORITY:52.如何获取和设置当前线程优先级:m1.setPriority();m1.getPriority();优先级高并不一定代表一定先执行,只是概率大一点。
3)案例:多窗口卖票
/*** 继承Thread方法实现多窗口卖票,存在线程安全问题*/public class ThreadTest1 {public static void main(String[] args) {Window w1=new Window();Window w2=new Window();w1.start();w2.start();}}class Window extends Thread{private static int piao=100;public void run(){while (true){if (piao>0){System.out.println(currentThread().getName()+" "+piao);piao--;}else{break;}}}}
3.创建多线程的方式二:实现runnerable接口的方式
/*** 通过实现runnable接口创建多线程* 1.创建类a实现runnable接口* 2.类a重写runnable的run(方法* 3.在调用方法里创建a的对象;* 4创建Thread对象b并传入a的对象* 5.b.start(;*/public class RunnableTest2 {public static void main(String[] args) {myRunnable m1=new myRunnable();Thread t1=new Thread(m1);t1.start();}}class myRunnable implements Runnable{public void run(){for (int i = 0; i <10 ; i++) {System.out.println(Thread.currentThread().getName()+" "+i);}}}
1)案例:多窗口卖票
*** runnable方式实现多窗口卖票,存在线程安全问题*/public class RunnableTest {public static void main(String[] args) {MyRunnable m1=new MyRunnable();Thread t1=new Thread(m1);Thread t2=new Thread(m1);Thread t3=new Thread(m1);t1.start();t2.start();t3.start();}}class MyRunnable implements Runnable{private int piao;/*** 此处不用static修饰的原因,因为上面类中的方法仅仅new了一个此类的对象,* 所以个Thread对象实际上只是使用了同一个对象的票。*/public void run(){while(true){if (piao>0){System.out.println(Thread.currentThread().getName()+" :"+piao);piao--;}else{break;}}}}
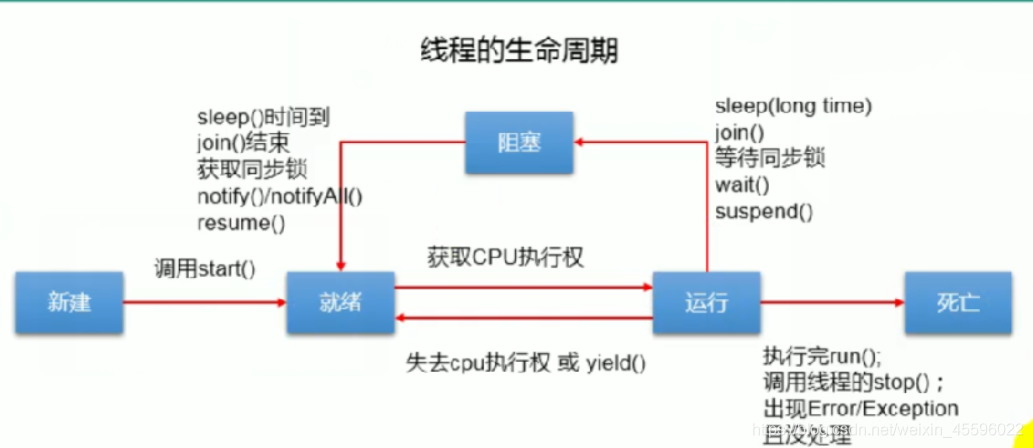
2)线程的生命周期
线程的生命周期Thread.state();1.新建 new2.就绪 start3.运行 run4.阻塞 join,sleep,等待同步锁,wait,(过时的挂起)5.死亡 stop
4.线程的同步
/*** runnable方式实现多窗口卖票,存在线程安全问题* 1.买票过程中出现重票错票* 2.问题描述:当某个线程操作车票的过程中,尚未操作完成,其他线程参与进来,也操作车票。* 3.如何解决:当一个线程在操作共享数据的时候,其他线程不能参与进来,直到线程a操作完,其他线程才能参与进来,* 即使线程a出现了阻塞,也不能被改变。* 4.在Java中我们通过同步机制,来解决线程安全问题。* 方式一:同步代码块* synchronized (同步监视器){* 需要被同步的代码*不能包多了,也不能包少了* }* 说明:1.操作共享数据的代码,就是需要被同步的代码。* 2.共享数据:多个线程共同操作的数据。* 3.同步监视器:俗称锁。任何一个类的对象都可以来充当锁。* 要求:多个线程必须公用同一把锁。* 补充:在实现runnable接口创建的多线程方式中,我么可以考虑使用this关键字充当锁,* 在继承Thread类创建的多线程方式中,我们可以考虑使用当前类.class的方式充当锁。* 方式二:同步方法*如果操作共享数据的代码,完整的声明在一个方法中,我们不妨将此方法声明为同步的。* 1.同步方法仍然涉及到同步监视器,只是不需要我i们显示的声明* 2.非静态的同步方法,同步监视器是this,静态方法的同步监视器是类的本身。* 5.同步的方式:解决了安全问题--好处* 操作同步代码时,只能有一个线程参与,其他线程等待,相当于是一个单线程的过程,效率低。--缺点*/
通过继承Thread类实现多窗口卖票
/*** 使用同步代码块方式解决线程安全问题* 通过继承Thread类实现多窗口卖票*/public class TreadTest1 {public static void main(String[] args) {window1 w1=new window1();window1 w2=new window1();w1.setName("窗口一");w2.setName("窗口二");w1.start();w2.start();}}class window1 extends Thread {private static int ticket=100;@Overridepublic void run() {while (true){synchronized (window1.class){if (ticket>0){try {sleep(10);} catch (InterruptedException e) {e.printStackTrace();}System.out.println(getName()+"卖出了一张票:"+ticket);ticket--;}else{break;}}}}}
继承Runnable方式实现多窗口卖票
/*** 使用同步代码块解决线程安全问题* 继承Runnable方式实现多窗口卖票*/public class RunnableTest1 {public static void main(String[] args) {window2 w1=new window2();Thread t1=new Thread(w1);Thread t2=new Thread(w1);t1.setName("窗口一:");t1.setName("窗口二:");t1.start();t2.start();}}class window2 implements Runnable{private int ticket=100;@Overridepublic void run() {while (true){synchronized (this){if (ticket>0){System.out.println(Thread.currentThread().getName()+"卖出了票:"+ticket);ticket--;}else{break;}}}}}
通过继承Thread类来创建多线程
/*** @author 尹会东* @create 2020 -01 - 21 - 16:41*//*** 通过同步方法解决线程安全问题* 通过继承Thread类来创建多线程*/public class ThreadTest2 {public static void main(String[] args) {window3 t1=new window3();window3 t2=new window3();t1.setName("窗口一:");t2.setName("窗口二:");t1.start();t2.start();}}class window3 extends Thread{private static int ticket=100;@Overridepublic void run() {while (true){show();}}public static synchronized void show(){//加static:此时的锁相当于当前类的对象if (ticket>0){System.out.println(Thread.currentThread().getName()+"卖出了票:"+ticket);ticket--;}}}
通过继承runnable方式来创建多线程
/*** 使用同步方法解决线程安全问题* 通过继承runnable方式来创建多线程*/public class RunnableTest2 {public static void main(String[] args) {window4 w=new window4();Thread t1=new Thread(w);Thread t2=new Thread(w);t1.setName("窗口一:");t2.setName("窗口二:");t1.start();t2.start();}}class window4 implements Runnable{private int ticket=100;@Overridepublic void run() {while (true){show();}}public synchronized void show(){if (ticket>0){System.out.println(Thread.currentThread().getName()+"卖出了:"+ticket);ticket--;}}}
5.线程安全的单例模式之懒汉式
1)通过同步代码块解决懒汉式单例设计模式的线程安全问题
/*** 通过同步代码块解决懒汉式单例设计模式的线程安全问题*/public class Thread1 {private static Thread1 instance=null;public Thread1 getInstance(){//效率低// synchronized (Thread1.class) {// if(instance==null){// instance=new Thread1();// }// return instance;// }/*** 先判断是否为空,如果为空,进行锁住,否则可以直接获取该对象。*/if (instance==null){synchronized (Thread1.class){if (instance==null){instance=new Thread1();}}}return instance;}}
2)通过同步方法解决懒汉式单例设计模式的线程安全问题
/*** 通过同步方法解决懒汉式单例设计模式的线程安全问题*/public class Thread2 {private static Thread2 instance = null;public synchronized Thread2 getInstance() {if (instance == null) {instance = new Thread2();}return instance;}}
6.死锁的问题:
/*** 死锁问题* 1.死锁的理解:不同的线程分别占用对方的同步资源不放弃,* 都在等待对方放弃自己需要的同步资源,就形成了线程的死锁* 2.说明:* 1)出现死锁后,不会出现异常,不会出现提示,只是所有的线程都处于阻塞状态,无法继续。* 2)我们使用同步时要避免出现死锁。*/
public class DeadTest {public static void main(String[] args) {StringBuffer s1=new StringBuffer();StringBuffer s2=new StringBuffer();new Thread(){public void run(){synchronized (s1){s1.append("123");s2.append("666");synchronized (s2){s1.append("456");s2.append("888");}}}}.start();new Thread(){public void run(){synchronized (s2){s1.append("123");s2.append("666");synchronized (s1){s1.append("456");s2.append("888");}}}}.start();}}
7.Lock锁方式解决线程安全问题:
/*** 解决线程安全的方式三:Lock锁--jdk5.0新特性* 面试题:synchronized与lock的异同:* 同:二者都可以解决线程安全问题* 异:synchronized机制在执行完相应的同步代码自动解锁(释放同步监视器),lock需要手动启动同步和解锁。* @author 尹会东* @create 2020 -01 - 21 - 12:09*/
public class LockTest {public static void main(String[] args) {testlock t=new testlock();Thread t1=new Thread(t);Thread t2=new Thread(t);t1.setName("窗口一!");t2.setName("窗口二:");t1.start();t2.start();}}class testlock implements Runnable {private int ticket = 100;private ReentrantLock lock = new ReentrantLock();@Overridepublic void run() {while (true) {try {lock.lock();if (ticket > 0) {System.out.println(Thread.currentThread().getName() + "卖出了票:" + ticket);ticket--;} else {break;}} finally {lock.unlock();}}}}
练习题:
/*** 银行一个账户,有两个储户分别向同一个账户存300元,每次存一百,分三次,每次存完打印账户余额。* 分析:* 1.是否是多线程问题?是,两个储户线程* 2.是否共想数据?,账户。* 3.是否线程安全问题?* 4.考虑如何解决线程安全问题?同步机制:种方式*/public class Bank {public static void main(String[] args) {Account account=new Account();Customer c1=new Customer(account);Customer c2=new Customer(account);c1.setName("尹会东");c2.setName("张贝贝");c1.start();c2.start();}}class Account {private double balance=0;public Account() {}public Account(double balance) {this.balance = balance;}public synchronized void save(double money) {try {Thread.sleep(1000);balance+=money;} catch (InterruptedException e) {e.printStackTrace();}System.out.println(Thread.currentThread().getName()+"存钱成功"+balance);}}class Customer extends Thread{private Account account;public Customer(Account account){this.account=account;}public void run(){for (int i = 0; i <3 ; i++) {account.save(1000);}}}
8.线程的通信:
/*** 线程通信的例子:使用两个线程交替打印1-100* 涉及到的个方法:* wait():一旦执行此方法,当前线程进入阻塞状态,并释放监视器* notify():一旦执行此方法,就会唤醒被wait的一个线程,如果有多个线程wait',就会唤醒优先级高的那个。* notifyAll():会唤醒所被wait的线程。* 说明:* 1.使用前提:只能写在同步方法或同步代码块里面* 2.方法的调用者必须是同步代码块或同步方法中的同步监视器,否则会出现异常。* 3.这个方法是定义在Object类中的。* 面试题:sleep和wait的异同:* 同:都可以让当前线程进入阻塞状态* 异:1两个方法声明位置不一样:Thread类中声明sleep,Object类中声明wait* 2调用的范围或者要求是不一样的:sleep随时可以调用,wait只能在同步代码块或同步方法中调用。* 3关于是否释放同步监视器:如果两个方法都使用在同步代码块或同步方法中,wait会释放同步监视器,sleep不会。**/public class Number implements Runnable {private int num=100;@Overridepublic synchronized void run() {while (true){notify();//唤醒if (num>0){System.out.println(Thread.currentThread().getName()+"打印了:"+num);num--;try {wait();//使得调用wait方法的线程进入阻塞状态,此时会释放锁} catch (InterruptedException e) {e.printStackTrace();}}else{break;}}}}class test{public static void main(String[] args) {Number n=new Number();Thread t1=new Thread(n);Thread t2=new Thread(n);t1.setName("线程一");t2.setName("线程二");t1.start();t2.start();}}
经典例题:生产者和消费者问题:
/*** 生产者消费者问题:线程通信的应用* 分析:* 1.多线程问题,生产者,消费者* 2.存在共享数据,产品/店员* 3.处理线程安全问题:同步机制* 4.线程通信:产品超过20停止生产,产品低于0停止购买*/public class ProductTest {public static void main(String[] args) {Shop shop=new Shop();Producer p=new Producer(shop);Customers c=new Customers(shop);Thread t1=new Thread(p);Thread t2=new Thread(c);Thread t3=new Thread(c);t1.setName("生产者");t2.setName("消费者一");t3.setName("消费者二");t1.start();t2.start();t3.start();}}class Producer implements Runnable{private Shop shop;public Producer(Shop shop){this.shop=shop;}@Overridepublic void run() {System.out.println("生产者开始生产东西");while (true){try {sleep(50);} catch (InterruptedException e) {e.printStackTrace();}shop.in();}}}class Customers implements Runnable{private Shop shop;public Customers(Shop shop){this.shop=shop;}@Overridepublic void run() {System.out.println("消费者开始购买东西");while (true){try {sleep(100);} catch (InterruptedException e) {e.printStackTrace();}shop.out();}}}class Shop{private int thing=0;public synchronized void in() {if (thing<20){thing++;System.out.println(Thread.currentThread().getName()+"生产了东西"+thing);notify();}else{try {wait();} catch (InterruptedException e) {e.printStackTrace();}}}public synchronized void out(){if (thing>0) {System.out.println(Thread.currentThread().getName()+"购买了东西"+thing);thing--;notify();}else{try {wait();} catch (InterruptedException e) {e.printStackTrace();}}}}
9.创建多线程的方式三:实现Callable接口
/*** 创建线程的方式:实现Callable接口的方式* 1.创建一个实现Callable接口的实现类(重写call方法)的对象* 2.创建一个FutureTask对象并传入Callable接口的实现类的对象* 3.创建一个Thread类对象并传入FutureTask对象* 4.get()方法的返回值就是FutureTask构造器参数callable实现类重写的call(的返回值。* 面试题:如何理解实现Callable接口创建多线程比实现runnable接口创建多线程强大?* 1call(方法可以返回值* 2call(方法可以抛出异常被外面的操作捕获并获取异常信息‘* 3callable接口支持泛型* @author 尹会东* @create 2020 -01 - 21 - 14:00*/public class Demo1 {public static void main(String[] args) {Share share = new Share();new Thread(new FutureTask(()->{for (int i = 0; i < 100; i++) share.print(); return null;}),"AA").start();new Thread(new FutureTask(()->{for (int i = 0; i < 100; i++) share.print(); return null;}),"BB").start();}}class Share {private Integer num=0;private ReentrantLock lock=new ReentrantLock();private Condition cd=lock.newCondition();public void print(){try {lock.lock();while (num<100){cd.signal();System.out.println(Thread.currentThread().getName()+"打印了一张票:"+ ++num+"还剩"+(100-num) +"张票。");cd.await();}} catch (Exception e) {e.printStackTrace();} finally {lock.unlock();}}}
10.创建多线程的方式四:使用线程池
/*** 创建线程的方式四:使用线程池* 使用线程池的好处:* 1.提高响应速度* 2.降低资源消耗* 3.便于线程管理* 属性:* corePoolSize:核心池的大小* maximumPoolSize:最大线程数* keepAliveTime:线程没任务时最多保持多长时间后终止** @author 尹会东* @create 2020 -01 - 21 - 14:43*/class num implements Runnable {private int num = 100;@Overridepublic void run() {while (true) {synchronized (com.qtguigu.fuxi.num.class) {if (num > 0) {System.out.println(Thread.currentThread().getName() + num);num--;} else {break;}}}}}public class PoolTest {public static void main(String[] args) {ExecutorService service = Executors.newFixedThreadPool(10);num n1 = new num();//如果需要设置属性需要把service类型转换为ThreadPoolExecutor//ThreadPoolExecutor e = (ThreadPoolExecutor) service;service.execute(n1);//2.1执行:适合适用于runnable(传入一个实现runnable接口的对象// service.submit();//2.1提交:适合适用于callable(传入一个实现callable接口的对象service.shutdown();//3.关闭线程}}
七,常用类
1.String
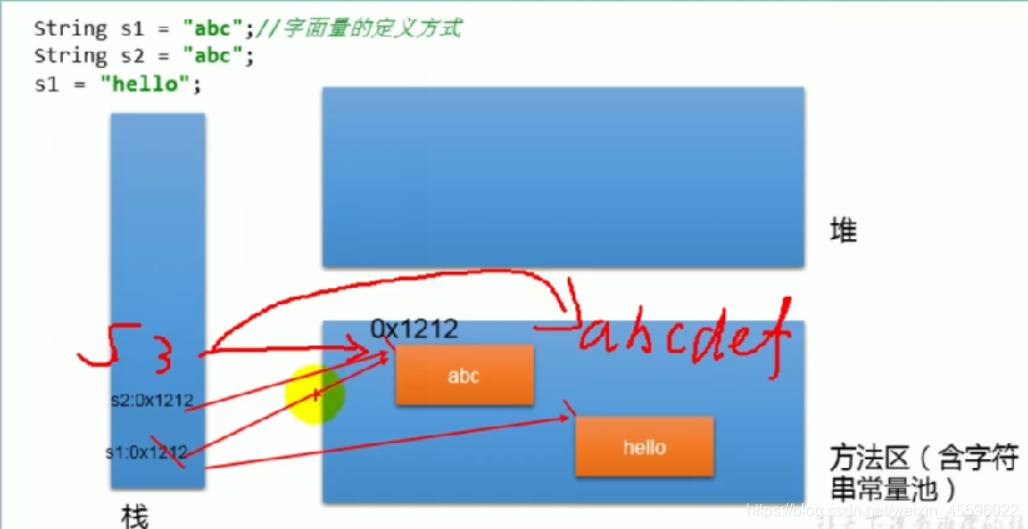
1)String内存解析
2)String分析
/*** 1.声明为final,不可被继承。* 2.实现了java.io.Serializable接口,表示字符串是支持序列化的。* 3.实现了Comparable<String>接口,表示String可以比较大小。* 4.String内部定义了final char[] value用于存储字符串数据* 5.String代表了不可变的字符序列,简称:不可变性。* 1)当对字符串重新赋值,需要重新指定内存区域,不能再原有的地址重新赋值。* 2)当对现的字符串进行连接操作时,需要重新指定内存区域,不能再原有的地址重新赋值。* 3)当调用String的replace(方法修改字符或字符串时,也必须重新指定内存区域进行赋值。* 6.通过字面量的方式给字符串赋值,此时的字符串值声明在字符串常量池中* 7.字符串常量池不会存储相同内容的字符串的。*/
String s1="abc";//字面量的定义方式String s2="abc";//s1="hello";System.out.println(s1==s2);//比较s1和s2的地址值System.out.println("**********************************");String s3="abc";s3+="def";System.out.println(s1==s3);//falseSystem.out.println("**********************************");String s4="abc";String s5=s4.replace('a','m');System.out.println(s4+" "+s5);//abc mbc
3)String实例化
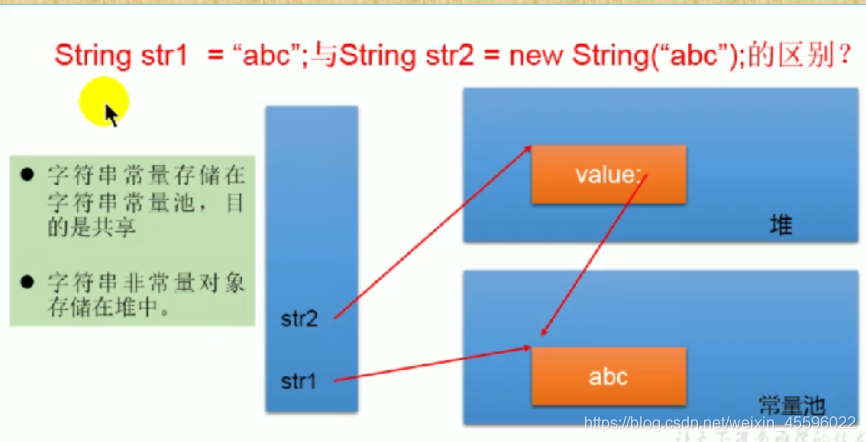
/*** String的实例化方式:* 1.通过字面量定义的方式:*数据声明在方法区对应的字符串常量池中* 2.通过new+构造器的方式:* 保存的地址值在堆空间中* 面试题:String s3=new String("java");在内存中创建了几个对象?* 两个:一个是堆空间中new的结构,一个是char【】数组对应的常量池的数据:java*/
//此时的s1和s2数据声明在方法区对应的字符串常量池中String s1="java";String s2="java";//此时s3和s4保存的地址值在堆空间中String s3=new String("java");String s4=new String("java");System.out.println(s1==s2);//trueSystem.out.println(s1==s3);//falseSystem.out.println(s3==s4);//false
4)图解两种创建字符串方式的区别
5)图解字符串的存储
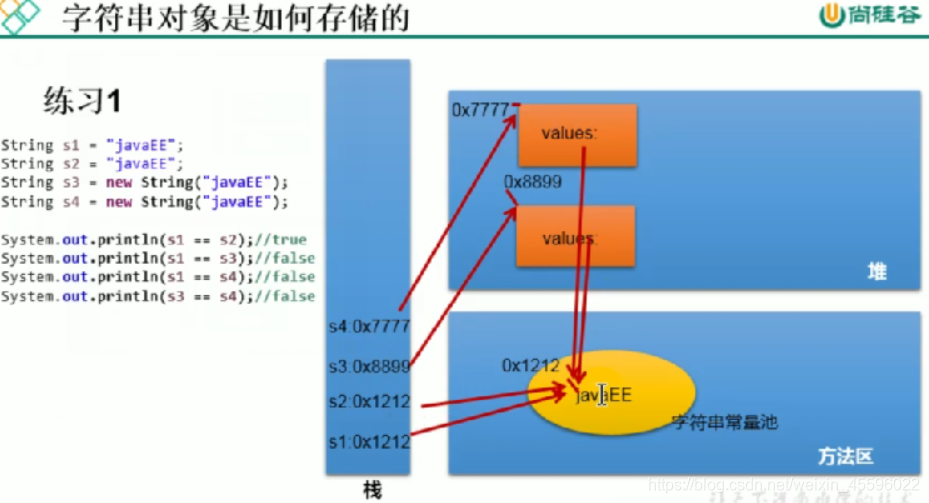
6)图解字符串对象的存储
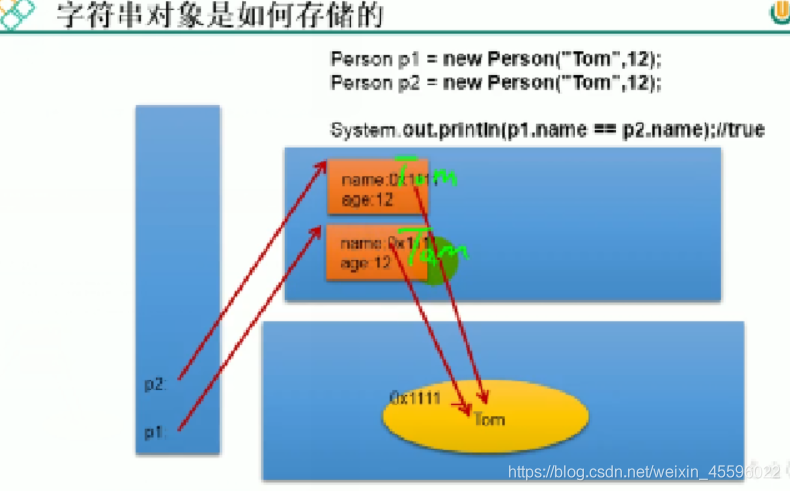
7)String不同拼接操作的对比:
/** 1.常量与常量的拼接结果在常量池,且常量池中不会存在相同内容的常量。* 2.只要其中一个是变量,结果就在堆中。* 3.String s8=s5.intern();此时的返回值得到的s8是使用的常量池中已经存在的javahadoop* 4.intern的返回值在方法去的常量池*/String s1="java";//常量池String s2="hadoop";//常量池String s3="javahadoop";//常量池String s4="java"+"hadoop";//常量池String s5=s1+"hadoop";//堆空间String s6="java"+s2;//堆空间String s7=s1+s2;//堆空间String s8=s5.intern();//常量池System.out.println(s3==s4);//trueSystem.out.println(s4==s5);//falseSystem.out.println(s3==s5);//falseSystem.out.println(s5==s6);//falseSystem.out.println(s3==s7);//falseSystem.out.println(s5==s7);//falseSystem.out.println(s6==s7);//falseSystem.out.println(s8==s3);//true
面试题
/*** String的一道面试题:* str传递给change方法的形参,只是形参的地址也指向了str所指向的地址,形参改变的话,因为是String* 类型,不可变性,所以形参只是重新开辟一一个value=”test ok"的地址。* 而基本数据类型,改变他的值,就是把原地址的值给改变了。*/public class StringTest4 {String str=new String("good");char []ch={'t','e','s','t'};public static void main(String[] args) {StringTest4 ex=new StringTest4();ex.change(ex.str,ex.ch);System.out.println(ex.str+" "+ex.ch);//good best}private void change(String str, char[] ch) {str="test ok";ch[0]='b';}}
8)String的常用方法:
public static void main(String[] args) {String s1="hello";String s2="world";System.out.println(s1.length());//返回数组的长度 5System.out.println(s1.charAt(3));//返回指定索引的字符 lSystem.out.println(s1.isEmpty());//判空 falseSystem.out.println(s1.toLowerCase());//将String中所字符转换为小写 helloSystem.out.println(s1.toUpperCase());//将String中所字符转换为大写 HELLOSystem.out.println(s1.trim());//返回字符串副本,忽略前后的空白 helloSystem.out.println(s1.equals(s2));//比较字符串内容是否相同 falseSystem.out.println(s1.equalsIgnoreCase(s2));//忽略大小写的比较字符串是否相同 falseSystem.out.println(s1.compareTo(s2));//比较两个字符串的大小 -15System.out.println(s1.substring(2));//从指定位置开始截取 lloSystem.out.println(s1.substring(2,4));//截取指定位置的字符串 ll}
public static void main(String[] args) {String s1="helloworld";String s2="HelloWorld";System.out.println(s1.endsWith("ld"));//是否已指定字符串结尾 trueSystem.out.println(s1.startsWith("he"));//是否以指定的字符串开始 trueSystem.out.println(s1.startsWith("wo",5));//是否在指定位置以这个字符串开始 //trueSystem.out.println(s1.contains("owo"));//判断是否包含这个字符串 trueSystem.out.println(s1.indexOf("lo"));//指定字符串所在的位置 3,没的话返回-1System.out.println(s1.indexOf("lo",5));//从指定位置找指定的字符串 -1System.out.println(s1.lastIndexOf("lo"));//从后往前找 3System.out.println(s1.replace('l','y'));//替换字符System.out.println(s1.replace("hello","666"));//替换字符串
9)String和其他类型之间的转换
/*** String和其他类型之间的转换*/public class StringTest7 {public static void main(String[] args) {//String与基本数据类型,包装类的转换String str1="123";int num=Integer.parseInt(str1);//String-->int/integerString str2=String.valueOf(num);//int/integer-->String//String与char[]之间的转换String str3="123456";char[] array = str3.toCharArray();//String-->char[]数组String str4 = new String(array);//char[]-->String//String和字节数组之间的转换byte[]String str5="123456";byte [] bytes= str5.getBytes(); //String-->byte[] 编码String str6 = new String(bytes);//byte[]-->String 解码/*** 编码:字符串转换成字节。* 解码:字节转换为字符串。*/}}
10)String的四道面试题:
/*** 模拟一个trim方法,去除字符串两端的空格*/public static void main(String[] args) {String str1 = " 123456 ";char[] array = str1.toCharArray();char[] array2 = new char[str1.length()];int num = 0;for (int i = 0; i < array.length; i++) {if (array[i] == ' ') {continue;} else {array2[num] = array[i];num++;}}String string = new String(array2);System.out.println(string.substring(0, num));}
/*** 交换指定位置字符串* @param args*/public static void main(String[] args) {int start=2;int end=5;String str1="0123456789";char[] array = str1.toCharArray();for (int i = start; i <(start+end)/2+1 ; i++) {char a=array[i];array[i]=array[end+start-i];array[end+start-i]=a;}String s = new String(array);System.out.println(s);}
/*** 获取一个字符串在另一个字符串中出现的次数*/public static void main(String[] args) {String str1="我爱中国,中国共产党万岁!";String str2="中国";int sum=0;while (str1.contains(str2)){sum++;int num=str1.indexOf(str2);str1=str1.substring(num+str2.length());}System.out.println(sum);}
/*** 对字符串中的字符进行自然排序*/public static void main(String[] args) {String str1="9876543210";char[] array = str1.toCharArray();Arrays.sort(array);String str2 = new String(array);System.out.println(str2);}
11)StringBuffer和StringBuilder
/*** 关于StringBuffer和StringBuilder的使用* 1.StringBuffer的常用方法:* StringBuffer sb1 = new StringBuffer("abcdef");* sb1.append("A");//abcdefA* sb1.delete(1, 4);//aefA* sb1.replace(2,3,"hello");//aehelloA* sb1.insert(2,"HELLO");//aeHELLOhelloA* sb1.reverse();//反转 AollehOLLEHea* sb1.charAt(1);* sb1.indexOf("A");* System.out.println(sb1);* 2.StringBuilder的常用方法:* 同StringBuffer* String,StringBuffer,StringBuilder者的异同:* 相同点:底层结构使用char[]数组存取,String的char[]数组用了final修饰* String:不可变字符串,* StringBuffer:可变的字符序列,线程安全的,效率低。* StringBuilder:可变的字符序列,线程不安全的,效率高。jdk1.5* String,StringBuffer,StringBuilder者效率对比:* StringBuilder效率最高,StringBuffer第二,String第3* 源码分析:* String str=new String();//char[] value=new char[0];* String str1=new String("abc");//char [] value=new char[] {'a','b','c'};* <p>* StringBuffer sb1=new StringBuffer();//char value[]=new char[16];底层创建了一个长度为16的char数组。* sb1.append('a');//value[0]='a';* sb1.append('b');//value[1]='b';* StringBuffer sb2=new StringBuffer("abc");//char []value=new char ["abc".length()+16];* 问题一:System.out.println(sb2.length());//3* 因为底层返回的长度只是字符串的长度不是数组的长度* 问题二:扩容问题:如果要添加的数据底层数组装不下了,那就需要扩容底层的数组。* 默认情况下,扩容为原来容量的2倍+2,同时将原数组中的元素复制到新的数组中。* 指导意义:开发中建议大家使用:StringBuffer或StringBuilder*/public class StringBufferTest {public static void main(String[] args) {StringBuffer sb1 = new StringBuffer("abcdef");sb1.append("A");//abcdefAsb1.delete(1, 4);//aefAsb1.replace(2,3,"hello");//aehelloAsb1.insert(2,"HELLO");//aeHELLOhelloAsb1.reverse();//反转 AollehOLLEHeasb1.charAt(1);sb1.indexOf("A");System.out.println(sb1);}}
面试题
public static void main(String[] args) {String s1=null;StringBuffer sb1=new StringBuffer();sb1.append(s1);/*** StringBuffer的append方法会将添加进来的null字符串转化为”null“字符串添加进去。* 所以此处不会出空指针异常*/System.out.println(sb1.length());//4System.out.println(sb1);//"null"StringBuffer sb2=new StringBuffer(s1);/*** StringBuffer的构造器并不会对传入的null进行处理* 所以此处空指针异常*/System.out.println(sb2);//java.lang.NullPointerException}
String,StringBuffer,StringBuilder的区别
/*** :* 1.String:不可变字符串。任何对内容的修改,String指向的地址都发生了变化。* 1String a="123"; a在栈里面,指向字符串常量池中的123所对应的地址。当修改a的内容,就相当于* 将a所指向的地址做出了改变。* 2String a=new String("123");a在栈里面,指向堆空间中new出来的结构,new出来的结构指向字符串常量池* 中123对应的地址,改变a的内容,还是相当于改变了a所指向的地址。* 2.StringBuffer:线程安全的,jdk1.1,效率低。* 3.StringBuilder:线程不安全,效率高。jdk1.5新特性。底层先创建一个长度为16的数组,* 每次添加值,就是给数组对应的位置赋值,扩容问题:每次扩容为原来的2倍+2.再将原来的数组复制进去。**/
2.时间日期类
1)jdk8之前的时间日期API
①时间戳
@Testpublic void test(){long millis = System.currentTimeMillis();System.out.println(millis);}
②java.util.Date
-->java.sql.Date
两个构造器的使用
两个方法的使用
toString()显示当前的年月日时分秒
date.getTime()时间戳
@Testpublic void test2(){Date date=new Date();System.out.println(date.toString());//Thu Jan 30 17:00:01 CST 2020System.out.println(date.getTime());//1580374801066}@Testpublic void test3(){Date date = new Date(System.currentTimeMillis());System.out.println(date.toString());//Thu Jan 30 17:00:33 CST 2020}
③java.sql.Date
对应着数据库中的日期类型变量
如何实例化
sql.Date—>util.Date直接赋值
util.Date—>sql.Date
@Testpublic void test4(){java.sql.Date date=new java.sql.Date(System.currentTimeMillis());System.out.println(date.toString());Date date1=new Date();long time = date1.getTime();java.sql.Date date2=new java.sql.Date(time);System.out.println(date2.toString());}
④SimpleDateFormat类
- 实例化
- 格式化:日期—>文本(字符串)
- 解析:文本(字符串)—>日期
@Testpublic void test6() throws ParseException {//实例化SimpleDateFormat format = new SimpleDateFormat("yyyy-MM-dd hh:mm:ss");Date date=new Date();//格式化String s = format.format(date);System.out.println(s);//2020-01-30 05:24:23//解析Date date1 = format.parse(s);System.out.println(date1);//Thu Jan 30 05:24:23 CST 2020}
⑤Calendar日历类的使用(抽象类)
- 1.实例化:
- ①创建子类的对象(不建议)
- ②调用其静态方法
@Testpublic void test7() {Calendar calendar = Calendar.getInstance();//2.常用方法:// calendar.get();int days = calendar.get(Calendar.DAY_OF_MONTH);System.out.println(days);//这个月的第几天// calendar.set();//修改calendar本身calendar.set(Calendar.DAY_OF_MONTH, 20);System.out.println(calendar.get(Calendar.DAY_OF_MONTH));// calendar.add();//修改calendar本身calendar.add(Calendar.DAY_OF_MONTH, 20);System.out.println(calendar.get(Calendar.DAY_OF_MONTH));// calendar.getTime();Date time = calendar.getTime();System.out.println(time);// calendar.setTime();Date date = new Date();calendar.setTime(date);System.out.println(calendar.getTime());}
⑥练习
字符串2020-09-08转换为java.sql.Date
@Testpublic void test8() throws ParseException {String str="2020-09-08";SimpleDateFormat format = new SimpleDateFormat("yyyy-MM-dd");Date date = format.parse(str);long time = date.getTime();java.sql.Date sqlDate=new java.sql.Date(time);System.out.println(sqlDate.toString());}
渔夫三天打鱼,两天晒网。1990-01-01
* 问:渔夫在打鱼还是在晒网?* 2020-09-08* 总天数%5==1,2,3打鱼;0,4晒网* 总天数?
@Testpublic void test9() throws ParseException {String start="1990-01-01";String end="2020-09-08";SimpleDateFormat format = new SimpleDateFormat("yyyy-MM-dd");Date date = format.parse(start);Date date1 = format.parse(end);long time = date.getTime();long time1 = date1.getTime();long day=(time1-time)/(1000*60*60*24)+1;if (day%5==0||day%5==4){System.out.println("今天筛网");}else{System.out.println("今天打🐟");}}
2)jdk8时间日期API
①LocalDate,LocalTime,LocalDateTime的使用
@Testpublic void test() {//实例化方式一:获取当前时间LocalDate now = LocalDate.now();LocalTime now1 = LocalTime.now();LocalDateTime now2 = LocalDateTime.now();System.out.println(now);//2020-01-30System.out.println(now1);//13:57:33.240System.out.println(now2);//2020-01-30T13:57:33.240}@Testpublic void test2() {//实例化方式二:获取指定的日期时间LocalDate date = LocalDate.of(2020, 2, 2);System.out.println(date);//2020-02-02}@Testpublic void test3() {LocalDateTime time = LocalDateTime.of(2012, 2, 2, 12, 53, 23);System.out.println(time.getDayOfMonth());//2System.out.println(time.getDayOfWeek());//THURSDAYSystem.out.println(time.getDayOfYear());//33System.out.println(time.getHour());//12System.out.println(time.getMonthValue());//2}@Testpublic void test4() {LocalDateTime time = LocalDateTime.of(2012, 2, 2, 12, 53, 23);LocalDateTime localDateTime = time.withDayOfMonth(2);//不可变性,重置System.out.println(localDateTime);LocalDateTime plusDays = time.plusDays(108);//不可变性,加System.out.println(plusDays);LocalDateTime minusDays = time.minusDays(20);//不可变性,减System.out.println(minusDays);}
②Instant类
@Testpublic void test(){//实例化Instant now = Instant.now();System.out.println(now);//本初子午线的时间OffsetDateTime offsetDateTime = now.atOffset(ZoneOffset.ofHours(8));System.out.println(offsetDateTime);//当前时间long second = offsetDateTime.toEpochSecond();System.out.println(second);//获取m数sInstant instant = Instant.ofEpochMilli(1580365450L*1000);System.out.println(instant);}
③格式化或者解析时间日期
@Testpublic void test(){//自定义格式DateTimeFormatter formatter=DateTimeFormatter.ofPattern("yyyy-MM-dd hh:mm:ss");//格式化String str=formatter.format(LocalDateTime.now());//2020-01-30 04:37:39System.out.println(str);////解析TemporalAccessor accessor=formatter.parse("2020-02-18 03:52:09");System.out.println(accessor);}
3.比较器与其他类
1)比较器
Java中的对象,只能使用==或者!=进行比较,不能使用<或>进行比较,但是在实际开发中,我们需要对多个对象进行排序,言外之意,就需要比较对象的大小。如何实现?使用两个接口,Comparable或Comparator。liang者使用对比:1)Comparable:让类去继承接口,对象具有比较大小的属性2)Comparator:临时new一个匿名对象重写方法,传入对象进行比较,对象不具有比较大小的属性* Comparable接口的使用:自然排序* 1.String或者包装类实现了Comparable接口重写了ComepareTo方法,给出了比较两个对象大小的方法。* 2.重写CompareTo()方法的规则:* 如果当前对象this大于形参对象obj,则返回正整数,* 如果当前对象this小于形参对象obj,则返回负整数,* 否则返回0;* 3.对于自定义类来说,如果需要排序,我们可以让自定义类实现Comparable接口,重写CompareTo方法。* 在方法中指明如何排序。
public static void main(String[] args) {Goods[]arr=new Goods[4];arr[0]=new Goods("lenovo",50.0);arr[1]=new Goods("honor",50.0);arr[2]=new Goods("iphone",888.8);arr[3]=new Goods("zte",66.6);Arrays.sort(arr);System.out.println(Arrays.toString(arr));}}class Goods implements Comparable{private String name;private double price;public Goods() {}public Goods(String name, double price) {this.name = name;this.price = price;}public String getName() {return name;}public void setName(String name) {this.name = name;}public double getPrice() {return price;}@Overridepublic String toString() {return "Goods{" +"name='" + name + '\'' +", price=" + price +'}';}public void setPrice(double price) {this.price = price;}@Overridepublic int compareTo(Object o) {if (o instanceof Goods){Goods goods= (Goods) o;return this.price>goods.price?1:(this.price<goods.price?-1:(this.name.compareTo(goods.name)));// return this.name.compareTo(goods.name);}throw new RuntimeException("传入的数据类型不一致!");}}
* Comparator接口:定制排序* 1.当元素的北京没有实现java.long.Comparable接口而又不方便修改代码* 2.实现了java.lang.Comparable接口的排序规则不适合当前的操作* 3.抽象方法:compare(Object obj1,Object obj2)
public static void main(String[] args) {Dog[]arr=new Dog[4];arr[0]=new Dog("lenovo",50);arr[1]=new Dog("honor",50);arr[2]=new Dog("iphone",40);arr[3]=new Dog("zte",60);Arrays.sort(arr, new Comparator<Dog>() {@Overridepublic int compare(Dog o1, Dog o2) {//先照名字从低到高,再照年龄从高到低if (o1.getName().equals(o2.getName())){return -Double.compare(o1.getAge(),o2.getAge());}else{return o1.getName().compareTo(o2.getName());}}});System.out.println(Arrays.toString(arr));}}class Dog {private String name;private int age;public Dog() {}public Dog(String name, int age) {this.name = name;this.age = age;}public String getName() {return name;}public void setName(String name) {this.name = name;}public int getAge() {return age;}public void setAge(int age) {this.age = age;}@Overridepublic String toString() {return "Dog{" +"name='" + name + '\'' +", age=" + age +'}';}}
2)Math类
/*** Math.abs();//绝对值* Math.sqrt();//平方根* Math.pow();//a的b次幂* Math.log();//自然对数* Math.exp();//e为底指数* Math.max();//* Math.min();//* Math.random();//随机数* Math.round();//double/float转long*/
3)BigInteger和BigDecimal
高精度整数运算器和高精度浮点数运算器
八,枚举类和注解
1.枚举类
1)枚举类的使用
- 1.枚举的理解:类的对象只有有限个,确定的。我们称此类为枚举类。
- 2.当我们定义一组常量时,建议使用枚举类。
- 3.如果枚举类的对象只有一个,可以看作时单例设计模式。
2)如何定义枚举类
方式一:jdk5.0之前自定义枚举类
/*** @author yinhuidong* @createTime 2020-04-08-13:11* jdk5.0之前自定义枚举类*/public class Season {private final String name;private final String desc;private Season(String name,String desc){this.name=name;this.desc=desc;}public static final Season SPRING=new Season("春天","春暖花开");public static final Season SUMMER=new Season("夏天","夏日炎炎");public static final Season AUTUMO=new Season("秋天","秋高气爽");public static final Season WINTER=new Season("冬天","雪花飘飘");public String getName() {return name;}public String getDesc() {return desc;}@Overridepublic String toString() {return name;}}/***测试jdk5.0之前的枚举类*/class Test1{public static void main(String[] args) {//System.out.println(Season.SPRING);Season season=Season.SPRING;}}
jdk5.0使用enum关键字定义枚举类
/*** @author yinhuidong* @createTime 2020-04-08-17:50*/interface Info{void show();}public enum Status implements Info{FREE{public void show(){System.out.println("空闲");}},BUSY{public void show(){System.out.println("忙碌");}},WORK{public void show(){System.out.println("工作");}};private Status(){}}/***jdk5.0之后使用enum关键字定义枚举类*/class Test2{public static void main(String[] args) {Status status= FREE;status.show();Status[] values = Status.values();for (int i=0;i<values.length;i++){System.out.println(values[i]);}System.out.println(FREE.toString());System.out.println(Status.valueOf("FREE"));}}
3)Enum类中常用方法
value()
valueof()
toString()
State[] states = State.values();for (int i = 0; i <states.length ; i++) {System.out.print(states[i]+" ");//FREE HARD SLEEP}System.out.println(free.toString());//FREESystem.out.println(State.valueOf("FREE"));//FREE,如果没此对象就会报异常。java.lang.IllegalArgumentException
4)使用enum关键字定义的枚举类实现接口的情况
*情况一:实现接口,在enum的枚举类中重写方法
- 情况二:实现接口,在enum的枚举类中声明的每个对象下都重写方法
FREE{@Overridepublic void show() {System.out.println("空闲!");}},
2.注解
1.Annotation使用示例
/*** @author yinhuidong* @createTime 2020-04-08-20:56* 1.Annotation使用示例* 1)文档注释中的注解* @return* @Exception* @param* @see* 2)jdk三个内置的注解* 1.@Override 子类重写父类方法,编译期间校验* 2.@Deprecated 过时的或危险的(可能造成线程死锁)* 3.@SuppressWarnings() 未使用提醒* 3)组件框架,跟踪代码依赖性,代替配置文件* @Autowrited*/
2.自定义注解与元注解
/*** @author yinhuidong* @createTime 2020-04-08-21:02* 自定义注解:参照@SuppressWarnings()* 如果自定义的注解没有成员,那就代表一个标识* 如果自定义注解有成员,需要在使用时指定成员的值* 自定义注解必须配合反射* 如果想食用反射操作注解,那么注解必须声明为RUNTIME** 元注解:可以修饰其他注解的注解* 1. Retention:指明修饰的注解的生命周期:SOURCE\CLASS(默认行为)\RUNTIME* *只有声明为runtime的注解,才能通过反射获取* 2.Target:用于指定被修饰的结构有哪些* 3.Documented:被他修饰的注解可以被文档注释读取,保留下来* 4.Inherited:具有继承性,父类被此注解修饰,子类自动继承父类的注解*/public @interface MyAnnotation {String value() default "hello";//String类型的属性,默认值为hello}
1.Retention
@Documented@Retention(RetentionPolicy.RUNTIME)@Target(ElementType.ANNOTATION_TYPE)public @interface Retention {/*** Returns the retention policy.* @return the retention policy*/RetentionPolicy value();}继续查看RetentionPolicy,这是一个枚举类public enum RetentionPolicy {/*** Annotations are to be discarded by the compiler.*/SOURCE,/*** Annotations are to be recorded in the class file by the compiler* but need not be retained by the VM at run time. This is the default* behavior.*/CLASS,/*** Annotations are to be recorded in the class file by the compiler and* retained by the VM at run time, so they may be read reflectively.** @see java.lang.reflect.AnnotatedElement*/RUNTIME}SOURCE:编译时起作用CLASS:字节码文件RUNTIME:运行时
2.Target
@Documented@Retention(RetentionPolicy.RUNTIME)@Target(ElementType.ANNOTATION_TYPE)public @interface Target {/*** Returns an array of the kinds of elements an annotation type* can be applied to.* @return an array of the kinds of elements an annotation type* can be applied to*/ElementType[] value();}继续点击进入ElementType又是一个枚举类:指定可以修饰的类型public enum ElementType {/** Class, interface (including annotation type), or enum declaration */TYPE,//类上/** Field declaration (includes enum constants) */FIELD,//属性/** Method declaration */METHOD,//方法/** Formal parameter declaration */PARAMETER,//成员变量/** Constructor declaration */CONSTRUCTOR,//构造器/** Local variable declaration */LOCAL_VARIABLE,//局部变量/** Annotation type declaration */ANNOTATION_TYPE,//注解类型/** Package declaration */PACKAGE,//包/*** Type parameter declaration** @since 1.8*/TYPE_PARAMETER,//泛型/*** Use of a type** @since 1.8*/TYPE_USE //可重复注解}
3.Documented
@Documented@Retention(RetentionPolicy.RUNTIME)@Target(ElementType.ANNOTATION_TYPE)public @interface Documented {}指示默认情况下iavadoc和类似工具将记录具有类型的注释。此类型应用于对类型声明进行注释,这些类型的注释会影响其客户端对带注释的元素的使用。如果类型声明是用文档注释的,那么它的注释将成为公共API的一部分注释元素的。
4.Inherited
@Documented@Retention(RetentionPolicy.RUNTIME)@Target(ElementType.ANNOTATION_TYPE)public @interface Inherited {}表示注释类型是自动继承的。如果继承的元注释存在于注释类型上声明,用户查询类声明上的注释类型,而类声明没有针对这种类型的注释,然后类的超类将自动查询注释类型。此过程将重复进行,直到找到此类型的注释,或找到类层次结构的顶部(对象)是达到了。如果没有该类的超类,那么查询将表明所涉及的类没有这样的注释。<p>注意,这个元注释类型没有效果,如果注释的类型是用来注释类以外的任何东西。还要注意,这个元注释只会导致从超类继承注释;对实现接口的注释没有效果
3.jdk8新特性
1.可重复注解
一个类上写两个一样的注解
@MyAnnotation("hi")@MyAnnotationpublic class AnnotationTest {}@Retention(RetentionPolicy.RUNTIME)//运行时//指定可以修饰哪些结构@Target(value = {ElementType.ANNOTATION_TYPE, ElementType.CONSTRUCTOR, ElementType.FIELD,ElementType.LOCAL_VARIABLE, ElementType.METHOD, ElementType.PACKAGE,ElementType.PARAMETER, ElementType.TYPE, ElementType.TYPE_PARAMETER,ElementType.TYPE_USE})@Documented//文档注释保留识别@Inherited//被子类继承@Repeatable(MyAnnotations.class)//标识该注解可以实现重复注解public @interface MyAnnotation {String value() default "hello";//String类型的属性,默认值为hello}@Retention(RetentionPolicy.RUNTIME)//运行时//指定可以修饰哪些结构@Target(value = {ElementType.ANNOTATION_TYPE, ElementType.CONSTRUCTOR, ElementType.FIELD,ElementType.LOCAL_VARIABLE, ElementType.METHOD, ElementType.PACKAGE,ElementType.PARAMETER, ElementType.TYPE, ElementType.TYPE_PARAMETER,ElementType.TYPE_USE})@Documented//文档注释保留识别@Inherited//被子类继承public @interface MyAnnotations {//声明一个MyAnnotation类型的数组MyAnnotation []value();}
2.类型注解
class Test<@MyAnnotation T> {}//此时需要指明@Target(ElementType.TYPE_PARAMETER)
class Test2{public static void main(String[] args) {Class<Test> clazz = Test.class;Annotation[] annotations = clazz.getAnnotations();for (int i = 0; i <annotations.length ; i++) {System.out.println(annotations[i]);}}}
九,集合框架
1.collection接口
1)Java集合框架的概述
1.集合和数组都是对多个数据进行存储操作的结构,简称Java容器。说明:此时的存储时内存方面的存储,不涉及持久化存储2.1数组在存储多个数据方面的特点:1)一旦初始化以后,长度就确定了。2)元素类型一旦指定,就不能改变,我们就只能操作指定类型的数据。2.2数组在存取数据方面的缺点:1)初始化以后,长度不可修改。2)数组中提供的方法非常有限,对于删除插入数据非常不方便,效率也不高。3)获取数组中实际元素的个数,数组并没有提供现成的方法。4)数组存储数据的特点:有序,可重复。
集合框架
Collection接口:单列集合,用来存储一个一个对象list接口:有序的可重复的数据。“动态数组”Set接口:无序的不可重复的数据。Map接口:双列集合,用来存储一对一对的数据。(key,value)
Collection接口中的方法的使用
public static void main(String[] args) {Collection collection=new ArrayList();collection.add("aa");//将元素添加到集合中collection.add("bb");collection.add("cc");System.out.println(collection.size());//获取添加的元素的个数Collection collection2=new ArrayList();collection2.add("bbb");collection2.add("ccc");collection.addAll(collection2);//将一个集合的元素添加到另一个集合System.out.println(collection.size());System.out.println(collection);//输出集合collection2.clear();//清空集合中的元素System.out.println(collection.isEmpty());//判断当前集合是否为空 true false}
public static void main(String[] args) {Collection collection=new ArrayList();collection.add(123);collection.add("tom");collection.add("aa");Person p1=new Person("dong",23);collection.add(p1);/*** 集合中添加对象,最好重写该对象所在类的equals(方法*/System.out.println(collection.contains(p1));//判断当前集合是否包含该元素,使用Obj对象所在类的equals(方法。collection.containsAll(collection);//判断形参集合中的所元素是否都在该集合中。collection.remove(p1);//移除某个元素 boolean返回true/falsecollection.removeAll(collection);//从当前集合移除两者都的元素collection.retainAll(collection);//获取当前集合和形参集合的交集,并返回当前集合。collection.equals(collection);//比较两个集合是否完全相同}
public static void main(String[] args) {Collection collection=new ArrayList();collection.add("123");collection.add("aaa");collection.add("bbbb");collection.add("dddd");System.out.println(collection.hashCode());//输出hash值collection.toArray();//集合-->数组//数组-->集合Arrays.asList();//iterator返回这个接口的实例,用于遍历集合元素。}
使用Iterator遍历Colllection集合
- Collection集合实现了Iterator接口,重写了接口的hasNext()和next()方法。
- 内部定义了remove()方法,可以在便利的时候,删除集合中的元素,
此方法不同于集合直接调用remove().
public static void main(String[] args) {Collection co=new ArrayList();co.add("123113212");co.add("456487874");co.add("56646665454654");Iterator<Collection>iterator=co.iterator();while (iterator.hasNext()){// if (iterator.next().equals("Tom")){// iterator.remove();// }System.out.println(iterator.next());}}
增强for循环遍历集合
内部仍然调用了迭代器
把集合中的每个值一次一次赋值给Object类型的变量然后输出
public static void main(String[] args) {Collection co=new ArrayList();co.add("123113212");co.add("456487874");co.add("56646665454654");for (Object c:co){System.out.println(c);}}
Collection集合接口是支持泛型的,并且继承了Iterable接口,可以使用Iterator iterator()进行遍历
* @see Set* @see List* @see Map* @see SortedSet* @see SortedMap* @see HashSet* @see TreeSet* @see ArrayList* @see LinkedList* @see Vector* @see Collections* @see Arrays* @see AbstractCollection* @since 1.2*/public interface Collection<E> extends Iterable<E> {public interface Iterable<T> {/*** Returns an iterator over elements of type {@code T}.** @return an Iterator.*/Iterator<T> iterator();
2)list
比较ArrayList,LinkedList,Vector
* 同:三个类都实现了list接口,存储数据的特点相同,有序,可重复。* ArrayList:作为list接口的主要实现类,jdk1.2,线程不安全的,效率高,底层使用Object []elementData存储* LinkedList:jdk1.2:底层使用双向链表存储,对于频繁的插入删除,他的效率高。* Vector:古老的实现类jdk1.0,线程安全的。
List接口常用方法测试:
public static void main(String[] args) {ArrayList<Object> list = new ArrayList<>();list.add("123");list.add("456");list.add("789");System.out.println(list);//[123, 456, 789]list.add(0,"000");//指定位置插入System.out.println(list);//[000, 123, 456, 789]List<Integer> list1 = Arrays.asList(1, 2, 3, 4, 5, 6);//数组转化为集合list.addAll(list1);//将集合list1添加进集合listSystem.out.println(list.size());//输出集合多少个元素 10Object o = list.get(0);//通过索引获取元素System.out.println(o);//000int index = list.indexOf("456");//查找元素的索引.如果不存在返回-1System.out.println(index);//2Object o1 = list.remove(1);//可以照索引或者对象删除System.out.println(o1+" "+list);//123 [000, 456, 789, 1, 2, 3, 4, 5, 6]list.set(1,"cc");//将某个索引的值改为List<Object> list2 = list.subList(1, 5);//截取集合中的元素System.out.println(list2);//[cc, 789, 1, 2]}
List遍历,及方法总结
public static void main(String[] args) {ArrayList<Object> list = new ArrayList<>();list.add("123");list.add("456");list.add("789");//1.IteratorIterator<Object> iterator = list.iterator();while (iterator.hasNext()){System.out.println(iterator.next());}//2.增强for循环for (Object obj:list){System.out.println(obj);}//3..普通for循环for (int i=0;i<list.size();i++){System.out.println(list.get(i));}}
List的一道面试题
public static void main(String[] args) {List list=new ArrayList<>();list.add(1);list.add(2);list.add(3);updatelist(list);System.out.println(list);//[1, 2]}private static void updatelist(List list) {list.remove(2);// list.remove(new Integer(2));//如果想删除元素2}
jdk 1.2的接口
继承了Collection接口
sort方法需要传入一个比较器
定制排序
实际上使用了Arrays的sort方法
public interface List<E> extends Collection<E> {default void sort(Comparator<? super E> c) {Object[] a = this.toArray();Arrays.sort(a, (Comparator) c);ListIterator<E> i = this.listIterator();for (Object e : a) {i.next();i.set((E) e);}}
ArrayList源码分析:
/** jdk7:* ArrayList list=new ArrayList()//底层创建了长度是10的Object[]elementDate数组* list.add(123);//elementData[0]=new Integer(123);* ...* list.add();//如果此次的添加导致底层的数组容量不够,则扩容。* 默认情况下,扩容为原来的1.5倍,同时需要将原有数组的数据复制到新的数组。* 结论:建议开发中使用带参数的构造器:ArrayList list=new ArrayList(int 数组长度);* jdk8:* ArrayList list=new ArrayList()//底层Object[]elementDate={},并没有创建长度为10的数组* list.add(123);//第一次调用add时,底层才创建了长度为10的数组,并将数据123添加到elementData[0]* ...后续的添加和扩容操作与jdk7无异。* 对比:jdk7中的对象创建类似于单例的饿汉式,而jdk8中的对象的创建类似于单例的懒汉式,* 延迟了数组的创建,节省内存空间。*/
public class ArrayList<E> extends AbstractList<E>implements List<E>, RandomAccess, Cloneable, java.io.Serializable{//默认初始容量为10private static final int DEFAULT_CAPACITY = 10;//空的ElementData数组private static final Object[] EMPTY_ELEMENTDATA = {};//用于默认大小的空实例。我们从空的ELEMENTDATA中解出这个问题,以了解在添加第一个元素时应该增加多少private static final Object[] DEFAULTCAPACITY_EMPTY_ELEMENTDATA = {};//存储ArrayList的元素的数组缓冲区。arraylisis的容量是这个数组缓冲区的长度。当添加第一个元素时,任何带有elementData DBEAULTCAPACITY empty ELEMENTDATE的空ArrayList都将被扩展为默认容量(10)transient Object[] elementData;//带有指定长度的数组构造器public ArrayList(int initialCapacity) {if (initialCapacity > 0) {this.elementData = new Object[initialCapacity];} else if (initialCapacity == 0) {this.elementData = EMPTY_ELEMENTDATA;} else {throw new IllegalArgumentException("Illegal Capacity: "+initialCapacity);}}//传入一个Collection类型的构造器public ArrayList(Collection<? extends E> c) {elementData = c.toArray();if ((size = elementData.length) != 0) {// c.toArray might (incorrectly) not return Object[] (see 6260652)if (elementData.getClass() != Object[].class)elementData = Arrays.copyOf(elementData, size, Object[].class);} else {// replace with empty array.this.elementData = EMPTY_ELEMENTDATA;}}//将这个<tt>ArrayList</tt>实例的容量调整为列表的当前大小。集合创建的时候会流出来预留的空间,使用这个方法可以去掉预留空间,节省内存。public void trimToSize() {modCount++;if (size < elementData.length) {elementData = (size == 0)? EMPTY_ELEMENTDATA: Arrays.copyOf(elementData, size);}}//设置数组的最大长度为integer的最大值-8,防止造成内存溢出异常private static final int MAX_ARRAY_SIZE = Integer.MAX_VALUE - 8;//数组的扩容问题:>>1意思就是/2private void grow(int minCapacity) {// overflow-conscious code//扩容前数组的长度int oldCapacity = elementData.length;//新数组扩容为原来的1.5倍int newCapacity = oldCapacity + (oldCapacity >> 1);//如果扩容前比扩容后小if (newCapacity - minCapacity < 0)//还是原来的数组newCapacity = minCapacity;//如果扩容后超出数组的最大值if (newCapacity - MAX_ARRAY_SIZE > 0)//数组长度变为数组的最大长度newCapacity = hugeCapacity(minCapacity);//将原来的数组在复制进新的数组elementData = Arrays.copyOf(elementData, newCapacity);}//在列表中指定的位置插入指定的元素。将当前位于该位置的元素(如果有)和任何后续元素右移一位(将一个元素添加到它们的索引中)public void add(int index, E element) {rangeCheckForAdd(index);ensureCapacityInternal(size + 1); // Increments modCount!!System.arraycopy(elementData, index, elementData, index + 1,size - index);elementData[index] = element;size++;}//底层重写了sort方法@Override@SuppressWarnings("unchecked")public void sort(Comparator<? super E> c) {//记录集合的修改次数final int expectedModCount = modCount;//排序Arrays.sort((E[]) elementData, 0, size, c);if (modCount != expectedModCount) {//应该是多线程考虑throw new ConcurrentModificationException();}modCount++;}
LinkedList源码分析
/***LinkedList list=new LinkedList();//内部声明了Node类型的first和last属性,默认值为null* list.add(123);//将123封装到了node中,创建了Node对象。* 其中,Node定义为:体现了LinkedList双向链表的说法。*/private static class Node<E> {E item;Node<E> next;Node<E> prev;Node(Node<E> prev, E element, Node<E> next) {this.item = element;this.next = next;this.prev = prev;}}
jdk1.2
实现了List接口,Deque,Cloneable, java.io.Serializable
Deque
线性集合,支持两端插入和移除元素。 名称deque是“双端队列”的缩写
Cloneable
cloneable其实就是一个标记接口,只有实现这个接口后,然后在类中重写Object中的clone方法,然后通过类调用clone方法才能克隆成功,如果不实现这个接口,则会抛出CloneNotSupportedException(克隆不被支持)异常。
java.io.Serializable
支持序列化
public class LinkedList<E>extends AbstractSequentialList<E>implements List<E>, Deque<E>, Cloneable, java.io.Serializable{//指向第一个节点的指针transient Node<E> first;//指向最后一个节点的指针transient Node<E> last;//LinkedList的数据结构就是双向链表private static class Node<E> {E item;//数据元素Node<E> next;//后继节点Node<E> prev;//前驱节点Node(Node<E> prev, E element, Node<E> next) {this.item = element;this.next = next;this.prev = prev;}}//构造器transient int size = 0;//数据个数transient Node<E> first;//表示链表的第一个节点transient Node<E> last;//表示链表的最后一个节点public LinkedList() {}public LinkedList(Collection<? extends E> c) {//用于整合Collection类型的数据this();addAll(c);}//add:public boolean add(E e) {linkLast(e);return true;}void linkLast(E e) {//采用的是尾插法final Node<E> l = last;final Node<E> newNode = new Node<>(l, e, null);//新节点的前驱指向last的地址,后继为null,//所以说这是一个双向链表,但不是循环的,循环的话,后继指向头节点last = newNode;//让last指向新节点,也就说这个新节点是链表的最后一个元素if (l == null)//当第一次添加时,first,last都是null,如果last是null,表明这是一个空链表first = newNode;//就让新节点指向first,现在first和last都是同一个节点elsel.next = newNode;//当在添加数据时,就让老链表的最后一个节点的后继指向新节点(那个节点本来是null的)size++; //长度加1modCount++;/**总结:新建一个节点,让新节点的前驱指向老链表的最后一个节点让老链表的最后一个节点的后继指向新节点让新节点变成链表的最后一个节点长度加1第一个节点前驱为null,最后一个节点后继为null*/}//getpublic E get(int index) {checkElementIndex(index);//检查一下索引是否在0到size的范围内return node(index).item;}Node<E> node(int index) {// assert isElementIndex(index);if (index < (size >> 1)) {//看看索引的位置是在链表的前半部分还是后半部分,决定正着搜索或倒着搜索,找到后返回就行啦Node<E> x = first;for (int i = 0; i < index; i++)//在这里看到链表是从0开始的x = x.next;return x;} else {Node<E> x = last;for (int i = size - 1; i > index; i--)x = x.prev;return x;}}//removepublic E remove(int index) {checkElementIndex(index);//先检查一下索引return unlink(node(index));}//先拿着索引找到这个节点E unlink(Node<E> x) {// assert x != null;final E element = x.item;//节点的元素final Node<E> next = x.next;//节点的后继final Node<E> prev = x.prev;//节点的前驱if (prev == null) {first = next;} else {prev.next = next;x.prev = null;}if (next == null) {last = prev;} else {next.prev = prev;x.next = null;}x.item = null;size--;modCount++;return element;}
Vector源码分析
先创建初始长度为十的数组,扩容默认为原来的二倍,线程安全的。
Vector 是矢量队列,底层是数组。它是JDK1.0版本添加的类。继承于AbstractList,实现了List, RandomAccess, Cloneable
Vector 继承了AbstractList,实现了List;所以,它是一个队列,支持相关的添加、删除、修改、遍历等功能。
Vector 实现了RandmoAccess接口,即提供了随机访问功能。RandmoAccess是java中用来被List实现,为List提供快速访问功能的。在Vector中,我们即可以通过元素的序号快速获取元素对象;这就是快速随机访问。
Vector 实现了Cloneable接口,即实现clone()函数。它能被克隆。
Vector中的操作是线程安全的。因为Vector的方法前加了synchronized 关键字,所以效率不高。
public class Vector<E>extends AbstractList<E>implements List<E>, RandomAccess, Cloneable, java.io.Serializable{//向量的分量所在的数组缓冲区存储。向量的容量是这个数组缓冲区的长度,并且至少大到可以包含向量的所有元素。protected Object[] elementData;//这个对象有效组件的数量protected int elementCount;//当向量的大小大于其容量时,该向量的容量自动增加的量。如果容量增量小于或等于0,则每次需要增长时,向量的容量将增加一倍。protected int capacityIncrement;//用指定的初始容量和容量增量构造一个空向量。@paraminitialCapacity向量的初始容量@paramcapacitylncrement容量所占的量当向量溢出@抛出illeqalarqumentexceptionifspecifiedinitialcapacity时增加是负的public Vector(int initialCapacity, int capacityIncrement) {super();if (initialCapacity < 0)throw new IllegalArgumentException("Illegal Capacity: "+initialCapacity);this.elementData = new Object[initialCapacity];this.capacityIncrement = capacityIncrement;}//默认增量为0public Vector(int initialCapacity) {this(initialCapacity, 0);}//默认长度为10public Vector() {this(10);}//扩容方法//@param minCapacity the desired minimum capacity 所需要的最低容量如果最低容量>0,记录集合又被修改一次调用ensureCapacityHelper(minCapacity)方法public synchronized void ensureCapacity(int minCapacity) {if (minCapacity > 0) {modCount++;ensureCapacityHelper(minCapacity);}}//接下来,进入ensureCapacityHelper(minCapacity)方法private void ensureCapacityHelper(int minCapacity) {// overflow-conscious code如果指定的扩容后长度比现在的容量大,说明扩容是合法的调用grow(minCapacity)方法if (minCapacity - elementData.length > 0)grow(minCapacity);}//继续点击,进入grow(minCapacity)private void grow(int minCapacity) {// overflow-conscious codeint oldCapacity = elementData.length;//用来记录原长度//新的长度的计算:如果增长的长度大于0就扩容为原来的长度+新增的长度,否则扩容为原来的2倍int newCapacity = oldCapacity + ((capacityIncrement > 0) ?capacityIncrement : oldCapacity);if (newCapacity - minCapacity < 0)//如果闲的容量比所需要的最低容量小,新的长度就等于所需的最低容量newCapacity = minCapacity;if (newCapacity - MAX_ARRAY_SIZE > 0)//如果超出最大临界值,就让新数组长度等于最大临界值newCapacity = hugeCapacity(minCapacity);//将原来的元素复制进来elementData = Arrays.copyOf(elementData, newCapacity);}
3)set
/*** 1.Set接口的框架结构:存储无顺序的,不可重复的数据。* HashSet:作为set接口的主要实现类,线程不安全,可以存储null** LinkedHashSet:HashSet的子类。遍历其内部数据时,可以按照添加的顺序遍历。** TreeSet:可以按照添加对象的指定属性,进行排序。** 2.如何理解Set的无序,不可重复。* ①无序性:不等于随机性。*以hashset为例,存储的数据在底层数组中并非按照数组索引的顺序添加,而是根据数据的哈希值添加。* ②不可重复性:保证添加的元素按照equals()方法判断时,不能返回True。即,相同的元素只能添加一个。* hashset底层为数组加链表* 3.Set接口中没有额外定义新的方法,使用的都是Collection接口中声明过的方法。* 4.添加元素的过程:以HashSet为例* 我们想hashset中添加元素a,首先调用a所在类的hashcode方法,计算a的哈希值,* 此哈希值通过算法计算中在hashset底层数组的存放位置,判断数组此位置是否已经有元素,* 如果此位置上没有其他元素,a直接添加成功;如果此位置有其他元素b(或以链表形式存在多个元素),* 则比较a和b的哈希值,如果哈希值不相同,则,元素a添加成功,如果哈希值相同,调用元素a所在类的equals()* 方法,equals()返回true,元素添加失败,如果返回false,元素a添加成功。* 说明/:对于添加的位置有元素还添加成功的情况,与已经存在位置上数据以链表形式存储,* jdk7中a放到数组中,指向原来的元素,jdk8中原来的元素放在数组中,指向a元素。* 5.要求:* ①向set中添加的数据,其所在的类一定要重写hashCode()和equals()方法* ②重写hashCode()和equals()方法尽可能保持一致:相等的对象哈希值必须相同。*/
public interface Spliterator<T> {Spliterator(splitable iterator可分割迭代器)接口是Java为了并行遍历数据源中的元素而设计的迭代器,这个可以类比最早Java提供的顺序遍历迭代器Iterator,但一个是顺序遍历,一个是并行遍历
public interface Set<E> extends Collection<E> {//证明了set集合不可重复@Overridedefault Spliterator<E> spliterator() {return Spliterators.spliterator(this, Spliterator.DISTINCT);}
面试题
/*** 面试题一:在list内去除重复数据值,*/public static void main(String[] args) {ArrayList<String> list = new ArrayList<>();list.add("123");list.add("456");list.add("789");list.add("456");List list2=quChong(list);Iterator<String> iterator = list2.iterator();while (iterator.hasNext()){System.out.println(iterator.next ());}}public static List<String> quChong(List list){HashSet<String> set = new HashSet<>();set.addAll(list);return new ArrayList(set);}
HashSet
/** 我们想hashset中添加元素a,首先调用a所在类的hashcode方法,计算a的哈希值,* 此哈希值通过算法计算中在hashset底层数组的存放位置,判断数组此位置是否已经有元素,* 如果此位置上没有其他元素,a直接添加成功;如果此位置有其他元素b(或以链表形式存在多个元素),* 则比较a和b的哈希值,如果哈希值不相同,则,元素a添加成功,如果哈希值相同,调用元素a所在类的equals()* 方法,equals()返回true,元素添加失败,如果返回false,元素a添加成功。* 说明/:对于添加的位置有元素还添加成功的情况,与已经存在位置上数据以链表形式存储,* jdk7中a放到数组中,指向原来的元素,jdk8中原来的元素放在数组中,指向a元素。*/
继承了AbstractSet
实现了Set, Cloneable, java.io.Serializable
AbstractSet
public abstract class AbstractSet<E> extends AbstractCollection<E> implements Set<E> {里面写了equals hashcode removeAll方法
public class HashSet<E>extends AbstractSet<E>implements Set<E>, Cloneable, java.io.Serializable{static final long serialVersionUID = -5024744406713321676L;// 底层使用HashMap来保存HashSet中所有元素。private transient HashMap<E,Object> map;// 定义一个虚拟的Object对象作为HashMap的value,将此对象定义为static final。private static final Object PRESENT = new Object();//关于为什么不用null而是用一个Object类型的对象,因为map的key本身是可以为null的,二set存储元素成功与否是需要返回一个true或者false,如果使用null来充当value,你就不知道到底存储成功没/*** 默认的无参构造器,构造一个空的HashSet。** 实际底层会初始化一个空的HashMap,并使用默认初始容量为16和加载因子0.75。*/public HashSet() {map = new HashMap<E,Object>();}/*** 构造一个包含指定collection中的元素的新set。** 实际底层使用默认的加载因子0.75和足以包含指定* collection中所有元素的初始容量来创建一个HashMap。* @param c 其中的元素将存放在此set中的collection。*/public HashSet(Collection<? extends E> c) {map = new HashMap<E,Object>(Math.max((int) (c.size()/.75f) + 1, 16));addAll(c);}/*** 以指定的initialCapacity和loadFactor构造一个空的HashSet。** 实际底层以相应的参数构造一个空的HashMap。* @param initialCapacity 初始容量。* @param loadFactor 加载因子。*/public HashSet(int initialCapacity, float loadFactor) {map = new HashMap<E,Object>(initialCapacity, loadFactor);}/*** 以指定的initialCapacity构造一个空的HashSet。** 实际底层以相应的参数及加载因子loadFactor为0.75构造一个空的HashMap。* @param initialCapacity 初始容量。*/public HashSet(int initialCapacity) {map = new HashMap<E,Object>(initialCapacity);}/*** 以指定的initialCapacity和loadFactor构造一个新的空链接哈希集合。* 此构造函数为包访问权限,不对外公开,实际只是是对LinkedHashSet的支持。** 实际底层会以指定的参数构造一个空LinkedHashMap实例来实现。* @param initialCapacity 初始容量。* @param loadFactor 加载因子。* @param dummy 标记。*/HashSet(int initialCapacity, float loadFactor, boolean dummy) {map = new LinkedHashMap<E,Object>(initialCapacity, loadFactor);}/*** 返回对此set中元素进行迭代的迭代器。返回元素的顺序并不是特定的。** 底层实际调用底层HashMap的keySet来返回所有的key。* 可见HashSet中的元素,只是存放在了底层HashMap的key上,* value使用一个static final的Object对象标识。* @return 对此set中元素进行迭代的Iterator。*/public Iterator<E> iterator() {return map.keySet().iterator();}/*** 返回此set中的元素的数量(set的容量)。** 底层实际调用HashMap的size()方法返回Entry的数量,就得到该Set中元素的个数。* @return 此set中的元素的数量(set的容量)。*/public int size() {return map.size();}/*** 如果此set不包含任何元素,则返回true。** 底层实际调用HashMap的isEmpty()判断该HashSet是否为空。* @return 如果此set不包含任何元素,则返回true。*/public boolean isEmpty() {return map.isEmpty();}/*** 如果此set包含指定元素,则返回true。* 更确切地讲,当且仅当此set包含一个满足(o==null ? e==null : o.equals(e))* 的e元素时,返回true。** 底层实际调用HashMap的containsKey判断是否包含指定key。* @param o 在此set中的存在已得到测试的元素。* @return 如果此set包含指定元素,则返回true。*/public boolean contains(Object o) {return map.containsKey(o);}/*** 如果此set中尚未包含指定元素,则添加指定元素。* 更确切地讲,如果此 set 没有包含满足(e==null ? e2==null : e.equals(e2))* 的元素e2,则向此set 添加指定的元素e。* 如果此set已包含该元素,则该调用不更改set并返回false。** 底层实际将将该元素作为key放入HashMap。* 由于HashMap的put()方法添加key-value对时,当新放入HashMap的Entry中key* 与集合中原有Entry的key相同(hashCode()返回值相等,通过equals比较也返回true),* 新添加的Entry的value会将覆盖原来Entry的value,但key不会有任何改变,* 因此如果向HashSet中添加一个已经存在的元素时,新添加的集合元素将不会被放入HashMap中,* 原来的元素也不会有任何改变,这也就满足了Set中元素不重复的特性。* @param e 将添加到此set中的元素。* @return 如果此set尚未包含指定元素,则返回true。*/public boolean add(E e) {return map.put(e, PRESENT)==null;}/*** 如果指定元素存在于此set中,则将其移除。* 更确切地讲,如果此set包含一个满足(o==null ? e==null : o.equals(e))的元素e,* 则将其移除。如果此set已包含该元素,则返回true* (或者:如果此set因调用而发生更改,则返回true)。(一旦调用返回,则此set不再包含该元素)。** 底层实际调用HashMap的remove方法删除指定Entry。* @param o 如果存在于此set中则需要将其移除的对象。* @return 如果set包含指定元素,则返回true。*/public boolean remove(Object o) {return map.remove(o)==PRESENT;}/*** 从此set中移除所有元素。此调用返回后,该set将为空。** 底层实际调用HashMap的clear方法清空Entry中所有元素。*/public void clear() {map.clear();}/*** 返回此HashSet实例的浅表副本:并没有复制这些元素本身。** 底层实际调用HashMap的clone()方法,获取HashMap的浅表副本,并设置到HashSet中。*/public Object clone() {try {HashSet<E> newSet = (HashSet<E>) super.clone();newSet.map = (HashMap<E, Object>) map.clone();return newSet;} catch (CloneNotSupportedException e) {throw new InternalError();}}}
LinkedHashSet
/** LinkedHashSet的使用* LinkedHashSet作为hashSet的子类,再添加数据的同时,每个数据还维护了一对双向链表,* 记录此数据的前一个数据和后一个数据。对于频繁的遍历,LinkedHashSet的效率高于HashSet*/
public class LinkedHashSet<E> extends HashSet<E> implements Set<E>, Cloneable, java.io.Serializable {LinkHashSet底层只是单纯的继承了HashSet并没啥太大改变
TreeSet的使用
public class TreeSet<E> extends AbstractSet<E>implements NavigableSet<E>, Cloneable, java.io.Serializable{/*** 可以排序的map.*/private transient NavigableMap<E,Object> m;// 用来存入map的value的private static final Object PRESENT = new Object();/*** 构造一个指定map集合的TreeSet*/TreeSet(NavigableMap<E,Object> m) {this.m = m;}//自然排序构造一个新的空树集,根据其元素的自然顺序排序。所有插入到集合中的元素必须实现{@link comparable}接口。此外,所有这些元素都必须<我>相互可比< / ix: f@code e1.compareTo (e2)}不能抛出一个f@code ClassCastException} {@code el}对任何元素集和f@code e2}。如果用户试图添加一个字符串进入Integer类型的Set{@code添加}调用将抛出一个public TreeSet() {this(new TreeMap<E,Object>());}/**定制排序* Constructs a new, empty tree set, sorted according to the specified* comparator. All elements inserted into the set must be <i>mutually* comparable</i> by the specified comparator: {@code comparator.compare(e1,* e2)} must not throw a {@code ClassCastException} for any elements* {@code e1} and {@code e2} in the set. If the user attempts to add* an element to the set that violates this constraint, the* {@code add} call will throw a {@code ClassCastException}.** @param comparator the comparator that will be used to order this set.* If {@code null}, the {@linkplain Comparable natural* ordering} of the elements will be used.*/public TreeSet(Comparator<? super E> comparator) {this(new TreeMap<>(comparator));}/*** Constructs a new tree set containing the elements in the specified* collection, sorted according to the <i>natural ordering</i> of its* elements. All elements inserted into the set must implement the* {@link Comparable} interface. Furthermore, all such elements must be* <i>mutually comparable</i>: {@code e1.compareTo(e2)} must not throw a* {@code ClassCastException} for any elements {@code e1} and* {@code e2} in the set.** @param c collection whose elements will comprise the new set* @throws ClassCastException if the elements in {@code c} are* not {@link Comparable}, or are not mutually comparable* @throws NullPointerException if the specified collection is null*/public TreeSet(Collection<? extends E> c) {this();addAll(c);}/*** Constructs a new tree set containing the same elements and* using the same ordering as the specified sorted set.** @param s sorted set whose elements will comprise the new set* @throws NullPointerException if the specified sorted set is null*/public TreeSet(SortedSet<E> s) {this(s.comparator());addAll(s);}/*** Returns an iterator over the elements in this set in ascending order.*以升序返回此集合中元素的迭代器。* @return an iterator over the elements in this set in ascending order*/public Iterator<E> iterator() {return m.navigableKeySet().iterator();}/*** Returns an iterator over the elements in this set in descending order.*按降序返回该集合中元素的迭代器。* @return an iterator over the elements in this set in descending order* @since 1.6*/public Iterator<E> descendingIterator() {return m.descendingKeySet().iterator();}/*** @since 1.6*/public NavigableSet<E> descendingSet() {return new TreeSet<>(m.descendingMap());}public int size() {return m.size();}public boolean isEmpty() {return m.isEmpty();}public boolean contains(Object o) {return m.containsKey(o);}/*** Adds the specified element to this set if it is not already present.* More formally, adds the specified element {@code e} to this set if* the set contains no element {@code e2} such that* <tt>(e==null ? e2==null : e.equals(e2))</tt>.* If this set already contains the element, the call leaves the set* unchanged and returns {@code false}.*大概意思就是先根据hash值比交,不相同直接添加成功,hashcode相同在判断是不是null然后调用equals方法进行比较equals方法返回true,则添加失败,否则添加成功。* @param e element to be added to this set* @return {@code true} if this set did not already contain the specified* element* @throws ClassCastException if the specified object cannot be compared* with the elements currently in this set* @throws NullPointerException if the specified element is null* and this set uses natural ordering, or its comparator* does not permit null elements*/public boolean add(E e) {return m.put(e, PRESENT)==null;}如果指定的元素存在,则从该集合中移除它。更正式的说法是,删除元素f@code e}< (ttx - o = null ? e = -null  ;o.equals (e)) / tt >、<如果这个集合包含这样一个元素。如果该集合包含元素,则返回{@code true}(或者,如果该集合由于调用而改变,则返回相等的结果)。(一旦调用返回,这个集合将不包含元素。)* @param o object to be removed from this set, if present* @return {@code true} if this set contained the specified element* @throws ClassCastException if the specified object cannot be compared* with the elements currently in this set* @throws NullPointerException if the specified element is null* and this set uses natural ordering, or its comparator* does not permit null elements*/public boolean remove(Object o) {return m.remove(o)==PRESENT;}/*** Removes all of the elements from this set.* The set will be empty after this call returns.*/public void clear() {m.clear();}/*** Adds all of the elements in the specified collection to this set.** @param c collection containing elements to be added to this set* @return {@code true} if this set changed as a result of the call* @throws ClassCastException if the elements provided cannot be compared* with the elements currently in the set* @throws NullPointerException if the specified collection is null or* if any element is null and this set uses natural ordering, or* its comparator does not permit null elements*/public boolean addAll(Collection<? extends E> c) {// Use linear-time version if applicableif (m.size()==0 && c.size() > 0 &&c instanceof SortedSet &&m instanceof TreeMap) {SortedSet<? extends E> set = (SortedSet<? extends E>) c;TreeMap<E,Object> map = (TreeMap<E, Object>) m;Comparator<?> cc = set.comparator();Comparator<? super E> mc = map.comparator();if (cc==mc || (cc != null && cc.equals(mc))) {map.addAllForTreeSet(set, PRESENT);return true;}}return super.addAll(c);}
- ①向TreeSet中添加的数据,要求是同一个类的对象,不能添加不同类的对象。
- ②两种排序方式:自然排序和定制排序
- ③自然排序中,比较两个对象是否相同的标准:compareTo()返回0,不再是equals();
public static void main(String[] args) {TreeSet<Object> treeSet = new TreeSet<>();treeSet.add(123);treeSet.add(456);treeSet.add(789);treeSet.add(456);System.out.println(treeSet);//[123, 456, 789]System.out.println("*****************************************");TreeSet<Object> set = new TreeSet<>();set.add(new User("Tom",22));set.add(new User("Jerry",24));set.add(new User("BeiBei",21));set.add(new User("DongDong",20));set.add(new User("MM",18));//set.add(new Integer(123));Iterator<Object> iterator = set.iterator();while (iterator.hasNext()){System.out.println(iterator.next());}}}class User implements Comparable{private String name;private int age;public User(String name, int age) {this.name = name;this.age = age;}public User() {}public String getName() {return name;}public void setName(String name) {this.name = name;}public int getAge() {return age;}public void setAge(int age) {this.age = age;}@Overridepublic String toString() {return "User{" +"name='" + name + '\'' +", age=" + age +'}';}@Overridepublic int compareTo(Object o) {//姓名从大到小,年龄从小到大if (o instanceof User){User user= (User) o;int num= this.name.compareTo(user.name);if (num!=0){return -num;}else{return Integer.compare(this.age,user.age);}}else{throw new RuntimeException("类型不一致!");}}}
TreeSet定制排序
- ①new一个Comparator对象,重写compare方法
- ②将Comparator对象传入TreeSet的构造器
- ③添加对象时就会按照compare方法进行比较
public static void main(String[] args) {//照年龄从小到大排列Comparator comparator = new Comparator(){@Overridepublic int compare(Object o1, Object o2) {if (o1 instanceof Dog&& o2 instanceof Dog){Dog d1= (Dog) o1;Dog d2= (Dog) o2;return Integer.compare(d1.getAge(),d2.getAge());}else{throw new RuntimeException("类型不一致!");}}};TreeSet<Object> set = new TreeSet<>(comparator);set.add(new Dog("Tom",22));set.add(new Dog("Jerry",22));set.add(new Dog("BeiBei",21));set.add(new Dog("DongDong",20));set.add(new Dog("MM",18));set.add(123);//set.add(new Integer(123));Iterator<Object> iterator = set.iterator();while (iterator.hasNext()){System.out.println(iterator.next());}}}class Dog{private String name;private int age;public Dog() {}public String getName() {return name;}public void setName(String name) {this.name = name;}public int getAge() {return age;}public void setAge(int age) {this.age = age;}public Dog(String name, int age) {this.name = name;this.age = age;}@Overridepublic String toString() {return "Dog{" +"name='" + name + '\'' +", age=" + age +'}';}}
2.map接口
map底层源码分析
/*** Map:双列数据,用于存储具有键值对的数据,类似于函数的概念。* 1.HashMap:作为map的主要实现类,线程不安全的,效率高。可以存储null的key或value。** *LinkedHashMap:HashMap的子类,保证在遍历map元素时,可以按照添加的顺序进行遍历。* 原因:在原有hashMap底层的基础结构上,添加了一对指针,指向前一个和后一个元素。*对于频繁的遍历操作,此类执行效率高于hashMap。** 2.TreeMap:可以按照添加的键值对进行排序,实现便利排序。按照key来排序。*底层使用红黑树。** 3.HashTable:古老的实现类。jdk1.0.,线程安全的,效率低,不可以存储null的key或value。** *Properties:HashTable的子类。常用来处理配置文件。key和value都是String类型。** HashMap的底层:jdk7 数组加链表* jdk8数组+链表+红黑树* 面试题:* 1.hashMap的底层实现原理:** 2.HashMap和HashTable的异同:** 二:Map中key-value的理解:* 1.key不可重复(无序),value可以重复。* 2.实际上放入map集合的是entry,entry有两个属性key和value。* 3.entry无序不可重复。* 4.key所在的类要重写hashcode()和equals()方法,针对于HashMap* 5.判断该元素存不存在,需要重写equals()。*/
支持自然排序和定制排序
public interface Map<K,V> {//里面定义了一个Entry接口interface Entry<K,V> {public static <K extends Comparable<? super K>, V> Comparator<Map.Entry<K,V>> comparingByKey() {return (Comparator<Map.Entry<K, V>> & Serializable)(c1, c2) -> c1.getKey().compareTo(c2.getKey());}public static <K, V extends Comparable<? super V>> Comparator<Map.Entry<K,V>> comparingByValue() {return (Comparator<Map.Entry<K, V>> & Serializable)(c1, c2) -> c1.getValue().compareTo(c2.getValue());}public static <K, V> Comparator<Map.Entry<K, V>> comparingByKey(Comparator<? super K> cmp) {Objects.requireNonNull(cmp);return (Comparator<Map.Entry<K, V>> & Serializable)(c1, c2) -> cmp.compare(c1.getKey(), c2.getKey());}public static <K, V> Comparator<Map.Entry<K, V>> comparingByValue(Comparator<? super V> cmp) {Objects.requireNonNull(cmp);return (Comparator<Map.Entry<K, V>> & Serializable)(c1, c2) -> cmp.compare(c1.getValue(), c2.getValue());}}
HashMap
底层源码分析
/*** 以jdk7为例说明:* HashMap<Object, Object> map = new HashMap<>();//实例化以后,底层创建了长度为16的一维数组Entry[]table。* ....已经执行过多次put操作。。。。* map.put(1,666);//首先,计算key1的hash值,此hash值经过某种算法计算,得到在entry数组的存放位置。* 如果此位置的数据为空,此时的key1添加成功(成功一);如果此位置的数据不为空(意味着此位置存在一个或者多个数据),* 比较key1和已经存在的一个或多个数据的哈希值,如果key1的哈希值与已经存在的都不相同,此时添加成功(成功二)。* 如果如果key1的哈希值与已经存在的某个数据(key2-value2)的哈希值相同,继续比较,* 调用key1所在类的equals()方法,比较:* 如果equals()返回false:添加成功(成功三);如果返回true:使用value1替换value2.* 关于成功二和成功三:* 此时key1value1和原来的数据一链表的方式存储。* 在不断的添加过程中,涉及到扩容问题,当超出临界值,且要存放的位置非空时,默认的扩容方式,扩容为原来容量的2倍,并将原有的数据复制过来。* 在jdk8中的底层实现:* jdk8相比于底层实现方面的不同:* 1.new HashMap();底层没有创建一个长度为16的数组。* 2.jdk8底层是Node【】,不再是Entry【】。* 3.首次调用put方法时,底层创建长度为16的数组。* 4.原来jdk7底层结构只有数组加链表,jdk8又加入了红黑树,当数组某一个索引位置上的元素以链表形式存在的* 数据个数>8且当前数组长度>64时,此时此索引位置上的所有数据改为使用红黑树存储。*/
HashMap基于Map接口实现,元素以键值对的方式存储,并且允许使用null 建和null 值, 因为key不允许重复,因此只能有一个键为null,另外HashMap不能保证放入元素的顺序,它是无序的,和放入的顺序并不能相同。HashMap是线程不安全的。
public class HashMap<K,V> extends AbstractMap<K,V>implements Map<K,V>, Cloneable, Serializable {static final int DEFAULT_INITIAL_CAPACITY = 1 << 4; //默认初始化大小 16static final float DEFAULT_LOAD_FACTOR = 0.75f; //负载因子0.75static final Entry<?,?>[] EMPTY_TABLE = {}; //初始化的默认数组transient int size; //HashMap中元素的数量int threshold; //判断是否需要调整HashMap的容量//当数组总长度>64,且单个节点的元素大于8个时,该节点的元素使用红黑树存储当删除该节点元素时,当该节点的元素小于6个,从二叉树变为指针static final int TREEIFY_THRESHOLD = 8;static final int UNTREEIFY_THRESHOLD = 6;static final int MIN_TREEIFY_CAPACITY = 64;//底层使用指针static class Node<K,V> implements Map.Entry<K,V> {final int hash;final K key;V value;Node<K,V> next;Node(int hash, K key, V value, Node<K,V> next) {this.hash = hash;this.key = key;this.value = value;this.next = next;}//HashMap计算hash对key的hashcode进行了二次hash,以获得更好的散列值,然后对table数组长度取摸。int hash = hash(key.hashCode());int i = indexFor(hash, table.length);static int hash(int h) {// This function ensures that hashCodes that differ only by// constant multiples at each bit position have a bounded// number of collisions (approximately 8 at default load factor).h ^= (h >>> 20) ^ (h >>> 12);return h ^ (h >>> 7) ^ (h >>> 4);}static int indexFor(int h, int length) {return h & (length-1);//在该方法中,添加键值对时,首先进行table是否初始化的判断,如果没有进行初始化(分配空间,Entry[]数组的长度)。然后进行key是否为null的判断,如果key==null ,放置在Entry[]的0号位置。计算在Entry[]数组的存储位置,判断该位置上是否已有元素,如果已经有元素存在,则遍历该Entry[]数组位置上的单链表。判断key是否存在,如果key已经存在,则用新的value值,替换点旧的value值,并将旧的value值返回。如果key不存在于HashMap中,程序继续向下执行。将key-vlaue, 生成Entry实体,添加到HashMap中的Entry[]数组中。public V put(K key, V value) {if (table == EMPTY_TABLE) { //是否初始化inflateTable(threshold);}if (key == null) //放置在0号位置return putForNullKey(value);int hash = hash(key); //计算hash值int i = indexFor(hash, table.length); //计算在Entry[]中的存储位置for (Entry<K,V> e = table[i]; e != null; e = e.next) {Object k;if (e.hash == hash && ((k = e.key) == key || key.equals(k))) {V oldValue = e.value;e.value = value;e.recordAccess(this);return oldValue;}}modCount++;addEntry(hash, key, value, i); //添加到Map中return null;}添加到方法的具体操作,在添加之前先进行容量的判断,如果当前容量达到了阈值,并且需要存储到Entry[]数组中,先进性扩容操作,空充的容量为table长度的2倍。重新计算hash值,和数组存储的位置,扩容后的链表顺序与扩容前的链表顺序相反。然后将新添加的Entry实体存放到当前Entry[]位置链表的头部。在1.8之前,新插入的元素都是放在了链表的头部位置,但是这种操作在高并发的环境下容易导致死锁,所以1.8之后,新插入的元素都放在了链表的尾部。/** hash hash值* key 键值* value value值* bucketIndex Entry[]数组中的存储索引* /void addEntry(int hash, K key, V value, int bucketIndex) {if ((size >= threshold) && (null != table[bucketIndex])) {resize(2 * table.length); //扩容操作,将数据元素重新计算位置后放入newTable中,链表的顺序与之前的顺序相反hash = (null != key) ? hash(key) : 0;bucketIndex = indexFor(hash, table.length);}createEntry(hash, key, value, bucketIndex);}void createEntry(int hash, K key, V value, int bucketIndex) {Entry<K,V> e = table[bucketIndex];table[bucketIndex] = new Entry<>(hash, key, value, e);size++;}HashMap里面实现一个静态内部类Entry,其重要的属性有 hash,key,value,next。HashMap里面用到链式数据结构的一个概念。上面我们提到过Entry类里面有一个next属性,作用是指向下一个Entry。打个比方, 第一个键值对A进来,通过计算其key的hash得到的index=0,记做:Entry[0] = A。一会后又进来一个键值对B,通过计算其index也等于0,现在怎么办?HashMap会这样做:B.next = A,Entry[0] = B,如果又进来C,index也等于0,那么C.next = B,Entry[0] = C;这样index=0的地方其实存取了A,B,C三个键值对,他们通过next这个属性链接在一起。也就是说数组中存储的是最后插入的元素。void addEntry(int hash, K key, V value, int bucketIndex) {Entry<K,V> e = table[bucketIndex];table[bucketIndex] = new Entry<K,V>(hash, key, value, e); //参数e, 是Entry.next//如果size超过threshold,则扩充table大小。再散列if (size++ >= threshold)resize(2 * table.length);}//添加方法精讲public V put(K key, V value) {//调用putVal()方法完成return putVal(hash(key), key, value, false, true);}final V putVal(int hash, K key, V value, boolean onlyIfAbsent,boolean evict) {Node<K,V>[] tab; Node<K,V> p; int n, i;//判断table是否初始化,否则初始化操作if ((tab = table) == null || (n = tab.length) == 0)n = (tab = resize()).length;//计算存储的索引位置,如果没有元素,直接赋值if ((p = tab[i = (n - 1) & hash]) == null)tab[i] = newNode(hash, key, value, null);else {Node<K,V> e; K k;//节点若已经存在,执行赋值操作if (p.hash == hash &&((k = p.key) == key || (key != null && key.equals(k))))e = p;//判断链表是否是红黑树else if (p instanceof TreeNode)//红黑树对象操作e = ((TreeNode<K,V>)p).putTreeVal(this, tab, hash, key, value);else {//为链表,for (int binCount = 0; ; ++binCount) {if ((e = p.next) == null) {p.next = newNode(hash, key, value, null);//链表长度8,将链表转化为红黑树存储if (binCount >= TREEIFY_THRESHOLD - 1) // -1 for 1sttreeifyBin(tab, hash);break;}//key存在,直接覆盖if (e.hash == hash &&((k = e.key) == key || (key != null && key.equals(k))))break;p = e;}}if (e != null) { // existing mapping for keyV oldValue = e.value;if (!onlyIfAbsent || oldValue == null)e.value = value;afterNodeAccess(e);return oldValue;}}//记录修改次数++modCount;//判断是否需要扩容if (++size > threshold)resize();//空操作afterNodeInsertion(evict);return null;}
LinkedHashMap
在LinkedHashMap中,是通过双联表的结构来维护节点的顺序的。每个节点都进行了双向的连接,维持插入的顺序(默认)。head指向第一个插入的节点,tail指向最后一个节点。
LinkedHashMap是HashMap的亲儿子,直接继承HashMap类。LinkedHashMap中的节点元素为Entry,直接继承HashMap.Node。
在HashMap类的put方法中,新建节点是使用的newNode方法。而在LinkedHashMap没有重写父类的put方法,而是重写了newNode方法来构建自己的节点对象。Node<K,V> newNode(int hash, K key, V value, Node<K,V> next) {return new Node<>(hash, key, value, next);}Node<K,V> newNode(int hash, K key, V value, Node<K,V> e) {LinkedHashMap.Entry<K,V> p =new LinkedHashMap.Entry<K,V>(hash, key, value, e);linkNodeLast(p);return p;}
LinkedHashMap相对于HashMap,增加了双链表的结果(即节点中增加了前后指针),其他处理逻辑与HashMap一致,同样也没有锁保护,多线程使用存在风险。
Map接口中定义的方法1
public static void main(String[] args) {HashMap<Object, Object> map = new HashMap<>();map.put(1, 666);//添加map.putAll(map);//添加一个集合map.remove(1);//通过key移除map.clear();//移除集合中所元素map.size();//集合大小map.get(1);//通过key获取值map.containsKey(1);//判断是否包含指定keymap.containsValue(666);//判断是否包含指定valuemap.isEmpty();//判断是否为空map.equals(map);//判断当前map和参数Object是否相等
Map中的常用方法二
public static void main(String[] args) {HashMap<Object, Object> map = new HashMap<>();map.put(1,666);map.put(2,888);map.put(3,555);//遍历所的key:keySetSet<Object> set = map.keySet();Iterator<Object> iterator = set.iterator();while (iterator.hasNext()){System.out.println(iterator.next());}//遍历所的value:valuesCollection<Object> collection = map.values();Iterator<Object> iterator1 = collection.iterator();while (iterator1.hasNext()){System.out.println(iterator1.next());}//遍历所的key,value:entrySetSet<Map.Entry<Object, Object>> entries = map.entrySet();Iterator<Map.Entry<Object, Object>> iterator2 = entries.iterator();while (iterator2.hasNext()){System.out.println(iterator2.next());}}
HashTable
public class Hashtable<K,V>extends Dictionary<K,V>implements Map<K,V>, Cloneable, java.io.Serializable {属性:table:为一个Entry[]数组类型,Entry代表了“拉链”的节点,每一个Entry代表了一个键值对,哈希表的"key-value键值对"都是存储在Entry数组中的。count:HashTable的大小,注意这个大小并不是HashTable的容器大小,而是他所包含Entry键值对的数量。threshold:Hashtable的阈值,用于判断是否需要调整Hashtable的容量。threshold的值="容量*加载因子"。loadFactor:加载因子。modCount:用来实现“fail-fast”机制的(也就是快速失败)。所谓快速失败就是在并发集合中,其进行迭代操作时,若有其他线程对其进行结构性的修改,这时迭代器会立马感知到,并且立即抛出ConcurrentModificationException异常,而不是等到迭代完成之后才告诉你(你已经出错了)构造方法:1.默认构造函数,容量为11,加载因子为0.75:public Hashtable() {this(11, 0.75f);}2.public Hashtable(int initialCapacity) {this(initialCapacity, 0.75f);}3.public Hashtable(int initialCapacity, float loadFactor) {if (initialCapacity < 0)throw new IllegalArgumentException("Illegal Capacity: "+initialCapacity);if (loadFactor <= 0 || Float.isNaN(loadFactor))throw new IllegalArgumentException("Illegal Load: "+loadFactor);if (initialCapacity==0)initialCapacity = 1;this.loadFactor = loadFactor;table = new Entry<?,?>[initialCapacity];threshold = (int)Math.min(initialCapacity * loadFactor, MAX_ARRAY_SIZE + 1);}重要方法public synchronized V get(Object key) {Entry<?,?> tab[] = table;int hash = key.hashCode();int index = (hash & 0x7FFFFFFF) % tab.length;for (Entry<?,?> e = tab[index] ; e != null ; e = e.next) {if ((e.hash == hash) && e.key.equals(key)) {return (V)e.value;}}return null;}public synchronized V put(K key, V value) {// Make sure the value is not nullif (value == null) {throw new NullPointerException();}// Makes sure the key is not already in the hashtable.Entry<?,?> tab[] = table;int hash = key.hashCode();int index = (hash & 0x7FFFFFFF) % tab.length;//计算出索引@SuppressWarnings("unchecked")//遍历该数组Entry<K,V> entry = (Entry<K,V>)tab[index];for(; entry != null ; entry = entry.next) {if ((entry.hash == hash) && entry.key.equals(key)) {V old = entry.value;entry.value = value;return old;}}addEntry(hash, key, value, index);return null;}private void addEntry(int hash, K key, V value, int index) {modCount++;Entry<?,?> tab[] = table;if (count >= threshold) {// Rehash the table if the threshold is exceededrehash();tab = table;hash = key.hashCode();index = (hash & 0x7FFFFFFF) % tab.length;}// Creates the new entry.@SuppressWarnings("unchecked")Entry<K,V> e = (Entry<K,V>) tab[index];tab[index] = new Entry<>(hash, key, value, e);count++;}//扩容protected void rehash() {int oldCapacity = table.length;Entry<?,?>[] oldMap = table;// overflow-conscious codeint newCapacity = (oldCapacity << 1) + 1;2倍+1if (newCapacity - MAX_ARRAY_SIZE > 0) {if (oldCapacity == MAX_ARRAY_SIZE)// Keep running with MAX_ARRAY_SIZE bucketsreturn;newCapacity = MAX_ARRAY_SIZE;}Entry<?,?>[] newMap = new Entry<?,?>[newCapacity];modCount++;threshold = (int)Math.min(newCapacity * loadFactor, MAX_ARRAY_SIZE + 1);table = newMap;for (int i = oldCapacity ; i-- > 0 ;) {for (Entry<K,V> old = (Entry<K,V>)oldMap[i] ; old != null ; ) {Entry<K,V> e = old;old = old.next;int index = (e.hash & 0x7FFFFFFF) % newCapacity;e.next = (Entry<K,V>)newMap[index];newMap[index] = e;}}}
TreeMap
public class TreeMap<K,V>extends AbstractMap<K,V>implements NavigableMap<K,V>, Cloneable, java.io.Serializable{private final Comparator<? super K> comparator;private transient Entry<K,V> root;public Comparator<? super K> comparator() {return comparator;}
TreeMap两种添加方式的使用:
向treemap中添加数据,要求key必须是同一个类创建的对象,因为要按照类进行排序。
①自然排序
public static void main(String[] args) {TreeMap<Object, Object> map = new TreeMap<>();map.put(new User("尹会东",23),"6666");map.put(new User("张贝贝",25),"6666");map.put(new User("刘淼",23),"6666");Set<Map.Entry<Object, Object>> set = map.entrySet();Iterator<Map.Entry<Object, Object>> iterator = set.iterator();while (iterator.hasNext()){System.out.println(iterator.next());}}}class User implements Comparable{private String name;private int age;public User(String name, int age) {this.name = name;this.age = age;}public User() {}public String getName() {return name;}public void setName(String name) {this.name = name;}public int getAge() {return age;}public void setAge(int age) {this.age = age;}@Overridepublic String toString() {return "User{" +"name='" + name + '\'' +", age=" + age +'}';}@Overridepublic int compareTo(Object o) {//姓名从大到小,年龄从小到大if (o instanceof User){User user= (User) o;int num= this.name.compareTo(user.name);if (num!=0){return -num;}else{return Integer.compare(this.age,user.age);}}else{throw new RuntimeException("类型不一致!");}}}
②定制排序
public static void main(String[] args) {Comparator comparator = new Comparator() {@Overridepublic int compare(Object o1, Object o2) {if (o1 instanceof Dog && o2 instanceof Dog){Dog d1= (Dog) o1;Dog d2= (Dog) o2;return Integer.compare(d1.getAge(),d2.getAge());}throw new RuntimeException("类型不一致!");}};TreeMap<Object, Object> map = new TreeMap<>(comparator);map.put(new Dog("尹会东",23),"6666");map.put(new Dog("张贝贝",25),"6666");map.put(new Dog("45646",56),"888");Set<Map.Entry<Object, Object>> set = map.entrySet();Iterator<Map.Entry<Object, Object>> iterator = set.iterator();while (iterator.hasNext()){System.out.println(iterator.next());}}}class Dog{private String name;private int age;public Dog() {}public String getName() {return name;}public void setName(String name) {this.name = name;}public int getAge() {return age;}public void setAge(int age) {this.age = age;}public Dog(String name, int age) {this.name = name;this.age = age;}@Overridepublic String toString() {return "Dog{" +"name='" + name + '\'' +", age=" + age +'}';}}
Properties
public synchronized Object setProperty(String key, String value) {return put(key, value);}public synchronized void load(Reader reader) throws IOException {load0(new LineReader(reader));}private void load0 (LineReader lr) throws IOException {char[] convtBuf = new char[1024];int limit;int keyLen;int valueStart;char c;boolean hasSep;boolean precedingBackslash;while ((limit = lr.readLine()) >= 0) {c = 0;keyLen = 0;valueStart = limit;hasSep = false;//System.out.println("line=<" + new String(lineBuf, 0, limit) + ">");precedingBackslash = false;while (keyLen < limit) {c = lr.lineBuf[keyLen];//need check if escaped.if ((c == '=' || c == ':') && !precedingBackslash) {valueStart = keyLen + 1;hasSep = true;break;} else if ((c == ' ' || c == '\t' || c == '\f') && !precedingBackslash) {valueStart = keyLen + 1;break;}if (c == '\\') {precedingBackslash = !precedingBackslash;} else {precedingBackslash = false;}keyLen++;}while (valueStart < limit) {c = lr.lineBuf[valueStart];if (c != ' ' && c != '\t' && c != '\f') {if (!hasSep && (c == '=' || c == ':')) {hasSep = true;} else {break;}}valueStart++;}String key = loadConvert(lr.lineBuf, 0, keyLen, convtBuf);String value = loadConvert(lr.lineBuf, valueStart, limit - valueStart, convtBuf);put(key, value);}}
Properties处理配置文件
public static void main(String[] args) {Properties prop=new Properties();FileInputStream fileInputStream=null;try {fileInputStream = new FileInputStream("jdbc.properties");prop.load(fileInputStream);String name=prop.getProperty("user");System.out.println(name);} catch (IOException e) {e.printStackTrace();}finally {try {if (fileInputStream!=null){fileInputStream.close();}} catch (IOException e) {e.printStackTrace();}}}
3.collections工具类
Collections工具类:操作set,map,list的工具类
面试题:Collection和Collections的区别:
public static void main(String[] args) {//排序ArrayList<Object> list = new ArrayList<>();list.add(new Integer(1));list.add(new Integer(2));list.add(new Integer(3));Collections.reverse(list);//反转list本身Collections.shuffle(list);//随机化处理// Collections.sort(list);//升序排序Collections.swap(list,1,2);//交换两处位置的元素Collections.frequency(list,1);//指定元素出现的次数//同步控制List<Object> list1 = Collections.synchronizedList(list);//返回的list1就是线程安全的list}
十,泛型
jdk1.5新特性泛型
把元素的类型设计成一个参数,这个参数类型叫做泛型。
为什么要使用泛型?
1.类型无限制,类型不安全。
2.类型强制转换时,容易出现异常。
ClassCastException
集合中使用泛型集合接口或类在jdk5.0都修改为带泛型的结构。在实例化集合类时,可以指明泛型的类型。指明完以后,在集合类或接口中,凡是定义接口或类时,内部结构使用到类的泛型位置,都指定为实例化的泛型。泛型的类型必须是一个类。,使用基本数据类型时,需要转换为包装类。如果实例化时未指明泛型,默认为Object类型。
public static void main(String[] args) {ArrayList<Integer> list = new ArrayList<>();list.add(99);list.add(100);list.add(88);for (Integer integer:list){System.out.print(integer+" ");}System.out.println();System.out.println("-------------------------------------------------------");Iterator<Integer> iterator = list.iterator();while (iterator.hasNext()){System.out.print(iterator.next()+" ");}System.out.println("-------------------------------------------------------");HashMap<String, Integer> map = new HashMap<>();map.put("第一个",123);map.put("第二个",456);map.put("第个",789);Set<Map.Entry<String, Integer>> set = map.entrySet();Iterator<Map.Entry<String, Integer>> iterator1 = set.iterator();while (iterator1.hasNext()){System.out.print(iterator1.next()+" ");}System.out.println("-------------------------------------------------------------");}
自定义泛型结构:泛型类,接口,方法
/*** 泛型类被某个类继承:* ①public class SubOrder extends Order<Integer>//此时子类时普通类* 由于子类在继承带泛型的父类时,指明了泛型类型,则实例化子类对象时,不再需要指明泛型。* ②public class SubOrder1<T> extends Order<T>//此时子类也是泛型类** 自定义泛型的注意点* ①泛型不同的引用不能相互赋值* ArrayList<Integer>list1=null;* ArrayList<String>list2=null;* 此时list1和list2不能相互赋值。* ②类型推断* Order<String> order1 = new Order<>();* ③静态方法中不能使用类的泛型** 泛型方法:在方法中出现了泛型的结构,泛型参数与类的泛型参数没有任何关系。* 换句话说,泛型方法所属的类是不是泛型类都没有关系。* 泛型方法可以声明为静态的。原因:泛型参数是在调用方法时确定的。并非在实例化类时确定。*/
/*** @author yinhuidong* @createTime 2020-04-10-15:23* 案例需求:* 一个学生类包含两个属性:String类型的name和不确定类型的score* 老师一登记成绩:优秀,良好,及格* 老师二登记成绩:89.5,100.。。。* 老师三登记成绩:A,B,C,* 需求二:* 一个指定类型的学生类*/public class Test1 {@Testpublic void test1() {//实例化子类对象时,指明带泛型的类型//泛型不指定就相当于默认Object类型//如果泛型结构是借口或抽象类,不可以实例化对象//静态方法中不能使用类的泛型,原因:类的泛型是在对象实例化时指定的,而静态方法是在类加载时加载的//异常类不能声明为泛型类//jdk1.8类型推断Student<String> student = new Student<>("张三", "优秀");Student<Double> student1 = new Student<>("李四", 90.5);Student<Character> student2 = new Student<>("王五", 'A');}@Testpublic void test2() {//由于子类在继承带泛型的父类时,指明了带泛型的类型,则实例化子类对象时,不再需要指明泛型。Student2 student = new Student2("zhangsan", "优秀");}@Testpublic void test3(){Integer[] arr = new Integer[4];arr[0]=1;arr[1]=2;arr[2]=3;arr[3]=4;Student2 student = new Student2();//泛型方法在调用时指明泛型参数的类型List<Integer> list = student.copy(arr);for (Integer i:list){System.out.println(i);}}}class Student<T> {private String name;private T score;public Student() {}public Student(String name, T score) {this.name = name;this.score = score;}public String getName() {return name;}public void setName(String name) {this.name = name;}public T getScore() {return score;}public void setScore(T score) {this.score = score;}@Overridepublic String toString() {return "Student{" +"name='" + name + '\'' +", score=" + score +'}';}}class Student2 extends Student<String> {public Student2() {}public Student2(String name, String score) {super(name, score);}/*** 泛型方法:* 在方法中出现了泛型结构,泛型参数与类的泛型参数没有任何关系* 泛型方法可以声明为static,原因:泛型参数是在调用方法时确定的,而不是在实例化类时确定的*/public <E> List<E> copy(E[] arr) {ArrayList<E> list = new ArrayList<>();for (E e : arr) {list.add(e);}return list;}}
通配符的使用
类A是类B的父类,G和G是没有关系的,二者共有的父类是G<?>。
/*** @author yinhuidong* @createTime 2020-04-10-15:57* 1.泛型在继承方面的提现** 2.通配符的使用*/public class Test2 {/*** 泛型在继承方面的提现* 类A是类B的父类,* G<A>和G<B>不具有子父类关系* 二者是并列关系,二者公共的父类时G<?>** 类A是类B的父类,A<G>是B<G>的子父类*/@Testpublic void test1(){List<Object> list1=null;List<Integer> list2=null;//此时的list1和list2类型不具有子父类关系//list1=list2;}/*** 通配符的使用* ?* 有限制条件的通配符的使用* <? extends Person> ?代表的类型必须是Person的子类* <? implement PersonDao> ?代表的类型必须实现了PersonDao接口* <? super Person> ?代表的类型必须是Person或Person的父类*/public void show(List<?> list){//list.add(1);//此时list<?>并不能再添加数据(null除外)list.add(null);Iterator<?> iterator = list.iterator();while (iterator.hasNext()){System.out.println(iterator.next());}//读取数据:允许,返回类型为Object类型Object o = list.get(0);}@Testpublic void test2(){ArrayList<Integer> list = new ArrayList<>();list.add(1);list.add(2);list.add(3);show(list);}}

