一,线程的创建
在java中,有多种方式来实现多线程。继承Thread类,实现Runnable接口,使用ExecutorService,Callable,Future实现带返回结果的多线程。
1.继承Thread类创建线程
Thread类的本质是实现了Runnable接口的一个实例,代表一个线程的实例。启动线程的唯一方法就是通过Thread类的start()方法,这是一个本地方法,他会启动一个新线程,并执行run()。
public class Thread implements Runnable{private Runnable target;@Overridepublic void run() {if (target != null) {target.run();}}public synchronized void start() {if (threadStatus != 0)throw new IllegalThreadStateException();group.add(this);boolean started = false;try {start0();started = true;} finally {try {if (!started) {group.threadStartFailed(this);}} catch (Throwable ignore) {/* do nothing. If start0 threw a Throwable thenit will be passed up the call stack */}}}private native void start0();}
2.实现Runnable接口创建多线程
@FunctionalInterfacepublic interface Runnable {public abstract void run();}
为什么实现Runnable接口能够实现多线程?
/*** @author yhd* @description 使用Runnable接口创建多线程* @email yinhuidong2@xiaomi.com* @since 2021/6/27*/public class RunnableTest implements Runnable{public static void main(String[] args) {RunnableTest runnableTest = new RunnableTest();new Thread(runnableTest).start();}@Overridepublic void run() {System.out.println(Thread.currentThread().getName());}}
在Thread类里面,有两个方法
public Thread(Runnable target) {init(null, target, "Thread-" + nextThreadNum(), 0);}private void init(ThreadGroup g, Runnable target, String name,long stackSize, AccessControlContext acc) {this.target = target;}
3.实现callable接口来创建线程
有的时候,我们可能需要让一个执行的线程在执行完以后,提供一个返回值给到当前的主线程,主线程需要依赖这个值进行后续的逻辑处理,那么这个时候,就需要用到带返回值的线程了。Java中提供了这样的实现方式:
/*** @author yhd* @description 使用Callable接口创建多线程* @email yinhuidong2@xiaomi.com* @since 2021/6/27*/public class CallableTest implements Callable {@Overridepublic Object call() throws Exception {System.out.println("正在计算结果");return "123";}public static void main(String[] args) {try {FutureTask task = new FutureTask<>(new CallableTest());while (task.isDone()){System.out.println(task.get());}} catch (Exception e) {} finally {}}}
二,线程的生命周期
1.生命周期
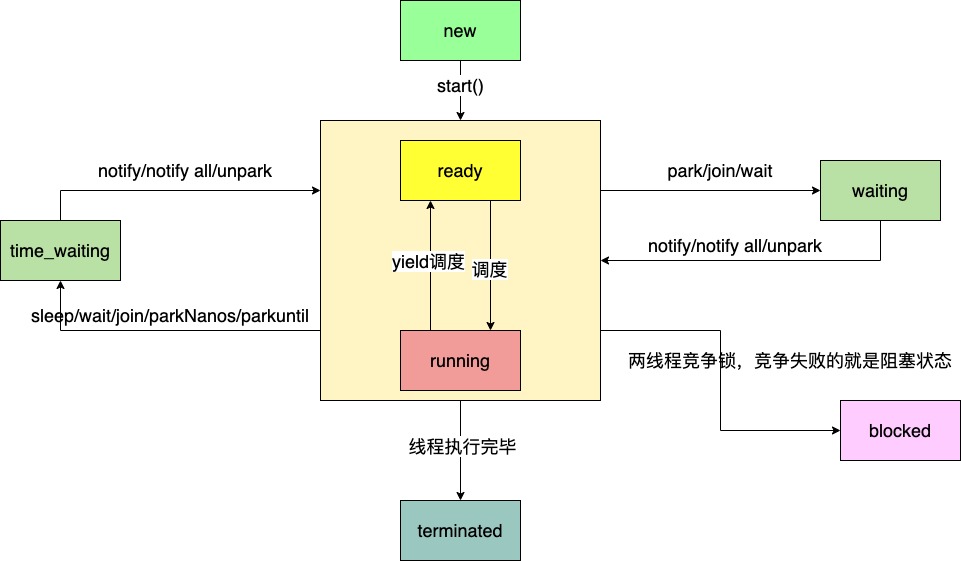
线程一共有六种状态(NEW、RUNNABLE、BLOCKED、WAITING、TIME_WAITING、TERMINATED)New:初始化状态,线程被创建,但是还没有调用start()。Runnabled:运行状态,Java线程把操作系统中的运行状态和就绪状态统称为运行中状态。Blocked:阻塞状态,表示线程进入等待状态,也就是线程因为某种原因放弃了CPU的使用权。
阻塞也分为几种情况:
等待阻塞:运行的线程执行wait(),jvm会把当前线程放入到等待队列同步阻塞:运行的线程在获取对象的同步锁时,若该同步锁被其他线程占用了,那么JVM会把当前线程放入到锁池中,也就是同步队列其他阻塞:运行中的线程执行thread.sleep()或者thread.join(),或者发出了IO请求时,JVM会把当前线程设置为阻塞状态,当sleep结束,join线程终止,io处理完毕则线程恢复
time——waiting:超时以后自动返回。terminated:终止状态,表示当前线程执行完毕。
2.代码演示线程状态
/*** @author yhd* @description 代码演示线程状态* @email yinhuidong2@xiaomi.com* @since 2021/6/27*/public class ThreadStatus {public static void main(String[] args) {//time_waitingnew Thread(()->{while (true){try {TimeUnit.SECONDS.sleep(100);} catch (Exception e) {} finally {}}},"time_waiting").start();//waiting 线程拿到当前的类锁以后,执行wait()new Thread(()->{while (true){synchronized (ThreadStatus.class){try {ThreadStatus.class.wait();} catch (Exception e) {} finally {}}}}).start();//block 两个线程竞争锁new Thread(new BlockedDemo(),"block-01").start();new Thread(new BlockedDemo(),"block-02").start();}static class BlockedDemo extends Thread {@Overridepublic void run() {synchronized (BlockedDemo.class) {while (true) {try {TimeUnit.SECONDS.sleep(100);} catch (InterruptedException e) {e.printStackTrace();}}}}}}
3.通过工具查看线程的状态
jstack是java虚拟机自带的一种堆栈跟踪工具。 jstack用于打印给定的java进程ID或者core file 或者远程调试服务的Java 堆栈信息。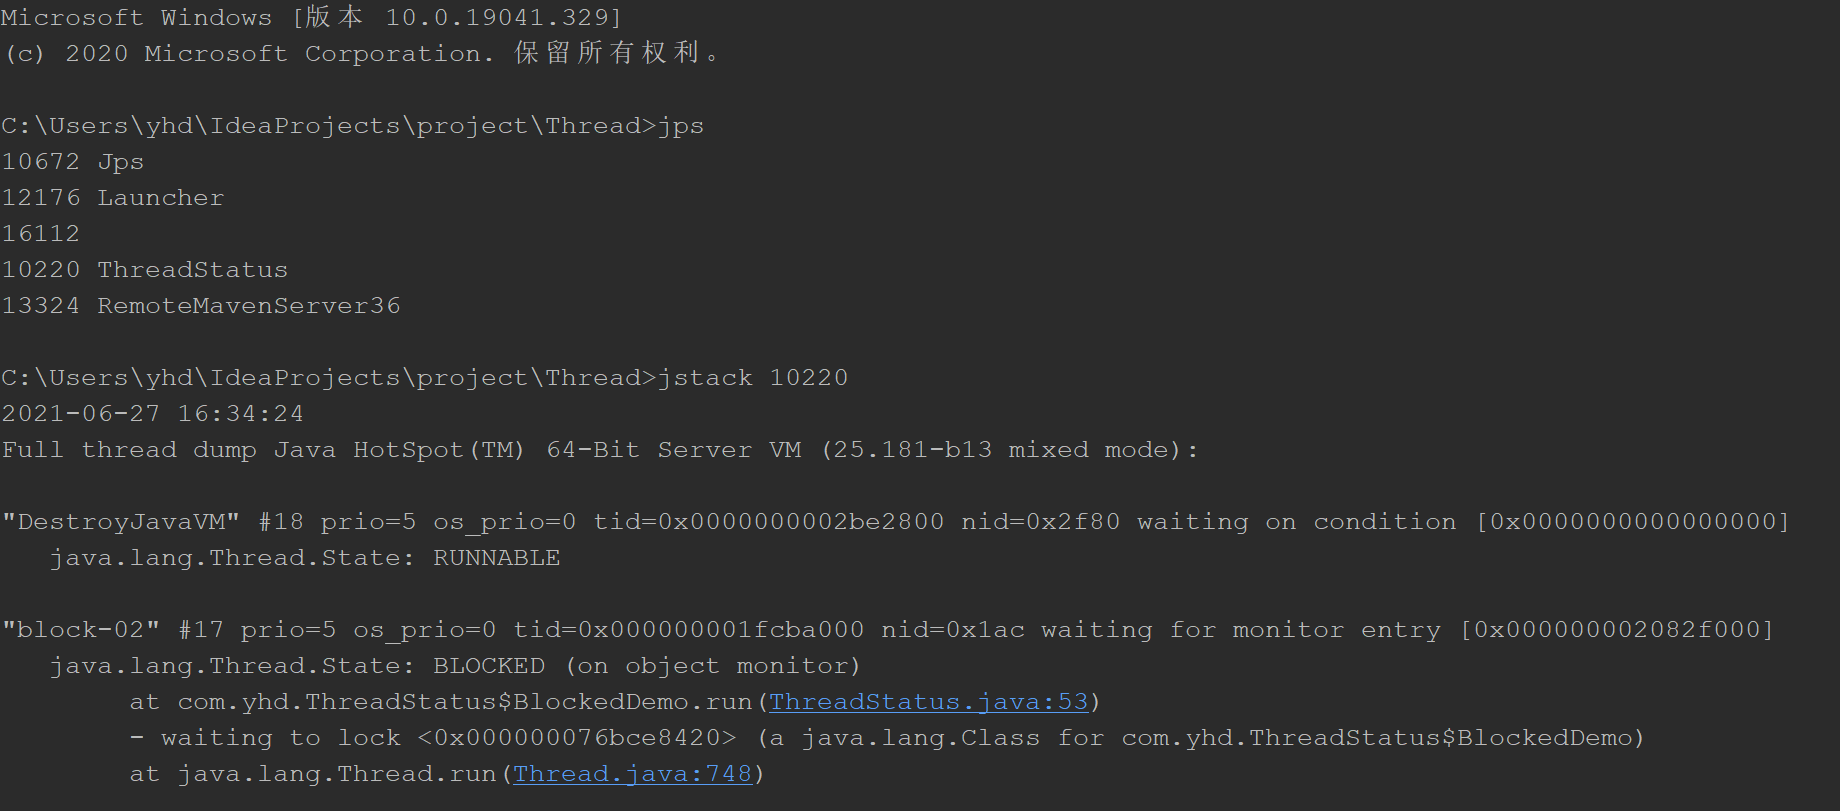
通过上面的代码演示,可以知道线程在整个生命周期中并不是固定处于某种状态,而是随着代码的执行在不同的状态之间进行切换。
三,线程相关方法
1.启动
调用start()去启动一个线程,当run()中的代码执行完毕以后,线程的生命周期也将终止。调用start()的语义是当前线程告诉jvm,启动调用start()方法的线程。
1)启动原理
启动一个线程为什么是调用start(),而不是run()?
调用start()实际上是调用一个native方法start0()来启动一个线程,首先start0()这个方法是在Thread.class的静态代码块中注册的。registerNatives的本地方法的定义在文件Thread.c,Thread.c定义了各个操作系统平台要用的关于线程的公共数据和操作。
#include "jni.h"#include "jvm.h"#include "java_lang_Thread.h"#define THD "Ljava/lang/Thread;"#define OBJ "Ljava/lang/Object;"#define STE "Ljava/lang/StackTraceElement;"#define ARRAY_LENGTH(a) (sizeof(a)/sizeof(a[0]))static JNINativeMethod methods[] = {{"start0", "()V", (void *)&JVM_StartThread},{"stop0", "(" OBJ ")V", (void *)&JVM_StopThread},{"isAlive", "()Z", (void *)&JVM_IsThreadAlive},{"suspend0", "()V", (void *)&JVM_SuspendThread},{"resume0", "()V", (void *)&JVM_ResumeThread},{"setPriority0", "(I)V", (void *)&JVM_SetThreadPriority},{"yield", "()V", (void *)&JVM_Yield},{"sleep", "(J)V", (void *)&JVM_Sleep},{"currentThread", "()" THD, (void *)&JVM_CurrentThread},{"countStackFrames", "()I", (void *)&JVM_CountStackFrames},{"interrupt0", "()V", (void *)&JVM_Interrupt},{"isInterrupted", "(Z)Z", (void *)&JVM_IsInterrupted},{"holdsLock", "(" OBJ ")Z", (void *)&JVM_HoldsLock},{"getThreads", "()[" THD, (void *)&JVM_GetAllThreads},{"dumpThreads", "([" THD ")[[" STE, (void *)&JVM_DumpThreads},};#undef THD#undef OBJ#undef STEJNIEXPORT void JNICALLJava_java_lang_Thread_registerNatives(JNIEnv *env, jclass cls){(*env)->RegisterNatives(env, cls, methods, ARRAY_LENGTH(methods));}
从这段代码可以看出,start0(),实际上会执行JVM_StartThread(),这个方法是干嘛的?
从名字上来看,似乎是JVM层面去启动一个线程,如果真的是这样,那么在JVM层面,一定会调用Java中的run()。
来到jvm.cpp文件(这个文件需要下载hotspot源码才能找到)。
JVM_ENTRY(void, JVM_StartThread(JNIEnv* env, jobject jthread))native_thread = new JavaThread(&thread_entry, sz);
JVM_ENTRY是用来定义 JVM_StartThread函数的,在这个函数里面创建了一个真正和平台有关的本地线程. 继续看看 newJavaThread 做了什么事情,继续寻找 JavaThread的定义。
JavaThread::JavaThread(ThreadFunction entry_point, size_t stack_sz) : JavaThread() {_jni_attach_state = _not_attaching_via_jni;set_entry_point(entry_point);// Create the native thread itself.// %note runtime_23os::ThreadType thr_type = os::java_thread;thr_type = entry_point == &CompilerThread::thread_entry ? os::compiler_thread :os::java_thread;os::create_thread(this, thr_type, stack_sz);}
这个方法有两个参数,第一个是函数名称,线程创建成功之后会根据这个函数名称调用对应的函数;第二个是当前进程内已经有的线程数量。最后重点关注一下os::create_thread,实际就是调用平台创建线程的方法来创建线程。
接下来就是线程的启动,会调用 Thread.cpp 文件中的Thread::start(Thread* thread)方法,代码如下:
void Thread::start(Thread* thread) {if (thread->is_Java_thread()) {java_lang_Thread::set_thread_status(thread->as_Java_thread()->threadObj(),JavaThreadStatus::RUNNABLE);}os::start_thread(thread);}
start ()中有一个函数调用: os::start_thread(thread);,调用平台启动线程的方法,最终会调用 Thread.cpp 文件中的JavaThread::run()方法。
2.终止
线程的终止并不是简单的调用stop命令,虽然api仍然可以使用,但是和其他的控制线程的方法(`` suspend、resume ``)一样,都是不建议使用的。就拿stop来说,stop()在结束一个线程时并不会保证线程的资源正常释放,因此可能导致程序出现一些不确定的状态。
要优雅的去中断一个线程,在线程中提供了一个**interrupt()**。
1)interrupt()
其他线程通过调用当前线程的interrupt(),表示像当前线程打个招呼,告诉他可以中断线程的执行了,至于什么时候中断,取决于当前线程自己。
线程通过检查自身 是否被中断来进行响应,可以通过isInterrupted()来判断是否被中断。
代码演示线程的优雅终止
/*** @author yhd* @description 代码演示线程的优雅终止* @email yinhuidong2@xiaomi.com* @since 2021/6/27*/public class Stop {private static int i;public static void main(String[] args) {Thread t = new Thread(()->{while (!Thread.currentThread().isInterrupted()){i++;}System.out.println("num:"+i);},"interrupt");t.start();try {TimeUnit.SECONDS.sleep(1);} catch (InterruptedException e) {e.printStackTrace();}t.interrupt();}}
这种通过标识位或者中断操作的方式能够使线程在终止时有机会去清理资源,而不是武断地将线程停止,因此这种终止线程的做法显得更加安全和优雅。
2)Thread.interrupted()
上面的案例中,通过interrupt,设置了一个标识告诉线程可 以 终 止 了 , 线 程 中 还 提 供 了 静 态 方 法Thread.interrupted()对设置中断标识的线程复位。比如在上面的案例中,外面的线程调用thread.interrupt 来设置中断标识,而在线程里面,又通过Thread.interrupted把线程的标识又进行了复位。
public class InterruptDemo {public static void main(String[] args) throws InterruptedException {Thread thread = newThread(() -> {while (true) {if (Thread.currentThread().isInterrupted()) {System.out.println("before:" + Thread.currentThread().isInterrupted());Thread.interrupted(); // 对线程进行复位,由 true 变成 falseSystem.out.println("after:" + Thread.currentThread().isInterrupted());}}}, "interruptDemo");thread.start();TimeUnit.SECONDS.sleep(1);thread.interrupt();}}
3)其他线程的复位
除了通过 Thread.interrupted 方法对线程中断标识进行复位 以 外 , 还 有 一 种 被 动 复 位 的 场 景 , 就 是 对 抛 出InterruptedException 异 常 的 方 法 , 在InterruptedException 抛出之前,JVM 会先把线程的中断标识位清除,然后才会抛出InterruptedException,这个时候如果调用isInterrupted(),将会返回 false。
public class InterruptDemo {private static int i;public static void main(String[] args) throws InterruptedException {Thread thread = new Thread(() -> {while (!Thread.currentThread().isInterrupted()) {try {TimeUnit.SECONDS.sleep(1);} catch (InterruptedException e) {e.printStackTrace();}}System.out.println("Num:" + i);}, "interruptDemo");thread.start();TimeUnit.SECONDS.sleep(1);thread.interrupt();System.out.println(thread.isInterrupted());}}
4)为什么要复位
Thread.interrupted()是属于当前线程的,是当前线程对外界中断信号的一个响应,表示自己已经得到了中断信号,但不会立刻中断自己,具体什么时候中断由自己决定,让外界知道在自身中断前,他的中断状态仍然是 false,这就是复位的原因。
5)线程的终止原理
public void interrupt() {if (this != Thread.currentThread())checkAccess();synchronized (blockerLock) {Interruptible b = blocker;if (b != null) {interrupt0(); // Just to set the interrupt flagb.interrupt(this);return;}}interrupt0();}
这个方法里面,调用了interrupt0(),这个方法在前面分析start()的时候见过,是一个 native 方法,同样,找到jvm.cpp 文件,找到JVM_Interrupt 的定义,这个方法比较简单,直接调用了Thread::interrupt(thr),这个方法的定义在 Thread.cpp 文件中,Thread::interrupt() 调用了 os::interrupt(),这个是调用平台的interrupt(),这个方法的实现是在os_*.cpp文件中,其中星号代表的是不同平台,因为 jvm 是跨平台的,所以对于不同的操作平台,线程的调度方式都是不一样的。以os_linux.cpp 文件为例:set_interrupted(true)实际上就是调用 osThread.hpp 中的set_interrupted(),在 osThread 中定义了一个成员属性volatile jint _interrupted。
通过上面的代码分析可以知道,thread.interrupt()实际就是设置一个 interrupted 状态标识为 true、并且通过ParkEvent 的 unpark()来唤醒线程。
对于 synchronized阻塞的线程,被唤醒以后会继续尝试获取锁,如果失败仍然可能被 park
在调用 ParkEvent 的 park 方法之前,会先判断线程的中断状态,如果为 true,会清除当前线程的中断标识
Object.wait 、Thread.sleep 、 Thread.join 会 抛 出InterruptedException
为什么 Object.wait、Thread.sleep 和 Thread.join 都 会 抛 出InterruptedException?
这几个方法有一个共同点,都是属于阻塞的方法,而阻塞方法的释放会取决于一些外部的事件,但是阻塞方法可能因为等不到外部的触发事件而导致无法终止,所以它允许一个线程请求自己来停止它正在做的事情。当一个方法抛出 InterruptedException 时,它是在告诉调用者如果执行该方法的线程被中断,它会尝试停止正在做的事情并且通过抛出 InterruptedException 表示提前返回。所以,这个异常的意思是表示一个阻塞被其他线程中断了。然后,由于线程调用了 interrupt()中断方法,那么Object.wait、Thread.sleep 等被阻塞的线程被唤醒以后会通过 is_interrupted 方法判断中断标识的状态变化,如果发现中断标识为 true,则先清除中断标识,然后抛出InterruptedException。
InterruptedException 异常的抛出并不意味着线程必须终止,而是提醒当前线程有中断的操作发生,至于接下来怎么处理取决于线程本身,
直接捕获异常不做任何处理
将异常往外抛出
停止当前线程,并打印异常信息
总结:如果当前线程正处于wait,sleep,join状态,然后当前线程被打断,如果当前线程中断标识为true,清除当前线程的中端标识,并且当前线程会收到中断异常。
6)代码时间
①打断sleep,wait,join的线程
这几个方法都会让线程进入阻塞状态
打断sleep的线程,会清空打断状态,并抛出异常
/*** @author yhd* @description interrupt打断sleep的线程* @email yinhuidong2@xiaomi.com* @since 2021/6/27*/public class Sleep {public static void test() throws Exception{Thread t = new Thread(()->{try {Thread.sleep(10000);} catch (Exception e) {System.out.println("抛出异常");} finally {}});t.start();Thread.sleep(1000);t.interrupt();System.out.println("打断状态:"+t.isInterrupted());}public static void main(String[] args) {try {test();} catch (Exception e) {e.printStackTrace();}}}
②打断正常运行的线程
打断正常运行的线程,不会清空打断状态
/*** @author yhd* @description 打断正常运行的线程* @email yinhuidong2@xiaomi.com* @since 2021/6/27*/public class InterruptTest {private static void test1() throws InterruptedException {Thread t2 = new Thread(()->{while(true) {Thread current = Thread.currentThread();boolean interrupted = current.isInterrupted();if(interrupted) {System.out.println(" 打断状态: {}"+ Thread.currentThread().isInterrupted());break;}}}, "t2");t2.start();sleep(1);t2.interrupt();}public static void main(String[] args) throws Exception {test1();}}
③打断park线程
/*** @author yhd* @description 打断park线程* @email yinhuidong2@xiaomi.com* @since 2021/6/27*/public class ParkTest {private static void test1() throws InterruptedException {Thread t1 = new Thread(() -> {System.out.println("park...");LockSupport.park();System.out.println("unpark...");System.out.println("打断状态:{}"+ Thread.currentThread().isInterrupted());}, "t1");t1.start();sleep(1);t1.interrupt();}public static void main(String[] args) throws Exception {test1();}}
如果打断标记已经是true,则park会失效。
/*** @author yhd* @description park的第二个案例演示* @email yinhuidong2@xiaomi.com* @since 2021/6/27*/public class ParkTest2 {private static void test4() throws InterruptedException {Thread t1 = new Thread(() -> {for (int i = 0; i < 5; i++) {System.out.println("park...");LockSupport.park();System.out.println("打断状态:{}"+Thread.currentThread().isInterrupted());}});t1.start();sleep(1);t1.interrupt();}public static void main(String[] args) throws Exception {test4();}}
可以使用 Thread.interrupted() 清除打断状态。
3.sleep() & yield()
1)sleep()
- 调用sleep会让当前线程从running状态进入timedwaiting状态(阻塞)
- 其他线程可以使用
interrupt打断正在睡眠的线程,这时sleep()会抛出中断异常 - 睡眠结束后的线程未必会立即得到执行
建议使用
TimeUnit.second.sleep()替代sleep获得更好的可读性2)yield()
调用yield会让当前线程从running进入runnable就绪状态,然后调度执行其他线程
-
4.join()
1)为什么需要join
下面的代码,打印r是什么?
/*** @author yhd*/public class JoinDemo {static int r = 0;public static void main(String[] args) throws InterruptedException {test1();}private static void test1() throws InterruptedException {System.out.println("开始");Thread t1 = new Thread(() -> {System.out.println("开始");try {sleep(1);} catch (InterruptedException e) {e.printStackTrace();}System.out.println("结束");r = 10;});t1.start();System.out.println("结果为:{}"+r);System.out.println("结束");}}
分析:
因为主线程和线程t1是并行执行的,t1需要1s之后才能算出r=10
而主线程一开始就要打印r的结果,所以只能打印r=0
解决方法:
- sleep为什么不行?因为主线程无法准确捕捉到t1线程什么时候结束
-
2)有时效的join()
等够时间
public class JoinDemo {static int r1 = 0;static int r2 = 0;public static void main(String[] args) throws InterruptedException {test3();}public static void test3() throws InterruptedException {Thread t1 = new Thread(() -> {try {sleep(1);} catch (InterruptedException e) {e.printStackTrace();}r1 = 10;});long start = System.currentTimeMillis();t1.start();// 线程执行结束会导致 join 结束t1.join(1500);long end = System.currentTimeMillis();System.out.println("r1: {} r2: {} cost: {}"+ r1 +" "+ r2+" "+ (end - start));}}
t1线程的结束会导致调用了t1.join(1500)的主线程结束。
没等够时间
public class JoinDemo {static int r1 = 0;static int r2 = 0;public static void main(String[] args) throws InterruptedException {test3();}public static void test3() throws InterruptedException {Thread t1 = new Thread(() -> {try {sleep(2);} catch (InterruptedException e) {e.printStackTrace();}r1 = 10;});long start = System.currentTimeMillis();t1.start();t1.join(1500);long end = System.currentTimeMillis();System.out.println("r1: {} r2: {} cost: {}"+ r1 +" "+ r2+" "+ (end - start));}}
3)原理
调用者轮训检查alive状态
t1.join();
等价于
synchronized (t1) {// 调用者线程进入 t1 的 waitSet 等待, 直到 t1 运行结束while (t1.isAlive()) {t1.wait(0);}}
当前线程调用其他线程的wait(),会让当前线程处于阻塞状态,直到其他线程的wait()执行结束。
join()能够让线程顺序执行的原因就是底层实际上是wait(),也就是主线程调用t1线程的join(),会让主线程阻塞,直到t1线程的join()执行结束。
5.java中操作线程的方法
| 方法名 | static | 功能说明 | 注意 |
|---|---|---|---|
| start() | 启动一个新线程,在新的线程运行 run 方法中的代码 | start 方法只是让线程进入就绪,里面代码不一定立刻运行(CPU 的时间片还没分给它)。每个线程对象的start方法只能调用一次,如果调用了多次会出现IllegalThreadStateException。 | |
| run() | 新线程启动后会调用的方法 | 如果在构造 Thread 对象时传递了 Runnable 参数,则线程启动后会调用 Runnable 中的 run 方法,否则默认不执行任何操作。但可以创建 Thread 的子类对象,来覆盖默认行为 | |
| join() | 等待线程运行结束 | ||
| join(long n) | 等待线程运行结束,最多等待 n毫秒 | ||
| getId() | 获取线程长整型的 id | 唯一 | |
| getName() | 获取线程名 | ||
| setName(String) | 修改线程名 | ||
| getPriority() | 获取线程优先级 | ||
| setPriority(int) | 修改线程优先级 | java中规定线程优先级是1~10 的整数,较大的优先级能提高该线程被 CPU 调度的机率 | |
| getState() | 获取线程状态 | Java 中线程状态是用 6 个 enum 表示,分别为:NEW, RUNNABLE, BLOCKED, WAITING,TIMED_WAITING, TERMINATED | |
| isInterrupted() | 判断是否被打断 | 不会清除 打断标记 | |
| isAlive() | 线程是否存活(还没有运行完毕) | ||
| interrupt() | 打断线程 | 如果被打断线程正在 sleep,wait,join 会导致被打断的线程抛出 InterruptedException,并清除 打断标记 ;如果打断的正在运行的线程,则会设置 打断标记 ;park 的线程被打断,也会设置 打断标记 | |
| interrupted() | static | 判断当前线程是否被打断 | 会清除 打断标记 |
| currentThread() | static | 获取当前正在执行的线程 | |
| sleep(long n) | static | 让当前执行的线程休眠n毫秒,休眠时让出 cpu的时间片给其它线程 | |
| yield() | static | 提示线程调度器让出当前线程对CPU的使用 | 主要是为了测试和调试 |
6.LockSupport
用于创建锁和其他同步类的基本线程阻塞原语。
本质就是线程阻塞和唤醒wait notify的加强版
park() unpark()
1)线程阻塞唤醒的三种方法
①使用Object中的wait()让线程等待,使用Object的notify()唤醒线程。
/*** @author yhd* @description 阻塞&唤醒* @email yinhuidong2@xiaomi.com* @since 2021/6/28*/public class WaitNotify {private static Object lock = new Object();public static void main(String[] args) {new Thread(()->{synchronized (lock){try {lock.wait();System.out.println(Thread.currentThread().getName()+"继续执行!");} catch (InterruptedException e) {e.printStackTrace();}}},"t1").start();new Thread(()->{synchronized (lock){lock.notify();System.out.println(Thread.currentThread().getName()+"唤醒");}},"t2").start();}}
存在的问题:必须在synchronized代码块里,顺序不能反。
②使用Condition的await和signal方法
/*** @author yhd* @description 阻塞&唤醒* @email yinhuidong2@xiaomi.com* @since 2021/6/28*/public class AwaitSignal {private static Lock lock = new ReentrantLock();private static Condition condition =lock.newCondition();public static void main(String[] args) {new Thread(()->{lock.lock();try {condition.await();} catch (Exception e) {} finally {lock.unlock();}},"t1").start();new Thread(()->{lock.lock();try {condition.signal();} catch (Exception e) {} finally {lock.unlock();}},"t2").start();}}
存在的问题:必须在lock代码块里面使用,使用顺序不能反。
③LockSupport类park()可以阻塞当前线程以及unpark(Thread)唤醒指定被阻塞的线程。
LockSupport类使用了一种名为Permit(许可)的概念来做到阻塞和唤醒线程的功能,每个线程都有一个许可,permit只有1和0两个值,默认是0.
permit默认是0,所以一开始调用park()方法,当前线程就会阻塞,直到别的线程将当前线程的permit设置为1时,park方法会被唤醒,然后将permit再次设置为0并返回。
/*** @author yhd* @description 阻塞&唤醒* @email yinhuidong2@xiaomi.com* @since 2021/6/28*/public class ParkUnpark {public static void main(String[] args) {LockSupport.unpark(Thread.currentThread());LockSupport.park();LockSupport.park();}}
2)总结
LockSupport是一个线程阻塞工具类,所有的方法都是静态方法,可以让线程在任意位置阻塞,阻塞之后也有对应的唤醒方法。归根结底,LockSupport调用的Unsafe中的native代码。
LockSupport提供park()和unpark()方法实现阻塞线程和解除线程阻塞的过程
LockSupport和每个使用它的线程都有一个许可(permit)关联。permit相当于1,0的开关,默认是0,调用一次unpark就加1变成1,调用一次park会消费permit,也就是将1变成o,同时park立即返回。
如再次调用park会变成阻塞(因为permit为零了会阻塞在这里,一直到permit变为1),这时调用unpark会把permit置为1。
每个线程都有一个相关的permit, permit最多只有一个,重复调用unpark也不会积累凭证。
为什么可以先唤醒线程后阻塞线程?
因为unpark获得了一个凭证,之后再调用park方法,就可以名正言顺的凭证消费,故不会阻塞。
为什么唤醒两次后阻塞两次,但最终结果还会阻塞线程?
因为凭证的数量最多为1,连续调用两次unpark和调用一次unpark效果一样,只会增加一个凭证;而调用两次park却需要消费两个凭证,证不够,不能放行。
四,多线程相关概念
1.并发?并行
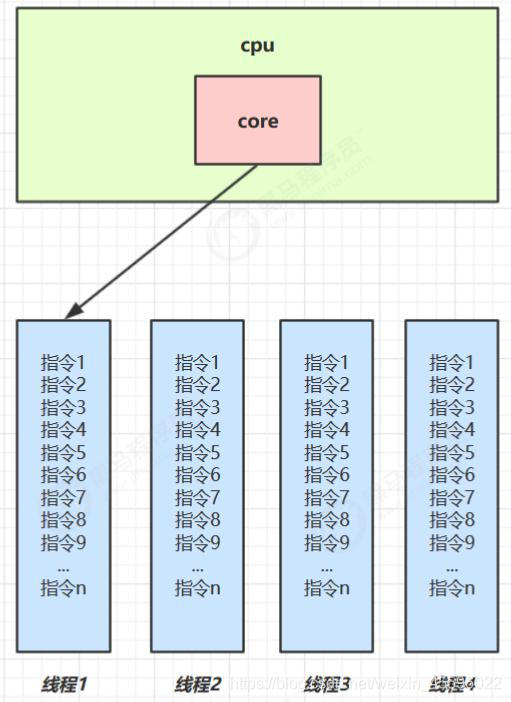
单核 cpu 下,线程实际还是 串行执行 的。操作系统中有一个组件叫做任务调度器,将 cpu 的时间片(windows下时间片最小约为 15 毫秒)分给不同的程序使用,只是由于 cpu 在线程间(时间片很短)的切换非常快,人类感觉是 同时运行的 。总结为一句话就是: 微观串行,宏观并行 ,一般会将这种 线程轮流使用 CPU 的做法称为并发, concurrent
| cpu | 时间片1 | 时间片2 | 时间片3 | 时间片4 |
|---|---|---|---|---|
| core | 线程1 | 线程2 | 线程3 | 线程4 |
<br />多核 cpu下,每个 核(core) 都可以调度运行线程,这时候线程可以是并行的。
| cpu | 时间片1 | 时间片2 | 时间片3 | 时间片4 |
|---|---|---|---|---|
| core1 | 线程1 | 线程1 | 线程3 | 线程3 |
| core2 | 线程2 | 线程2 | 线程4 | 线程4 |
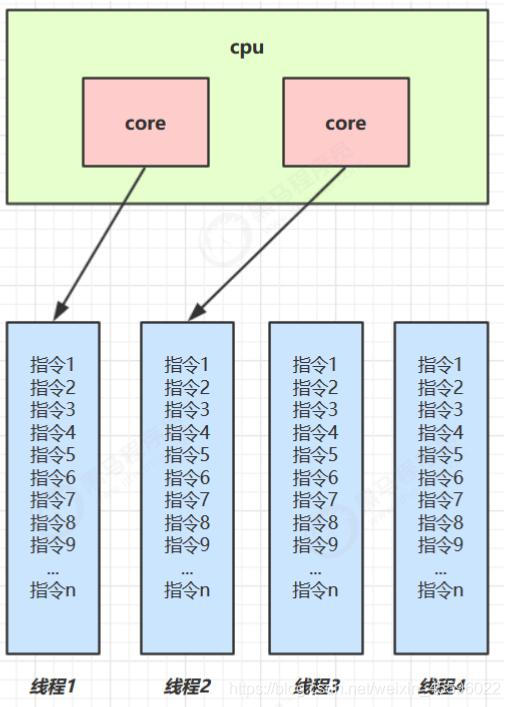<br />并发是同一时间应对多件事情的能力。并行是同一时间动手做多件事情的能力。
- 单核CPU下,多线程不能实际提高运行效率,只是为了能够在不同的任务之间切换,不同的线程轮流使用CPU,不至于一个线程总占用CPU,别的线程没法干活。
- 多核CPU可以并行跑多个线程,但能否提高运行效率还是要看具体情况的。
- IO操作不占用CPU,只是一般拷贝文件使用的是阻塞IO,这时相当于线程虽然不用CPU,但是需要一直等待IO结束,没能充分利用线程。所以后面才有非阻塞IO和异步IO的优化。
2.线程上下文的切换
因为以下一些原因导致 cpu 不再执行当前的线程,转而执行另一个线程的代码[1]。
线程的cpu时间片用完
垃圾回收
有更高优先级的线程需要运行
线程自己调用了 sleep、yield、wait、join、park、synchronized、lock 等方法。
当 Context Switch 发生时,需要由操作系统保存当前线程的状态,并恢复另一个线程的状态[2],Java 中对应的概念就是程序计数器(Program Counter Register),它的作用是记住下一条 jvm 指令的执行地址,是线程私有的
3.主线程与守护线程
默认情况下,Java 进程需要等待所有线程都运行结束,才会结束。有一种特殊的线程叫做守护线程,只要其它非守护线程运行结束了,即使守护线程的代码没有执行完,也会强制结束。
垃圾回收器线程就是一种守护线程。
Tomcat 中的 Acceptor 和 Poller 线程都是守护线程,所以 Tomcat 接收到 shutdown 命令后,不会等待它们处理完当前请求。
4.临界区的概念
一个程序运行多个线程本身是没有问题的,问题出在多个线程访问共享资源。
多个线程读共享资源其实也没有问题,在多个线程对共享资源读写操作时发生指令交错,就会出现问题。
一段代码块内如果存在对共享资源的多线程读写操作,称这段代码块为临界区。
5.死锁
1)死锁
有这样的情况:一个线程需要同时获取多把锁,这时就容易发生死锁
t1 线程 获得 A对象 锁,接下来想获取 B对象 的锁 t2 线程 获得 B对象 锁,接下来想获取 A对象 的锁 例:
2)定位死锁
检测死锁可以使用 jconsole工具,或者使用 jps 定位进程 id,再用 jstack 定位死锁。
避免死锁要注意加锁顺序。
另外如果由于某个线程进入了死循环,导致其它线程一直等待,对于这种情况 linux 下可以通过 top 先定位到CPU 占用高的 Java 进程,再利用top -Hp 进程id来定位是哪个线程,最后再用 jstack 排查。
6.活锁
活锁出现在两个线程互相改变对方的结束条件,最后谁也无法结束。
7.final原理
1)设置 final 变量的原理
字节码
发现 final 变量的赋值也会通过 putfield 指令来完成,同样在这条指令之后也会加入写屏障,保证在其它线程读到它的值时不会出现为 0 的情况。
- Context Switch 频繁发生会影响性能. ↩︎
- 状态包括程序计数器、虚拟机栈中每个栈帧的信息,如局部变量、操作数栈、返回地址等. ↩︎
8.可重入锁
可重入锁又名递归锁
是指在同一个线程在外层方法获取锁的时候,再进去该线程的内层方法会自动获取锁(前提:同一个锁对象),不会因为之前已经获取过还没释放而阻塞。
java中的ReentrantLock和Synchronized都是可重入锁,可重入锁的一个优点是可一定程度避免死锁。
public class Demo2 {private static Object lock = new Object();public static void main(String[] args) {test();}public static void test() {new Thread(() -> {synchronized (lock) {System.out.println(Thread.currentThread().getName() + "外");synchronized (lock) {System.out.println(Thread.currentThread().getName() + "中");synchronized (lock) {System.out.println(Thread.currentThread().getName() + "内");}}}}).start();}}
五,线程通信
1.两个线程交替打印
题目:
i=0,a:i++,b:i—,交替打印10次
1.1 使用synchronized
/*** @author 二十* @since 2021/8/31 9:01 下午*/public class DemoA {static CountDownLatch count=new CountDownLatch(2);public static void main(String[] args)throws Exception {Lock lock = new Lock();new Thread(()->{for (int i = 0; i < 10; i++) {try {lock.add();}catch (Exception e){}}count.countDown();},"A").start();new Thread(()->{for (int i = 0; i < 10; i++) {try {lock.del();}catch (Exception e){}}count.countDown();},"B").start();count.await();}private static class Lock{static int num = 0;public synchronized void add()throws Exception{if (num!=0){this.wait();}System.out.println(Thread.currentThread().getName()+"num = " + ++num);this.notify();}public synchronized void del()throws Exception{if (num!=1){this.wait();}System.out.println(Thread.currentThread().getName()+"num = " + --num);this.notify();}}}
1.2 两个线程可以正常执行,现在增加到四个
/*** @author 二十* @since 2021/8/31 9:24 下午*/public class DemoB {static CountDownLatch count=new CountDownLatch(4);public static void main(String[] args)throws Exception {Lock lock = new Lock();new Thread(()->{for (int i = 0; i < 10; i++) {try {lock.add();}catch (Exception e){}}count.countDown();},"A").start();new Thread(()->{for (int i = 0; i < 10; i++) {try {lock.del();}catch (Exception e){}}count.countDown();},"B").start();new Thread(()->{for (int i = 0; i < 10; i++) {try {lock.add();}catch (Exception e){}}count.countDown();},"C").start();new Thread(()->{for (int i = 0; i < 10; i++) {try {lock.del();}catch (Exception e){}}count.countDown();},"D").start();count.await();}private static class Lock{static int num = 0;public synchronized void add()throws Exception{if (num!=0){this.wait();}System.out.println(Thread.currentThread().getName()+"num = " + ++num);this.notify();}public synchronized void del()throws Exception{if (num!=1){this.wait();}System.out.println(Thread.currentThread().getName()+"num = " + --num);this.notify();}}}
1.3 线程间调用化定制通信
查看jdkAPI wait();

注意:判断一定要while循环判断,不能用if,防止多线程虚假唤醒。

1.4 使用lock
/*** @author 二十* @since 2021/8/31 9:30 下午*/public class DemoC {private static CountDownLatch count = new CountDownLatch(2);public static void main(String[] args)throws Exception {Data data = new Data();new Thread(()->{for (int i = 0; i < 10; i++) {try {data.add();} catch (Exception e) {e.printStackTrace();}}count.countDown();},"A").start();new Thread(()->{for (int i = 0; i < 10; i++) {try {data.del();} catch (Exception e) {e.printStackTrace();}}count.countDown();},"B").start();count.await();}private static class Data {static volatile int num =0;static ReentrantLock lock = new ReentrantLock();static Condition c =lock.newCondition();public void add()throws Exception{lock.lock();try {while (num!=0){c.await();}System.out.println(Thread.currentThread().getName()+" num = " + ++num);c.signal();}finally {lock.unlock();}}public void del()throws Exception{lock.lock();try {while (num!=1){c.await();}System.out.println(Thread.currentThread().getName()+" num = " + --num);c.signal();}finally {lock.unlock();}}}}
2.多个线程按顺序打印
题目:
多线程之间按照顺序调用,实现A-B-C
三个线程启动,要求如下:
AA打印5次,BB打印10次,CC打印15次
接着循环10轮
分析:
- 有顺序通知,需要有标识位
- 有一个锁,lock,3把钥匙condition
- 判断标识位
- 输出线程名+第几次+第几轮
- 修改标识位,通知下一个
/*** @author 二十* @since 2021/8/31 9:48 下午*/public class DemoD {static CountDownLatch c = new CountDownLatch(3);public static void main(String[] args) throws Exception {Data data = new Data();for (int i = 0; i < 10; i++) {new Thread(() -> {data.p1();c.countDown();}, "A").start();new Thread(() -> {data.p2();c.countDown();}, "B").start();new Thread(() -> {data.p3();c.countDown();}, "C").start();}c.await();}private static class Data {static int flag = 0;ReentrantLock lock = new ReentrantLock();Condition c1 = lock.newCondition();Condition c2 = lock.newCondition();Condition c3 = lock.newCondition();public void printf() {System.out.println(Thread.currentThread().getName() + " flag" + flag);}public void p1() {lock.lock();try {while (flag != 0) {try {c1.await();} catch (InterruptedException e) {e.printStackTrace();}}for (int i = 0; i < 5; i++) {printf();}flag++;c2.signal();} finally {lock.unlock();}}public void p2() {lock.lock();try {while (flag != 1) {try {c2.await();} catch (InterruptedException e) {e.printStackTrace();}}for (int i = 0; i < 10; i++) {printf();}flag++;c3.signal();} finally {lock.unlock();}}public void p3() {lock.lock();try {while (flag != 2) {try {c3.await();} catch (InterruptedException e) {e.printStackTrace();}}for (int i = 0; i < 15; i++) {printf();}flag = 0;c1.signal();} finally {lock.unlock();}}}}
六,线程与集合
1.如何证明集合是线程不安全的
public static void main(String[] args) {List<String> list = new ArrayList<>();for (int i = 0; i < 30; i++) {new Thread(() -> {list.add(UUID.randomUUID().toString().substring(8));System.out.println(list);}, String.valueOf(i)).start();}}//java.util.ConcurrentModificationException

2.如何让集合变的安全
2.1 调用工具类
List<String> list= Arrays.asList("a","b","c","d");List<String> list2= Collections.synchronizedList(list);
2.2 使用JUC
- copyOnWriteArrayList
- ConcurrentLinkedQueue
- ConcurrentHashMap
public static void main(String[] args) {CopyOnWriteArrayList<String> list = new CopyOnWriteArrayList<>();for (int i = 0; i < 30; i++) {new Thread(()->{list.add(UUID.randomUUID().toString().substring(8));System.out.println(list);},String.valueOf(i)).start();}}
源码: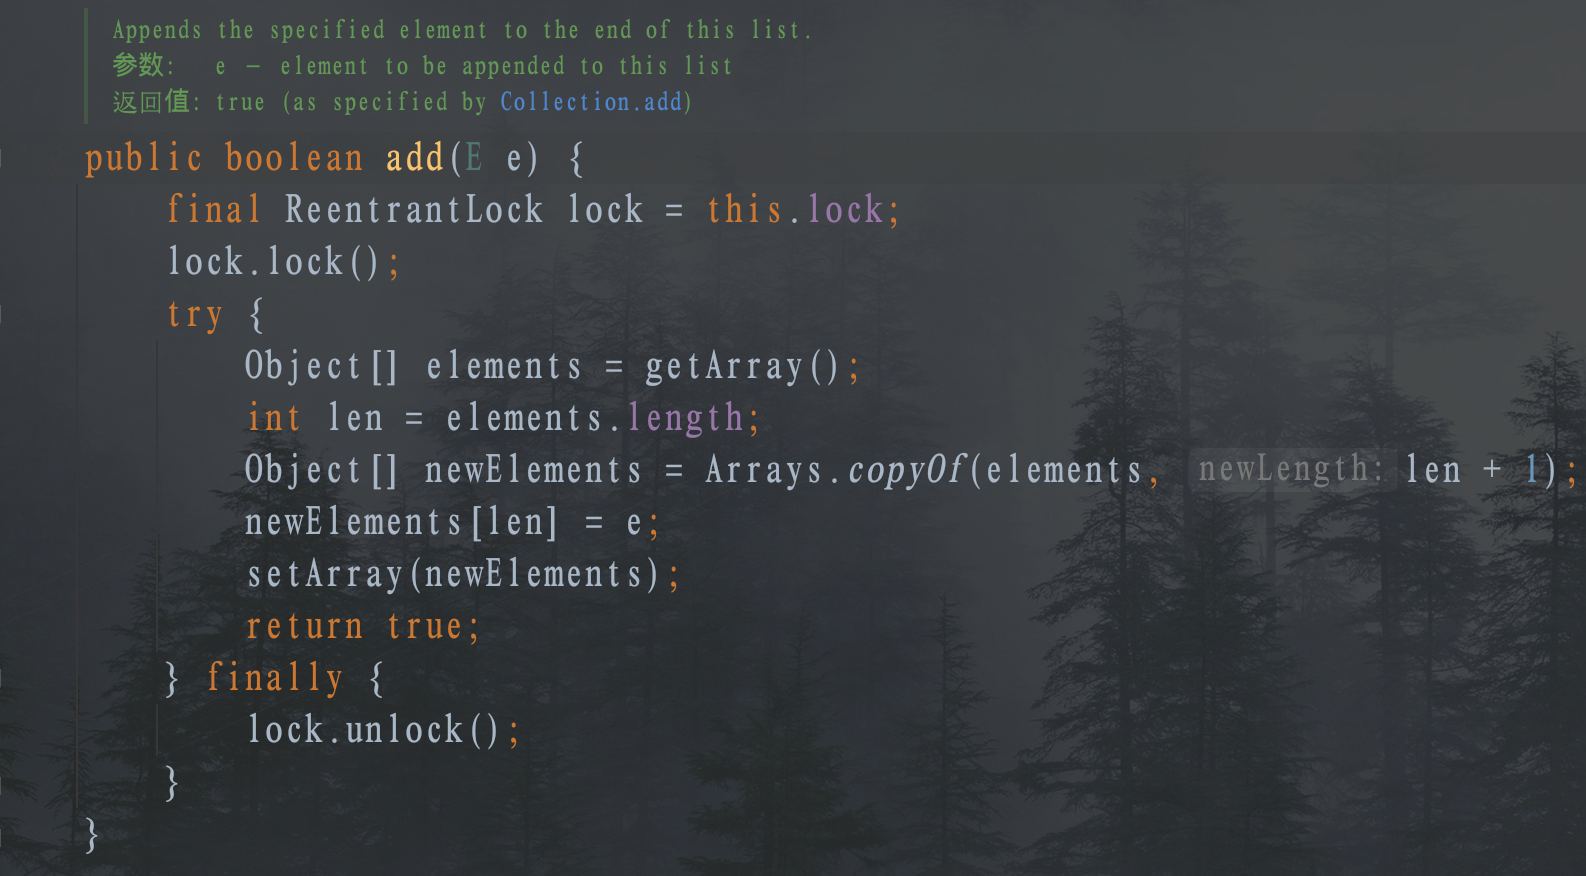
/*** @author 二十* @since 2021/8/31 10:44 下午*/public class DemoF {public static void main(String[] args) {Printers printers = new Printers();new Thread(() -> {for (int i = 1; i <= 26; i++)printers.printNum();}, "数字打印线程").start();new Thread(() -> {for (int i = 1; i <= 26; i++)printers.printLetter(i + 64);}, "字母打印线程").start();}private static class Printers {private int num = 1;private int a = 0;private ReentrantLock lock = new ReentrantLock();private Condition cd1 = lock.newCondition();private Condition cd2 = lock.newCondition();public void printNum() {try {lock.lock();while (num != 1)cd1.await();for (int i = 0; i < 2; i++) {System.out.println(Thread.currentThread().getName() + "打印了:" + ++a);}num++;cd2.signal();} catch (Exception e) {e.printStackTrace();} finally {lock.unlock();}}public void printLetter(int aa) {try {lock.lock();while (num != 2)cd2.await();System.out.println(Thread.currentThread().getName() + "打印了:" + (char) aa);num--;cd1.signal();} catch (Exception e) {e.printStackTrace();} finally {lock.unlock();}}}}
