服务治理其实和注册中心一回事。Eureka包含两个组件:Eureka Server(注册中心)和Eureka Client(服务消费者和服务提供者)。
一. 搭建Eureka Server
1.1 建立父工程spring cloud,导入相关坐标
<!--spring boot 环境 --><parent><groupId>org.springframework.boot</groupId><artifactId>spring-boot-starter-parent</artifactId><version>2.1.0.RELEASE</version><relativePath/></parent><properties><project.build.sourceEncoding>UTF-8</project.build.sourceEncoding><project.reporting.outputEncoding>UTF-8</project.reporting.outputEncoding><java.version>1.8</java.version><!--spring cloud 版本--><spring-cloud.version>Greenwich.RELEASE</spring-cloud.version></properties><!--引入Spring Cloud 依赖--><dependencyManagement><dependencies><dependency><groupId>org.springframework.cloud</groupId><artifactId>spring-cloud-dependencies</artifactId><version>${spring-cloud.version}</version><type>pom</type><scope>import</scope></dependency></dependencies></dependencyManagement>
1.2 建立module eureka-server,导入相关坐标
<dependencies><dependency><groupId>org.springframework.boot</groupId><artifactId>spring-boot-starter-web</artifactId></dependency><!-- eureka-server --><dependency><groupId>org.springframework.cloud</groupId><artifactId>spring-cloud-starter-netflix-eureka-server</artifactId></dependency></dependencies>
1.3 建立yml配置文件
server:port: 8761# eureka 配置# eureka 一共有4部分 配置# 1. dashboard:eureka的web控制台配置# 2. server:eureka的服务端配置# 3. client:eureka的客户端配置# 4. instance:eureka的实例配置eureka:instance:hostname: localhost # 主机名client:service-url:defaultZone: http://${eureka.instance.hostname}:${server.port}/eureka # eureka服务端地址,将来客户端使用该地址和eureka进行通信register-with-eureka: false # 是否将自己的路径 注册到eureka上。eureka server 不需要的,eureka provider client 需要fetch-registry: false # 是否需要从eureka中抓取路径。eureka server 不需要的,eureka consumer client 需要
1.4 建立启动类
@SpringBootApplication// 启用EurekaServer@EnableEurekaServerpublic class EurekaApp {public static void main(String[] args) {SpringApplication.run(EurekaApp.class,args);}}
二. 搭建Eureka Client
2.1 服务提供者
2.1.1 建立module eureka-provider,导入相关坐标
<dependencies><!--spring boot web--><dependency><groupId>org.springframework.boot</groupId><artifactId>spring-boot-starter-web</artifactId></dependency><!-- eureka-client --><dependency><groupId>org.springframework.cloud</groupId><artifactId>spring-cloud-starter-netflix-eureka-client</artifactId></dependency></dependencies>
2.1.2 配置yml
server:port: 8001eureka:instance:hostname: localhost # 主机名client:service-url:defaultZone: http://localhost:8761/eureka # eureka服务端地址,将来客户端使用该地址和eureka进行通信spring:application:name: eureka-provider # 设置当前应用的名称。将来会在eureka中Application显示。将来需要使用该名称来获取路径
2.1.3 启动类
@EnableEurekaClient //该注解 在新版本中可以省略@SpringBootApplicationpublic class ProviderApp {public static void main(String[] args) {SpringApplication.run(ProviderApp.class,args);}}
2.2 服务消费者
2.2.1 配置yml文件
server:port: 9000eureka:instance:hostname: localhost # 主机名client:service-url:defaultZone: http://localhost:8761/eureka # eureka服务端地址,将来客户端使用该地址和eureka进行通信spring:application:name: eureka-consumer # 设置当前应用的名称。将来会在eureka中Application显示。将来需要使用该名称来获取路径
2.2.2 使用RestTemplate进行远程连接
在Consumer消费端建立一个配置类RestTemplateConfig:
@Configurationpublic class RestTemplateConfig {@Bean//交给IOC容器管理public RestTemplate restTemplate(){return new RestTemplate();}}
进行远程调用。并使用DiscoveryClient动态获取端口或IP
/*** 服务的调用方*/@RestController@RequestMapping("/order")public class OrderController {@Autowiredprivate RestTemplate restTemplate;@Autowiredprivate DiscoveryClient discoveryClient;@GetMapping("/goods/{id}")public Goods findGoodsById(@PathVariable("id") int id){/*动态从Eureka Server 中获取 provider 的 ip 和端口1. 注入 DiscoveryClient 对象.激活2. 调用方法*///演示discoveryClient 使用List<ServiceInstance> instances = discoveryClient.getInstances("EUREKA-PROVIDER");//判断集合是否有数据if(instances == null || instances.size() == 0){//集合没有数据return null;}ServiceInstance instance = instances.get(0);String host = instance.getHost();//获取ipint port = instance.getPort();//获取端口System.out.println(host);System.out.println(port);String url = "http://"+host+":"+port+"/goods/findOne/"+id;// 3. 调用方法Goods goods = restTemplate.getForObject(url, Goods.class);return goods;}}
2.2.3 启动类
@EnableDiscoveryClient // 激活DiscoveryClient@EnableEurekaClient@SpringBootApplicationpublic class ConsumerApp {public static void main(String[] args) {SpringApplication.run(ConsumerApp.class,args);}}
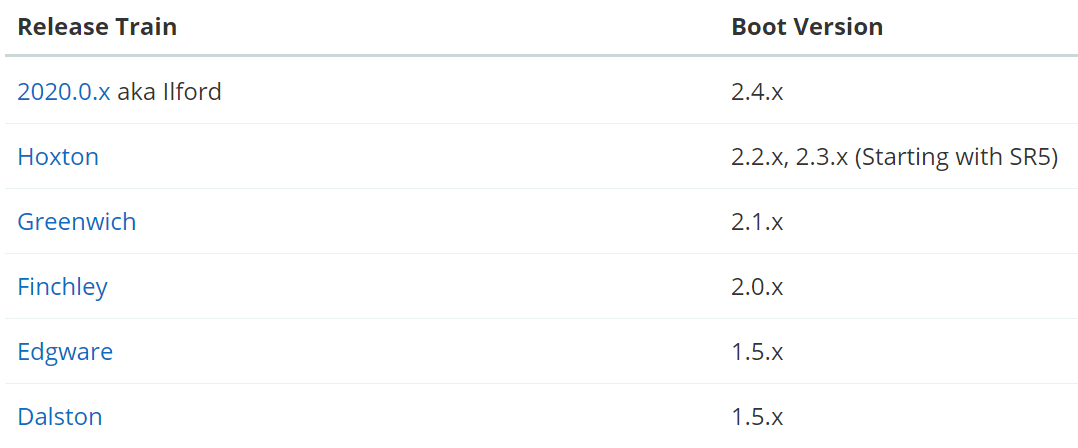
注意:引入SpringCloud依赖时,需要注意和Spring Boot的版本需要匹配上,具体可以进官网查看:https://spring.io/projects/spring-cloud.
三. Eureka高可用
Eureka高可用其实就是搭建集群。
- 准备多个Eureka-Server,这里准备2个,eureka-server-1,eureka-server-2;
- 分别进行配置,相互注册。
eureka-server-1中注册eureka-server-2
eureka:instance:hostname: eureka-server1 # 主机名(这里生产环境中写上ip地址)client:service-url:defaultZone: http://eureka-server2:8762/eurekaregister-with-eureka: true # 是否将自己的路径 注册到eureka上。eureka server 不需要的,eureka provider client 需要fetch-registry: true # 是否需要从eureka中抓取路径。eureka server 不需要的,eureka consumer client 需要spring:application:name: eureka-server-ha #名字都起一样的
同理,eureka-server-2中也需要注册eureka-server-1
consumer和provider修改配置:
eureka:instance:hostname: localhost # 主机名prefer-ip-address: true # 将当前实例的ip注册到eureka server 中。默认是false 注册主机名ip-address: 127.0.0.1 # 设置当前实例的ipinstance-id: ${eureka.instance.ip-address}:${spring.application.name}:${server.port} # 设置web控制台显示的 实例idlease-renewal-interval-in-seconds: 3 # 每隔3 秒发一次心跳包lease-expiration-duration-in-seconds: 9 # 如果9秒没有发心跳包,服务器呀,你把我干掉吧~client:service-url:defaultZone: http://eureka-server1:8761/eureka,http://eureka-server2:8762/eureka # eureka服务端地址,将来客户端使用该地址和eureka进行通信spring:application:name: eureka-provider # 设置当前应用的名称。将来会在eureka中Application显示。将来需要使用该名称来获取路径
注意defaultZone,将所有的eureka-server都写进去,eureka-server1、eureka-server2都是IP地址,测试环境中采用修改端口,生产环境中端口都是一致的。

