Ansible综合案例
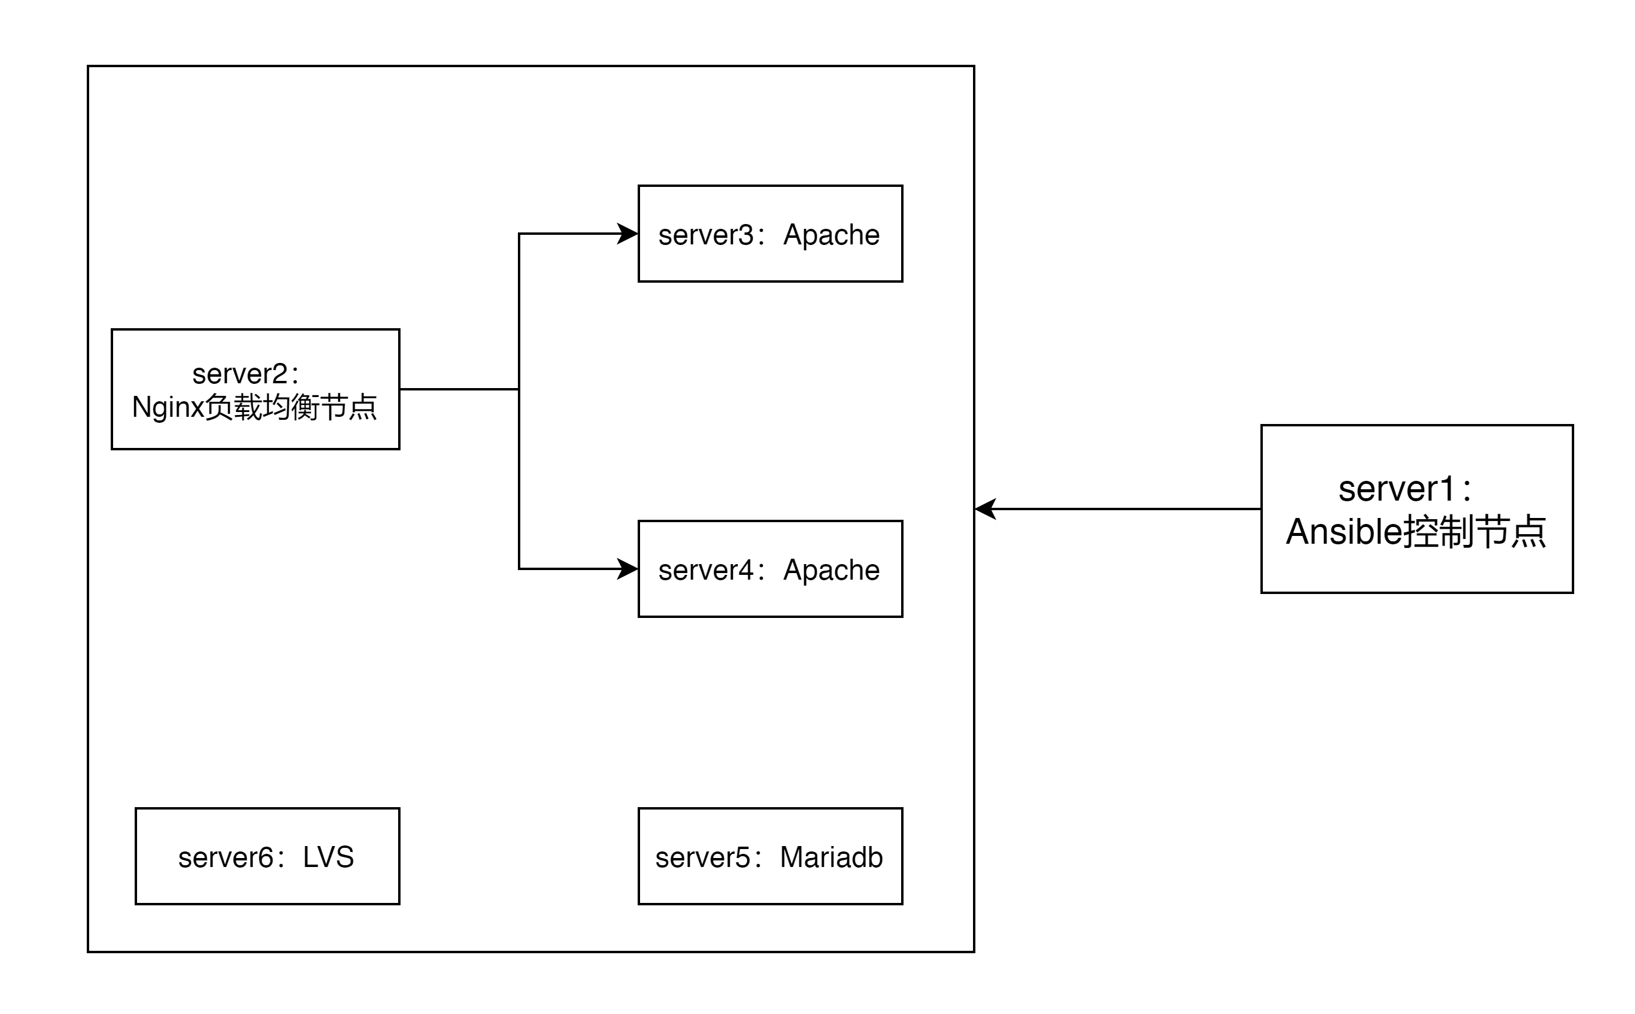
架构图
分步剧本执行
初始配置
- 修改主机清单文件
[root@server1 ~]# vim /etc/ansible/hosts[all_ip]192.168.31.10192.168.31.20192.168.31.30192.168.31.40192.168.31.50192.168.31.60[all_hostname]server1server2server3server4server5server6[nginx]server2[apache]server3server4[mariadb]server5[nfs]server6
- 配置ssh免密登录
[root@server1 ~]# ssh-keygen[root@server1 ~]# ssh-copy-id -i /root/.ssh/id_rsa.pub root@192.168.31.10[root@server1 ~]# ssh-copy-id -i /root/.ssh/id_rsa.pub root@192.168.31.20[root@server1 ~]# ssh-copy-id -i /root/.ssh/id_rsa.pub root@192.168.31.30[root@server1 ~]# ssh-copy-id -i /root/.ssh/id_rsa.pub root@192.168.31.40[root@server1 ~]# ssh-copy-id -i /root/.ssh/id_rsa.pub root@192.168.31.50[root@server1 ~]# ssh-copy-id -i /root/.ssh/id_rsa.pub root@192.168.31.60
主机名服务
- 创建hosts文件模板
[root@server1 ~]# vim /template/hosts.j2127.0.0.1 localhost localhost.localdomain localhost4 localhost4.localdomain4::1 localhost localhost.localdomain localhost6 localhost6.localdomain6{% for host in groups.all_ip %}{{hostvars[hosts].ansible_ens33.ipv4.address}} {{hostvars[hosts].ansible_hostname}}{% endfor %}
- 编写剧本
[root@server1 ~]# vim /playbook/hosts.yml- name: Config hosts filehosts: all_ipremote_user: roottasks:- name: copy hosts.j2 to group serverstemplate:src: /template/hosts.j2dest: /etc/hosts
- 执行剧本
[root@server1 playbook]# ansible-playbook hosts.yml
- 测试连通性
[root@server1 ~]# ping server1[root@server1 ~]# ping server2[root@server1 ~]# ping server3[root@server1 ~]# ping server4[root@server1 ~]# ping server5[root@server1 ~]# ping server6
更换阿里源
- 创建角色
[root@server1 roles]# ansible-galaxy init ali_yum_repo
更换阿里yum源
- 使用
file模块把所有受控节点的/etc/yum.repos.d/下的所有文件删除 - 再使用
copy模块把准备好的.repo文件copy到所有受控节点
- 使用
[root@server1 roles]# vim ali_yum_repo/tasks/main.yml---# tasks file for ali_yum_repo- name: Find files in yum.repos.d/*find:paths: /etc/yum.repos.d/patterns: '*'register: files_to_delete- name: Remove original yum.repos.d/*file:path: "{{ item.path }}"state: absentwith_items: "{{ files_to_delete.files }}"- name: Copy aliyun yum.repo to all nodescopy:src: /etc/ansible/roles/ali_yum_repo/files/yum.repodest: /etc/yum.repos.d/yum.repo
- 编写剧本
[root@server1 roles]# vim yum_repo_role_use.yml- name: Updata all nodes yum.repo filehosts: all_hostnameroles:- ali_yum_repo
- 执行剧本
[root@server1 roles]# ansible-playbook yum_repo_role_use.yml
部署Nginx
- 创建角色
[root@server1 roles]# ansible-galaxy init nginx
- 部署Nginx
[root@server1 roles]# vim nginx/tasks/main.yml---# tasks file for nginx- name: yum install epelyum:name: epel-release.noarchstate: present- name: yum install nginxyum:name: nginxstate: present- name: stop firewalldservice:name: firewalldstate: stopped- name: start nginxservice:name: nginxstate: restartedenable: yes
- 编写剧本
[root@server1 roles]# vim nginx_install.yml- name: install nginxhosts: server2roles:- nginx
- 执行剧本
[root@server1 roles]# ansible-playbook nginx_install.yml
- 测试网站
[root@server1 ~]# curl server2 -IHTTP/1.1 200 OKServer: nginx/1.20.1Date: Mon, 07 Mar 2022 15:00:51 GMTContent-Type: text/htmlContent-Length: 4833Last-Modified: Fri, 16 May 2014 15:12:48 GMTConnection: keep-aliveETag: "53762af0-12e1"Accept-Ranges: bytes
部署Apache
- 创建角色
[root@server1 roles]# ansible-galaxy init apache
- 部署Apache
[root@server1 roles]# vim apache/tasks/main.yml---# tasks file for apache- name: Install lamp environmentyum:name: httpd,php-fpm,php-mysql,mod_phpstate: present- name: Start httpdservice:name: httpdstate: restarted- name: Start php-fpmservice:name: php-fpmstate: restarted
- 编写剧本
[root@server1 roles]# vim lamp_install.yml- name: prepare lamphosts: apacheroles:- apache
- 执行剧本
[root@server1 roles]# ansible-playbook lamp_install.yml
负载均衡
- 创建角色
[root@server1 roles]# ansible-galaxy init nginx_lb
- 创建负载均衡配置文件
[root@server1 roles]# vim nginx_lb/templates/lb.conf.j2upstream webservers{server server3;server server4;}server{listen 8080;server_name 192.168.31.20:8080;location / {proxy_pass http://webservers;}}
- 拷贝配置文件
[root@server1 roles]# vim nginx_lb/tasks/main.yml---# tasks file for nginx_lb- name: configure nginx lb conf filetemplate:src: /etc/ansible/roles/nginx_lb/templates/lb.conf.j2dest: /etc/nginx/conf.d/lb.conf- name: restart nginxservice:name: nginxstate: restarted
- 编写剧本
[root@server1 roles]# vim nginx_lb.yml- name: configure nginx lb serverhosts: server2roles:- nginx_lb
- 执行剧本
[root@server1 roles]# ansible-playbook nginx_lb.yml
部署Mariadb
- 创建角色
[root@server1 roles]# ansible-galaxy init mariadb
- 部署Mariadb
[root@server1 roles]# vim mariadb/tasks/main.yml---# tasks file for mariadb- name: yum install mariadbyum:name: mariadb-serverstate: present- name: stop firewalldservice:name: firewalldstate: stopped- name: start mariadbservice:name: mariadbstate: restarted
- 编写剧本
[root@server1 roles]# vim mariadb_install.yml- name: install mariadbhosts: mariadbroles:- mariadb
- 运行剧本
[root@server1 roles]# ansible-playbook mariadb_install.yml
部署逻辑卷
- 创建角色
[root@server1 roles]# ansible-galaxy init lvm_create
- 使用
parted模块创建分区,使用lvg模块创建卷组,使用lvol模块创建逻辑卷,再把逻辑卷挂载到本地文件夹
[root@server1 roles]# vim lvm_create/tasks/main.yml---# tasks file for lvm_create- name: create partion # 创建分区parted:device: /dev/sdbnumber: 1flags: [ lvm ]state: presentpart_start: 1MiBpart_end: 2GiB- name: create vg # 创建卷组lvg:vg: vg-nfspvs: /dev/sdb1- name: create lvm 1G # 创建逻辑卷lvol:vg: vg-nfslv: lv-nfssize: 1G- name: format lv-nfs # 格式化filesystem:fstype: ext4dev: /dev/vg-nfs/lv-nfs- name: mkdir nfs dir # 创建挂载目录file:path: /nfsstate: directory- name: mount lvm # 挂载逻辑卷mount:path: /nfssrc: /dev/vg-nfs/lv-nfsfstype: ext4state: mountedopts: noatime
- 编写剧本
[root@server1 roles]# vim lvm_create.yml- name: Create lvm for nfshosts: nfsroles:- lvm_create
- 执行剧本
[root@server1 ~]# ansible-playbook lvm_create.yml
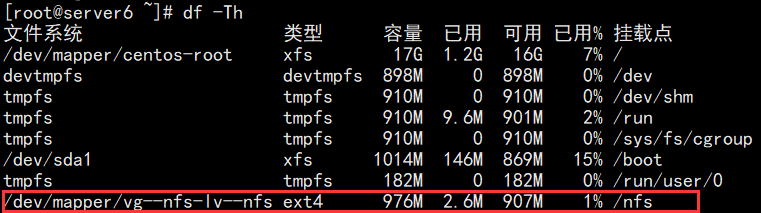
- 在server6上检验
整体剧本执行
- server1中需要用到每一个角色的
tasks/main.yml文件(定义任务列表),以及/template/hosts.j2文件
[root@server1 roles]# ansible-galaxy list# /usr/share/ansible/roles# /etc/ansible/roles- ali_yum_repo, (unknown version)- nginx, (unknown version)- nginx_lb, (unknown version)- apache, (unknown version)- mariadb, (unknown version)- lvm_create, (unknown version)
- server2-server6都是纯净环境
- 配置ssh免密登录
[root@server1 ~]# ssh-keygen[root@server1 ~]# ssh-copy-id -i /root/.ssh/id_rsa.pub root@192.168.31.10[root@server1 ~]# ssh-copy-id -i /root/.ssh/id_rsa.pub root@192.168.31.20[root@server1 ~]# ssh-copy-id -i /root/.ssh/id_rsa.pub root@192.168.31.30[root@server1 ~]# ssh-copy-id -i /root/.ssh/id_rsa.pub root@192.168.31.40[root@server1 ~]# ssh-copy-id -i /root/.ssh/id_rsa.pub root@192.168.31.50[root@server1 ~]# ssh-copy-id -i /root/.ssh/id_rsa.pub root@192.168.31.60
- 编写剧本文件
[root@server1 roles]# vim all.yaml- name: update hosts file # 更新hosts文件hosts: all_ipremote_user: roottasks:- name: copy hosts.j2 to group serverstemplate:src: /template/hosts.j2dest: /etc/hosts- name: update yum.repo file # 换源hosts: all_hostnameremote_user: roottasks:- include_tasks: /etc/ansible/roles/ali_yum_repo/tasks/main.yml- name: install nginx # 部署nginxhosts: nginxremote_user: roottasks:- include_tasks: /etc/ansible/roles/nginx/tasks/main.yml- name: install apache # 部署apachehosts: apacheremote_user: roottasks:- include_tasks: /etc/ansible/roles/apache/tasks/main.yml- name: install mariadb # 部署mariadbhosts: mariadbremote_user: roottasks:- include_tasks: /etc/ansible/roles/mariadb/tasks/main.yml- name: configure nginx lb server # 负载均衡hosts: nginxremote_user: roottasks:- include_tasks: /etc/ansible/roles/nginx_lb/tasks/main.yml- name: create lvm for nfs # 创建逻辑卷hosts: nfsremote_user: roottasks:- include_tasks: /etc/ansible/roles/lvm_create/tasks/main.yml
- 执行剧本
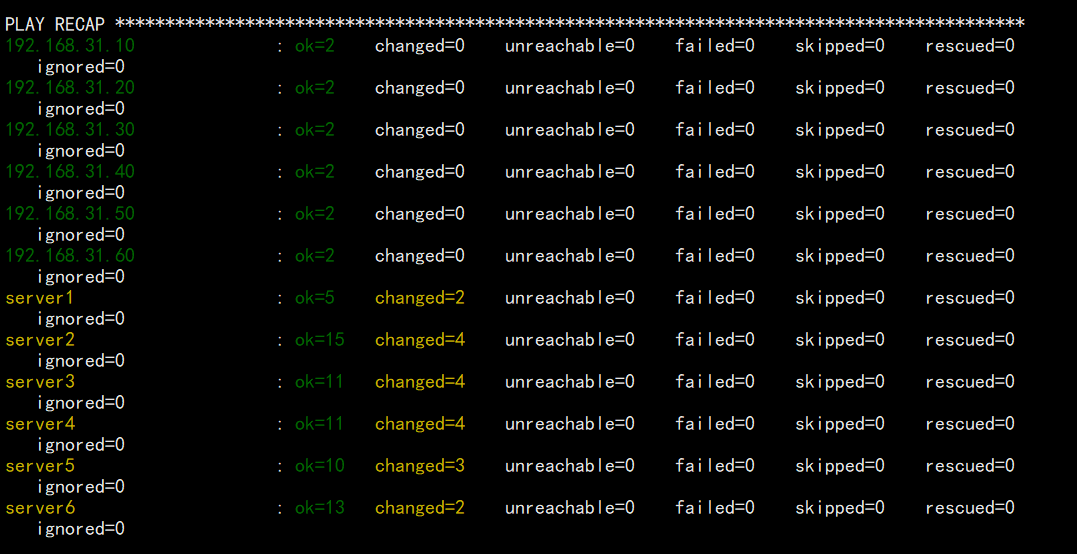
[root@server1 roles]# ansible-playbook all.yaml
只需要准备好角色以及它们的一些任务列表,然后再进行统一的剧本配置就可以只需要在一台机器上通过一个命令就可以完成部署,由此可见Ansible的自动化部署的强大性

若有收获,就点个赞吧
0 人点赞
