第一章、MVC框架整合思想
1. 搭建Web运行环境
<dependency><groupId>javax.servlet</groupId><artifactId>javax.servlet-api</artifactId><version>3.1.0</version><scope>provided</scope></dependency><dependency><groupId>javax.servlet</groupId><artifactId>jstl</artifactId><version>1.2</version></dependency><!-- https://mvnrepository.com/artifact/javax.servlet.jsp/javax.servlet.jsp-api --><dependency><groupId>javax.servlet.jsp</groupId><artifactId>javax.servlet.jsp-api</artifactId><version>2.3.1</version><scope>provided</scope></dependency><dependency><groupId>org.springframework</groupId><artifactId>spring-web</artifactId><version>5.1.14.RELEASE</version></dependency><dependency><groupId>org.springframework</groupId><artifactId>spring-core</artifactId><version>5.1.14.RELEASE</version></dependency><dependency><groupId>org.springframework</groupId><artifactId>spring-beans</artifactId><version>5.1.14.RELEASE</version></dependency><dependency><groupId>org.springframework</groupId><artifactId>spring-tx</artifactId><version>5.1.14.RELEASE</version></dependency><dependency><groupId>org.springframework</groupId><artifactId>spring-jdbc</artifactId><version>5.1.14.RELEASE</version></dependency><dependency><groupId>org.mybatis</groupId><artifactId>mybatis-spring</artifactId><version>2.0.2</version></dependency><dependency><groupId>com.alibaba</groupId><artifactId>druid</artifactId><version>1.1.18</version></dependency><dependency><groupId>mysql</groupId><artifactId>mysql-connector-java</artifactId><version>5.1.48</version></dependency><dependency><groupId>org.mybatis</groupId><artifactId>mybatis</artifactId><version>3.4.6</version></dependency><dependency><groupId>junit</groupId><artifactId>junit</artifactId><version>4.11</version><scope>test</scope></dependency><!-- https://mvnrepository.com/artifact/org.springframework/spring-context --><dependency><groupId>org.springframework</groupId><artifactId>spring-context</artifactId><version>5.1.4.RELEASE</version></dependency><dependency><groupId>org.springframework</groupId><artifactId>spring-aop</artifactId><version>5.1.14.RELEASE</version></dependency><dependency><groupId>org.aspectj</groupId><artifactId>aspectjrt</artifactId><version>1.8.8</version></dependency><dependency><groupId>org.aspectj</groupId><artifactId>aspectjweaver</artifactId><version>1.8.3</version></dependency><dependency><groupId>org.slf4j</groupId><artifactId>slf4j-log4j12</artifactId><version>1.7.25</version></dependency><dependency><groupId>log4j</groupId><artifactId>log4j</artifactId><version>1.2.17</version></dependency>
2. 为什么要整合MVC框架
1. MVC框架提供了控制器(Controller)调用ServiceDAO ---》 Service2. 请求响应的处理3. 接受请求参数 request.getParameter("")4. 控制程序的运行流程5. 视图解析 (JSP JSON Freemarker Thyemeleaf )
3. Spring可以整合那些MVC框架
1. struts12. webwork3. jsf4. struts25. springMVC
4.Spring整合MVC框架的核心思路
1. 准备工厂
1. Web开发过程中如何创建工厂ApplicationContext ctx = new ClassPathXmlApplicationContext("/applicationContext.xml");WebXmlApplicationContext()2. 如何保证工厂唯一同时被共用被共用:Web request|session|ServletContext(application)工厂存储在ServletContext这个作用域中 ServletContext.setAttribute("xxxx",ctx);唯一:ServletContext对象 创建的同时 ---》 ApplicationContext ctx = new ClassPathXmlApplicationContext("/applicationContext.xml");ServletContextListener ---> ApplicationContext ctx = new ClassPathXmlApplicationContext("/applicationContext.xml");ServletContextListener 在ServletContext对象创建的同时,被调用(只会被调用一次) ,把工厂创建的代码,写在ServletContextListener中,也会保证只调用一次,最终工厂就保证了唯一性3. 总结ServletContextListener(唯一)ApplicationContext ctx = new ClassPathXmlApplicationContext("/applicationContext.xml");ServletContext.setAttribute("xxx",ctx) (共用)4. Spring封装了一个ContextLoaderListener1. 创建工厂2. 把工厂存在ServletContext中
ContextLoaderListener使用方式web.xml<listener><listener-class>org.springframework.web.context.ContextLoaderListener</listener-class></listener><context-param><param-name>contextConfigLocation</param-name><param-value>classpath:applicationContext.xml</param-value></context-param>
2. 代码整合
依赖注入:把Sevice对象注入个控制器对象。

第二章、Spring与Struts2框架整合 (选学)
1. Spring与Struts2整合思路分析
1. Struts2中的Action需要通过Spring的依赖注入获得Service对象。
2. Spring与Struts2整合的编码实现
搭建开发环境
引入相关jar (Spring Struts2)
<dependency><groupId>org.apache.struts</groupId><artifactId>struts2-spring-plugin</artifactId><version>2.3.8</version></dependency>
引入对应的配置文件
- applicationContext.xml
- struts.xml
- log4j.properties
- 初始化配置
```xml
org.springframework.web.context.ContextLoaderListener
- Spring (ContextLoaderListener —> Web.xml)- Struts2(Filter —> Web.xml)- 编码- 开发Service对象```markdown最终在Spring配置文件中创建Service对象<bean id="userService" class="com.baizhi.struts2.UserServiceImpl"/>
开发Action对象
- 开发类 ```java public class RegAction implements Action{ private UserService userService; set get
public String execute(){ userService.register(); return Action.SUCCESS; } }
- Spring (applicationContext.xml)```markdown<bean id="regAction" class="com.baizhi.struts2.RegAction" scope="prototype"><property name="userService" ref=""/></bean
- Struts2(struts.xml)
```xml
url reg.action —-> 会接受到用户的请求后,创建RegAction这个类的对象 进行相应的处理
/index.jsp
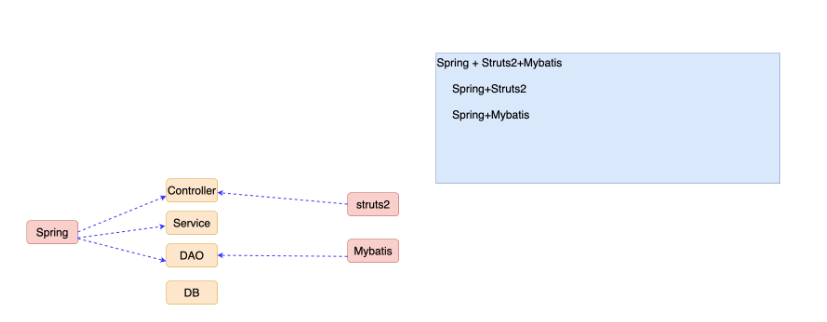
3. Spring+Struts2+Mybatis整合(SSM)
1. 思路分析
SSM = Spring+Struts2 Spring+Mybatis

2. 整合编码
- 搭建开发环境
- 引入相关jar (Spring Struts2 Mybatis) ```xml
<dependency><groupId>org.apache.struts</groupId><artifactId>struts2-spring-plugin</artifactId><version>2.3.8</version></dependency><dependency><groupId>javax.servlet</groupId><artifactId>javax.servlet-api</artifactId><version>3.1.0</version><scope>provided</scope></dependency><dependency><groupId>javax.servlet</groupId><artifactId>jstl</artifactId><version>1.2</version></dependency><!-- https://mvnrepository.com/artifact/javax.servlet.jsp/javax.servlet.jsp-api --><dependency><groupId>javax.servlet.jsp</groupId><artifactId>javax.servlet.jsp-api</artifactId><version>2.3.1</version><scope>provided</scope></dependency><dependency><groupId>org.springframework</groupId><artifactId>spring-web</artifactId><version>5.1.14.RELEASE</version></dependency><dependency><groupId>org.springframework</groupId><artifactId>spring-core</artifactId><version>5.1.14.RELEASE</version></dependency><dependency><groupId>org.springframework</groupId><artifactId>spring-beans</artifactId><version>5.1.14.RELEASE</version></dependency><dependency><groupId>org.springframework</groupId><artifactId>spring-tx</artifactId><version>5.1.14.RELEASE</version></dependency><dependency><groupId>org.springframework</groupId><artifactId>spring-jdbc</artifactId><version>5.1.14.RELEASE</version></dependency><dependency><groupId>org.mybatis</groupId><artifactId>mybatis-spring</artifactId><version>2.0.2</version></dependency><dependency><groupId>com.alibaba</groupId><artifactId>druid</artifactId><version>1.1.18</version></dependency><dependency><groupId>mysql</groupId><artifactId>mysql-connector-java</artifactId><version>5.1.48</version></dependency><dependency><groupId>org.mybatis</groupId><artifactId>mybatis</artifactId><version>3.4.6</version></dependency><dependency><groupId>junit</groupId><artifactId>junit</artifactId><version>4.11</version><scope>test</scope></dependency><!-- https://mvnrepository.com/artifact/org.springframework/spring-context --><dependency><groupId>org.springframework</groupId><artifactId>spring-context</artifactId><version>5.1.4.RELEASE</version></dependency><dependency><groupId>org.springframework</groupId><artifactId>spring-aop</artifactId><version>5.1.14.RELEASE</version></dependency><dependency><groupId>org.aspectj</groupId><artifactId>aspectjrt</artifactId><version>1.8.8</version></dependency><dependency><groupId>org.aspectj</groupId><artifactId>aspectjweaver</artifactId><version>1.8.3</version></dependency><dependency><groupId>org.slf4j</groupId><artifactId>slf4j-log4j12</artifactId><version>1.7.25</version></dependency><dependency><groupId>log4j</groupId><artifactId>log4j</artifactId><version>1.2.17</version></dependency>
- 引入对应的配置文件- applicationContext.xml- struts.xml- log4j.properties- xxxxMapper.xml- 初始化配置- Spring (ContextLoaderListener —> Web.xml)- Struts2(Filter —> Web.xml)```xml<listener><listener-class>org.springframework.web.context.ContextLoaderListener</listener-class></listener><context-param><param-name>contextConfigLocation</param-name><param-value>classpath:applicationContext.xml</param-value></context-param><filter><filter-name>struts2</filter-name><filter-class>org.apache.struts2.dispatcher.ng.filter.StrutsPrepareAndExecuteFilter</filter-class></filter><filter-mapping><filter-name>struts2</filter-name><url-pattern>/*</url-pattern></filter-mapping>
- 编码
- DAO (Spring+Mybatis) ```markdown
- 配置文件的配置
- DataSource
- SqlSessionFactory ——> SqlSessionFactoryBean
- dataSource
- typeAliasesPackage
- mapperLocations
- MapperScannerConfigur —-> DAO接口实现类
编码
- entity
- table
- DAO接口
- 实现Mapper文件 ```
- Service (Spring添加事务) ```markdown
- 原始对象 —-》 注入DAO
- 额外功能 —-》 DataSourceTransactionManager —-> dataSource
- 切入点 + 事务属性 @Transactional(propagation,readOnly…)
组装切面 <tx:annotation-driven ```
- Controller (Spring+Struts2) ```markdown
- 开发控制器 implements Action 注入Service
- Spring的配置文件
- 注入 Service
- scope = prototype
- struts.xml
```
4. Spring开发过程中多配置文件的处理
Spring会根据需要,把配置信息分门别类的放置在多个配置文件中,便于后续的管理及维护。DAO ------ applicationContext-dao.xmlService --- applicationContext-service.xmlAction --- applicationContext-action.xml注意:虽然提供了多个配置文件,但是后续应用的过程中,还要进行整合
- 通配符方式 ```markdown
- 非web环境 ApplicationContext ctx = new ClassPathXmlApplicationContext(“/applicationContext-*.xml”);
- web环境
<param-name>contextConfigLocation</param-name><param-value>classpath:applicationContext-*.xml</param-value>
```
- 非web环境 ApplicationContext ctx = new ClassPathXmlApplicationContext(“/applicationContext.xml”);
- web环境
<param-name>contextConfigLocation</param-name><param-value>classpath:applicationContext.xml</param-value>
```

