Element& Component都具有更新的逻辑 , 只不过 Component的更新没有太复杂
happy
创建需要测试通过的文件
App 组件
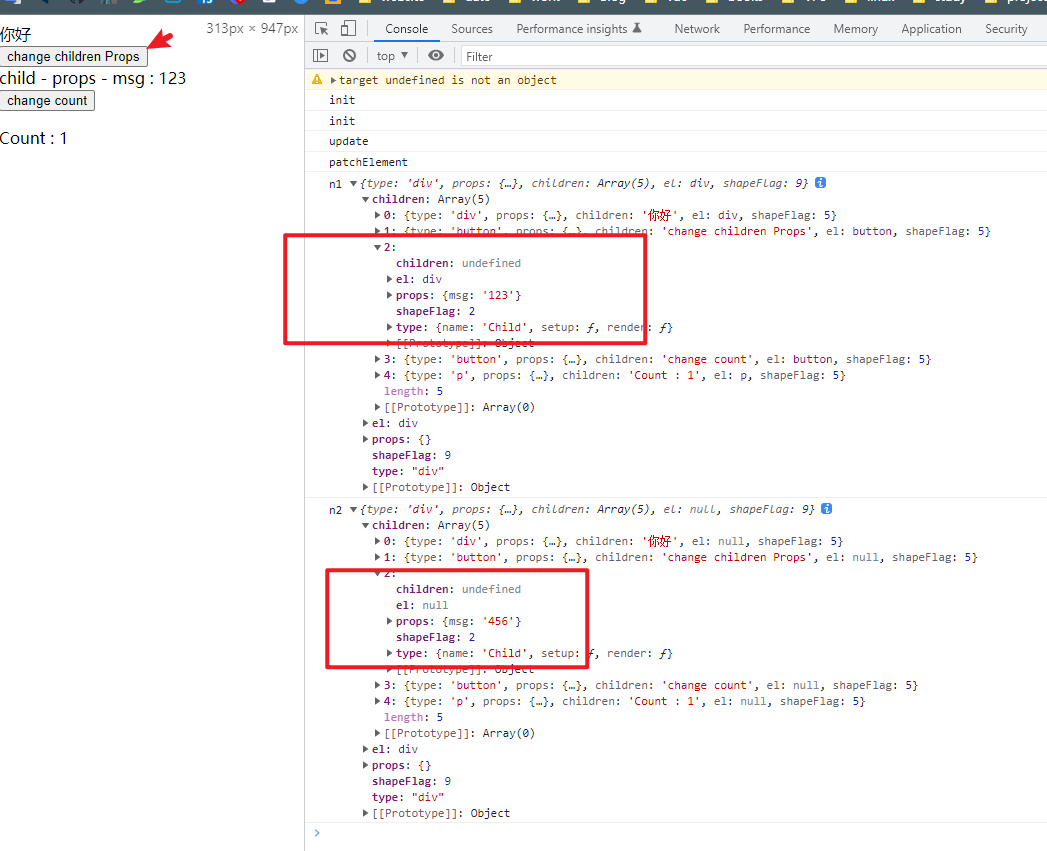
/* example/componentUpdate/App.js */import Child from "./Child.js"// 实现组件更新的逻辑export const App = {name: "App",setup() {const msg = ref("123")const count = ref(1)window.msg = msgconst changeChildrenProps = () => {msg.value = "456"}const changCount = () => {count.value++}return {msg, changeChildrenProps, count, changCount}},render() {return h("div",{},[h('div', {}, "你好"),h('button', { onClick: this.changeChildrenProps }, "change children props"),// 传给 Child 组件的 propsh(Child, { msg: this.msg }),// 修改 counth('button', { onClick: this.changCount }, "change self count"),h('p', {}, "count: " + this.count)])}}
Child 组件
/* example/componentUpdate/Child.js */export default {name: "Child",setup(props, { emit }) {},render(proxy) {return h('div', {}, [// 在render 中,实现通过 this.$props 访问当前组件的 propsh('div', {}, "child - props - msg: " + this.$props.msg)])}}
实现 $props的逻辑
在访问render() 中, 能够通过 this 访问的的 属性, 都是通过 componentPublicInstance.ts添加属性 ,所以 $props 同样实现
/* src/runtime-core/componentPublicInstance.ts */// 声明一个对象,根据key,判断是否有属性,返回 instance 上的值const publicPropertiesMap = {$el: (instance) => instance.vnode.el,$slots: (instance) => instance.slots// 通过 $props 访问到 当前组件的 props$props: (instance) => instance.props}
7.1 组件的更新逻辑
添加组件发生变化时 执行 函数
/* renderer.ts*/// 处理组件function processComponent(n1, n2, container, parentComponent, anchor) {// 判断组件 是否为 更新 | 初始化if (!n1) {// 1. initmountComponent(n2, container, parentComponent, anchor)} else {// 2. updateupdateComponet(n1, n2)}}
实现组件更新的逻辑
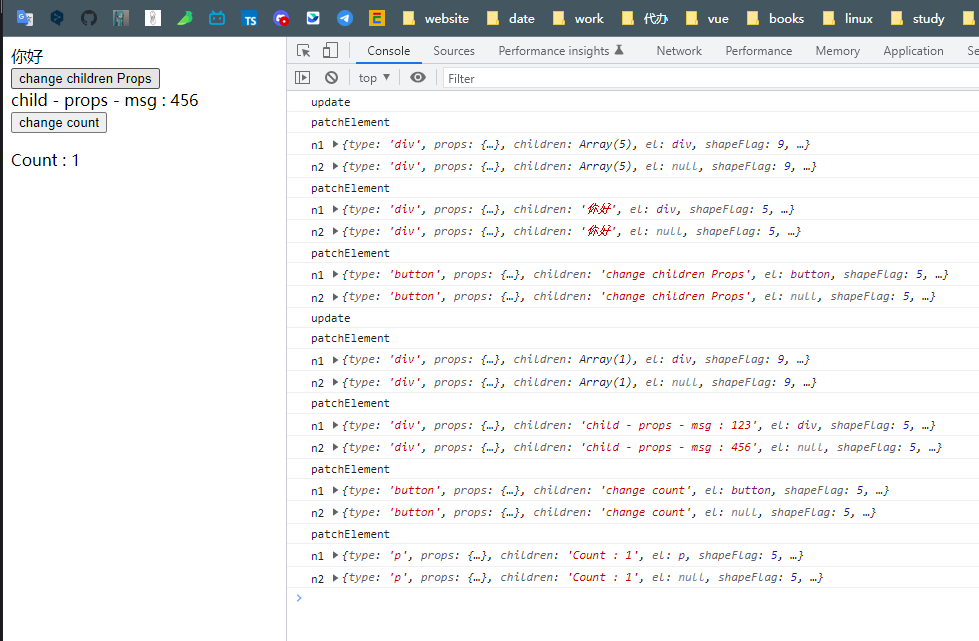
/*** 更新组件的逻辑: 重新调用当前组件的 render函数, 重新生成虚拟节点,再进行patch* -> 更新组件的props , 调用组件的render()** 1. 当调用 响应式数据时,会重新执行 effect 函数,而 effect 函数会具有一个返回值* 2. effect 函数的返回值,可以再次effect 收集的依赖,进行调用 -> 赋值为 instance.update* 3. 在更新组件时, 调用 instance.update 就行* 4. 进行组件内容的更新 props* - 实现逻辑: 在更新逻辑需要更新之后的虚拟节点,也就是 n2, 使用 next 保存 n2 的虚拟节点* - 1. 赋值 instance.next , 并在 component 中初始化 next* - 2. 在更新的逻辑中 取出 next 更新的虚拟节点,和 vnode 当前的组件虚拟节点* - 3. 把el 进行更新 next.el = n1.el* - 4. 更新props* - 更新虚拟节点 : 老的虚拟节点 = 更新后的虚拟节点 next* - 清空 instance.next* - 更新 props : instance.props = next.props** 5. 优化: 判断组件是否更新* - 实现判断是否更新的方法,主要就是判断 props 是否相等* - 1. 封装 shouldUpdateComponent() 函数 传入 n1 n2* - 2. 取出 n1 n2 的 props , 然后 循环对比 key 是否相同*/
/* component.ts */// 初始化 componentconst component = {// 初始化 update, 用于挂载 effect返回的 runner 函数update: null,// 定义 component 挂载当前组件的实例component: null,// 初始化 next - 用于保存更新后虚拟节点next: null}
/* renderre.ts */// 更新组件函数function updateComponet(n1, n2) {// 1. 获取到 instanceconst instance = (n2.component = n1.component)// 优化 -> 判断组件是否更新if (shouldUpdateComponent(n1, n2)) {// 更新逻辑先执行这里// 2. 赋值 instance.next = n2// 更新之后的虚拟节点 为了在 effect 中拿到更新后的虚拟节点instance.next = n2// 当更新时候调用 instance.update -> 再次执行 effect 函数instance.update()} else {// 不需要更新时n2.el = n1.elinstance.vnode = n2}}// 初始化组件function mountComponent(initialVNode, container, parentComponent, anchor) {// 获取 组件的初始化实例// 在初始化 组件时候 赋值 componet -> 当前组件的实例 instanceconst instance = (initialVNode.component = createComponentInstance(initialVNode, parentComponent))}// effect 函数中执行更新组件// 拿到 effect 的返回值 runner函数, 并且把 runner 函数挂载在 instance.update 方法中// 需要到 componet 中初始化 update 方法instance.update = effect(() => {// 其他代码 ...} else {// 更新逻辑console.log("update")// 需要一个 更新之后的 虚拟节点 vnode -> instance.next 在之前有赋// 实现组件的更新// 取出 next & vnode 新的虚拟节点 & 老的虚拟节点const { next, vnode } = instance// 如果 next 虚拟节点有值if (next) {// 更新 elnext.el = vnode.el// 更新组件属性 propsupdateComponetPreRender(instance, next)}// 其他 代码 ...}})// 组件的props更新逻辑function updateComponetPreRender(instance, nextVNode) {// 需要更新当前虚拟节点 -> 为 nextVNodeinstance.vnode = nextVNode// 最后清空 instance.nextinstance.next = null// 更新 propsinstance.props = nextVNode.props}
实现优化的更新的函数
/* componentUpdateUtils.ts */// 判断组件是否更新的逻辑export function shouldUpdateComponent(prevVNode, nextVNode) {// 1. 获取propsconst { props: prevProps } = prevVNodeconst { props: nextProps } = nextVNode// 2. 循环对比for (const key in nextProps) {// 如果它们的 props key 不相等时,返回 trueif (nextProps[key] !== prevProps[key]) {return true}}return false}
7.2 实现 nextTick 逻辑
Vue3 视图更新的逻辑
vue3 视图更新实现逻辑
测试组件
/* nextTicker/App.js */import { h, ref, getCurrentInstance } from "../../lib/guide-mini-vue-esm.js"export const App = {name: "App",setup() {const count = ref(1)// 当前组件的实例const instance = getCurrentInstance()// 点击循环 100 次 , 并更新视图const onClick = () => {for (let i = 0; i < 100; i++) {console.log("update")count.value = i}}// 获取当前组件实例console.log(instance)// 因为当执行 打印instance, 此时 count 已经为 99 了, 但是 instance 中页面上的 count 又是 1 , 这时进行同步的代码return {count,onClick}},render() {const button = h('button', { onClick: this.onClick }, "update")const p = h('p', {}, "count : " + this.count)return h("div", {}, [button, p])}}
初始时候,循环 100 次, 页面视图就会更新100 次 ;
解决 :
思路 : 使用微任务,当执行 for 循环时会执行 instance.update 100 次,我们只需呀最后渲染的一个,所以把 instance.update 存入一个队列中, 并且这个队列 不能有重复的 job ; 当 for 循环执行完, 微任务去这个队列中 取出 job 执行 ; 可以达到 instance.update 只更新一次
- vue3 的视图更新是异步的
实现 :
- 使用 effect 实现的
schedule第二个参数,实现微任务 - 定义函数可以把
instance.update存储到 一个队列里 - 执行微任务 , 取出 job 然后执行
具体代码
/* renderer.ts */// effect 函数中使用 schedule// 要把更新视图的逻辑添加到队列中, 所以更新逻辑不能立即执行instance.update = effect(() => {}, {// 使用 schedulerscheduler() {console.log("update - scheduler")// 调用 effect 返回出来的 fn -> instance.update// 所以这里 job 就是 instance.update, 当前组件发生变化的逻辑// 收集 job 的逻辑 queueJobs()queueJobs(instance.update)}})
创建 scheduler.ts 写微任务的逻辑
/* scheduler.ts */// 1. 定义一个队列, 用于存储 jobconst queue: any[] = [];// 定义一个函数 queueJob , 收集 job 的方法// 所以这里 job 就是 instance.update, 当前组件发生变化的逻辑export function queueJobs(job) {// 2. 添加 job 到队列中// 判断当前的 job 在不在这个队列中if (!queue.includes(job)) { // 能达到 for 循环只能有个 job// 如果不在,才添加到队列中queue.push(job);}// 执行微任务queueFlush()}// 3. 在微任务时候执行 jobfunction queueFlush() {Promise.resolve().then(() => {let jobwhile ((job = queue.shift())) {// 取出job , 执行 jobjob && job()}})}
效果 : 页面内容只更新一次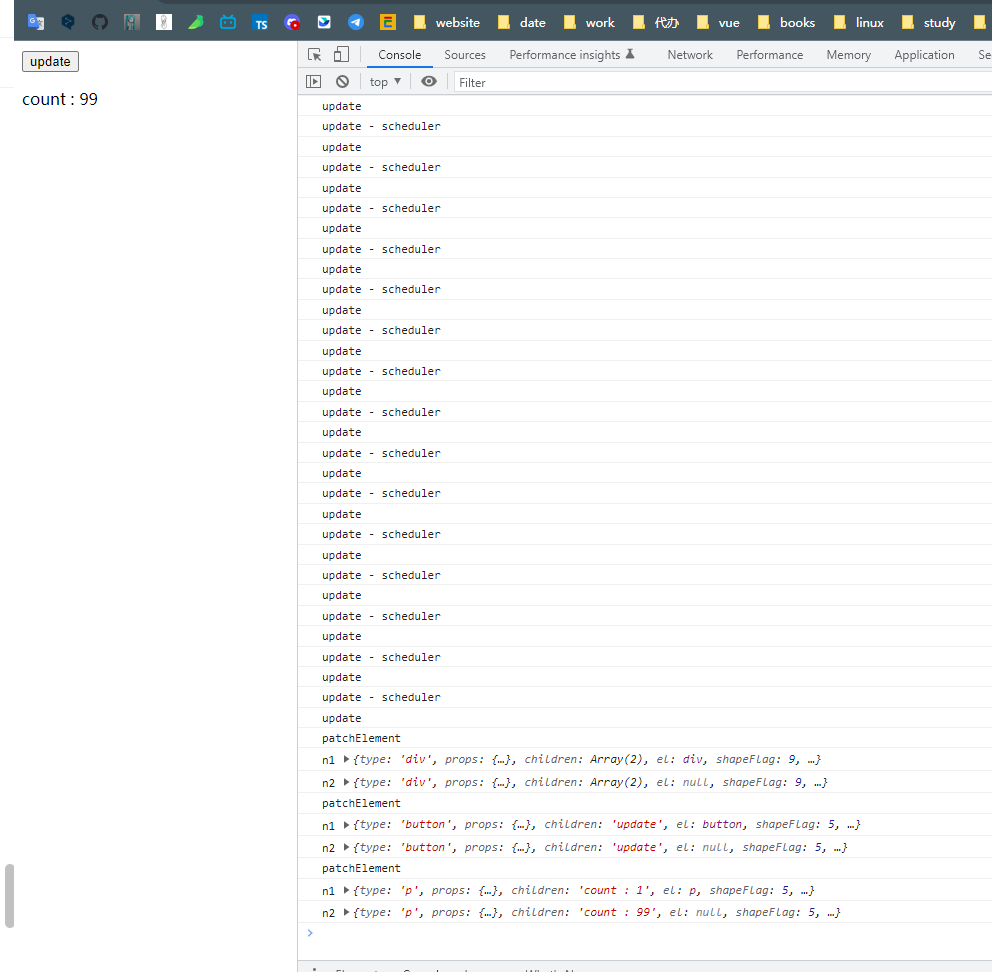
优化代码
// 1. 定义一个队列, 用于存储 jobconst queue: any[] = [];// 优化微任务执行 - 因为当前代码会执行 99 次 queueFlush// 定义一个 布尔值 -> false , 在执行queueFlush前判断一下let isFlushPending = false;// 定义一个函数 queueJob , 收集 job 的方法// 所以这里 job 就是 instance.update, 当前组件发生变化的逻辑export function queueJobs(job) {// 2. 添加 job 到队列中// 判断当前的 job 在不在这个队列中if (!queue.includes(job)) {// 如果不在,才添加到队列中queue.push(job);}// 因为当前代码会执行 99 次 queueFlushqueueFlush()}function queueFlush() {// 如果 isFlushPending = false 执行代码if (isFlushPending) return;isFlushPending = true; // 关闭执行 微任务函数// 3. 在微任务时候执行 jobPromise.resolve().then(() => {// 把 isFlushPending 打开isFlushPending = false;let jobwhile ((job = queue.shift())) {// 取出job , 执行 jobjob && job()}})}
实现 nextTick
setup() {const count = ref(1)// 当前组件的实例const instance = getCurrentInstance()// 点击循环 100 次 , 并更新视图const onClick = () => {for (let i = 0; i < 100; i++) {console.log("update")count.value = i}// 获取当前组件实例console.log(instance) // 因为执行到这里 还是主任务 (同步逻辑)// 因为当执行 打印instance, 此时 count 已经为 99 了, 但是 instance 中页面上的 count 又是 1 , 这时进行同步的代码// 所以使用 nextTick() 获取到更新后页面数据nextTick(() => { // 执行到这里就是 异步逻辑了// 拿到更细完成之后的 视图console.log(instance)})// 还可以使用// await nextTick()// console.log(instance)}},
nextTick 实现的逻辑
就是把接收的函数添加到微任务(异步队列中), 当执行完 视图更新 , nextTick 传入的异步函数就会执行
/* scheduler.ts */// 实现 nextTick// 实现就是 把接收到的 fn ,添加到微任务就行export function nextTick(fn) {// 把fn添加到 微任务 , 异步执行 fn// 如果没有 fn , 也会执行 微任务 Promise.resolve(); -> 进行一个等待return fn ? Promise.resolve().then(fn) : Promise.resolve();// 还可以使用// await nextTick()// console.log(instance)}
重构代码
/* scheduler.ts */// 实现 nextTick// 实现就是 把接收到的 fn ,添加到微任务就行export function nextTick(fn) {// 把fn添加到 微任务 , 异步执行 fn// 如果没有 fn , 也会执行 微任务 Promise.resolve(); -> 进行一个等待return fn ? Promise.resolve().then(fn) : Promise.resolve();// 还可以使用// await nextTick()// console.log(instance)}function queueFlush() {// 如果 isFlushPending = false 执行代码if (isFlushPending) return;isFlushPending = true; // 关闭执行 微任务函数// 3. 在微任务时候执行 job// 异步执行 job// Promise.resolve().then(() => {// // 把 isFlushPending 打开// isFlushPending = false;// let job// while ((job = queue.shift())) {// // 取出job , 执行 job// job && job()// }// })// 进行重构nextTick(flushJobs)}function flushJobs() {// 把 isFlushPending 打开isFlushPending = false;let jobwhile ((job = queue.shift())) {// 取出job , 执行 jobjob && job()}}
实现效果
- 此时主任务 视图还没有进行更细
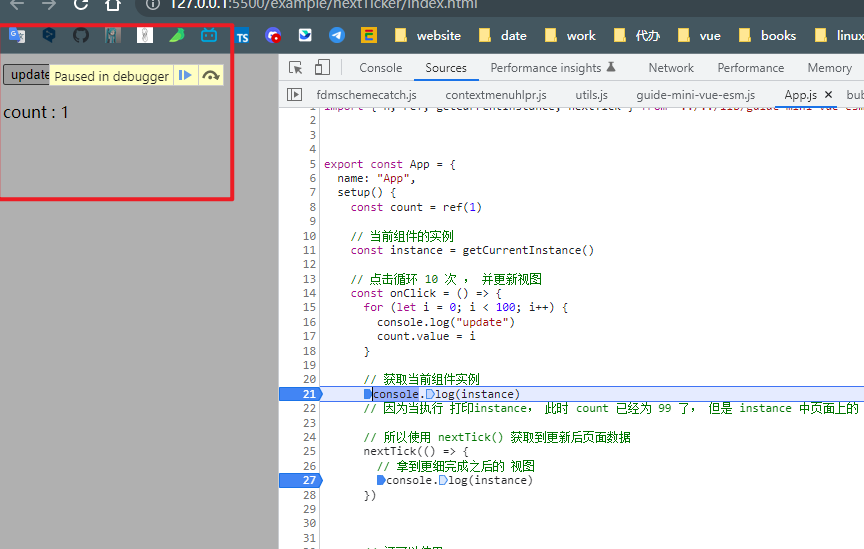
使用 nextTick() 后 fn 转为异步的 , 又因为 vue3 的视图更细是异步的, 所以执行完 视图更新,就立即执行 nextTick(fn) ; 所以能够拿到页面更新后的效果 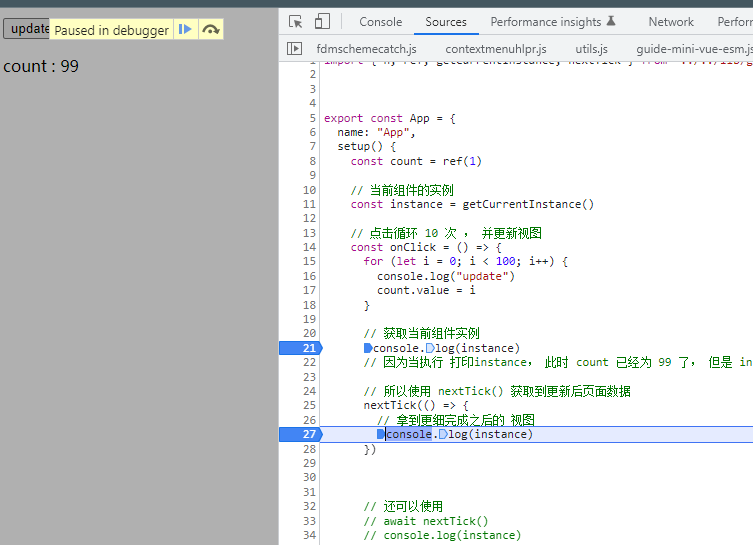
最后要知道的 vue3 视图更新为什么采用异步的方式 :
- 如果是同步的 , 会出现 for 循环 100 次, 页面内容都要更细 100 次
- 采用异步,的可以减少循环, 页面的渲染等等好处,基于 JS的异步任务队列 实现
nextTick

若有收获,就点个赞吧
0 人点赞
