一、引入Spock有什么好处
1.代码更简洁、语义更明确
由于Spock基于Groovy,一门基于 jvm 的动态语言,因此它非常灵活;又由于它是基于Java的,所以完全兼容Java的语法,因此它对于Java程序员非常易于上手;又由于Groovy提供的独特语法,这使得编写测试代码非常高效。
def divideExceptionTest() {given:def num1 = 1and:def num2 = 0when:num1 / num2then:def ex = thrown(ArithmeticException)ex.message == "Division by zero"}
以上代码的可读性十分高,这是Groovy的独特语法使然,这使得我们易于使用“声明式编程”编写测试代码
2.易于Mock
Spock天生支持Mock,不需要引入其他组件。只需要使用Mock(类名)就可以Mock对象,甚至可以使用“>>”模拟方法的返回值,而这在我们“面向接口文档编程”的时候十分重要
3.使用简单
只需继承Spock提供的Specification类就可以使用
class DemoTest extends Specification {
}
集成Spring只需加上@SpringBootTest
@SpringBootTest
class BaseSpockTest extends Specification {
}
二、引入依赖
          <!--如果不需要集成SpringTest,该包可以省略-->
        <dependency>
            <groupId>org.springframework.boot</groupId>
            <artifactId>spring-boot-starter-test</artifactId>
            <scope>test</scope>
        </dependency>
        <!--引入spock 核心包-->
        <dependency>
            <groupId>org.spockframework</groupId>
            <artifactId>spock-core</artifactId>
            <version>1.3-groovy-2.5</version>
            <scope>test</scope>
        </dependency>
        <!--引入spock 与 spring 集成包-->
        <dependency>
            <groupId>org.spockframework</groupId>
            <artifactId>spock-spring</artifactId>
            <version>1.3-groovy-2.5</version>
            <scope>test</scope>
        </dependency>
        <!--引入 groovy 依赖-->
        <dependency>
            <groupId>org.codehaus.groovy</groupId>
            <artifactId>groovy-all</artifactId>
            <version>2.5.7</version>
            <scope>test</scope>
        </dependency>
三、使用方法
1.Spock基本用法说明
首先,所有测试类都要集成一个spock.lang.Specification。其次,如上文所说,Spock是基于Groovy,所以创建的文件应该是.groovy而不是.java
可以看到,虽然都是“c”但Groovy Class是正方形的小图标而Java Class是圆形的。
最后一点,def 是 groovy 的关键字,可以用来定义变量跟方法名,如下demo所示:
class DemoTest extends Specification {

    def num1 = RandomUtils.nextLong(0, 1024)
    def num2 = RandomUtils.nextLong(num1, 2 * num2)
}
2.where控制多种参数情况的测试样例
    def divideTest() {
        expect:
        num1 / num2 == result
        where:
        num1 | num2 | result
        1    | 1    | 1
        2    | 1    | 2
        1    | 2    | 0.5
    }
expect 是“期望”的语义。在使用其它单测框架时,与之类似的是 assert ,表达如下语义:若结果如是,则用例通过,否则用例失败。 要注意的是,在 expect 的块内,可以有多个表达式,所有表达式成立则验证通过,反之有任一个不成立则验证失败。
这里引入了一个“块”的概念。在 Spock 中,块可以类比成 html 中的标签。html 的标签的范围是两个标签之间,而 Spock 更简洁一些,从这个块开始到下一个块开始或代码结束的地方,就是它的范围。
where是“当….”的语义,比如“当a=1,b=2,c=3”,在Spock中,where一般会结合expect使用,正如上述样例所示,expect 块里面定义了三个变量 num1、num2、result,而这些变量可以在 where 块里定义。where 块使用了一种很像 markdown 中表格的定义方法。第一行或者说表头,列出了我们要传数据的变量名称,这里要与 expect 中对应,不能少但是可以多。其它行都是数据行,与表头一样都是通过 “|”号分隔。通过这样,spock 就会跑 3 次用例,分别是 1 / 1= 1、2 / 1 = 2、1 / 2 = 0.5 这些用例,后面再扩充用例只要再加一行数据就可以了。
在实际编码过程中,我们对于要使用“|”符号对齐不同长度的变量和数据这件事情,感到不方便,虽然事实上不对齐也是可以用的,但我们显然不会这么干,这个时候很多人会选择使用“代码格式化”,这个方法未尝不可,但这里我为了要介绍两个Groovy语法而使用了另外一个方案:
    def divideTest2() {
        expect:
        num1 / num2 == result
        where:
        num1 << [1, 2, 1]
        num2 << [1, 1, 2]
        result << [1, 2, 0.5]
    }
“<<”符号(注意方向)是把右边的值赋值给左边的语义,而“[”、“]”跟Java一样是数组的语义,那么把数组赋值给变量在这里是按照数组中的顺序依次赋值的语义。
3.测试结果说明以及改进
以2中最后一个例子来看,在idea运行会有如下结果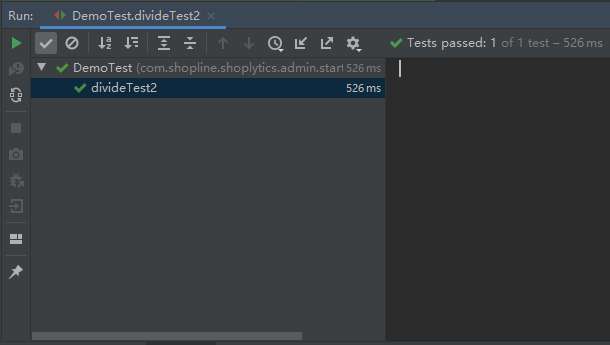
那么失败会是怎样呢,我们把where块的第二行改为:
num2 << [1, 2, 1]
结果如下: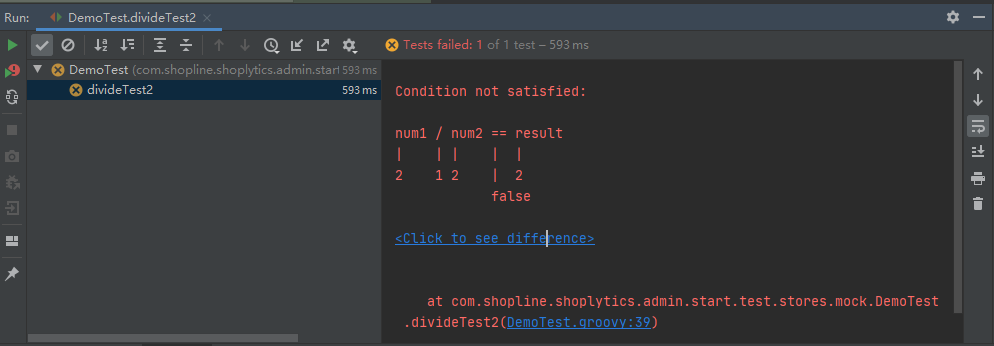
简单解释一下:指向各个变量的数字表示用例的输入,指向“==”的“false”表示实际断言,而多出来的一个数字是表达式实际运行的结果。
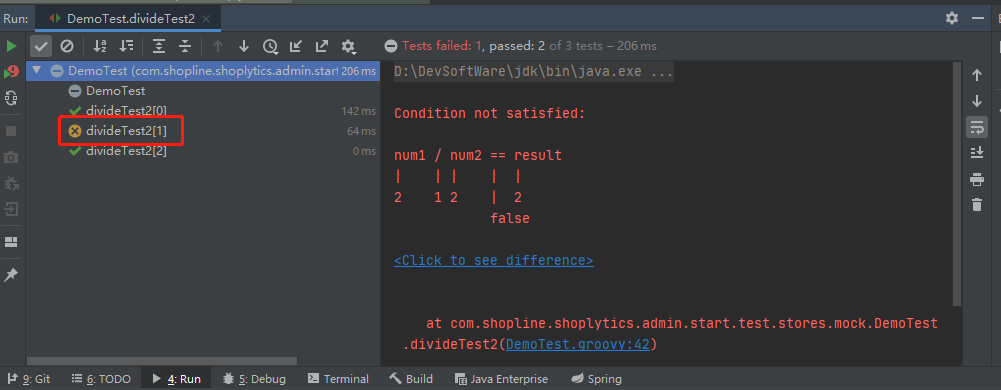
问题来了,在输入的用例中我怎么知道是哪一条出了问题呢,难道要肉眼一一对照吗?Spock也知道了这个问题,于是就有了@Unroll注解
    @Unroll
    def divideTest2() {
        expect:
        num1 / num2 == result
        where:
        num1 << [1, 2, 1]
        num2 << [1, 2, 2]
        result << [1, 2, 0.5]
    }
4.抛出异常的用例
我们看回开篇所示的样例代码:
    def divideException() {
        given:
        def num1 = 1
        and:
        def num2 = 0
        when:
        num1 / num2
        then:
        def ex = thrown(ArithmeticException)
        ex.message == "Division by zero"
    }
先解释一下when和then关键字,它们通常是成对出现的,是“当…则…”的语义,代表着当执行了 when 块中的操作,会出现 then 块中的期望。而given是“给出”的语义,通常用来定义一些下文要使用的变量。而“thrown”方法是抛出异常的语义。
整段代码的语义如下:
给出num1=1,num2=0,当执行num1 / num2 表达式时,期望会抛出 ArithmeticException 异常,并且异常信息是 “Division by zero”。
5.实用的Mock用例
以下是一个Service层mock中台接口返回数据的样例(只列出Service类方法,详情请参考:https://git.yy.com/opensource/shopline/sl-ec-shoplytics
feature/luoruihua/1.1.0分支)
相关类:
@Service
public class MultipleStoreService {

    @Autowired
    MultipleStoreRemote multipleStoreRemote;


    /**
     * 店铺对比数据查询
     *
     * @param multipleStoreCompareReqDTO
     *
     * @return
     */
    public PageResponse<MultipleStoreCompareRspDTO> getStoreCompareData(final MultipleStoreCompareReqDTO multipleStoreCompareReqDTO) {
        final StoreBasePageReqBean reqBean = MultipleStoreMapping.INSTANCE.toCompareReq(multipleStoreCompareReqDTO);
        reqBean.setWhere(this.getWhereStr(multipleStoreCompareReqDTO.getSellerId(), multipleStoreCompareReqDTO.getStoreIds()));
        return MultipleStoreMapping.INSTANCE.toStoreCompareRsp(
                this.multipleStoreRemote.getStoreCompareData(reqBean));
    }

    @NotNull
    private String getWhereStr(final Long sellerId, final String[] storeIds) {
        return "seller_id = " + sellerId + "and store_id in (" +
                String.join(",", storeIds) +
                ")";
    }
}
测试代码:
class MultipleStoreServiceMockTest extends Specification {
    MultipleStoreService multipleStoreService = new MultipleStoreService()
    MultipleStoreRemote multipleStoreRemote = Mock(MultipleStoreRemote)

    def setup(){
        multipleStoreService.multipleStoreRemote = multipleStoreRemote
    }

    def mockRemoteTest() {
        given:
        def sellerId = 1L
        def storeId = "30"
        when:
        def result = multipleStoreService.getStoreCompareData(buildReq(sellerId, storeId))
        then:
        1 * multipleStoreRemote.getStoreCompareData(_) >> buildRemoteCompareRsp(10)
        print(result)
        then:
        10 == result.getTotal()
    }

    def buildReq(Long sellerId, String storeId) {
        MultipleStoreCompareReqDTO reqDTO = new MultipleStoreCompareReqDTO()
        reqDTO.with {
            reqDTO.sellerId = sellerId
            String[] storeIds = new String[1]
            storeIds[0] = storeId
            reqDTO.storeIds = storeIds
            startTime = LocalDateTime.now().plusDays(-30L).toEpochSecond(ZoneOffset.of("+8")) * 1000
            endTime = LocalDateTime.now().toEpochSecond(ZoneOffset.of("+8")) * 1000
            pageNo = 1
            pageSize = 1000
        }
        return reqDTO
    }

    def buildRsp(int size) {
        PageResponse<MultipleStoreCompareRspDTO> rsp = new PageResponse<MultipleStoreCompareRspDTO>()
        rsp.with {
            pageSize = size
            pageNum = 1
            total = size
            lastPage = true
            list = buildMultipleStoreCompareRspDTOList(size)
        }
        return rsp;
    }

    def buildMultipleStoreCompareRspDTOList(int size) {
       //buildMock对象的方法略
    }
}
Spock 使用 mock 也很简单,直接使用 Mock(类) 就可以了。如上代码
MultipleStoreRemote multipleStoreRemote = Mock(MultipleStoreRemote)
上面的例子中有几点要说明一下:
1.setup()是每个方法执行前都会调用的
其他类似的公共方法如下
def setup() {
        println "方法开始前初始化"
    }

    def cleanup() {
        println "方法执行完清理"
    }

    def setupSpec() {
        println "类加载前开始前初始化"
    }

    def cleanupSpec() {
        println "所有方法执行完清理"
    }
2.print是打印函数
3.“with{}”语法用来赋值对象的属性,可以直接用:属性名=赋值内容,不需要调用set方法
4.“>>”用来表示模拟对象的返回值,当方法执行的时候会Mock成“>>”后面的值
5下划线“_”表示匹配所有的输入值
6.“1 * ”代表方法执行一次,1可以替换成任意自然数
可以看出用Spock进行Mock测试十分便捷,本身只需要像mockRemoteTest方法的几行代码就可以实现Mock测试,当然也可以像示例代码一样自己编写一些build方法,从而达到Mock对象逻辑可复用的目的
四、参考资料:
https://github.com/spockframework/spock-example/tree/master/src/test/groovy
https://aurogon.yuque.com/docs/share/e76e12b3-3c2e-478c-8092-cab2b6ceef5b?#
1 人点赞


若有收获,就点个赞吧
0 人点赞
