前置工作
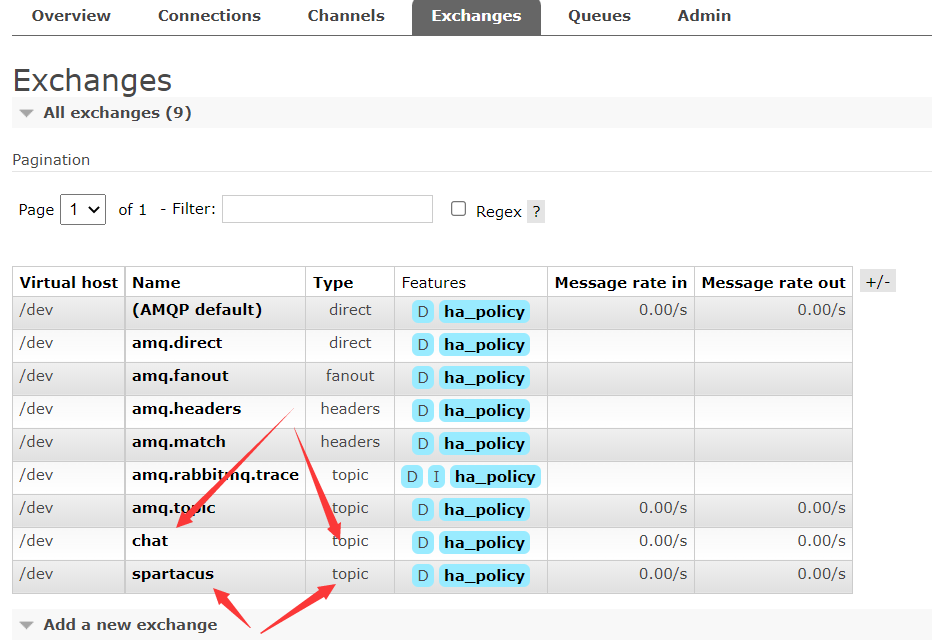
提前在rabbitmq上创建好topic、queue,并设置好route,将topic与queue关联起来!说明:下文创建的chat及其queue是给后面的聊天应用使用的,并非数据同步使用,在这里一并创建好得了。
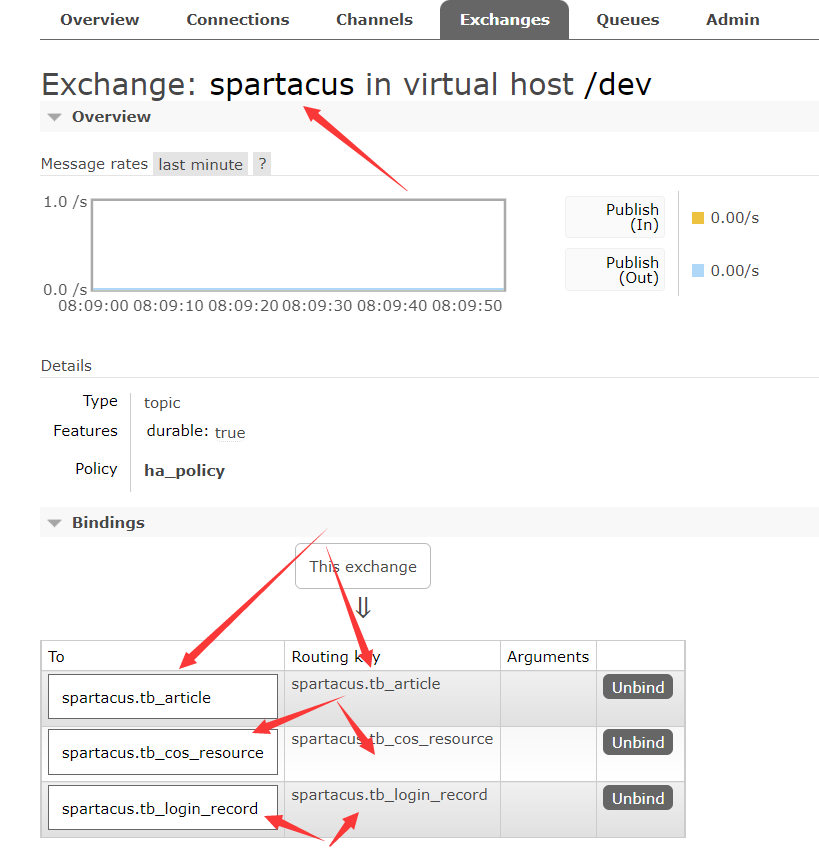
创建两个topic:chat、spartacus
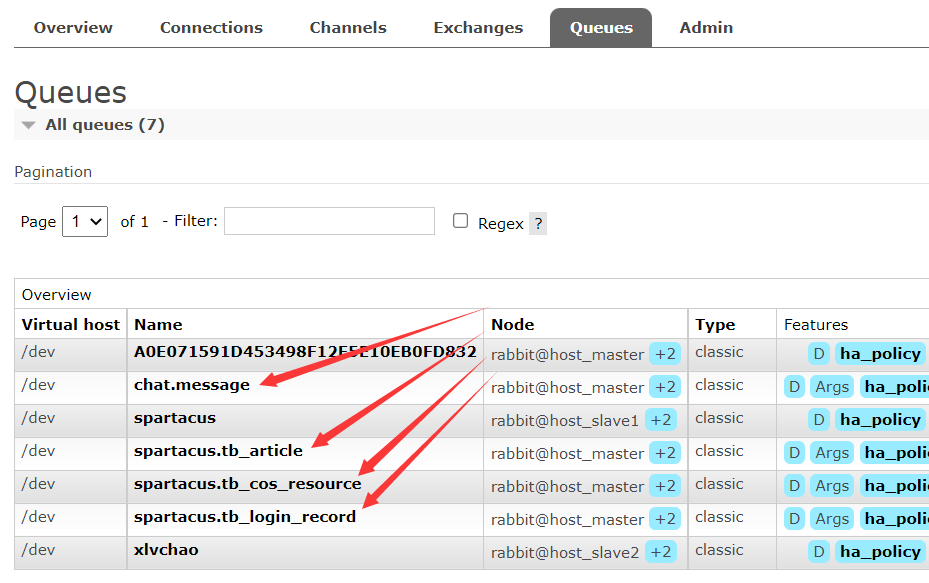
创建4个queue:chat.message、spartacus.tb_article、spartacus.tb_cos_resource、spartacus.tb_login_record
创建路由,并将topic与queue关联起来:

一、启动3个节点
重要说明:下面使用的镜像是我自己构建的镜像,不能使用官方镜像!我构建的这个镜像支持传入更多的启动命令参数。#节点1docker run -d --restart always --hostname maxwell1 --name maxwell1 xlvchao/maxwell:1.33.0 --log_level=DEBUG --producer=rabbitmq --daemon=true --output_nulls=true --jdbc_options='autoReconnet=true' --host 10.0.0.5 --port=3306 --user=root --password=Pwd@123 --filter='exclude:*.*,include:spartacus.tb_cos_resource,include: spartacus.tb_article,include: spartacus.tb_login_record' --rabbitmq_host=10.0.0.3 --rabbitmq_port=5672 --rabbitmq_user=root --rabbitmq_pass=Pwd@123 --rabbitmq_virtual_host=/dev --rabbitmq_exchange=spartacus --rabbitmq_exchange_type=topic --rabbitmq_exchange_durable=true --rabbitmq_exchange_autodelete=false --rabbitmq_routing_key_template='%db%.%table%' --rabbitmq_message_persistent=true --rabbitmq_declare_exchange=true --ha --raft_member_id=A --jgroups_config=raft.xml#节点2docker run -d --restart always --hostname maxwell2 --name maxwell2 xlvchao/maxwell:1.33.0 --log_level=DEBUG --producer=rabbitmq --daemon=true --output_nulls=true --jdbc_options='autoReconnet=true' --host 10.0.0.5 --port=3306 --user=root --password=Pwd@123 --filter='exclude:*.*,include:spartacus.tb_cos_resource,include: spartacus.tb_article,include: spartacus.tb_login_record' --rabbitmq_host=10.0.0.3 --rabbitmq_port=5672 --rabbitmq_user=root --rabbitmq_pass=Pwd@123 --rabbitmq_virtual_host=/dev --rabbitmq_exchange=spartacus --rabbitmq_exchange_type=topic --rabbitmq_exchange_durable=true --rabbitmq_exchange_autodelete=false --rabbitmq_routing_key_template='%db%.%table%' --rabbitmq_message_persistent=true --rabbitmq_declare_exchange=true --ha --raft_member_id=B --jgroups_config=raft.xml#节点3docker run -d --restart always --hostname maxwell3 --name maxwell3 xlvchao/maxwell:1.33.0 --log_level=DEBUG --producer=rabbitmq --daemon=true --output_nulls=true --jdbc_options='autoReconnet=true' --host 10.0.0.5 --port=3306 --user=root --password=Pwd@123 --filter='exclude:*.*,include:spartacus.tb_cos_resource,include: spartacus.tb_article,include: spartacus.tb_login_record' --rabbitmq_host=10.0.0.3 --rabbitmq_port=5672 --rabbitmq_user=root --rabbitmq_pass=Pwd@123 --rabbitmq_virtual_host=/dev --rabbitmq_exchange=spartacus --rabbitmq_exchange_type=topic --rabbitmq_exchange_durable=true --rabbitmq_exchange_autodelete=false --rabbitmq_routing_key_template='%db%.%table%' --rabbitmq_message_persistent=true --rabbitmq_declare_exchange=true --ha --raft_member_id=C --jgroups_config=raft.xml#日志级别log_level=DEBUG#输出地producer=rabbitmq#以后台守护进程执行daemon=true#监控的数据库, mysql用户必须拥有读取binlog权限和新建库表的权限host=10.0.0.5user=rootport=3306password=Pwd@123#records include fields with null values (default true).#If this is false, fields where the value is null will be omitted entirely from outputoutput_nulls=true#options to pass into the jdbc connection, given as opt=val&opt2=val2jdbc_options=autoReconnet=true#监控数据库中的哪些表filter=exclude: *.*,include: spartacus.tb_cos_resource,include: spartacus.tb_article,include: spartacus.tb_login_record#每台实例的replica_server_id 、 client_id必须唯一(默认值是1、maxwell)#集群部署时请忽略这两项配置,保持默认值即可,或者各个节点配置成一样的值!replica_server_id=123client_id=maxwell#rabbitmq相关配置rabbitmq_host=10.0.5rabbitmq_port=5672rabbitmq_user=rootrabbitmq_pass=Pwd@123rabbitmq_virtual_host=/devrabbitmq_exchange=spartacusrabbitmq_exchange_type=topicrabbitmq_exchange_durable=truerabbitmq_exchange_autodelete=falserabbitmq_routing_key_template=%db%.%table%rabbitmq_message_persistent=truerabbitmq_declare_exchange=true#下面两项是高可用配置--raft_member_id=C--jgroups_config=raft.xml#配置文件:https://github.com/xlvchao/spartacus/tree/main/docs/maxwell/raft.xml注:相关topic、routing_key、queue都要事先在rabbitmq上创建好!exchange(topic): spartacusrouting_key: spartacus.tb_cos_resource、spartacus.tb_article、spartacus.tb_login_recordqueue: spartacus.tb_cos_resource、spartacus.tb_article、spartacus.tb_login_record
二、容器启动后(maxwell数据库创建完成),执行一次全量同步
#初始化同步用户#创建一个有同步数据的用户maxwellcreate user 'maxwell'@'*' identified by 'maxwell';#此用户maxwell要有对需要同步的数据库表有操作权限grant all privileges on spartacus.* to 'maxwell'@'%' identified by 'maxwell';#给maxwell有同步数据的权限grant select,replication client,replication slave on *.* to 'maxwell'@'%' identified by 'maxwell';# Maxwell需要在schema_database选项指定的数据库中存储状态的权限(默认库名称为maxwell)grant all privileges on maxwell.* to 'maxwell'@'%' identified by 'maxwell';#创建全量同步任务(而后maxwell会自动触发执行,将mysql数据同步到rabbitmq中)insert into maxwell.bootstrap (database_name, table_name, client_id) values ('spartacus', 'tb_cos_resource', 'maxwell');insert into maxwell.bootstrap (database_name, table_name, client_id) values ('spartacus', 'tb_article', 'maxwell');insert into maxwell.bootstrap (database_name, table_name, client_id) values ('spartacus', 'tb_login_record', 'maxwell');注意:此处client_id要与一中的入参client_id必须一样!
全量同步执行完后(maxwell.bootstrap表里查看是否同步任务已执行完成),去rabbitmq控制台,查看对应的queue里有没有数据,有的话(前提是表里有数据)说明数据同步的第1步成功了,剩下的工作就交给后面的datasyner集群吧!
如果搞不定,请加群讨论,扫码关注,发送“加群”

若有收获,就点个赞吧
0 人点赞
