前置知识
后台启动容器:docker-compose up -d查看容器运行情况:docker-compose ps停止容器:docker-compose stop启动容器:docker-compose start停止并删除容器:docker-compose down停止并删除容器并删除volume:docker-compose down --volumesrm -rf /data/es/{es01,es02,es03}/data && rm -rf /data/es/{es01,es02,es03}/log
1、防止JVM报错
修改宿主机配置:vi /etc/sysctl.conf末尾追加:vm.max_map_count=262145保存后执行(最好重启服务器):sysctl -p
2、搭建es集群
1、创建映射目录mkdir -p /data/es/{es01,es02,es03}/data && \mkdir -p /data/es/{es01,es02,es03}/log && \mkdir -p /data/es/plugins/elasticsearch-analysis-ik-7.2.0下载分词器:https://github.com/medcl/elasticsearch-analysis-ik/releases/download/v7.2.0/elasticsearch-analysis-ik-7.2.0.zip解压到:/data/es/plugins/elasticsearch-analysis-ik-7.2.0授权(因为es集群是使用非root用户启动的):chmod -R 777 /data/es2、创建docker-compose.ymlversion: "3.4"services:es01:image: docker.elastic.co/elasticsearch/elasticsearch:7.2.0container_name: es01restart: alwaysenvironment:- node.name=es01- cluster.name=spartacus- node.master=true- node.data=true- discovery.seed_hosts=es01,es02,es03- cluster.initial_master_nodes=es01,es02,es03- http.cors.enabled=true- http.cors.allow-origin="*"- xpack.security.enabled=true- xpack.security.transport.ssl.enabled=true- xpack.security.transport.ssl.keystore.type=PKCS12- xpack.security.transport.ssl.verification_mode=certificate- xpack.security.transport.ssl.keystore.path=/usr/share/elasticsearch/config/elastic-certificates.p12- xpack.security.transport.ssl.truststore.path=/usr/share/elasticsearch/config/elastic-certificates.p12- xpack.security.transport.ssl.truststore.type=PKCS12- bootstrap.memory_lock=true- "ES_JAVA_OPTS=-Xms512m -Xmx512m"- "TZ=Asia/Shanghai"ulimits:memlock:soft: -1hard: -1nofile:soft: 65536hard: 65536ports:- "9200:9200"- "9300:9300"volumes:- ./elastic-certificates.p12:/usr/share/elasticsearch/config/elastic-certificates.p12- /data/es/es01/data:/usr/share/elasticsearch/data- /data/es/es01/log:/usr/share/elasticsearch/log- /data/es/plugins:/usr/share/elasticsearch/pluginsnetworks:- net-eses02:image: docker.elastic.co/elasticsearch/elasticsearch:7.2.0container_name: es02restart: alwaysenvironment:- node.name=es02- cluster.name=spartacus- node.master=true- node.data=true- discovery.seed_hosts=es01,es02,es03- cluster.initial_master_nodes=es01,es02,es03- http.cors.enabled=true- http.cors.allow-origin="*"- xpack.security.enabled=true- xpack.security.transport.ssl.enabled=true- xpack.security.transport.ssl.keystore.type=PKCS12- xpack.security.transport.ssl.verification_mode=certificate- xpack.security.transport.ssl.keystore.path=/usr/share/elasticsearch/config/elastic-certificates.p12- xpack.security.transport.ssl.truststore.path=/usr/share/elasticsearch/config/elastic-certificates.p12- xpack.security.transport.ssl.truststore.type=PKCS12- bootstrap.memory_lock=true- "ES_JAVA_OPTS=-Xms512m -Xmx512m"- "TZ=Asia/Shanghai"ulimits:memlock:soft: -1hard: -1nofile:soft: 65536hard: 65536ports:- "9201:9200"- "9301:9300"volumes:- ./elastic-certificates.p12:/usr/share/elasticsearch/config/elastic-certificates.p12- /data/es/es02/data:/usr/share/elasticsearch/data- /data/es/es02/log:/usr/share/elasticsearch/log- /data/es/plugins:/usr/share/elasticsearch/pluginsnetworks:- net-eses03:image: docker.elastic.co/elasticsearch/elasticsearch:7.2.0container_name: es03restart: alwaysenvironment:- node.name=es03- cluster.name=spartacus- node.master=true- node.data=true- discovery.seed_hosts=es01,es02,es03- cluster.initial_master_nodes=es01,es02,es03- http.cors.enabled=true- http.cors.allow-origin="*"- xpack.security.enabled=true- xpack.security.transport.ssl.enabled=true- xpack.security.transport.ssl.keystore.type=PKCS12- xpack.security.transport.ssl.verification_mode=certificate- xpack.security.transport.ssl.keystore.path=/usr/share/elasticsearch/config/elastic-certificates.p12- xpack.security.transport.ssl.truststore.path=/usr/share/elasticsearch/config/elastic-certificates.p12- xpack.security.transport.ssl.truststore.type=PKCS12- bootstrap.memory_lock=true- "ES_JAVA_OPTS=-Xms512m -Xmx512m"- "TZ=Asia/Shanghai"ulimits:memlock:soft: -1hard: -1nofile:soft: 65536hard: 65536ports:- "9202:9200"- "9302:9300"volumes:- ./elastic-certificates.p12:/usr/share/elasticsearch/config/elastic-certificates.p12- /data/es/es03/data:/usr/share/elasticsearch/data- /data/es/es03/log:/usr/share/elasticsearch/log- /data/es/plugins:/usr/share/elasticsearch/pluginsnetworks:- net-esnetworks:net-es:driver: bridge3、生成证书文件,用于es各节点之间进行ssl通信#启一个临时容器,用于创建证书用docker run -d --name es -p 9200:9200 -p 9300:9300 -e "discovery.type=single-node" elasticsearch:7.2.0#进入容器docker exec -it es /bin/bash#生成ca: elastic-stack-ca.p12(enter键跳过设置证书名称、密码)./bin/elasticsearch-certutil ca#再生成cert: elastic-certificates.p12(enter键跳过设置证书名称、密码)#退出容器,拷贝证书至宿主机(与docker-compose.yml同目录)docker cp es:/usr/share/elasticsearch/elastic-certificates.p12 .#销毁临时es容器docker stop esdocker rm es4、授权chmod 777 elastic-certificates.p12chmod 777 docker-compose.yml5、后台启动docker-compose up -d6、设置密码(多个节点只需要设置其中一个即可)进入任意一个容器:docker exec -it --user root es01 /bin/bash设置密码:./bin/elasticsearch-setup-passwords interactive#控制台交互....温馨提示:建议所有密码都设置一样,方便记忆,比如Pwd@123
3、搭建Logstash
1、创建logstash配置文件(/apps/logstash/logstash.conf)input {tcp {mode => "server"host => "0.0.0.0" #监听指定的IP,此处为不限制来源IPport => 4560codec => json_lines}}filter {#增加一个字段,计算 timestamp 8小时ruby {code => "event.set('timestamp', event.get('@timestamp').time.utc+8*60*60)"}#用 mutate 插件先转换为 string 类型,gsub只处理string类型的数据#再用正则匹配,最终得到想要的日期mutate {convert => ["timestamp", "string"]gsub => ["timestamp", "T([\S\s]*?)Z", ""]gsub => ["timestamp", "-", "."]}}output {if "spartacus-discovery" == [applicationName] {elasticsearch {hosts => ["10.0.0.5:9200","10.0.0.5:9201","10.0.0.5:9202"]action => "index"codec => jsonindex => "spartacus-discovery-logs-%{timestamp}"user => elasticpassword => "Pwd@123"}}if "spartacus-article" == [applicationName] {elasticsearch {hosts => ["10.0.0.5:9200","10.0.0.5:9201","10.0.0.5:9202"]action => "index"codec => jsonindex => "spartacus-article-logs-%{timestamp}"user => elasticpassword => "Pwd@123"}}if "spartacus-auth" == [applicationName] {elasticsearch {hosts => ["10.0.0.5:9200","10.0.0.5:9201","10.0.0.5:9202"]action => "index"codec => jsonindex => "spartacus-auth-logs-%{timestamp}"user => elasticpassword => "Pwd@123"}}if "spartacus-chat" == [applicationName] {elasticsearch {hosts => ["10.0.0.5:9200","10.0.0.5:9201","10.0.0.5:9202"]action => "index"codec => jsonindex => "spartacus-chat-logs-%{timestamp}"user => elasticpassword => "Pwd@123"}}if "spartacus-comment" == [applicationName] {elasticsearch {hosts => ["10.0.0.5:9200","10.0.0.5:9201","10.0.0.5:9202"]action => "index"codec => jsonindex => "spartacus-comment-logs-%{timestamp}"user => elasticpassword => "Pwd@123"}}if "spartacus-datasyner" == [applicationName] {elasticsearch {hosts => ["10.0.0.5:9200","10.0.0.5:9201","10.0.0.5:9202"]action => "index"codec => jsonindex => "spartacus-datasyner-logs-%{timestamp}"user => elasticpassword => "Pwd@123"}}if "spartacus-gateway" == [applicationName] {elasticsearch {hosts => ["10.0.0.5:9200","10.0.0.5:9201","10.0.0.5:9202"]action => "index"codec => jsonindex => "spartacus-gateway-logs-%{timestamp}"user => elasticpassword => "Pwd@123"}}if "spartacus-monitor" == [applicationName] {elasticsearch {hosts => ["10.0.0.5:9200","10.0.0.5:9201","10.0.0.5:9202"]action => "index"codec => jsonindex => "spartacus-monitor-logs-%{timestamp}"user => elasticpassword => "Pwd@123"}}if "spartacus-friday" == [applicationName] {elasticsearch {hosts => ["10.0.0.5:9200","10.0.0.5:9201","10.0.0.5:9202"]action => "index"codec => jsonindex => "spartacus-friday-logs-%{timestamp}"user => elasticpassword => "Pwd@123"}}if "spartacus-sunday" == [applicationName] {elasticsearch {hosts => ["10.0.0.5:9200","10.0.0.5:9201","10.0.0.5:9202"]action => "index"codec => jsonindex => "spartacus-sunday-logs-%{timestamp}"user => elasticpassword => "Pwd@123"}}if "spartacus-resource" == [applicationName] {elasticsearch {hosts => ["10.0.0.5:9200","10.0.0.5:9201","10.0.0.5:9202"]action => "index"codec => jsonindex => "spartacus-resource-logs-%{timestamp}"user => elasticpassword => "Pwd@123"}}if "spartacus-system" == [applicationName] {elasticsearch {hosts => ["10.0.0.5:9200","10.0.0.5:9201","10.0.0.5:9202"]action => "index"codec => jsonindex => "spartacus-system-logs-%{timestamp}"user => elasticpassword => "Pwd@123"}}}注:input中的tcp输入块可配置多个,表示logstash后端会起多个线程监听多个输入源(可利用这个特点变相实现单节点logstash的高可用)input、output配置项可参考:https://www.elastic.co/guide/en/logstash/current/plugins-inputs-tcp.html#plugins-inputs-tcp-host2、创建docker-compose.ymlversion: "3.4"services:logstash:image: logstash:7.2.0container_name: logstashrestart: alwaysvolumes:- /apps/logstash/logstash.conf:/usr/share/logstash/pipeline/logstash.confports:- 4560:4560networks:- net-ltnetworks:net-lt:driver: bridge3、授权chmod 777 docker-compose.yml4、后台启动logstashdocker-compose up -d5、安装json_lines插件# 进入logstash容器docker exec -it logstash /bin/bash# 进入bin目录cd /bin/# 安装插件logstash-plugin install logstash-codec-json_lines# 退出容器exit# 重启logstash服务docker restart logstash
4、搭建kibana
1、创建docker-compose.ymlversion: "3.4"services:kibana:image: kibana:7.2.0container_name: kibanarestart: alwaysenvironment:- SERVER_HOST="0.0.0.0"- ELASTICSEARCH_HOSTS=["http://10.0.0.5:9200","http://10.0.0.5:9201","http://10.0.0.5:9202"]- ELASTICSEARCH_USERNAME="elastic"- ELASTICSEARCH_PASSWORD=Pwd@123"ports:- "5601:5601"networks:- net-kbnetworks:net-kb:driver: bridge2、授权chmod 777 docker-compose.yml3、后台启动kibanadocker-compose up -d注意:如果创建索引模式报错: POST 403 (forbidden)查看索引状态:GET _cat/indices查看全局配置GET .kibana/_settings重点关注一个指标:read_only_allow_delete是否为true,如果是则置为false:PUT _settings{"index": {"blocks": {"read_only_allow_delete": "false"}}}
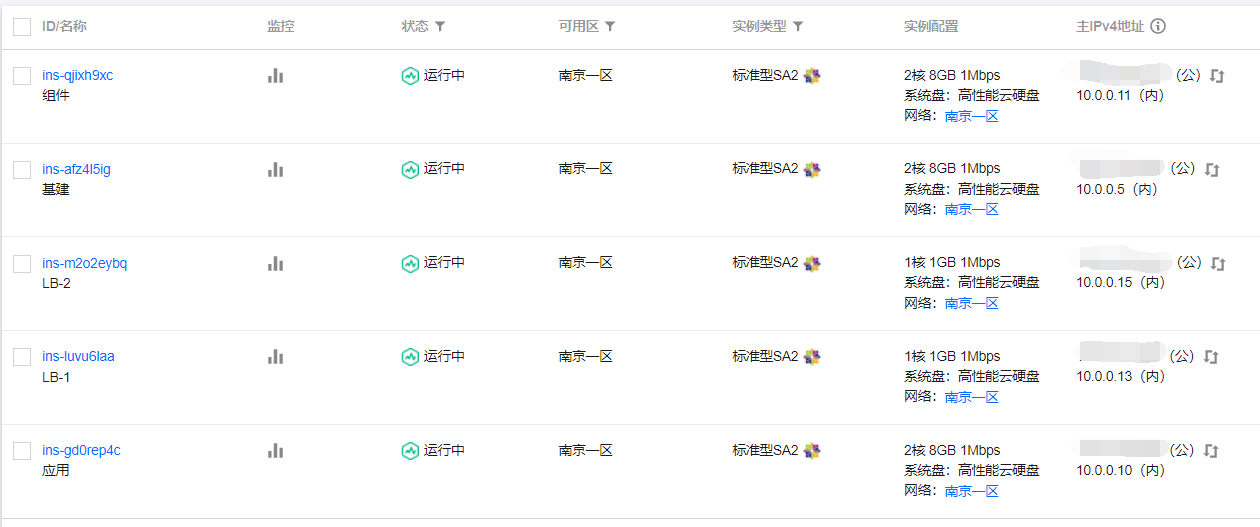
5、云服务器安全组
开放云服务器5601端口(kibana控制台访问端口):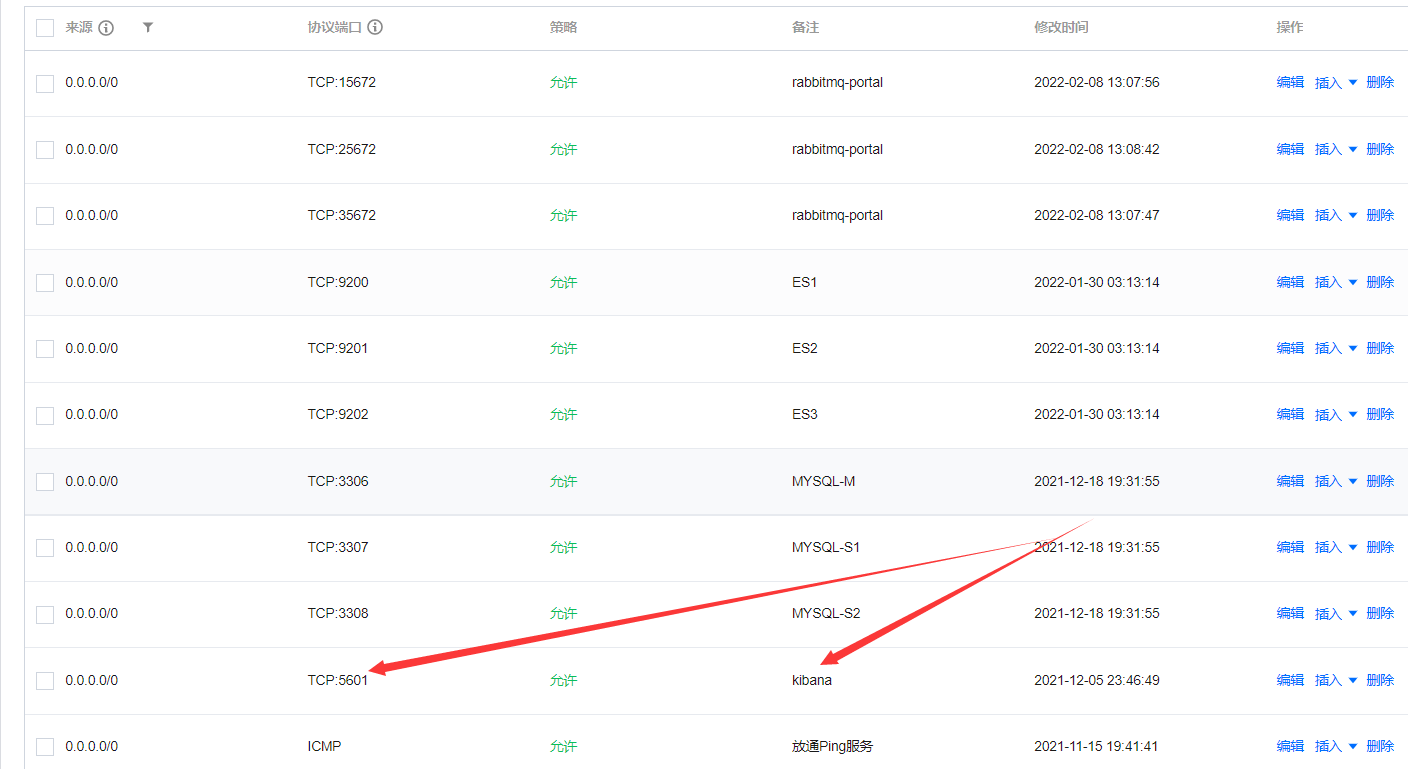
然后访问kibana控制台:
http://云主机公网IP:5601
账号密码即是 步骤2 中为各个账号设置的密码(如果认真操作了肯定知道我在说什么)!
如果搞不定,请加群讨论,扫码关注,发送“加群”

若有收获,就点个赞吧
0 人点赞
