- Set up Elasticsearch(设置ES)
- Installing Elasticsearch(安装ES)
- Configuring Elasticsearch(配置Elasticsearch)
- Config files location(配置文件位置)
- changing the path of the data and logs directories:(更改数据和日志目录的路径:)
- ">
- ">
- Environment variable substitution(环境变量替代)
- Setting JVM options(设置JVM选项:)
- Secure settings(安全设置)
- Auditing security settings(审核安全设置)
- Circuit breaker settings(熔断器设置)
- Cluster-level shard allocation and routing settings(集群级分片分配和路由设置)
- Important System Configuration(重要系统配置)
- Disable swapping(禁用交换)
- File Descriptors (文件描述符)
- Virtual memory(虚拟内存)
- Number of threads(线程数)
- DNS cache settings(DNS缓存设置)
- JNA temporary directory not mounted with
noexec(JNA临时目录未用noexec挂载) - TCP retransmission timeout(TCP重传超时)

Set up Elasticsearch(设置ES)
Installing Elasticsearch(安装ES)
Install Elasticsearch from archive on Linux(从Linux上下载ES)
从Linux上的存档安装Elasticsearch
NOTE:
Elasticsearch includes a bundled version of OpenJDK from the JDK maintainers (GPLv2+CE). To use your own version of Java, see the JVM version requirements
Elasticsearch包含来自JDK维护者(GPLv2 + CE)的OpenJDK捆绑版。 要使用自己的Java版本,请参阅JVM版本要求。
wget https://artifacts.elastic.co/downloads/elasticsearch/elasticsearch-7.10.1-linux-x86_64.tar.gzwget https://artifacts.elastic.co/downloads/elasticsearch/elasticsearch-7.10.1-linux-x86_64.tar.gz.sha512shasum -a 512 -c elasticsearch-7.10.1-linux-x86_64.tar.gz.sha512 --1tar -xzf elasticsearch-7.10.1-linux-x86_64.tar.gzcd elasticsearch-7.10.1/ --2
- — 1
Compares the SHA of the downloaded
.tar.gzarchive and the published checksum, which should outputelasticsearch-{version}-linux-x86_64.tar.gz: OK.
比较下载的.tar.gz档案的SHA和校验,输出: elasticsearch-{version}-linux-x86_64.tar.gz: OK。
- — 2
This directory is known as
$ES_HOME.
此目录称为$ ES_HOME。
Alternatively, you can download the following package, which includes only Apache 2.0 licensed code: https://artifacts.elastic.co/downloads/elasticsearch/elasticsearch-oss-7.10.1-linux-x86_64.tar.gz
或者,您可以下载以下软件包,其中仅包含Apache 2.0许可的代码:
https://artifacts.elastic.co/downloads/elasticsearch/elasticsearch-oss-7.10.1-linux-x86_64.tar.gz
Enable automatic creation of system indices(启用自动创建系统索引)
Some commercial features automatically create indices within Elasticsearch. By default, Elasticsearch is configured to allow automatic index creation, and no additional steps are required. However, if you have disabled automatic index creation in Elasticsearch, you must configure
action.auto_create_indexinelasticsearch.ymlto allow the commercial features to create the following indices:
一些商业功能会在Elasticsearch中自动创建索引。默认情况下,Elasticsearch配置为允许自动创建索引,并且不需要其他步骤。
但是,如果你有Elasticsearch禁用自动创建索引,您必须配置 action.auto_create_index在elasticsearch.yml允许商业功能创建以下指标:
cat >> /opt/es1/config/elasticsearch.yml << EOFaction.auto_create_index: .monitoring*,.watches,.triggered_watches,.watcher-history*,.ml*EOF
Running Elasticsearch from the command line(命令行运行elasticsearch)
./bin/elasticsearch
Checking that Elasticsearch is running(检查Elasticsearch是否正在运行)
curl -X GET "localhost:9200/?pretty"
Running as a daemon(作为守护程序运行)
Log printing to
stdoutcan be disabled using the-qor--quietoption on the command line.
可以使用命令行上的-q或—quiet选项禁用将日志打印到stdout的功能。
./bin/elasticsearch -d -p pid
Configuring Elasticsearch on the command line(在命令行上配置Elasticsearch)
Any settings that can be specified in the config file can also be specified on the command line, using the -E syntax as follows:
可以在命令行上使用-E语法在配置文件中指定的任何设置也可以如下指定:
./bin/elasticsearch -d -Ecluster.name=my_cluster -Enode.name=node_1
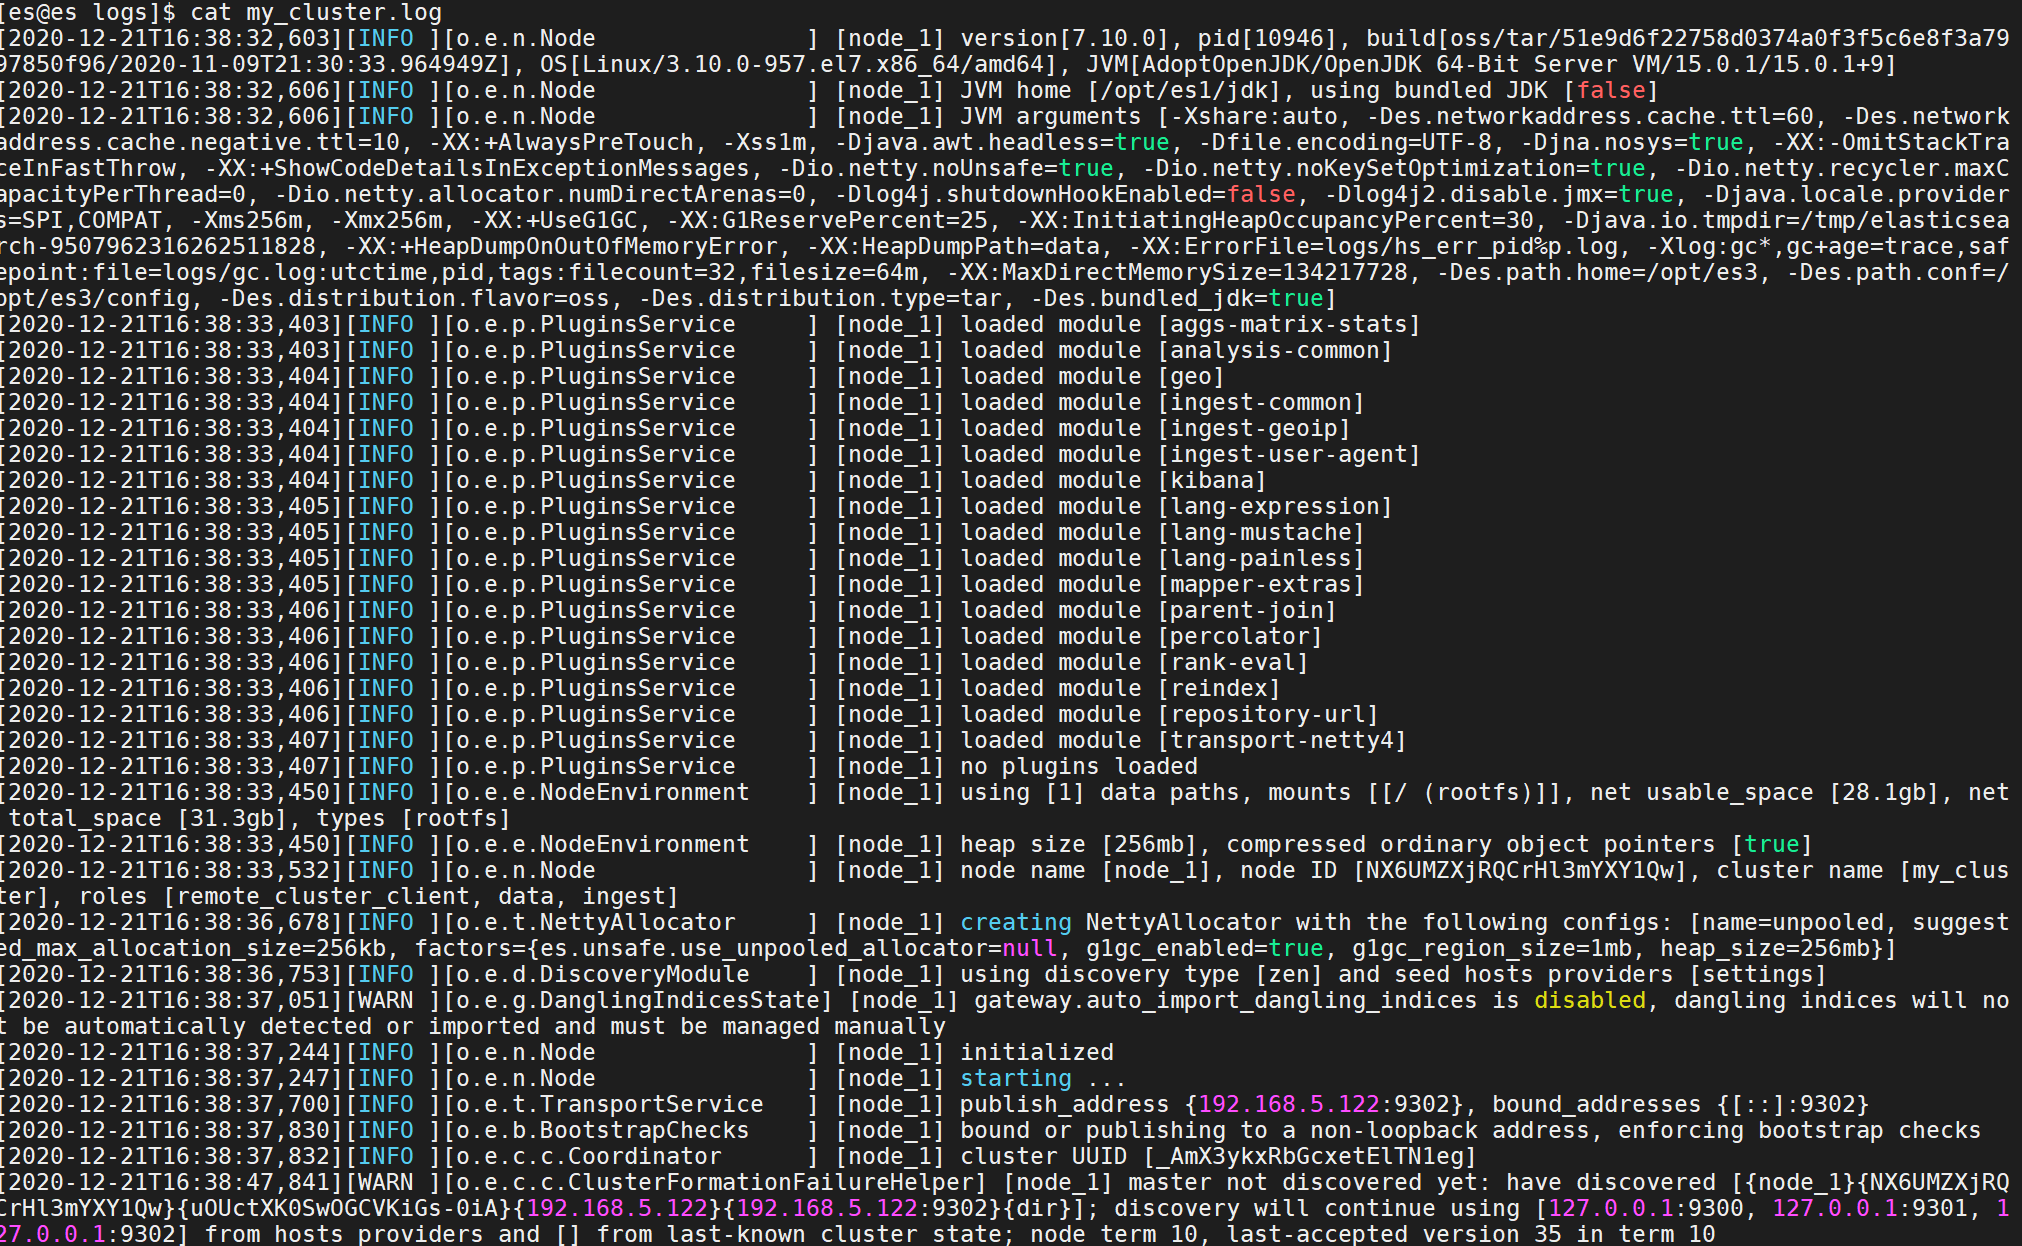
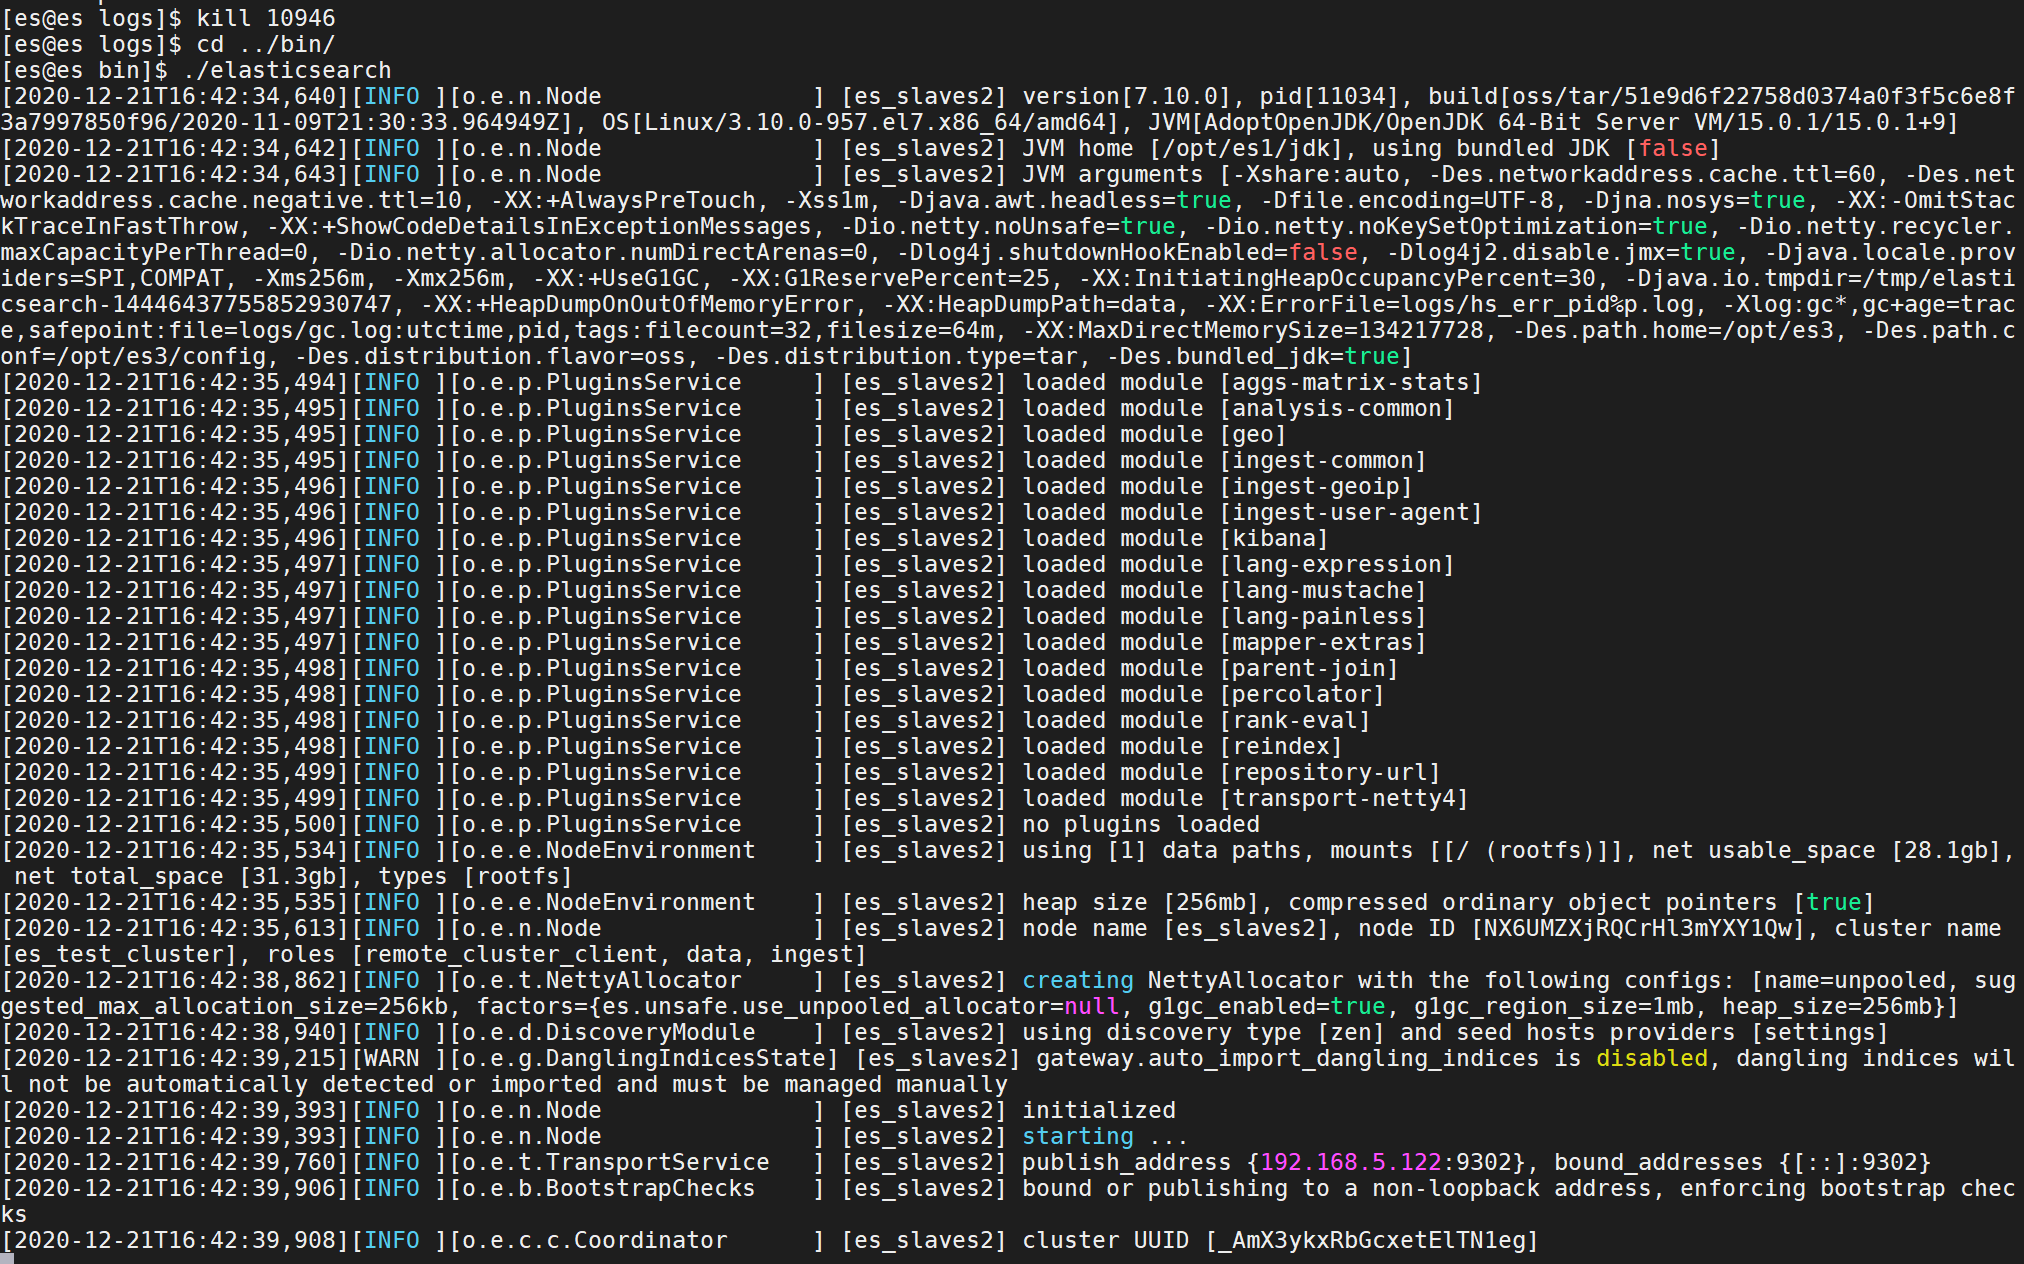
关闭后再次运行集群:
cd /opt/es3/bin./elasticsearch
第一张图的方式是临时性的,永久设置需要在$ES_HOME/config/elasticsearch.yml添加相应的配置
| Type | Description | Default Location | Setting |
|---|---|---|---|
| 类型 | 描述 | 默认位置 | 设置 |
| home | Elasticsearch home directory or $ES_HOME |
Directory created by unpacking the archive | |
| 家 | Elasticsearch主目录或 $ES_HOME |
通过解压缩存档创建目录 | |
| bin | Binary scripts including elasticsearch to start a node and elasticsearch-plugin to install plugins |
$ES_HOME/bin |
|
| 箱子 | 二进制脚本,包括elasticsearch启动节点和elasticsearch-plugin安装插件 |
||
| conf | Configuration files including elasticsearch.yml |
$ES_HOME/config |
ES_PATH_CONF |
配置文件包括 elasticsearch.yml |
|||
| data | The location of the data files of each index / shard allocated on the node. Can hold multiple locations. | $ES_HOME/data |
path.data |
| 数据 | 节点上分配的每个索引/分片的数据文件的位置。可以容纳多个位置。 | ||
| logs | Log files location. | $ES_HOME/logs |
path.logs |
| 日志 | 日志文件位置。 | ||
| plugins | Plugin files location. Each plugin will be contained in a subdirectory. | $ES_HOME/plugins |
|
| 外挂程式 | 插件文件位置。每个插件将包含在一个子目录中。 | ||
| repo | Shared file system repository locations. Can hold multiple locations. A file system repository can be placed in to any subdirectory of any directory specified here. | Not configured | path.repo |
| 回购 | 共享文件系统存储库位置。可以容纳多个位置。可以将文件系统存储库放置在此处指定的任何目录的任何子目录中。 | 未配置 |
Configuring Elasticsearch(配置Elasticsearch)
Config files location(配置文件位置)
Elasticsearch具有三个重要配置文件:
elasticsearch.yml用于配置Elasticsearchjvm.options用于配置Elasticsearch JVM设置log4j2.properties用于配置Elasticsearch日志记录
For the archive distributions, the config directory location defaults to
$ES_HOME/config. The location of the config directory can be changed via theES_PATH_CONFenvironment variable as follows:
对于压缩包发行版,配置目录位置默认为$ ES_HOME / config。 可以通过ES_PATH_CONF环境变量来更改config目录的位置,如下所示:
ES_PATH_CONF=/path/to/my/config ./bin/elasticsearch
或者,您可以通过命令行或您的Shell配置文件导出ES_PATH_CONF环境变量。
根据配置方式对群集和节点设置进行分类:
动态
Dynamic You can configure and update dynamic settings on a running cluster using the cluster update settings API. You can also configure dynamic settings locally on an unstarted or shut down node using
elasticsearch.yml.
使用集群API更新设置在正在运行的集群上配置和更新动态 。
也可以在本地未启动或关闭的节点上设置elasticsearch.yml
来配置动态。
静态
Static Static settings can only be configured on an unstarted or shut down node using
elasticsearch.yml.
只能在本地未启动或关闭的节点上设置elasticsearch.yml来配置静态。
changing the path of the data and logs directories:(更改数据和日志目录的路径:)
linux下的tar包解压使用会默认将数据和日志存储位置放在elasticsearch根目录下,elasticsearch不建议将数据和日志储存在es的根目录下,因为在以后的升级操作中,文件可能会造成丢失,所以我们要在es目录以外的建立专门存储这两个的目录
创建es用户组和用户的专属的数据存储和日志存储目录
mkdir -p /opt/es_storage/{data,logs}chown -R es:es /opt/es_storage

在elaseticsearch.yml中添加路径
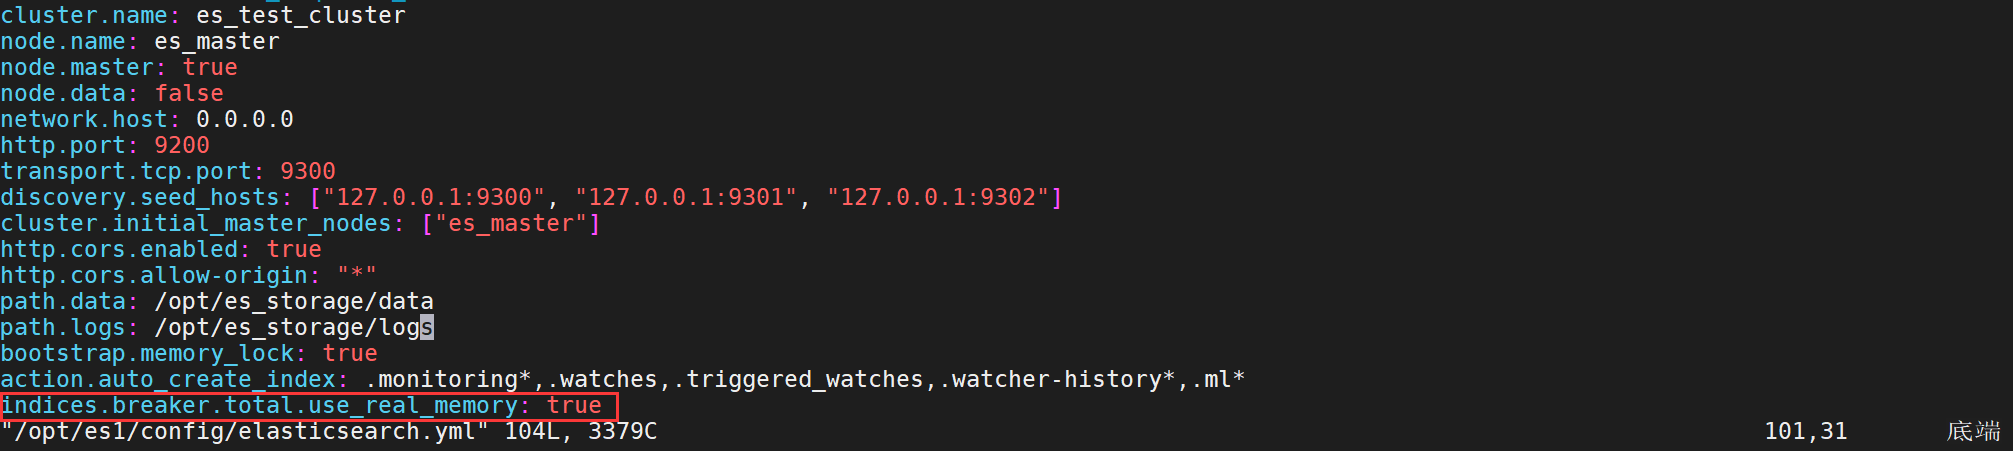
cat >> /opt/es1/config/elasticsearch.yml << EOFpath.data: /opt/es_storage/datapath.logs: /opt/es_storage/logsEOF

注:可以添加多个储存路径
但是elasticsearch不会平衡分片储存在每个路径上,因此会造成单个磁盘路径上的的高频率使用,一旦达到上限90%,elasticsearch便不会在向该节点储存分片,即使该节点其他路径上还存在磁盘空间。
再次运行elasticsearch
su escd /opt/es1/bin/./elasticsearch
修改后data和logs存储位置不在$ES_HOME下了,而在自定义目录/opt/es_storage目录下:
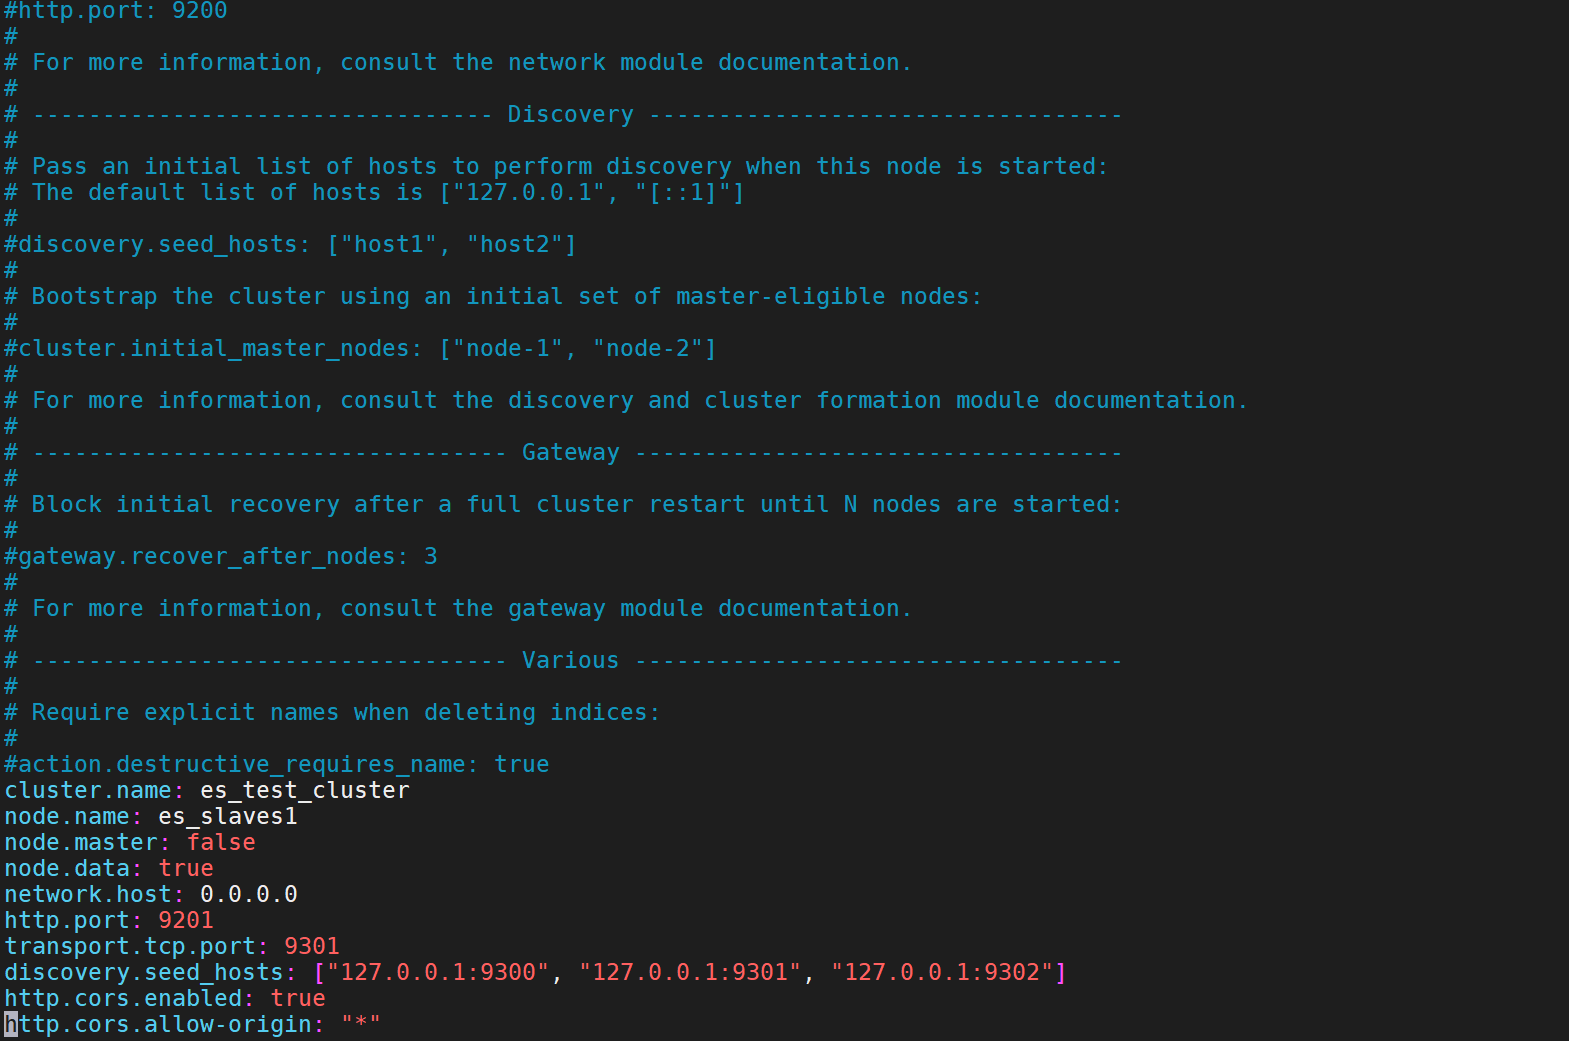
In YAML, you can format non-scalar values as sequences:
在YAML中,您可以将非标量值格式化为序列:
cat >> /opt/es1/config/elasticsearch <<EOFdiscovery.seed_hosts:- 127.0.0.1:9300- 127.0.0.1:9301- 127.0.0.1:9032EOF
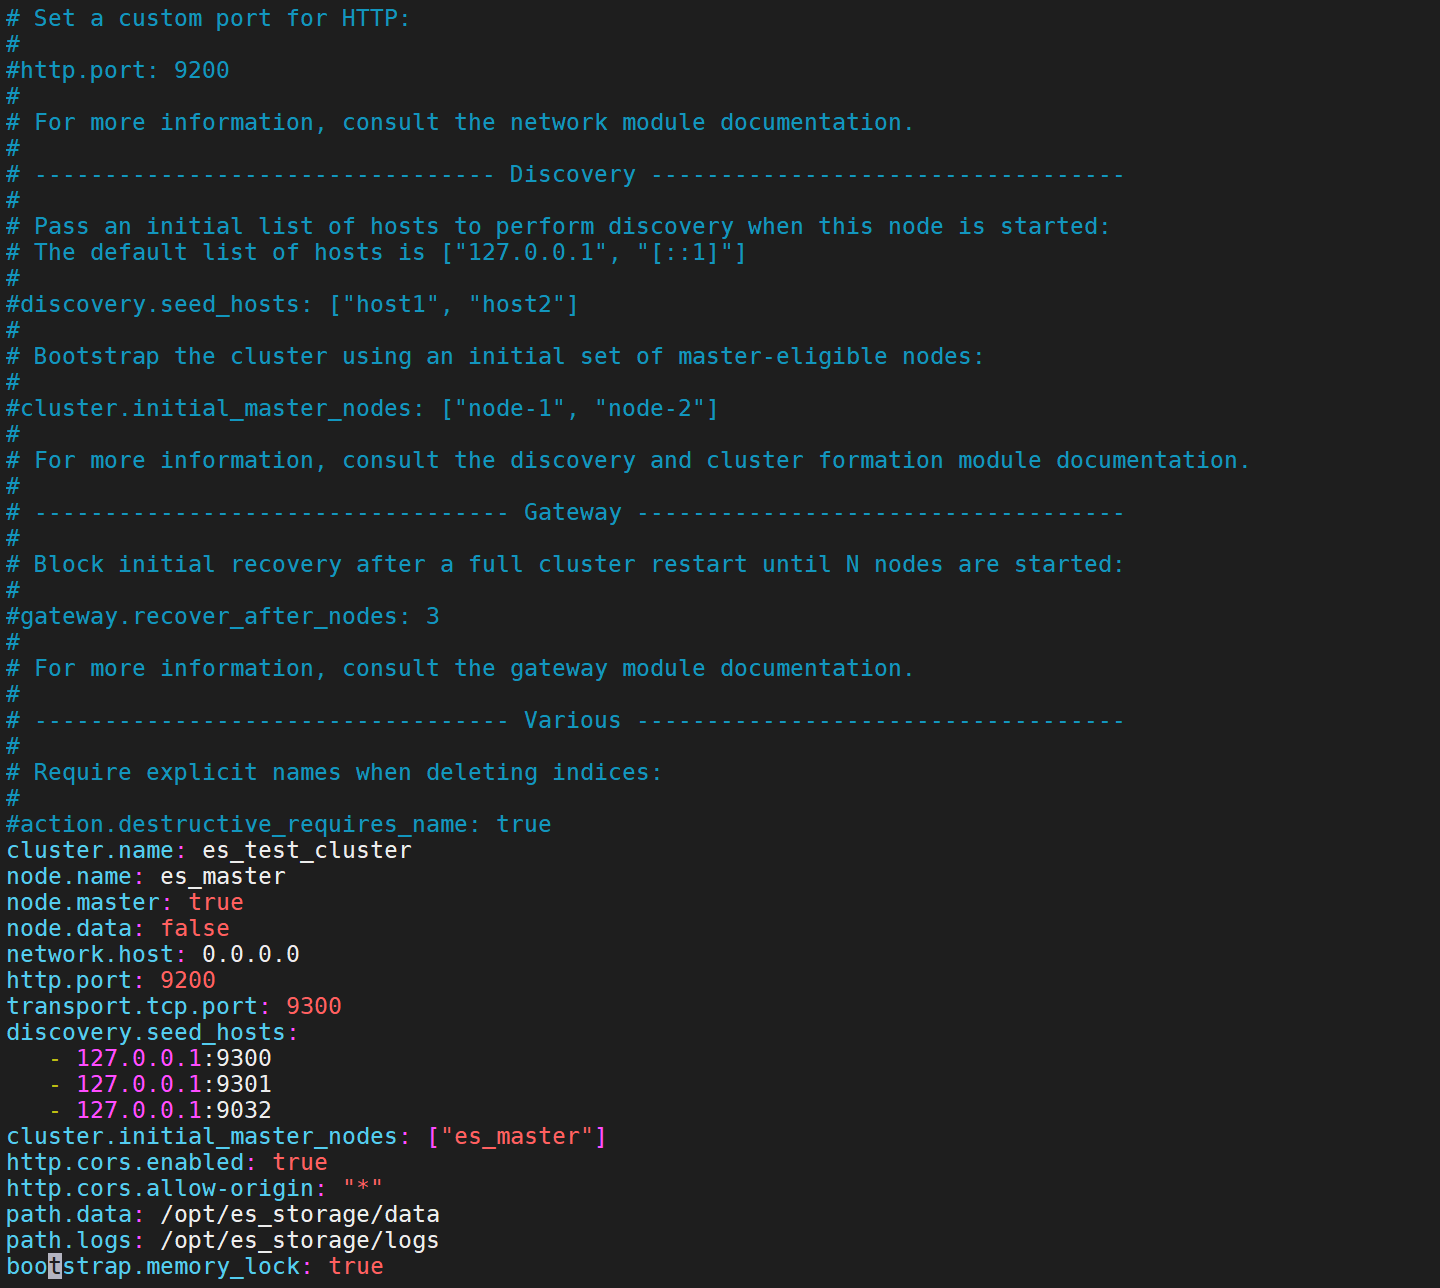
Though less common, you can also format non-scalar values as arrays:
尽管不太常见,您也可以将非标量值格式化为数组:
cat >> /opt/es1/config/elasticsearch << EOFdiscovery.seed_hosts: ["127.0.0.1:9300", "127.0.0.1:9301", "127.0.0.1:9302"]EOF
Environment variable substitution(环境变量替代)
Environment variables referenced with the ${...} notation within the configuration file will be replaced with the value of the environment variable. For example:
配置文件中用$ {…}标记引用的环境变量将替换为环境变量的值。 例如:
node.name: ${HOSTNAME}network.host: ${ES_NETWORK_HOST}
Values for environment variables must be simple strings. Use a comma-separated string to provide values that Elasticsearch will parse as a list. For example, Elasticsearch will split the following string into a list of values for the ${HOSTNAME} environment variable.
环境变量的值必须是简单的字符串。 使用逗号分隔的字符串提供Elasticsearch将解析为列表的值。 例如,Elasticsearch将以下字符串拆分为$ {HOSTNAME}环境变量的值列表。
export HOSTNAME=“host1,host2"
Setting JVM options(设置JVM选项:)
| -Xmx2g | lines beginning with a - are treated as a JVM option that applies independent of the version of the JVM |
以-开头的行被视为独立于JVM版本而应用的JVM选项 |
|---|---|---|
| 8:-Xmx2g |
lines beginning with a number followed by a : followed by a - are treated as a JVM option that applies only if the version of the JVM matches the number |
以数字开头接:后跟-的行被视为仅在JVM版本与数字匹配时才适用的JVM选项。 |
| 8-:-Xmx2g | lines beginning with a number followed by a - followed by a : are treated as a JVM option that applies only if the version of the JVM is greater than or equal to the number |
以数字接- 加:加-开头的行被视为JVM选项,仅在JVM版本大于或等于该数字时才适用 |
| 8-9:-Xmx2g |
lines beginning with a number followed by a - followed by a number followed by a : are treated as a JVM option that applies only if the version of the JVM falls in the range of the two numbers |
以数字接-加数字接:开头的行被视为JVM选项,仅当JVM版本在两个数字范围内时才适用 |
An alternative mechanism for setting Java Virtual Machine options is via the _**`ES_JAVA_OPTS`**_ environment variable. For instance:
设置Java虚拟机选项的另一种机制是通过ES_JAVA_OPTS环境变量。 例如:
export ES_JAVA_OPTS="$ES_JAVA_OPTS -Djava.io.tmpdir=/path/to/temp/dir"./bin/elasticsearch
Secure settings(安全设置)
Auditing security settings(审核安全设置)
use audit logging to record security-related events, such as authentication failures, refused connections, and data-access events.
使用审核日志记录来记录与安全性相关的事件,例如身份验证失败,拒绝连接和数据访问事件。
Circuit breaker settings(熔断器设置)
Elasticsearch contains multiple circuit breakers used to prevent operations from causing an OutOfMemoryError. Each breaker specifies a limit for how much memory it can use. Additionally, there is a parent-level breaker that specifies the total amount of memory that can be used across all breakers. Except where noted otherwise, these settings can be dynamically updated on a live cluster with the cluster-update-settings API.
Elasticsearch包含多个断路器,用于防止操作引起OutOfMemoryError(内存溢出错误)。
每个熔断器都指定了可以使用多少内存的限制。
此外,还有一个父级断路器,它指定了可在所有熔断中使用的内存总量。
除非另有说明,否则可以使用cluster-update-settings API在活动集群上动态更新这些设置。
Parent circuit breaker(父级熔断器)

The parent-level breaker can be configured with the following settings:
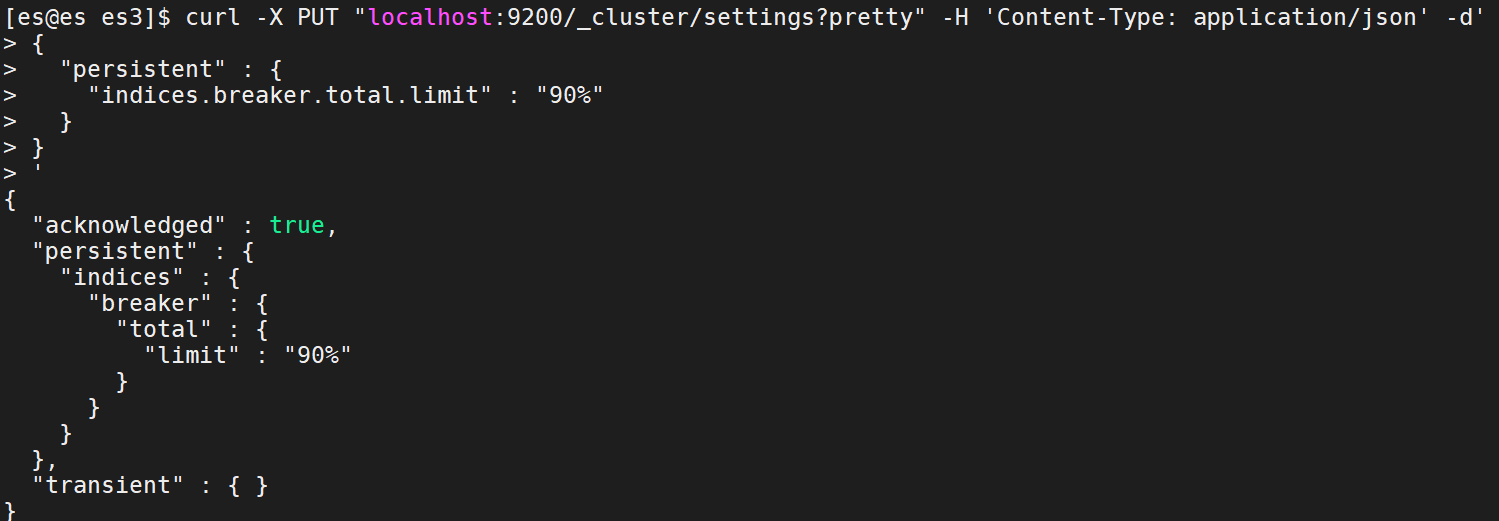
可以使用以下设置来配置父级熔断器:indices.breaker.total.use_real_memory
(Static) Determines whether the parent breaker should take real memory usage into account (
true) or only consider the amount that is reserved by child circuit breakers (false). Defaults totrue.
(静态)
(true)考虑实际内存使用情况
(false)仅考虑子熔断器所保留的数量
默认为true。
cat >> /opt/es1/config/elasticsearch.yml << EOFindices.breaker.total.use_real_memory: trueEOF
indices.breaker.total.limit 
(Dynamic) Starting limit for overall parent breaker. Defaults to 70% of JVM heap if
indices.breaker.total.use_real_memoryisfalse. Ifindices.breaker.total.use_real_memoryistrue, defaults to 95% of the JVM heap.
调整熔断内存比例大小:
(动态)整个父级熔断器的启动限制。
如果indices.breaker.total.use_real_memory为false,则默认为JVM堆的70% 。
如果indices.breaker.total.use_real_memory 为true,则默认为JVM堆的95%。
使用动态调整父级熔断器的限制:
curl -X PUT "localhost:9200/_cluster/settings?pretty" -H 'Content-Type: application/json' -d'{"persistent" : {"indices.breaker.total.limit" : "90%"}}'
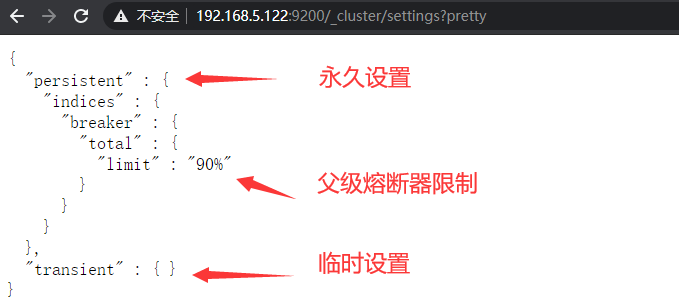
网页查看:
http://192.168.5.122:9200/_cluster/settings?pretty
Content-Type: application/json
告诉服务器请求的主题内容是json的字符串,服务器端会对json字符串进行解析。
-X 指定请求方法
-H 指定请求标头
-d 发送POST请求提交的数据,使用-d参数后,会自动将请求转为POST,HTTP请求会自动加上标头Content-Type : application/x-www-form-urlencoded,可省略-X POST
Field data circuit breaker(列数据熔断器)

The field data circuit breaker estimates the heap memory required to load a field into the field data cache. If loading the field would cause the cache to exceed a predefined memory limit, the circuit breaker stops the operation and returns an error.
列数据熔断器估算将现场加载到列数据高速缓存所需的堆内存。
如果加载该字段将导致缓存超过预定义的内存限制,则熔断器将停止操作并返回错误。indices.breaker.fielddata.limit 
(Dynamic) Limit for fielddata breaker. Defaults to 40% of JVM heap.
(动态)字段数据断路器的限制。默认为JVM堆的40%。
curl -X PUT "localhost:9200/_cluster/settings?pretty" -H 'Content-Type: application/json' -d'{"persistent" : {"indices.breaker.fielddata.limit" : "40%"}}'
indices.breaker.fielddata.overhead 
(Dynamic) A constant that all field data estimations are multiplied with to determine a final estimation. Defaults to 1.03.
(动态)所有列数据乘以一个常量得到最终的值。 默认为1.03。
在系统加载fielddata会进行预先估计,当系统发现要加载进内存的值超过limit*overhead时,会进行内存回收,默认是1.03
curl -X PUT "localhost:9200/_cluster/settings?pretty" -H 'Content-Type: application/json' -d'{"persistent" : {"indices.breaker.fielddata.overhead" : "1.03"}}'
Cache size
indices.fielddata.cache.size
(Static) The max size of the field data cache, eg 38% of node heap space, or an absolute value, eg 12GB. Defaults to unbounded. If you choose to set it, it should be smaller than Field data circuit breaker limit.
(静态)字段数据缓存的最大大小,例如,节点堆空间的38%,或绝对值,例如12GB。
默认为无界。 如果选择设置,则它应小于列数据熔断器极限。
curl -X PUT "localhost:9200/_cluster/settings?pretty" -H 'Content-Type: application/json' -d'{"persistent" : {"indices.fielddata.cache.size" : "38%"}}'
In flight requests circuit breaker(请求中的熔断器)

The in flight requests circuit breaker allows Elasticsearch to limit the memory usage of all currently active incoming requests on transport or HTTP level from exceeding a certain amount of memory on a node. The memory usage is based on the content length of the request itself. This circuit breaker also considers that memory is not only needed for representing the raw request but also as a structured object which is reflected by default overhead.
限制当前通过HTTP等进来的请求使用内存不能超过Node内存的指定值。这个内存主要是限制请求内容的长度。 默认100%。
该熔断器还认为,不仅需要内存来表示原始请求,而且还需要将其作为结构化对象,这由默认开销反映出来。network.breaker.inflight_requests.limit
(Dynamic) Limit for in flight requests breaker, defaults to 100% of JVM heap. This means that it is bound by the limit configured for the parent circuit breaker.
(动态)运行中请求中断程序的限制,默认为JVM堆的100%。 这意味着它受到为父级熔断器配置的限制所限制。
curl -X PUT "localhost:9200/_cluster/settings?pretty" -H 'Content-Type: application/json' -d'{"persistent" : {"network.breaker.inflight_requests.limit" : "95%"}}'
network.breaker.inflight_requests.overhead
(Dynamic) A constant that all in flight requests estimations are multiplied with to determine a final estimation. Defaults to 2.
(动态)一个常数,所有运行中的请求估计值都将与该常数相乘以确定最终估计值。 默认为2。
curl -X PUT "localhost:9200/_cluster/settings?pretty" -H 'Content-Type: application/json' -d'{"persistent" : {"network.breaker.inflight_requests.overhead" : "2"}}'
Accounting requests circuit breaker(累计请求熔断器)
The accounting circuit breaker allows Elasticsearch to limit the memory usage of things held in memory that are not released when a request is completed. This includes things like the Lucene segment memory.
累计请求熔断器允许Elasticsearch限制请求完成后未释放的内存使用。例如 Lucene Segment memory(段内存)。indices.breaker.accounting.limit
(Dynamic) Limit for accounting breaker, defaults to 100% of JVM heap. This means that it is bound by the limit configured for the parent circuit breaker.
(动态)累计请求熔断器的限制,默认为JVM堆的100%,这意味着它受父熔断器限制的约束。
累计请求熔断器,限制的是请求完成时,未被释放的内容的内存大小(例如,Lucene 段内存等),默认值为 100%(这意味着可能会在父熔断器允许的范围内将内存耗尽)
curl -X PUT "localhost:9200/_cluster/settings?pretty" -H 'Content-Type: application/json' -d'{"persistent" : {"indices.breaker.accounting.limit" : "80%"}}'
indices.breaker.accounting.overhead
(Dynamic) A constant that all accounting estimations are multiplied with to determine a final estimation. Defaults to 1
(动态)用来和累计请求熔断器的估计值相乘的常数,默认值为 1
curl -X PUT "localhost:9200/_cluster/settings?pretty" -H 'Content-Type: application/json' -d'{"persistent" : {"indices.breaker.accounting.overhead" : "1"}}'
Script compilation circuit breaker(脚本编译熔断器)

Slightly different than the previous memory-based circuit breaker, the script compilation circuit breaker limits the number of inline script compilations within a period of time. See the “prefer-parameters” section of the scripting documentation for more information.
脚本编译断路器与以前的基于内存的熔断器略有不同,它限制了一段时间内内联脚本编译的次数。
有关更多信息,请参见脚本文档的“首选参数”部分。script.context.$CONTEXT.max_compilations_rate
(Dynamic) Limit for the number of unique dynamic scripts within a certain interval that are allowed to be compiled for a given context. Defaults to
75/5m, meaning 75 every 5 minutes.
(动态)在给定上下文中允许在一定间隔内唯一动态脚本的数量限制。 默认值为75 / 5m,即每5分钟75。
curl -X PUT "localhost:9200/_cluster/settings?pretty" -H 'Content-Type: application/json' -d'{"persistent" : {"script.context.$CONTEXT.max_compilations_rate" : "75/5m"}}'
cluster update settings API.(集群API更新设置.)
The order of precedence for cluster settings is:
- transient cluster settings
- persistent cluster settings
- settings in the elasticsearch.yml configuration file.
群集设置的优先顺序为:
- 临时群集设置
- 永久集群设置
- elasticsearch.yml配置文件中的设置。
查询参数:
| flat_settings | (Optional, Boolean) If true, returns settings in flat format. Defaults to false. |
|---|---|
(可选,布尔值)如果为 true,则以平面格式返回设置。默认为 false。 |
|
| include_defaults | (Optional, Boolean) If true, returns all default cluster settings. Defaults to false. |
(可选,布尔值)如果为 true,则返回所有默认群集设置。默认为false。 |
|
| master_timeout | (Optional, time units) Specifies the period of time to wait for a connection to the master node. If no response is received before the timeout expires, the request fails and returns an error. Defaults to 30s. |
(可选,时间单位)指定等待连接到主节点的时间段。如果在超时到期之前未收到任何响应,则请求将失败并返回错误。默认为 30s。 |
|
| timeout | (Optional, time units) Specifies the period of time to wait for a response. If no response is received before the timeout expires, the request fails and returns an error. Defaults to 30s. |
(可选,时间单位)指定等待响应的时间段。如果在超时到期之前未收到任何响应,则请求将失败并返回错误。默认为 30s。 |
**
persistent:永久更新,重启后更新仍然生效
transitent:临时更新,重启后更新失效
An example of a persistent update:(持续更新示例:)
curl -X PUT "192.168.5.122:9200/_cluster/settings?pretty" -H 'Content-Type: application/json' -d'{"persistent" : {"indices.recovery.max_bytes_per_sec" : "50mb"}}'
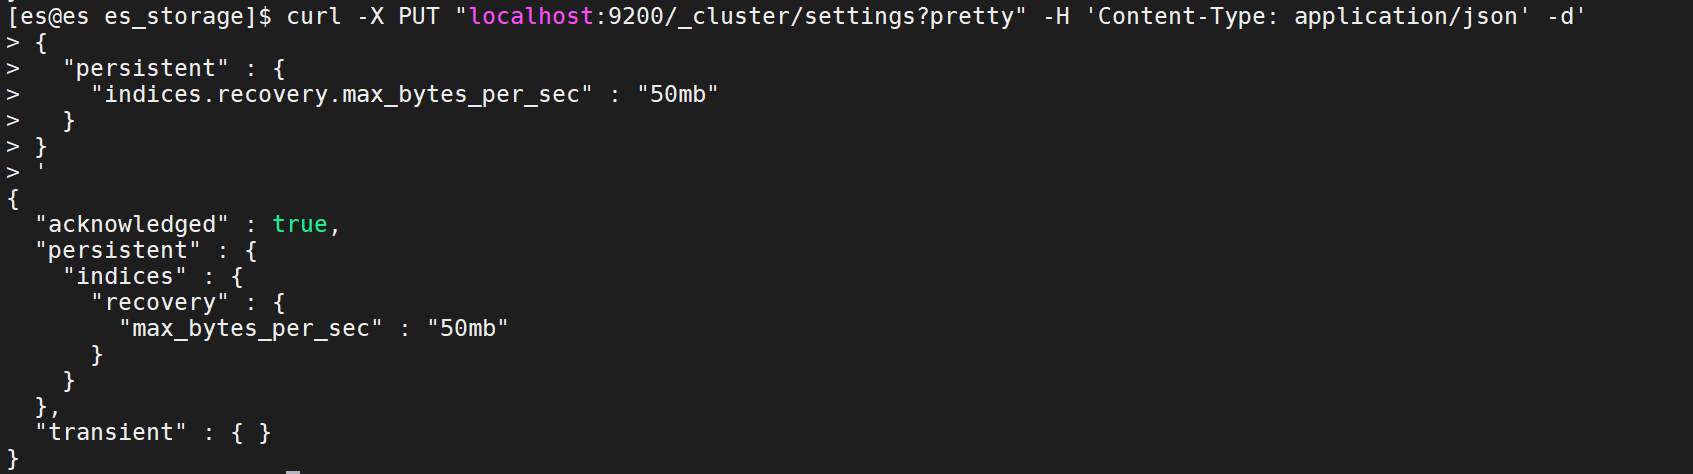

indices.recovery.max_bytes_per_sec:该属性默认设置为50MB,表示分片在恢复过程中每秒传输的最大数据量。要想关闭传输量的限制,用户需要设置该属性值为0。
An example of a transient update:(临时更新示例:)
curl -X PUT "localhost:9200/_cluster/settings?flat_settings=true&pretty" -H 'Content-Type: application/json' -d'{"transient" : {"indices.recovery.max_bytes_per_sec" : "20mb"}}'

集群日志更新,主节点和从节点同时反馈:
网页上查看:
This example resets a setting:
本示例重置设置:
curl -X PUT "localhost:9200/_cluster/settings?pretty" -H 'Content-Type: application/json' -d'{"transient" : {"indices.recovery.max_bytes_per_sec" : null}}'
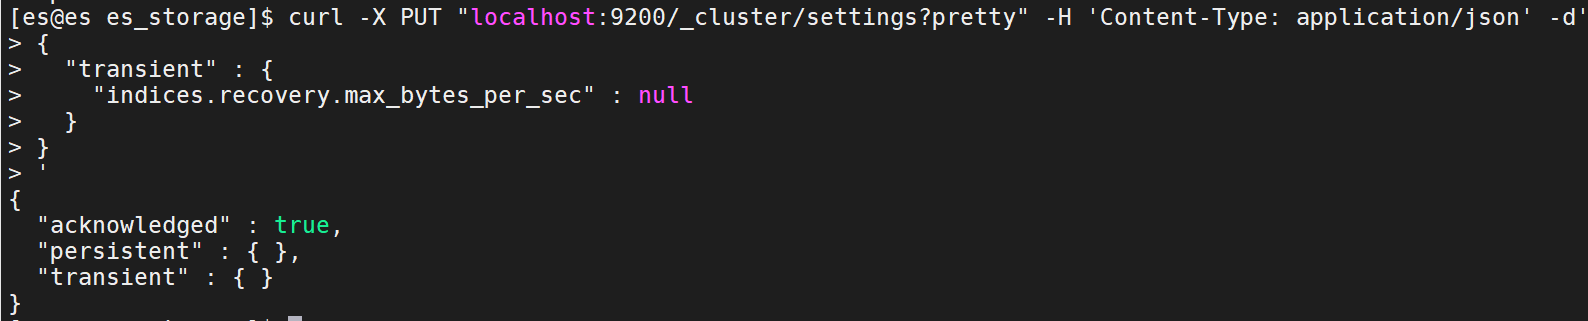
网页中,transient设置已经消除:
The response does not include settings that have been reset:(该响应不包括已重置的设置:)

You can also reset settings using wildcards. For example, to reset all dynamic **indices.recovery** settings:
可以使用通配符重置设置。例如,要重置所有动态indices.recovery设置:
curl -X PUT "localhost:9200/_cluster/settings?pretty" -H 'Content-Type: application/json' -d'{"transient" : {"indices.recovery.*" : null}}'
在linux环境下,如下配置:
主节点日志更新:
从节点日志更新:
Cluster-level shard allocation and routing settings(集群级分片分配和路由设置)
There are a number of settings available to control the shard allocation process:
- Cluster-level shard allocation settings control allocation and rebalancing operations.
- Disk-based shard allocation settings explains how Elasticsearch takes available disk space into account, and the related settings.
- Shard allocation awareness and Forced awareness control how shards can be distributed across different racks or availability zones.
- Cluster-level shard allocation filtering allows certain nodes or groups of nodes excluded from allocation so that they can be decommissioned.
Besides these, there are a few other miscellaneous cluster-level settings.
有许多设置可用于控制分片分配过程:
- 集群级分片分配设置控制分配和重新平衡操作。
- 基于磁盘的分片分配设置介绍了Elasticsearch如何考虑可用磁盘空间以及相关设置。
- 分片分配感知和强制感知控制了如何在不同机架或可用性区域之间分配分片。
- 集群级分片分配过滤允许某些节点或某些节点组从分配中排除,以便将其停用。
除了这些,还有其他一些集群级别的设置。
Cluster-level shard allocation settings(集群级分片分配设置)
cluster.routing.allocation.enable
(Dynamic) Enable or disable allocation for specific kinds of shards:
all- (default) Allows shard allocation for all kinds of shards.
primaries- Allows shard allocation only for primary shards.
new_primaries- Allows shard allocation only for primary shards for new indices.
none- No shard allocations of any kind are allowed for any indices.This setting does not affect the recovery of local primary shards when restarting a node. A restarted node that has a copy of an unassigned primary shard will recover that primary immediately, assuming that its allocation id matches one of the active allocation ids in the cluster state.
cluster.routing.allocation.node_concurrent_incoming_recoveries
(Dynamic) How many concurrent incoming shard recoveries are allowed to happen on a node. Incoming recoveries are the recoveries where the target shard (most likely the replica unless a shard is relocating) is allocated on the node. Defaults to
2.
cluster.routing.allocation.node_concurrent_outgoing_recoveries
(Dynamic) How many concurrent outgoing shard recoveries are allowed to happen on a node. Outgoing recoveries are the recoveries where the source shard (most likely the primary unless a shard is relocating) is allocated on the node. Defaults to
2.
cluster.routing.allocation.node_concurrent_recoveries
(Dynamic) A shortcut to set both
cluster.routing.allocation.node_concurrent_incoming_recoveriesandcluster.routing.allocation.node_concurrent_outgoing_recoveries.
cluster.routing.allocation.node_initial_primaries_recoveries
(Dynamic) While the recovery of replicas happens over the network, the recovery of an unassigned primary after node restart uses data from the local disk. These should be fast so more initial primary recoveries can happen in parallel on the same node. Defaults to
4.
cluster.routing.allocation.same_shard.host
(Dynamic) Allows to perform a check to prevent allocation of multiple instances of the same shard on a single host, based on host name and host address. Defaults to
false, meaning that no check is performed by default. This setting only applies if multiple nodes are started on the same machine.
Important System Configuration(重要系统配置)
Configuring system settings(配置系统设置)
When using the
.zipor.tar.gzpackages, system settings can be configured:
- temporarily with
ulimit, or- permanently in
/etc/security/limits.conf.
使用.zip或.tar.gz软件包时,可以配置系统设置:
- 临时设置:
ulimit - 永久设置:
/etc/security/limits.confE.g:File Descriptors
临时设置:
Change the max number of open files:(更改打开文件的最大数量:)
ulimit -n 65535

永久设置:
cat >> /etc/security/limits.conf << EOFes soft nofile 65535es hard nofile 65535EOF

NOTE-Ubuntu:
Linux桌面版需要将下面这行取消注释:
vim /etc/pam.d/su#(删除该井号) session required pam_limits.so
Systemd configuration(系统配置)
软件包环境变量配置文件位置:
| RPM | /etc/sysconfig/elasticsearch |
|---|---|
| Debian | /etc/default/elasticsearch |
An alternative mechanism for setting Java Virtual Machine options is via the
ES_JAVA_OPTSenvironment variable. For instance:
设置Java虚拟机选项的另一种机制是通过ES_JAVA_OPTS环境变量。
例如:
export ES_JAVA_OPTS="$ES_JAVA_OPTS -Djava.io.tmpdir=/path/to/temp/dir"./bin/elasticsearch
using the RPM:
The systemd service file (
/usr/lib/systemd/system/elasticsearch.service) contains the limits that are applied by default.
systemd服务文件(/usr/lib/systemd/system/elasticsearch.service)包含默认情况下应用的限制。
To override them, add a file called
/etc/systemd/system/elasticsearch.service.d/override.conf(alternatively, you may runsudo systemctl edit elasticsearchwhich opens the file automatically inside your default editor). Set any changes in this file, such as:
要覆盖它们,请添加一个名为的文件 /etc/systemd/system/elasticsearch.service.d/override.conf
(或者,您可以运行sudo systemctl edit elasticsearch该文件,该文件会在默认编辑器中自动打开)。
设置此文件中的所有更改,例如:
[Service]LimitMEMLOCK=infinity
Once finished, run the following command to reload units:
完成后,运行以下命令以重新加载单元:
sudo systemctl daemon-reload
Disable swapping(禁用交换)
减少内核交换趋势:
cat >> /etc/sysctl.conf << EOFvm.swappiness = 1EOF
完全禁止swap内存交换:
cat >> /opt/es1/config/ << EOFbootstrap.memory_lock: trueEOF
直接运行会报一个es用户无权锁定内存并失败的错误: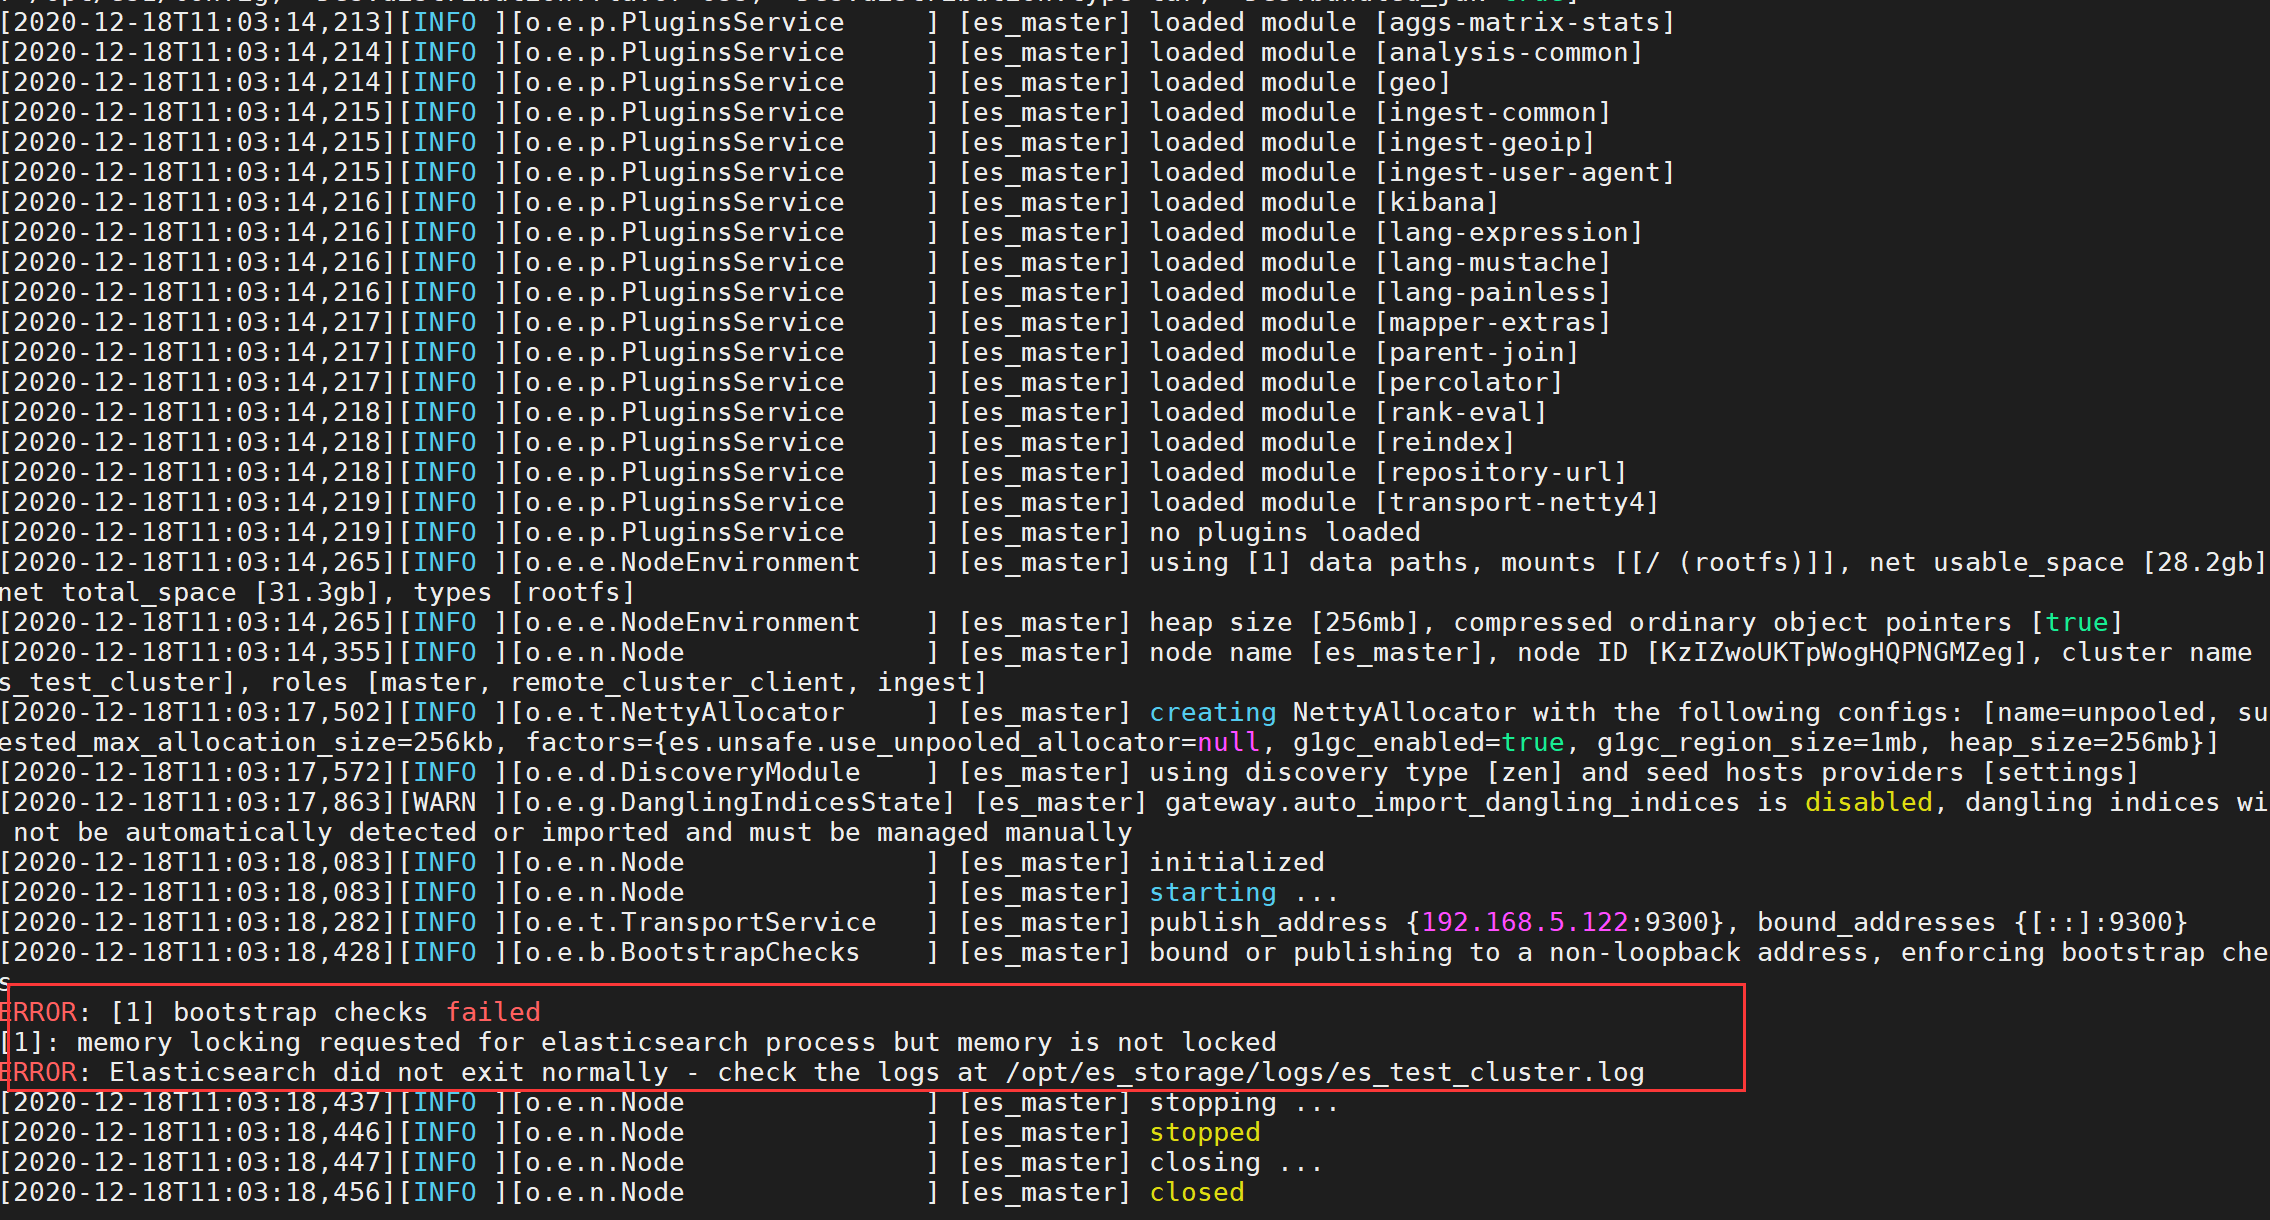
将安全限制配置中,将内存锁定值的限制(max locked memory)设置为无限,用户限定设置为允许所有用户
cat >> /etc/security/limits.conf << EOFes soft memlock unlimitedes hard memlock unlimitedEOF
su escd /opt/es1/bin./elasticseasrch

启动Elasticsearch之后,您可以通过检查mlockall此请求输出中的值来查看是否成功应用了此设置:
curl -X GET "localhost:9200/_nodes?filter_path=**.mlockall&pretty"
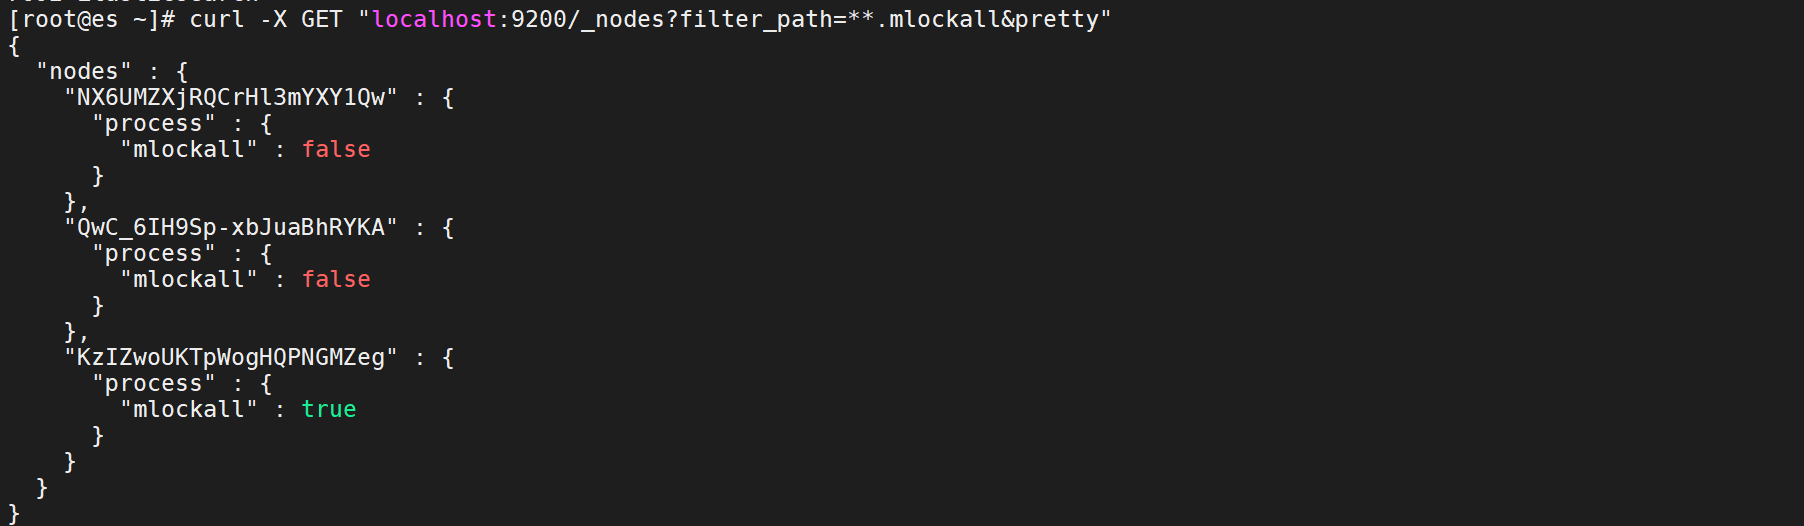 第一台为true,发现其他两台为false,也可以在这两台从机的elasticsearch.yml文件配置中添加
bootstrap.memory_lock: true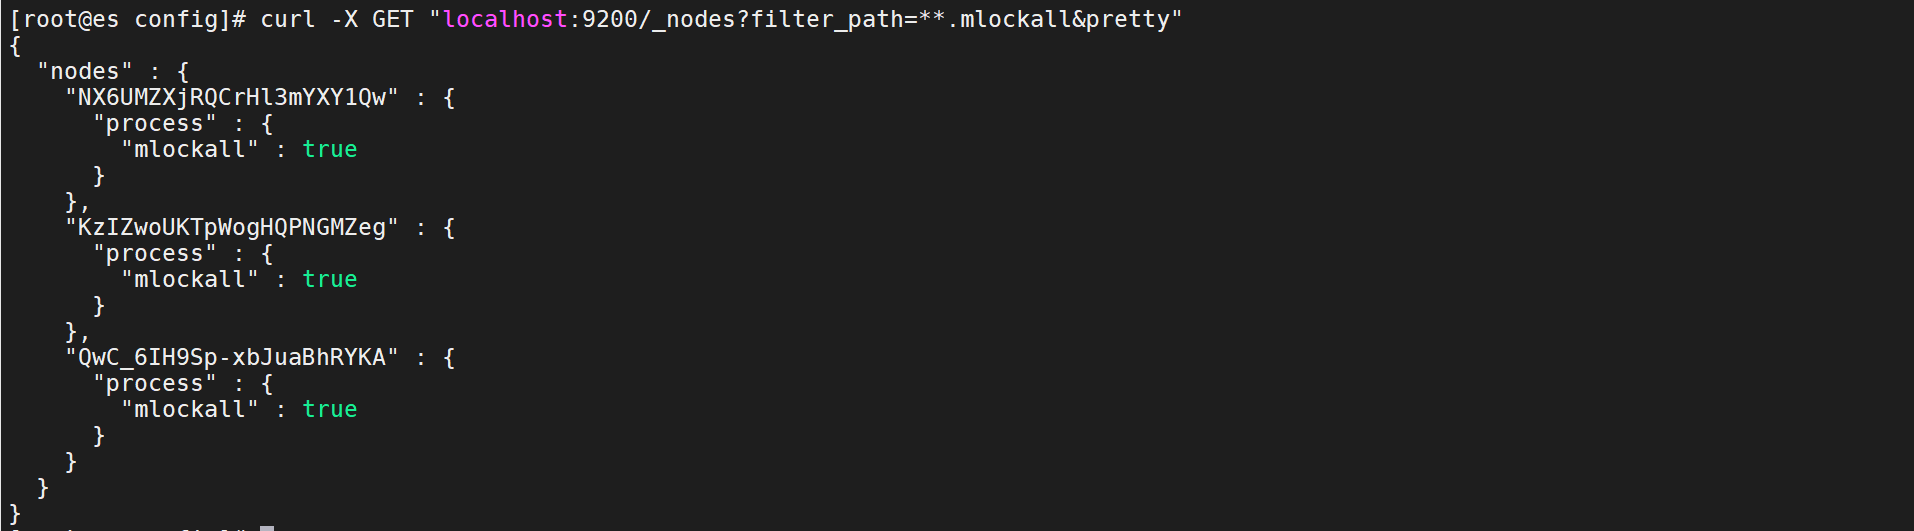
设置完成。
Systems using systemdSet LimitMEMLOCK to infinity in the systemd configuration.
在systemd配置中,将systemdSet LimitMEMLOCK设置为infinity的系统。
Another possible reason why mlockall can fail is that the JNA temporary directory (usually a sub-directory of /tmp) is mounted with the noexec option.
mlockall失败的另一个可能原因是JNA临时目录(通常是/ tmp的子目录)是使用noexec选项安装的。
This can be solved by specifying a new temporary directory for JNA using the ESJAVA_OPTS environment variable:
这可以通过使用[ES_JAVA_OPTS环境变量](#VeeHz)为JNA指定新的临时目录来解决:_
linux:与/tmp or /var/tmp有关
export ES_JAVA_OPTS="$ES_JAVA_OPTS -Djna.tmpdir=<path>"./bin/elasticsearch
JNA temporary directory not mounted with noexec(JNA临时目录未装入 noexec)
NOTE:This is only relevant for Linux. Elasticsearch uses the Java Native Access (JNA) library for executing some platform-dependent native code. On Linux, the native code backing this library is extracted at runtime from the JNA archive. By default, this code is extracted to the Elasticsearch temporary directory which defaults to a sub-directory of
/tmp. Alternatively, this location can be controlled with the JVM flag-Djna.tmpdir=<path>. As the native library is mapped into the JVM virtual address space as executable, the underlying mount point of the location that this code is extracted to must not be mounted withnoexecas this prevents the JVM process from being able to map this code as executable. On some hardened Linux installations this is a default mount option for/tmp. One indication that the underlying mount is mounted withnoexecis that at startup JNA will fail to load with ajava.lang.UnsatisfiedLinkerErrorexception with a message along the lines offailed to map segment from shared object. Note that the exception message can differ amongst JVM versions. Additionally, the components of Elasticsearch that rely on execution of native code via JNA will fail with messages indicating that it isbecause JNA is not available. If you are seeing such error messages, you must remount the temporary directory used for JNA to not be mounted withnoexec.
注意:这仅与 Linux 有关
Elasticsearch 使用 Java 本机访问 (JNA) 库来执行一些平台相关的本机代码.
在 Linux 上,在运行时从 JNA 存档中提取支持该库的本机代码。默认情况下,此代码被提取到 Elasticsearch 的临时目录中,该目录默认为 / tmp 的子目录。
或者,可以使用 JVM 标志 -Djna.tmpdir=
由于本机库以可执行文件的形式映射到 JVM 虚拟地址空间中,因此代码提取到的位置的底层挂载点必须不能使用 noexec 装载,因为这会阻止 JVM 进程能够将此代码映射为可执行文件。
在某些加载的 Linux 安装中,这是 / tmp 的默认安装选项。表示使用 noexec 挂载了基础挂载的一种迹象是,JNA 在启动时将无法加载,会导致 java.lang.UnsatisfiedLinkerError 异常,并带有一条类似 failed to map segment from shared object 映射段。
请注意,在 JVM 版本之间,异常消息可能有所不同。
此外,依赖于通过 JNA 执行本机代码的 Elasticsearch 组件将失败,并显示消息 because JNA is not available。如果看到此类错误消息,则必须重新挂载用于 JNA 的临时目录,以使其不通过 noexec 进行挂载。
| JNA | 全称Java Native Access,是一个建立在经典的JNI技术之上的Java开源框架(https://github.com/twall/jna)。JNA提供一组Java工具类用于在运行期动态访问系统本地库(native library:如Window的dll)而不需要编写任何Native/JNI代码。开发人员只要在一个java接口中描述目标native library的函数与结构,JNA将自动实现Java接口到native function的映射。 |
|---|---|
| JNI | JNI(Java Native Interface,JAVA原生接口) 使用JNI可以使Java代码和其他语言写的代码(如C/C++代码)进行交互。 |
File Descriptors(文件描述符)
Virtual memory(虚拟内存)
Elasticsearch uses a
mmapfsdirectory by default to store its indices. The default operating system limits on mmap counts is likely to be too low, which may result in out of memory exceptions. On Linux, you can increase the limits by running the following command asroot:
Elasticsearchmmapfs默认使用目录来存储其索引。默认的操作系统对mmap计数的限制可能太低,这可能会导致内存不足异常。
在Linux上,您可以通过运行以下命令来增加限制 root:mmapfs(内存映射文件系统)
The MMap FS type stores the shard index on the file system (maps to Lucene MMapDirectory) by mapping a file into memory (mmap).
Memory mapping uses up a portion of the virtual memory address space in your process equal to the size of the file being mapped.
Before using this class, be sure you have allowed plenty of virtual address space.
Elasticsearch uses a mmapfs directory by default to store its indices.
The default operating system limits on mmap counts is likely to be too low, which may result in out of memory exceptions.
MMap FS类型将shard索引存储在文件系统上 (映射到LuceneMMapDirectory) 通过将文件映射到内存 (mmap)。
内存映射会占用进程中虚拟内存地址空间的一部分,该空间等于要映射的文件的大小。
在使用此类之前,请确保您已允许大量虚拟地址空间。
Elasticsearch使用一个mmapfs默认情况下,目录用于存储其索引。
Mmap计数的默认操作系统限制可能太低,这可能导致内存不足异常。
临时设置:
sysctl -w vm.max_map_count=262144
永久设置:
cat >> /etc/sysctl.conf << EOFvm.max_map_count=262144EOFsysctl -p
Number of threads(线程数)
Elasticsearch uses a number of thread pools for different types of operations. It is important that it is able to create new threads whenever needed. Make sure that the number of threads that the Elasticsearch user can create is at least 4096. This can be done by setting
ulimit -u 4096as root before starting Elasticsearch, or by settingnprocto4096in/etc/security/limits.conf.
Elasticsearch对不同类型的操作使用许多线程池。能够在需要时创建新线程很重要。
确保Elasticsearch用户可以创建的线程数至少为4096。
这可以通过ulimit -u 4096在启动Elasticsearch之前设置为root或在/etc/security/limits.conf设置nproc为4096来完成。
临时设置:
ulimit -u 4096
永久设置:
cat >> /etc/security/limits.conf << EOFes soft nproc 4096es hard nproc 4096EOF
DNS cache settings(DNS缓存设置)
Elasticsearch runs with a security manager in place.
With a security manager in place, the JVM defaults to caching positive hostname resolutions indefinitely and defaults to caching negative hostname resolutions for ten seconds. Elasticsearch overrides this behavior with default values to cache positive lookups for sixty seconds, and to cache negative lookups for ten seconds. These values should be suitable for most environments, including environments where DNS resolutions vary with time. If not, you can edit the values es.networkaddress.cache.ttl and es.networkaddress.cache. negative.ttl in the JVM options. Note that the values networkaddress.cache.ttl= and networkaddress.cache.negative.ttl= in the Java security policy are ignored by Elasticsearch unless you remove the settings for es.networkaddress.cache.ttl and es.networkaddress.cache.negative.ttl.
Elasticsearch 运行时有一个安全管理器。
有了它, JVM 会默认无期限地缓存正主机名解析,并默认将负主机名解析缓存十秒。
Elasticsearch 用默认值覆盖此行为,以将正向查找缓存六十秒,并将负向查找缓存十秒,这些值应适用于大多数环境,包括 DNS 分辨率随时间变化的环境。
如果没有,你可以编辑 es.networkaddress.cache.ttl 和 es.networkaddress.cache.negative.ttl 在 JVM 选项的值,注意这些值 networkaddress.cache.ttl=
networkaddress.cache.ttlSpecified in java.security to indicate the caching policy for successful name lookups from the name service.. The value is specified as integer to indicate the number of seconds to cache the successful lookup. A value of -1 indicates “cache forever”. The default behavior is to cache forever when a security manager is installed, and to cache for an implementation specific period of time, when a security manager is not installed. networkaddress.cache.negative.ttl (default: 10)Specified in java.security to indicate the caching policy for un-successful name lookups from the name service.. The value is specified as integer to indicate the number of seconds to cache the failure for un-successful lookups. A value of 0 indicates “never cache”. A value of -1 indicates “cache forever”.
networkaddress.cache.ttl在java.security中指定,以指示从名称服务进行成功的名称查找的缓存策略。该值指定为整数,以指示缓存成功查找的秒数。
值-1表示“永远缓存”。默认行为是在安装安全管理器时永久缓存,并在未安装安全管理器时缓存实现特定时间段。
networkaddress.cache.negative.ttl(默认值:10)在java.security中指定,以指示从名称服务进行不成功的名称查找的缓存策略。该值指定为整数,以指示对不成功的查找进行高速缓存的秒数。
值为0表示“从不缓存”。值-1表示“永远缓存”。
JNA temporary directory not mounted with noexec(JNA临时目录未用noexec挂载)
TCP retransmission timeout(TCP重传超时)
The Linux default allows for communication over networks that may experience very long periods of packet loss, but this default is excessive for production networks within a single data centre as is the case for most Elasticsearch clusters. Highly-available clusters must be able to detect node failures quickly so that they can react promptly by reallocating lost shards, rerouting searches and perhaps electing a new master node. Linux users should therefore reduce the maximum number of TCP retransmissions. You can decrease the maximum number of TCP retransmissions to
5by running the following command asroot. Five retransmissions corresponds with a timeout of around six seconds.
Linux默认设置允许通过可能遭受很长数据包丢失的网络进行通信,但是对于大多数Elasticsearch集群而言,此默认设置对于单个数据中心内的生产网络而言过于昂贵。
高可用性群集必须能够快速检测节点故障,以便它们可以通过重新分配丢失的碎片,重新路由搜索以及可能选择一个新的主节点来迅速做出反应。
因此,Linux用户应减少TCP重传的最大次数。
您可以通过root运行以下命令来减少最大TCP重传次数5。五次重传对应于大约六秒钟的超时。
临时设置:
sysctl -w net.ipv4.tcp_retries2=5
永久设置:
cat >> /etc/sysctl.conf << EOFnet.ipv4.tcp_retries2=5EOFsysctl -p
IMPORTANT: This setting applies to all TCP connections and will affect the reliability of communication with systems outside your cluster too. If your cluster communicates with external systems over an unreliable network then you may need to select a higher value for
net.ipv4.tcp_retries2. For this reason, Elasticsearch does not adjust this setting automatically.
重要:
此设置适用于所有TCP连接,并且也会影响与群集外部系统的通信可靠性。如果您的群集通过不可靠的网络与外部系统通信,则可能需要net.ipv4.tcp_retries2选择一个更高的值。因此,Elasticsearch不会自动调整此设置。

若有收获,就点个赞吧
0 人点赞
