原生API编写简单富文本编辑器003
在上一节,我们实现了一个简单的富文本编辑器,但是其中很多功能按钮点击还没有反应,因为这些功能需要参数,而我们并没有提供参数,这一节就来实现这些功能,它们包括:
- 字体
- 字号
- 前景色
- 背景色
- 插入链接
- 取消链接
字体设置
要设置字体,首先我们需要一个字体列表,为了能够在大多数电脑上显示正确的字体,我们目前就挑选一些系统自带的常用字体组成一个字体列表。
// index.js……const fontFamilys = ['仿宋','黑体','楷体','宋体','微软雅黑','新宋体','Calibri','Consolas','Droid Sans',];
然后当我们点击字体设置按钮时,动态生成一个字体选择组件,插入到字体选择按钮下方。
btn.onclick = function(e) {if (command === 'fontName') {showFontName(e);} else {document.execCommand(command, true, '');}};function showFontName(e) {// 定义字体列表const fontFamilys = ['仿宋','黑体','楷体','宋体','微软雅黑','新宋体','Calibri','Consolas','Droid Sans',];// 生成字体选择列表模板let tpl = '<div class="editor-dialog-fontfamily">';tpl += '<ul>';for (let i = 0; i < fontFamilys.length; i++) {tpl += `<li onclick="selectFontFamily('${fontFamilys[i]}')">${fontFamilys[i]}</li>`;}tpl+ '</ul>';tpl += '</div>';// 将字体选择列表填充到通用弹窗内let dialog = document.getElementById('editorDialog');dialog.innerHTML = tpl;// 获取按钮的相对位置坐标let target = e.target;let left = target.offsetLeft;let top = target.offsetTop;// 将弹窗放置在按钮下方位置并显示出来dialog.style.left = left + 'px';dialog.style.top = top + target.offsetHeight + 20 + 'px';dialog.style.display = 'block';}
在HTML中,我们需要一个专门放弹出框的元素:
<div class="editor"><div id="editorBar" class="editor-toolbar">//...</div><div id="editorContent" class="editor-content" contenteditable="true"></div><div id="editorDialog"></div> <!-- 专门放置弹出框 --></div>
在CSS中,给弹出框和字体选择列表一些简单的样式:
.editor {// ...position: relative;}#editorDialog {position: absolute;display: none;border: 1px solid #e9e9e9;z-index: 100;}.editor-dialog-fontfamily ul {list-style: none;padding: 0;padding-right: 15px;}.editor-dialog-fontfamily ul li {height: 30px;line-height: 30px;padding-left: 10px;cursor: pointer;}.editor-dialog-fontfamily ul li:hover {background-color: #cecece;}
看看效果:

然后我们实现选择具体字体后的方法:
function selectFontFamily(fontName) {const rs = document.execCommand('fontName', true, fontName);console.log(rs);}
我们发现,当我们点击选择某个字体后,编辑区中所选的文字字体并没有改变,并且控制台输出执行结果,发现是false。
原因是,当我们点击某个字体的时候,浏览器就会取消编辑区内的选区,所以当我们执行命令时,并没有选区,所以会执行失败。
现在我们对上面的代码进行改造,将字体列表改造为一个下拉选框,当选择值变化时,设置字体
let tpl = '<div class="editor-dialog-fontfamily">';tpl += '<select id="fontNameSelect" onchange="selectFontFamily()">';for (let i = 0; i < fontFamilys.length; i++) {tpl += `<option value="${fontFamilys[i]}" style="font-family: '${fontFamilys[i]}'">${fontFamilys[i]}</option>`;}tpl+ '</select>';tpl += '</div>';//...function selectFontFamily() {const target = document.getElementById('fontNameSelect');const rs = document.execCommand('fontName', true, target.value);console.log(rs);}
这时我们再看:

到此,终于完成了字体的设置功能,接下来我们先对字体设置功能进行一定的优化——与其点击某个按钮才弹出下拉框选择,不如一开始就用下拉框替代按钮
window.onload= function() {const btns = document.getElementById('editorBar').getElementsByTagName('button');for (let i=0; i<btns.length; i++) {const btn = btns[i];const command = btn.getAttribute('command');if (command === 'fontName') {showFontName(btn);}btn.onclick = function(e) {document.execCommand(command, 'true', '');};}};function showFontName(btn) {let tpl = getFontNameTpl();const $li = btn.parentElement;$li.innerHTML = tpl;}function getFontNameTpl() {const fontFamilys = ['仿宋','黑体','楷体','宋体','微软雅黑','新宋体','Calibri','Consolas','Droid Sans','Microsoft YaHei',];let tpl = '';tpl += '<select id="fontNameSelect" onchange="selectFontFamily()">';for (let i = 0; i < fontFamilys.length; i++) {tpl += `<option value="${fontFamilys[i]}" style="font-family: '${fontFamilys[i]}'">${fontFamilys[i]}</option>`;}tpl+ '</select>';return tpl;}
还需要改一下CSS,取消按钮li的宽度限制,并给一个下边距:
.editor-toolbar ul li {height: 20px;line-height: 20px;display: inline-block;cursor: pointer;margin-left: 10px;margin-bottom: 10px;}
看下最终效果:

字号
字号与字体是相同的作用机制,我们补充下代码:
const command = btn.getAttribute('command');if (command === 'fontName') {showFontName(btn);}if (command === 'fontSize') {showFontSize(btn);}// ...function getFontSizeTpl() {const fontSizes = ['12','14','16','18','20','24','28','36','48','72',];let tpl = '';tpl += '<select id="fontSizeSelect" onchange="selectFontSize()">';for (let i = 0; i < fontSizes.length; i++) {tpl += `<option value="${fontSizes[i]}" style="font-size: '${fontSizes[i]}'">${fontSizes[i]}</option>`;}tpl+ '</select>';return tpl;}function showFontSize(btn) {let tpl = getFontSizeTpl();const $li = btn.parentElement;$li.innerHTML = tpl;}function selectFontSize() {const target = document.getElementById('fontSizeSelect');const rs = document.execCommand('fontSize', true, parseInt(target.value) + 'px');}

我们会发现,在下拉框中,我们未字体提供了若干以像素为单位的值,并且当用户选择时,我们会将这个像素值作为execCommand命令的参数,但是实际操作时,无论我们选择多少的字号,最后的字号始终是一样大的。
通过查看控制台元素面板,我们发现无论我们传入什么值,最终浏览器给文字加的控制字号的属性size 都是 7。
再仔细翻看文档,我们看到对fontSize 命令的说明:
fontSize : 在插入点或者选中文字部分修改字体大小. 需要提供一个HTML字体尺寸 (1-7) 作为参数
所以当我们传入超出范围的不合法参数时,它会始终将字体设置为最大尺寸7。
修改一下:
const fontSizes = ['1','2','3','4','5','6','7',];

这回就正常了,可是用户并不知道1-7代表的具体大小对应的是常见的文档软件(例如word)中的大小(通常以像素表示),我们需要继续改造:
function getFontSizeTpl() {const fontSizes = [{key: 1,value: '12',},{key: 2,value: '13',},{key: 3,value: '16',},{key: 4,value: '18',},{key: 5,value: '24',},{key: 6,value: '32',},{key: 7,value: '48',},];let tpl = '';tpl += '<select id="fontSizeSelect" onchange="selectFontSize()">';for (let i = 0; i < fontSizes.length; i++) {tpl += `<option value="${fontSizes[i].key}" style="font-size: '${fontSizes[i].value}px'">${fontSizes[i].value}</option>`;}tpl+ '</select>';return tpl;}

总算是正常了。
前景色
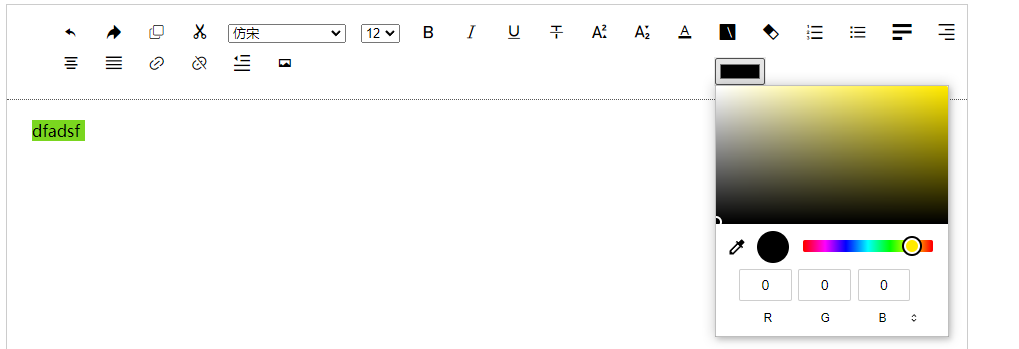
众所周知,要想随心所欲地设置富文本的颜色,必须提供一个颜色选择器,我们这里暂不考虑浏览器兼容性,直接使用HTML5中 type 为 color 的input 组件。
function showColorPicker(btn, type) {let tpl = getColorPickerTpl();const $dialog = document.getElementById('editorDialog');$dialog.innerHTML = tpl;$dialog.style.top = (btn.offsetTop + btn.offsetHeight + 15) + 'px';$dialog.style.left = btn.offsetLeft + 'px';$dialog.style.display = 'block';const colorPicker = document.getElementById('colorPicker');colorPicker.addEventListener("input", setColor.bind(this, type), false);colorPicker.addEventListener("change", setColor.bind(this, type), false);document.addEventListener("click", function(e) {e.stopPropagation();const $i = btn.firstChild;if (e.target !== $i && e.target !==colorPicker) {$dialog.style.display = 'none';}});}function getColorPickerTpl(type) {const tpl = `<input type="color" id="colorPicker" />`;return tpl;}function setColor(type, event) {const $dialog = document.getElementById('editorDialog');document.execCommand(type, 'false', event.target.value);$dialog.style.display = 'none';}

背景色
背景色的逻辑与前景色一样,所以其逻辑可以复用,只需要传入不同参数即可:
btn.onclick = function(e) {document.execCommand(command, 'true', '');if (command === 'fontColor') {showColorPicker(btn, 'foreColor');}if (command === 'backColor') {showColorPicker(btn, 'backColor');}};
但是,这里有一个问题,我们为文档对象和调色板绑定了事件监听,但却没有在任何地方进行解绑。
为了完善解绑功能,我们需要定义两个全局变量来分别存储设置富文本内容字体的监听函数和解绑监听隐藏调色板的函数。因为两个监听函数使用了bind 方法已便传参,但bind的问题是,它会产生一个新的函数,所以我们需要将这个新产生的函数缓存下来,以便在移除监听时传入与绑定时相同的函数。
var hideColorPickerFun;var setColorFun;function showColorPicker(btn, type) {//...hideColorPickerFun = hideColorPicker.bind(document, colorPicker, $dialog, btn, type);setColorFun = setColor.bind(this, type, $dialog, colorPicker, btn);colorPicker.addEventListener("input", setColorFun, false);colorPicker.addEventListener("change", setColorFun, false);document.addEventListener("click", hideColorPickerFun, false);}function hideColorPicker(colorPicker, $dialog, btn, type, e) {e.stopPropagation();const $i = btn.firstChild;if (e.target !== $i && e.target !==colorPicker) {$dialog.style.display = 'none';document.removeEventListener('click', hideColorPickerFun, false);colorPicker.removeEventListener('input', setColorFun, false);colorPicker.removeEventListener('change', setColorFun, false);$dialog.innerHTML = '';}}function setColor(type, $dialog, colorPicker, btn, event) {document.execCommand(type, 'false', event.target.value);$dialog.style.display = 'none';document.removeEventListener('click', hideColorPickerFun, false);colorPicker.removeEventListener('input', setColorFun, false);colorPicker.removeEventListener('change', setColorFun, false);$dialog.innerHTML = '';}
另外,在给功能按钮绑定事件时,我们将条件判断改为分支判断,方便扩展:
btn.onclick = function(e) {switch (command) {case 'fontColor':showColorPicker(btn, 'foreColor');break;case 'backColor':showColorPicker(btn, 'backColor');break;default:document.execCommand(command, 'true', '');}};
插入链接
插入链接的流程是当点击插入链接按钮的时候,弹出一个填写链接的输入框和一个确定按钮,点击确定按钮,为选中的文字增加链接。
直接上代码:
switch (command) {case 'fontColor':showColorPicker(btn, 'foreColor');break;case 'backColor':showColorPicker(btn, 'backColor');break;case 'createLink':showLinkDialog(btn);break;default:document.execCommand(command, 'true', '');}function showLinkDialog(btn) {const tpl = getLinkDialogTpl();const $dialog = document.getElementById('editorDialog');$dialog.innerHTML = tpl;$dialog.style.top = (btn.offsetTop + btn.offsetHeight + 15) + 'px';$dialog.style.left = btn.offsetLeft + 'px';$dialog.style.display = 'block';const linkDialog = document.getElementById('linkDialog');linkDialog.focus();const createLinkBtn = document.getElementById('createLinkBtn');createLinkBtn.addEventListener('click', createLink, false);}function getLinkDialogTpl() {const tpl = `<input type="text" id="linkDialog" /><button id="createLinkBtn">确定</button>`;return tpl;}function createLink() {const linkDialog = document.getElementById('linkDialog');document.execCommand('createLink', 'false', linkDialog.value);const createLinkBtn = document.getElementById('createLinkBtn');createLinkBtn.removeEventListener('click', createLink, false);const $dialog = document.getElementById('editorDialog');$dialog.innerHTML = '';$dialog.style.display = 'none';}

但是这里还有一个问题,当我们的焦点转移到链接输入框时,编辑器中的选区就被取消了,需要我们重新选择文本后再点击确定按钮,才能添加成功。
这个问题的原因和解决方法我们先暂时搁置,后面再细讲。
取消链接
之前插入链接不起作用是因为我们的编辑器没有插入链接功能,无法插入链接,就无法验证取消链接功能,现在我们给编辑器加上了插入链接功能,插入链接后,选中链接,直接点击取消链接按钮,链接就能被取消了。
插入图片
插入图片的原理与插入链接一样。
直接上代码:
switch (command) {case 'fontColor':showColorPicker(btn, 'foreColor');break;case 'backColor':showColorPicker(btn, 'backColor');break;case 'createLink':showLinkDialog(btn);break;case 'insertImage':showImageDialog(btn);break;default:document.execCommand(command, 'true', '');}function showImageDialog(btn) {const tpl = getImageDialogTpl();const $dialog = document.getElementById('editorDialog');$dialog.innerHTML = tpl;$dialog.style.top = (btn.offsetTop + btn.offsetHeight + 15) + 'px';$dialog.style.left = btn.offsetLeft + 'px';$dialog.style.display = 'block';const imageDialog = document.getElementById('imageDialog');imageDialog.focus();const createIamgeBtn = document.getElementById('createIamgeBtn');createIamgeBtn.addEventListener('click', createImage, false);}function getImageDialogTpl() {const tpl = `<input type="text" id="imageDialog" /><button id="createIamgeBtn">确定</button>`;return tpl;}function createImage() {const imageDialog = document.getElementById('imageDialog');document.execCommand('insertImage', 'false', imageDialog.value);const createLinkBtn = document.getElementById('createIamgeBtn');createIamgeBtn.removeEventListener('click', createImage, false);const $dialog = document.getElementById('editorDialog');$dialog.innerHTML = '';$dialog.style.display = 'none';}


至此,我们已经实现了所有浏览器API提供的编辑功能。
当然,现在看代码,有很多冗余,不够优雅,而且功能上也还有很多问题,比如:
- 设置的字体是使用 font属性,而非CSS
- 设置的字号只接受1-7, 并且是以 size 属性而非 CSS控制,超出大小无法设置。
- color使用HTML的input时,始终有一个input框在那里,并且如果手动触发click显示调色板,则调色板的位置无法自动跟随
- link 只能创建或取消,无法修改,无法指定是以何种方式打开
- link和image填写框聚焦时编辑器选区会被取消
当然,这只是肉眼可见的一些问题,还有更多问题,我们下一讲统一再将。
本节所有代码可在分支 1.0.4 上找到。

若有收获,就点个赞吧
0 人点赞
