在Hadoop平台上部署WordCount程序
在 Eclipse 中创建 “WordCount” MapReduce项目
点击 File 菜单,选择 New -> Project…:

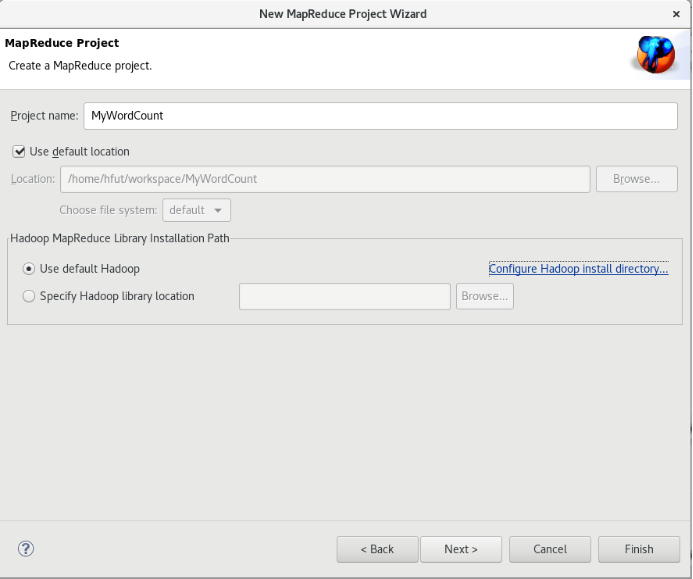
选择 Map/Reduce Project,点击 Next:

点击“Configure Hadoop install directory…”
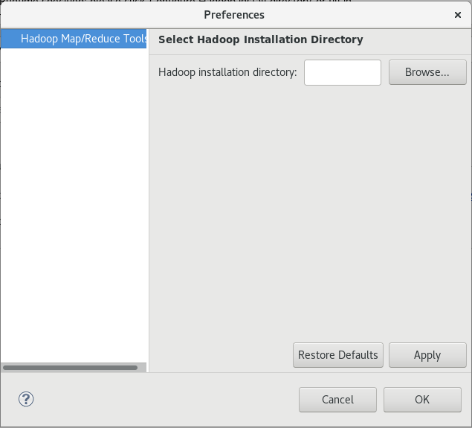
点击“Browse”,选择/home/hfut/hadoop-3.2.2

点击界面右下方“OK”按钮
点击Finish创建项目。
右键点击MyWordCount 项目,选择New -> Class:

在 Name 处填写 WordCountTest

将如下 WordCountTest 的代码复制到该WordCountTest.java中。
import java.io.IOException;import java.util.Iterator;import java.util.StringTokenizer;import org.apache.hadoop.conf.Configuration;import org.apache.hadoop.fs.Path;import org.apache.hadoop.io.IntWritable;import org.apache.hadoop.io.Text;import org.apache.hadoop.mapreduce.Job;import org.apache.hadoop.mapreduce.Mapper;import org.apache.hadoop.mapreduce.Reducer;import org.apache.hadoop.mapreduce.lib.input.FileInputFormat;import org.apache.hadoop.mapreduce.lib.output.FileOutputFormat;import org.apache.hadoop.util.GenericOptionsParser;public class WordCountTest {public WordCountTest() {}public static void main(String[] args) throws Exception {Configuration conf = new Configuration();String[] otherArgs = (new GenericOptionsParser(conf, args)).getRemainingArgs();if(otherArgs.length < 2) {System.err.println("Usage: wordcount <in> [<in>...] <out>");System.exit(2);}Job job = Job.getInstance(conf, "word count test");job.setJarByClass(WordCountTest.class);job.setMapperClass(WordCountTest.TokenizerMapper.class);job.setCombinerClass(WordCountTest.IntSumReducer.class);job.setReducerClass(WordCountTest.IntSumReducer.class);job.setOutputKeyClass(Text.class);job.setOutputValueClass(IntWritable.class);for(int i = 0; i < otherArgs.length - 1; ++i) {FileInputFormat.addInputPath(job, new Path(otherArgs[i]));}FileOutputFormat.setOutputPath(job, new Path(otherArgs[otherArgs.length - 1]));System.exit(job.waitForCompletion(true)?0:1);}public static class IntSumReducer extends Reducer<Text, IntWritable, Text, IntWritable> {private IntWritable result = new IntWritable();public IntSumReducer() {}public void reduce(Text key, Iterable<IntWritable> values, Reducer<Text, IntWritable, Text, IntWritable>.Context context) throws IOException, InterruptedException {int sum = 0;IntWritable val;for(Iterator itr = values.iterator(); itr.hasNext(); sum += val.get()) {val = (IntWritable)itr.next();}this.result.set(sum);context.write(key, this.result);}}public static class TokenizerMapper extends Mapper<Object, Text, Text, IntWritable> {private static final IntWritable one = new IntWritable(1);private Text word = new Text();public TokenizerMapper() {}public void map(Object key, Text value, Mapper<Object, Text, Text, IntWritable>.Context context) throws IOException, InterruptedException {StringTokenizer itr = new StringTokenizer(value.toString());while(itr.hasMoreTokens()) {this.word.set(itr.nextToken());context.write(this.word, one);}}}}
将Hadoop配置文件添加到“WordCount” MapReduce项目
将log4j.properties 复制到 WordCount 项目下的 src 文件夹(~/workspace/WordCount/src)中:
[hfut@master ~]$ cp ~/hadoop-3.2.2/etc/hadoop/log4j.properties ~/workspace/MyWordCount/src
复制完成后,务必右键点击 WordCount 选择 refresh 进行刷新(不会自动刷新,需要手动刷新),可以看到文件结构如下所示:

部署到Hadoop平台上运行
请在Eclipse工作界面左侧的“Package Explorer”面板中,在工程名称“MyWordCount”上点击鼠标右键,在弹出的菜单中选择“Export”,如下图所示。

然后,会看到弹出以下界面:

在该界面中,选择“Runnable JAR file”,然后,点击“Next>”按钮,弹出如下所示界面。

在该界面中,“Launch configuration”用于设置生成的JAR包被部署启动时运行的主类,需要在下拉列表中选择刚才配置的类“WordCountTest-MyWordCount”。在“Export destination”中需要设置JAR包要输出保存到哪个目录,比如,这里设置为“/home/hfut/hadoop-3.2.2/myapp/WordCountTest.jar”。在“Library handling”下面选择“Extract required libraries into generated JAR”。然后,点击“Finish”按钮,会出现如下图所示界面。

可以忽略该界面的信息,直接点击界面右下角的“OK”按钮,启动打包过程。打包过程结束后,会出现一个警告信息界面,如下图所示。

可以忽略该界面的信息,直接点击界面右下角的“OK”按钮。至此,已经顺利把MyWordCount工程打包生成了WordCountTest.jar。可以到Linux系统中查看一下生成的WordCountTest.jar文件,可以在Linux的终端中执行如下命令:
[hfut@master ~]$ ls ~/hadoop-3.2.2/myapp/

可以看到,“~/hadoop-3.2.2/myapp/”目录下已经存在一个WordCountTest.jar文件。现在,就可以在Linux系统中,使用hadoop jar命令运行程序,命令如下:
[hfut@master ~]$ hadoop jar ~/hadoop-3.2.2/myapp/MyWordCount.jar hdfs://master:9000/user/hfut/input hdfs://master:9000/user/hfut/output

由于文件已经存在,所以报错了
Exception in thread "main" org.apache.hadoop.mapred.FileAlreadyExistsException: Output directory hdfs://master:9000/user/hfut/output already exists
删除hadoop 中的/uesr/hfut/output后运行

查看运行结果
可以读取文件
[hfut@master ~]$ hadoop fs -ls /user/hfut/output

[hfut@master ~]$ hadoop fs -cat /user/hfut/output/part-r-00000

文件下载到本地
[hfut@master ~]$ hadoop fs -get /user/hfut/output/part-r-00000 /home/hfut/Downloads

本地查看
[hfut@master ~]$ cd
[hfut@master ~]$ cd Downloads
[hfut@master ~]$ ls
[hfut@master ~]$ cat part-r-00000

key和value
inputFormat将hdfs上要处理的文件一行一行的读入,将文件拆分成splits,由于测试用的文件较小,所以每个文件为一个split,并将文件按行分割形成
这里是把每个文件按行处理,下图有两个文件,每个文件有两行,每一行的开头字符所在位置的偏移量 ,第一行的开头偏移量自然是0,hello world共10个偏移量,加上中间的空格11个偏移量,回车再算一个,第二行的开头偏移量是12.

2)将分割好的
这里是用户自定义的map处理程序,每一行的字符按“ ” 分割,分割的每一个元素都记为1,也就是map节点的所有value都是1

3)得到map方法输出的

4)Reducer先对从Mapper接收的数据进行排序,再交由用户自定义的reduce方法进行处理,得到新的


若有收获,就点个赞吧
0 人点赞
