在实际的业务开发中,我们有太多的状态需要进行维护和管理,那么我们就需要将redux使用流程的这些模块进行进行相应的拆分,然后再合并起来,这样的话、便于我们后期的状态的维护与更新。
1、拆分redux、模块化开发
在项目中对redux进行相应的拆分,分为不同的模块,使不同的模块完成不同的功能。

1.1 actionCreators.js文件
作用:定义生成action对象的函数。
// 定义修改数据的行为// 引入常量import {INCREMENT,DECREMENT,MUL} from './constants.js'// 数据增加 普通函数定义 不推荐function incrementAction(num) {return {type: INCREMENT,num}}// 数据减少 箭头函数定义 不推荐const decrementAction = (num) => {return {type: DECREMENT,num}}// 数据相乘 箭头函数定义 简写形式 推荐写法const mulAction = num => ({type: MUL,num})// 将定义的函数进行导出export { incrementAction, decrementAction, mulAction }
1.2 constants.js
作用:定义action的类型,进行导出,在实际的业务组件和reducer纯函数中使用。
// 定义我们的常量,并将我们的常量进行导出使用。export const INCREMENT = 'INCREMENT'export const DECREMENT = 'DECREMENT'export const MUL = 'MUL'
1.3 reducer.js纯函数
作用:将我们需要管理的状态和需要派发的行为进行结合,根据派发行为的不同,返回不同的数据状态。
// 1、需要定义redux管理的初始化状态// 2、引入修改状态的行为action// 引入actionimport {INCREMENT,DECREMENT,MUL} from './constants.js'// 定义初始化状态const defaultStatus = {counter: 100}// 定义纯函数reducerfunction reducer(state = defaultStatus, action) {switch(action.type) {case INCREMENT:return {...state, counter: state.counter + action.num }case DECREMENT:return {...state, counter: state.counter - action.num }case MUL:return {...state, counter: state.counter * action.num }default:return state}}// 将reducer函数默认导出export default reducer;
1.4 index.js文件-store数据仓库的入口文件
原理:引入redux,创建store数据仓库,管理传入的状态,将reducer纯函数作为参数传入,再将store进行导出,提供给我们实际的业务组件使用。
// 在这里应该将store进行导出 提供给业务组件使用 在业务组件中只需要使用store进行dispatch派发action即可// 需要引入reduximport redux from 'redux'// 引入纯函数reducer纯函数作为参数import reducer from './reducer.js'const store = redux.createStore(reducer)// 将store对象进行导出 提供给我们实际的业务组件进行使用。export default store;
1.5 业务组件使用store的步骤
方法:引入store, 引入actionCreators文件,订阅store事件,并且派发相应的action行为。
// 当作业务组件使用 直接使用store 调用store来派发行为// 引入storeimport store from "./store/index.js"// 导入入actionimport {incrementAction,decrementAction,mulAction} from "./store/actionCreators.js"// 订阅store状态发生变化的事件store.subscribe(() => {// 获取最新的状态值const newState = store.getState()console.log(newState)})// 派发修改状态的行为store.dispatch(incrementAction(200))store.dispatch(decrementAction(200))store.dispatch(mulAction(5))// 在我们实际的业务组件中的使用流程也是这样的
1.6 在react组件中使用的步骤
使用步骤: 1、在react组件的生命周期中,componentDidMount中使用store进行数据的订阅。订阅完成后,一旦我们的数据发生了变化,我们的订阅事件就会发生回调,此时数据更新后,我们调用this.setState()函数,就会重新调用render方法,界面就会更新。也就是我们的状态更新了,我们的界面也应该随之更新。 2、在dom元素挂载以后,监听页面的相关的事件或者在其它的时机使用store来派发行为。再次更新页面数据。
// 在类组件中使用store中的状态 因为这个状态是我们组件内部需要的状态import React, { PureComponent } from 'react'// 引入storeimport store from '../store'// 引入actionimport { addNumberAction, subNumberAction } from '../store/actionCreators'export default class About extends PureComponent {constructor(props) {super(props)this.state = {counter: store.getState().counter}}// 组件挂载完毕componentDidMount() {this.unsubscribe = store.subscribe(() => {const newState = store.getState().counter;// 更新状态this.setState({counter: newState})})}// 组件卸载的时候 取消事件的订阅componentWillUnmount() {this.unsubscribe()}render() {return (<div><h2>数字: { this.state.counter }</h2><h2>about组件</h2><button onClick={ () => this.increment() }>+20</button><button onClick={ () => this.decrement() }>-10</button></div>)}increment() {// 派发actionstore.dispatch(addNumberAction(20))}decrement() {// 派发actionstore.dispatch(subNumberAction(10))}}
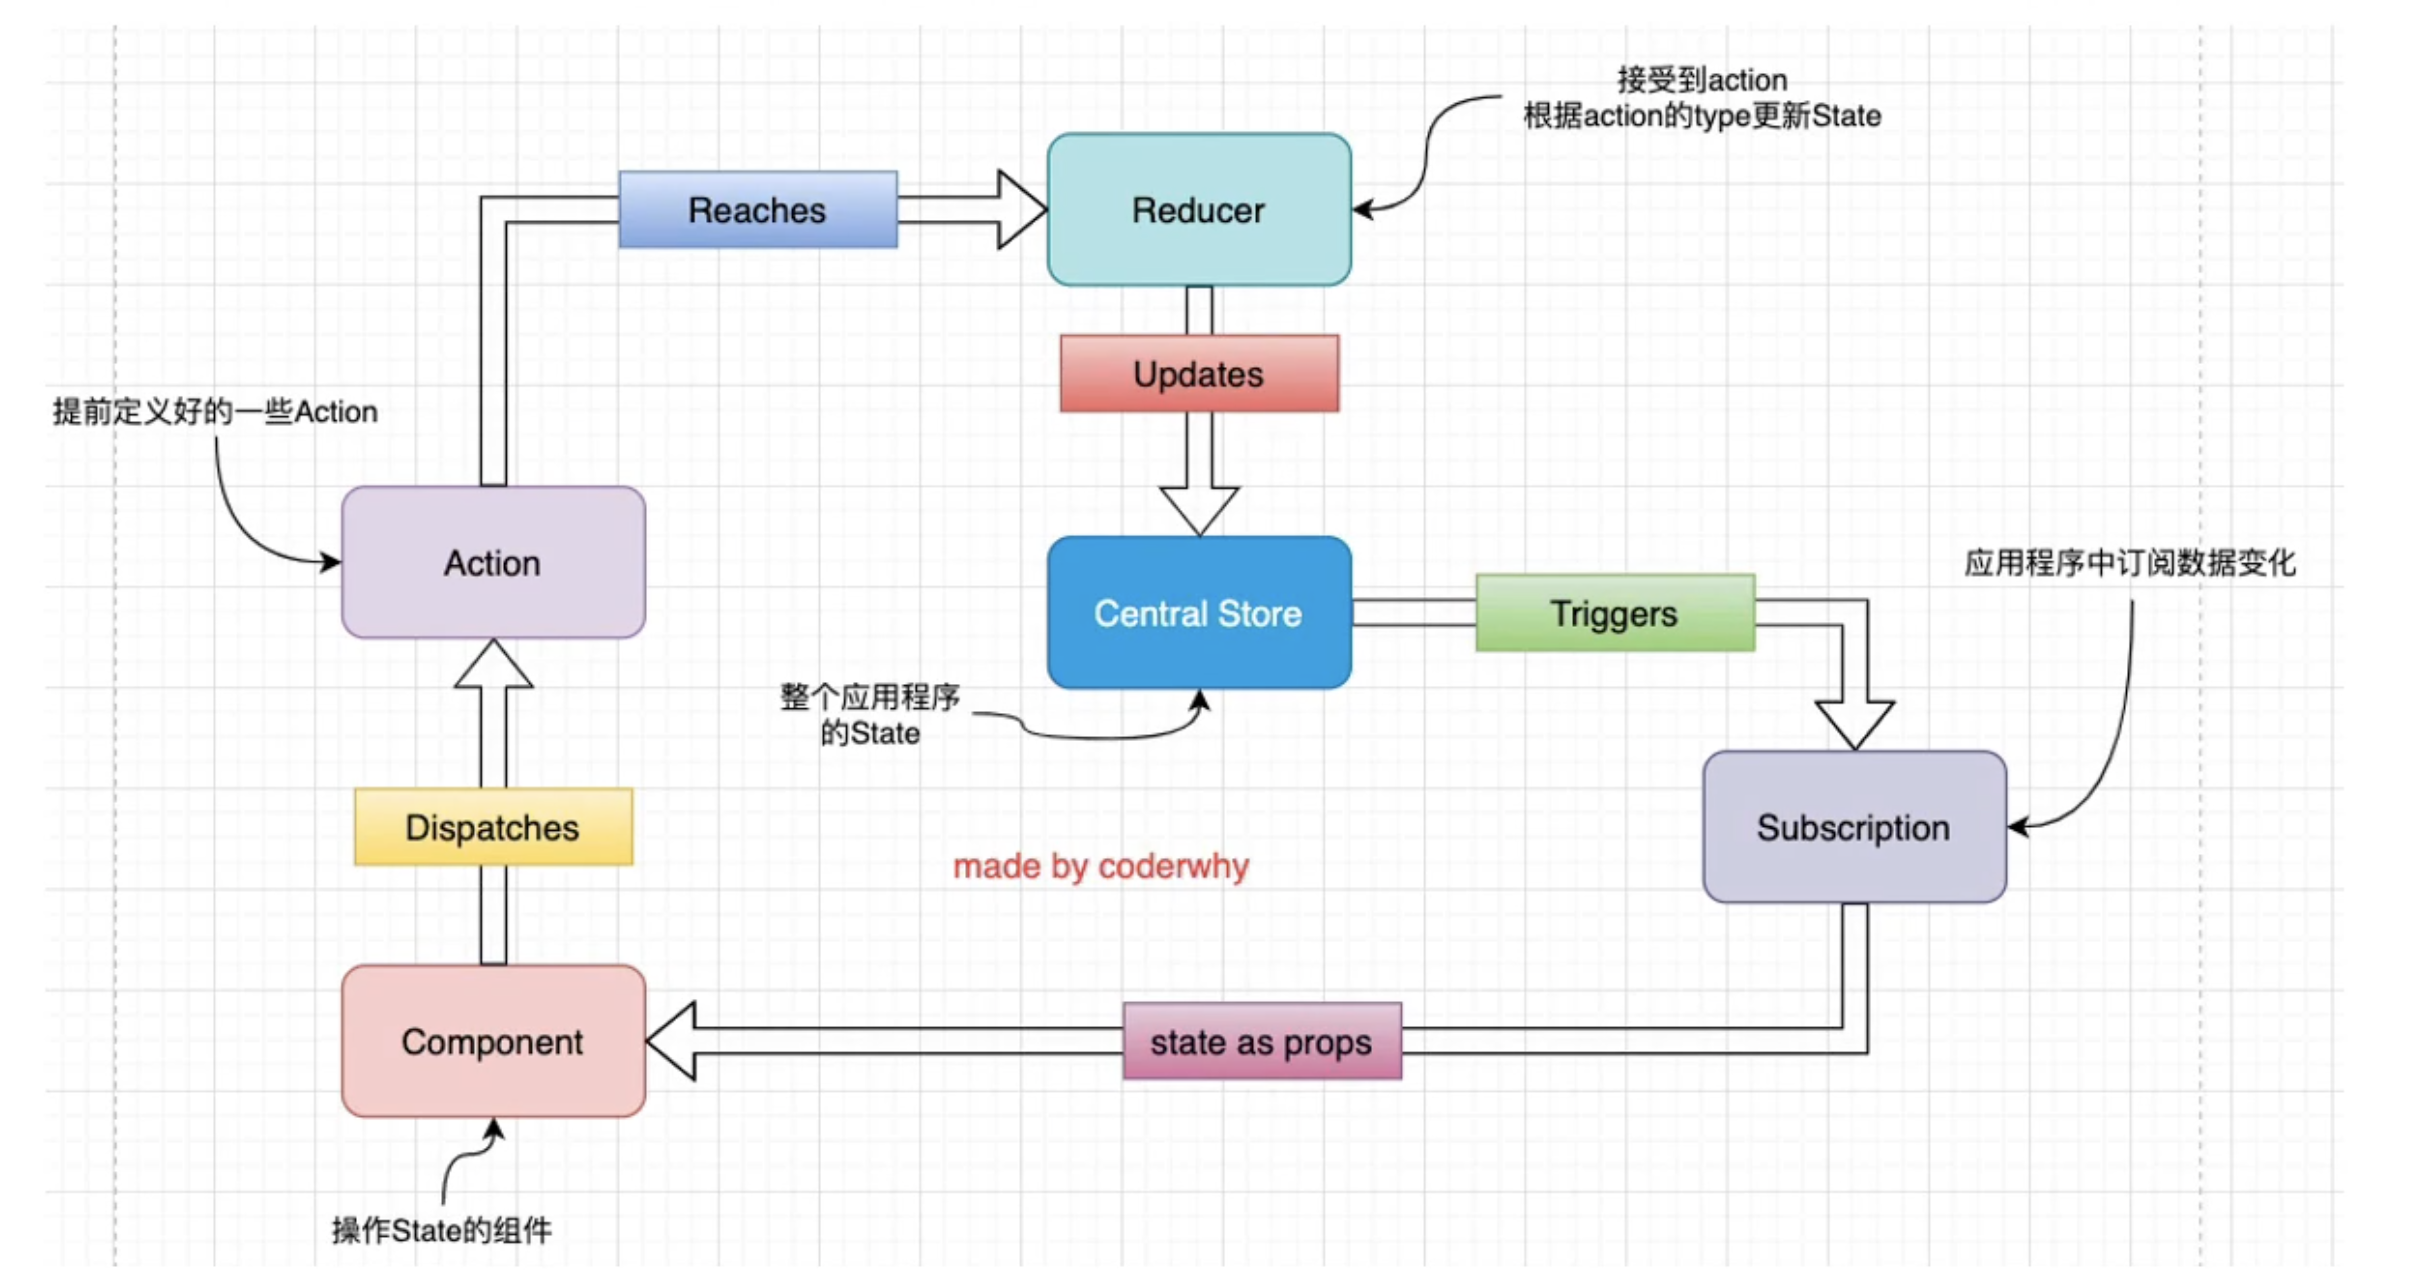
1.7 redux使用的流程图
流程图解释: 1、在我们实际的业务组件中引入全局仓库store,以及store需要派发的action行为,action是我们预先定义好的数据类型。在实际的业务组件中,需要先订阅store状态,当store的状态发生变更后,要修改state,重新渲染更新界面。然后再派发相应的action。action派发后,我们store事件的订阅才会进行相应的回调。 2、当我们派发相应的action后,在redux的内部,就会主动回调我们的reducer函数,reduce函数会结合store中维护的状态以及派发action的类型,对我们管理的状态进行修改,最后返回新修改的状态。 3、store中返回的新的状态可以对其映射为组件的属性,直接在组件中进行使用以及修改组件的相关属性。 以上就是redux的使用流程。
1.8 需要注意的事项:
1、redux推荐我们全局只创建一个store对象,不需要创建多个。
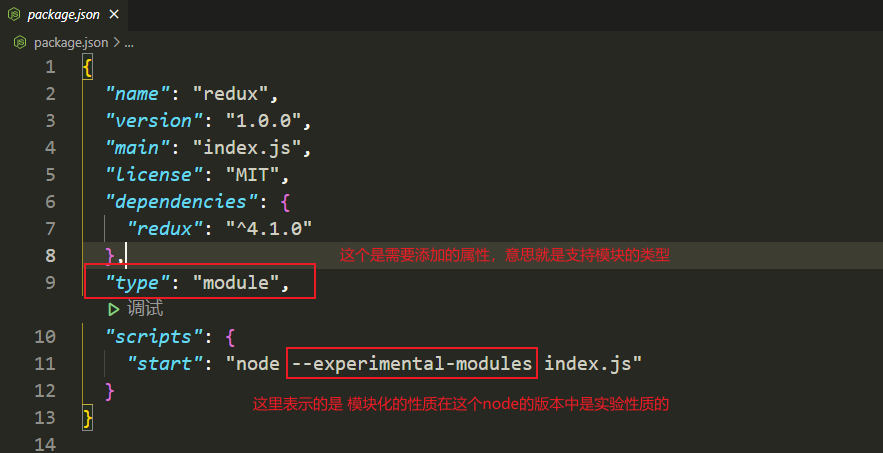
4.7 在node中,由于低版本的node不支持ES6的导入(import)和导出(export)的功能,在node的13.X版本下,我们需要进行一些特殊的配置,让node支持我们平时习惯使用的ES Module的功能,对package.json文件进行具体的配置,见下图:

以上就是redux简单的使用流程,以及对redu各个模块进行相应的拆分。


