- 消息可靠性投递
- Consumer ACK
- 消费端限流
- TTL
- 死信队列
- 延迟队列
- 日志与监控
- 消息可靠性分析与追踪
- 管理
1.1 消息的可靠投递
在使用 RabbitMQ 的时候,作为消息发送方希望杜绝任何消息丢失或者投递失败场景。RabbitMQ 为我们提供了两种方式用来控制消息的投递可靠性模式。
- confirm 确认模式
return 退回模式
Rabbitmq 整个消息投递的路径为: producer—->rabbitmq broker—->exchange—->queue—->consumer
消息从 producer 到 exchange 则会返回一个 confirmCallback 。
消息从 exchange—>queue 投递失败则会返回一个 returnCallback 。
我们将利用这两个 callback 控制消息的可靠性投递
1.1.1 确认模式
1)搭建生产者Spring工程
2)导入Spring整合RabbitMQ的相关依赖
3)编写spring-rabbitmq-producter.xml配置文件
rabbitmq-properties:配置文件
rabbitmq.host=172.16.98.133rabbitmq.port=5672rabbitmq.username=guestrabbitmq.password=guestrabbitmq.virtual-host=/
<?xml version="1.0" encoding="UTF-8"?><beans xmlns="http://www.springframework.org/schema/beans"xmlns:xsi="http://www.w3.org/2001/XMLSchema-instance"xmlns:context="http://www.springframework.org/schema/context"xmlns:rabbit="http://www.springframework.org/schema/rabbit"xsi:schemaLocation="http://www.springframework.org/schema/beanshttp://www.springframework.org/schema/beans/spring-beans.xsdhttp://www.springframework.org/schema/contexthttps://www.springframework.org/schema/context/spring-context.xsdhttp://www.springframework.org/schema/rabbithttp://www.springframework.org/schema/rabbit/spring-rabbit.xsd"><!--加载配置文件--><context:property-placeholder location="classpath:rabbitmq.properties"/><!-- 定义rabbitmq connectionFactory --><!-- publisher-confirms="true" 表示开启确认模式 --><rabbit:connection-factory id="connectionFactory" host="${rabbitmq.host}"port="${rabbitmq.port}"username="${rabbitmq.username}"password="${rabbitmq.password}"virtual-host="${rabbitmq.virtual-host}"publisher-confirms="true"/><!--定义管理交换机、队列--><rabbit:admin connection-factory="connectionFactory"/><!--定义rabbitTemplate对象操作可以在代码中方便发送消息--><rabbit:template id="rabbitTemplate" connection-factory="connectionFactory"/><!--消息可靠性投递(生产端)--><rabbit:queue id="test_queue_confirm" name="test_queue_confirm"></rabbit:queue><rabbit:direct-exchange name="test_exchange_confirm"><rabbit:bindings><rabbit:binding queue="test_queue_confirm" key="confirm"></rabbit:binding></rabbit:bindings></rabbit:direct-exchange></beans>
4)编写测试代码( 使用rabbitTemplate.setConfirmCallback设置回调函数 )
@RunWith(SpringJUnit4ClassRunner.class)@ContextConfiguration(locations = "classpath:spring-rabbitmq-producer.xml")public class ProducerTest {@Autowiredprivate RabbitTemplate rabbitTemplate;/*** 确认模式:* 步骤:* 1. 确认模式开启:ConnectionFactory中开启publisher-confirms="true"* 2. 在rabbitTemplate定义ConfirmCallBack回调函数*/@Testpublic void testConfirm() {//2. 定义回调rabbitTemplate.setConfirmCallback(new RabbitTemplate.ConfirmCallback() {/**** @param correlationData 相关配置信息* @param ack exchange交换机 是否成功收到了消息。true 成功,false代表失败* @param cause 失败原因*/@Overridepublic void confirm(CorrelationData correlationData, boolean ack, String cause) {System.out.println("confirm方法被执行了....");if (ack) {//接收成功System.out.println("接收成功消息" + cause);} else {//接收失败System.out.println("接收失败消息" + cause);//做一些处理,让消息再次发送。}}});//3. 发送消息rabbitTemplate.convertAndSend("test_exchange_confirm111", "confirm", "message confirm....");}}
1.1.2 退回模式
1)编写spring-rabbitmq-producter.xml配置文件
<?xml version="1.0" encoding="UTF-8"?><beans xmlns="http://www.springframework.org/schema/beans"xmlns:xsi="http://www.w3.org/2001/XMLSchema-instance"xmlns:context="http://www.springframework.org/schema/context"xmlns:rabbit="http://www.springframework.org/schema/rabbit"xsi:schemaLocation="http://www.springframework.org/schema/beanshttp://www.springframework.org/schema/beans/spring-beans.xsdhttp://www.springframework.org/schema/contexthttps://www.springframework.org/schema/context/spring-context.xsdhttp://www.springframework.org/schema/rabbithttp://www.springframework.org/schema/rabbit/spring-rabbit.xsd"><!--加载配置文件--><context:property-placeholder location="classpath:rabbitmq.properties"/><!-- 定义rabbitmq connectionFactory --><!-- publisher-returns="true" 表示开去退回模式 --><rabbit:connection-factory id="connectionFactory" host="${rabbitmq.host}"port="${rabbitmq.port}"username="${rabbitmq.username}"password="${rabbitmq.password}"virtual-host="${rabbitmq.virtual-host}"publisher-confirms="true"publisher-returns="true"/><!--定义管理交换机、队列--><rabbit:admin connection-factory="connectionFactory"/><!--定义rabbitTemplate对象操作可以在代码中方便发送消息--><rabbit:template id="rabbitTemplate" connection-factory="connectionFactory"/><!--消息可靠性投递(生产端)--><rabbit:queue id="test_queue_confirm" name="test_queue_confirm"></rabbit:queue><rabbit:direct-exchange name="test_exchange_confirm"><rabbit:bindings><rabbit:binding queue="test_queue_confirm" key="confirm"></rabbit:binding></rabbit:bindings></rabbit:direct-exchange></beans>
2)编写测试代码( 使用rabbitTemplate.setReturnCallback设置退回函数 )
/*** 回退模式: 当消息发送给Exchange后,Exchange路由到Queue失败是 才会执行 ReturnCallBack* 步骤:* 1. 开启回退模式:publisher-returns="true"* 2. 设置ReturnCallBack* 3. 设置Exchange处理消息的模式:* 1. 如果消息没有路由到Queue,则丢弃消息(默认)* 2. 如果消息没有路由到Queue,返回给消息发送方ReturnCallBack*/@Testpublic void testReturn() {//设置交换机处理失败消息的模式rabbitTemplate.setMandatory(true);//2.设置ReturnCallBackrabbitTemplate.setReturnCallback(new RabbitTemplate.ReturnCallback() {/**** @param message 消息对象* @param replyCode 错误码* @param replyText 错误信息* @param exchange 交换机* @param routingKey 路由键*/@Overridepublic void returnedMessage(Message message, int replyCode, String replyText, String exchange, String routingKey) {System.out.println("return 执行了....");System.out.println(message);System.out.println(replyCode);System.out.println(replyText);System.out.println(exchange);System.out.println(routingKey);//处理}});}
1.1.3 小结
➢ 设置ConnectionFactory的publisher-confirms=”true” 开启 确认模式。
➢ 使用rabbitTemplate.setConfirmCallback设置回调函数。当消息发送到exchange后回 调confirm方法。在方法中判断ack,如果为true,则发送成功,如果为false,则发 送失败,需要处理。
➢ 设置ConnectionFactory的publisher-returns=”true” 开启 退回模式。
➢ 使用rabbitTemplate.setReturnCallback设置退回函数,当消息从exchange路由到 queue失败后,如果设置了rabbitTemplate.setMandatory(true)参数,则会将消息退回给producer。并执行回调函数returnedMessage。
➢ 在RabbitMQ中也提供了事务机制,但是性能较差,此处不做讲解。
使用channel下列方法,完成事务控制:
- txSelect(), 用于将当前channel设置成transaction模式
- txCommit(),用于提交事务
- txRollback(),用于回滚事务
1.2 Consumer Ack (消费者)
ack指Acknowledge,确认。 表示消费端收到消息后的确认方式。
有三种确认方式:
- 自动确认:acknowledge=”none”
- 手动确认:acknowledge=”manual”
- 根据异常情况确认:acknowledge=”auto”,(这种方式使用麻烦,不作讲解)
其中自动确认是指,当消息一旦被Consumer接收到,则自动确认收到,并将相应 message 从 RabbitMQ 的 消息缓存中移除。但是在实际业务处理中,很可能消息接收到,业务处理出现异常,那么该消息就会丢失。如果设置了手动确认方式,则需要在业务处理成功后,调用channel.basicAck(),手动签收,如果出现异常,则 调用channel.basicNack()方法,让其自动重新发送消息。
1)创建消费者工程
2)导入Spring整合RabbitMQ相关依赖
3)配置spring-rabbitmq-consumer.xml配置
rabbitmq.properties:配置
rabbitmq.host=172.16.98.133rabbitmq.port=5672rabbitmq.username=guestrabbitmq.password=guestrabbitmq.virtual-host=/
<?xml version="1.0" encoding="UTF-8"?><beans xmlns="http://www.springframework.org/schema/beans"xmlns:xsi="http://www.w3.org/2001/XMLSchema-instance"xmlns:context="http://www.springframework.org/schema/context"xmlns:rabbit="http://www.springframework.org/schema/rabbit"xsi:schemaLocation="http://www.springframework.org/schema/beanshttp://www.springframework.org/schema/beans/spring-beans.xsdhttp://www.springframework.org/schema/contexthttps://www.springframework.org/schema/context/spring-context.xsdhttp://www.springframework.org/schema/rabbithttp://www.springframework.org/schema/rabbit/spring-rabbit.xsd"><!--加载配置文件--><context:property-placeholder location="classpath:rabbitmq.properties"/><!-- 定义rabbitmq connectionFactory --><rabbit:connection-factory id="connectionFactory" host="${rabbitmq.host}"port="${rabbitmq.port}"username="${rabbitmq.username}"password="${rabbitmq.password}"virtual-host="${rabbitmq.virtual-host}"/><!--扫描注解,加载到Spring容器中--><context:component-scan base-package="com.itheima.listener" /><!--定义监听器容器--><!--acknowledge="manual" 表示手动确认模式--><rabbit:listener-container connection-factory="connectionFactory" acknowledge="manual"><rabbit:listener ref="ackListener" queue-names="test_queue_confirm"></rabbit:listener></rabbit:listener-container></beans>
4)编写AckListener监听器实现ChannelAwareMessageListener接口
/*** Consumer ACK机制:* 1. 设置手动签收。acknowledge="manual"* 2. 让监听器类实现ChannelAwareMessageListener接口* 3. 如果消息成功处理,则调用channel的 basicAck()签收* 4. 如果消息处理失败,则调用channel的basicNack()拒绝签收,broker重新发送给consumer***/@Componentpublic class AckListener implements ChannelAwareMessageListener {@Overridepublic void onMessage(Message message, Channel channel) throws Exception {long deliveryTag = message.getMessageProperties().getDeliveryTag();try {//1.接收转换消息System.out.println(new String(message.getBody()));//2. 处理业务逻辑System.out.println("处理业务逻辑...");int i = 3/0;//出现错误//3. 手动签收channel.basicAck(deliveryTag,true);} catch (Exception e) {//e.printStackTrace();//4.拒绝签收/*第三个参数:requeue:重回队列。如果设置为true,则消息重新回到queue,broker会重新发送该消息给消费端*/channel.basicNack(deliveryTag,true,true);//channel.basicReject(deliveryTag,true);}}}
1.2.1 小结
➢ 在rabbit:listener-container标签中设置acknowledge属性,设置ack方式 none:自动确认,manual:手动确认
➢ 如果在消费端没有出现异常,则调用channel.basicAck(deliveryTag,false);方法确认签收消息
➢ 如果出现异常,则在catch中调用 basicNack或 basicReject,拒绝消息,让MQ重新发送消息。
1.3 消息可靠性总结
- 持久化
- exchange要持久化
- queue要持久化
- message要持久化
- 生产方确认Confirm模式
3. 消费方确认Ack 模式
4. Broker高可用 ,搭建集群
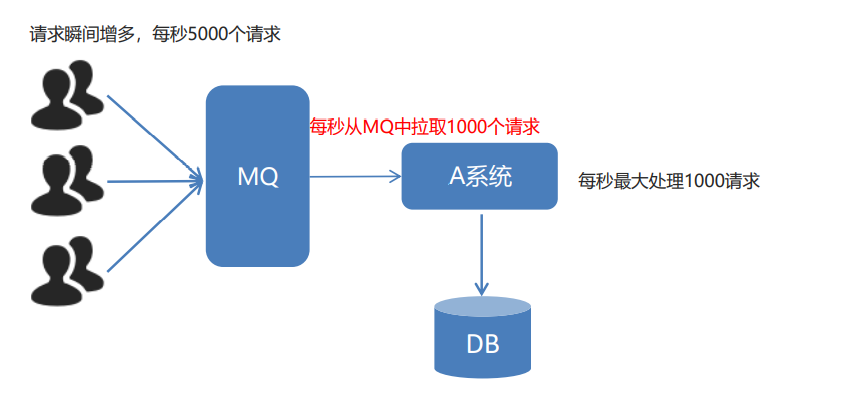
1.4 消费端限流
```xml ➢ 在
**1)编写配置文件**```xml<?xml version="1.0" encoding="UTF-8"?><beans xmlns="http://www.springframework.org/schema/beans"xmlns:xsi="http://www.w3.org/2001/XMLSchema-instance"xmlns:context="http://www.springframework.org/schema/context"xmlns:rabbit="http://www.springframework.org/schema/rabbit"xsi:schemaLocation="http://www.springframework.org/schema/beanshttp://www.springframework.org/schema/beans/spring-beans.xsdhttp://www.springframework.org/schema/contexthttps://www.springframework.org/schema/context/spring-context.xsdhttp://www.springframework.org/schema/rabbithttp://www.springframework.org/schema/rabbit/spring-rabbit.xsd"><!--加载配置文件--><context:property-placeholder location="classpath:rabbitmq.properties"/><!-- 定义rabbitmq connectionFactory --><rabbit:connection-factory id="connectionFactory" host="${rabbitmq.host}"port="${rabbitmq.port}"username="${rabbitmq.username}"password="${rabbitmq.password}"virtual-host="${rabbitmq.virtual-host}"/><context:component-scan base-package="com.itheima.listener" /><!--定义监听器容器--><!-- prefetch="1" 表示消费端一次拉取多少消息 --><rabbit:listener-container connection-factory="connectionFactory" acknowledge="manual" prefetch="1" ><!-- <rabbit:listener ref="ackListener" queue-names="test_queue_confirm"></rabbit:listener>--><rabbit:listener ref="qosListener" queue-names="test_queue_confirm"></rabbit:listener></rabbit:listener-container></beans>
2)编写测试代码
/*** Consumer 限流机制* 1. 确保ack机制为手动确认。* 2. listener-container配置属性* perfetch = 1,表示消费端每次从mq拉去一条消息来消费,直到手动确认消费完毕后,才会继续拉去下一条消息。*/@Componentpublic class QosListener implements ChannelAwareMessageListener {@Overridepublic void onMessage(Message message, Channel channel) throws Exception {Thread.sleep(1000);//1.获取消息System.out.println(new String(message.getBody()));//2. 处理业务逻辑//3. 签收channel.basicAck(message.getMessageProperties().getDeliveryTag(),true);}}
1.5 TTL (存活时间/过期时间)
➢ TTL 全称 Time To Live(存活时间/过期时间)。
➢ 当消息到达存活时间后,还没有被消费,会被自动清除。
➢ RabbitMQ可以对消息设置过期时间,也可以对整个队列(Queue)设置过期时间。
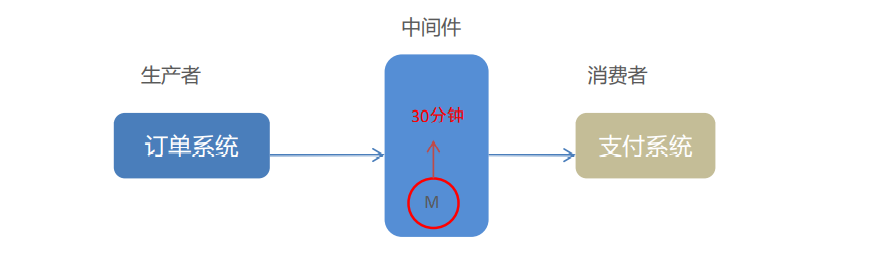
当订单系统下单后,会给MQ发送一条订单消息,当这条消息30分钟后,还是没有去消费就从队列中删除。
1.5.1 队列统一过期
1)编写spring-rabbitmq-producter.xml配置文件
<?xml version="1.0" encoding="UTF-8"?><beans xmlns="http://www.springframework.org/schema/beans"xmlns:xsi="http://www.w3.org/2001/XMLSchema-instance"xmlns:context="http://www.springframework.org/schema/context"xmlns:rabbit="http://www.springframework.org/schema/rabbit"xsi:schemaLocation="http://www.springframework.org/schema/beanshttp://www.springframework.org/schema/beans/spring-beans.xsdhttp://www.springframework.org/schema/contexthttps://www.springframework.org/schema/context/spring-context.xsdhttp://www.springframework.org/schema/rabbithttp://www.springframework.org/schema/rabbit/spring-rabbit.xsd"><!--加载配置文件--><context:property-placeholder location="classpath:rabbitmq.properties"/><!-- 定义rabbitmq connectionFactory --><rabbit:connection-factory id="connectionFactory" host="${rabbitmq.host}"port="${rabbitmq.port}"username="${rabbitmq.username}"password="${rabbitmq.password}"virtual-host="${rabbitmq.virtual-host}"publisher-confirms="true"publisher-returns="true"/><!--定义管理交换机、队列--><rabbit:admin connection-factory="connectionFactory"/><!--定义rabbitTemplate对象操作可以在代码中方便发送消息--><rabbit:template id="rabbitTemplate" connection-factory="connectionFactory"/><!--消息可靠性投递(生产端)--><rabbit:queue id="test_queue_confirm" name="test_queue_confirm"></rabbit:queue><rabbit:direct-exchange name="test_exchange_confirm"><rabbit:bindings><rabbit:binding queue="test_queue_confirm" key="confirm"></rabbit:binding></rabbit:bindings></rabbit:direct-exchange><!--ttl--><rabbit:queue name="test_queue_ttl" id="test_queue_ttl"><!--设置queue的参数--><rabbit:queue-arguments><!--x-message-ttl指队列的过期时间--><entry key="x-message-ttl" value="100000" value-type="java.lang.Integer"></entry></rabbit:queue-arguments></rabbit:queue><rabbit:topic-exchange name="test_exchange_ttl" ><rabbit:bindings><rabbit:binding pattern="ttl.#" queue="test_queue_ttl"></rabbit:binding></rabbit:bindings></rabbit:topic-exchange></beans>
2)编写测试代码
/*** TTL:过期时间* 1. 队列统一过期** 2. 消息单独过期*** 如果设置了消息的过期时间,也设置了队列的过期时间,它以时间短的为准。* 队列过期后,会将队列所有消息全部移除。* 消息过期后,只有消息在队列顶端,才会判断其是否过期(移除掉)**/@Testpublic void testTtl() {for (int i = 0; i < 10; i++) {// 发送消息rabbitTemplate.convertAndSend("test_exchange_ttl", "ttl.hehe", "message ttl....");}}
1.5.2 消息单独过期
/*** TTL:过期时间* 1. 队列统一过期** 2. 消息单独过期*** 如果设置了消息的过期时间,也设置了队列的过期时间,它以时间短的为准。* 队列过期后,会将队列所有消息全部移除。* 消息过期后,只有消息在队列顶端,才会判断其是否过期(移除掉)**/@Testpublic void testTtl() {// 消息后处理对象,设置一些消息的参数信息MessagePostProcessor messagePostProcessor = new MessagePostProcessor() {@Overridepublic Message postProcessMessage(Message message) throws AmqpException {//1.设置message的信息message.getMessageProperties().setExpiration("5000");//消息的过期时间//2.返回该消息return message;}};//消息单独过期//rabbitTemplate.convertAndSend("test_exchange_ttl", "ttl.hehe", "message ttl....",messagePostProcessor);//测试消息过期后,只有消息在队列顶端,才会判断其是否过期(移除掉)for (int i = 0; i < 10; i++) {if(i == 5){//消息单独过期rabbitTemplate.convertAndSend("test_exchange_ttl", "ttl.hehe", "message ttl....",messagePostProcessor);}else{//不过期的消息rabbitTemplate.convertAndSend("test_exchange_ttl", "ttl.hehe", "message ttl....");}}}
1.5.3 小结
➢ 设置队列过期时间使用参数:x-message-ttl,单位:ms(毫秒),会对整个队列消息统一过期。
➢ 设置消息过期时间使用参数:expiration。单位:ms(毫秒),当该消息在队列头部时(消费时),会单独判断 这一消息是否过期。
➢ 如果两者都进行了设置,以时间短的为准。
1.6 死信队列
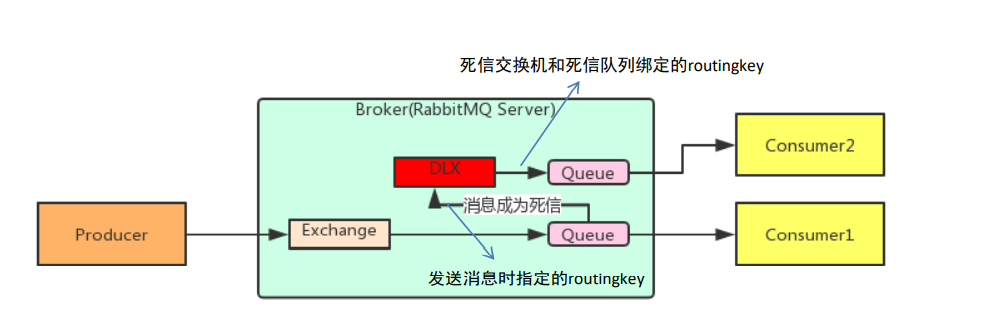
死信队列,英文缩写:DLX 。Dead Letter Exchange(死信交换机),当消息成为Dead message(死信)后,可以 被重新发送到另一个交换机,这个交换机就是DLX(死信交换机)。 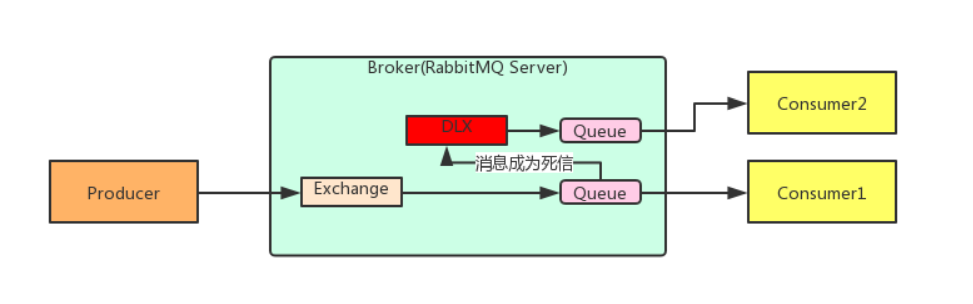
消息成为死信的三种情况:
队列消息长度到达限制;
2. 消费者拒接消费消息,basicNack/basicReject,并且不把消息重新放入原目标队列,requeue=false;
3. 原队列存在消息过期设置,消息到达超时时间未被消费;队列绑定死信交换机:
给队列设置参数: x-dead-letter-exchange 和 x-dead-letter-routing-key
1)编写spring-rabbitmq-producter配置文件
<?xml version="1.0" encoding="UTF-8"?><beans xmlns="http://www.springframework.org/schema/beans"xmlns:xsi="http://www.w3.org/2001/XMLSchema-instance"xmlns:context="http://www.springframework.org/schema/context"xmlns:rabbit="http://www.springframework.org/schema/rabbit"xsi:schemaLocation="http://www.springframework.org/schema/beanshttp://www.springframework.org/schema/beans/spring-beans.xsdhttp://www.springframework.org/schema/contexthttps://www.springframework.org/schema/context/spring-context.xsdhttp://www.springframework.org/schema/rabbithttp://www.springframework.org/schema/rabbit/spring-rabbit.xsd"><!--加载配置文件--><context:property-placeholder location="classpath:rabbitmq.properties"/><!-- 定义rabbitmq connectionFactory --><rabbit:connection-factory id="connectionFactory" host="${rabbitmq.host}"port="${rabbitmq.port}"username="${rabbitmq.username}"password="${rabbitmq.password}"virtual-host="${rabbitmq.virtual-host}"/><!--定义管理交换机、队列--><rabbit:admin connection-factory="connectionFactory"/><!--定义rabbitTemplate对象操作可以在代码中方便发送消息--><rabbit:template id="rabbitTemplate" connection-factory="connectionFactory"/><!--死信队列:1. 声明正常的队列(test_queue_dlx)和交换机(test_exchange_dlx)2. 声明死信队列(queue_dlx)和死信交换机(exchange_dlx)3. 正常队列绑定死信交换机设置两个参数:* x-dead-letter-exchange:死信交换机名称* x-dead-letter-routing-key:发送给死信交换机的routingkey--><!--1. 声明正常的队列(test_queue_dlx)和交换机(test_exchange_dlx)--><rabbit:queue name="test_queue_dlx" id="test_queue_dlx"><!--3. 正常队列绑定死信交换机--><rabbit:queue-arguments><!--3.1 x-dead-letter-exchange:死信交换机名称--><entry key="x-dead-letter-exchange" value="exchange_dlx" /><!--3.2 x-dead-letter-routing-key:发送给死信交换机的routingkey--><entry key="x-dead-letter-routing-key" value="dlx.hehe" /><!--4.1 设置队列的过期时间 ttl--><entry key="x-message-ttl" value="10000" value-type="java.lang.Integer" /><!--4.2 设置队列的长度限制 max-length --><entry key="x-max-length" value="10" value-type="java.lang.Integer" /></rabbit:queue-arguments></rabbit:queue><rabbit:topic-exchange name="test_exchange_dlx"><rabbit:bindings><rabbit:binding pattern="test.dlx.#" queue="test_queue_dlx"></rabbit:binding></rabbit:bindings></rabbit:topic-exchange><!--2. 声明死信队列(queue_dlx)和死信交换机(exchange_dlx)--><rabbit:queue name="queue_dlx" id="queue_dlx"></rabbit:queue><rabbit:topic-exchange name="exchange_dlx"><rabbit:bindings><rabbit:binding pattern="dlx.#" queue="queue_dlx"></rabbit:binding></rabbit:bindings></rabbit:topic-exchange></beans>
2)编写测试代码
/*** 发送测试死信消息:* 1. 过期时间* 2. 长度限制* 3. 消息拒收*/@Testpublic void testDlx(){//1. 测试过期时间,死信消息//rabbitTemplate.convertAndSend("test_exchange_dlx","test.dlx.haha","我是一条消息,我会死吗?");//2. 测试长度限制后,消息死信/* for (int i = 0; i < 20; i++) {rabbitTemplate.convertAndSend("test_exchange_dlx","test.dlx.haha","我是一条消息,我会死吗?");}*///3. 测试消息拒收rabbitTemplate.convertAndSend("test_exchange_dlx","test.dlx.haha","我是一条消息,我会死吗?");}
3)编写消费端拒收消息
<?xml version="1.0" encoding="UTF-8"?><beans xmlns="http://www.springframework.org/schema/beans"xmlns:xsi="http://www.w3.org/2001/XMLSchema-instance"xmlns:context="http://www.springframework.org/schema/context"xmlns:rabbit="http://www.springframework.org/schema/rabbit"xsi:schemaLocation="http://www.springframework.org/schema/beanshttp://www.springframework.org/schema/beans/spring-beans.xsdhttp://www.springframework.org/schema/contexthttps://www.springframework.org/schema/context/spring-context.xsdhttp://www.springframework.org/schema/rabbithttp://www.springframework.org/schema/rabbit/spring-rabbit.xsd"><!--加载配置文件--><context:property-placeholder location="classpath:rabbitmq.properties"/><!-- 定义rabbitmq connectionFactory --><rabbit:connection-factory id="connectionFactory" host="${rabbitmq.host}"port="${rabbitmq.port}"username="${rabbitmq.username}"password="${rabbitmq.password}"virtual-host="${rabbitmq.virtual-host}"/><context:component-scan base-package="com.itheima.listener" /><!--定义监听器容器--><rabbit:listener-container connection-factory="connectionFactory" acknowledge="manual" prefetch="1" ><!-- <rabbit:listener ref="ackListener" queue-names="test_queue_confirm"></rabbit:listener>--><!-- <rabbit:listener ref="qosListener" queue-names="test_queue_confirm"></rabbit:listener>--><!--定义监听器,监听正常队列--><rabbit:listener ref="dlxListener" queue-names="test_queue_dlx"></rabbit:listener></rabbit:listener-container></beans>
@Componentpublic class DlxListener implements ChannelAwareMessageListener {@Overridepublic void onMessage(Message message, Channel channel) throws Exception {long deliveryTag = message.getMessageProperties().getDeliveryTag();try {//1.接收转换消息System.out.println(new String(message.getBody()));//2. 处理业务逻辑System.out.println("处理业务逻辑...");int i = 3/0;//出现错误//3. 手动签收channel.basicAck(deliveryTag,true);} catch (Exception e) {//e.printStackTrace();System.out.println("出现异常,拒绝接受");//4.拒绝签收,不重回队列 requeue=falsechannel.basicNack(deliveryTag,true,false);}}}
1.6.1 小结
- 死信交换机和死信队列和普通的没有区别
2. 当消息成为死信后,如果该队列绑定了死信交换机,则消息会被死信交换机重新路由到死信队列
3. 消息成为死信的三种情况:
- 队列消息长度到达限制;
- 消费者拒接消费消息,并且不重回队列;
- 原队列存在消息过期设置,消息到达超时时间未被消费;
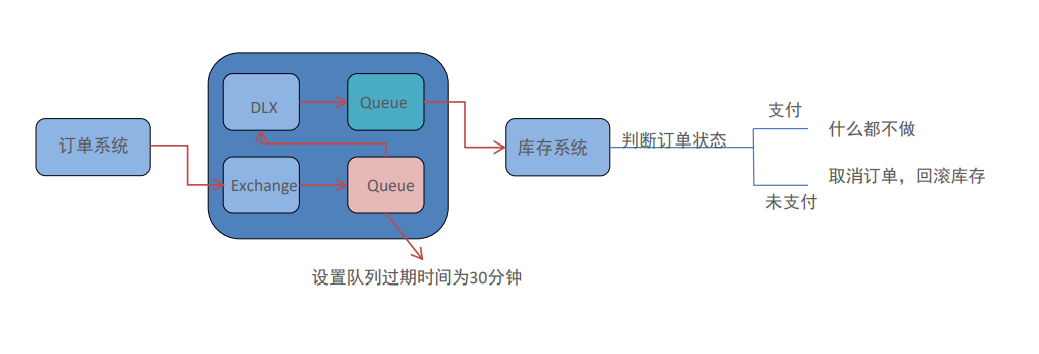
1.7 延迟队列
延迟队列,即消息进入队列后不会立即被消费,只有到达指定时间后,才会被消费。
需求:
下单后,30分钟未支付,取消订单,回滚库存。
2. 新用户注册成功7天后,发送短信问候。实现方式:
定时器
2. 延迟队列
很可惜,在RabbitMQ中并未提供延迟队列功能。
但是可以使用:TTL+死信队列 组合实现延迟队列的效果。
1)编写spring-rabbitmq-producter.xml配置文件
<?xml version="1.0" encoding="UTF-8"?><beans xmlns="http://www.springframework.org/schema/beans"xmlns:xsi="http://www.w3.org/2001/XMLSchema-instance"xmlns:context="http://www.springframework.org/schema/context"xmlns:rabbit="http://www.springframework.org/schema/rabbit"xsi:schemaLocation="http://www.springframework.org/schema/beanshttp://www.springframework.org/schema/beans/spring-beans.xsdhttp://www.springframework.org/schema/contexthttps://www.springframework.org/schema/context/spring-context.xsdhttp://www.springframework.org/schema/rabbithttp://www.springframework.org/schema/rabbit/spring-rabbit.xsd"><!--加载配置文件--><context:property-placeholder location="classpath:rabbitmq.properties"/><!-- 定义rabbitmq connectionFactory --><rabbit:connection-factory id="connectionFactory" host="${rabbitmq.host}"port="${rabbitmq.port}"username="${rabbitmq.username}"password="${rabbitmq.password}"virtual-host="${rabbitmq.virtual-host}"publisher-confirms="true"publisher-returns="true"/><!--定义管理交换机、队列--><rabbit:admin connection-factory="connectionFactory"/><!--定义rabbitTemplate对象操作可以在代码中方便发送消息--><rabbit:template id="rabbitTemplate" connection-factory="connectionFactory"/><!--延迟队列:1. 定义正常交换机(order_exchange)和队列(order_queue)2. 定义死信交换机(order_exchange_dlx)和队列(order_queue_dlx)3. 绑定,设置正常队列过期时间为30分钟--><!-- 1. 定义正常交换机(order_exchange)和队列(order_queue)--><rabbit:queue id="order_queue" name="order_queue"><!-- 3. 绑定,设置正常队列过期时间为30分钟--><rabbit:queue-arguments><entry key="x-dead-letter-exchange" value="order_exchange_dlx" /><entry key="x-dead-letter-routing-key" value="dlx.order.cancel" /><entry key="x-message-ttl" value="10000" value-type="java.lang.Integer" /></rabbit:queue-arguments></rabbit:queue><rabbit:topic-exchange name="order_exchange"><rabbit:bindings><rabbit:binding pattern="order.#" queue="order_queue"></rabbit:binding></rabbit:bindings></rabbit:topic-exchange><!-- 2. 定义死信交换机(order_exchange_dlx)和队列(order_queue_dlx)--><rabbit:queue id="order_queue_dlx" name="order_queue_dlx"></rabbit:queue><rabbit:topic-exchange name="order_exchange_dlx"><rabbit:bindings><rabbit:binding pattern="dlx.order.#" queue="order_queue_dlx"></rabbit:binding></rabbit:bindings></rabbit:topic-exchange></beans>
2)编写测试代码
@Testpublic void testDelay() throws InterruptedException {//1.发送订单消息。 将来是在订单系统中,下单成功后,发送消息//10秒后,这条消息才会到死信队列中,才被消费rabbitTemplate.convertAndSend("order_exchange","order.msg","订单信息:id=1,time=2019年8月17日16:41:47");//2.打印倒计时10秒for (int i = 10; i > 0 ; i--) {System.out.println(i+"...");Thread.sleep(1000);}}
3)编写消费端监听死信队列的值
<?xml version="1.0" encoding="UTF-8"?><beans xmlns="http://www.springframework.org/schema/beans"xmlns:xsi="http://www.w3.org/2001/XMLSchema-instance"xmlns:context="http://www.springframework.org/schema/context"xmlns:rabbit="http://www.springframework.org/schema/rabbit"xsi:schemaLocation="http://www.springframework.org/schema/beanshttp://www.springframework.org/schema/beans/spring-beans.xsdhttp://www.springframework.org/schema/contexthttps://www.springframework.org/schema/context/spring-context.xsdhttp://www.springframework.org/schema/rabbithttp://www.springframework.org/schema/rabbit/spring-rabbit.xsd"><!--加载配置文件--><context:property-placeholder location="classpath:rabbitmq.properties"/><!-- 定义rabbitmq connectionFactory --><rabbit:connection-factory id="connectionFactory" host="${rabbitmq.host}"port="${rabbitmq.port}"username="${rabbitmq.username}"password="${rabbitmq.password}"virtual-host="${rabbitmq.virtual-host}"/><context:component-scan base-package="com.itheima.listener" /><!--定义监听器容器--><rabbit:listener-container connection-factory="connectionFactory" acknowledge="manual" prefetch="1" ><!-- <rabbit:listener ref="ackListener" queue-names="test_queue_confirm"></rabbit:listener>--><!-- <rabbit:listener ref="qosListener" queue-names="test_queue_confirm"></rabbit:listener>--><!--定义监听器,监听正常队列--><!--<rabbit:listener ref="dlxListener" queue-names="test_queue_dlx"></rabbit:listener>--><!--延迟队列效果实现: 一定要监听的是 死信队列!!!--><rabbit:listener ref="orderListener" queue-names="order_queue_dlx"></rabbit:listener></rabbit:listener-container></beans>
@Componentpublic class OrderListener implements ChannelAwareMessageListener {@Overridepublic void onMessage(Message message, Channel channel) throws Exception {long deliveryTag = message.getMessageProperties().getDeliveryTag();try {//1.接收转换消息System.out.println(new String(message.getBody()));//2. 处理业务逻辑System.out.println("处理业务逻辑...");System.out.println("根据订单id查询其状态...");System.out.println("判断状态是否为支付成功");System.out.println("取消订单,回滚库存....");//3. 手动签收channel.basicAck(deliveryTag,true);} catch (Exception e) {//e.printStackTrace();System.out.println("出现异常,拒绝接受");//4.拒绝签收,不重回队列 requeue=falsechannel.basicNack(deliveryTag,true,false);}}}
1.7.1 小结
1. 延迟队列 指消息进入队列后,可以被延迟一定时间,再进行消费。
2. RabbitMQ没有提供延迟队列功能,但是可以使用 : TTL + DLX 来实现延迟队列效果。
1.8 日志与监控 (了解)
1.8.1 RabbitMQ日志
RabbitMQ默认日志存放路径: /var/log/rabbitmq/rabbit@xxx.log
日志包含了RabbitMQ的版本号、Erlang的版本号、RabbitMQ服务节点名称、cookie的hash值、 RabbitMQ配置文件地址、内存限制、磁盘限制、默认账户guest的创建以及权限配置等等。
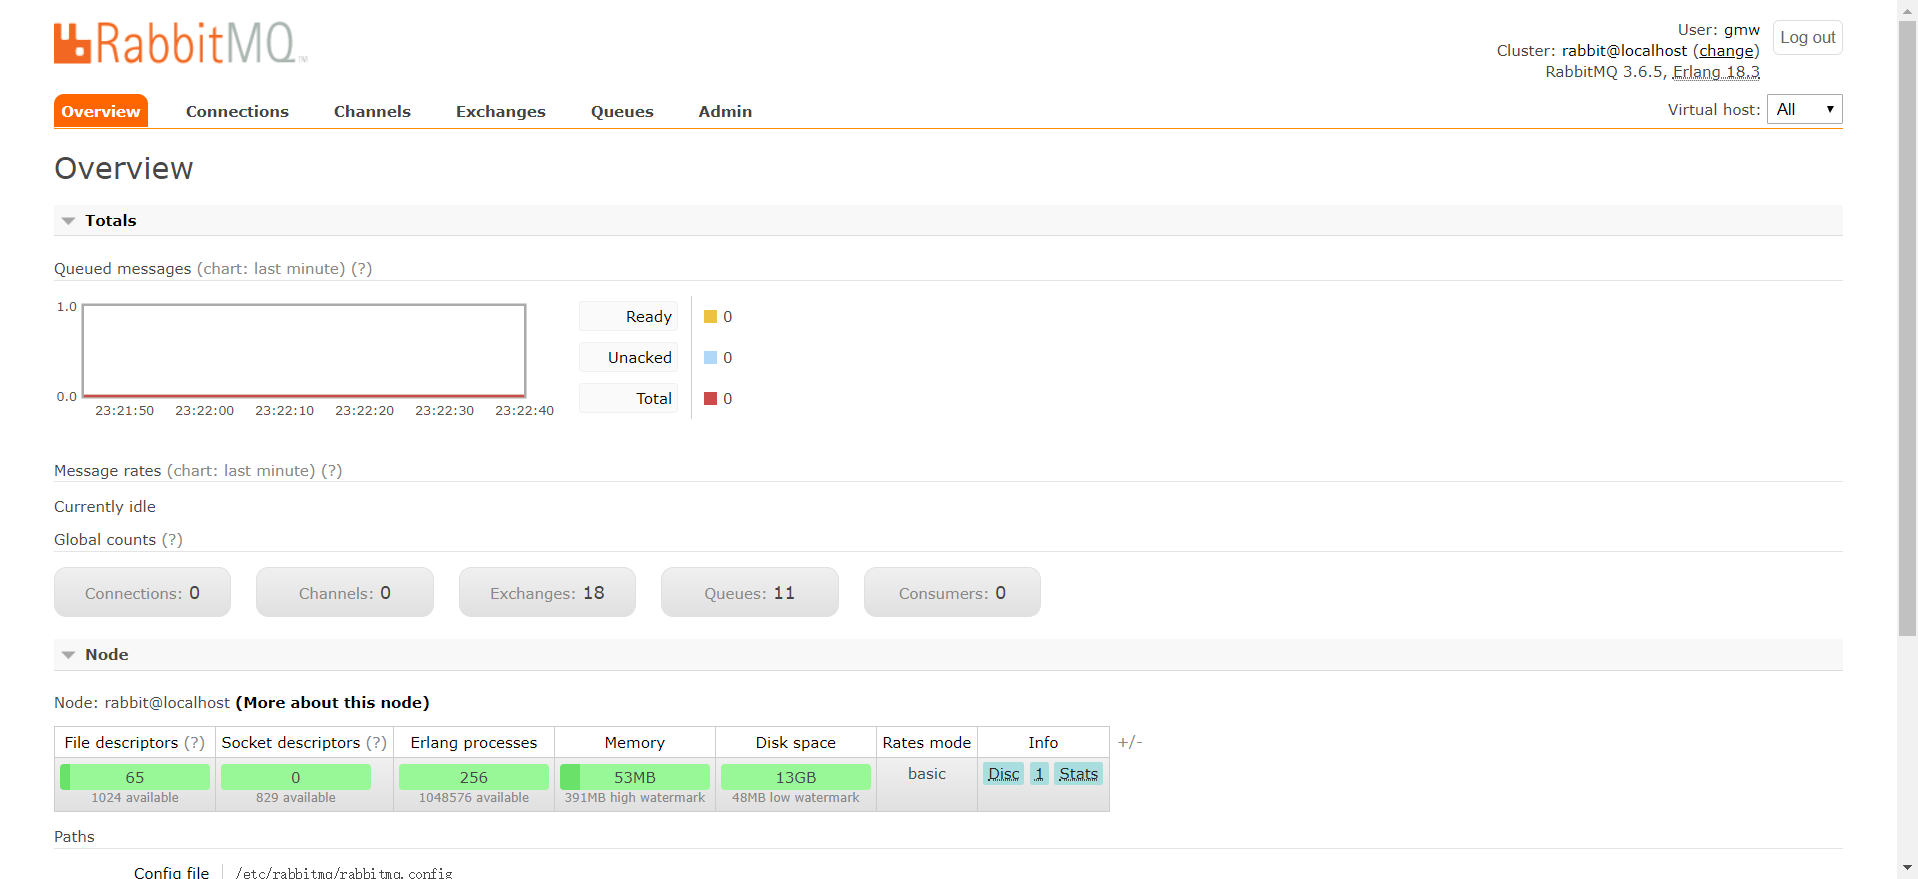
1.8.2 web管控台监控
1.8.3 rabbitmqctl管理和监控
查看队列# rabbitmqctl list_queues查看exchanges# rabbitmqctl list_exchanges查看用户# rabbitmqctl list_users查看连接# rabbitmqctl list_connections查看消费者信息# rabbitmqctl list_consumers查看环境变量# rabbitmqctl environment查看未被确认的队列# rabbitmqctl list_queues name messages_unacknowledged查看单个队列的内存使用# rabbitmqctl list_queues name memory查看准备就绪的队列# rabbitmqctl list_queues name messages_ready
1.9 消息追踪 (了解)
在使用任何消息中间件的过程中,难免会出现某条消息异常丢失的情况。对于RabbitMQ而言,可能 是因为生产者或消费者与RabbitMQ断开了连接,而它们与RabbitMQ又采用了不同的确认机制;也 有可能是因为交换器与队列之间不同的转发策略;甚至是交换器并没有与任何队列进行绑定,生产者 又不感知或者没有采取相应的措施;另外RabbitMQ本身的集群策略也可能导致消息的丢失。这个时 候就需要有一个较好的机制跟踪记录消息的投递过程,以此协助开发和运维人员进行问题的定位。
1.9.1 消息追踪-Firehose
firehose的机制是将生产者投递给rabbitmq的消息,rabbitmq投递给消费者的消息按照指定的格式 发送到默认的exchange上。这个默认的exchange的名称为amq.rabbitmq.trace,它是一个topic类型的exchange。发送到这个exchange上的消息的routing key为 publish.exchangename 和 deliver.queuename。其中exchangename和queuename为实际exchange和queue的名称,分别 对应生产者投递到exchange的消息,和消费者从queue上获取的消息。
注意:打开 trace 会影响消息写入功能,适当打开后请关闭。
rabbitmqctl trace_on:开启Firehose命令rabbitmqctl trace_off:关闭Firehose命令
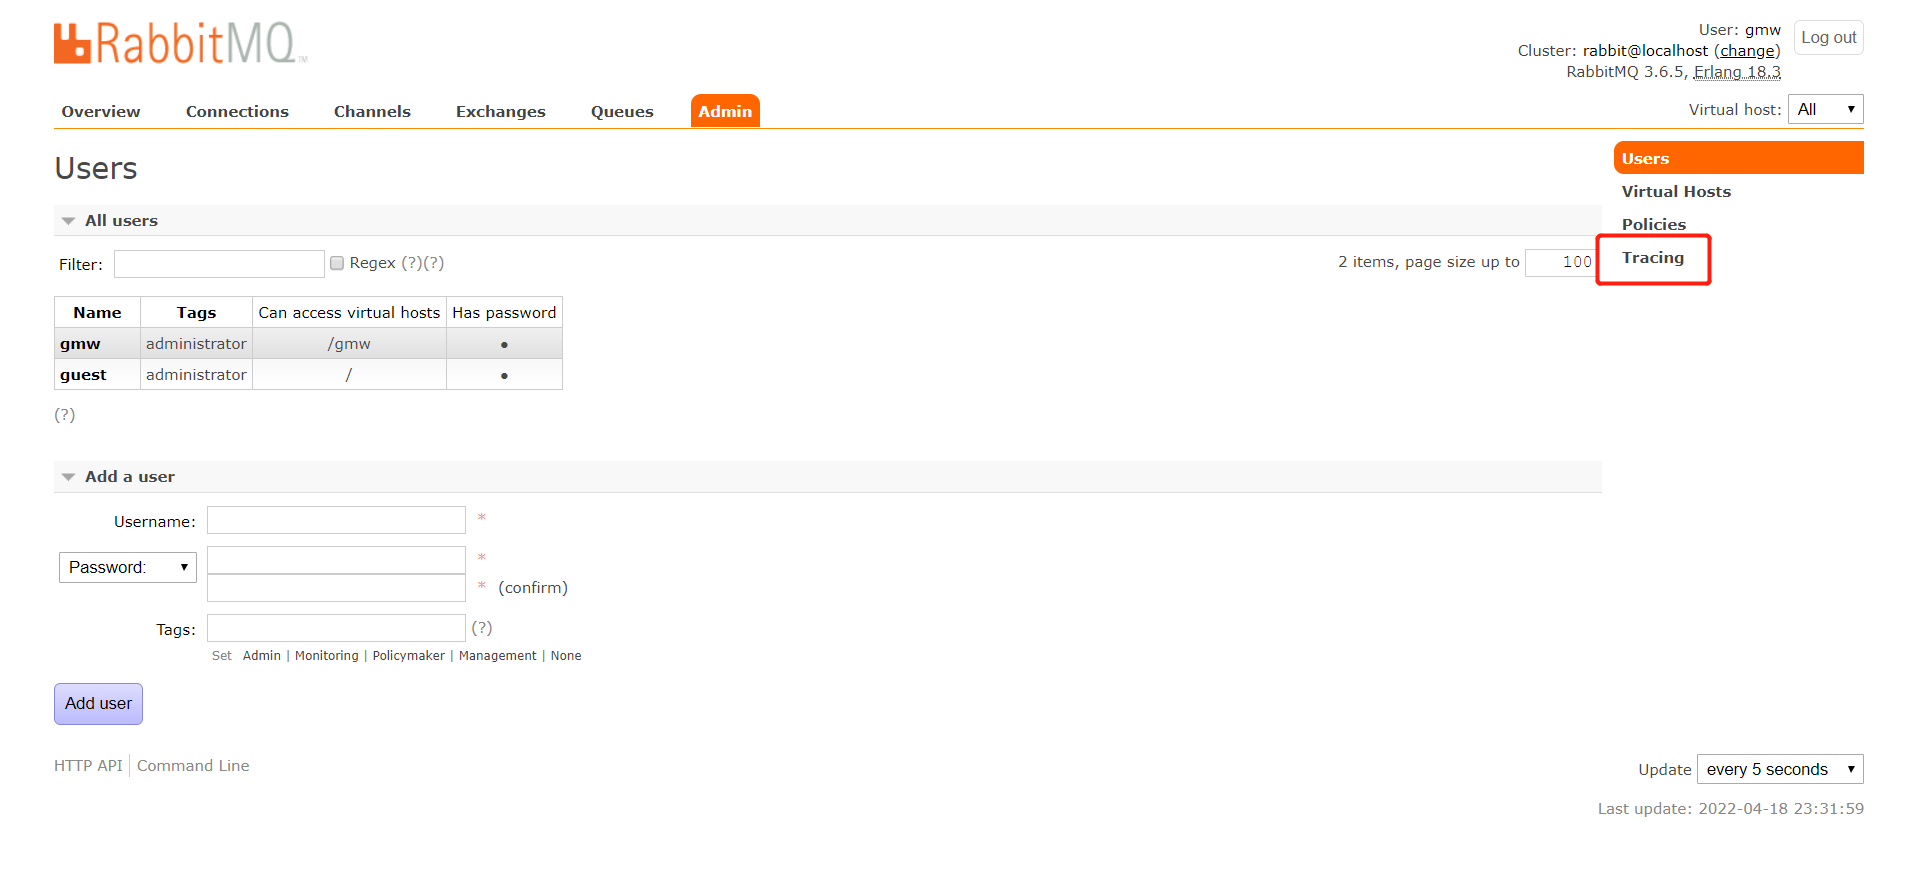
1.9.2 消息追踪-rabbitmq_tracing
rabbitmq_tracing和Firehose在实现上如出一辙,只不过rabbitmq_tracing的方式比Firehose多了一 层GUI的包装,更容易使用和管理。
启用插件:rabbitmq-plugins enable rabbitmq_tracing

若有收获,就点个赞吧
0 人点赞
