Win10编译
OpenCV中除了基础部分,还有一个叫openCV_contrib的部分,是其他人贡献的功能,比如说4.5.1版本中微信团队贡献的wechat_qrcode模块,以及sift模块。官方编译的版本中是不包含这个的,因此如果想要使用需要自己编译。
推荐的编译环境是 vs2019,cmake ,这一套组合网上的教程比较多,也是最常用的
知乎编译教程
编译过程中有踩过坑。一个库一般有两个版本,debug和release版本。按照教程中,在cmake中完成了config和generate工作之后,需要打开 vs 进行编译。选择release x64模式对ALL BUILD构建之后,需要对INSTALL进行构建。
使用Release模式编译,得到release版本的库。使用Debug模式编译,将得到debug模式的库,也就是说*d.dll/lib。在这个过程中,可能会报错找不到 python_d.lib,但是无所谓,不影响库的最后生成,可以正常使用,忽略就好。
基本操作
色彩空间转换
using namespace cv;Mat graycvtColor(src, gray, COLOR_BGR2GRAY);//CV_BGR2XXX、CV_XXX2BGR
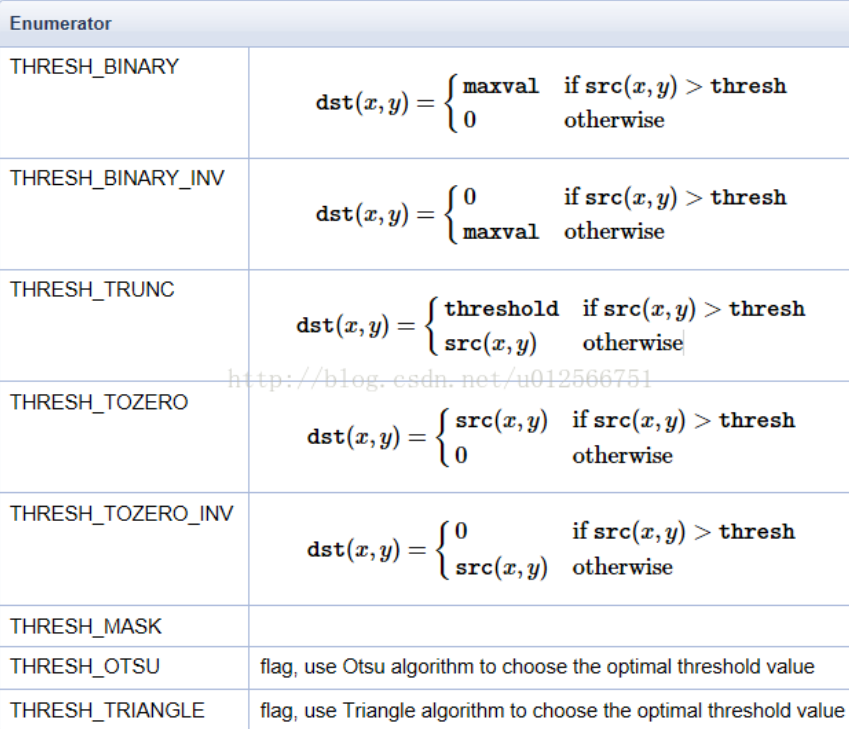
灰度图卡阈值
double cv::threshold(InputArray src, OutputArray dst, double thres, double maxval, int type)
Mat binary;threshold(gray, binary, 0, 255, THRESH_BINARY | THRESH_OTSU);
二值图找边界
函数原型
findContours( InputOutputArray image, OutputArrayOfArrays contours,OutputArray hierarchy, int mode,int method, Point offset=Point());
- InputOutputArray 里面可以是二值图或者灰度图,但是一般都是二值图。
- mode 取值
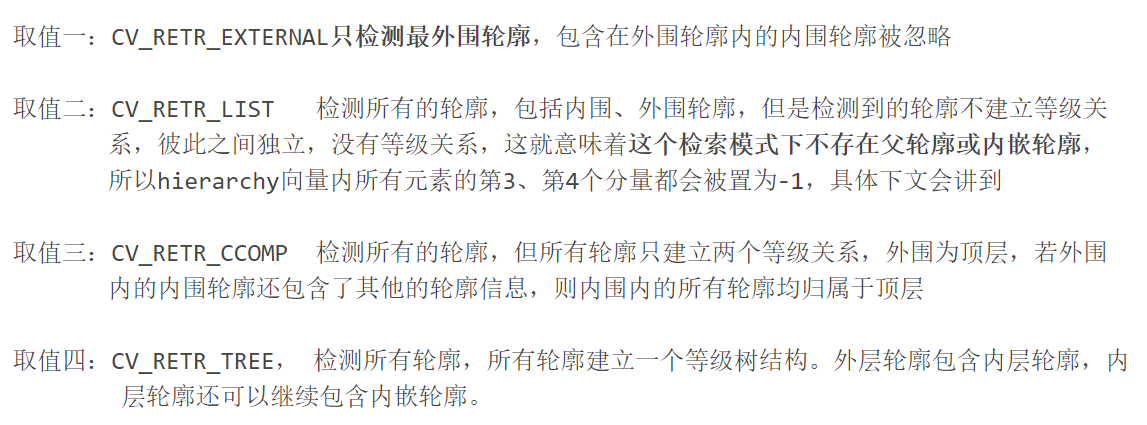
// detect rectangle nowvector<vector<Point>> contours;vector<Vec4i> hireachy;findContours(binary.clone(), contours, hireachy, RETR_LIST, CHAIN_APPROX_SIMPLE, Point());
Core Module
Mat
Mat是OpenCV中用来存储图片的基本数据格式。是一个C++类,无需像之前的C中的代码一样,手动管理内存。Mat类中具有Head和Matrix两个部分。Head部分保存了关于矩阵大小,存储方式,矩阵的地址等等信息
需要注意的是,由于图片占用内存空间过的大,一次OpenCV中有一个引用计数系统。在复制的时候,仅仅会复制Mat类中的head(保存Mat相关信息),而不会复制其中保存数据的矩阵。
Mat A, C; // creates just the header partsA = imread(argv[1], IMREAD_COLOR); // here we'll know the method used (allocate matrix)Mat B(A); // Use the copy constructorC = A; // Assignment operator
以上的所有Mat中的矩阵指针都指向同一个地址,对任何一个更改都会更改那个矩阵的值。但是他们的header是不同的。可以创建header为所有数据子集的一个Mat,比如说可以利用如下的方式来设置ROI(Region of Interest)
Mat D (A, Rect(10, 10, 100, 100) ); // using a rectangleMat E = A(Range::all(), Range(1,3)); // using row and column boundaries
如果要复制整个matrix,必须使用openCV提供的函数cv::Mat::clone()和cv::Mat::copyTo()。
Mat F = A.clone();Mat G;A.copyTo(G);
加载图片
#include <opencv2/core.hpp>#include <opencv2/imgcodecs.hpp>#include <opencv2/highgui.hpp>#include <iostream>using namespace cv;int main(){std::string image_path = samples::findFile("starry_night.jpg");Mat img = imread(image_path, IMREAD_COLOR);if(img.empty()){std::cout << "Could not read the image: " << image_path << std::endl;return 1;}imshow("Display window", img);int k = waitKey(0); // Wait for a keystroke in the windowif(k == 's'){imwrite("starry_night.png", img);}return 0;}
imread函数的第二个参数有三种参数,代表三种读取方式
- IMREAD_COLOR loads the image in the BGR 8-bit format. This is the default that is used here.
- IMREAD_UNCHANGED loads the image as is (including the alpha channel if present)
- IMREAD_GRAYSCALE loads the image as an intensity one
显式构造Mat
Mat不仅是图片容器,也是一个很正常的矩阵类型的类,因此可以手动显式地对其进行构造。
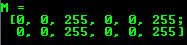
一般的二维矩阵的话,可以直接这样初始化Mat M(2,2, CV_8UC3, Scalar(0,0,255));cout << "M = " << endl << " " << M << endl << endl;
如果是高维度矩阵的话,可以将第二个参数改成一个数组,但是高维数组没有办法直接用std::cout进行输出。
其中int sz[3] = {2,2,2};Mat L(3,sz, CV_8UC(1), Scalar::all(0));
CV_8UC3是说该矩阵的数据类型是8位,unsigned/signed,类型(这里是Char),通道数量。
还可以声明全零,全1,单位阵,利用cv::Mat::zeros,cv::Mat::ones,cv::Mat::eye这三个函数来进行构造。Mat E = Mat::eye(4, 4, CV_64F);cout << "E = " << endl << " " << E << endl << endl;Mat O = Mat::ones(2, 2, CV_32F);cout << "O = " << endl << " " << O << endl << endl;Mat Z = Mat::zeros(3,3, CV_8UC1);cout << "Z = " << endl << " " << Z << endl << endl;
Mat中的一些成员变量和函数
Mat::ptr
Mat::ptr<Type>(n)会返回矩阵第n行的指针。不过使用的时候也需要比较谨慎,可能在程序运行的时候由于指针的溢出导致程序崩溃cv::Mat image = cv::Mat(400, 600, CV_8UC1); //宽400,长600uchar * data00 = image.ptr<uchar>(0);uchar * data10 = image.ptr<uchar>(1);uchar * data01 = image.ptr<uchar>(0)[1];
Mat::data
Mat::data会返回第一行第一列的指针,可以通过判断该指针来判断图片是否导入成功uchar* p = I.data;for( unsigned int i = 0; i < ncol*nrows; ++i)*p++ = table[*p];
Mat::MatIterator_
Mat::MatIterator_<type>会构造一个迭代器,迭代的步长和其类型有关系。Mat& ScanImageAndReduceIterator(Mat& I, const uchar* const table){// accept only char type matricesCV_Assert(I.depth() == CV_8U);const int channels = I.channels();switch(channels){case 1:{MatIterator_<uchar> it, end;for( it = I.begin<uchar>(), end = I.end<uchar>(); it != end; ++it)*it = table[*it];break;}case 3:{MatIterator_<Vec3b> it, end;for( it = I.begin<Vec3b>(), end = I.end<Vec3b>(); it != end; ++it){(*it)[0] = table[(*it)[0]];(*it)[1] = table[(*it)[1]];(*it)[2] = table[(*it)[2]];}}}return I;}
Vec3b是针对uchar类型的三位 vector,还有Vec3f等。Mat::beign
会返回Mat中矩阵的开始和结尾之后的迭代器。,Mat::end Mat::depth()
Mat::depth()会返回这个矩阵中的一个数据类型,比如说CV_8UC1之类。Mat::channels()
Mat::channels()会返回一个int,代表的是该矩阵的通道数。size()
首先size是一个结构体,定义了Mat矩阵内数据的分布形式,数值上有关系式:image.size().width==image.cols;image.size().height==image.rows
clone()
复制一个新的Mat,防止传引用更改数据。QRCode
QRCodeDetector
一般的之前都会选择使用ZXing这个开源的条码/二维码检测框架来进行,有人提供了一种二维码检测以及WeChatQRCode
```cppinclude
string detect_prototxt = “D:/Code/CppConsole/model/detect.prototxt”; string detect_caffe_model = “D:/Code/CppConsole/model/detect.caffemodel”; string sr_prototxt = “D:/Code/CppConsole/model/sr.prototxt”; string sr_caffe_model = “D:/Code/CppConsole/model/sr.caffemodel”;
// 构建detector wechat_qrcode::WeChatQRCode *decoder = new wechat_qrcode::WeChatQRCode( detect_prototxt, detect_caffe_model, sr_prototxt, sr_caffe_model );
vector
```

若有收获,就点个赞吧
0 人点赞
