1 函数概述
06-06. 函数概述
在一个完整的项目中,某些功能会反复的使用,那么会将功能封装成函数,当我们要使用功能的时候直接调用函数即可。
本质:函数就是对功能的封装。
函数的优点:
- 简化代码结构,增加了代码的复用度(重复使用的程度);
-
1.1 定义函数
def 函数名(参数列表):
语句
return 表达式 函数代码块以def关键字开始;
- 函数名遵循标识符规则;
- ():是参数列表的开始和结束;
- 参数列表(参数1,参数2,……,参数n):任何传入函数的参数和变量必须放在圆括号之间,用逗号分隔。函数从函数的调用者那里获取的信息;
- 冒号:函数内容(封装的功能)以冒号开始,并且缩进;
- 语句:函数封装的功能;
- return:一般用于结束函数,并返回信息给函数的调用者;
- 表达式:即为要返回给函数的调用者的信息。
注意:最后的return 表达式,可以不写,相当于return None。
#定义了一个无参无返回值的函数def myPrint():print("sunck is a very good man!")print("sunck is a nice man!")print("sunck is a handsome man!")myPrint()myPrint()
函数的调用
函数名(参数列表)
- 函数名:是要使用功能的函数名字;
- 参数列表:函数的调用者给函数传递的信息,如果没有参数,小括号也不能省略。
函数调用的本质是实参给形参赋值的过程。
参数
06-07. 最简单的函数、函数的参数、函数的返回值
形参(形式参数):定义函数时小括号中的变量,本质是变量,参数必须按顺序传递,个数目前要对应(有默认值时可以不对应)。
实参(实际参数):调用函数时给函数传递的数据,本质是值。
def myPrint(str, age):print(str, age)myPrint("sunck is a good man", 18)
返回值
def mySum(num1, num2):#将结果返回给函数的调用者return num1 + num2#执行完return语句,该函数就结束了,return后面的代码不执行print("**********")res = mySum(1, 2)print(res)
参数传递
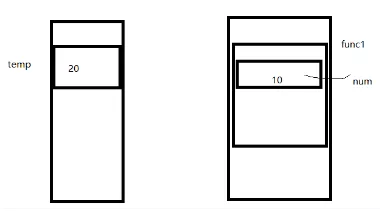
值传递:传递的不可变类型,如string、tuple、number是不可变的。
def func1(num):print(id(num))num = 10print(id(num))temp = 20print(id(temp))#-->8791555639568func1(temp)#num = temp#-->8791555639568#-->8791555639248print(temp)#-->20
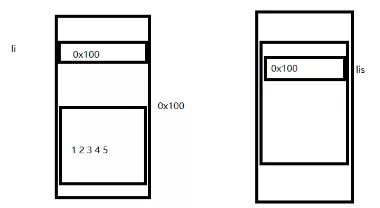
引用传递:传递的可变类型,如list、dict、set是可变的。
def func(lis):lis[0] = 100li = [1,2,3,4,5]func(li)print(li)#-->[100, 2, 3, 4, 5]
相同值的变量,地址一样。
a = 10b = 10print(id(a), id(b))#-->8791472146384 8791472146384c = 20d = 30print(id(c), id(d))#-->8791472146704 8791472147024d = cprint(id(c), id(d))#-->8791472146704 8791472146704
关键字参数
概念:允许函数调用时参数的顺序与定义时不一致。
def myPrint(str, age):print(str, age)#使用关键字参数myPrint(age = 18, str = "sunck is a good man")
默认参数
调用函数时,如果没有传递参数,则使用默认参数。要用默认参数,最好将默认参数放到最后。
def myPrint(str, age = 18):print(str, age)myPrint("kaige")
不定长参数
概念:能处理比定义时更多的参数。
加了星号(*)的变量存放所有未命名的变量参数,如果在函数调用时没有指定参数,它就是一个空元组。
def func(name, *args):print(name)print(type(args))for x in args:print(x)func("sunck", "good", "nice", "handsom")#-->sunck#--><class 'tuple'>#-->good#-->nice#-->handsomdef mySum(*l):sum = 0for i in l:sum += ireturn sumprint(mySum(1,2,3,4,5,6,7))#-->28
*代表键值对的参数字典,和所代表的意义类似。
def func(**kwargs):print(kwargs)print(type(kwargs))func(x=1, y=2, z=3)#-->{'x': 1, 'y': 2, 'z': 3}#--><class 'dict'>def func3(*args, **kwargs):pass #代表一个空语句
1.2 匿名函数
概念:不使用def这样的语句定义函数,使用lambda来创建匿名函数。
特点:
- lambda只是一个表达式,函数体比def简单;
- lambda的主体是一个表达式,而不是代码块,仅仅只能在lambda表达式中封装简单的逻辑;
- lambda函数有自己的命名空间,且不能访问自由参数列表之外的或全局命名空间的参数;
- 虽然lambda是一个表达式且看起来只能写一行,与C和C++内联函数不同。
格式:
lambda 参数1,参数2,……,参数n:expression
sum = lambda num1, num2:num1 + num2print(sum(1,2))
2 装饰器
07-01. 装饰器
2.1 简单装饰器
概念:是一个闭包,把一个函数当做参数,返回一个替代版的函数,本质上就是一个返回函数的函数。
#简单的装饰器def func1():print("sunck is a good man")def outer(func):def inner():print("*******************")func()return inner#f是函数func1的加强版本f = outer(func1)f()#-->*******************#-->sunck is a good man
2.2 复杂一点装饰器
def say(age):print("sunck is %d years old" % (age))def outer(func):def inner(age):if age < 0:age = 0func(age)return innersay = outer(say)say(-10)
def outer(func):def inner(age):if age < 0:age = 0func(age)return inner#使用@符号将装饰器应用到函数#@python2.4支持使用@符号@outer #相当于say = outer(say)def say(age):print("sunck is %d years old" % (age))say(-10)
2.3 通用装饰器
def outer(func):def inner(*args, **kwargs):#添加修改的功能print("&&&&&&&&&&&&&")return func(*args, **kwargs)return inner@outer #say = outer(say)def say(name, age): #函数的参数力理论上是无限制的,但实际上最好不要超过6、7个print("my name is %s, I am %d years old" % (name, age))return "aaaa"say("sunck", 18)
3 偏函数
07-03. 偏函数、变量作用域
3.1 自己定义偏函数
print(int("1010", base = 2))#-->10#偏函数def int2(str, base = 2):return int(str, base)print(int2("1011"))#-->11
3.2 使用functools偏函数
import functools#把一个参数固定住,形成一个新的函数int3 = functools.partial(int, base = 2)print(int3("1011"))#-->11
4 递归
4.1 概述
09-01. 递归
递归函数:一个会调用自身的函数称为递归函数;
递归调用:一个函数,调用了自身,称为递归调用。
凡是循环能干的事,递归都能干。
方式:
- 写出临界条件;
- 找这一次和上一次的关系;
- 假设当前函数已经能用,调用自身计算上一次的结果,再求出本次的结果。
输入一个数(大于等于1),求1+2+3+……+n的和 ```python循环
def sum(n): sum = 0 for x in range(1, n + 1):
return sumsum += x
递归
def sum(n): if n == 1: return 1 else: return n + sum(n - 1) res = sum(5) print(“res =”, res)
<a name="d485564c"></a>## 4.2 栈> _09-_02. 队列与栈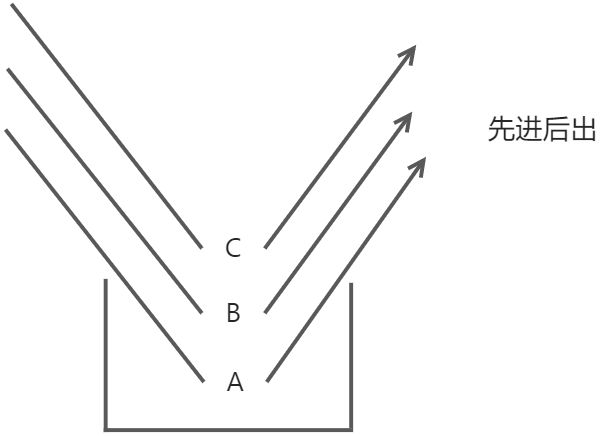以下仅用程序模拟栈的思想:```python#模拟栈结构stack = []#压栈(向栈里存数据)stack.append("A")print(stack)stack.append("B")print(stack)stack.append("C")print(stack)#出栈(在栈里取数据)res1 = stack.pop()print("res1 =", res1)print(stack)res2 = stack.pop()print("res2 =", res2)print(stack)res3 = stack.pop()print("res3 =", res3)print(stack)#-->['A']#-->['A', 'B']#-->['A', 'B', 'C']#-->res1 = C#-->['A', 'B']#-->res2 = B#-->['A']#-->res3 = A#-->[]
4.3 队列

import collections#创建一个队列queue = collections.deque()print(queue)#进队(存数据)queue.append("A")print(queue)queue.append("B")print(queue)queue.append("C")print(queue)#出队(取数据)res1 = queue.popleft()print("res1 =", res1)print(queue)res2 = queue.popleft()print("res2 =", res2)print(queue)res3 = queue.popleft()print("res3 =", res3)print(queue)#-->deque([])#-->deque(['A'])#-->deque(['A', 'B'])#-->deque(['A', 'B', 'C'])#-->res1 = A#-->deque(['B', 'C'])#-->res2 = B#-->deque(['C'])#-->res3 = C#-->deque([])
4.4 目录遍历
使用递归思路
09-03. 目录遍历(递归)
#使用递归方法import osdef getAllDirRE(path, sp = ""):#得到当前目录下所有的文件filesList = os.listdir(path)#处理每一个文件sp += " "for fileName in filesList:#判断是否是路径(用绝对路径)fileAbsPath = os.path.join(path, fileName)if os.path.isdir(fileAbsPath):print(sp + "目录:", fileName)#递归调用getAllDirRE(fileAbsPath, sp)else:print(sp + "普通文件:", fileName)getAllDirRE(r"C:\Users\John\Desktop\temp\dir")
使用压栈思路
09-04. 目录遍历(栈-深度遍历)
深度遍历思路: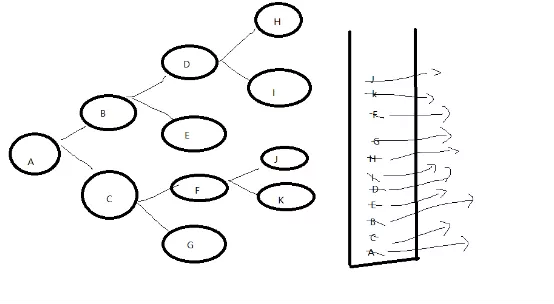
import osdef getAllDirDE(path):stack = []stack.append(path)#处理栈,当栈为空的时候结束循环while len(stack) != 0:#从栈里取出数据#[]dirPath = stack.pop()#print(dirPath)#目录下所有文件filesList = os.listdir(dirPath)#print(filesList)#处理每一个文件,如果是普通文件则打印出来,如果是目录则将该目录的地址压栈for fileName in filesList:fileAbsPath = os.path.join(dirPath, fileName)if os.path.isdir(fileAbsPath):#是目录就压栈print("目录:" + fileName)stack.append(fileAbsPath)#["B", "E", "F"]else:#打印普通文件print("普通:" + fileName)getAllDirDE(r"C:\Users\John\Desktop\temp\dir")
使用队列思路(广度遍历)
09-05. 目录遍历(队列-广度遍历)1
广度遍历思路:
import osimport collectionsdef getAllDirQU(path):queue = collections.deque()#进队queue.append(path)while len(queue) != 0:#出队数据dirPath = queue.popleft()#找出所有的文件filesList = os.listdir(dirPath)for fileName in filesList:#绝对路径fileAbsPath = os.path.join(dirPath, fileName)#判断是否是目录,是目录就进队,不是就打印if os.path.isdir(fileAbsPath):print("目录:" + fileName)queue.append(fileAbsPath)else:print("普通文件:" + fileName)getAllDirQU(r"C:\Users\xlg\Desktop\Python-1704\day09\temp\dir")
5 Time
5.1 time
09-06. 目录遍历(队列-广度遍历)2、time模块1
UTC(世界协调时间):格林尼治天文时间,世界标准时间,在中国来说是UTC+8。
时间的表示形式:
- 时间戳
以整型或浮点型表示时间的一个以秒为单位的时间间隔。这个时间间隔的基础值是从1970年1月1日零点开始算起。 - 元组
一种Python的数据结构表示,这个元组有9个整型内容: year、month、day、hours、minutes、seconds、weekday、Julia day、flag (1 或 -1 或0)。 - 格式化字符串 | %a | 本地(locale)简化星期名称 | | —- | —- | | %A | 本地完整星期名称 | | %b | 本地简化月份名称 | | %B | 本地完整月份名称 | | %c | 本地相应的日期和时间表示 | | %d | 一个月中的第几天(01-31) | | %H | 一天中的第几个小时(24小时制,00-23) | | %I | 第几个小时(12小时制,01-12) | | %j | 一年中的第几天(001-366) | | %m | 月份(01-12) | | %M | 分钟数(00-59) | | %p | 本地am或者pm的相应符 | | %S | 秒(01-61) | | %U | 一年中的星期数。(00-53星期天是一个星期的开始。)第一个星期天之前的所有天数都放在第0周 | | %w | 一个星期中的第几天(0-6,0是星期天) | | %W | 和%U基本相同,不同的是%W以星期一为一个星期的开始。 | | %x | 本地相应日期 | | %X | 本地相应时间 | | %y | 去掉世纪的年份(00-99) | | %Y | 完整的年份 | | %Z | 时区的名字(如果不存在为空字符) | | %% | ‘%’字符 |
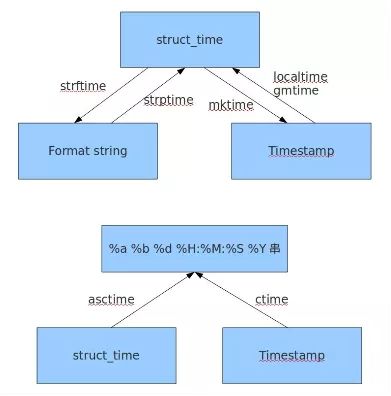
import time#返回当前时间的时间戳,浮点数形式,不需要参数c = time.time() #1618067951.5776775#将时间戳转为UTC时间元组t = time.gmtime(c) #time.struct_time(tm_year=2021, tm_mon=4, tm_mday=10, tm_hour=15, tm_min=19, tm_sec=11, tm_wday=5, tm_yday=100, tm_isdst=0)#将时间戳转为本地时间元组b = time.localtime(c) #time.struct_time(tm_year=2021, tm_mon=4, tm_mday=10, tm_hour=23, tm_min=19, tm_sec=11, tm_wday=5, tm_yday=100, tm_isdst=0)#将本地时间元组转成时间戳m = time.mktime(b) #1618067951.0#将时间元组转成字符串s = time.asctime(b) #Sat Apr 10 23:19:11 2021#将时间戳转为字符串 time.asctime(time.localtime(time.time()))p = time.ctime(c) #Sat Apr 10 23:19:11 2021#将时间元组转换成给定格式的字符串,参数2为时间元组,如果没有参数2,默认转当前时间q = time.strftime("%Y-%m-%d %X", b) #2021-04-10 23:19:11#将时间字符串转为时间元组w = time.strptime(q, "%Y-%m-%d %X") #time.struct_time(tm_year=2021, tm_mon=4, tm_mday=10, tm_hour=23, tm_min=19, tm_sec=11, tm_wday=5, tm_yday=100, tm_isdst=-1)#延迟一个时间,整型或者浮点型time.sleep(4)
time.perfcounter()可以理解为计时器,返回两次执行的间隔。
“09-_08. time模块3、datetime”讲解的为time.clock(),新版本已弃用。
import time#返回当前程序的cup执行时间#Unix系统始终返回全部的运行时间#windows从第二次开始,默认都是以第一个调用此函数的开始间戳作为基数tis1 = time.perf_counter()print("%d" % tis1) #0print("等待3秒......")time.sleep(3)tis2 = time.perf_counter()print("%d" % tis2) #3print(tis2-tis1) #2.9980309time.sleep(2)tis3=time.perf_counter()print("%d" % tis3) #5print(tis3-tis1) #5.018696print(tis3-tis2) #2.0206651000000004
异常:在pycharm中加Python3.8环境,调用time.clock出异常:AttributeError module 'time' has no attribute 'clock'
解决方案:用time.perf_counter()替换。
5.2 Datetime
09-08. time模块3、datetime
datetime比time高级了不少,可以理解为datetime基于time进行了封装,提供了各位使用的函数,datetime模块的接口更直观,更容易调用。
模块中的类:
| datetime | 同时有时间和日期 |
|---|---|
| timedelta | 主要用于计算时间的跨度 |
| tzinfo | 时区相关 |
| time | 只关注时间 |
| date | 只关注日期 |
import datetime#获取当前时间d1 = datetime.datetime.now()print(d1)#-->2021-04-11 18:22:37.489621print(type(d1))#--><class 'datetime.datetime'>#获取指定时间d2 = datetime.datetime(1999, 10, 1, 10, 28, 25, 123456)print(d2)#-->1999-10-01 10:28:25.123456#将时间转为字符串d3 = d1.strftime("%Y-%m-%d %X")print(d3)#-->2021-04-11 18:22:37print(type(d3))#--><class 'str'>#将格式化字符串转为datetime对象#注意:转换的格式要与字符串一致d4 = datetime.datetime.strptime(d3, "%Y-%m-%d %X")print(d4)#-->2021-04-11 18:22:37d5 = datetime.datetime(1999, 10, 1, 10, 28, 25, 123456)d6 = datetime.datetime.now()d7 = d6 - d5print(d7)#-->7863 days, 7:54:12.381766print(type(d7))#--><class 'datetime.timedelta'>#间隔的天数print(d7.days)#-->7863#间隔天数除外的秒数print(d7.seconds)#-->28452
5.3 calendar
09-09. datetime、calendar
import calendar#返回指定某年某月的日历print(calendar.month(2017, 7))#返回指定年的日历print(calendar.calendar(2017))#闰年返回True,否则返回Falseprint(calendar.isleap(2000))#-->True#返回某个月的weekday的第一天和这个月所有的天数print(calendar.monthrange(2017, 7))#-->(5, 31)#返回某个月以每一周为元素的列表print(calendar.monthcalendar(2017,7))#-->[[0, 0, 0, 0, 0, 1, 2], [3, 4, 5, 6, 7, 8, 9], [10, 11, 12, 13, 14, 15, 16], [17, 18, 19, 20, 21, 22, 23], [24, 25, 26, 27, 28, 29, 30], [31, 0, 0, 0, 0, 0, 0]]

若有收获,就点个赞吧
0 人点赞
