一HBase简介
HBASE是一个高可靠性、高性能、面向列、可伸缩的分布式存储系统,利用HBASE技术可在廉价PC Server上搭建起大规模结构化存储集群。
HBASE的目标是存储并处理大型的数据,更具体来说是仅需使用普通的硬件配置,就能够处理由成千上万的行和列所组成的大型数据。
HBASE是Google Bigtable的开源实现,但是也有很多不同之处。比如:Google Bigtable利用GFS作为其文件存储系统,HBASE利用Hadoop HDFS作为其文件存储系统;Google运行MAPREDUCE来处理Bigtable中的海量数据,HBASE同样利用Hadoop MapReduce来处理HBASE中的海量数据;Google Bigtable利用Chubby作为协同服务,HBASE利用Zookeeper作为对应。
它介于nosql和RDBMS之间,仅能通过主键(row key)和主键的range来检索数据,仅支持单行事务(可通过hive支持来实现多表join等复杂操作)。主要用来存储非结构化和半结构化的松散数据。
HBASE与mysql、oralce、db2、sqlserver等关系型数据库不同,它是一个NoSQL数据库(非关系型数据库)
Hbase的表模型与关系型数据库的表模型不同:
- Hbase的表没有固定的字段定义;
- Hbase的表中每行存储的都是一些key-value对
- Hbase的表中有列族的划分,用户可以指定将哪些kv插入哪个列族
- Hbase的表在物理存储上,是按照列族来分割的,不同列族的数据一定存储在不同的文件中
- Hbase的表中的每一行都固定有一个行键,而且每一行的行键在表中不能重复
- Hbase中的数据,包含行键,包含key,包含value,都是byte[ ]类型,hbase不负责为用户维护数据类型
- HBASE对事务的支持很差
HBASE相比于其他nosql数据库(mongodb、redis、cassendra、hazelcast)的特点:
Hbase的表数据存储在HDFS文件系统中,所以,hbase具备如下特性:
- 海量存储
- 列式存储
- 数据存储的安全性可靠性极高!
- 支持高并发
- 存储容量可以线性扩展;
二HBase安装
HBASE是一个分布式系统
其中有一个管理角色:HMaster(一般2台,一台active,一台backup)
其他的数据节点角色:HRegionServer(很多台,看数据量)
2.1 安装准备
需要先有一个java环境
首先,要有一个HDFS集群,并正常运行;regionserver应该跟hdfs中的datanode在一起
其次,还需要一个zookeeper集群,并正常运行,然后,安装HBASE
角色分配如下:
| Hdp01: namenode datanode regionserver hmaster zookeeper Hdp02: datanode regionserver zookeeper Hdp03: datanode regionserver zookeeper |
|---|
2.2安装步骤
解压hbase安装包
修改hbase-env.sh
| export JAVA_HOME=/root/apps/jdk1.7.0_67 export HBASE_MANAGES_ZK=false |
|---|
修改hbase-site.xml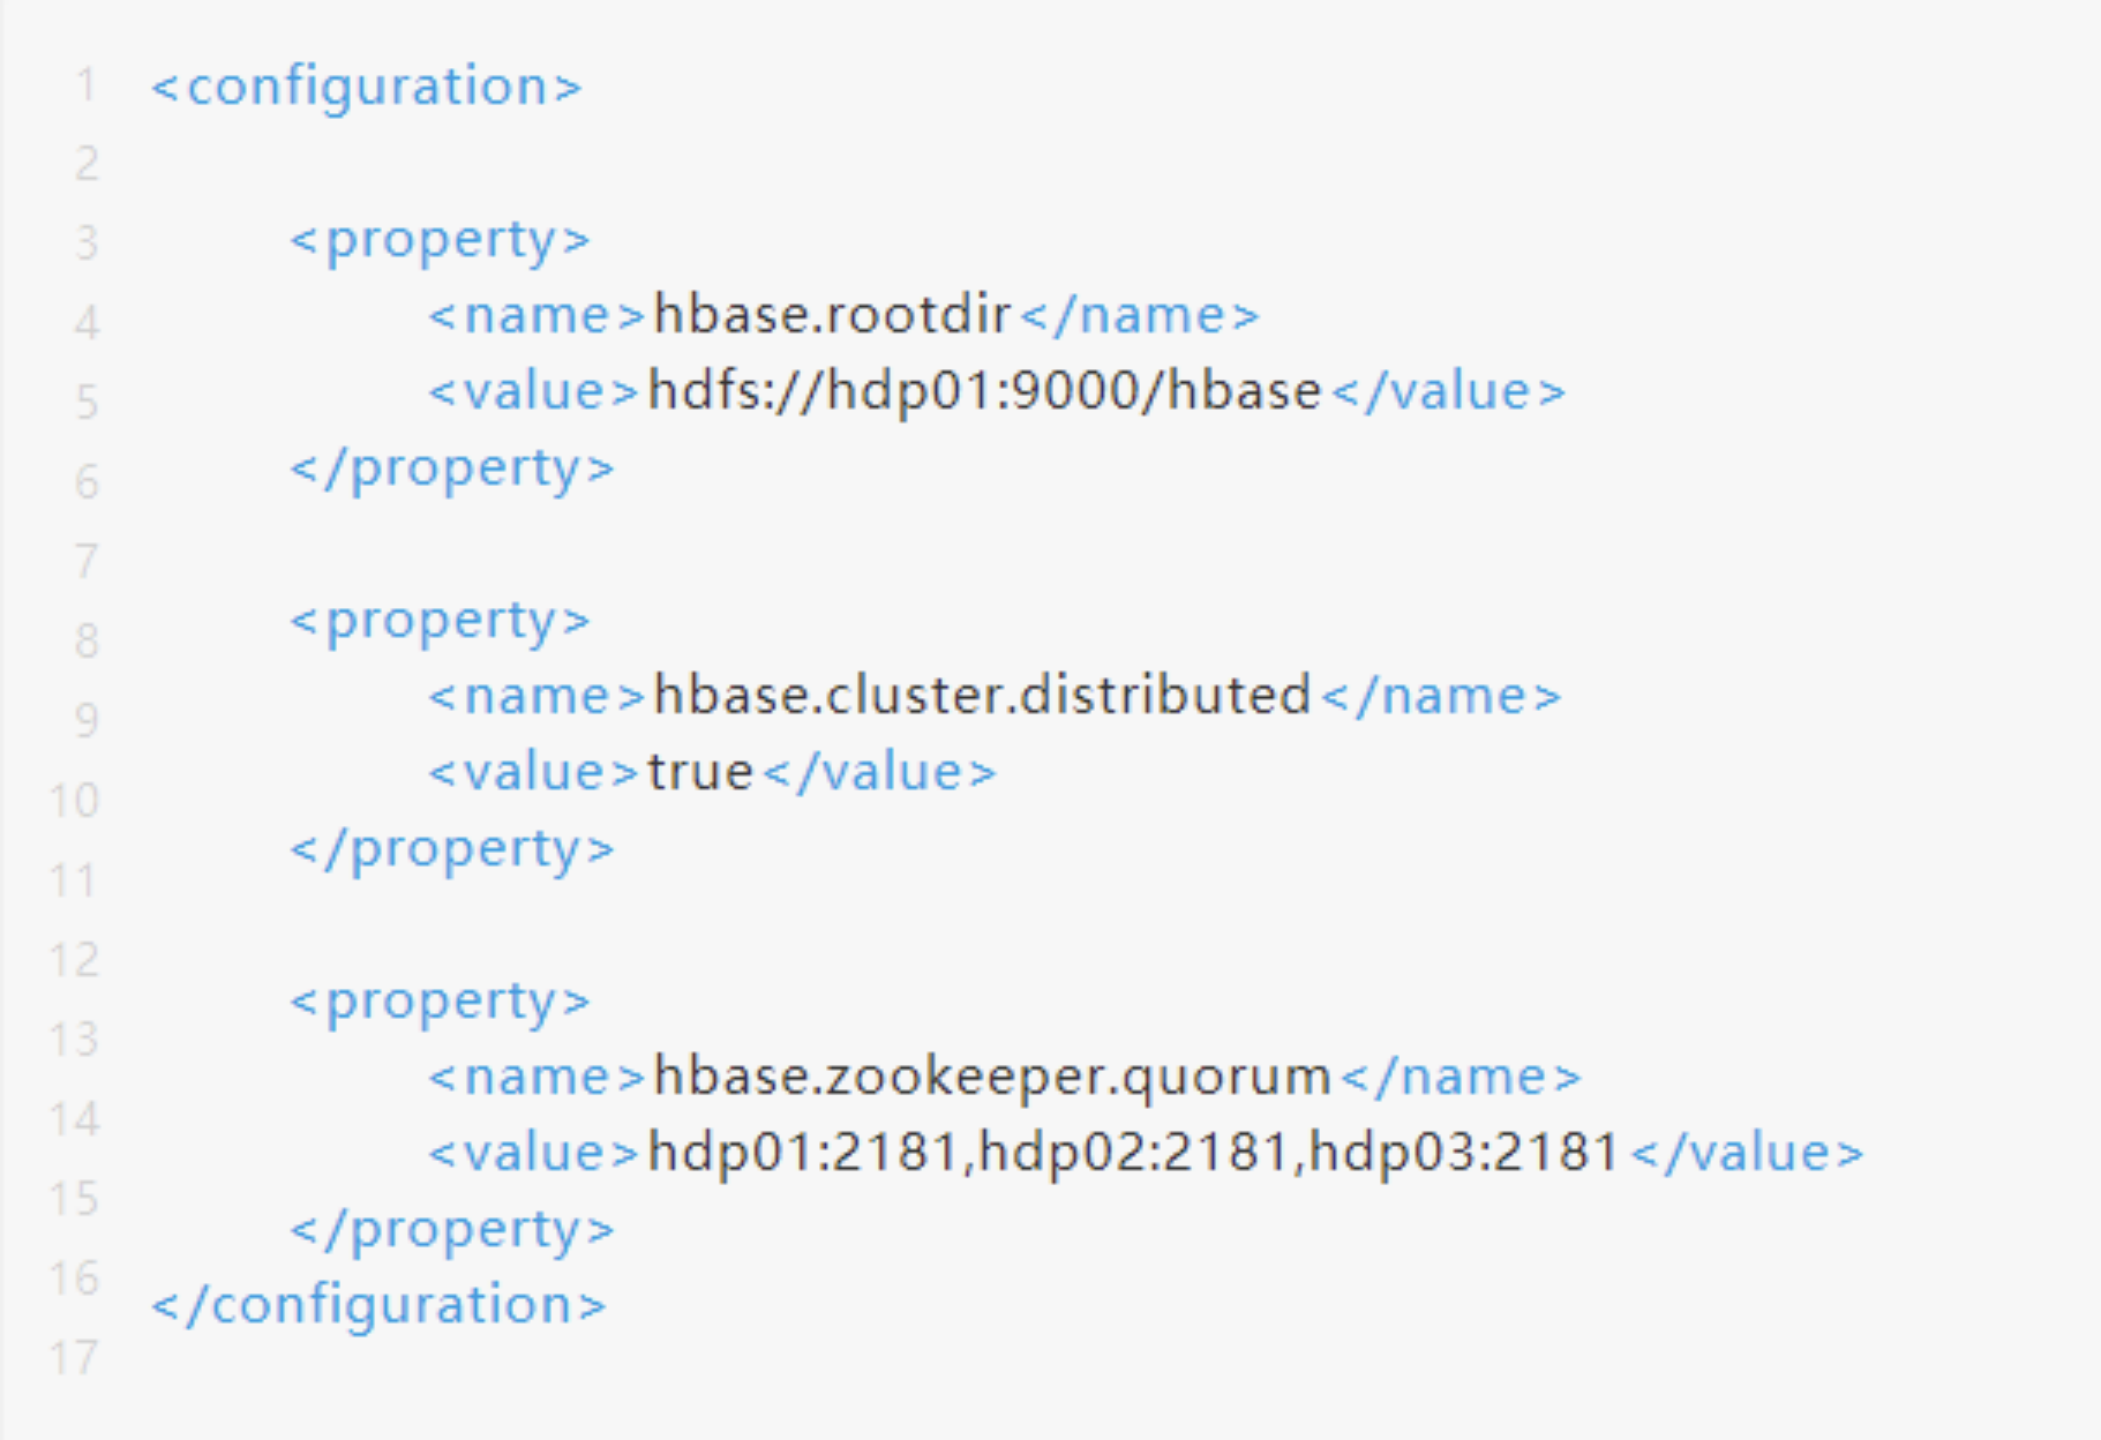
修改 regionservers 2.3 启动HBase集群
| bin/start-hbase.sh |
|---|
启动完后,还可以在集群中找任意一台机器启动一个备用的master
| bin/hbase-daemon.sh start master |
|---|
新启的这个master会处于backup状态
三HBase初体验
3.1启动HBase命令行客户端
| bin/hbase shellHbase> list // 查看表 Hbase> status // 查看集群状态 Hbase> version // 查看集群版本 |
|---|
3.2 HBase表模型特点

- 一个表,有表名
- 一个表可以分为多个列族(不同列族的数据会存储在不同文件中)
- 表中的每一行有一个“行键rowkey”,而且行键在表中不能重复
- 表中的每一对kv数据称作一个cell
- hbase可以对数据存储多个历史版本(历史版本数量可配置)
- 整张表由于数据量过大,会被横向切分成若干个region(用rowkey范围标识),不同region的数据也存储在不同文件中

- hbase会对插入的数据按顺序存储:
要点一:首先会按行键排序
要点二:同一行里面的kv会按列族排序,再按k排序
3.3 HBase数据类型
hbase中只支持byte[]
此处的byte[] 包括了:rowkey,key,value,列族名,表名
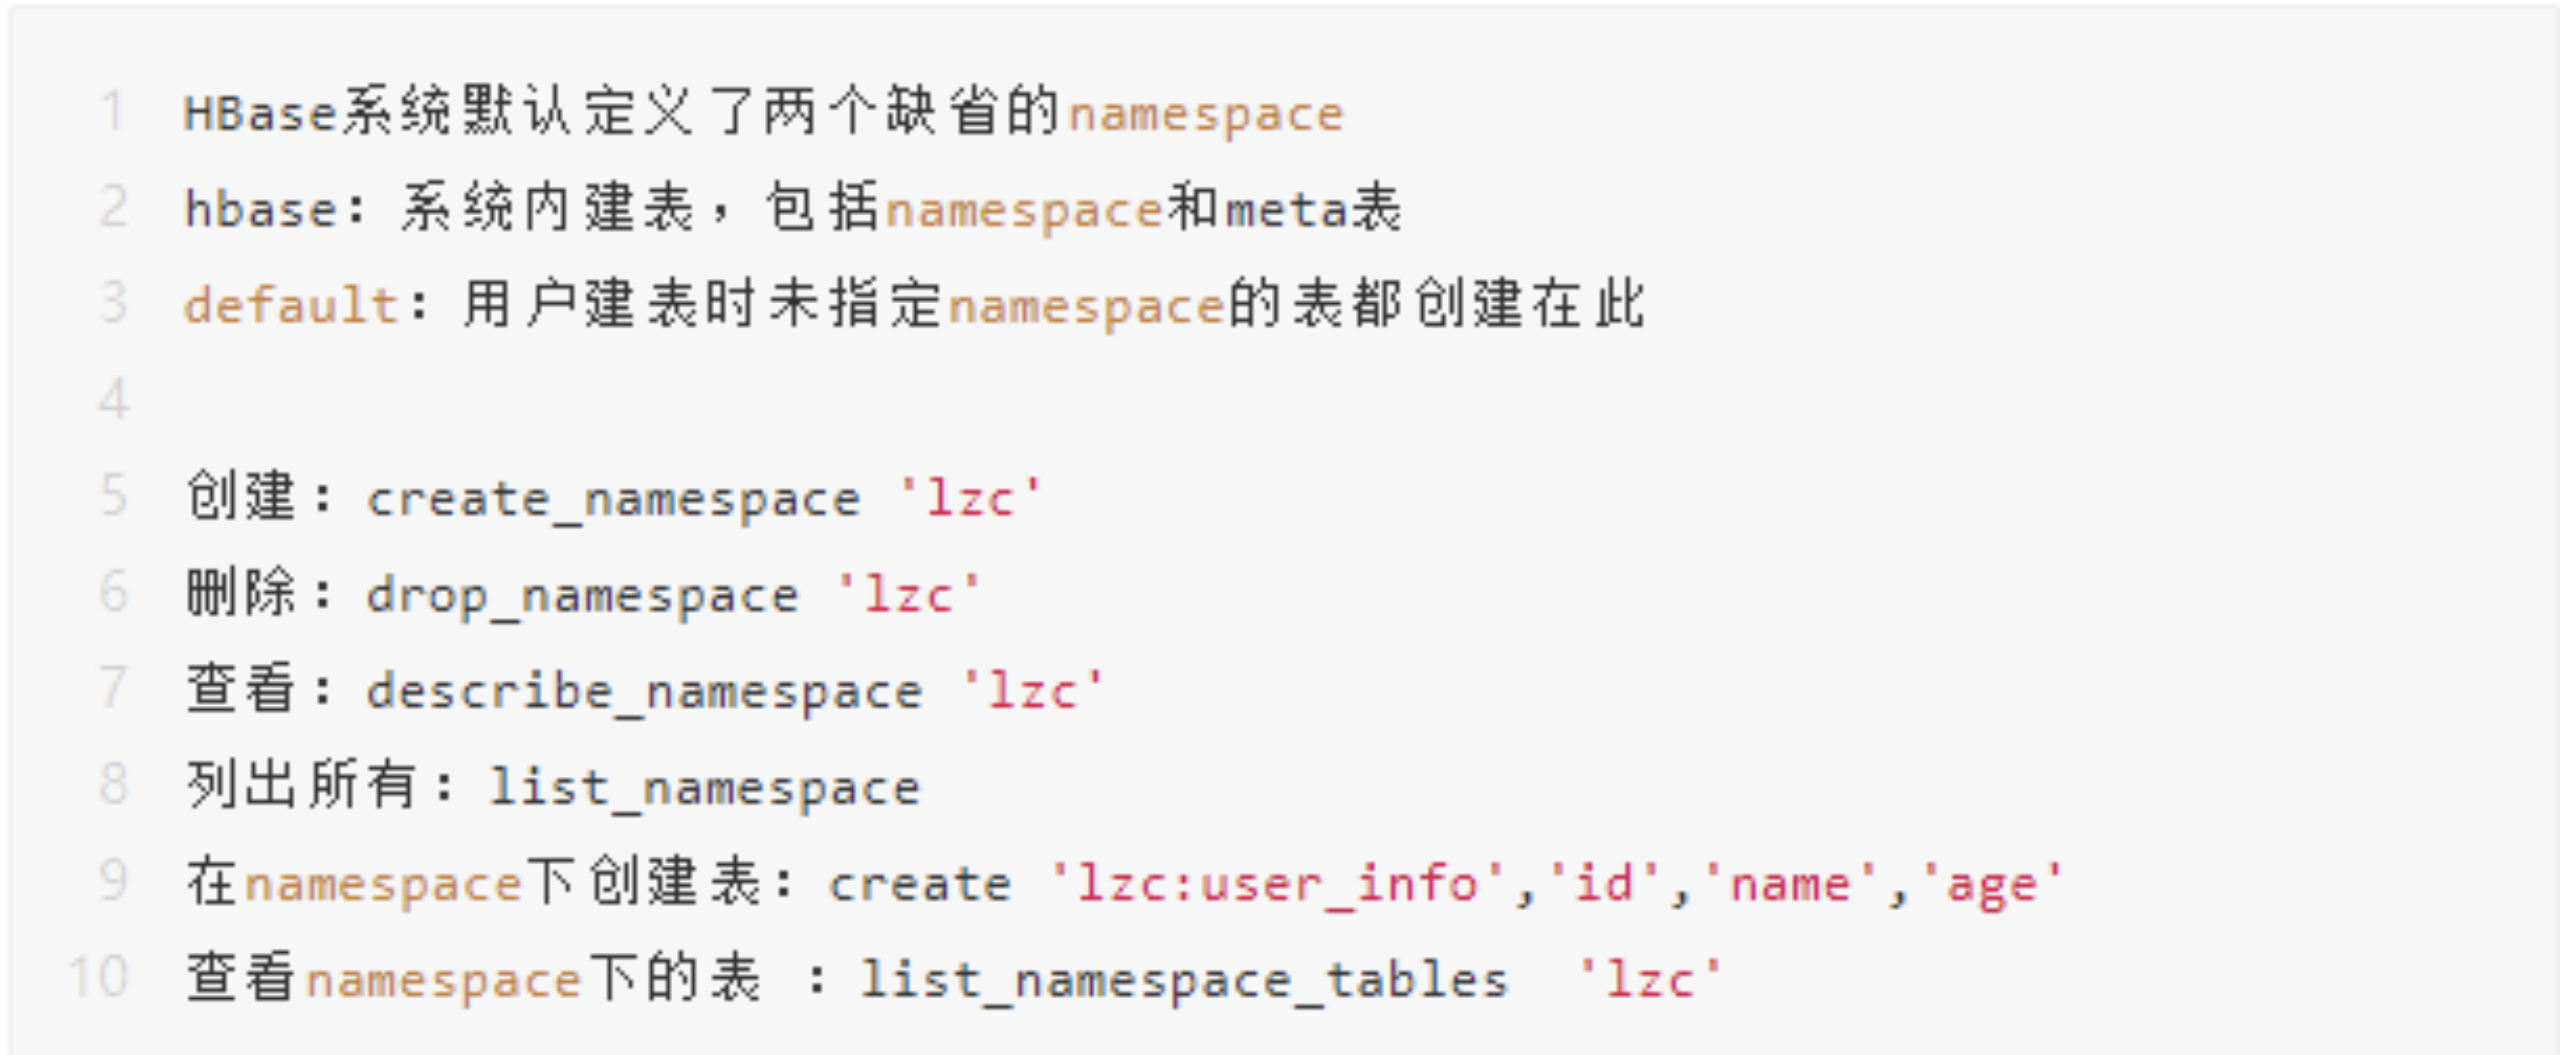
3.4 HBase命令行操作
| 名称 | 命令表达式 |
|---|---|
| 创建表 | create ‘表名’, ‘列族名1’,’列族名2’,’列族名N’ |
| 查看所有表 | list |
| 描述表 | describe ‘表名’ |
| 判断表存在 | exists ‘表名’ |
| 判断是否禁用启用表 | is_enabled ‘表名’ is_disabled ‘表名’ |
| 添加记录 | put ‘表名’, ‘rowKey’, ‘列族 : 列‘ , ‘值’ |
| 查看记录rowkey下的所有数据 | get ‘表名’ , ‘rowKey’ |
| 查看表中的记录总数 | count ‘表名’ |
| 获取某个列族 | get ‘表名’,’rowkey’,’列族’ |
| 获取某个列族的某个列 | get ‘表名’,’rowkey’,’列族:列’ |
| 删除记录 | delete ‘表名’ ,‘行名’ , ‘列族:列’ |
| 删除整行 | deleteall ‘表名’,’rowkey’ |
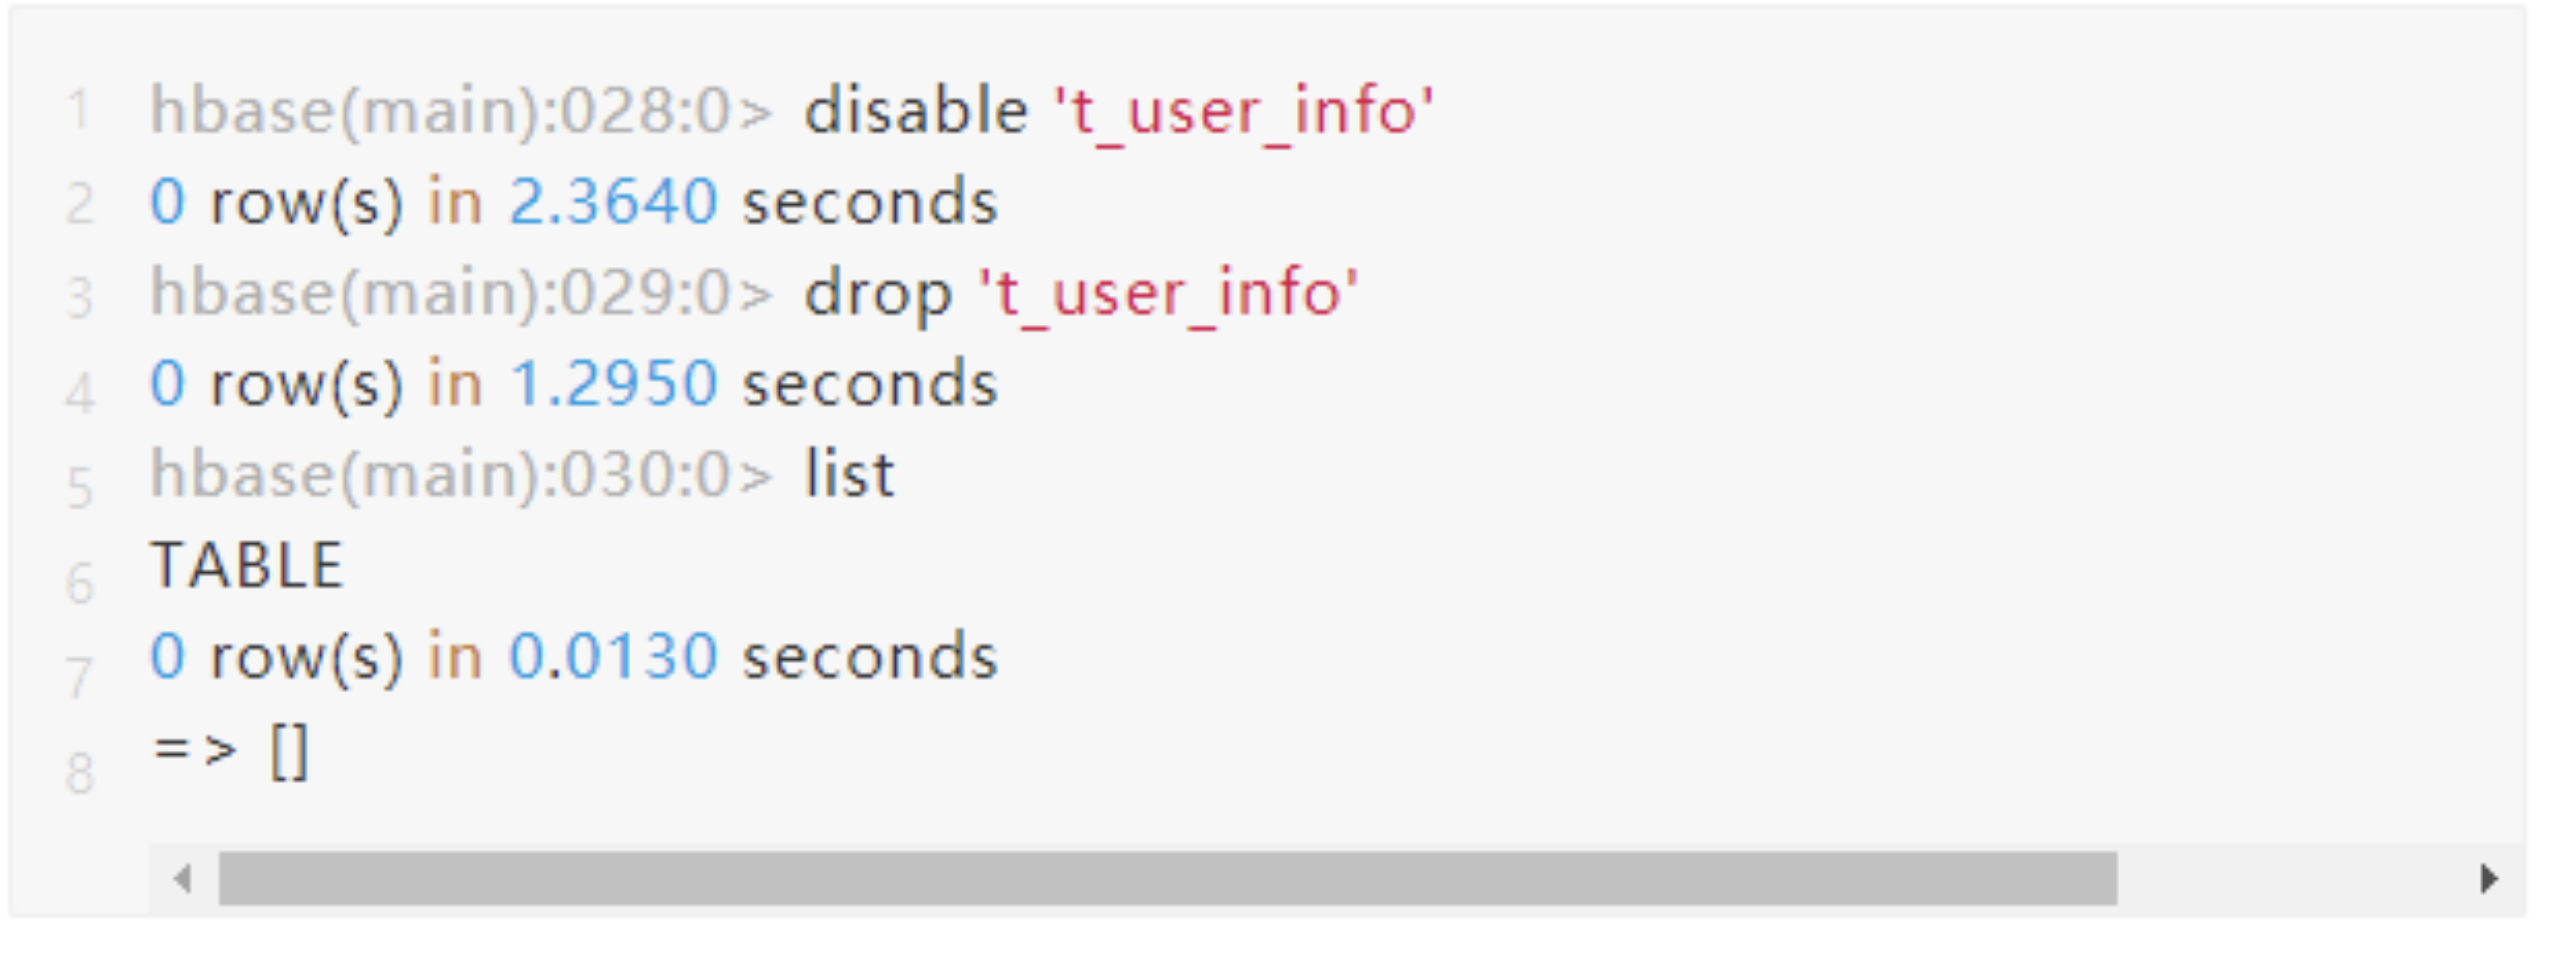
| 删除一张表 | 先要屏蔽该表,才能对该表进行删除 第一步 disable ‘表名’ ,第二步 drop ‘表名’ |
| 清空表 | truncate ‘表名’ |
| 查看所有记录 | scan “表名” |
| 查看某个表某个列中所有数据 | scan “表名” , {COLUMNS=>’列族名:列名’} |
| 更新记录 | 就是重写一遍,进行覆盖,hbase没有修改,都是追加 |
建表
插入数据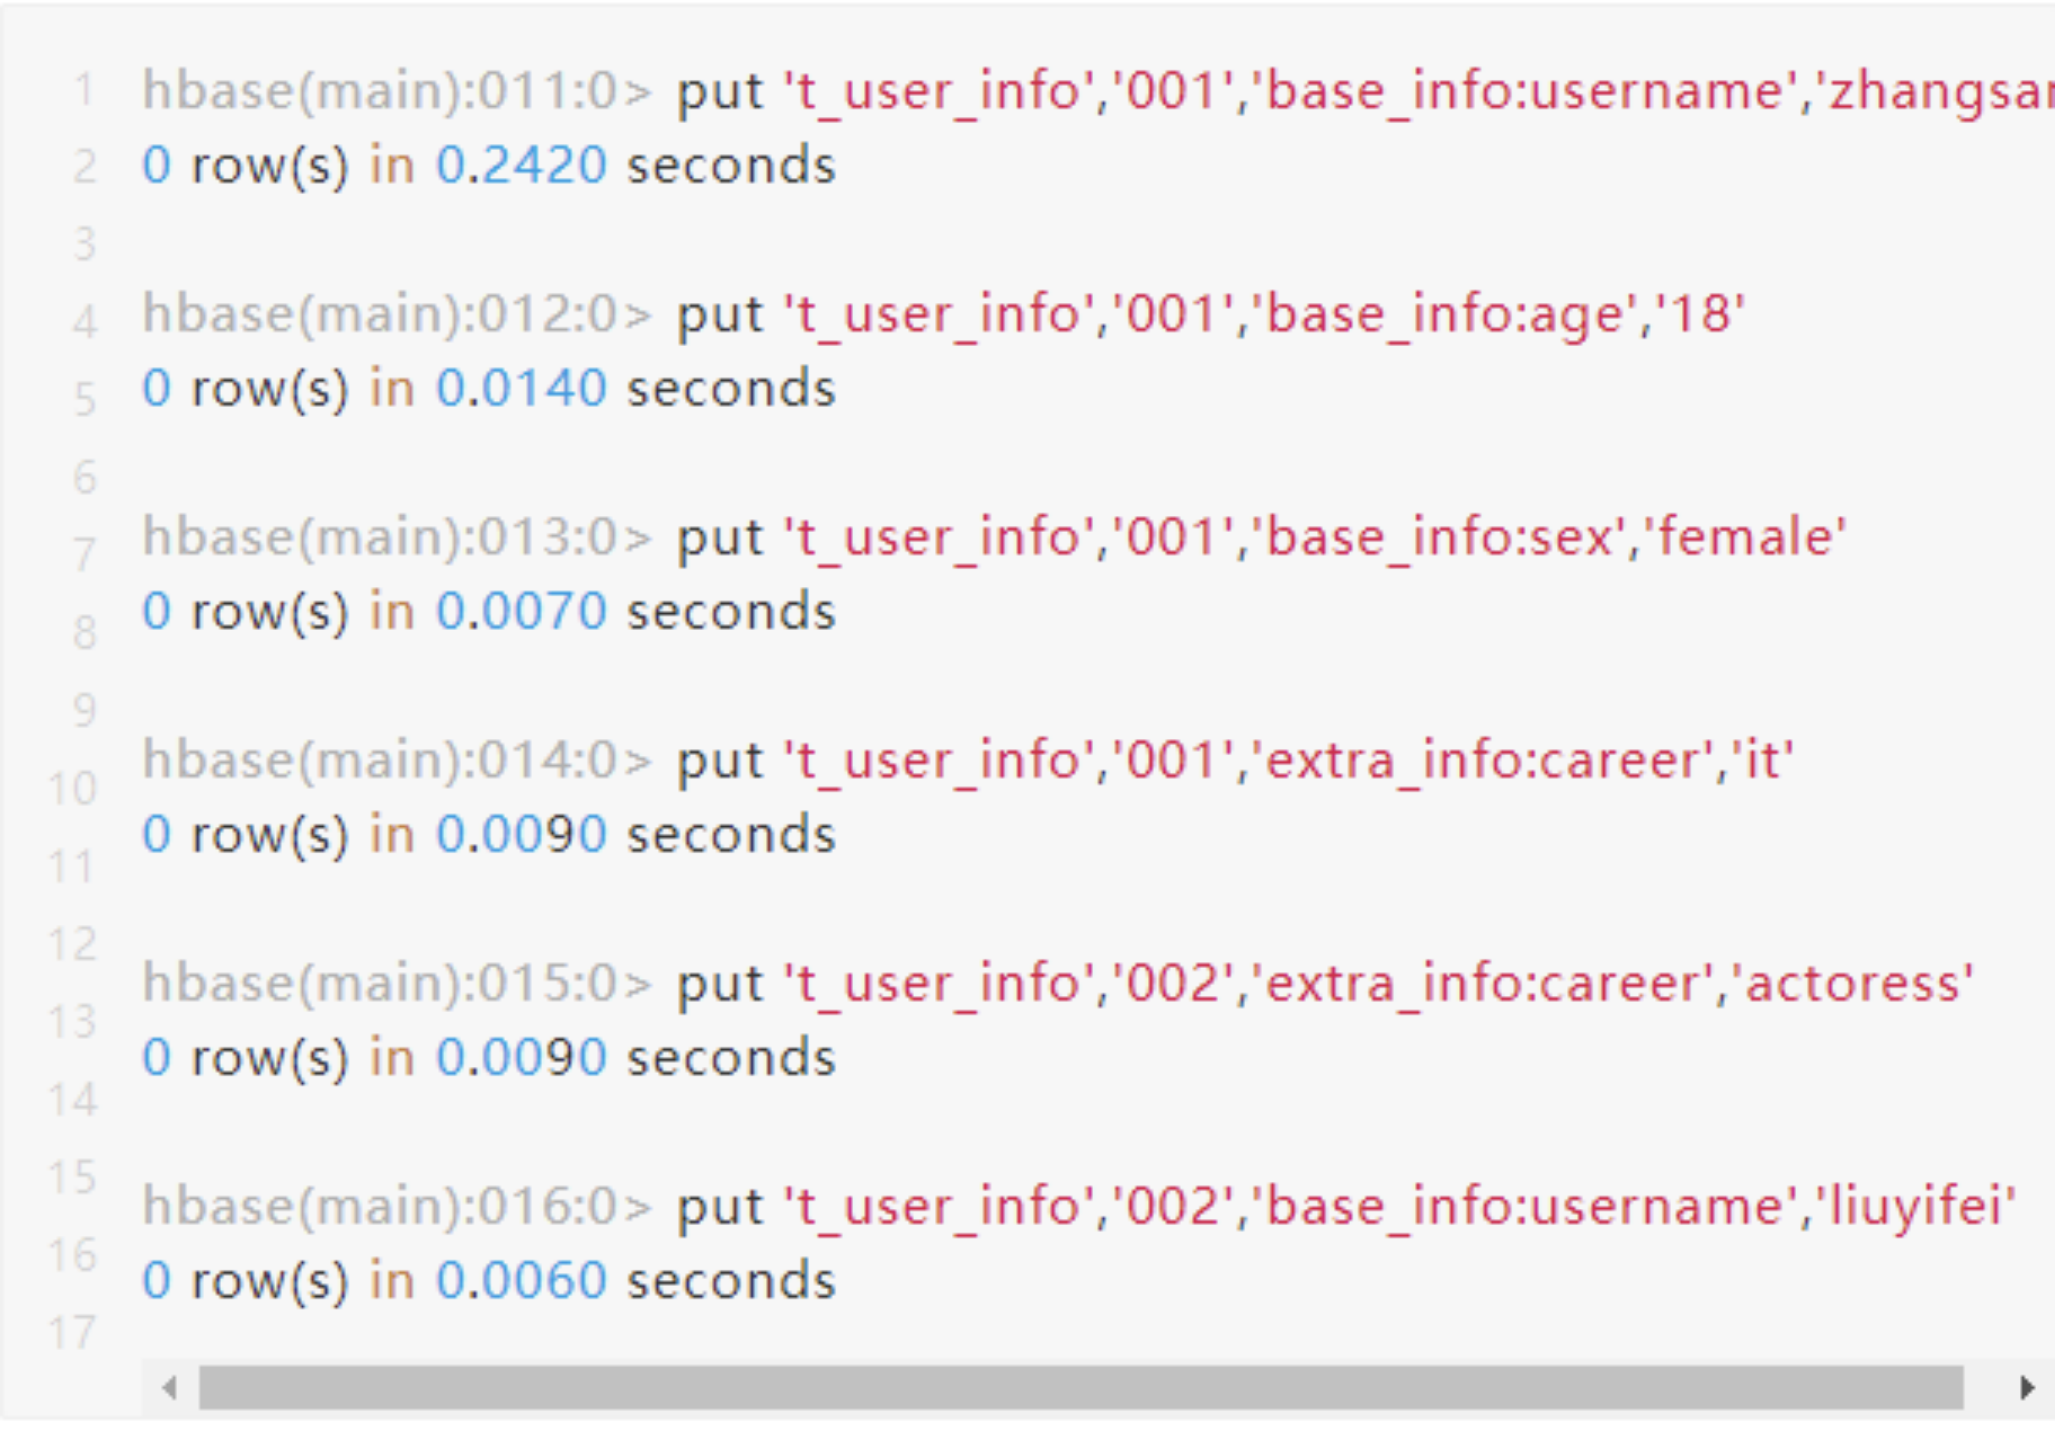
查询方式一 scan扫描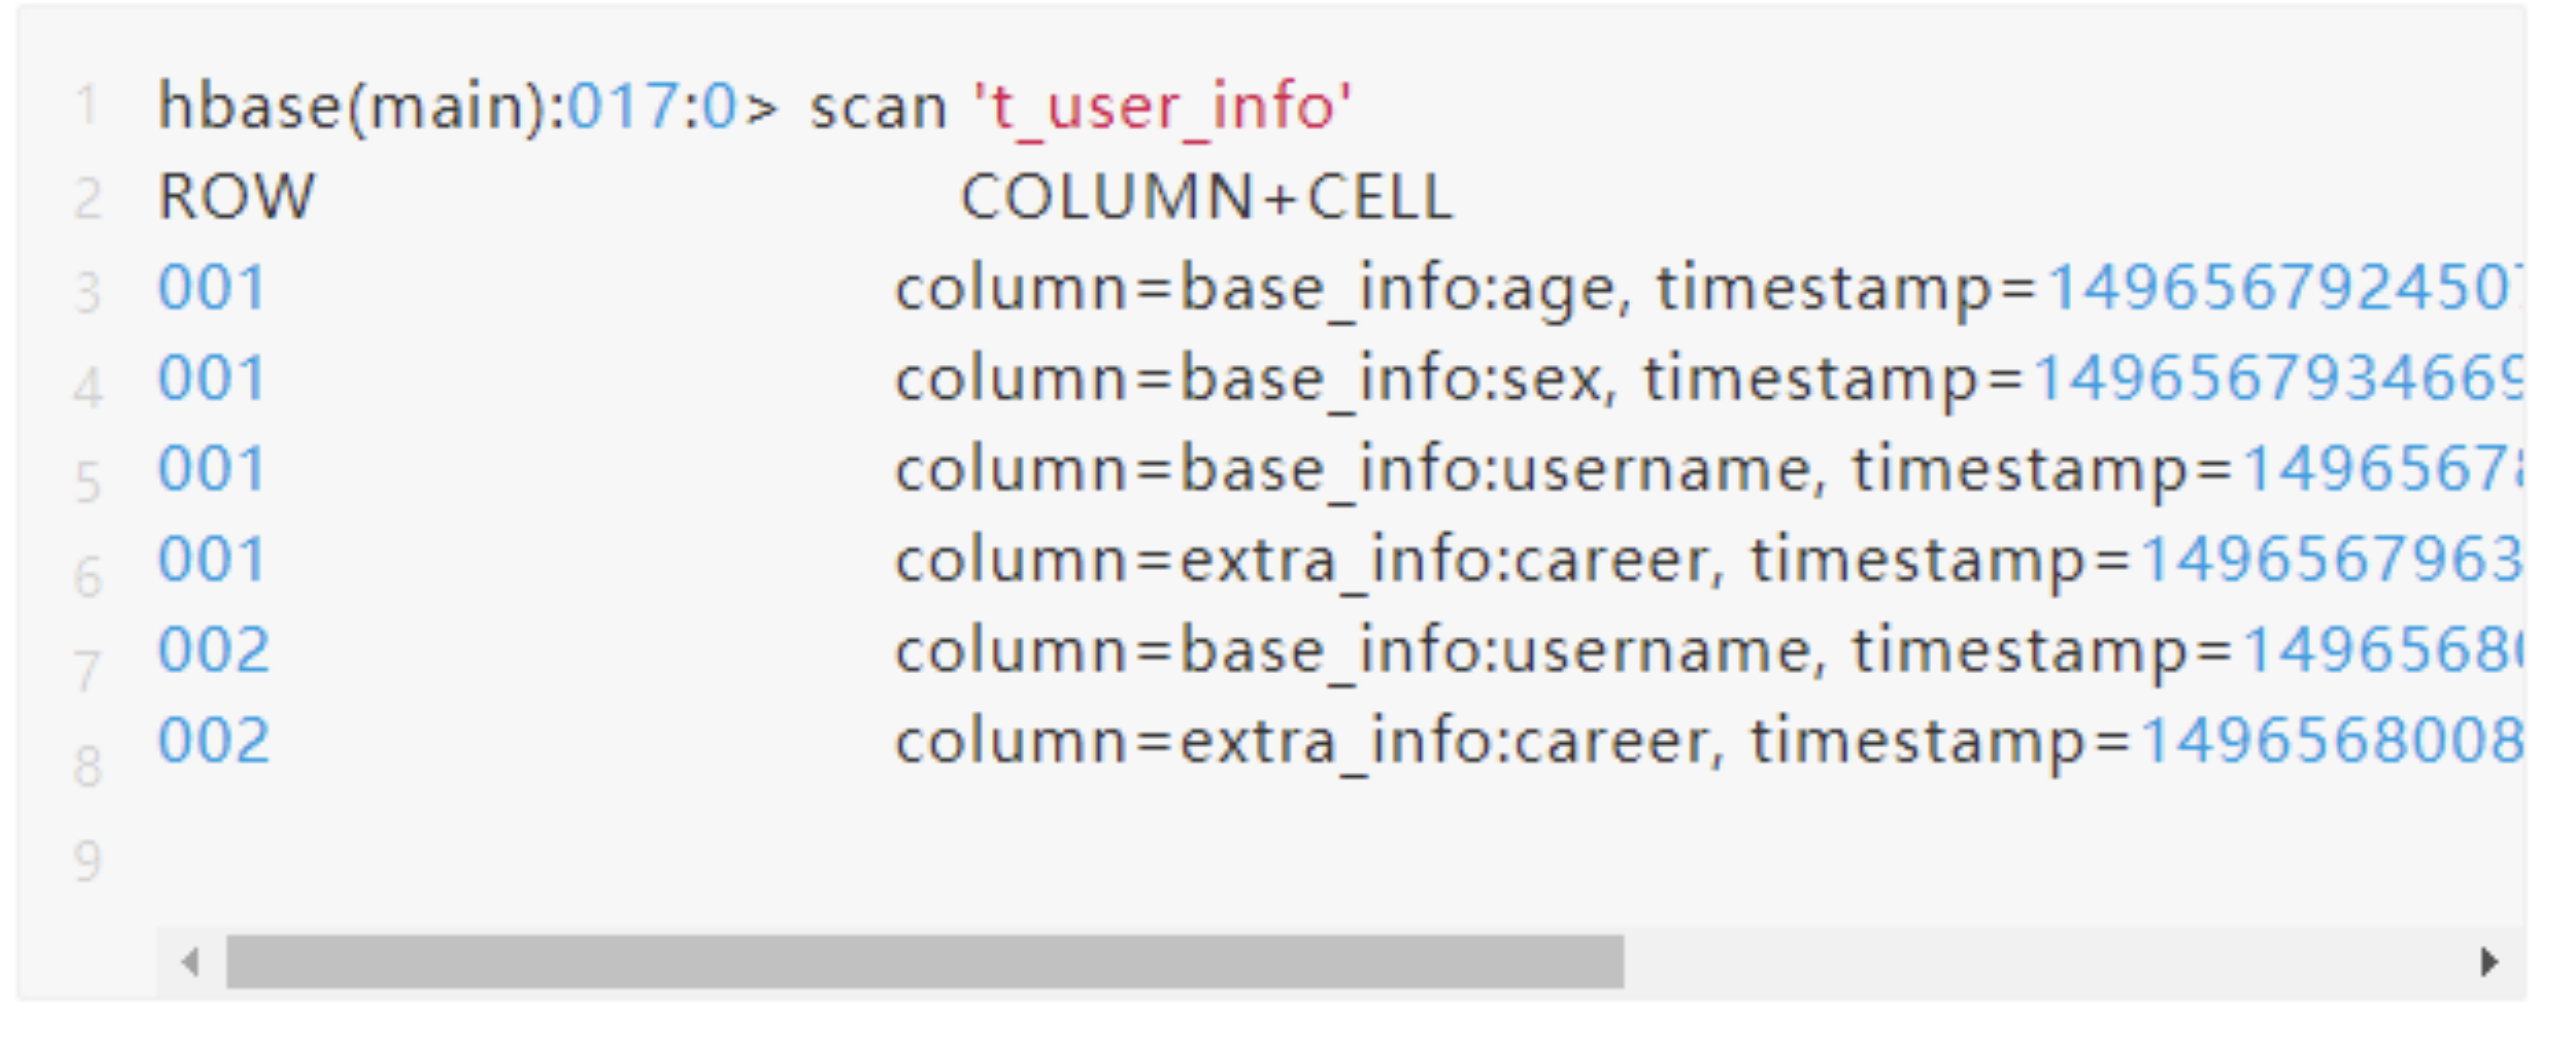
查询方式二 get单行数据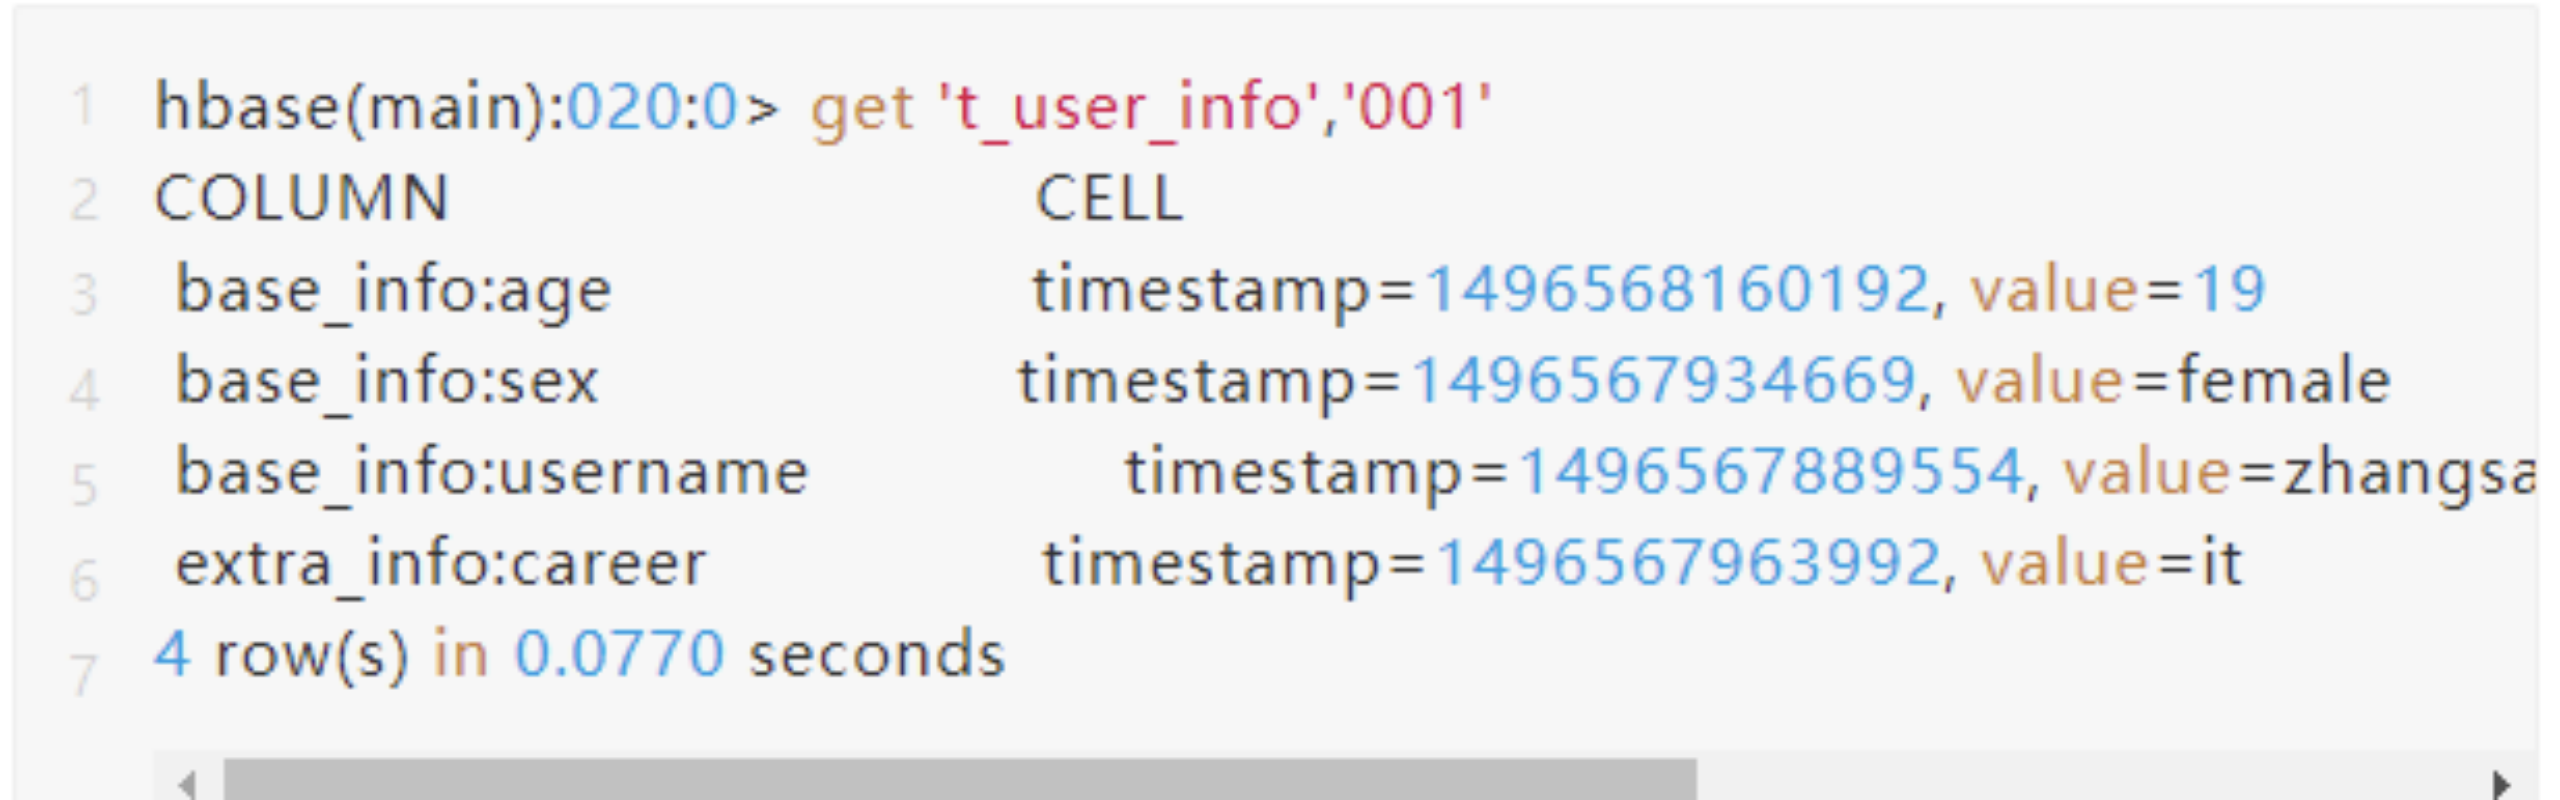
删除一个kv数据
| hbase(main):021:0> delete ‘t_user_info’,’001’,’base_info:sex’0 row(s) in 0.0390 seconds |
|---|
删除整行数据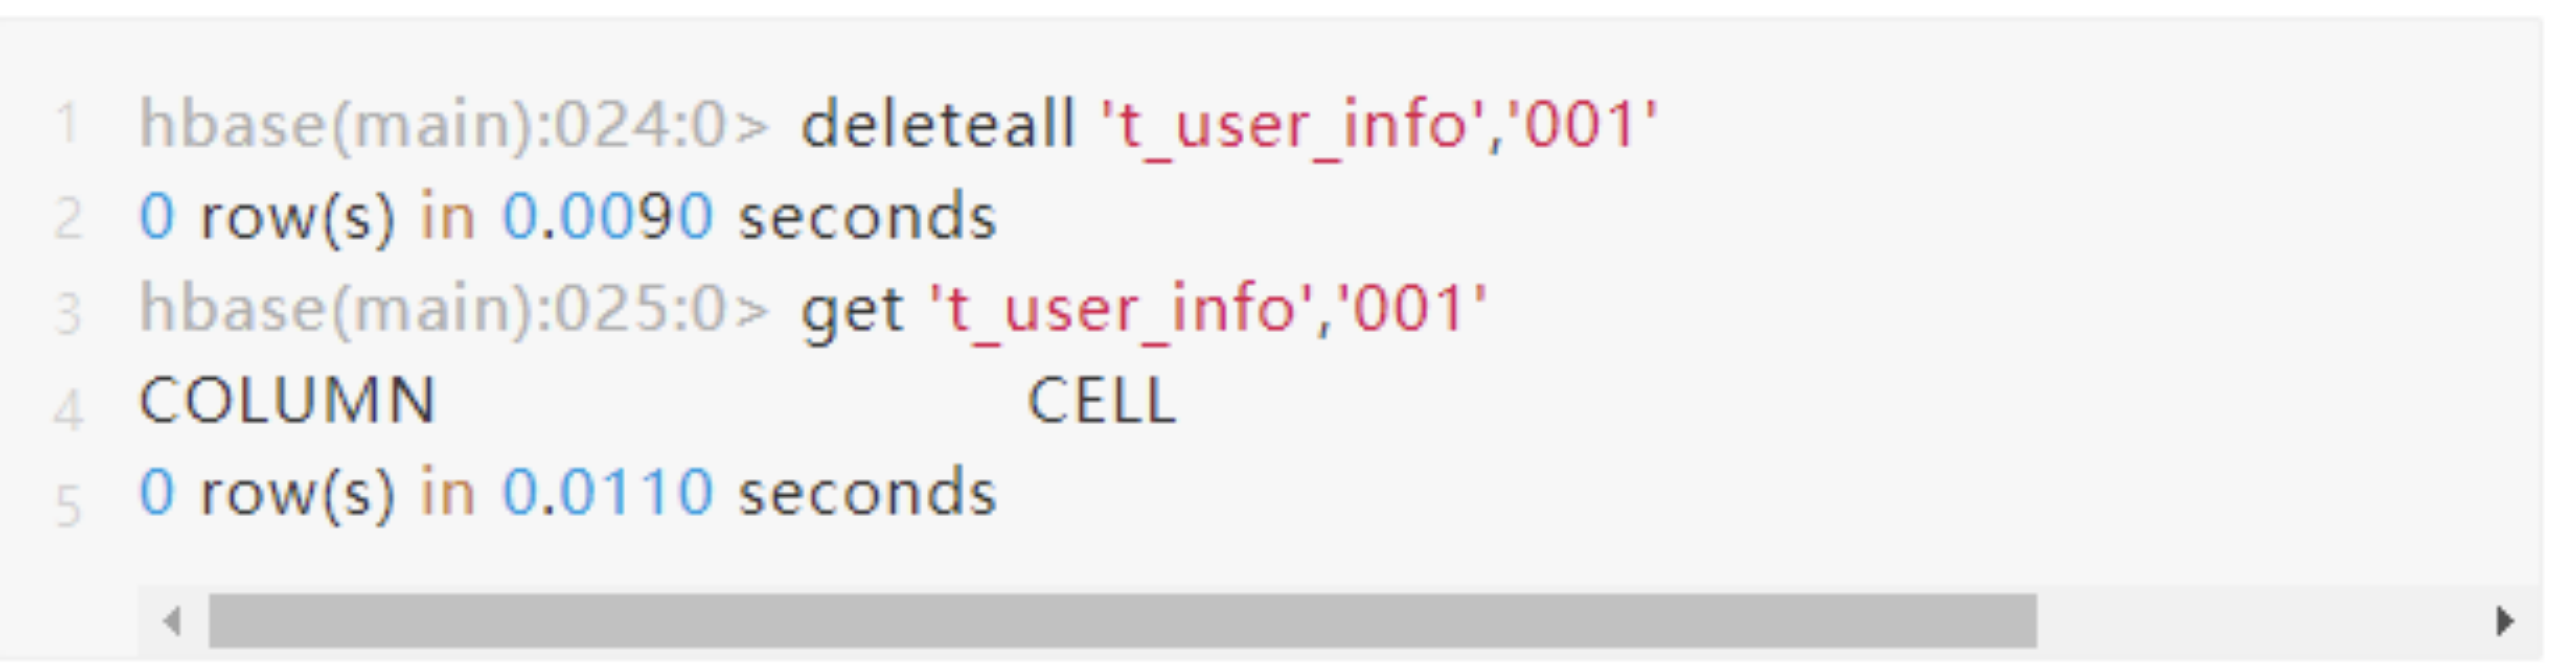
3.5 HBase排序特性
与nosql数据库们一样,row key是用来检索记录的主键。访问HBASE table中的行,只有三种方式:
- 通过单个row key访问
- 通过row key的range(正则)
- 全表扫描
Row key行键 (Row key)可以是任意字符串(最大长度 是 64KB,实际应用中长度一般为 10-100bytes),在HBASE内部,row key保存为字节数组。存储时,数据按照Row key的字典序(byte order)排序存储。设计key时,要充分排序存储这个特性,将经常一起读取的行存储放到一起。(位置相关性)
插入到hbase中去的数据,hbase会自动排序存储:
排序规则: 首先看行键,然后看列族名,然后看列(key)名;按字典顺序
Hbase的这个特性跟查询效率有极大的关系
比如:一张用来存储用户信息的表,有名字,户籍,年龄,职业….等信息
然后,在业务系统中经常需要:
查询某个省的所有用户
经常需要查询某个省的指定姓的所有用户
思路:如果能将相同省的用户在hbase的存储文件中连续存储,并且能将相同省中相同姓的用户连续存储,那么,上述两个查询需求的效率就会提高!!!
做法:将查询条件拼到rowkey内
四HBase客户端API操作
| package com.wedoctor.hbase; import java.util.ArrayList; import org.apache.hadoop.conf.Configuration; import org.apache.hadoop.hbase.Cell; import org.apache.hadoop.hbase.CellUtil; import org.apache.hadoop.hbase.HBaseConfiguration; import org.apache.hadoop.hbase.HColumnDescriptor; import org.apache.hadoop.hbase.HTableDescriptor; import org.apache.hadoop.hbase.MasterNotRunningException; import org.apache.hadoop.hbase.TableName; import org.apache.hadoop.hbase.ZooKeeperConnectionException; import org.apache.hadoop.hbase.client.Connection; import org.apache.hadoop.hbase.client.ConnectionFactory; import org.apache.hadoop.hbase.client.Delete; import org.apache.hadoop.hbase.client.Get; import org.apache.hadoop.hbase.client.HBaseAdmin; import org.apache.hadoop.hbase.client.HConnection; import org.apache.hadoop.hbase.client.HConnectionManager; import org.apache.hadoop.hbase.client.Put; import org.apache.hadoop.hbase.client.Result; import org.apache.hadoop.hbase.client.ResultScanner; import org.apache.hadoop.hbase.client.Scan; import org.apache.hadoop.hbase.client.Table; import org.apache.hadoop.hbase.filter.ColumnPrefixFilter; import org.apache.hadoop.hbase.filter.CompareFilter; import org.apache.hadoop.hbase.filter.FilterList; import org.apache.hadoop.hbase.filter.FilterList.Operator; import org.apache.hadoop.hbase.filter.RegexStringComparator; import org.apache.hadoop.hbase.filter.RowFilter; import org.apache.hadoop.hbase.filter.SingleColumnValueFilter; import org.apache.hadoop.hbase.util.Bytes; import org.junit.After; import org.junit.Before; import org.junit.Test; public class HbaseTest { / 配置ss / static Configuration config = null; private Connection connection = null; private Table table = null; @Before public void init() throws Exception { config = HBaseConfiguration.create();// 配置 config.set(“hbase.zookeeper.quorum”, “master,work1,work2”);// zookeeper地址 config.set(“hbase.zookeeper.property.clientPort”, “2181”);// zookeeper端口 connection = ConnectionFactory.createConnection(config); table = connection.getTable(TableName.valueOf(“user”)); } / 创建一个表 @throws Exception / @Test public void createTable() throws Exception { // 创建表管理类 HBaseAdmin admin = new HBaseAdmin(config); // hbase表管理 // 创建表描述类 TableName tableName = TableName.valueOf(“test3”); // 表名称 HTableDescriptor desc = new HTableDescriptor(tableName); // 创建列族的描述类 HColumnDescriptor family = new HColumnDescriptor(“info”); // 列族 // 将列族添加到表中 desc.addFamily(family); HColumnDescriptor family2 = new HColumnDescriptor(“info2”); // 列族 // 将列族添加到表中 desc.addFamily(family2); // 创建表 admin.createTable(desc); // 创建表 } @Test @SuppressWarnings(“deprecation”) public void deleteTable() throws MasterNotRunningException, ZooKeeperConnectionException, Exception { HBaseAdmin admin = new HBaseAdmin(config); admin.disableTable(“test3”); admin.deleteTable(“test3”); admin.close(); } / 向hbase中增加数据 @throws Exception / @SuppressWarnings({ “deprecation”, “resource” }) @Test public void insertData() throws Exception { table.setAutoFlushTo(false); table.setWriteBufferSize(534534534); ArrayList for (int i = 21; i < 50; i++) { Put put = new Put(Bytes.toBytes(“1234”+i)); put.add(Bytes.toBytes(“info”), Bytes.toBytes(“name”), Bytes.toBytes(“wangwu”+i)); put.add(Bytes.toBytes(“info”), Bytes.toBytes(“password”), Bytes.toBytes(1234+i)); arrayList.add(put); } //插入数据 table.put(arrayList); //提交 table.flushCommits(); } / 修改数据 @throws Exception / @Test public void uodateData() throws Exception { Put put = new Put(Bytes.toBytes(“1234”)); put.add(Bytes.toBytes(“info”), Bytes.toBytes(“namessss”), Bytes.toBytes(“lisi1234”)); put.add(Bytes.toBytes(“info”), Bytes.toBytes(“password”), Bytes.toBytes(1234)); //插入数据 table.put(put); //提交 table.flushCommits(); } / 删除数据 @throws Exception / @Test public void deleteDate() throws Exception { Delete delete = new Delete(Bytes.toBytes(“1234”)); table.delete(delete); table.flushCommits(); } / 单条查询 @throws Exception / @Test public void queryData() throws Exception { Get get = new Get(Bytes.toBytes(“1234”)); Result result = table.get(get); System.out.println(Bytes.toInt(result.getValue(Bytes.toBytes(“info”), Bytes.toBytes(“password”)))); System.out.println(Bytes.toString(result.getValue(Bytes.toBytes(“info”), Bytes.toBytes(“namessss”)))); System.out.println(Bytes.toString(result.getValue(Bytes.toBytes(“info”), Bytes.toBytes(“sex”)))); } / 全表扫描 @throws Exception / @Test public void scanData() throws Exception { Scan scan = new Scan(); //scan.addFamily(Bytes.toBytes(“info”)); //scan.addColumn(Bytes.toBytes(“info”), Bytes.toBytes(“password”)); scan.setStartRow(Bytes.toBytes(“wangsf_0”)); scan.setStopRow(Bytes.toBytes(“wangwu”)); ResultScanner scanner = table.getScanner(scan); for (Result result : scanner) { System.out.println(Bytes.toInt(result.getValue(Bytes.toBytes(“info”), Bytes.toBytes(“password”)))); System.out.println(Bytes.toString(result.getValue(Bytes.toBytes(“info”), Bytes.toBytes(“name”)))); //System.out.println(Bytes.toInt(result.getValue(Bytes.toBytes(“info2”), Bytes.toBytes(“password”)))); //System.out.println(Bytes.toString(result.getValue(Bytes.toBytes(“info2”), Bytes.toBytes(“name”)))); } } / 全表扫描的过滤器 列值过滤器 @throws Exception / @Test public void scanDataByFilter1() throws Exception { // 创建全表扫描的scan Scan scan = new Scan(); //过滤器:列值过滤器 SingleColumnValueFilter filter = new SingleColumnValueFilter(Bytes.toBytes(“info”), Bytes.toBytes(“name”), CompareFilter.CompareOp.EQUAL, Bytes.toBytes(“zhangsan2”)); // 设置过滤器 scan.setFilter(filter); // 打印结果集 ResultScanner scanner = table.getScanner(scan); for (Result result : scanner) { System.out.println(Bytes.toInt(result.getValue(Bytes.toBytes(“info”), Bytes.toBytes(“password”)))); System.out.println(Bytes.toString(result.getValue(Bytes.toBytes(“info”), Bytes.toBytes(“name”)))); } } /** rowkey过滤器 @throws Exception / @Test public void scanDataByFilter2() throws Exception { // 创建全表扫描的scan Scan scan = new Scan(); //匹配rowkey以wangsenfeng开头的 RowFilter filter = new RowFilter(CompareFilter.CompareOp.EQUAL, new RegexStringComparator(“^12341”)); // 设置过滤器 scan.setFilter(filter); // 打印结果集 ResultScanner scanner = table.getScanner(scan); for (Result result : scanner) { System.out.println(Bytes.toInt(result.getValue(Bytes.toBytes(“info”), Bytes.toBytes(“password”)))); System.out.println(Bytes.toString(result.getValue(Bytes.toBytes(“info”), Bytes.toBytes(“name”)))); //System.out.println(Bytes.toInt(result.getValue(Bytes.toBytes(“info2”), Bytes.toBytes(“password”)))); //System.out.println(Bytes.toString(result.getValue(Bytes.toBytes(“info2”), Bytes.toBytes(“name”)))); } } / 匹配列名前缀 @throws Exception */ @Test public void scanDataByFilter3() throws Exception { // 创建全表扫描的scan Scan scan = new Scan(); //匹配rowkey以wangsenfeng开头的 ColumnPrefixFilter filter = new ColumnPrefixFilter(Bytes.toBytes(“na”)); // 设置过滤器 scan.setFilter(filter); // 打印结果集 ResultScanner scanner = table.getScanner(scan); for (Result result : scanner) { System.out.println(“rowkey:” + Bytes.toString(result.getRow())); System.out.println(“info:name:” + Bytes.toString(result.getValue(Bytes.toBytes(“info”), Bytes.toBytes(“name”)))); // 判断取出来的值是否为空 if (result.getValue(Bytes.toBytes(“info”), Bytes.toBytes(“age”)) != null) { System.out.println(“info:age:” + Bytes.toInt(result.getValue(Bytes.toBytes(“info”), Bytes.toBytes(“age”)))); } // 判断取出来的值是否为空 if (result.getValue(Bytes.toBytes(“info”), Bytes.toBytes(“sex”)) != null) { System.out.println(“infi:sex:” + Bytes.toInt(result.getValue(Bytes.toBytes(“info”), Bytes.toBytes(“sex”)))); } // 判断取出来的值是否为空 if (result.getValue(Bytes.toBytes(“info2”), Bytes.toBytes(“name”)) != null) { System.out .println(“info2:name:” + Bytes.toString(result.getValue( Bytes.toBytes(“info2”), Bytes.toBytes(“name”)))); } // 判断取出来的值是否为空 if (result.getValue(Bytes.toBytes(“info2”), Bytes.toBytes(“age”)) != null) { System.out.println(“info2:age:” + Bytes.toInt(result.getValue(Bytes.toBytes(“info2”), Bytes.toBytes(“age”)))); } // 判断取出来的值是否为空 if (result.getValue(Bytes.toBytes(“info2”), Bytes.toBytes(“sex”)) != null) { System.out.println(“info2:sex:” + Bytes.toInt(result.getValue(Bytes.toBytes(“info2”), Bytes.toBytes(“sex”)))); } } } / 过滤器集合 @throws Exception */ @Test public void scanDataByFilter4() throws Exception { // 创建全表扫描的scan Scan scan = new Scan(); //过滤器集合:MUST_PASS_ALL(and),MUST_PASS_ONE(or) FilterList filterList = new FilterList(Operator.MUST_PASS_ONE); //匹配rowkey以wangsenfeng开头的 RowFilter filter = new RowFilter(CompareFilter.CompareOp.EQUAL, new RegexStringComparator(“^wangsenfeng”)); //匹配name的值等于wangsenfeng SingleColumnValueFilter filter2 = new SingleColumnValueFilter(Bytes.toBytes(“info”), Bytes.toBytes(“name”), CompareFilter.CompareOp.EQUAL, Bytes.toBytes(“zhangsan”)); filterList.addFilter(filter); filterList.addFilter(filter2); // 设置过滤器 scan.setFilter(filterList); // 打印结果集 ResultScanner scanner = table.getScanner(scan); for (Result result : scanner) { System.out.println(“rowkey:” + Bytes.toString(result.getRow())); System.out.println(“info:name:” + Bytes.toString(result.getValue(Bytes.toBytes(“info”), Bytes.toBytes(“name”)))); // 判断取出来的值是否为空 if (result.getValue(Bytes.toBytes(“info”), Bytes.toBytes(“age”)) != null) { System.out.println(“info:age:” + Bytes.toInt(result.getValue(Bytes.toBytes(“info”), Bytes.toBytes(“age”)))); } // 判断取出来的值是否为空 if (result.getValue(Bytes.toBytes(“info”), Bytes.toBytes(“sex”)) != null) { System.out.println(“infi:sex:” + Bytes.toInt(result.getValue(Bytes.toBytes(“info”), Bytes.toBytes(“sex”)))); } // 判断取出来的值是否为空 if (result.getValue(Bytes.toBytes(“info2”), Bytes.toBytes(“name”)) != null) { System.out .println(“info2:name:” + Bytes.toString(result.getValue( Bytes.toBytes(“info2”), Bytes.toBytes(“name”)))); } // 判断取出来的值是否为空 if (result.getValue(Bytes.toBytes(“info2”), Bytes.toBytes(“age”)) != null) { System.out.println(“info2:age:” + Bytes.toInt(result.getValue(Bytes.toBytes(“info2”), Bytes.toBytes(“age”)))); } // 判断取出来的值是否为空 if (result.getValue(Bytes.toBytes(“info2”), Bytes.toBytes(“sex”)) != null) { System.out.println(“info2:sex:” + Bytes.toInt(result.getValue(Bytes.toBytes(“info2”), Bytes.toBytes(“sex”)))); } } } @After public void close() throws Exception { table.close(); connection.close(); } } |
|---|
五HBase运行原理
5.1 master职责
1.管理监控HRegionServer,实现其负载均衡。
2.处理region的分配或转移,比如在HRegion split时分配新的HRegion;在HRegionServer退出时迁移其负责的HRegion到其他HRegionServer上。
3.处理元数据的变更
4.管理namespace和table的元数据(实际存储在HDFS上)。
5.权限控制(ACL)。
6.监控集群中所有HRegionServer的状态(通过Heartbeat和监听ZooKeeper中的状态)。
5.2 Region Server
- 管理自己所负责的region数据的读写。
- 读写HDFS,管理Table中的数据。
- Client直接通过HRegionServer读写数据(从HMaster中获取元数据,找到RowKey所在的HRegion/HRegionServer后)。
- 刷新缓存到HDFS
- 维护Hlog
- 执行压缩
- 负责分裂(region split)在运行过程中变得过大的region
5.3 zookeeper作用
存放整个HBase集群的元数据以及集群的状态信息。
实现HMaster主从节点的failover。
注:HMaster通过监听ZooKeeper中的Ephemeral节点(默认:/hbase/rs/*)来监控HRegionServer的加入和宕机。
在第一个HMaster连接到ZooKeeper时会创建Ephemeral节点(默认:/hbasae/master)来表示Active的HMaster,其后加进来的HMaster则监听该Ephemeral节点
如果当前Active的HMaster宕机,则该节点消失,因而其他HMaster得到通知,而将自身转换成Active的HMaster,在变为Active的HMaster之前,它会在/hbase/masters/下创建自己的Ephemeral节点。
5.4 HBase读写流程
写数据流程
客户端现在要插入一条数据,rowkey=r000001, 这条数据应该写入到table表中的那个region中呢?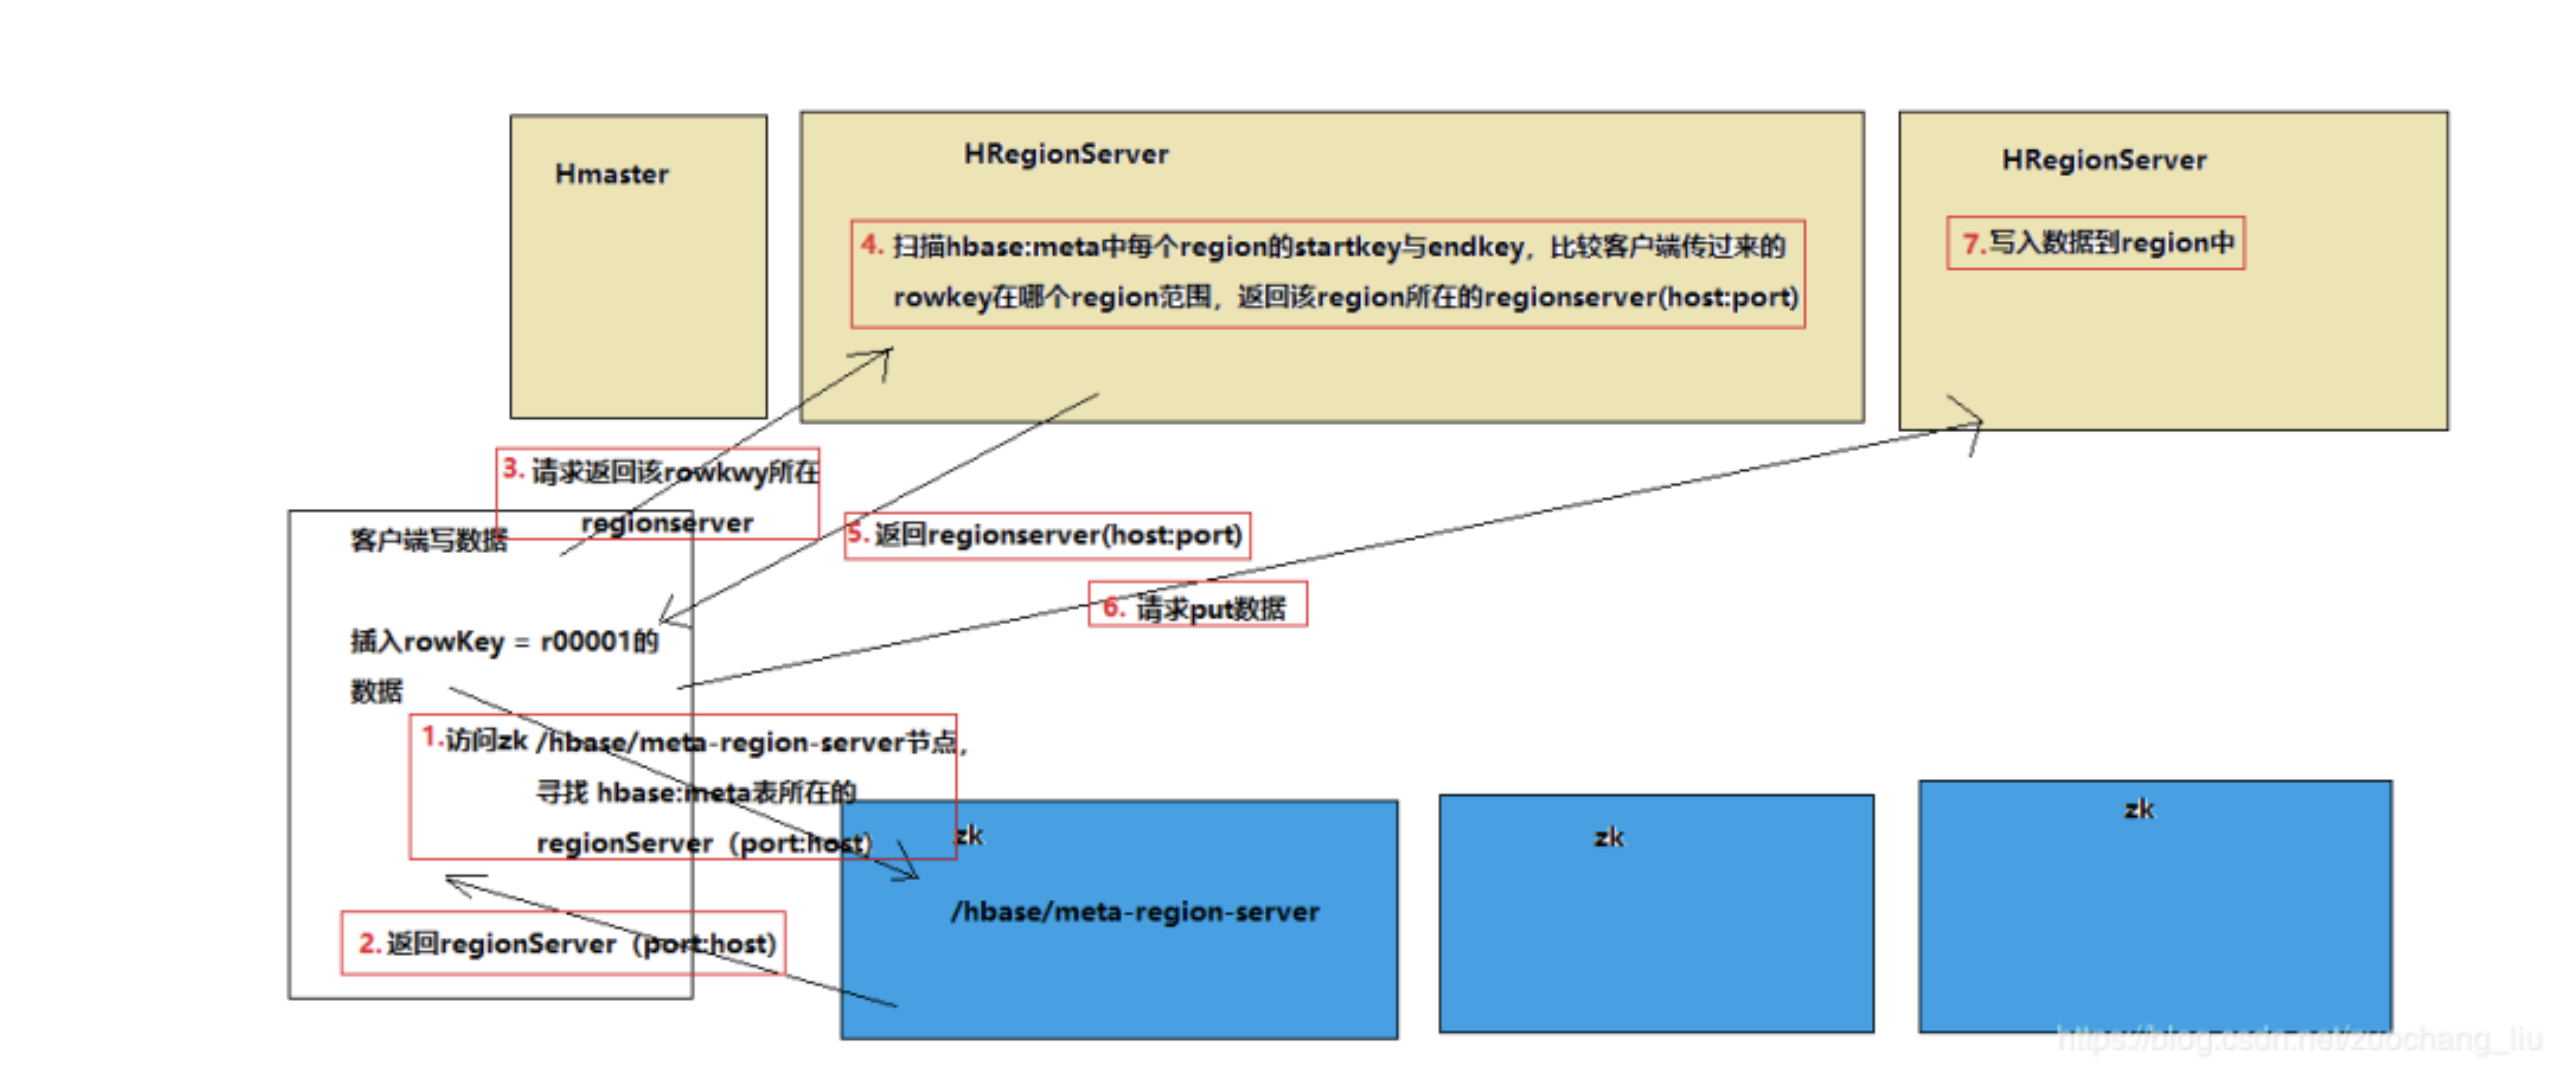
- 客户端要连接zookeeper, 从zk的/hbase节点找到hbase:meta表所在的regionserver(host:port);
2. regionserver扫描hbase:meta中的每个region的起始行健,对比r000001这条数据在那个region的范围内;
3. 从对应的 info:server key中存储了region是有哪个regionserver(host:port)在负责的;
4. 客户端直接请求对应的regionserver;
5. regionserver接收到客户端发来的请求之后,就会将数据写入到region中
读数据流程
客户端现在要查询rowkey=r000001这条数据,那么这个流程是什么样子的呢?
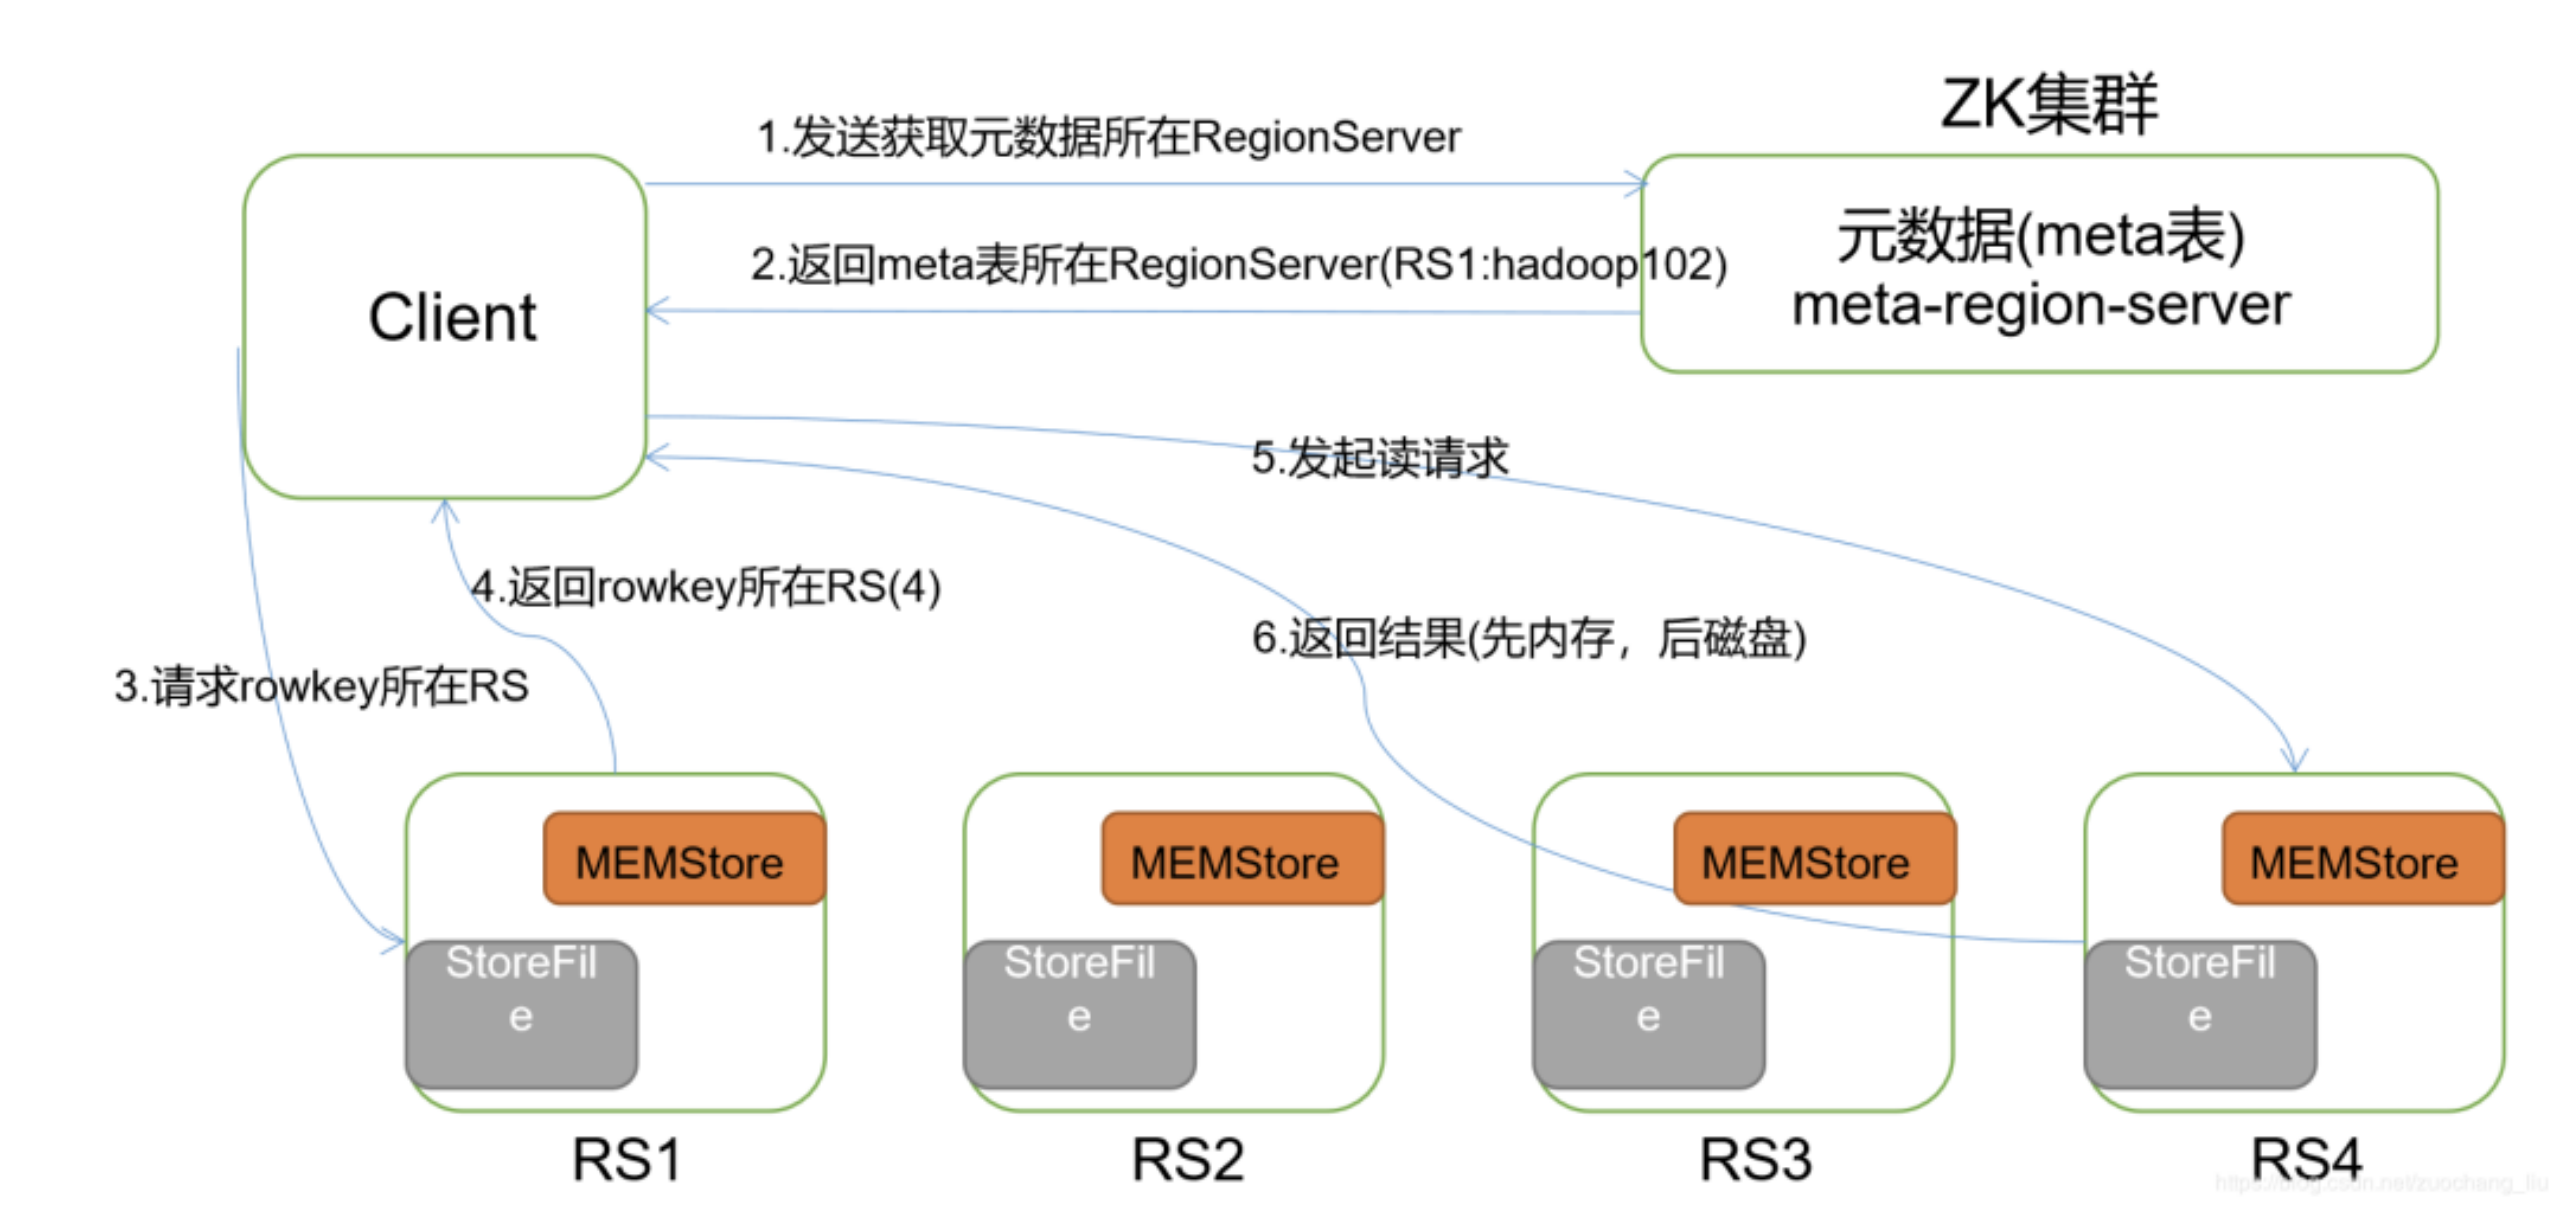
- 首先Client连接zookeeper, 找到hbase:meta表所在的regionserver;
- 请求对应的regionserver,扫描hbase:meta表,根据namespace、表名和rowkey在meta表中找到r00001所在的region是由那个regionserver负责的;
- 找到这个region对应的regionserver
- regionserver收到了请求之后,扫描对应的region返回数据到Client
(先从MemStore找数据,如果没有,再到BlockCache里面读;BlockCache还没有,再到StoreFile上读(为了读取的效率);
如果是从StoreFile里面读取的数据,不是直接返回给客户端,而是先写入BlockCache,再返回给客户端。)
blockcache逐渐满了之后,会采用LRU的淘汰策略
注:客户会缓存这些位置信息,然而第二步它只是缓存当前RowKey对应的HRegion的位置,因而如果下一个要查的RowKey不在同一个HRegion中,则需要继续查询hbase:meta所在的HRegion,然而随着时间的推移,客户端缓存的位置信息越来越多,以至于不需要再次查找hbase:meta Table的信息,除非某个HRegion因为宕机或Split被移动,此时需要重新查询并且更新缓存。
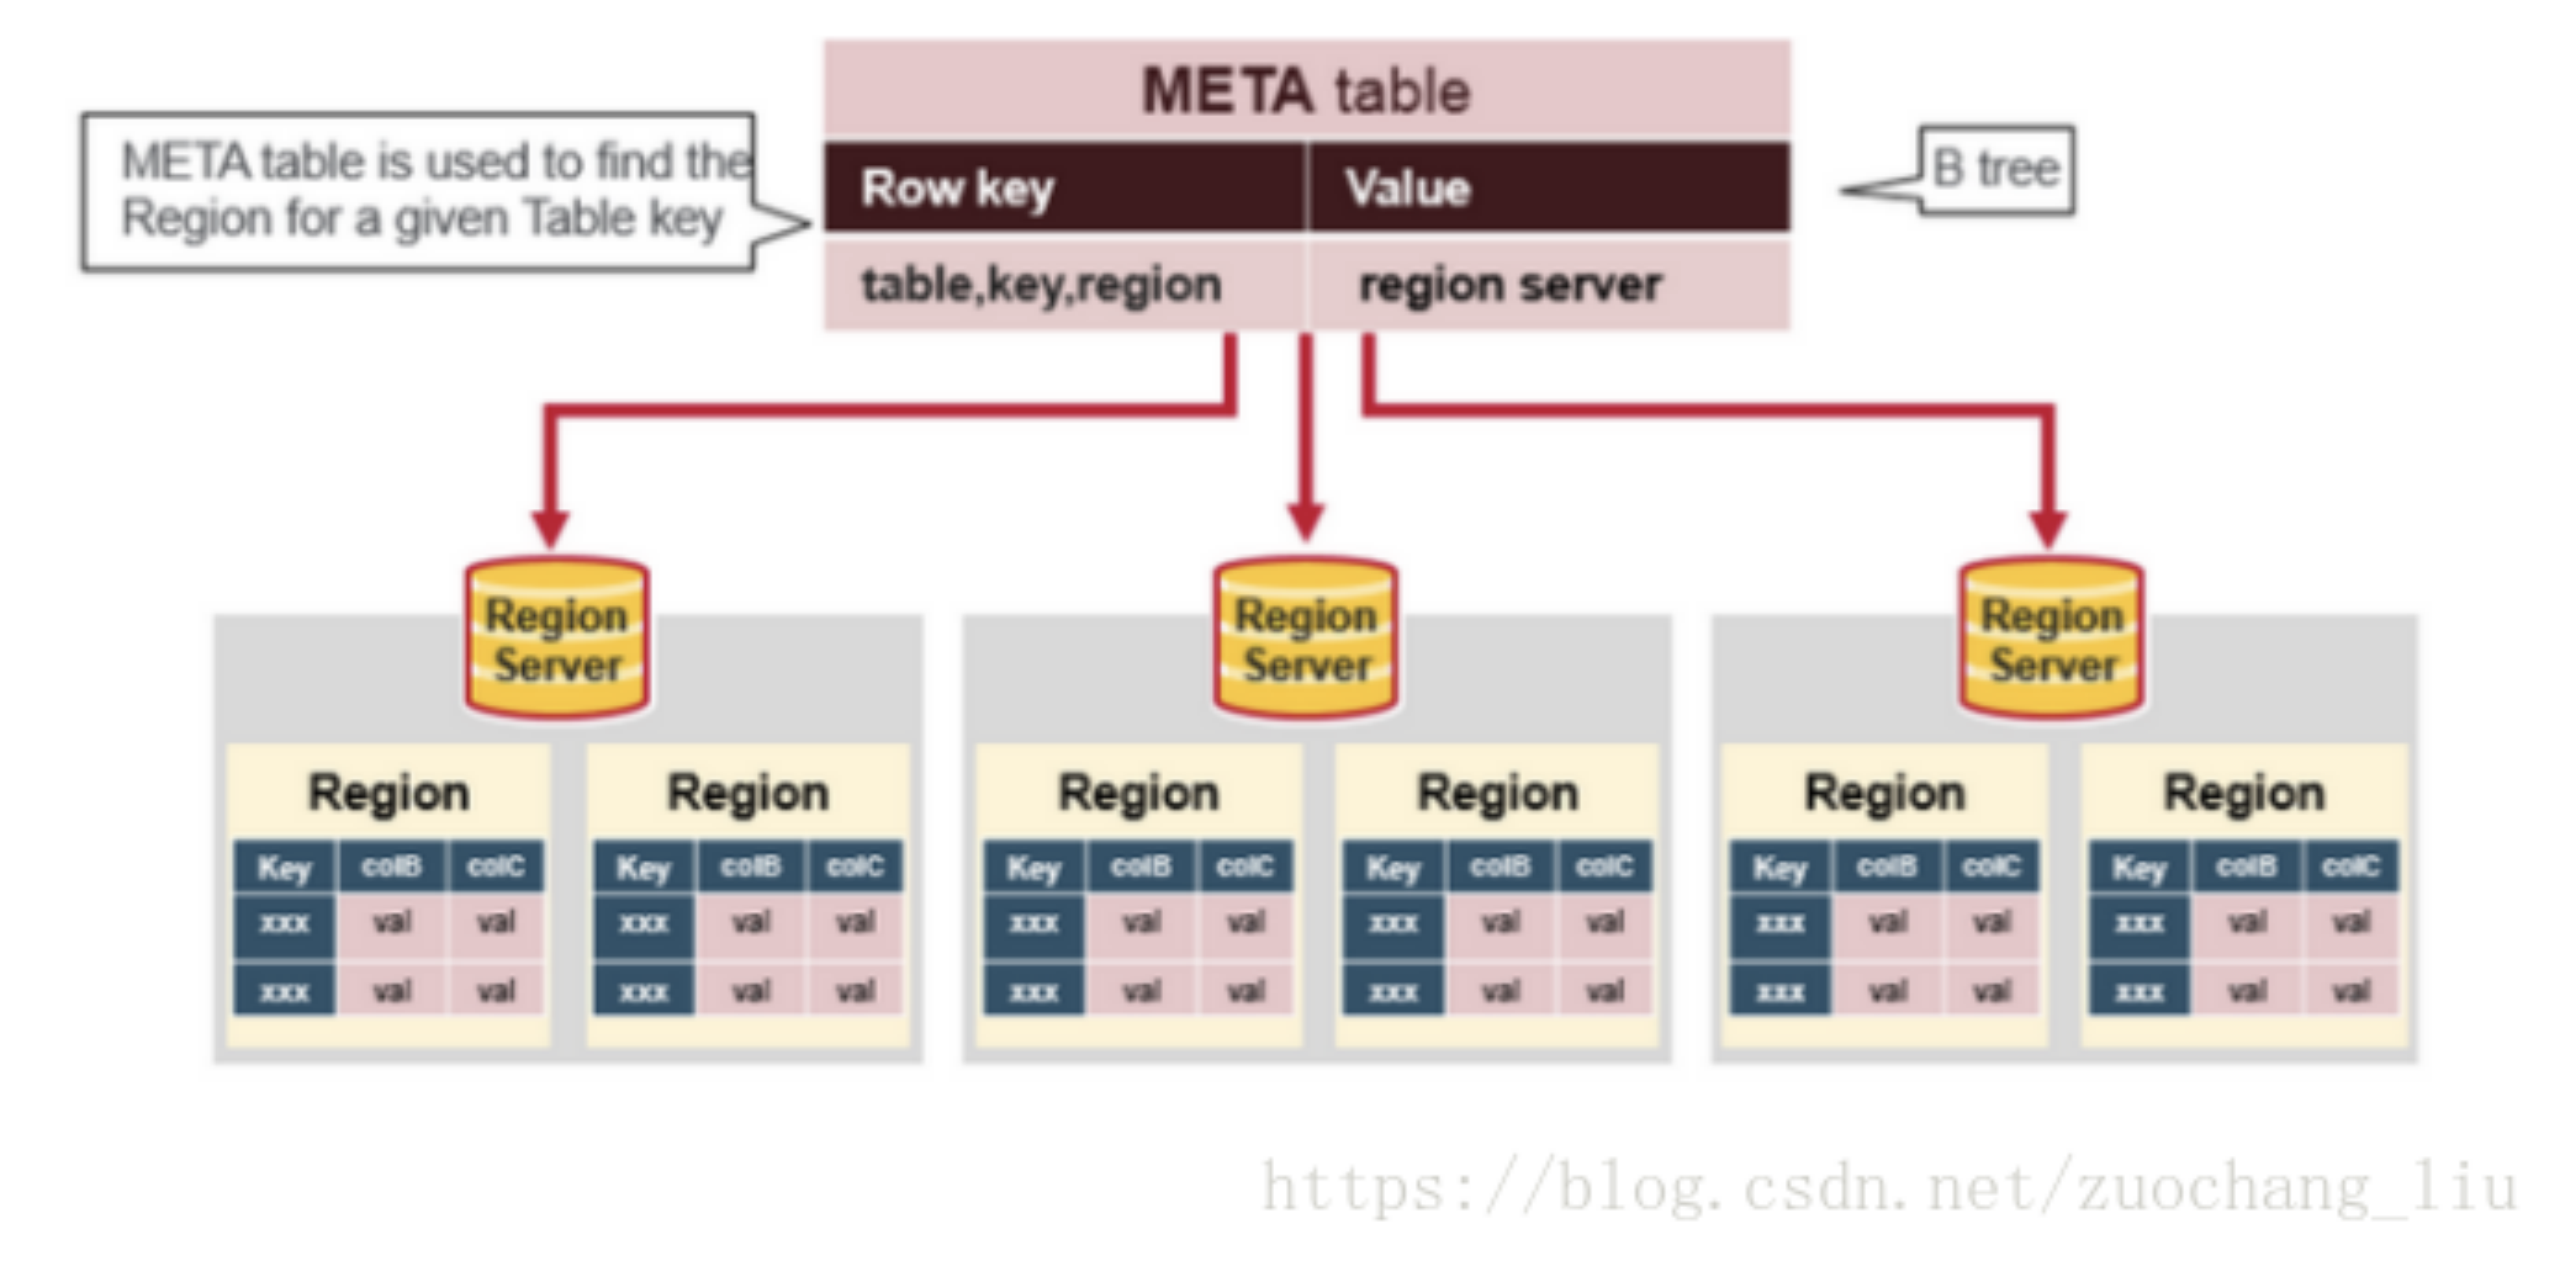
5.5 HBase:meta表
hbase:meta表存储了所有用户HRegion的位置信息:
Rowkey:tableName,regionStartKey,regionId,replicaId等;
info列族:这个列族包含三个列,他们分别是:
- info:regioninfo列:regionId,tableName,startKey,endKey,offline,split,replicaId;
- info:server列:HRegionServer对应的server:port;
- info:serverstartcode列:HRegionServer的启动时间戳。
5.6 Region Server内部机制

WAL即Write Ahead Log,在早期版本中称为HLog,它是HDFS上的一个文件,如其名字所表示的,所有写操作都会先保证将数据写入这个Log文件后,才会真正更新MemStore,最后写入HFile中。WAL文件存储在/hbase/WALs/${HRegionServer_Name}的目录中
BlockCache是一个读缓存,即“引用局部性”原理(也应用于CPU,分空间局部性和时间局部性,空间局部性是指CPU在某一时刻需要某个数据,那么有很大的概率在一下时刻它需要的数据在其附近;时间局部性是指某个数据在被访问过一次后,它有很大的概率在不久的将来会被再次的访问),将数据预读取到内存中,以提升读的性能。
HRegion是一个Table中的一个Region在一个HRegionServer中的表达。一个Table可以有一个或多个Region,他们可以在一个相同的HRegionServer上,也可以分布在不同的HRegionServer上,一个HRegionServer可以有多个HRegion,他们分别属于不同的Table。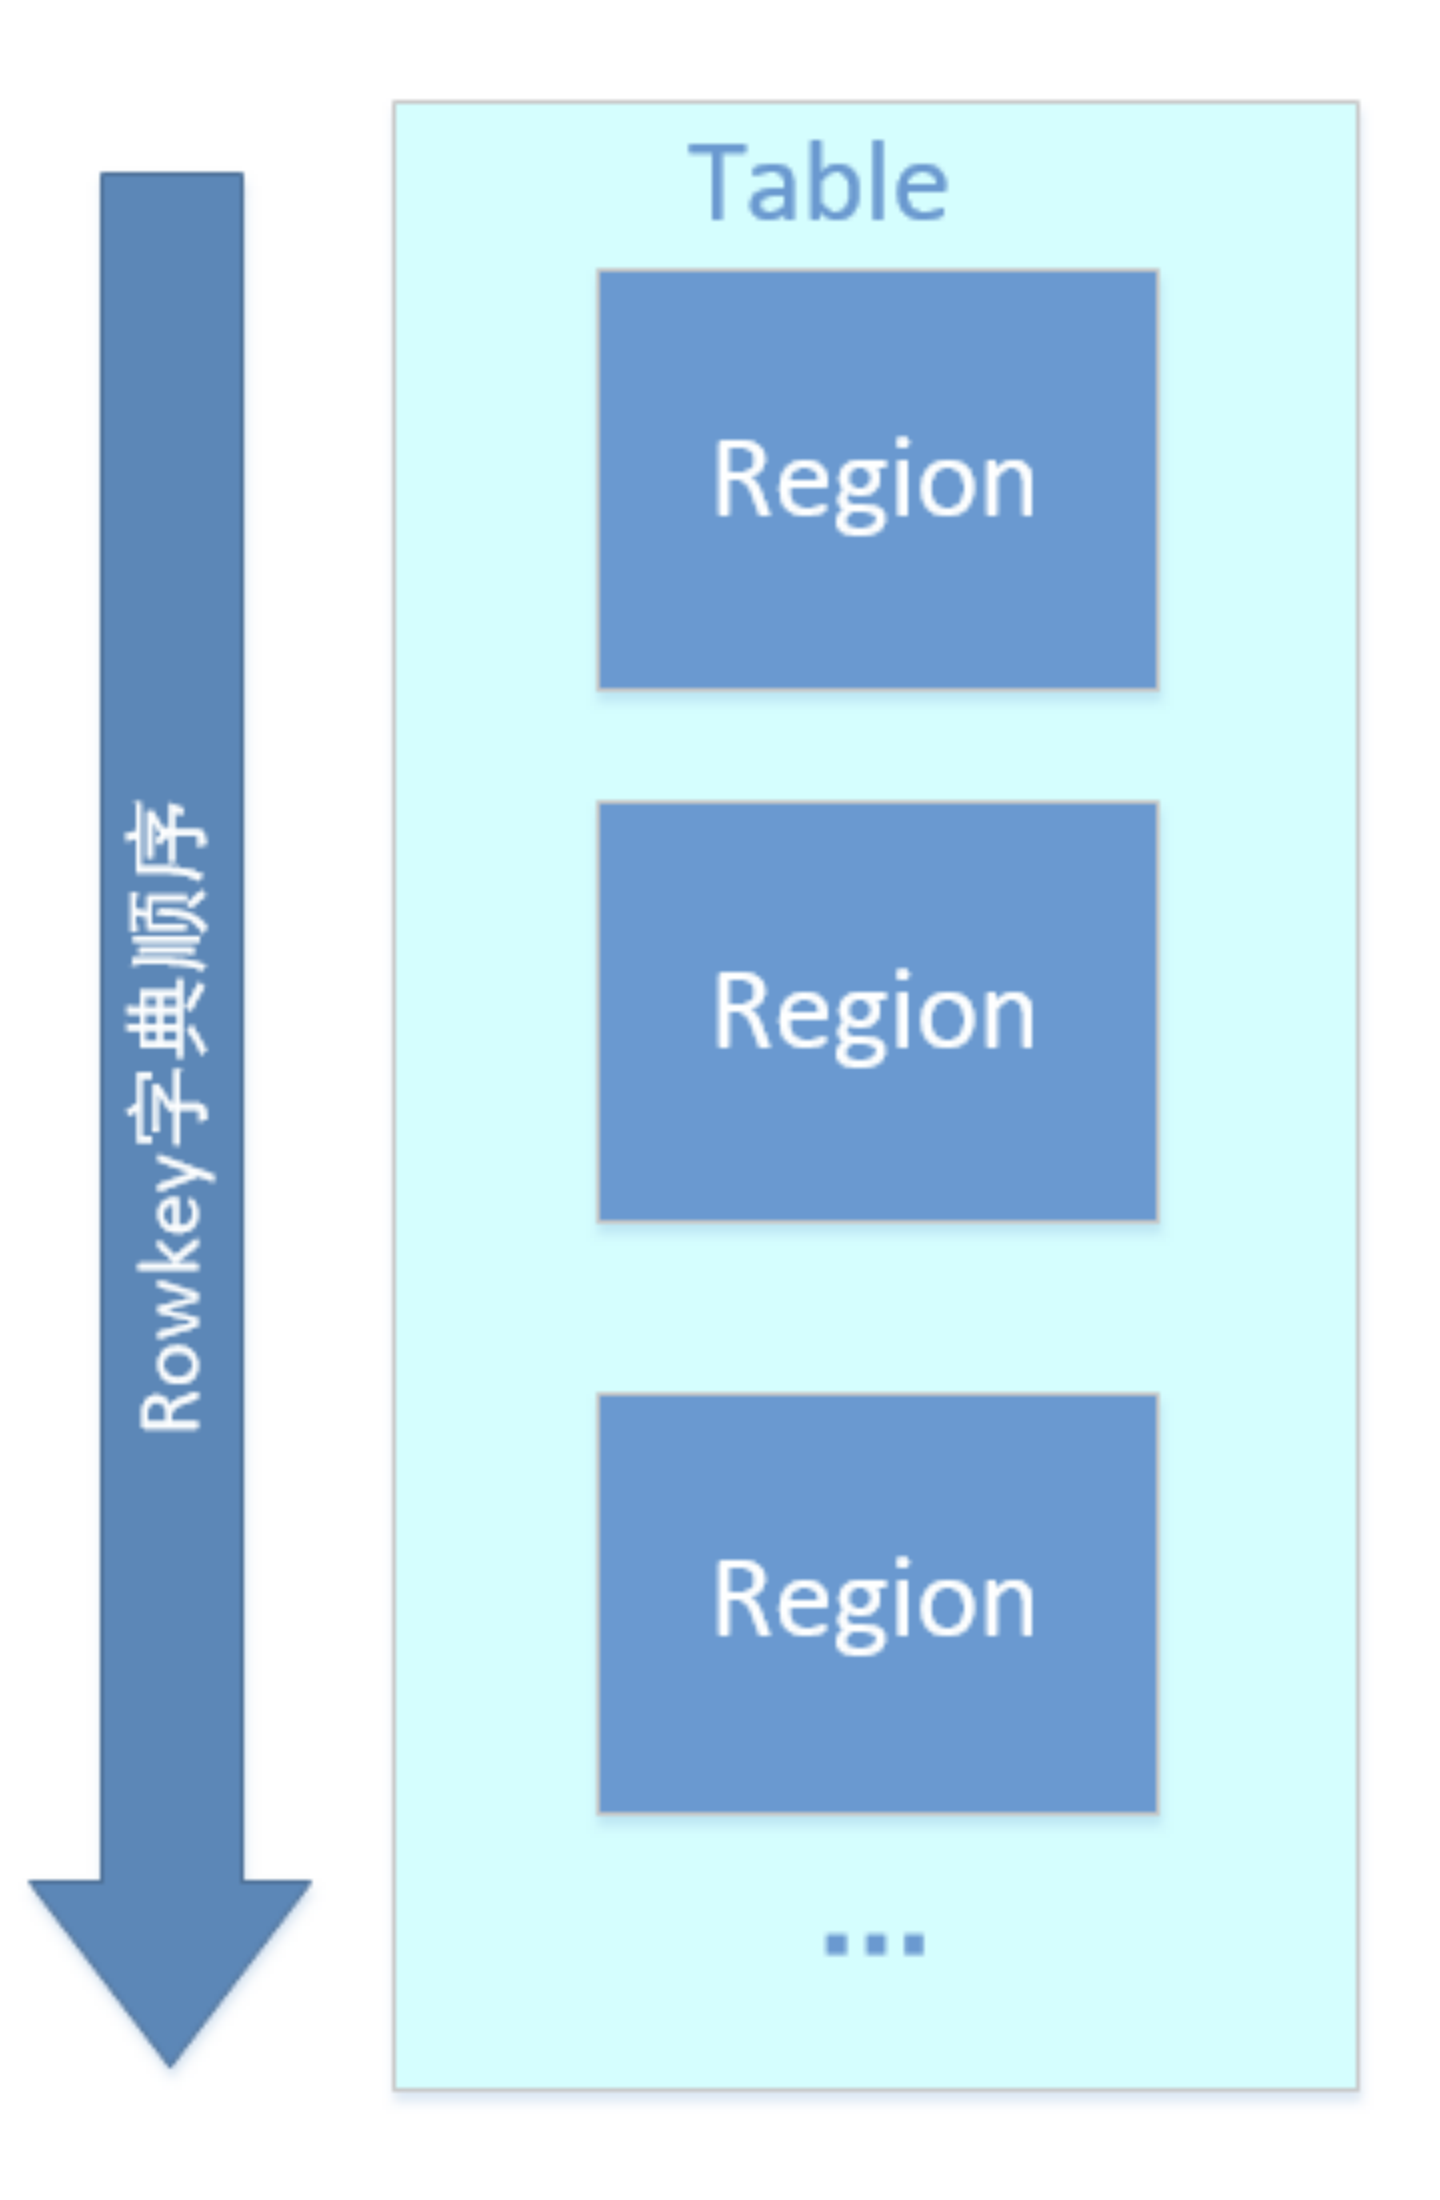
region按大小分割的,每个表一开始只有一个region,随着数据不断插入表,region不断增大,当增大到一个阀值的时候,Hregion就会等分会两个新的Hregion。当table中的行不断增多,就会有越来越多的Hregion。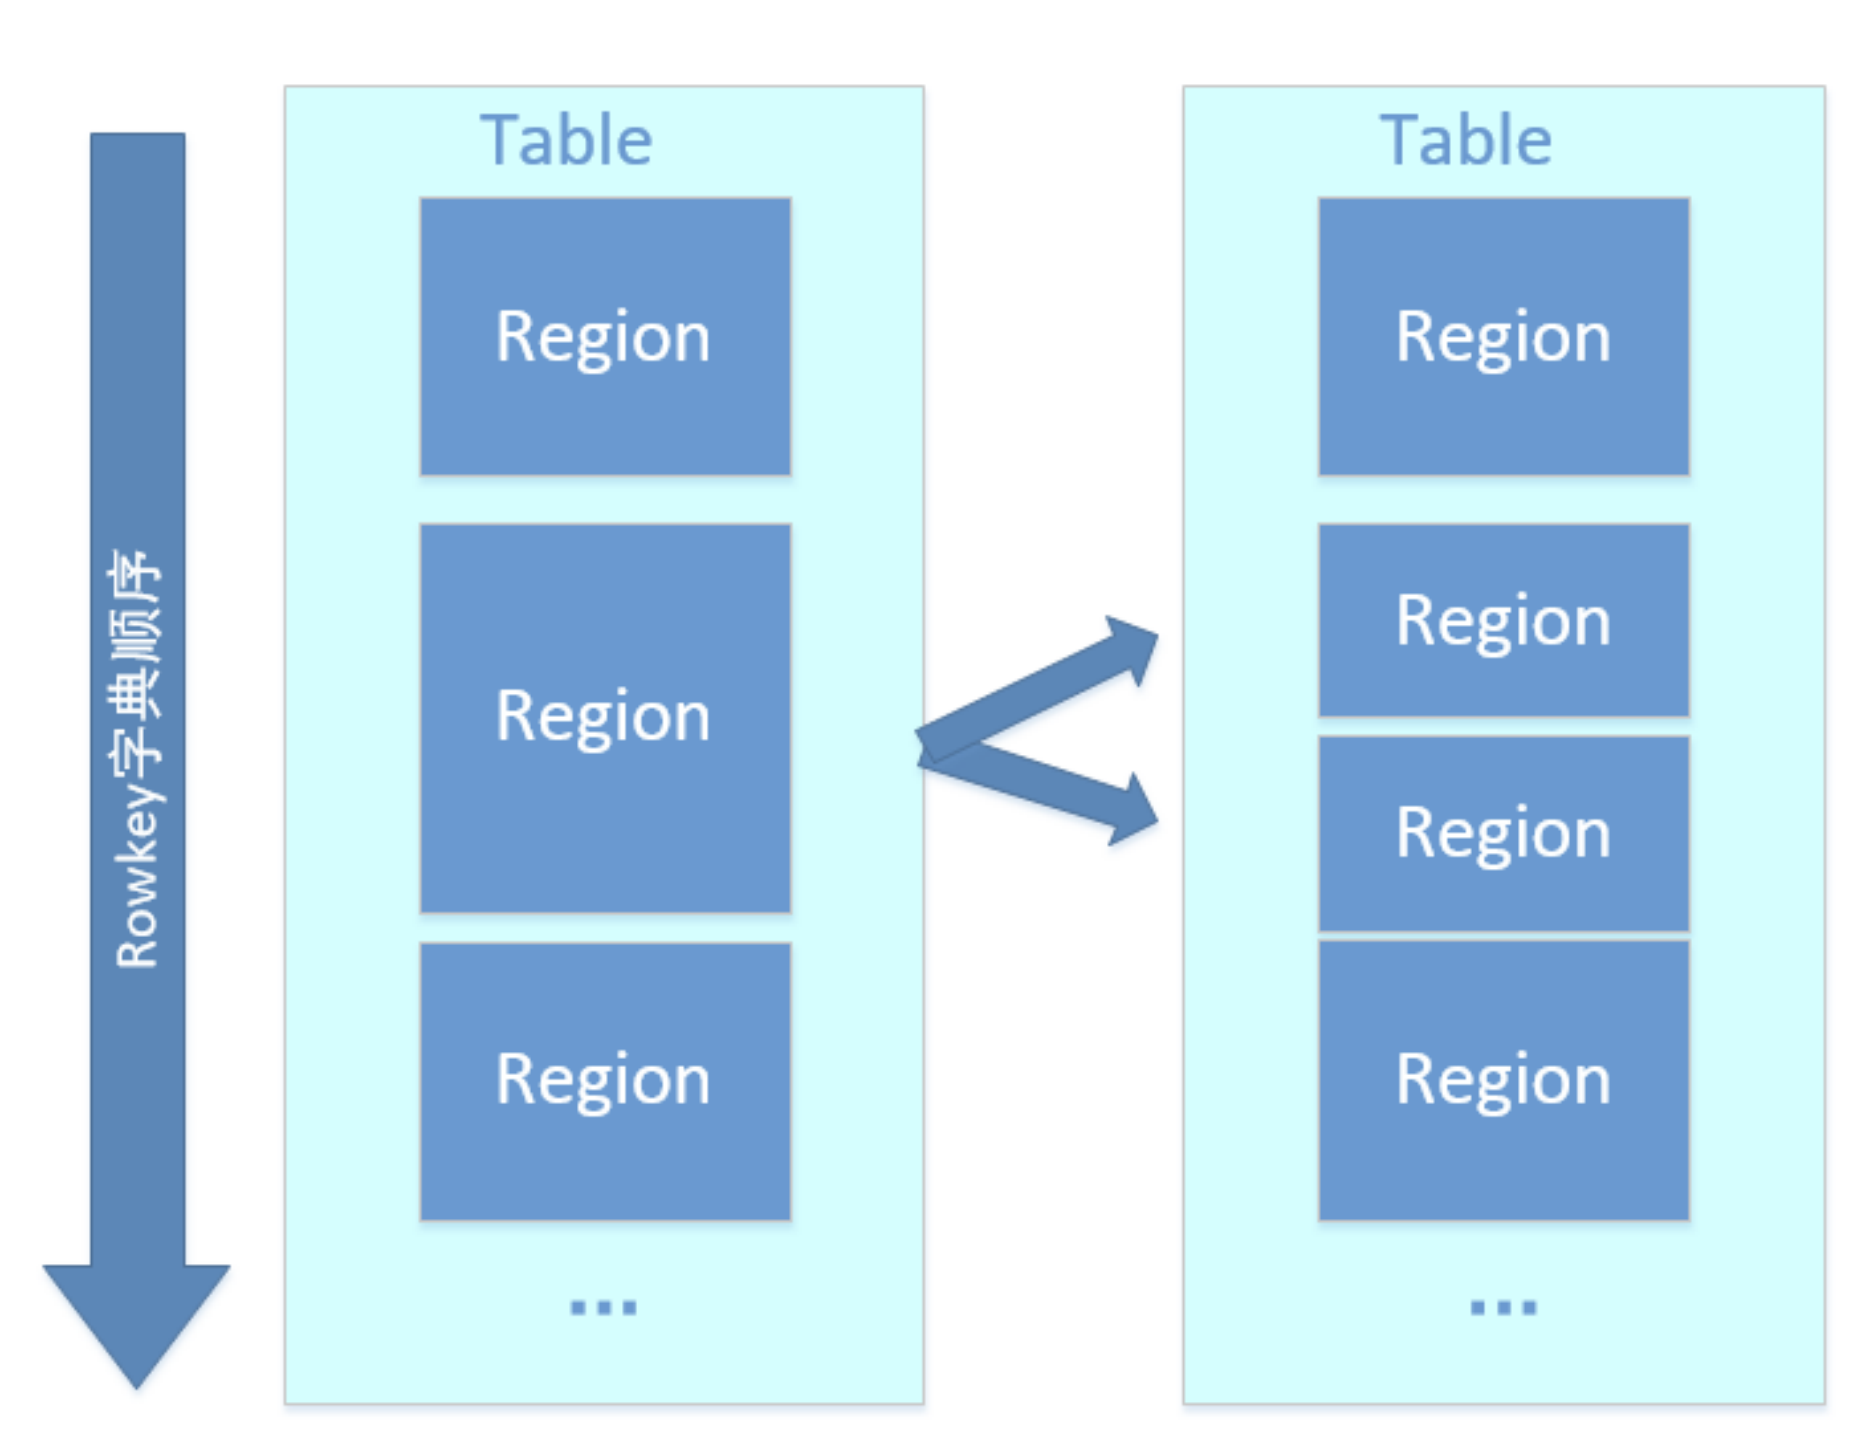
HRegion由多个Store(HStore)构成,每个HStore对应了一个Table在这个HRegion中的一个Column Family,即每个Column Family就是一个集中的存储单元,因而最好将具有相近IO特性的Column存储在一个Column Family,以实现高效读取(数据局部性原理,可以提高缓存的命中率)。HStore是HBase中存储的核心,它实现了读写HDFS功能,一个HStore由一个MemStore 和0个或多个StoreFile组成。
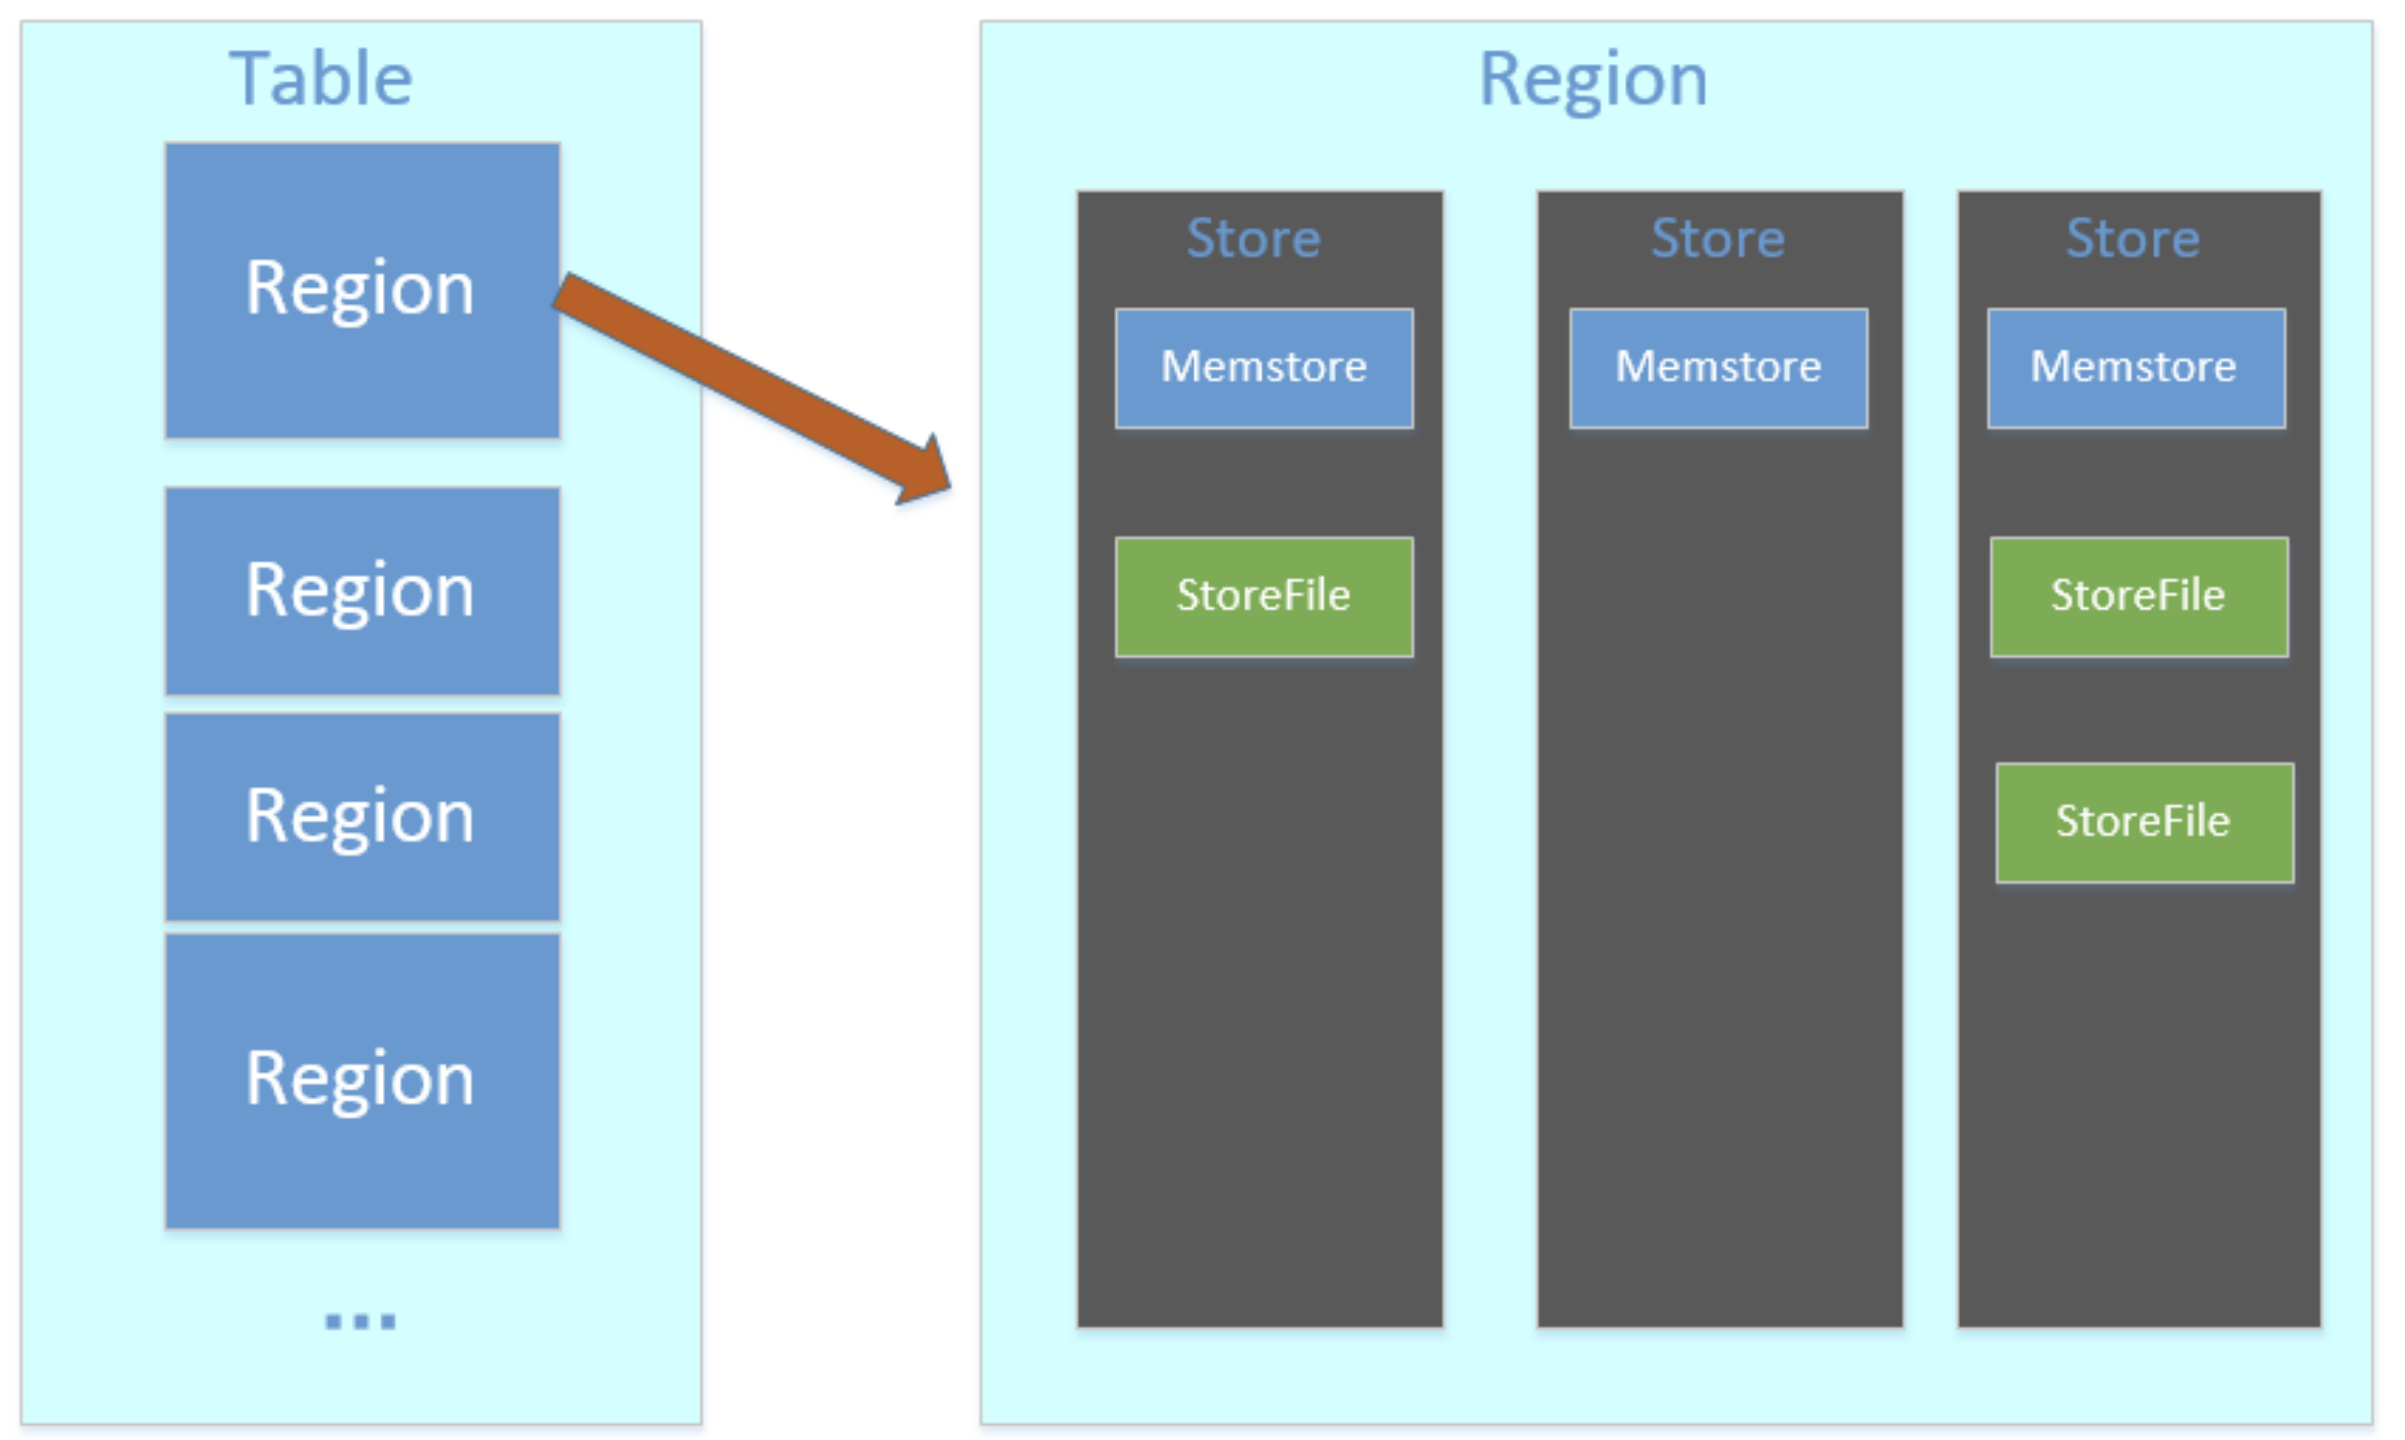
MemStore是一个写缓存(In Memory Sorted Buffer),所有数据的写在完成WAL日志写后,会 写入MemStore中,由MemStore根据一定的算法将数据Flush到地层HDFS文件中(HFile),通常每个HRegion中的每个 Column Family有一个自己的MemStore。
HFile(StoreFile) 用于存储HBase的数据(Cell/KeyValue)。在HFile中的数据是按RowKey、Column Family、Column排序,对相同的Cell(即这三个值都一样),则按timestamp倒序排列。
5.7 flush触发条件
- 每一次请求都是先写入到MemStore中,当MemStore满后会Flush成一个新的StoreFile(底层实现是HFile),即一个HStore(Column Family)可以有0个或多个StoreFile(HFile)。
- 当一个HRegion中的所有MemStore的大小总和超过了hbase.hregion.memstore.flush.size的大小,默认128MB。此时当前的HRegion中所有的MemStore会Flush到HDFS中。
- 当全局MemStore的大小超过了hbase.regionserver.global.memstore.upperLimit的大小,默认40%的内存使用量。此时当前HRegionServer中所有HRegion中的MemStore都会Flush到HDFS中,Flush顺序是MemStore大小的倒序(一个HRegion中所有MemStore总和作为该HRegion的MemStore的大小还是选取最大的MemStore作为参考?有待考证),直到总体的MemStore使用量低于hbase.regionserver.global.memstore.lowerLimit,默认38%的内存使用量。
- 当前HRegionServer中WAL的大小超过了hbase.regionserver.hlog.blocksize hbase.regionserver.max.logs的数量,当前HRegionServer中所有HRegion中的MemStore都会Flush到HDFS中,Flush使用时间顺序,最早的MemStore先Flush直到WAL的数量少于hbase.regionserver.hlog.blocksize hbase.regionserver.max.logs这里说这两个相乘的默认大小是2GB,查代码,hbase.regionserver.max.logs默认值是32,而hbase.regionserver.hlog.blocksize默认是32MB。但不管怎么样,因为这个大小超过限制引起的Flush不是一件好事,可能引起长时间的延迟
- 手动触发
六Hive表映射HBase
6.1 建HBase表
| hbase(main):018:0> create ‘user_info’,’info’ |
|---|
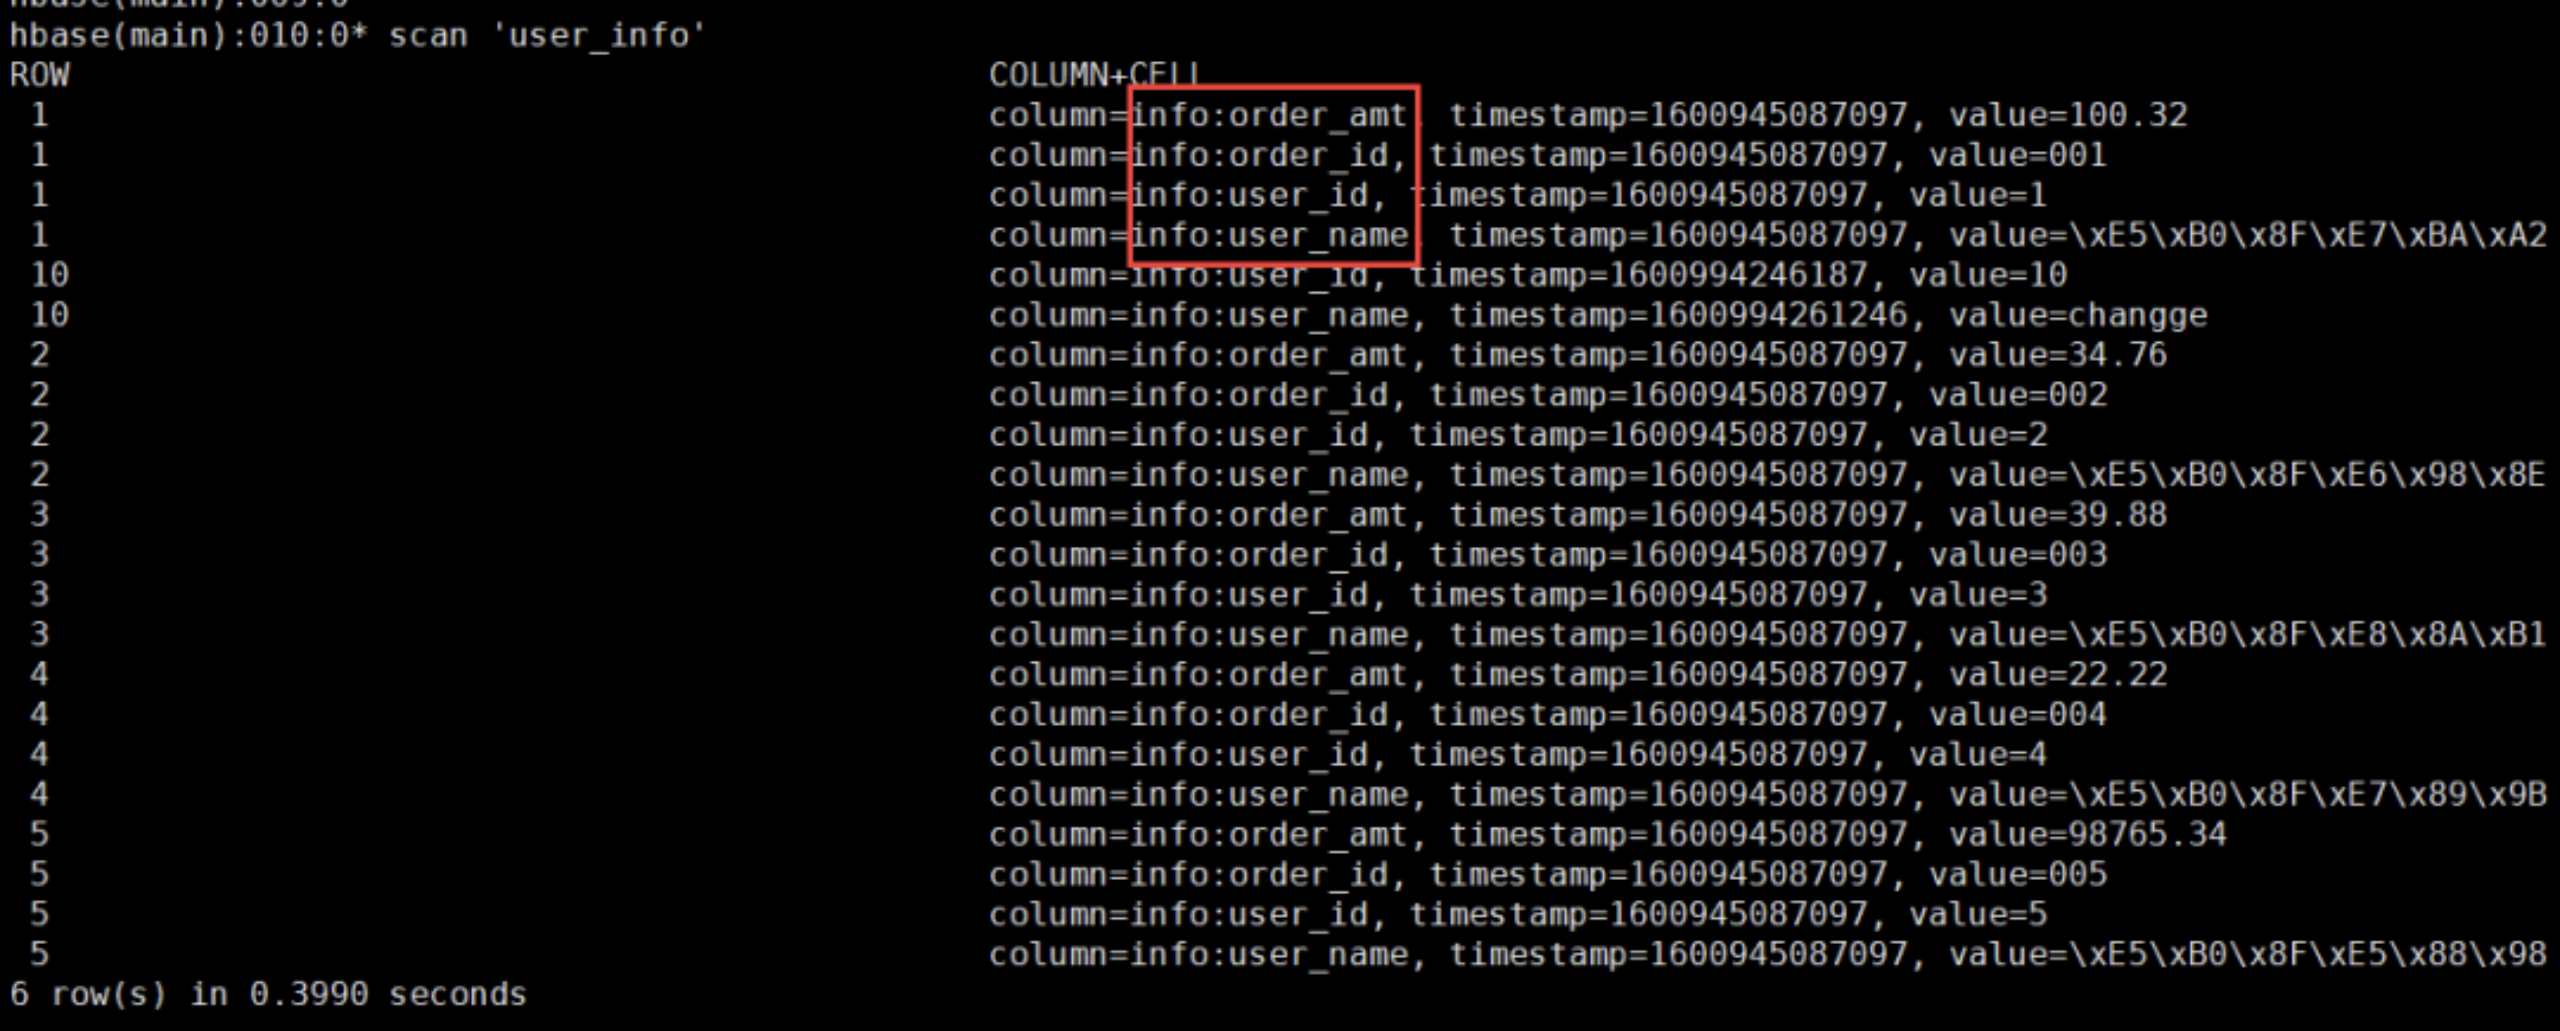
6.2 数据插入HBase
| info:order_amt info:order_id info:user_id info:user_name |
|---|
6.3 建hive映射表
| create external table wedw_tmp.t_user_info ( id string ,order_id string ,order_amt string ,user_id string ,user_name string ) STORED by ‘org.apache.hadoop.hive.hbase.HBaseStorageHandler’ with serdeproperties(“hbase.columns.mapping”=”:key,info:order_id,info:order_amt,info:user_id,info:user_name”) tblproperties(“hbase.table.name”=”user_info”); |
|---|
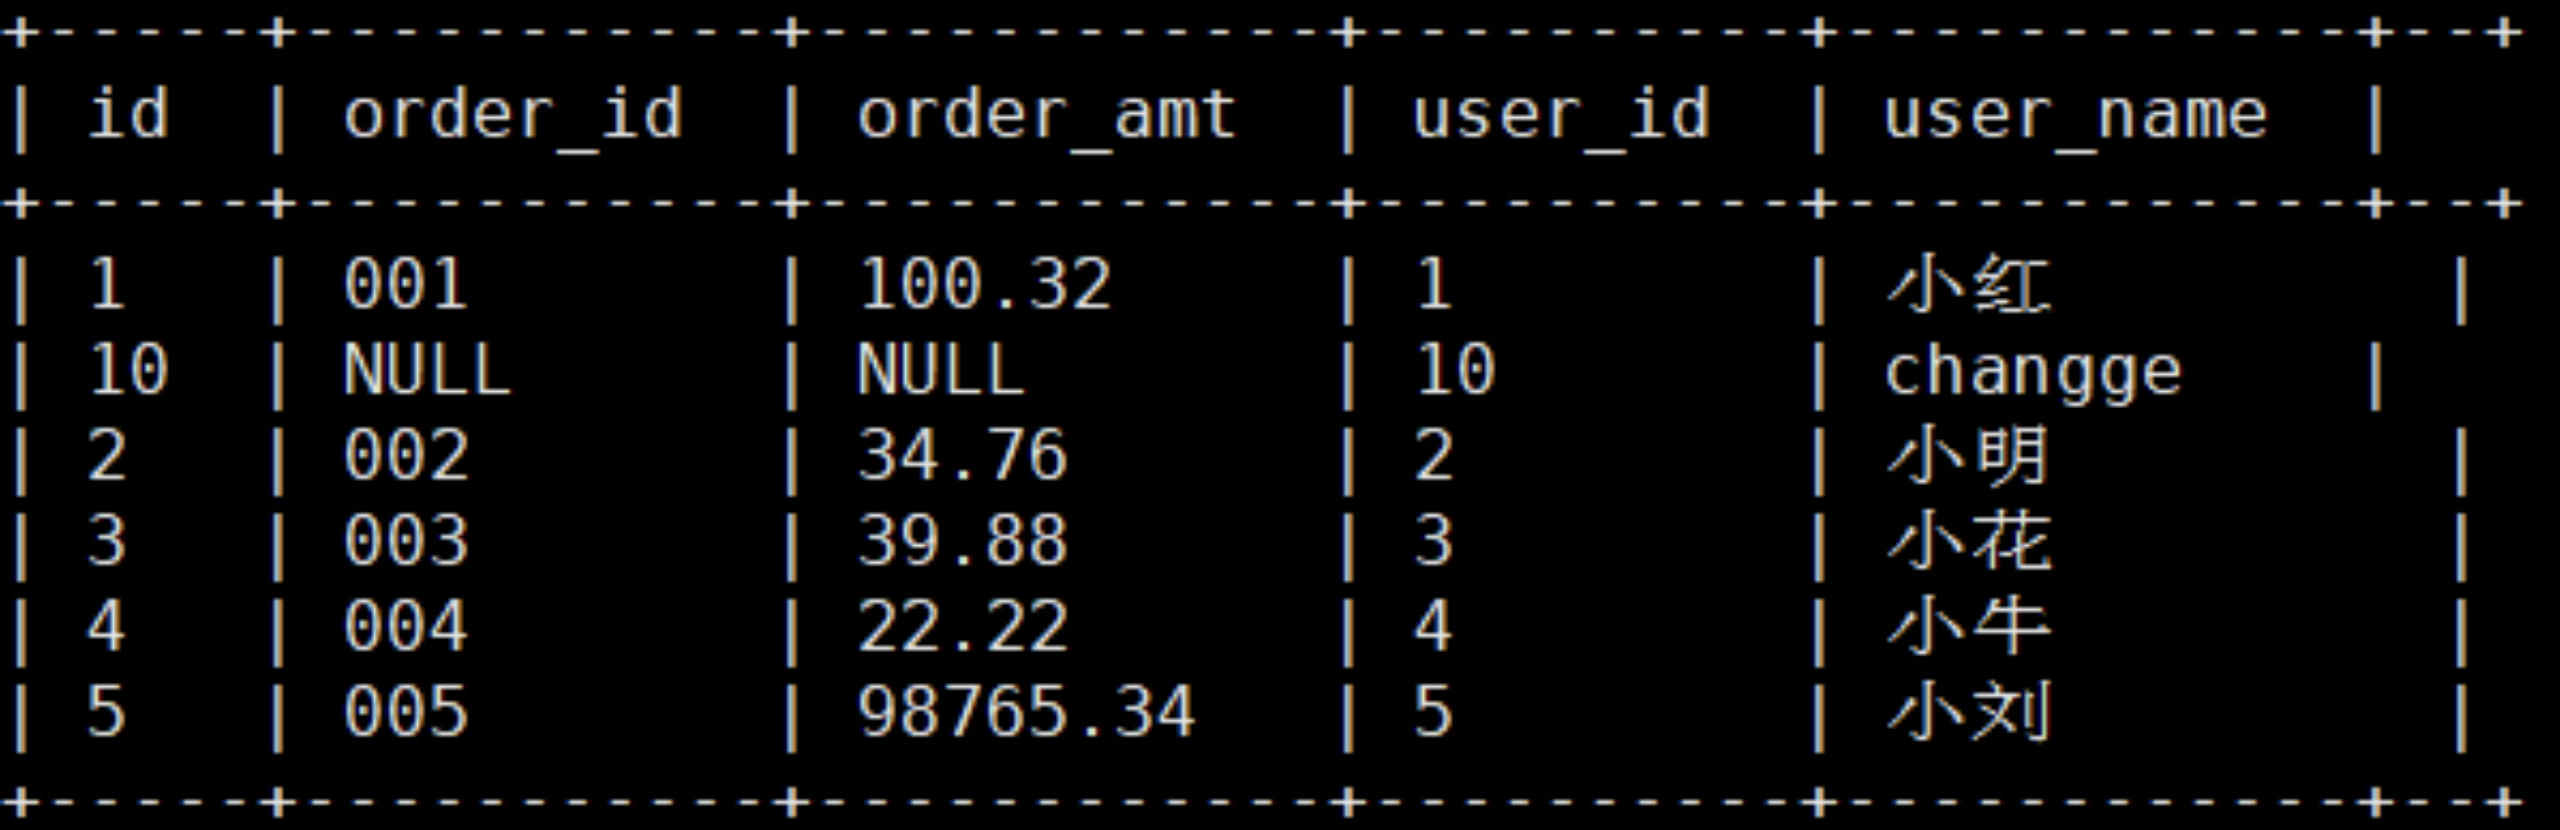
6.4 查询映射好的hive表
| select * from wedw_tmp.t_user_info; |
|---|
七BuckLoader
如果我们离线计算好的hive数据需要同步到hbase中,大家会用什么方法呢?如果是明细数据,上千万乃至上亿行的数据,导入到hbase中肯定是需要考虑效率问题的。如果是直接使用hbase客户端的API进行数据插入,效率是非常低的
所以我们选择了bulkloader工具进行操作(原理:利用hbase之外的计算引擎将源数据加工成hbase的底层文件格式:Hfile,然后通知hbase导入即可)
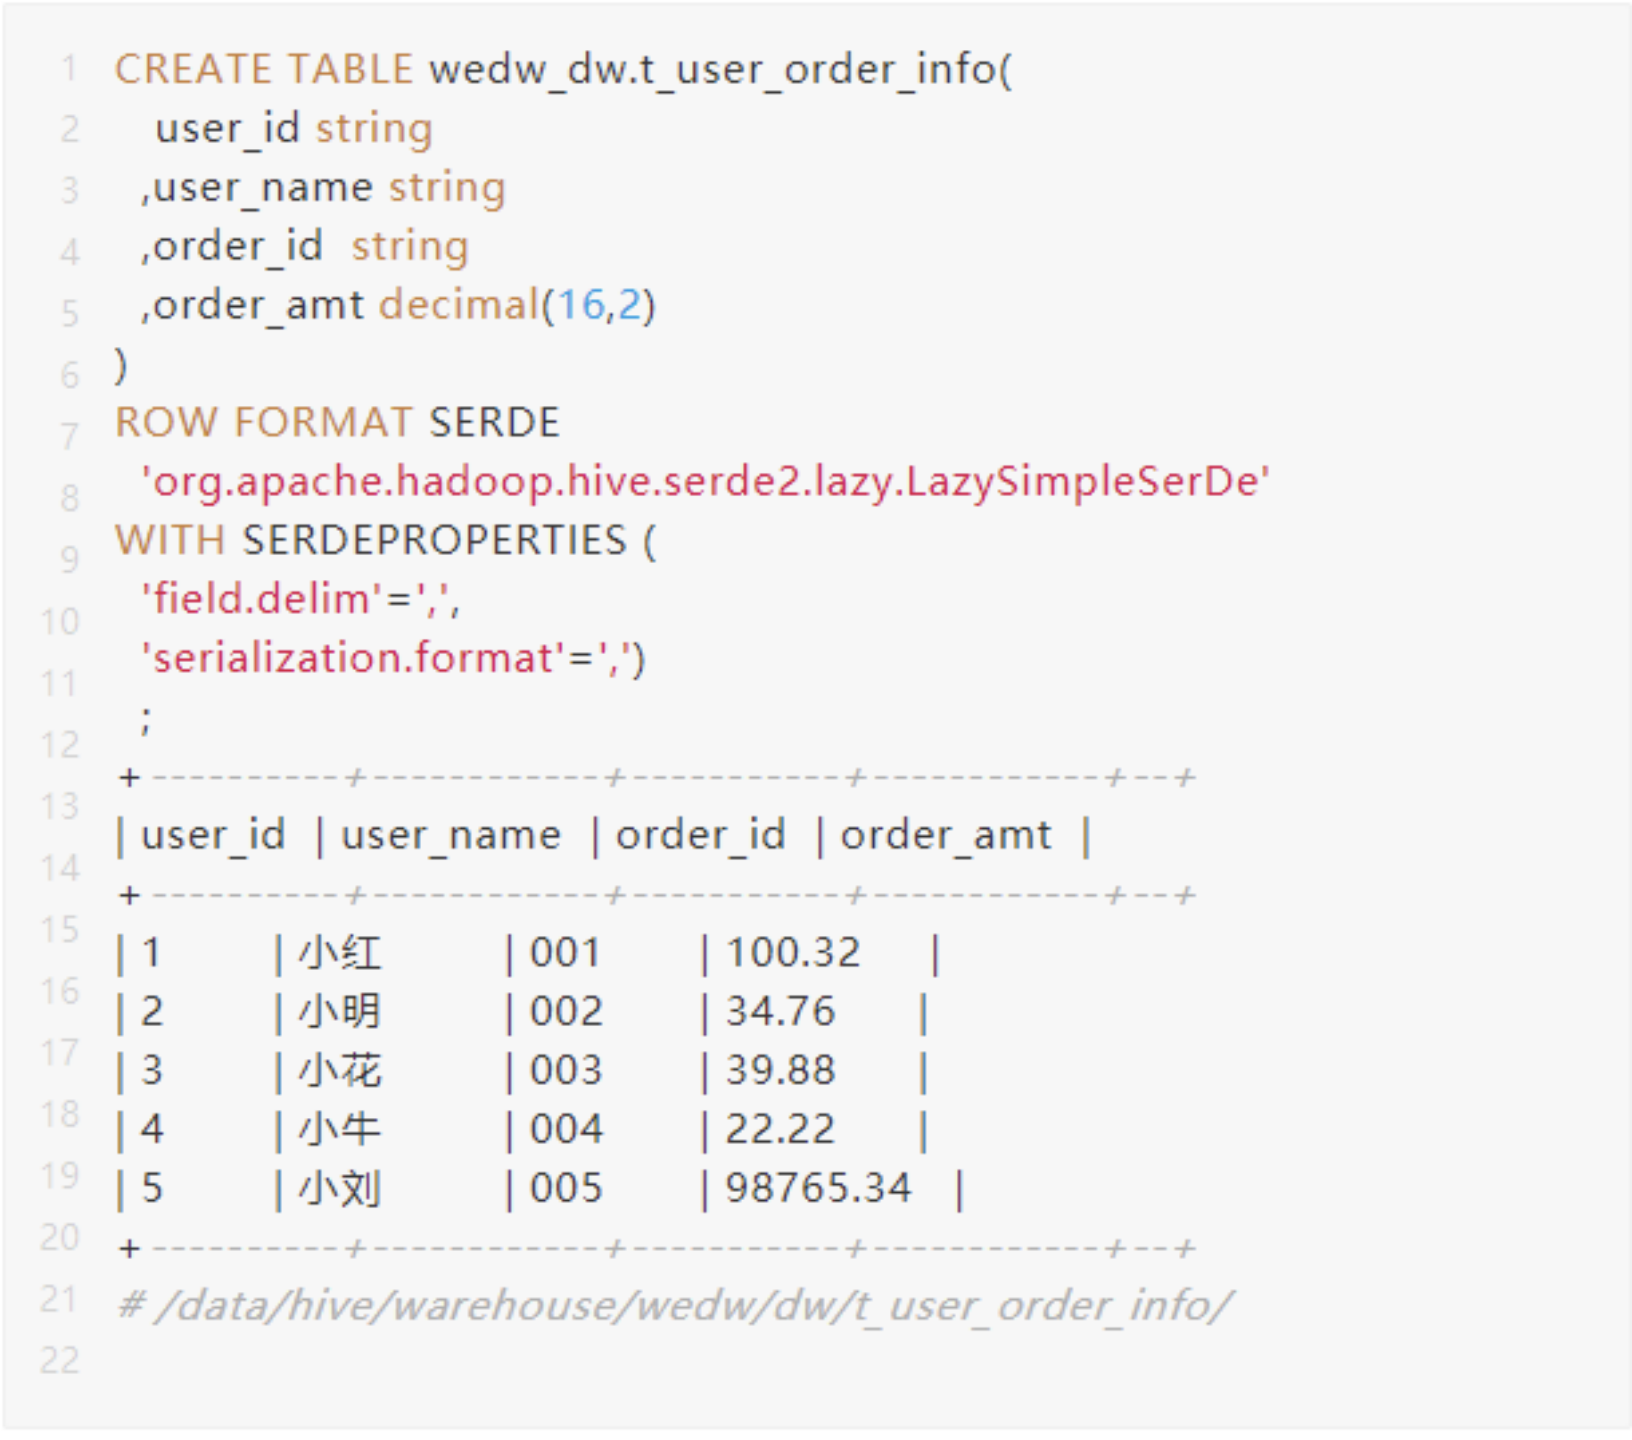
7.1 测试数据
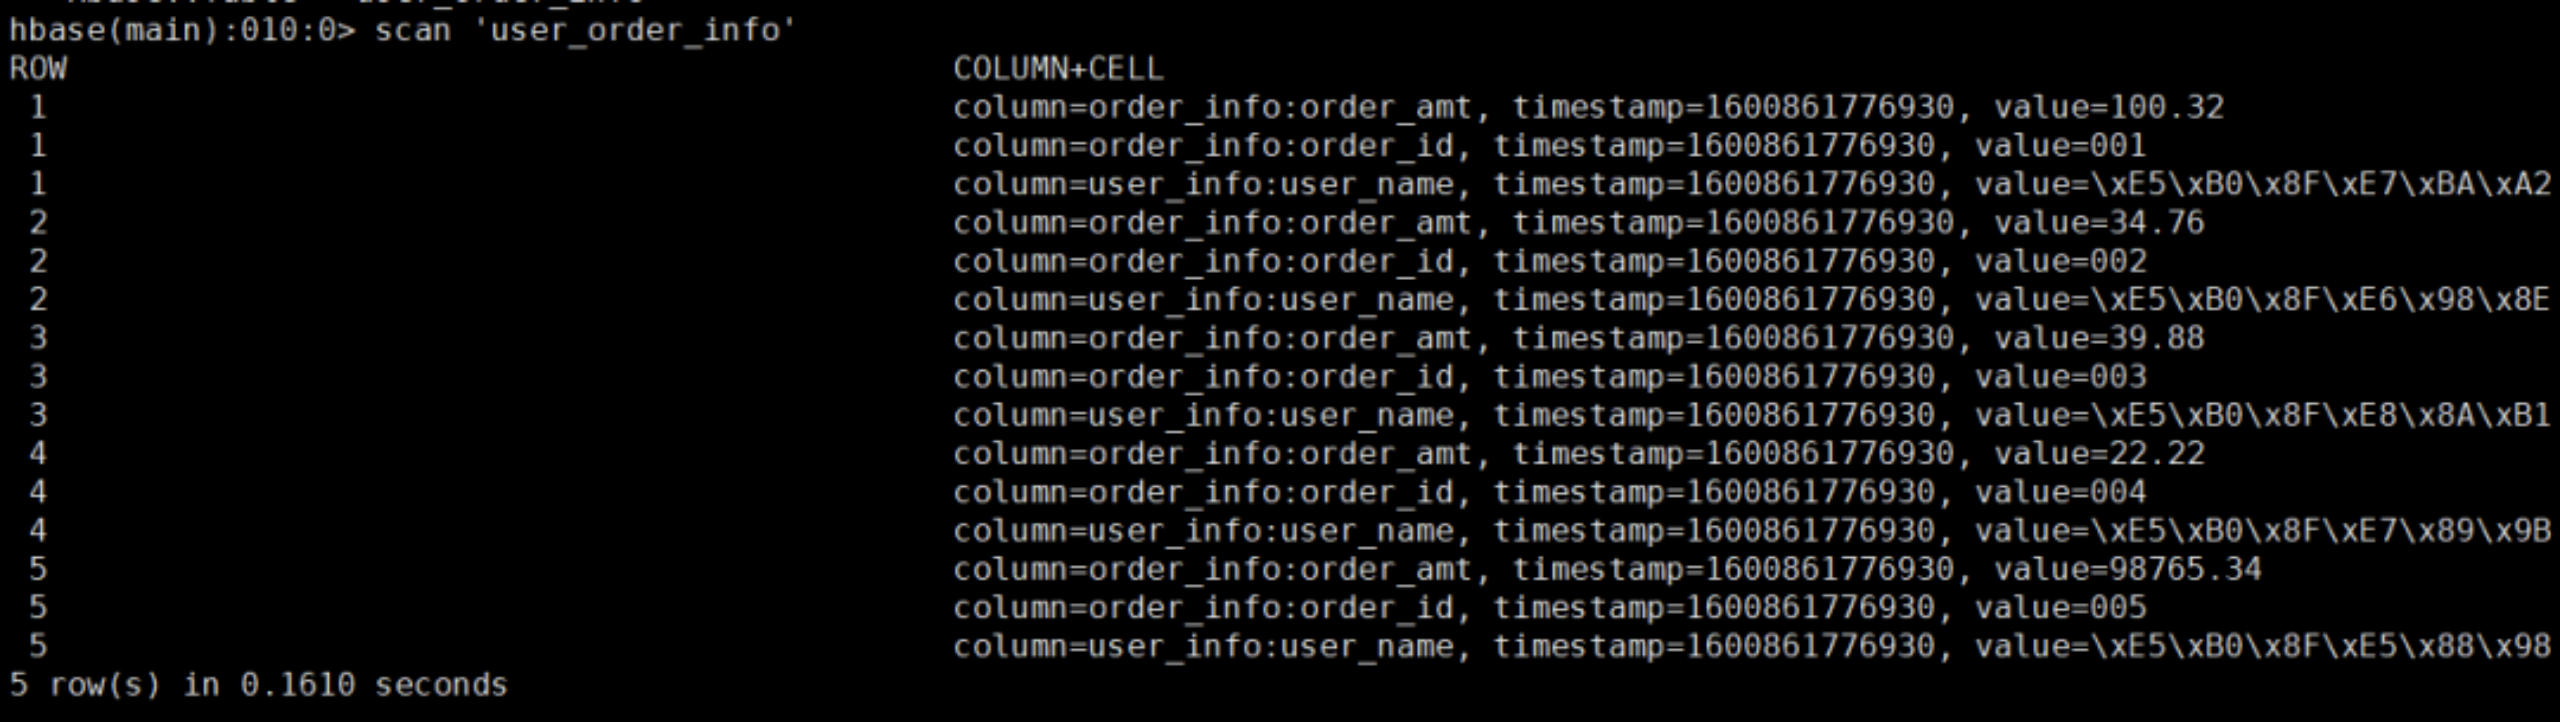
7.2利用hbasse自带程序导入
hbase建表
| hbase(main):009:0* create ‘user_order_info’,’user_info’,’order_info’ |
|---|
执行hbase自带的importtsv程序(mapreduce程序),将原始文件转成hfile
| /usr/local/hadoop-current/bin/yarn jar \/usr/local/hbase-current/lib/hbase-server-1.2.0-cdh5.8.2.jar \importtsv -Dimporttsv.columns=HBASE_ROW_KEY,user_info:user_name,order_info:order_id,order_info:order_amt \‘-Dimporttsv.separator=,’ \-Dmapreduce.job.queuename=’root.test’ \-Dimporttsv.bulk.output=hdfs://cluster/data/hive/output1 user_order_info \hdfs://cluster/data/hive/warehouse/wedw/dw/t_user_order_info |
|---|
完整参数:
- -Dimporttsv.bulk.output=/path/for/output 输出目录
- -Dimporttsv.skip.bad.lines=false 是否跳过脏数据行
- -Dimporttsv.separator=|’ 指定分隔符
- -Dimporttsv.timestamp=currentTimeAsLong 是否指定时间戳
- -Dimporttsv.mapper.class=my.Mapper 替换默认的Mapper类
移动数据到hbase表中
| hadoop jar hbase-server-1.2.0-cdh5.8.2.jar completebulkload hdfs://cluster/data/hive/output1 user_order_info |
|---|
7.3编写代码导入
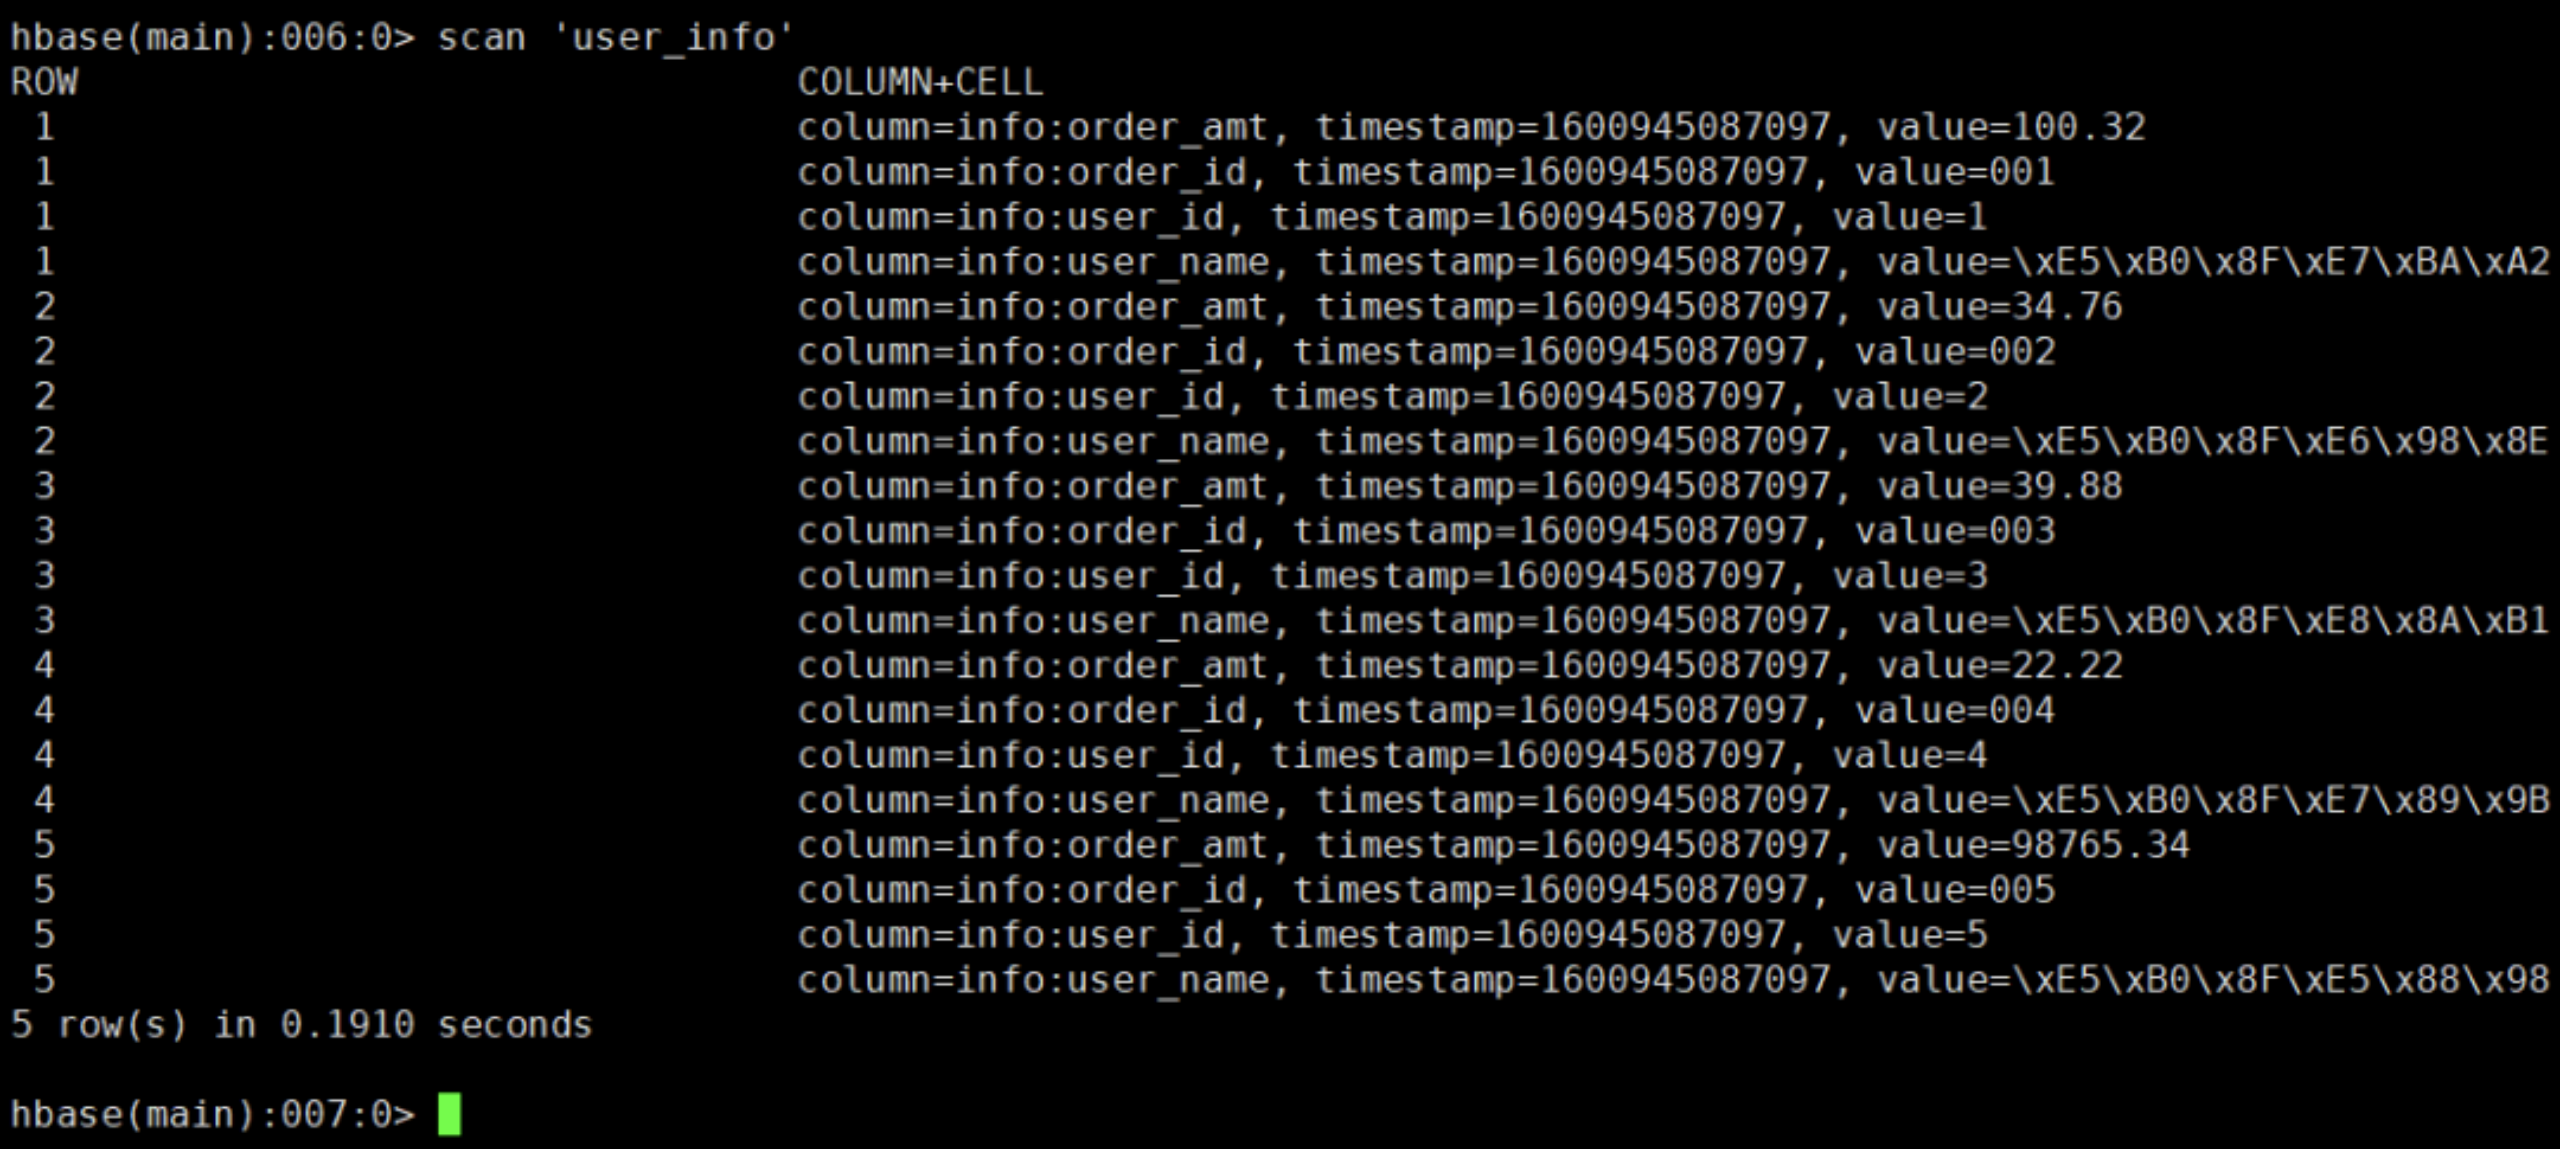
hbase建表
| hbase(main):018:0> create ‘user_info’,’info’ |
|---|
<?xml version=”1.0” encoding=”UTF-8”?> xsi:schemaLocation=”http://maven.apache.org/POM/4.0.0 http://maven.apache.org/xsd/maven-4.0.0.xsd"> |
|---|
spark程序编写
| package com.hbase.bulkloader import org.apache.hadoop.fs.{Path} import org.apache.hadoop.hbase.client.ConnectionFactory import org.apache.hadoop.hbase.{HBaseConfiguration, KeyValue, TableName} import org.apache.hadoop.hbase.io.ImmutableBytesWritable import org.apache.hadoop.hbase.mapreduce.{HFileOutputFormat2, LoadIncrementalHFiles} import org.apache.hadoop.hbase.util.Bytes import org.apache.hadoop.mapreduce.Job import org.apache.spark.rdd.RDD import org.apache.spark.sql.{DataFrame, SparkSession} object BulkLoader { //Logger.getLogger(“org”).setLevel(Level.ERROR) def main(args: Array[String]): Unit = { System.setProperty(“HADOOP_USER_NAME”, “pgxl”) val spark: SparkSession = SparkSession.builder() .master(“local[]”) .config(“hive.metastore.uris”, “thrift://10.11.3.44:9999”) .appName(“bulkloaderTest”) .enableHiveSupport() .getOrCreate() val re: DataFrame = spark.sql(“select from wedw_dw.t_user_order_info”) val dataRdd: RDD[(String, (String, String, String))] = re.rdd.flatMap(row => { val rowkey: String = row.getAsString.toString Array( (rowkey, (“info”, “user_id”, row.getAsString)), (rowkey, (“info”, “user_name”, row.getAsString)), (rowkey, (“info”, “order_id”, row.getAsString)), (rowkey, (“info”, “order_amt”, row.get(3).toString)) ) }) val output = dataRdd.filter(x=>x._1 != null).sortBy(x=>(x._1,x._2._1,x._2._2)).map { x => { val rowKey = Bytes.toBytes(x._1) val immutableRowKey = new ImmutableBytesWritable(rowKey) val colFam = x._2._1 val colName = x._2._2 val colValue = x._2._3 val kv = new KeyValue( rowKey, Bytes.toBytes(colFam), Bytes.toBytes(colName), Bytes.toBytes(colValue.toString) ) (immutableRowKey, kv) } } val conf = HBaseConfiguration.create() conf.set(“fs.defaultFS”, “hdfs://cluster”) conf.set(“hbase.zookeeper.quorum”, “10.11.3.43”) val job = Job.getInstance(conf) val conn = ConnectionFactory.createConnection(conf) val table = conn.getTable(TableName.valueOf(“user_info”)) val locator = conn.getRegionLocator(TableName.valueOf(“user_info”)) // 将我们自己的数据保存为HFile HFileOutputFormat2.configureIncrementalLoad(job, table, locator) output.saveAsNewAPIHadoopFile(“/data/hive/test/“, classOf[ImmutableBytesWritable], classOf[KeyValue], classOf[HFileOutputFormat2], job.getConfiguration) // 构造一个导入hfile的工具类 new LoadIncrementalHFiles(job.getConfiguration).doBulkLoad(new Path(“/data/hive/test/“),conn.getAdmin,table,locator) conn.close() spark.close() } } |
|---|
7.4 hbase表结果:
八HBase优化
8.1 HBase高可用
在HBase中Hmaster负责监控RegionServer的生命周期,均衡RegionServer的负载,如果Hmaster挂掉了,那么整个HBase集群将陷入不健康的状态,此时的工作状态并不会维持太久。所以需要配置hbase的高可用
8.2预分区
每一个region维护着startRow与endRowKey,如果加入的数据符合某个region维护的rowKey范围,则该数据交给这个region维护。那么依照这个原则,我们可以将数据所要投放的分区提前大致的规划好,以提高HBase性能。
手动设置预分区
| hbase> create ‘user’,’info’,’partition1’,SPLITS => [‘a’,’c’,’f’,’h’] |
|---|
生成16进制序列预分区
| create ‘user2’,’info’,’partition2’,{NUMREGIONS => 15, SPLITALGO => ‘HexStringSplit’} |
|---|
按照文件中设置的规则预分区
创建splits.txt文件内容如下:
| 10 20 30 40 |
|---|
然后执行:
| create ‘user3’,’partition3’,SPLITS_FILE => ‘splits.txt’ |
|---|
使用javaAPI创建预分区
| //自定义算法,产生一系列Hash散列值存储在二维数组中 byte[][] splitKeys = 某个散列值函数 //创建HBaseAdmin实例 HBaseAdmin hAdmin = new HBaseAdmin(HBaseConfiguration.create()); //创建HTableDescriptor实例 HTableDescriptor tableDesc = new HTableDescriptor(tableName); //通过HTableDescriptor实例和散列值二维数组创建带有预分区的HBase表 hAdmin.createTable(tableDesc, splitKeys); |
|---|
8.3 优化RowKey设计(防止热点)
Hbase中一条数据的唯一标识就是Rowkey,类似于关系型数据库中的主键,HBase中的数据是根据Rowkey的字典顺序来排序的。
那么这条数据存储于哪个分区,取决于Rowkey处于哪一个预分区的区间内,设计Rowkey的主要目的 ,就是让数据均匀的分布于所有的Region中,在一定程度上防止数据倾斜。尽量在访问的时候不会出现热点现象
8.3.1 什么是热点
因为HBase中的行是按照Rowkey的字典顺序排序的,这种设计使得Scan操作更为方便,但是也容易出现热点问题。
热点问题是大量的客户端只访问集群的一个或少数节点,大量访问请求会使该台机器的负载很高,直接导致性能下降,甚至Region不可用,而集群的其他节点却处于相对空闲的状态。
8.3.2 长度
Rowkey可以使任意字符串,最大长度64kb,建议越短越好,最好不要超过16个字节,原因如下:
目前操作系统都是64位系统,内存8字节对齐,控制在16字节,8字节的整数倍利用了操作系统的最佳特性。
Hbase将部分数据加载到内存当中,如果Rowkey太长,内存的有效利用率就会下降。
8.3.3 唯一
Rowkey必须保证是唯一的,如果不唯一的话,同一版本同一个Rowkey插入Hbase中会更新之前的数据,与需求不符
8.3.4 散列
8.3.4.1加盐
在Rowkey的前面增加随机数,散列之后的Rowkey就会根据随机生成的前缀分散到各个Region上,可以有效的避免热点问题。
加盐这种方式增加了写的吞吐,但是使得读数据更加困难
8.3.4.2 Hash
Hash算法包含了MD5等算法,可以直接取Rowkey的MD5值作为Rowkey,或者取MD5值拼接原始Rowkey,组成新的rowkey,由于Rowkey设计不应该太长,所以可以对MD5值进行截取拼接
8.3.4.3 字符串反转
l 时间戳反转
l 手机号反转
…
8.4 内存优化
HBase操作过程中需要大量的内存开销,毕竟Table是可以缓存在内存中的,一般会分配整个可用内存的70%给HBase的Java堆。
但是不建议分配非常大的堆内存,因为GC过程持续太久会导致RegionServer处于长期不可用状态,一般16~48G内存就可以了,如果因为框架占用内存过高导致系统内存不足,框架一样会被系统服务拖死。
8.5 压缩
生产系统应使用其ColumnFamily定义进行压缩。
注意
压缩会缩小磁盘上的数据。当它在内存中(例如,在MemStore中)或在线上(例如,在RegionServer和Client之间传输)时,它会膨胀。因此,虽然使用ColumnFamily压缩是最佳做法,但它不会完全消除过大的Keys,过大的ColumnFamily名称或过大的列名称的影响。
8.6 column数控制
Hbase中的每个列,都归属于某个列簇,列簇是表的schema的一部分(列不是),必须在使用之前定义
HBase 目前对于两列族或三列族以上的任何项目都不太合适,因此请将模式中的列族数量保持在较低水平。
目前,flushing 和 compactions 是按照每个区域进行的,所以如果一个列族承载大量数据带来的 flushing,即使所携带的数据量很小,也会 flushing 相邻的列族。当许多列族存在时,flushing 和 compactions 相互作用可能会导致一堆不必要的 I/O(要通过更改 flushing 和 compactions 来针对每个列族进行处理)。
8.7 开启布隆过滤器
8.7.1 什么是布隆过滤器
布隆过滤器是一种多哈希函数映射的快速查找算法(存储结构),可以实现用很小的空间和运算代价,来实现海量数据的存在与否的记录(黑白名单判断)。特点是高效的插入和查询,可以判断出一定不存在和可能存在
相比于传统的 List、Set、Map 等数据结构,它更高效、占用空间更少,但是缺点是其返回的可能存在结果是概率性的,而不是确切的。
布隆过滤器是一个bit向量或者bit数组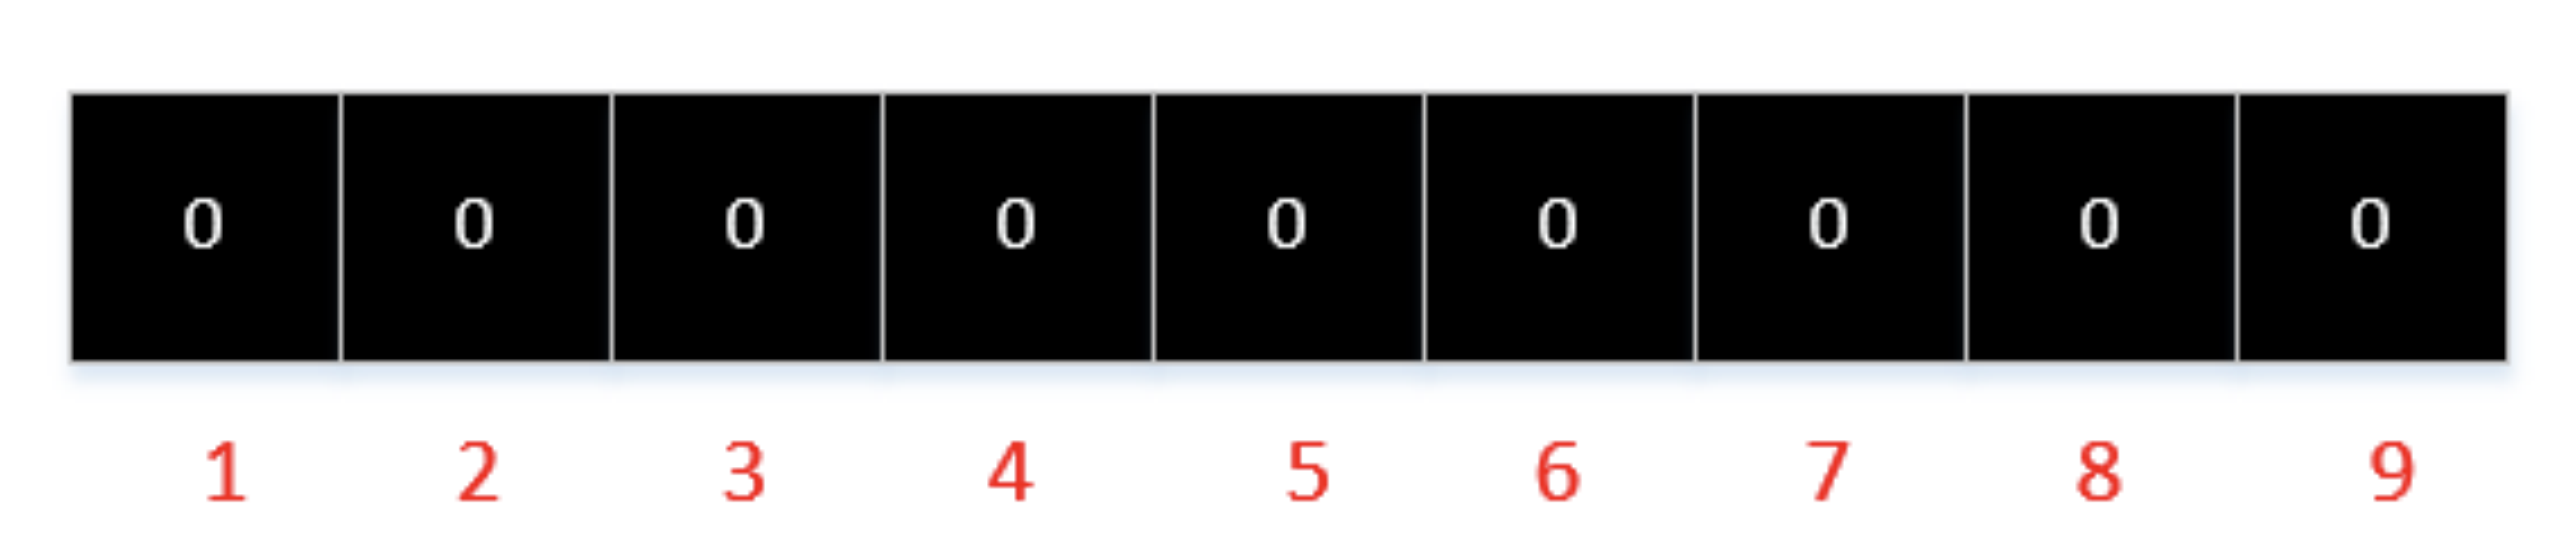
8.7.2 布隆过滤器操作及原理
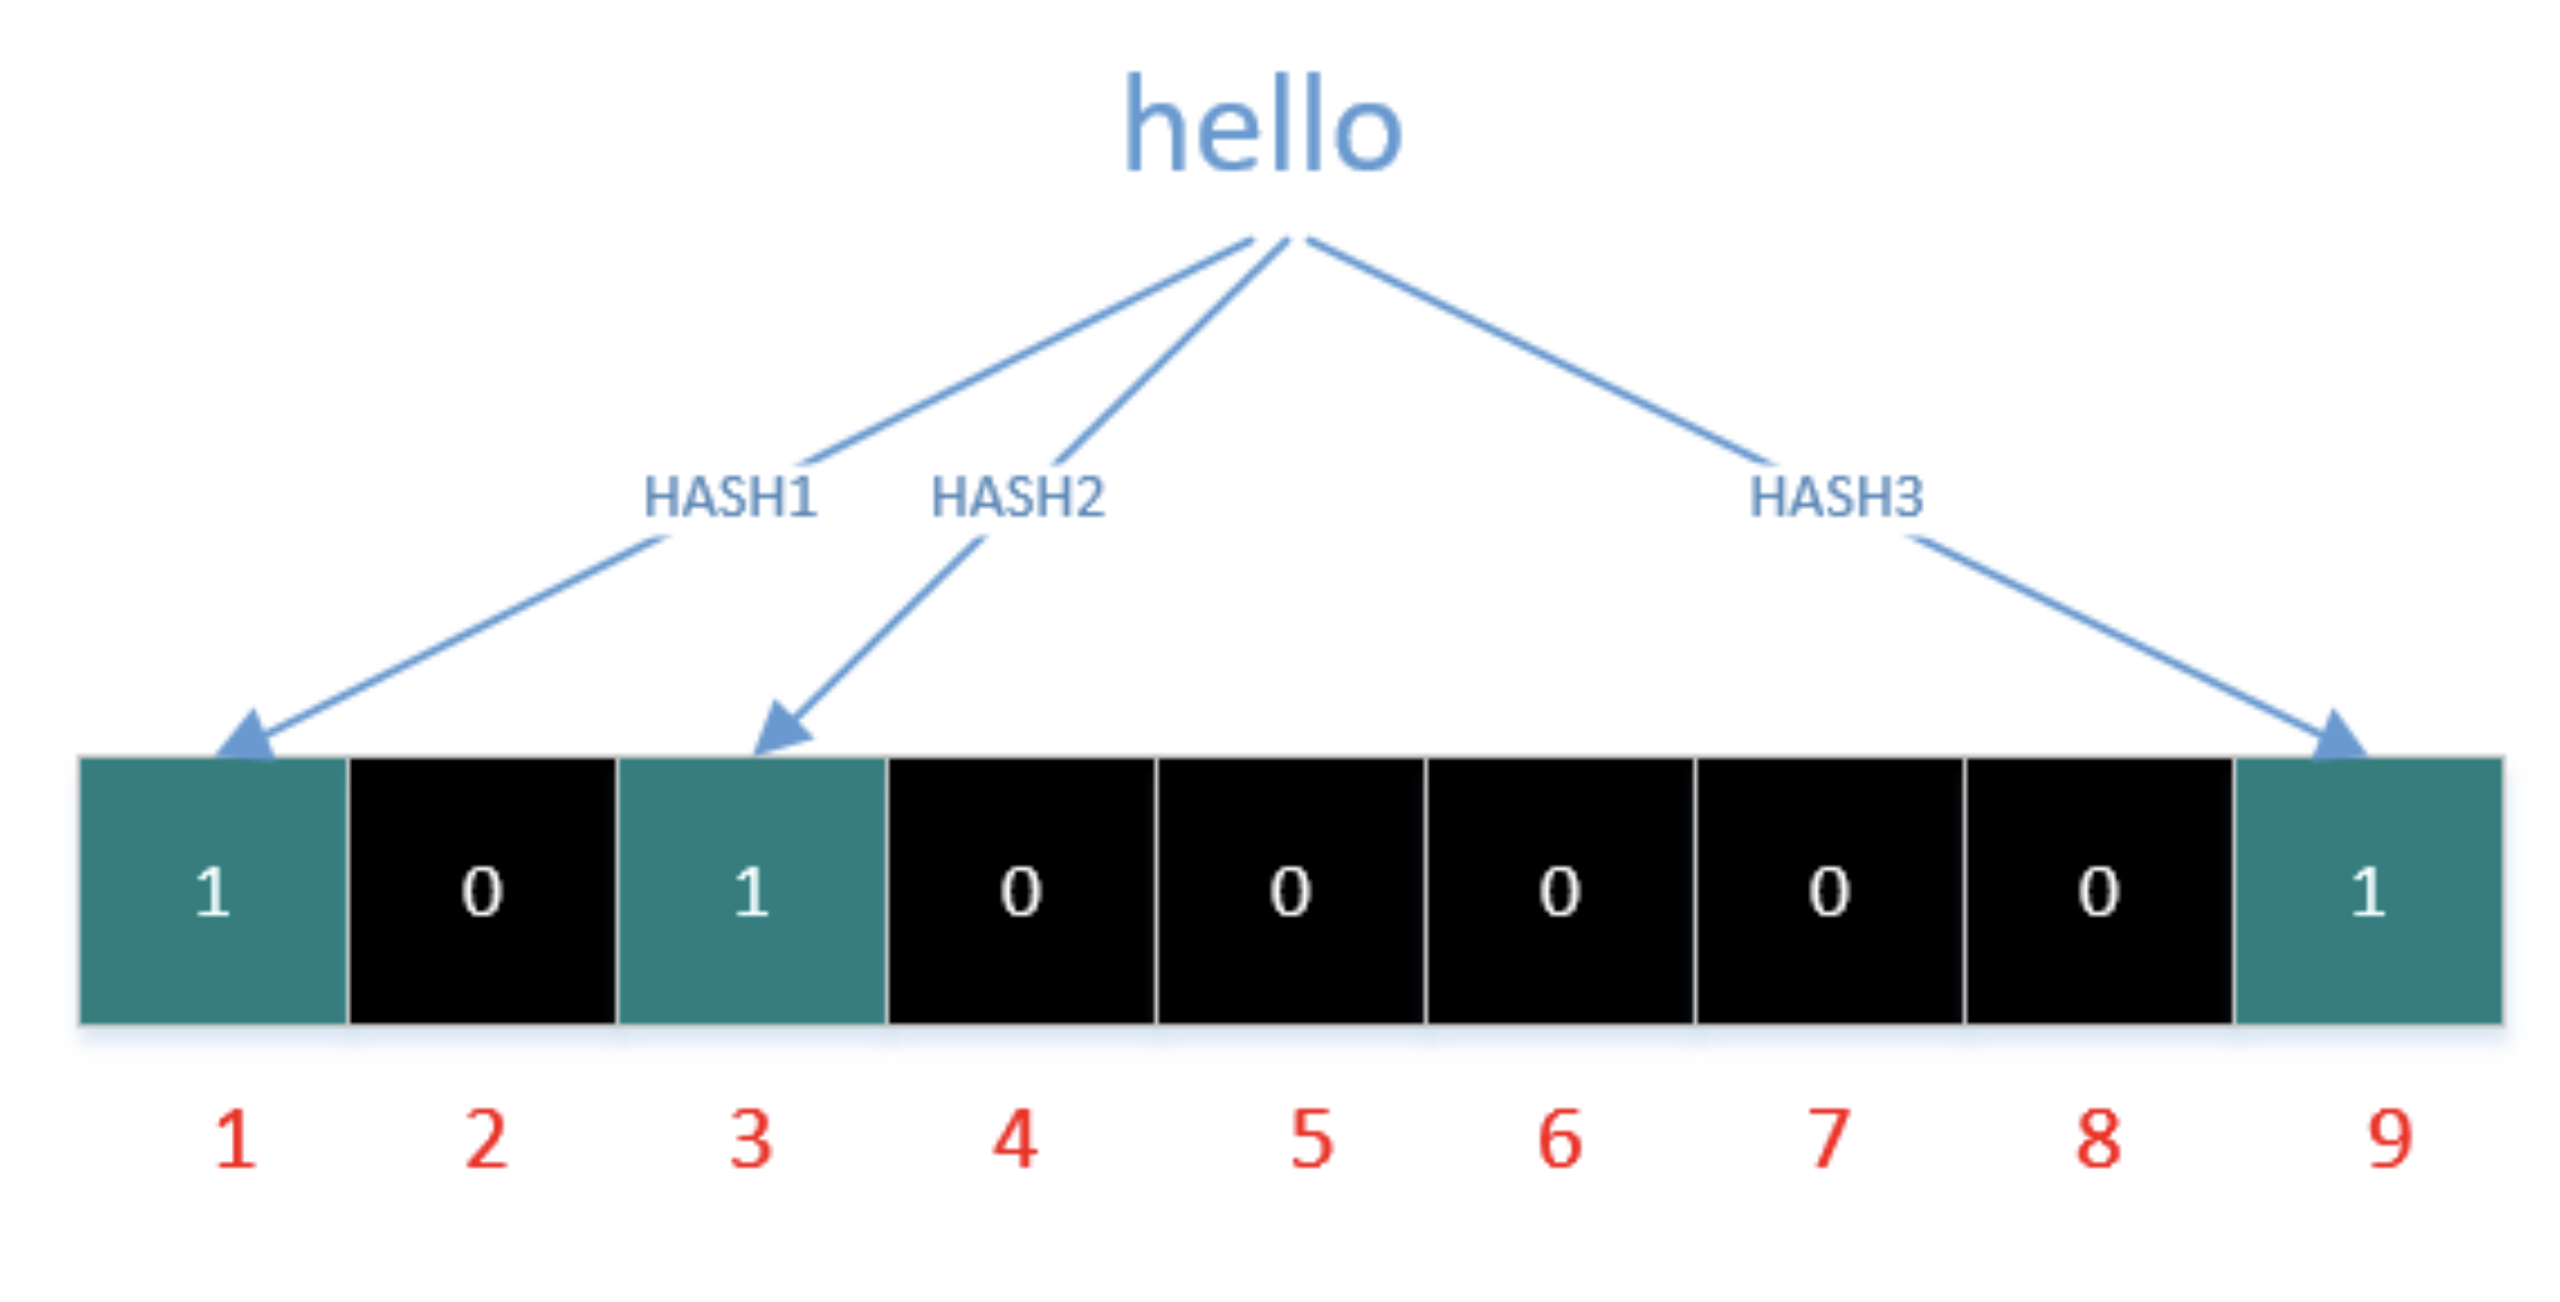
如果我们要添加一个值到布隆过滤器中,需要使用多个hash函数生成多个hash值,每个hash值对应位数组上的一个点,然后将位数组对应的位置标记为1。
如下图,字符串’hello’就通过3种hash函数生成了哈希值1,3,9,字符串‘word’就生成了1,5,7
注:由于hello和word都返回了bit位1,所以前面的1会被覆盖
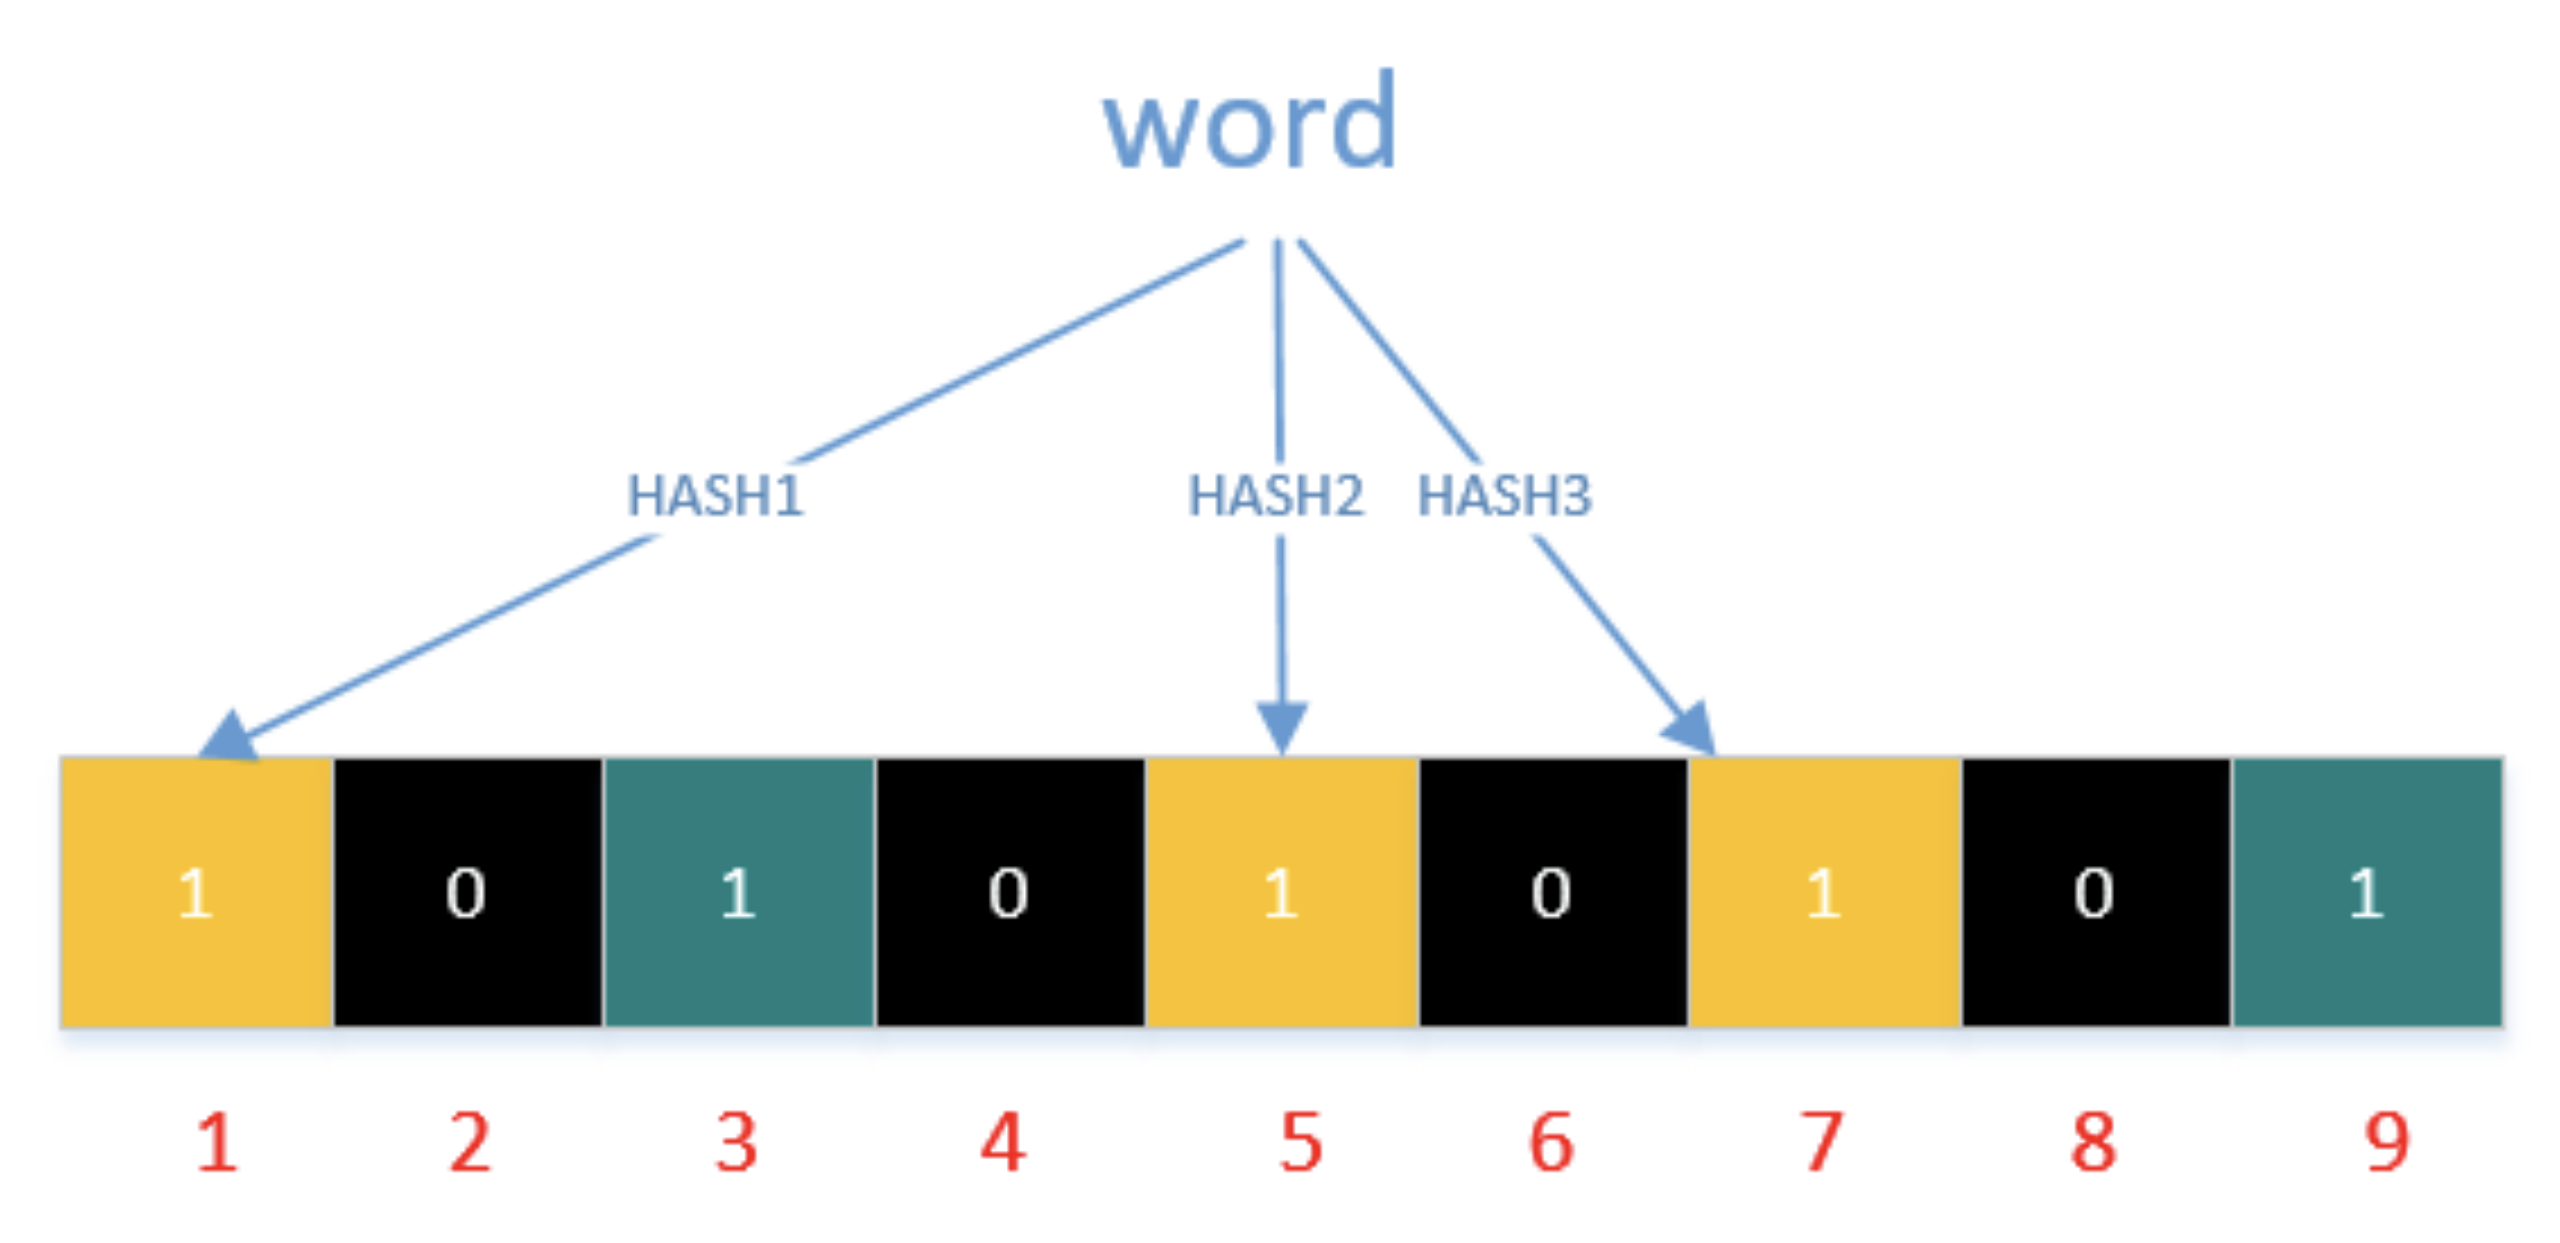
查询元素flink是否存在集合中的时候,同样的方法将flink通过哈希映射到位数组上的3个点。如果3个点的其中有一个点不为1,则可以判断该元素一定不存在集合中。
如果3个点都为1,则该元素可能存在集合中。注意:此处不能判断该元素是否一定存在,可能存在一定的误判率。
因为新增的元素越来越多,被置为 1 的 bit 位也会越来越多,这样“flink” 即使没有被存储过,但是万一哈希函数返回的三个 bit 位都被其他值置位了 1 ,那么程序还是会判断 “flink” 这个值存在。比如flink三个hash值为1,3,7,就能说明flink一定存在吗?
8.7.3如何减少误差?
- 加大布隆过滤器的长度,否则很容易就所有的bit位都为1了
2. 哈希函数的个数要考虑,个数越多则布隆过滤器 bit 位置位 1 的速度越快,且布隆过滤器的效率越低;但是如果太少的话,那我们的误差会变高。
8.7.4 布隆过滤器在HBase中的应用
布隆过滤器是hbase中的高级功能,它能够减少特定访问模式(get/scan)下的查询时间。不过由于这种模式增加了内存和存储的负担,所以被默认为关闭状态。
hbase支持如下类型的布隆过滤器:
- NONE 不使用布隆过滤器
- ROW 行键使用布隆过滤器
- ROWCOL 列键使用布隆过滤器
至于选用什么模式,还是要看使用场景
hbase的实际存储结构是HFile,它是位于hdfs系统中的,也就是在磁盘中。而加载到内存中的数据存储在MemStore中,当MemStore中的数据达到一定数量时,它会将数据存入HFile中。
HFIle是由一个个数据块与索引块组成,他们通常默认为64KB。hbase是通过块索引来访问这些数据块的。而索引是由每个数据块的第一行数据的rowkey组成的。当hbase打开一个HFile时,块索引信息会优先加载到内存当中。然后hbase会通过这些块索引来查询数据。
当我们随机读get数据时,如果采用hbase的块索引机制,hbase会加载很多块文件。
采用布隆过滤器后,它能够准确判断该HFile的所有数据块中是否含有我们查询的数据,从而大大减少不必要的块加载,增加吞吐,降低内存消耗,提高性能
在读取数据时,hbase会首先在布隆过滤器中查询,根据布隆过滤器的结果,再在MemStore中查询,最后再在对应的HFile中查询。
九HBase通过springboot提供接口
9.1 springboot简介
Spring Boot是由Pivotal团队提供的全新框架,其设计目的是用来简化新Spring应用的初始搭建以及开发过程。该框架使用了特定的方式来进行配置,从而使开发人员不再需要定义样板化的配置。通过这种方式,Spring Boot致力于在蓬勃发展的快速应用开发领域(rapid application development)成为领导者
数据开发人员应该是需要具备springboot开发提供接口服务能力的!!!
9.2 Hbase数据准备

9.3 工程创建
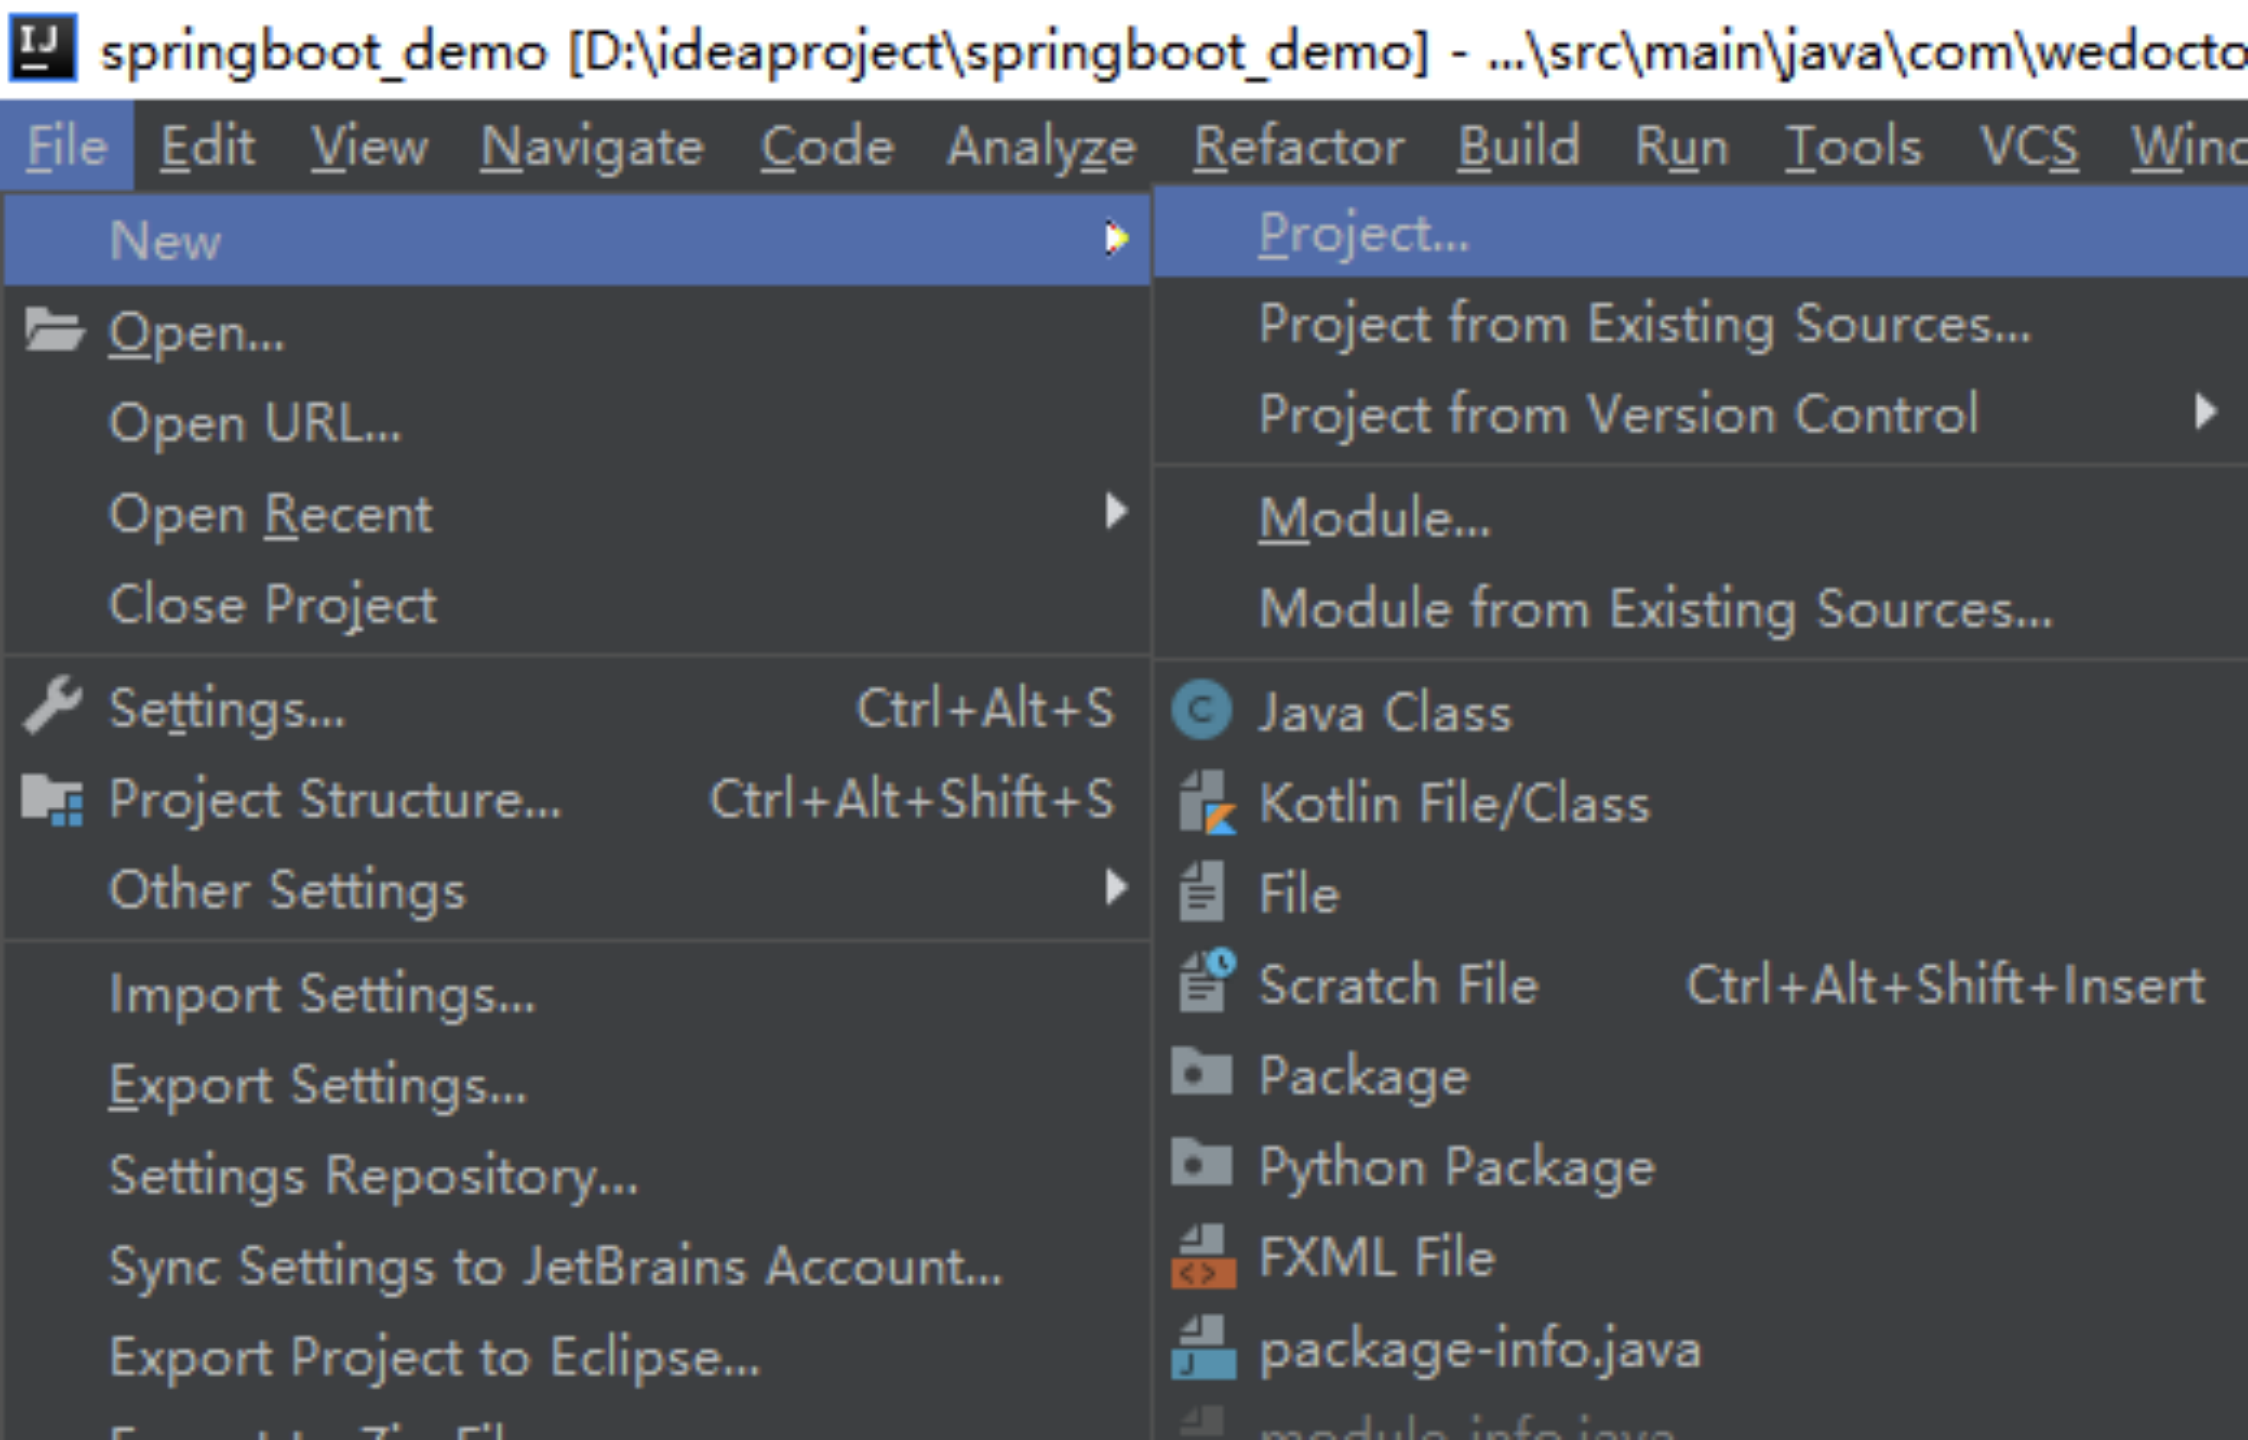
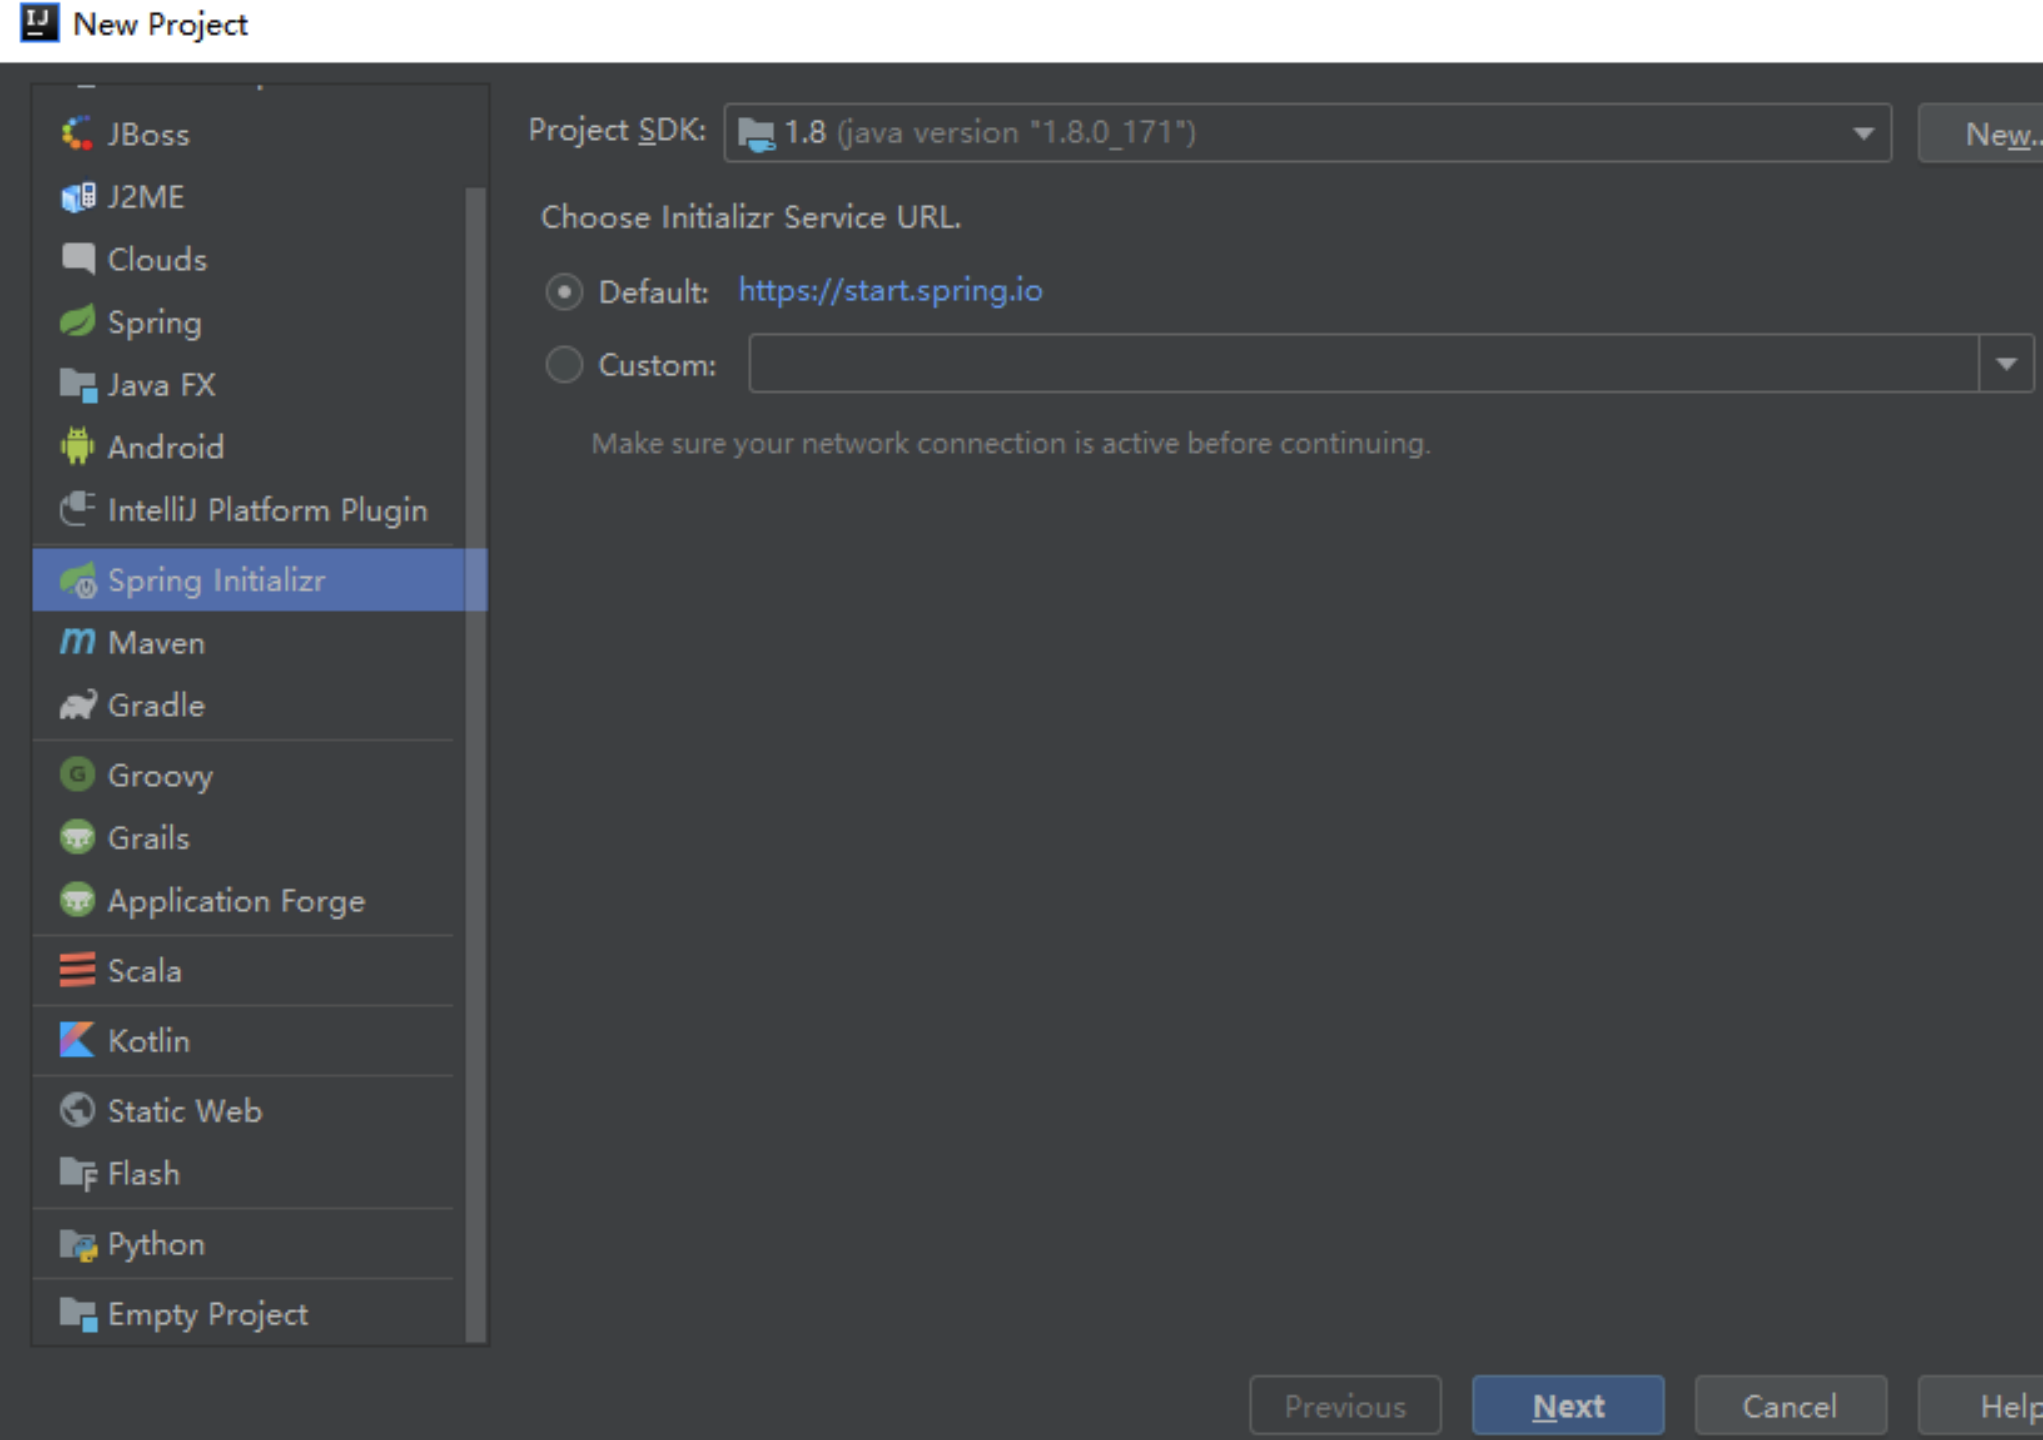
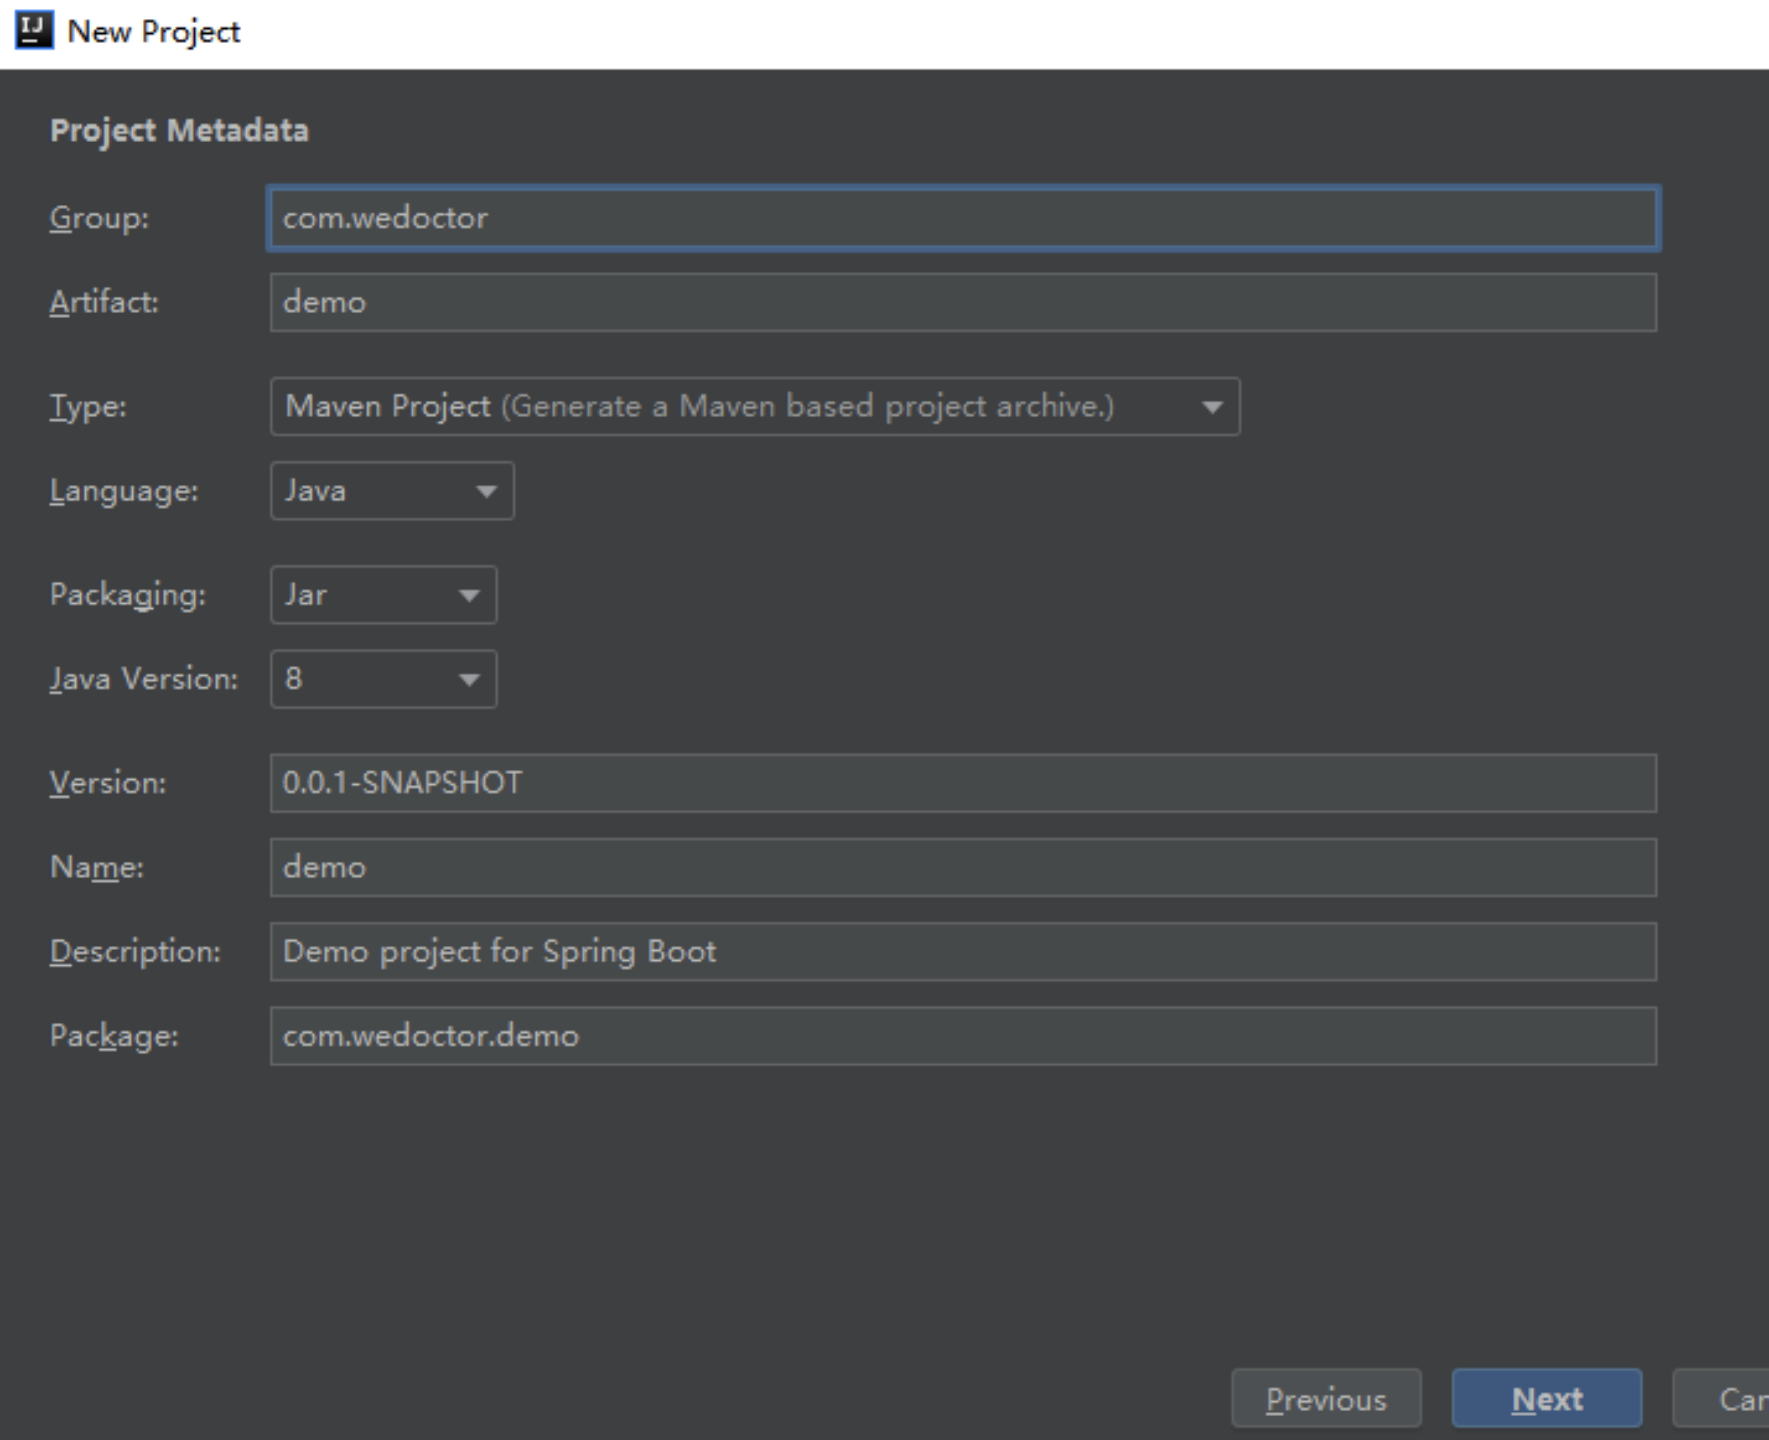
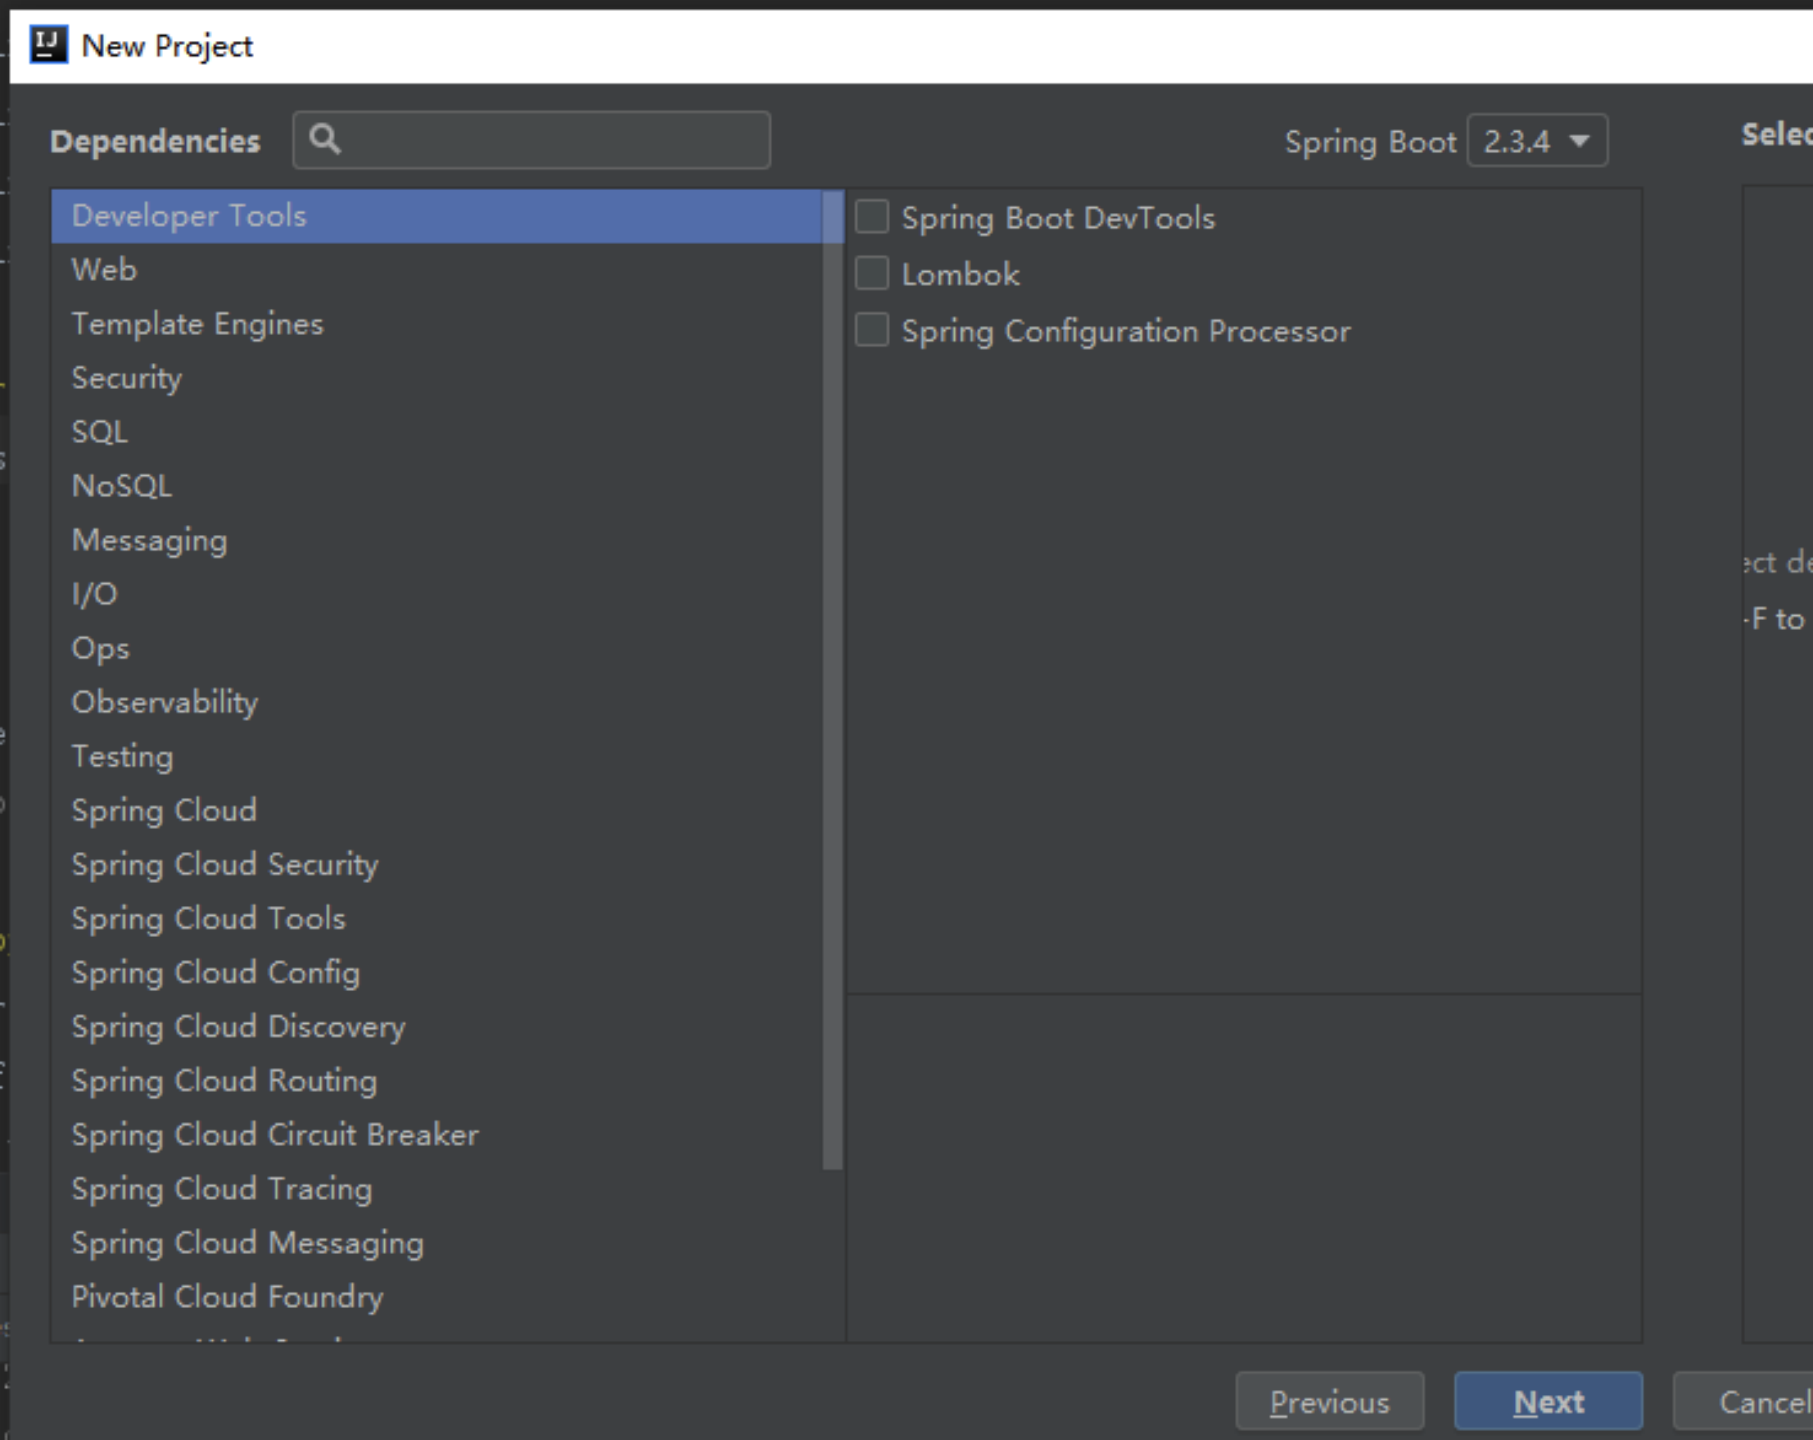
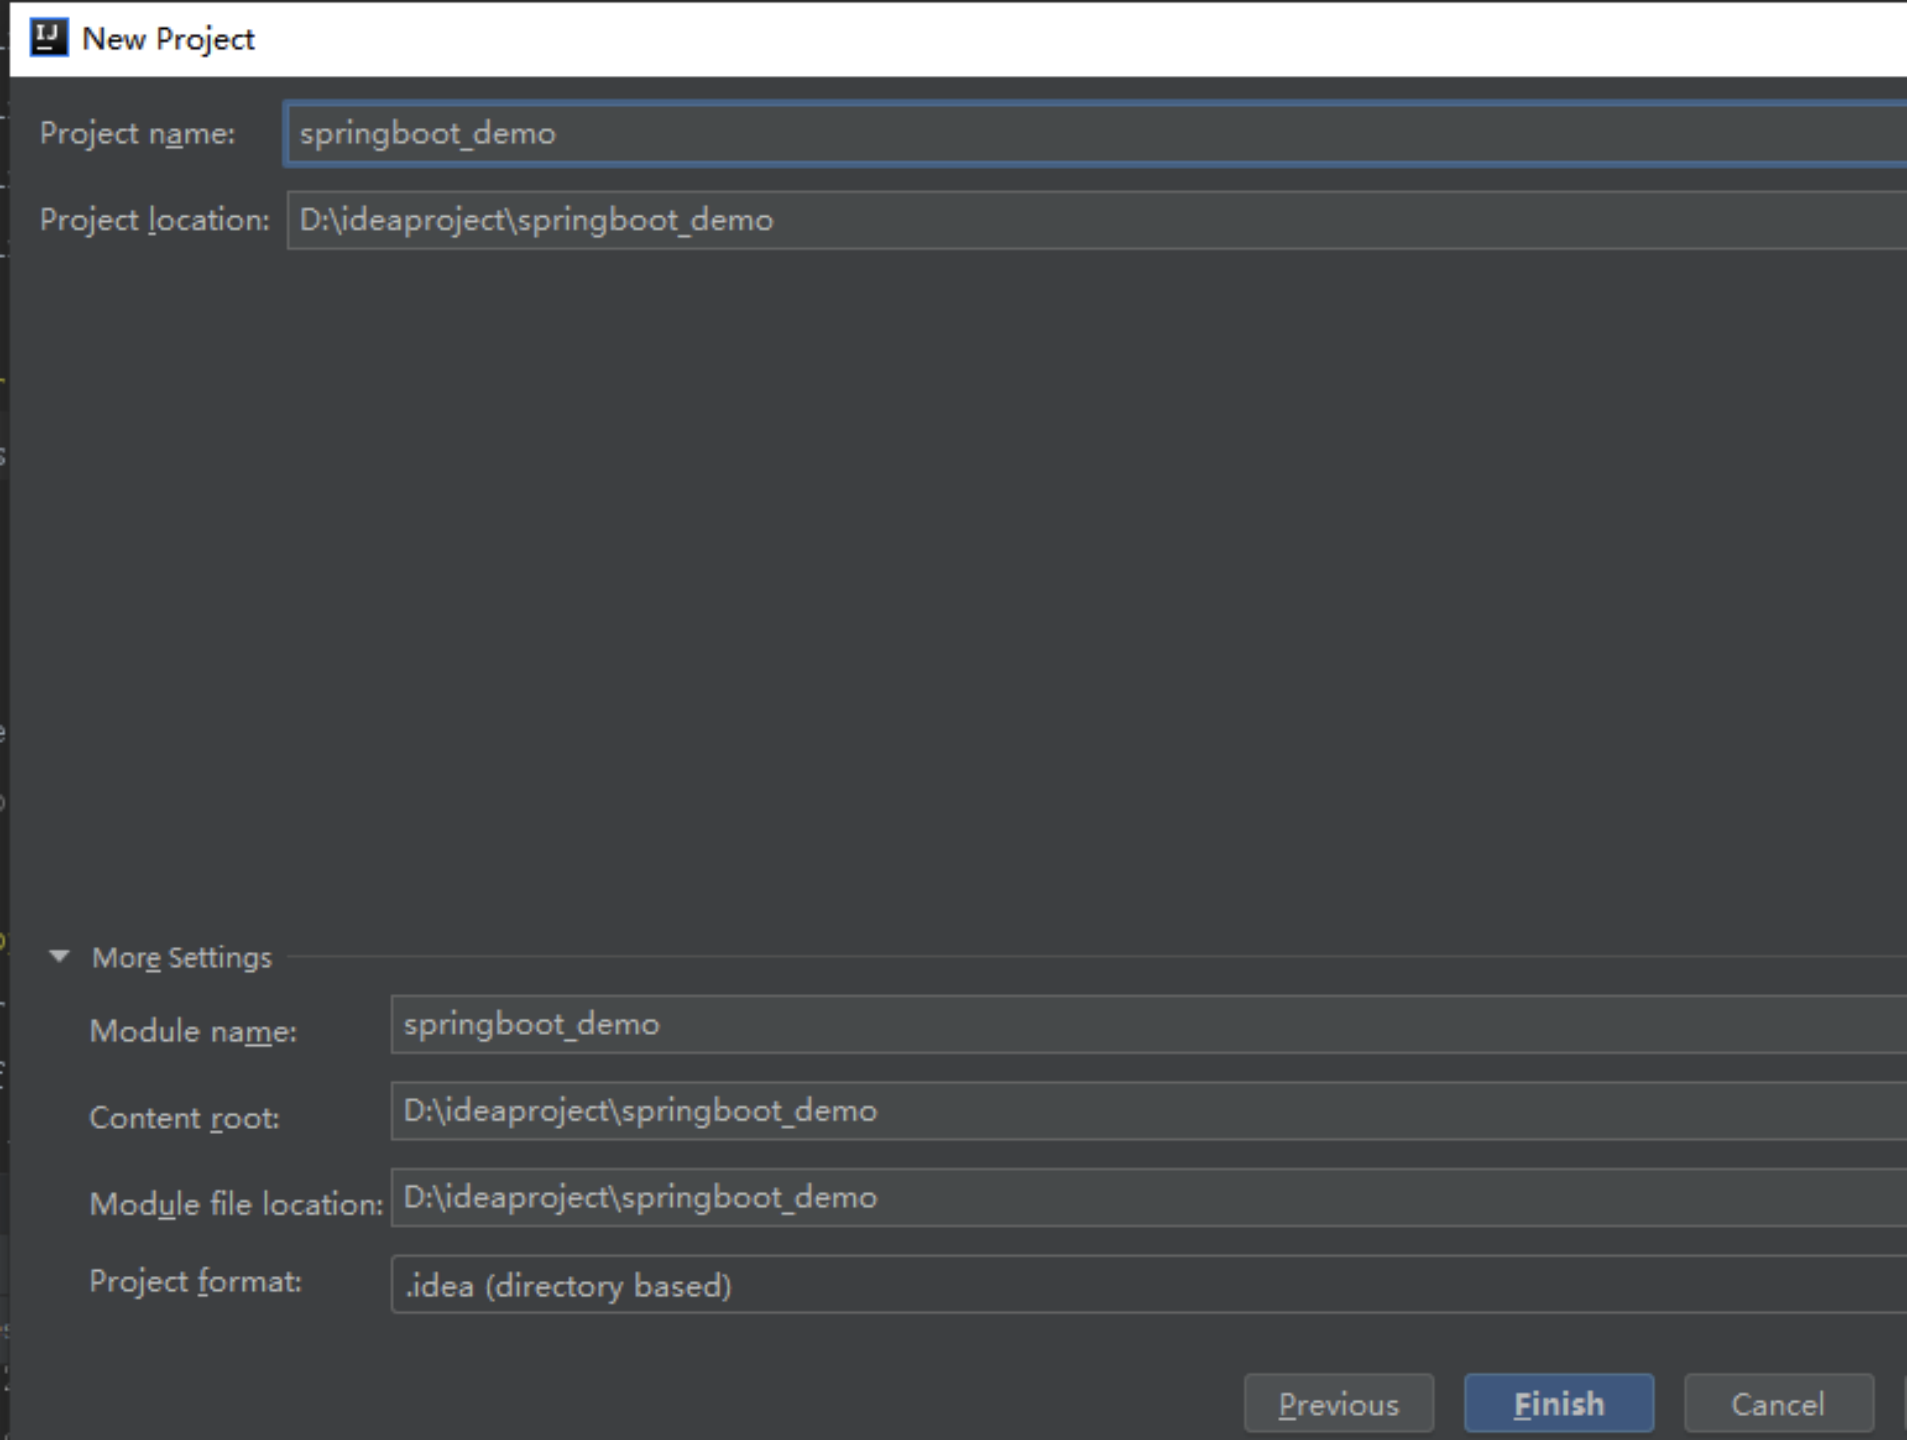
运行Application,出现以下界面,则表示创建工程成功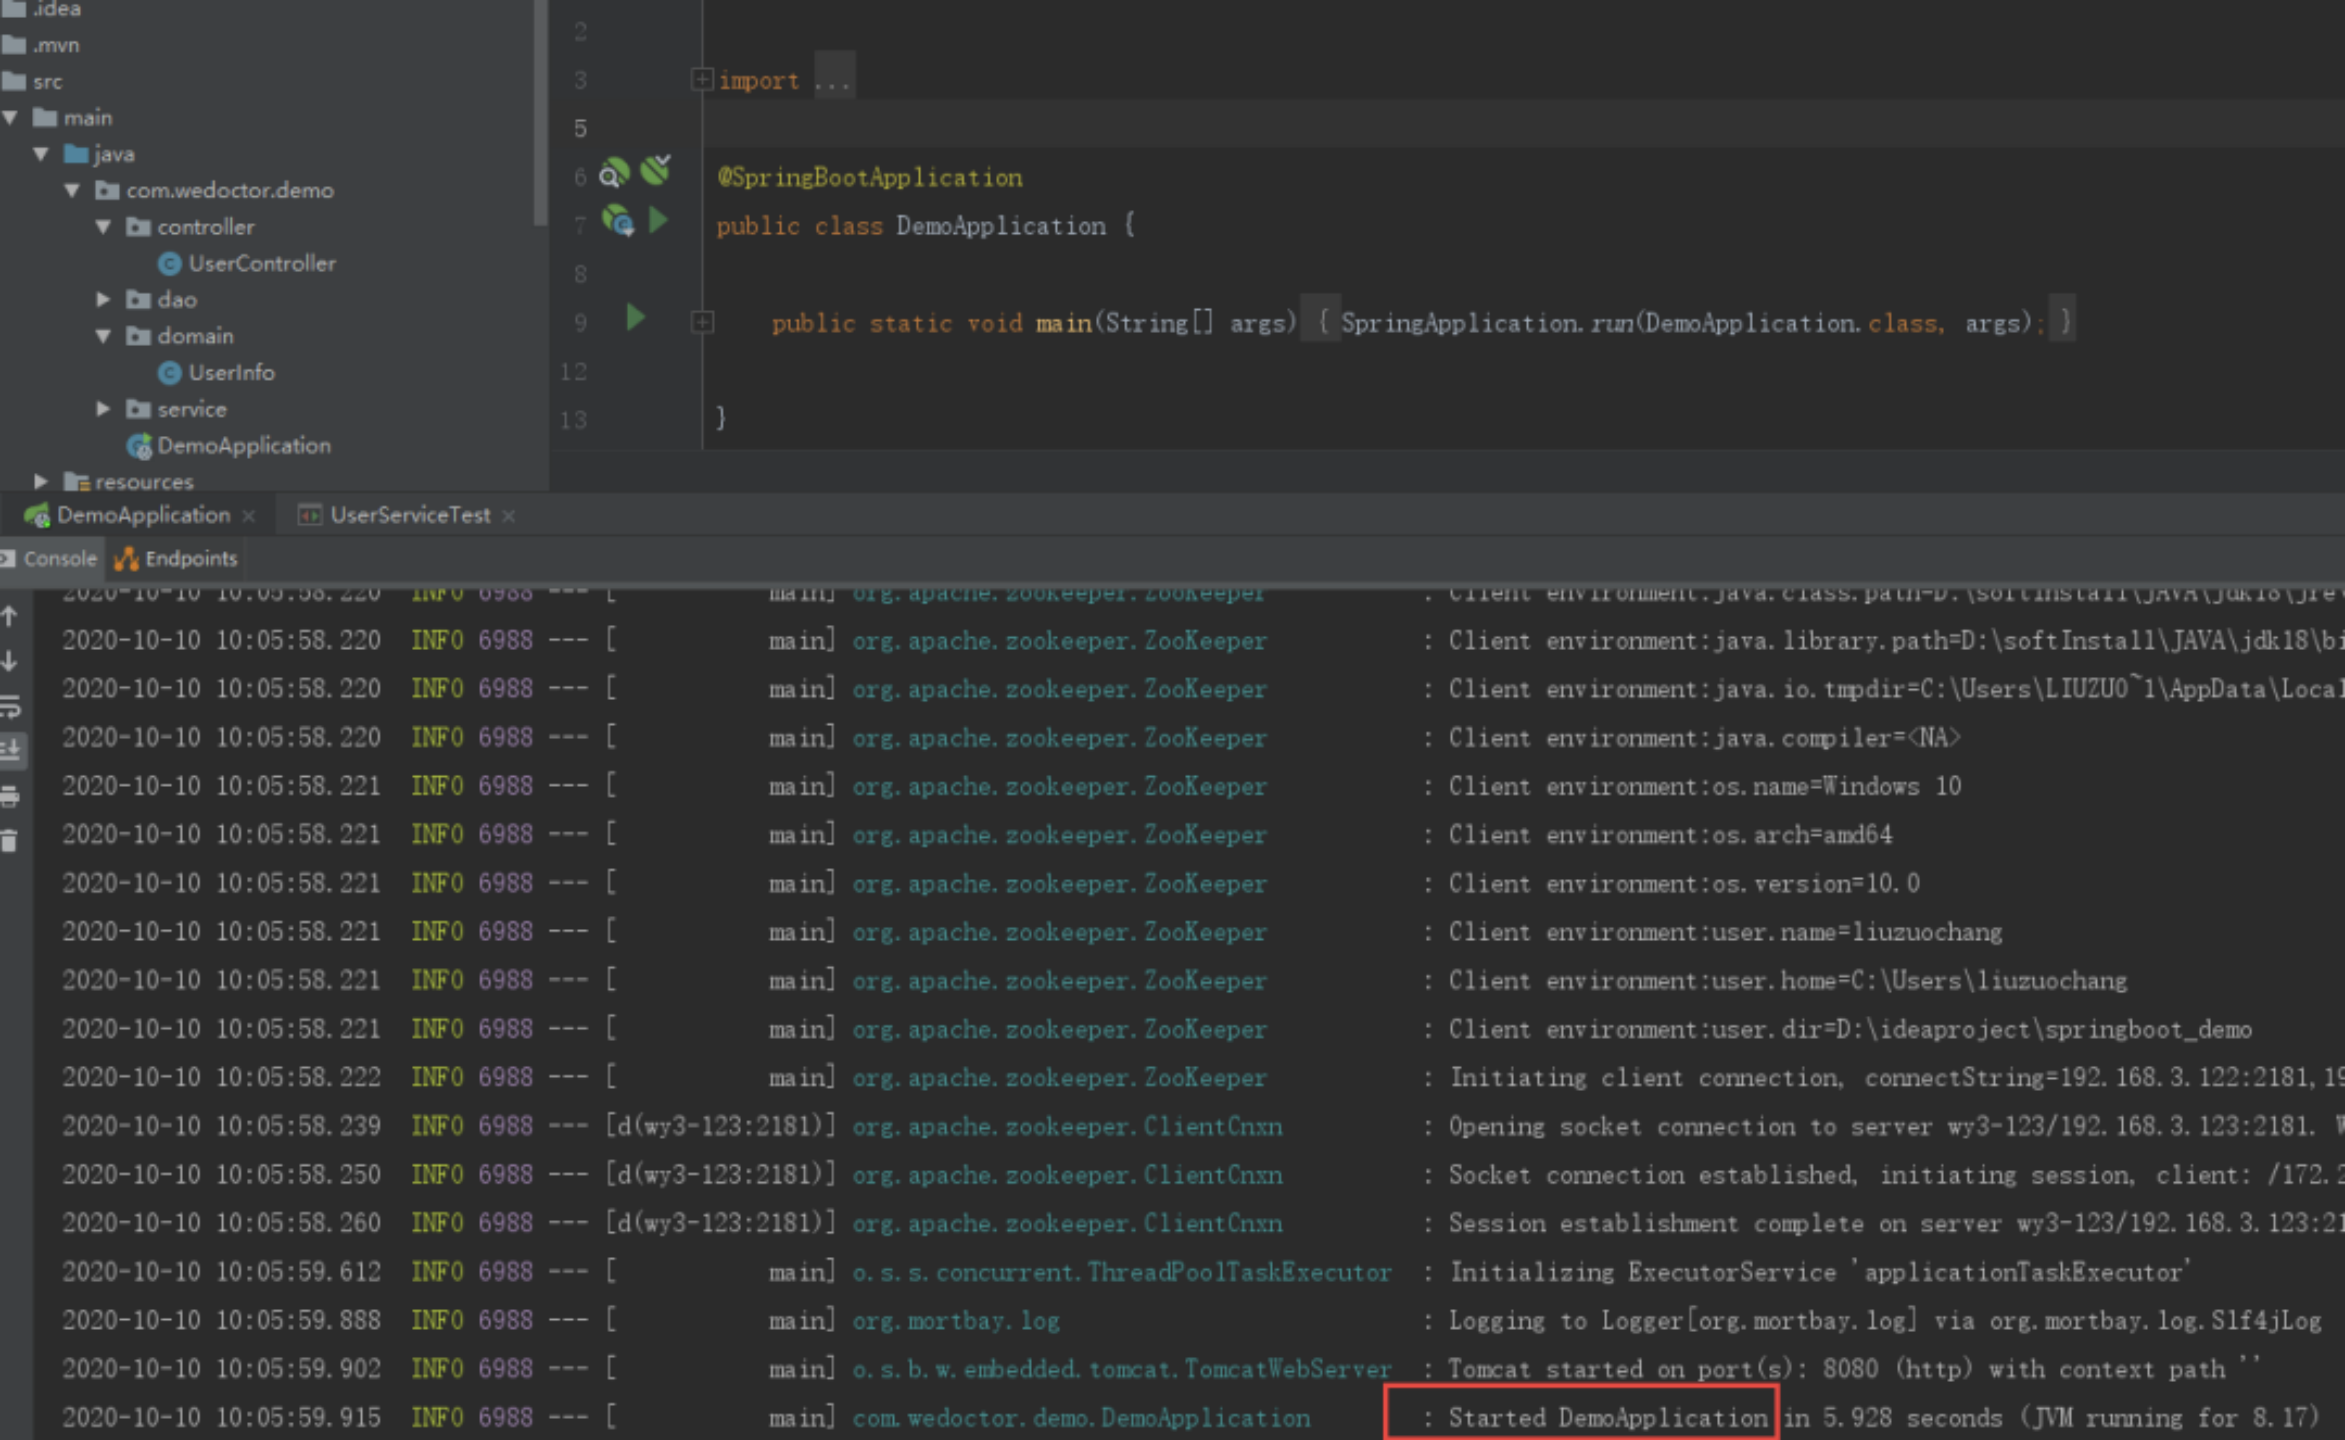
9.4简单测试
package com.wedoctor.demo.domain; public class UserInfo { private String userId; private String UserName; private Integer age; public String getUserId() { return userId; } public void setUserId(String userId) { this.userId = userId; } public String getUserName() { return UserName; } public void setUserName(String userName) { UserName = userName; } public Integer getAge() { return age; } public void setAge(Integer age) { this.age = age; } public UserInfo(String userId, String userName, Integer age) { this.userId = userId; UserName = userName; this.age = age; } @Override public String toString() { return “UserInfo{“ + “userId=’” + userId + ‘\‘’ + “, UserName=’” + UserName + ‘\‘’ + “, age=” + age + ‘}’; } } |
|---|

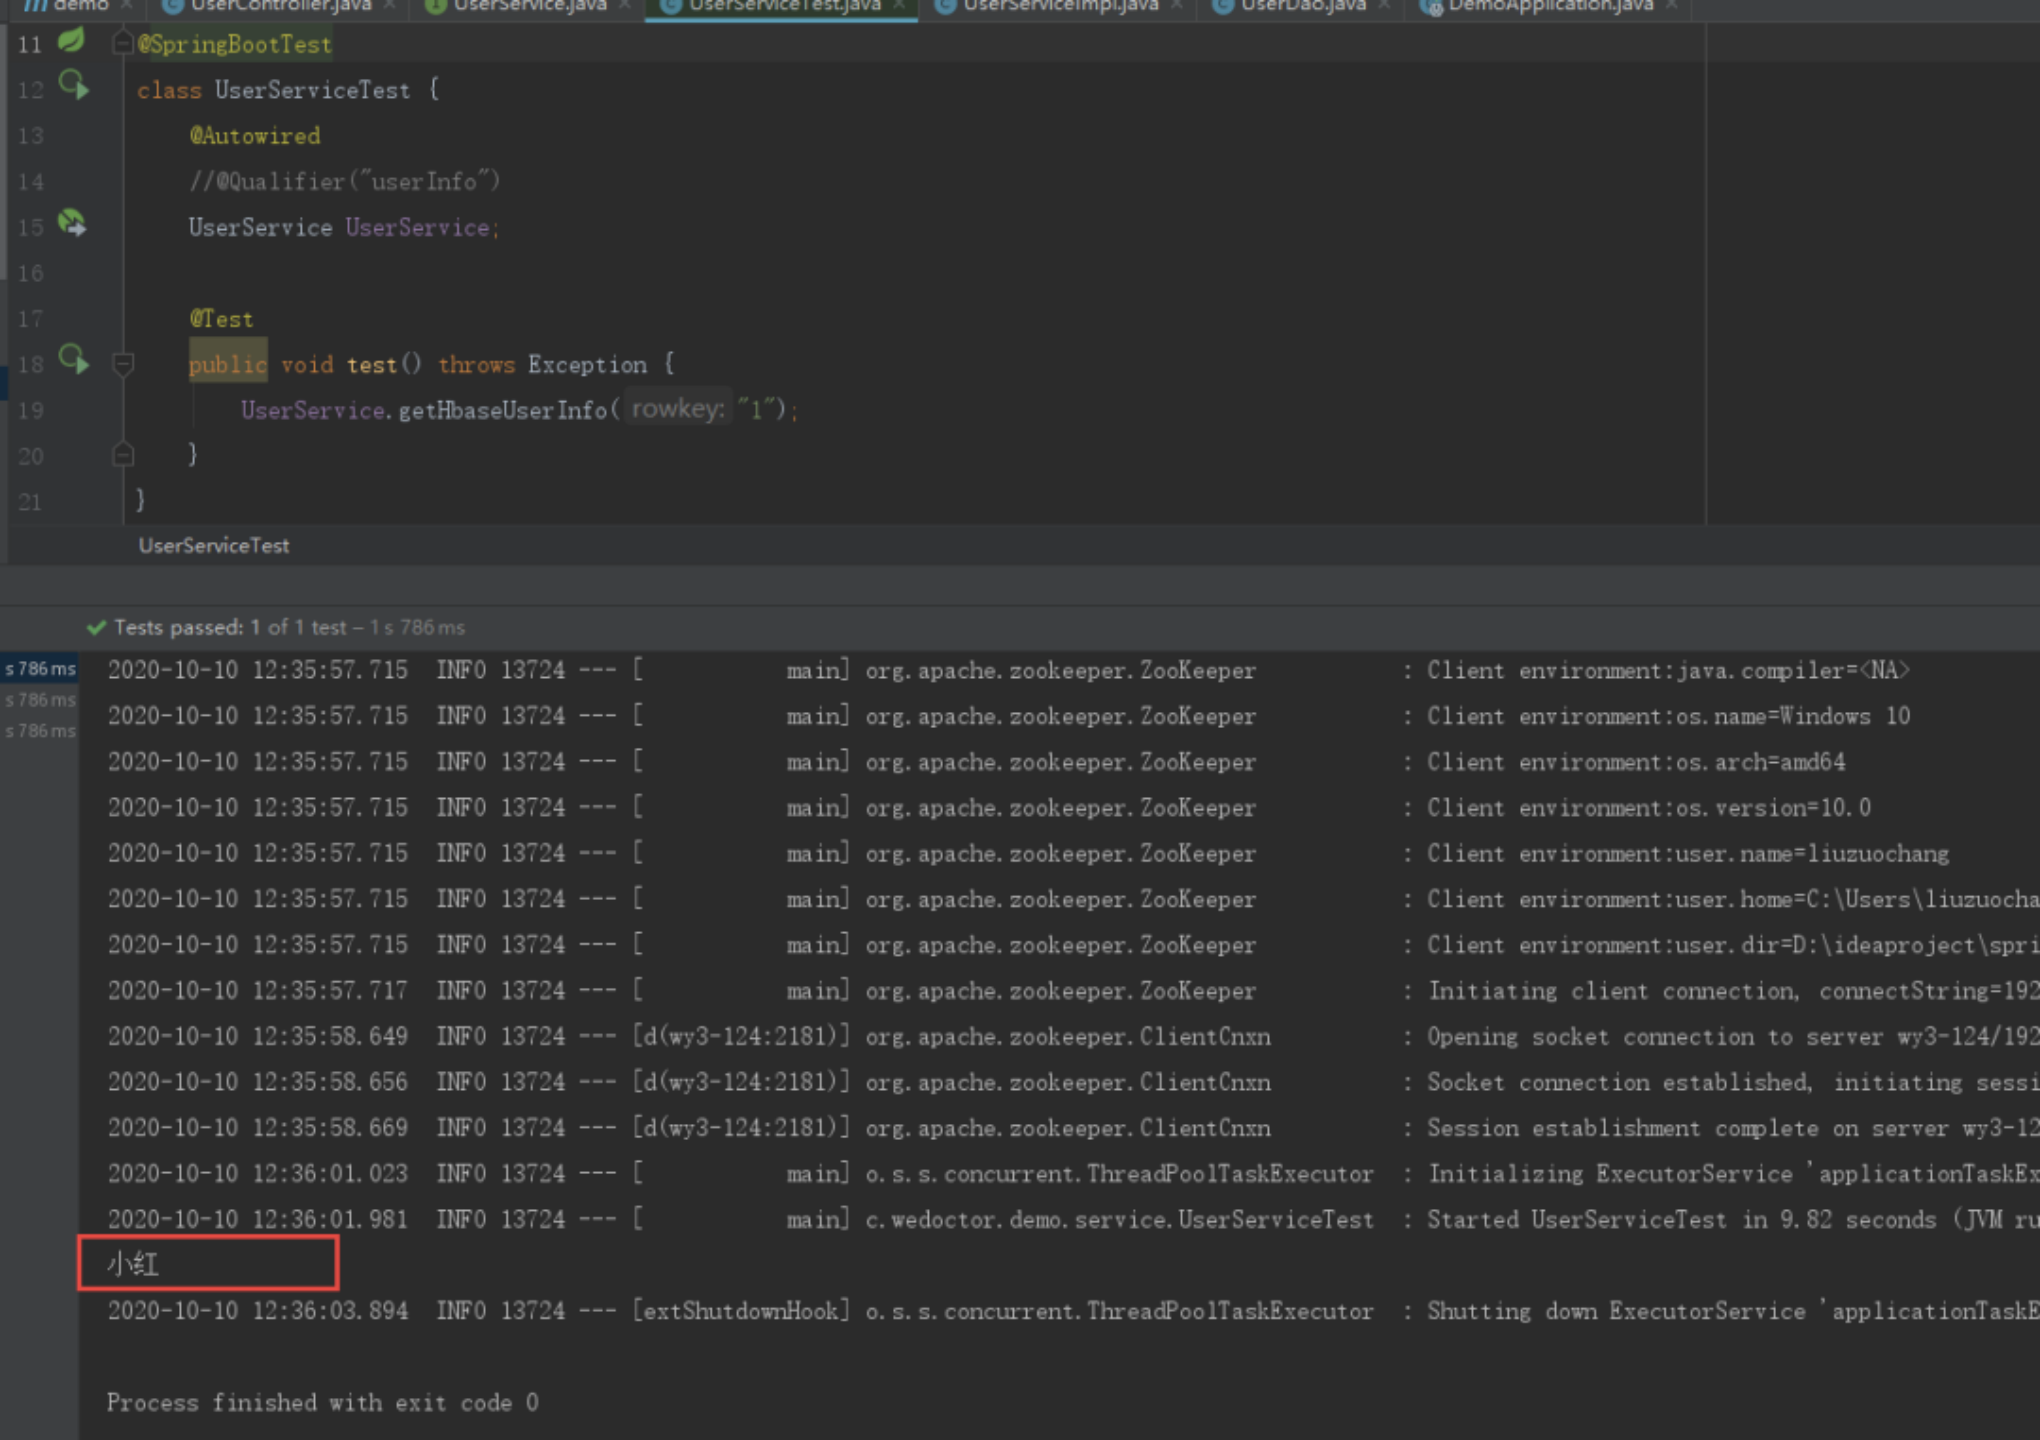
测试ok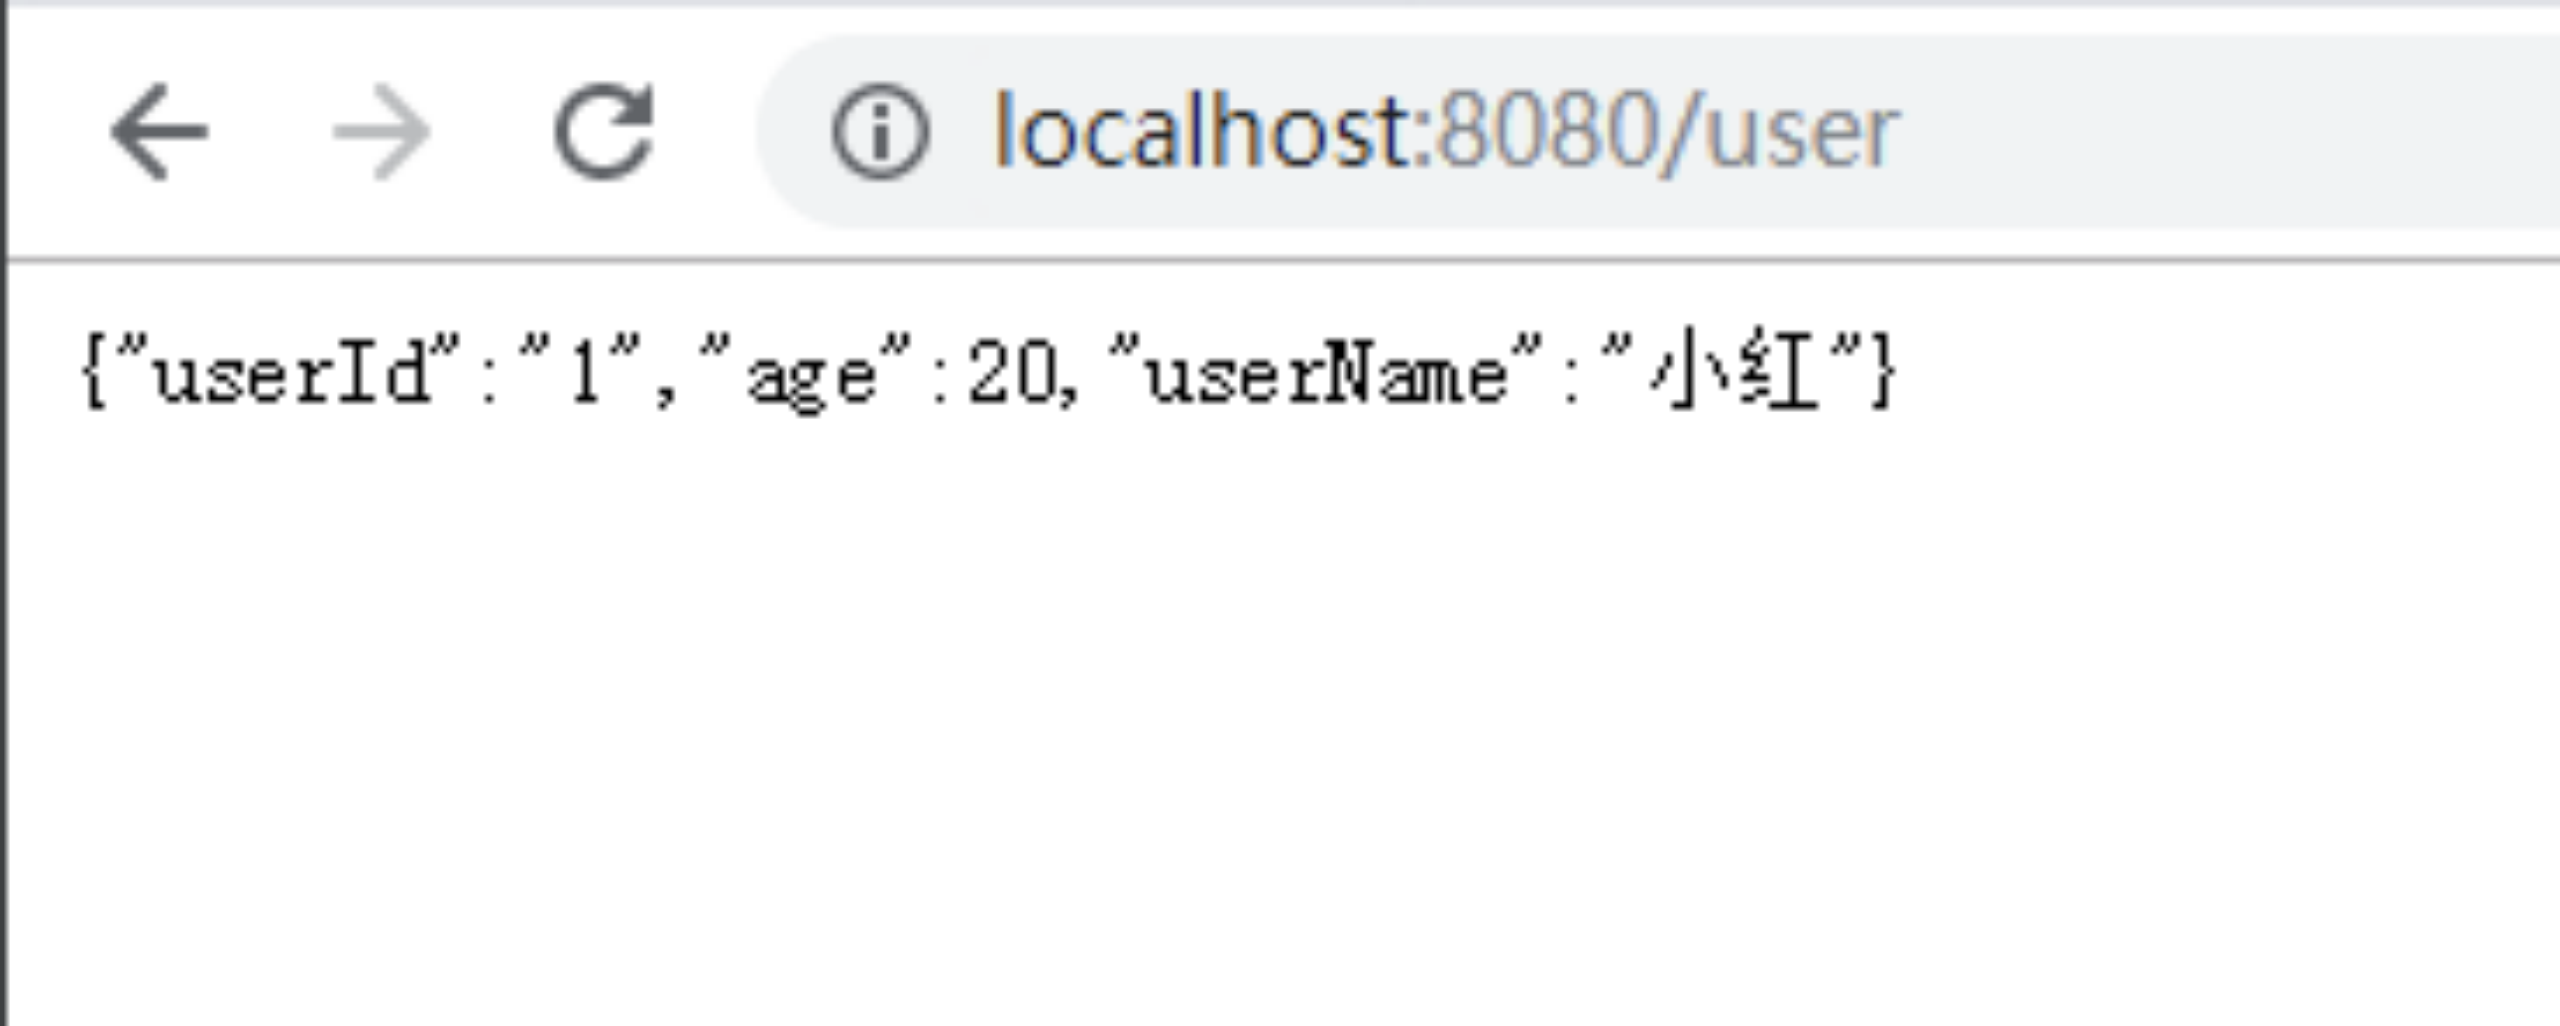
9.5 读取hbase数据并提供接口
整体代码结构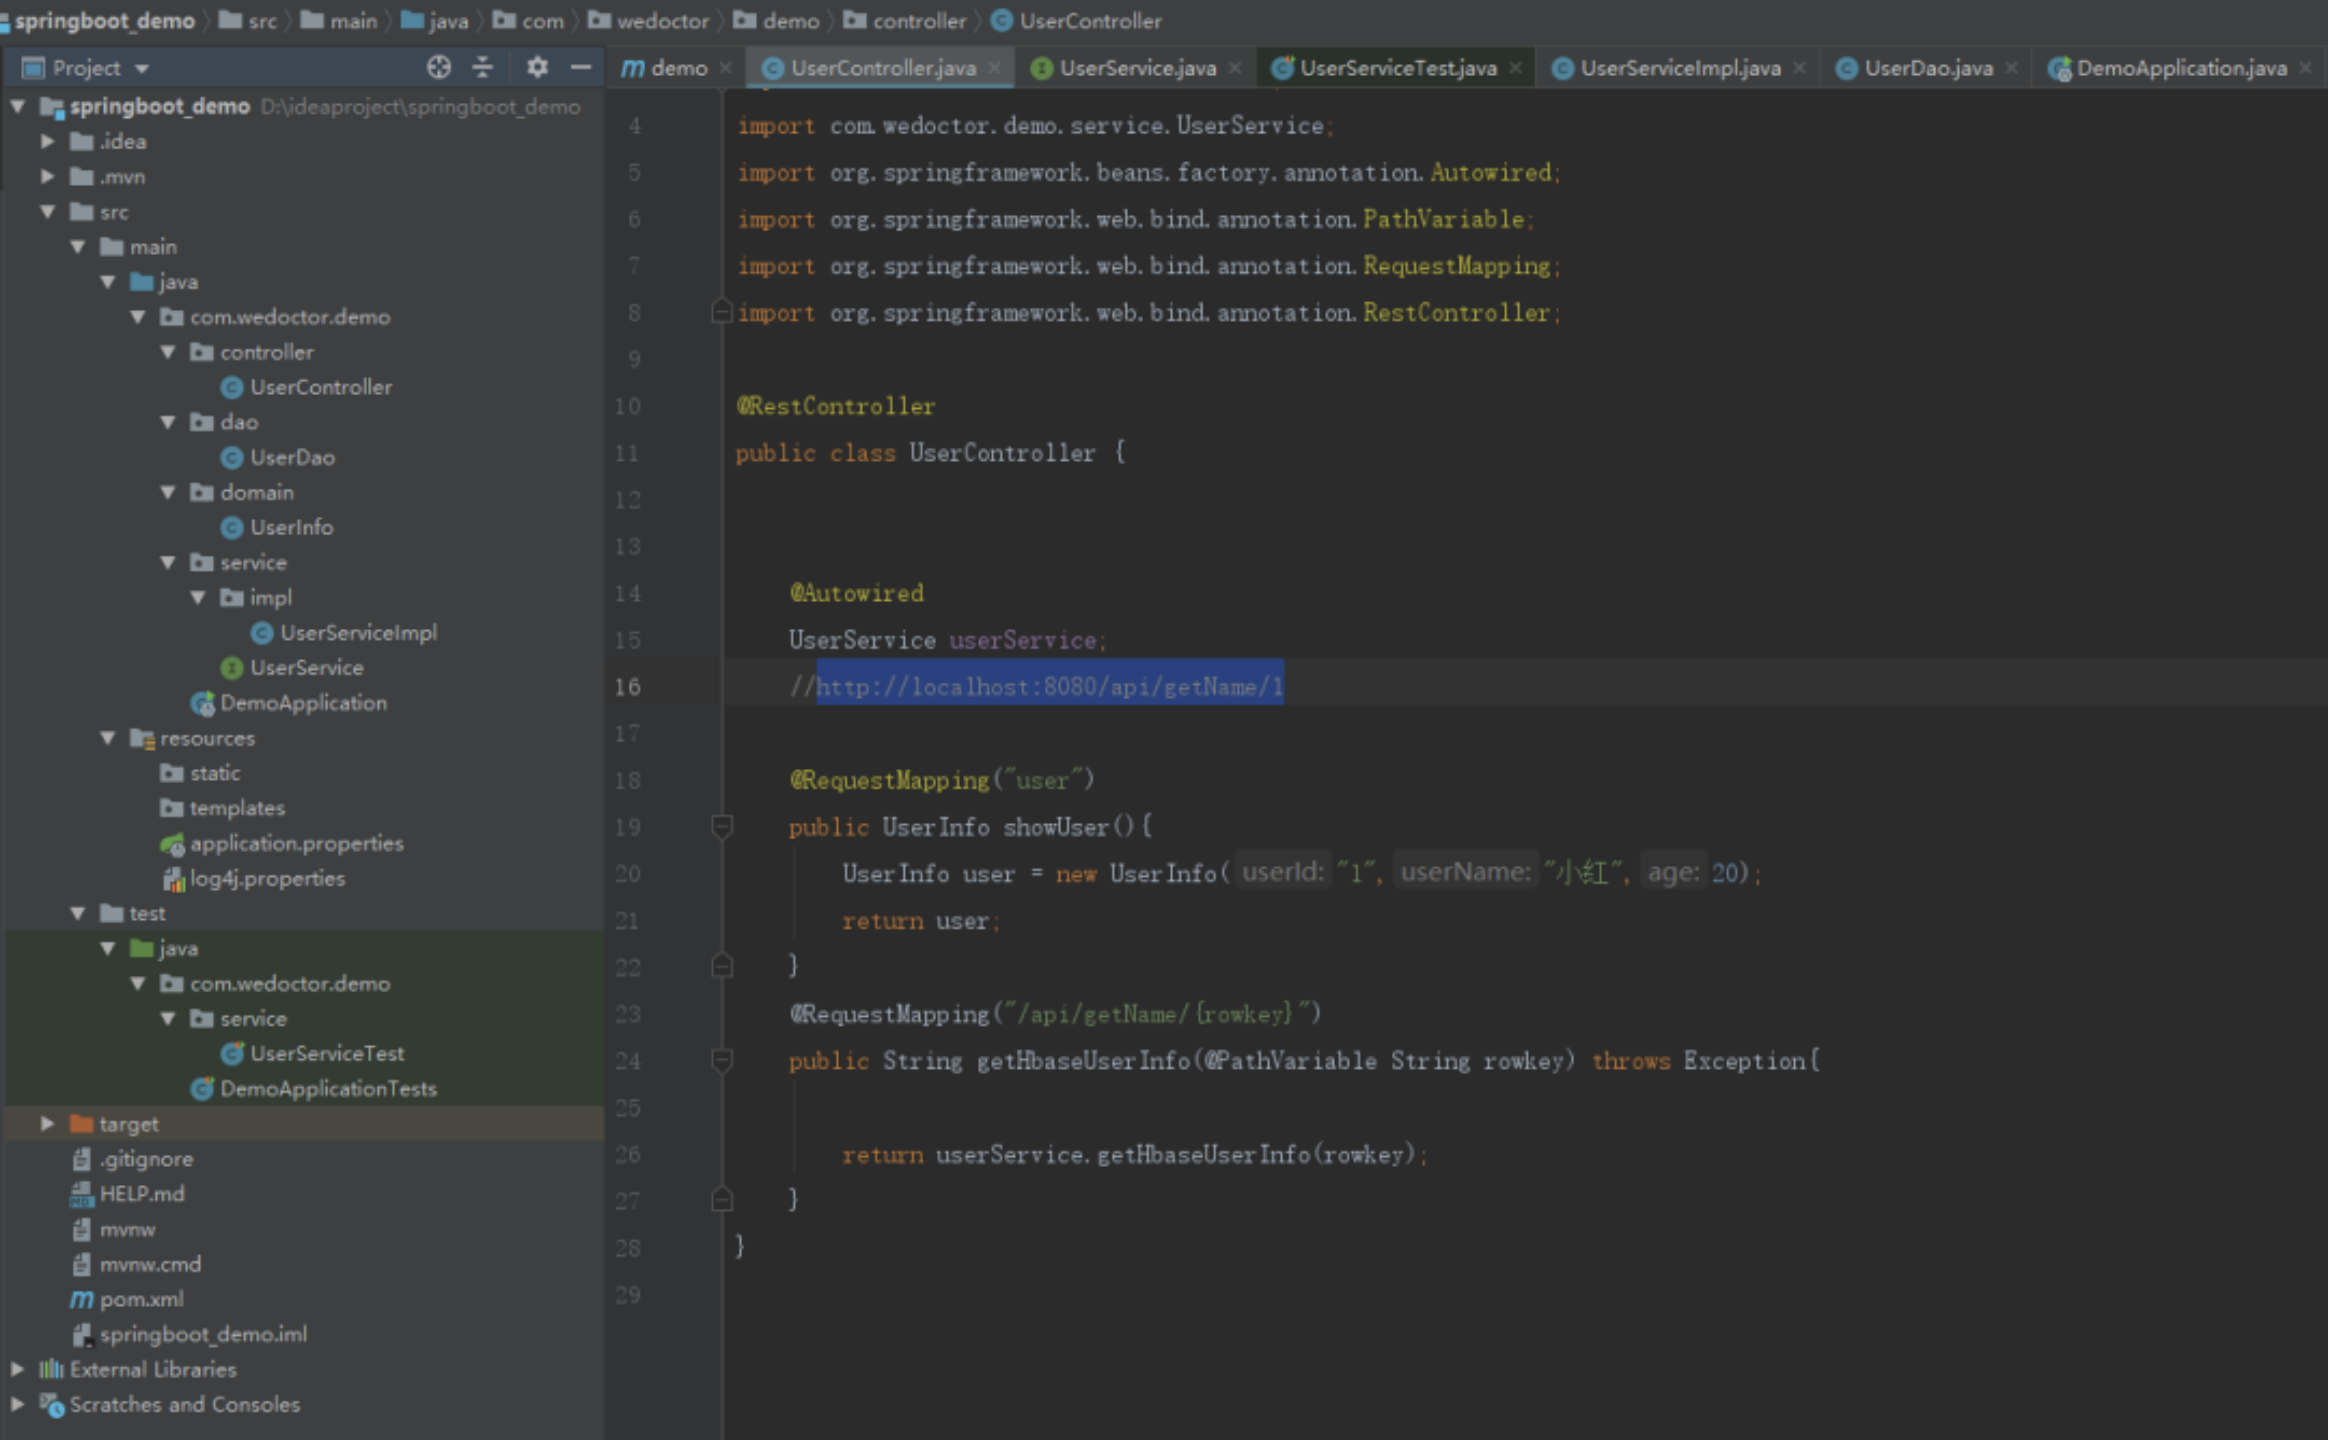
Controller层
| package com.wedoctor.demo.controller; import com.wedoctor.demo.domain.UserInfo; import com.wedoctor.demo.service.UserService; import org.springframework.beans.factory.annotation.Autowired; import org.springframework.web.bind.annotation.PathVariable; import org.springframework.web.bind.annotation.RequestMapping; import org.springframework.web.bind.annotation.RestController; @RestController public class UserController { @Autowired UserService userService; //http://localhost:8080/api/getName/2 @RequestMapping(“user”) public UserInfo showUser(){ UserInfo user = new UserInfo(“1”,”小红”,20); return user; } @RequestMapping(“/api/getName/{rowkey}”) public String getHbaseUserInfo(@PathVariable String rowkey) throws Exception{ return userService.getHbaseUserInfo(rowkey); } } |
|---|
Service层
| package com.wedoctor.demo.service; public interface UserService { String getHbaseUserInfo(String rowkey) throws Exception; } |
|---|
| package com.wedoctor.demo.service.impl; import com.wedoctor.demo.dao.UserDao; import com.wedoctor.demo.service.UserService; import org.springframework.beans.factory.annotation.Autowired; import org.springframework.stereotype.Service; @Service public class UserServiceImpl implements UserService { @Autowired UserDao userDao; @Override public String getHbaseUserInfo(String rowkey) throws Exception{ return userDao.getHbaseUserInfo(rowkey); } } |
|---|
Dao层
package com.wedoctor.demo.dao; import org.apache.hadoop.conf.Configuration; import org.apache.hadoop.hbase.; import org.apache.hadoop.hbase.client.; import org.apache.hadoop.hbase.util.Bytes; import org.springframework.stereotype.Repository; import java.io.IOException; @Repository public class UserDao { Table table = null; public UserDao() throws IOException { System.setProperty(“HADOOP_USER_NAME”, “root”); Configuration conf = HBaseConfiguration.create(); conf.set(“fs.defaultFS”, “hdfs://test”); conf.set(“hbase.zookeeper.quorum”, “192.168.1.111,192.168.1.222,192.168.1.333”); Connection conn = ConnectionFactory.createConnection(conf); table = conn.getTable(TableName.valueOf(“user_info”)); } public String getHbaseUserInfo(String rowkey) throws Exception{ Get get = new Get(Bytes.toBytes(rowkey)); Result result = table.get(get); /CellScanner cellScanner = result.cellScanner(); String res = null; while(cellScanner.advance()){ Cell cell = cellScanner.current(); byte[] valueBytes = CellUtil.cloneValue(cell); res = new String(valueBytes); } return res;/ // 从结果中取用户指定的某个key的value String name = Bytes.toString(result.getValue(Bytes.toBytes(“info”), Bytes.toBytes(“user_name”))); System.out.println(name); return name; } } |
|---|
测试类
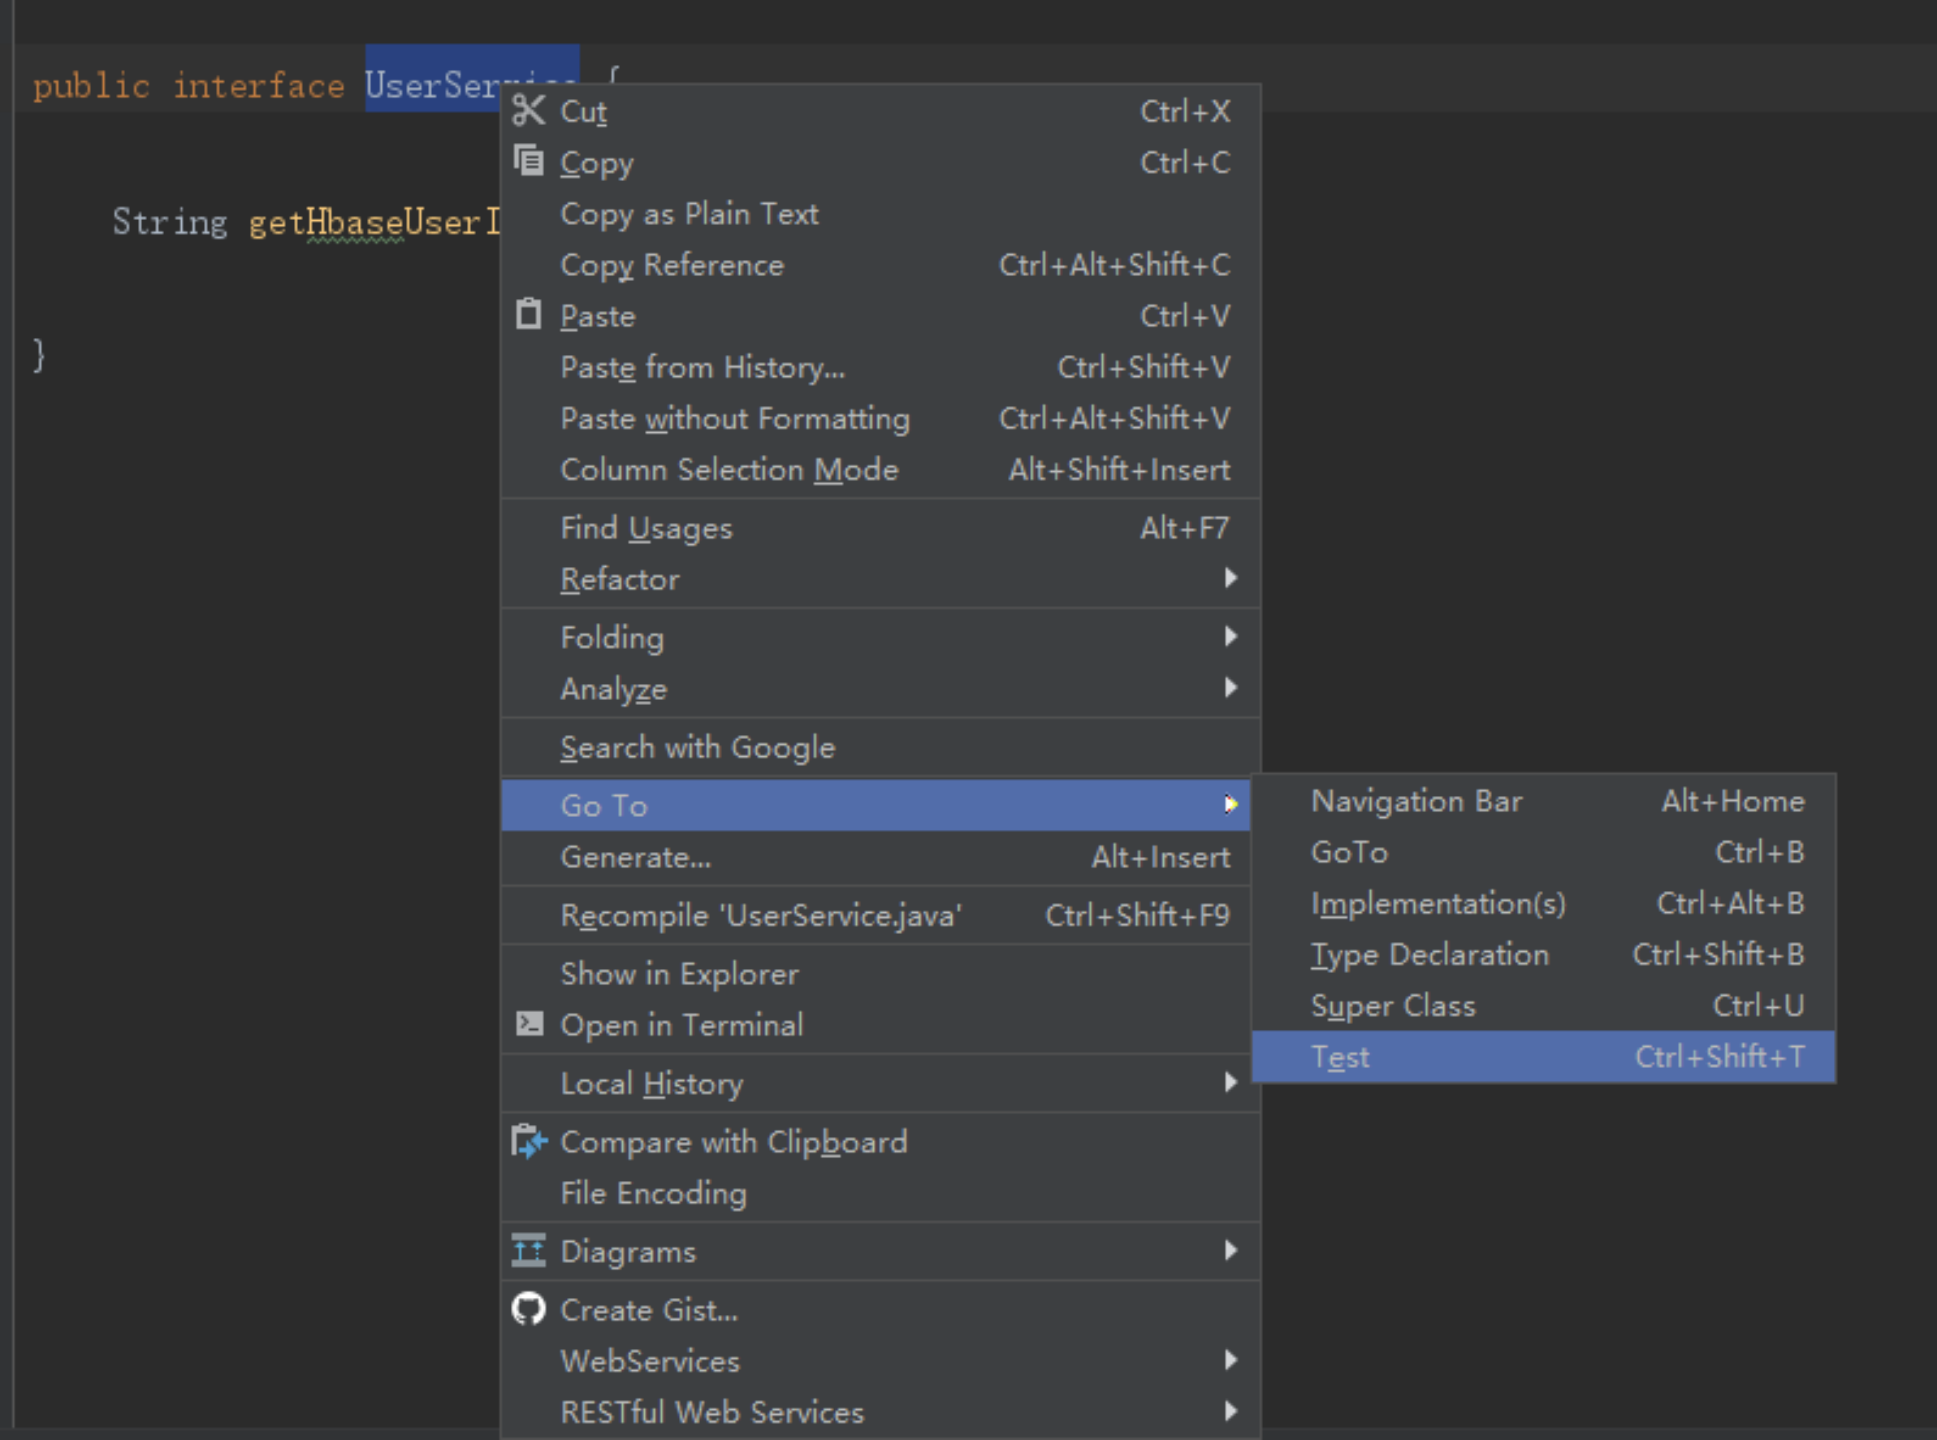
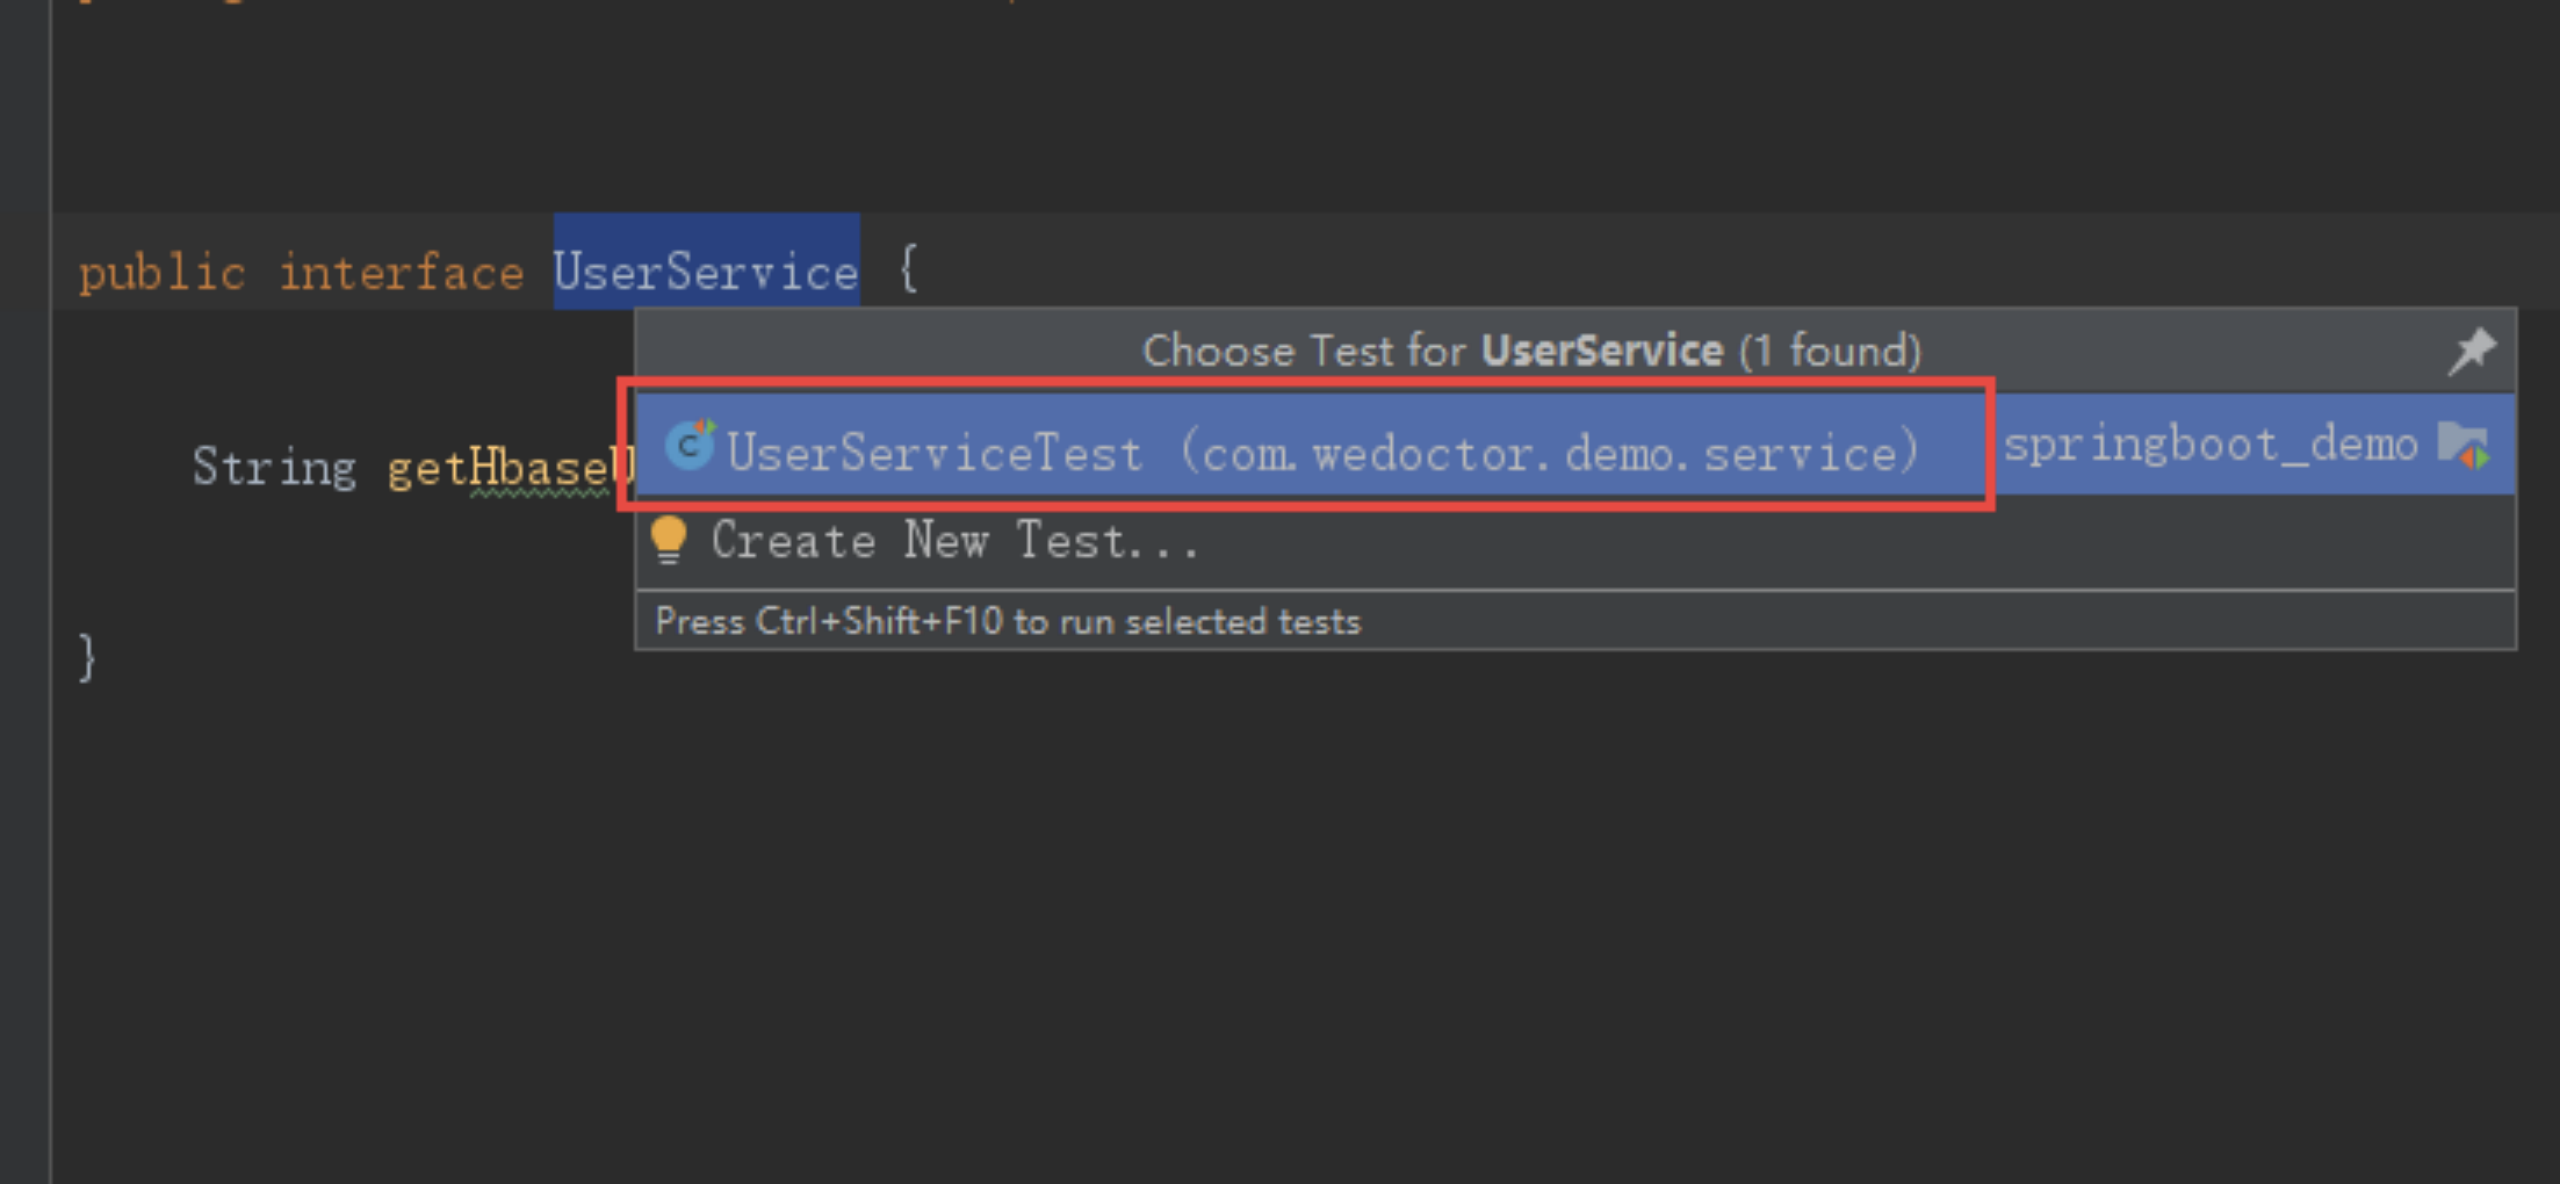
| package com.wedoctor.demo.service; import org.junit.jupiter.api.Test; import org.junit.runner.RunWith; import org.springframework.beans.factory.annotation.Autowired; import org.springframework.boot.test.context.SpringBootTest; import org.springframework.test.context.junit4.SpringRunner; import static org.junit.jupiter.api.Assertions.*; @RunWith(SpringRunner.class) @SpringBootTest class UserServiceTest { @Autowired //@Qualifier(“userInfo”) UserService UserService; @Test public void test() throws Exception { UserService.getHbaseUserInfo(“1”); } } |
|---|
接口访问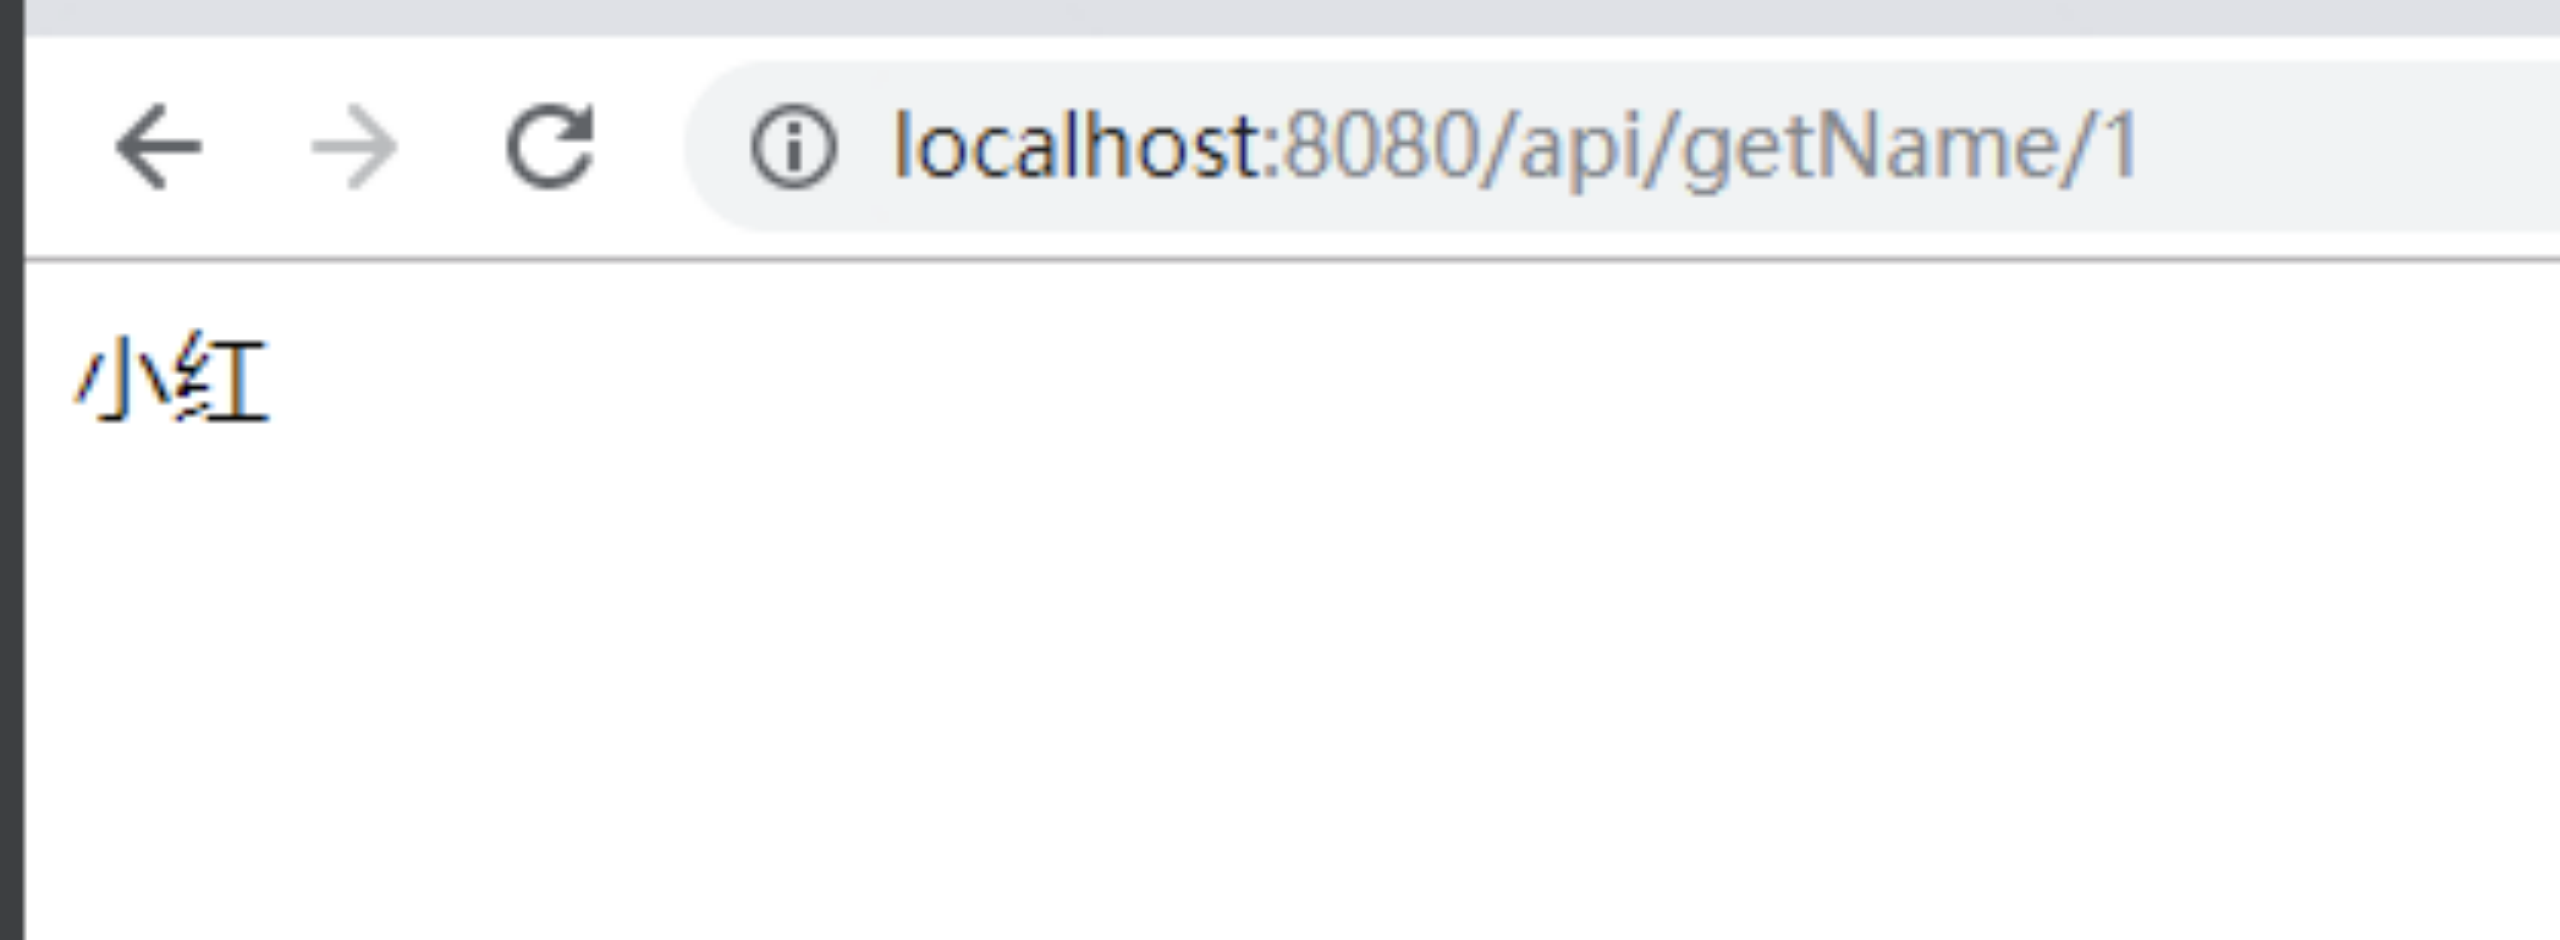
十HBase二级索引涉设计思想
10.1为什么需要创建二级索引
HBase对于多条件组合查询这种应用场景是非常不占优势的,甚至可以说就是其短板,一般情况下,我们有两种方式查询Hbase中的数据
通过Rowkey查询数据,Rowkey里面会组合固定查询条件,但是需要把多组合查询的字段都拼接在Rowkey中,这是不可能的。
通过Scan全部扫描符合条件的数据,这样的效率是非常低的
所以这时候我们就需要用建立二级索引的方法来解决这个问题
10.2二级索引原理

如上图所示,Hbase表中的字段为Rowkey,age,sex,username,phone,目前的需求是需要按照age,sex,username,phone随机组合查询符合条件的数据。
这时候我们就需要用ES来建立二级索引了,原始数据存在HBase中,索引存在ES中,如下图所示: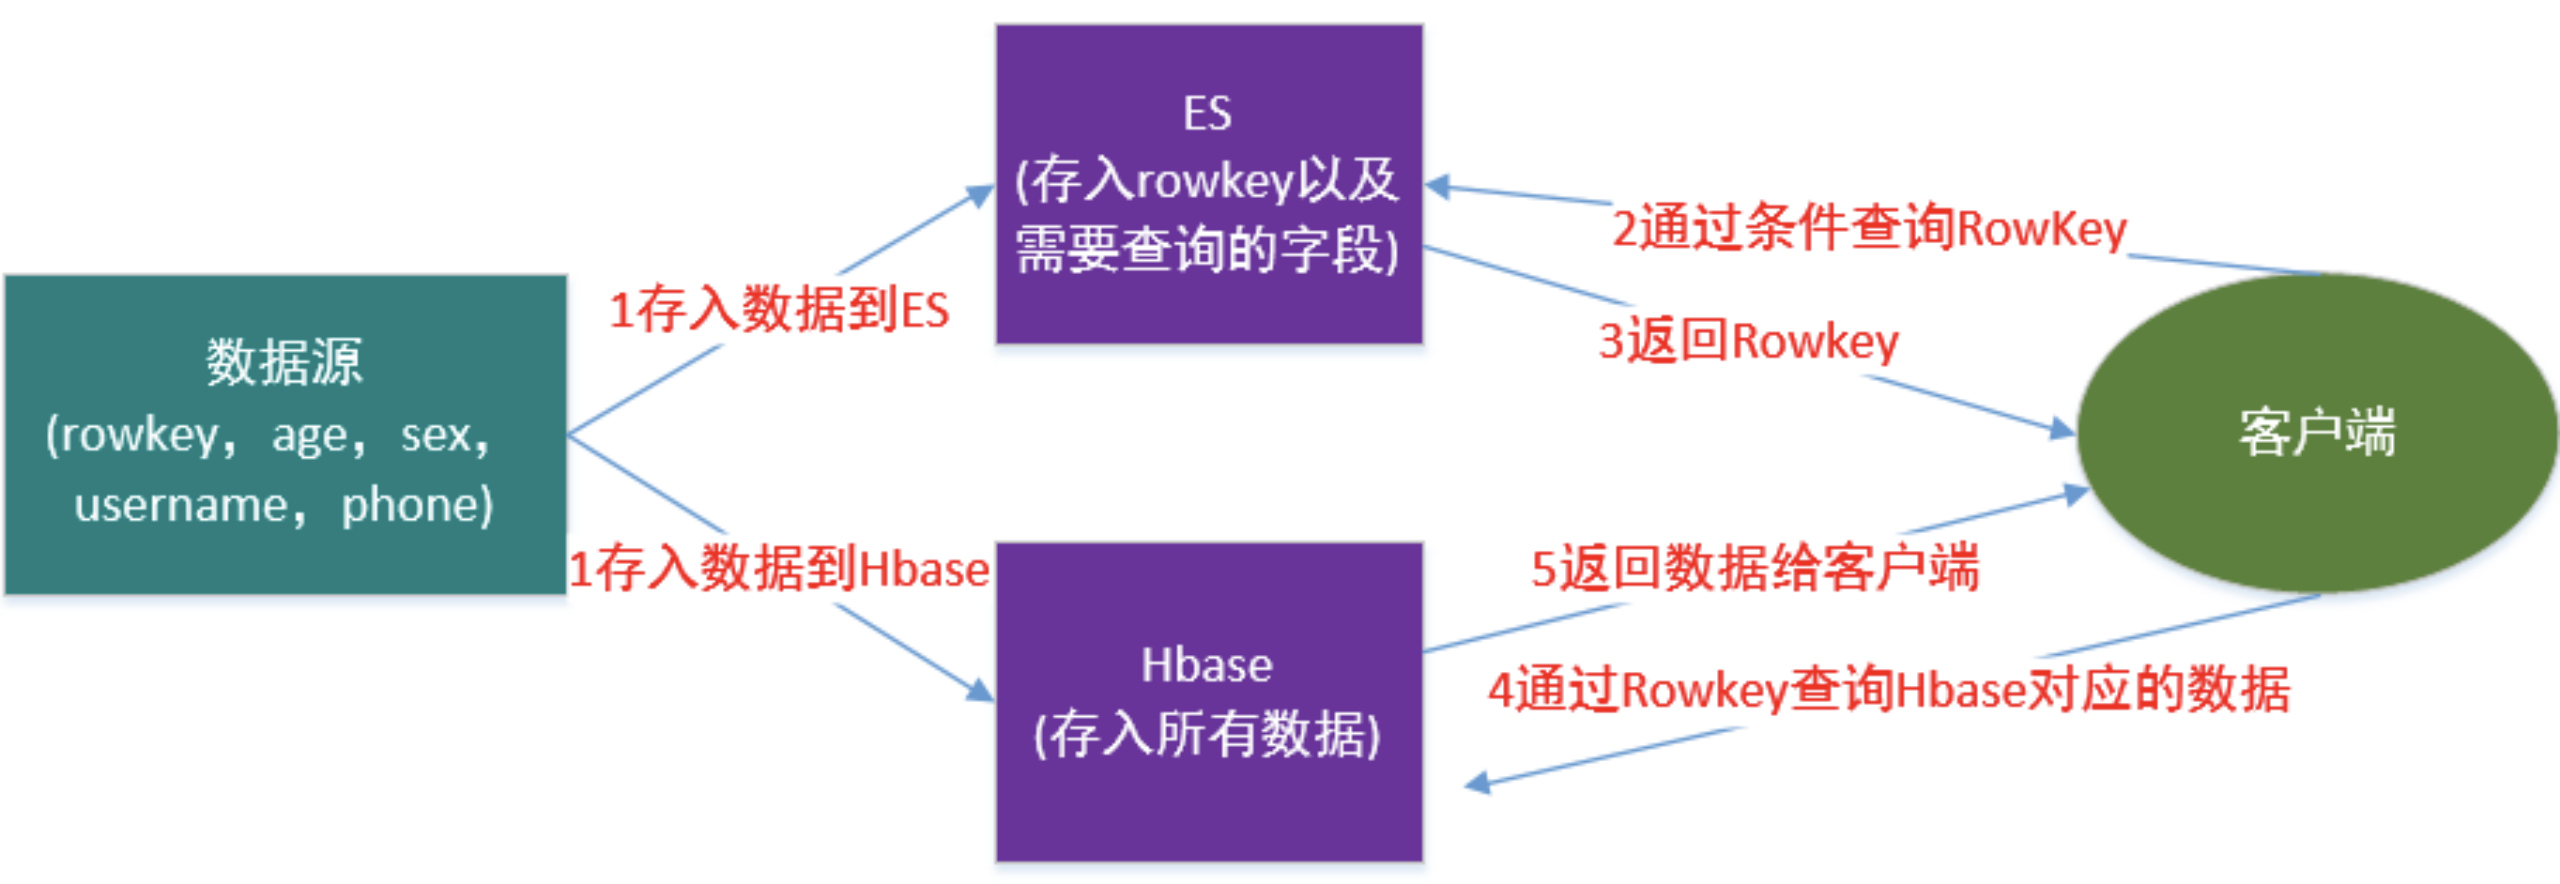
原理流程
- 将原始数据存入HBase
2. 将需要查询的条件字段及Rowkey存入ES
3. 客户端发送请求会根据组合查询条件去ES中查找到对应的RowKey
4. ES返回RowKey给客户端
5. 客户端根据ES返回的结果(RowKey)查询HBase数据
6. HBase返回符合条件的数据给客户端
十一phoenix操作HBase
Phoenix,由saleforce.com 开源的一个项目,后又捐给了Apache。它相当于一个Java 中间件,帮助开发者,像
使用jdbc 访问关系型数据库一样,访问NoSql 数据库HBase。
Apache Phoenix 与其他Hadoop 产品完全集成,如Spark,Hive,Pig,Flume 和MapReduce。
11.1安装pheonix
下载pheonix
http://phoenix.apache.org/download.html
注意:下载Phoenix 的时候,请注意对应的版本,其中4.14 版本可以运行在HBase0.98、1.1、1.2、1.3、1.4 上。
下载时也可以直接使用:
wget http://mirrors.shu.edu.cn/apache/phoenix/apache-phoenix-4.14.0-HBase-1.2/bin/apache-phoenix-4.14.0-HBase-1.2-bin.tar.gz
解压pheonix
tar -zxvf apache-phoenix-4.14.0-HBase-1.2-bin.tar.gz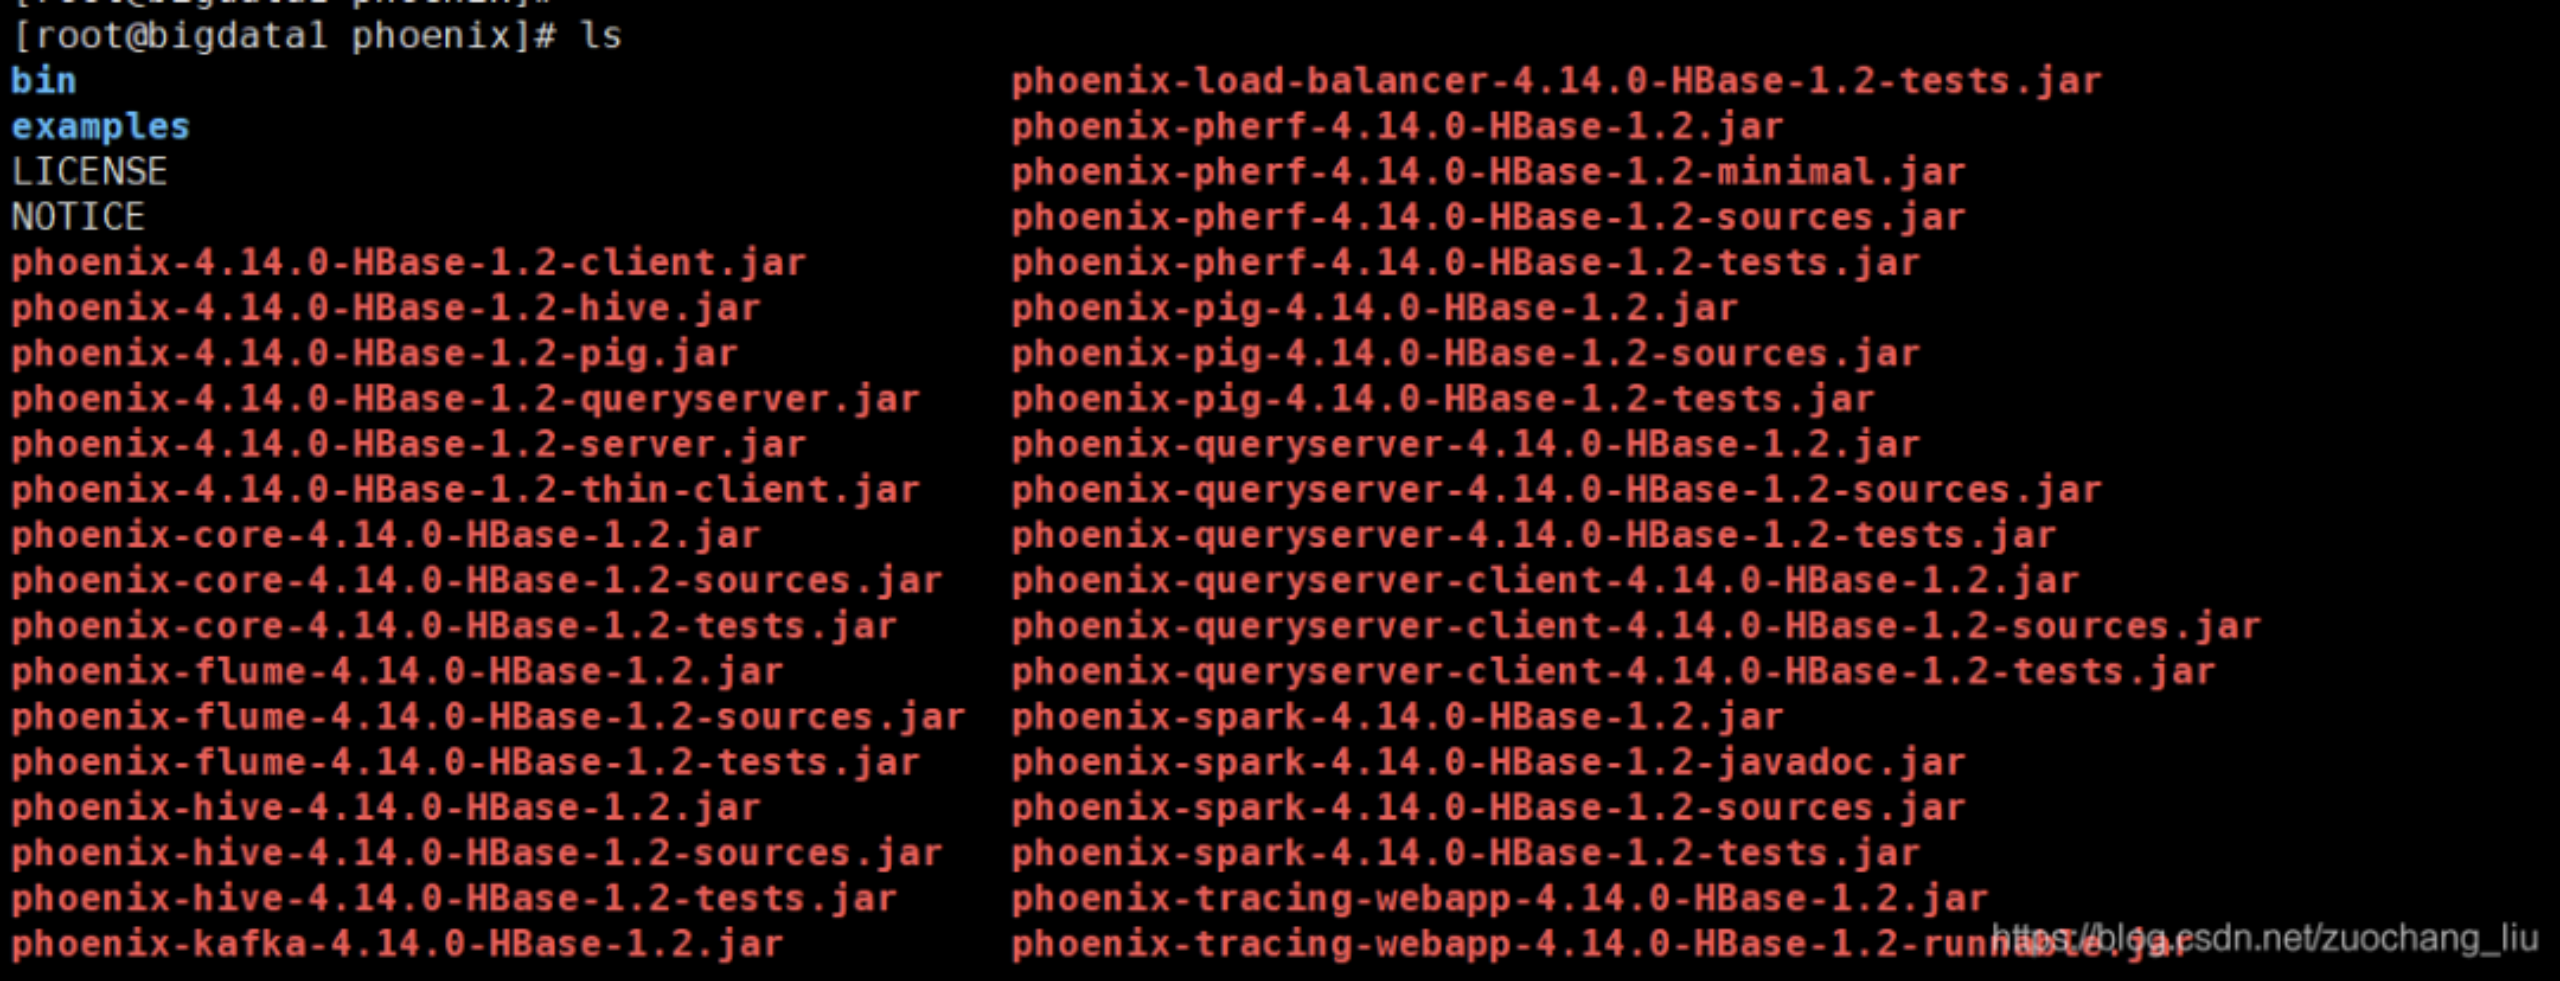
11.2 整合phoenix到hbase
查看Phoenix 下的所有的文件,将phoenix-4.14.0-HBase-1.2-server.jar 拷贝到所有HBase 节点(包括Hmaster以及HregionServer)的lib 目录下:
重启HBase:bin/stop-hbase.shbin/start-hbase.sh
11.3 使用phoenix SQL命令行
进入Phoenix 的安装包,执行:
bin/sqlline.py bigdata1:2181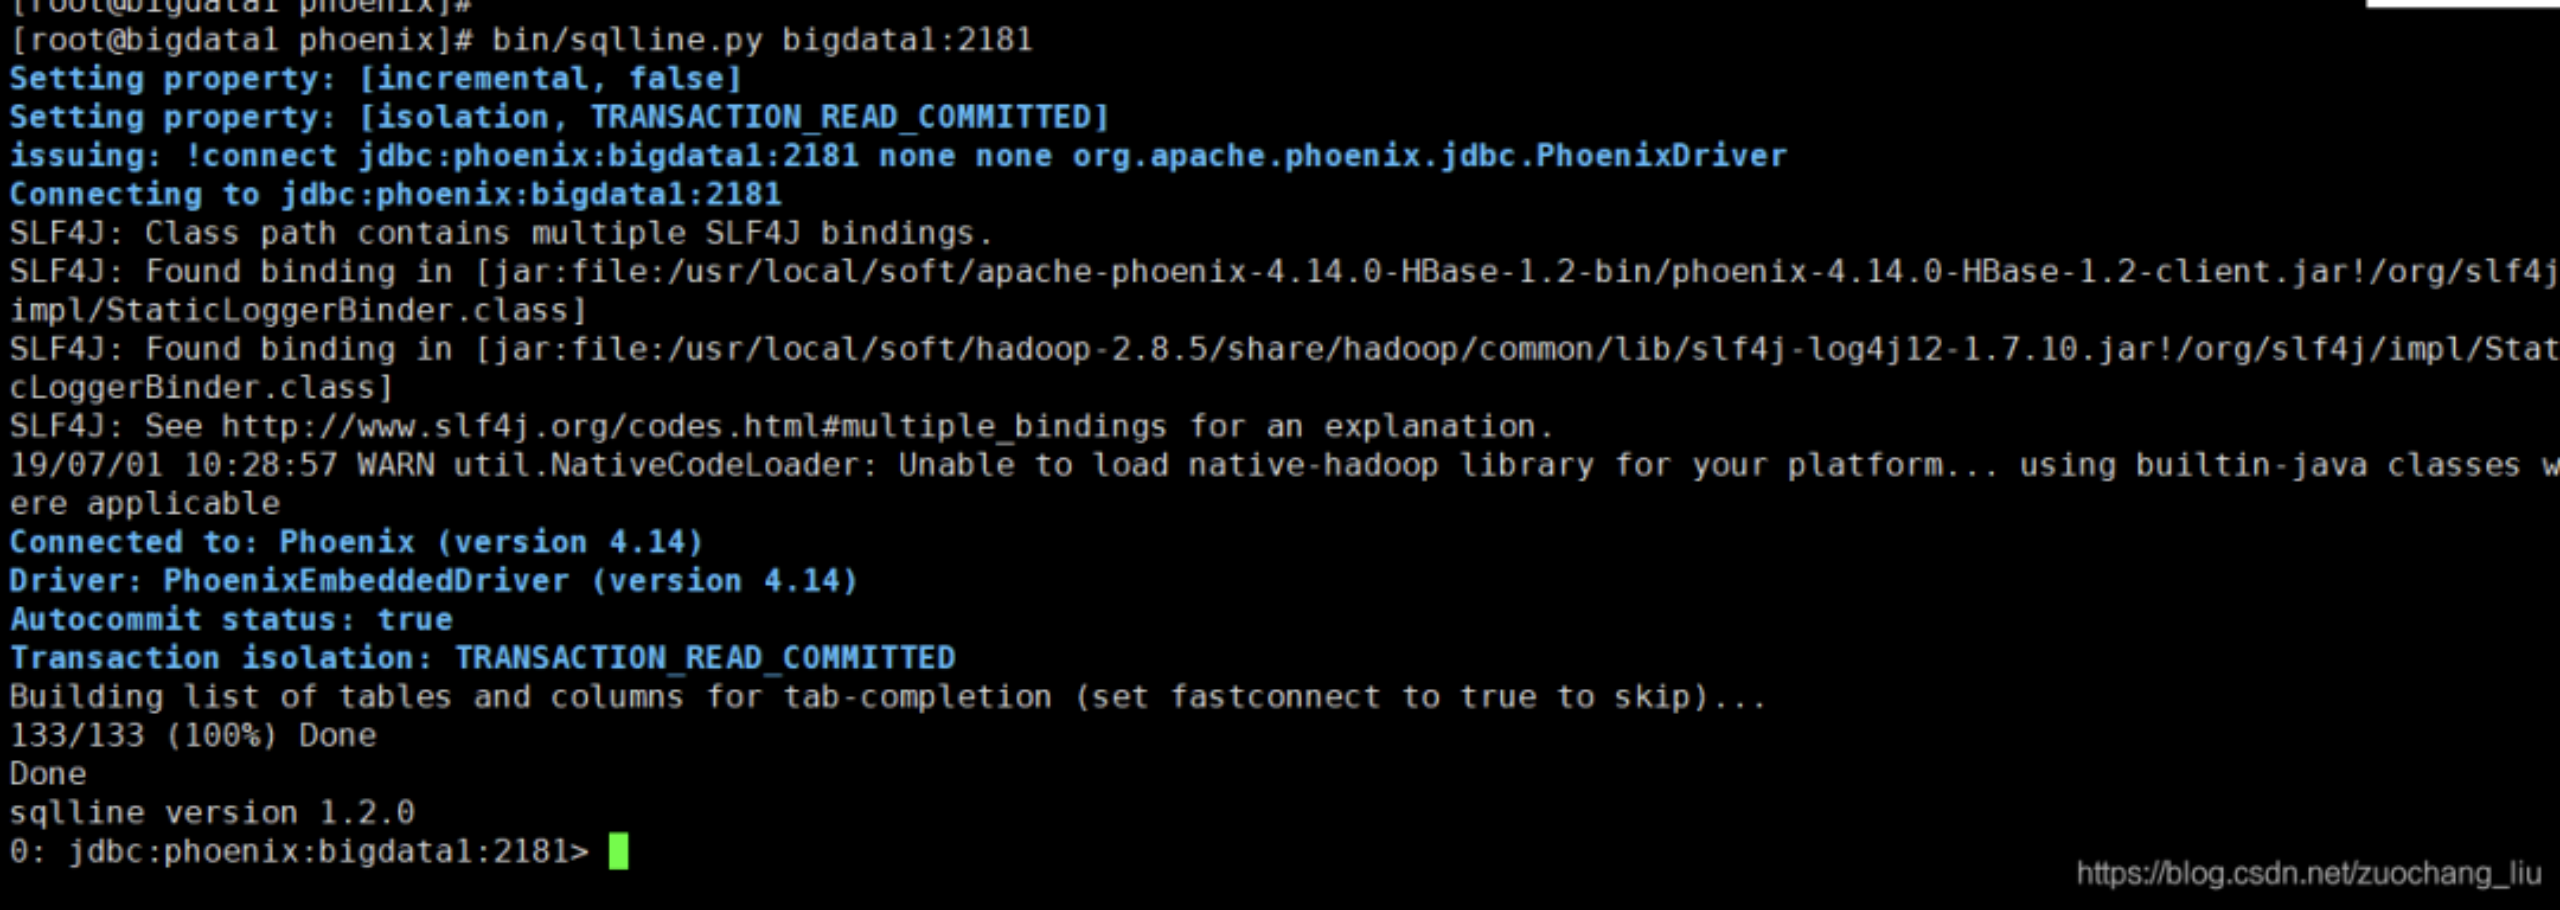
创建表
在Phoenix 终端下创建us_population 表: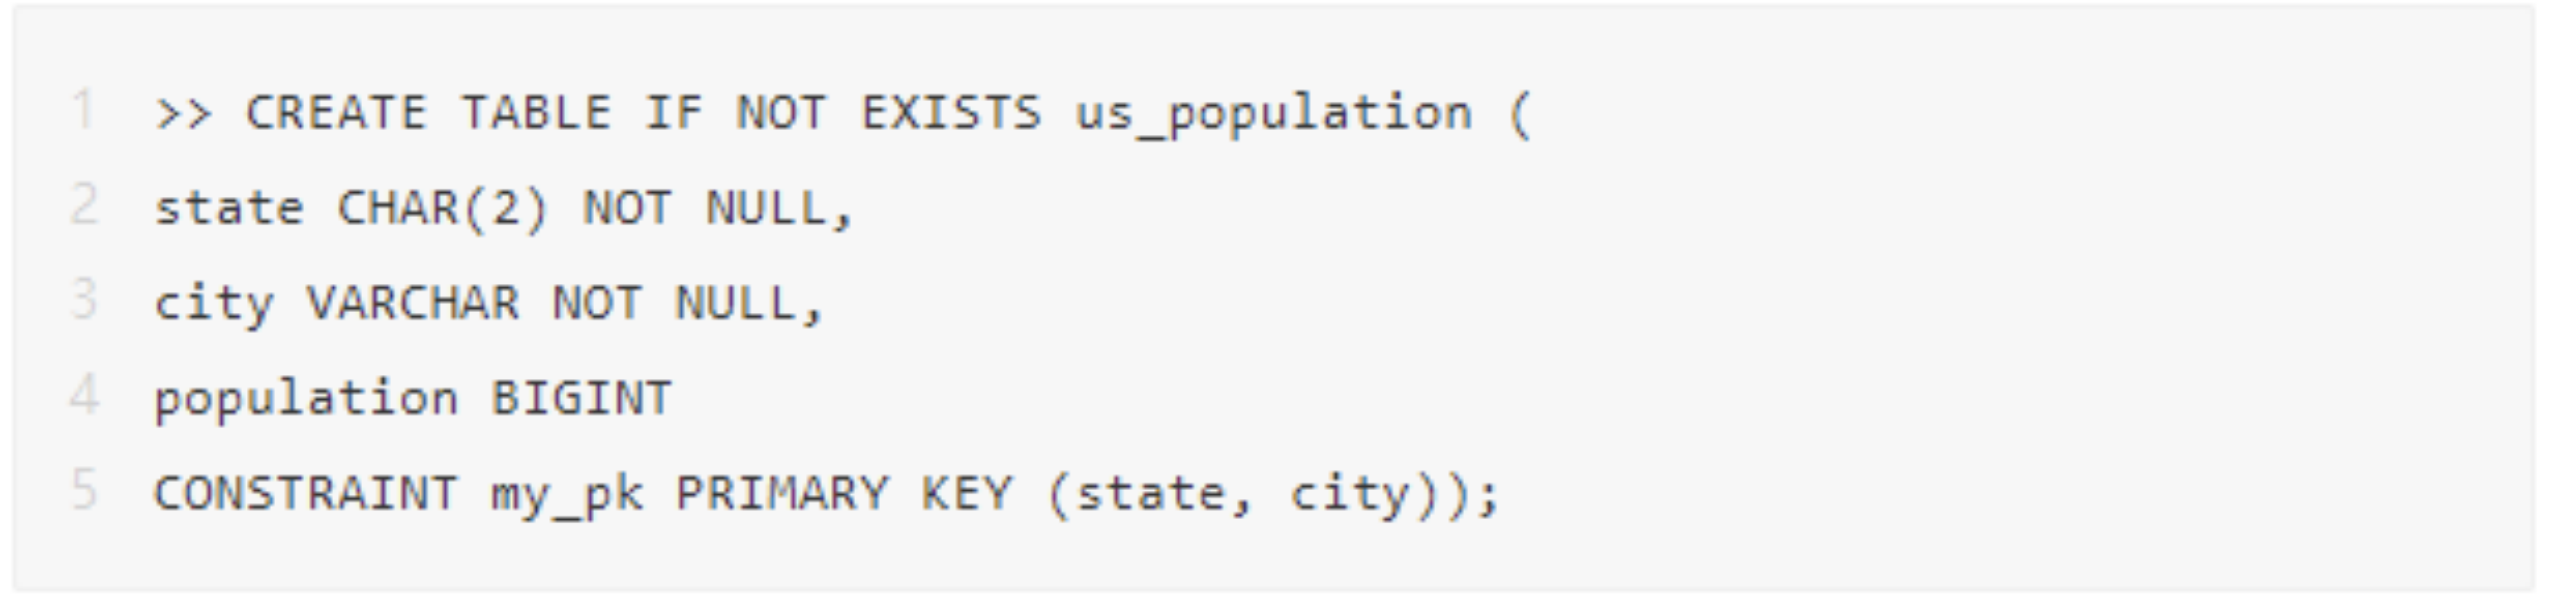
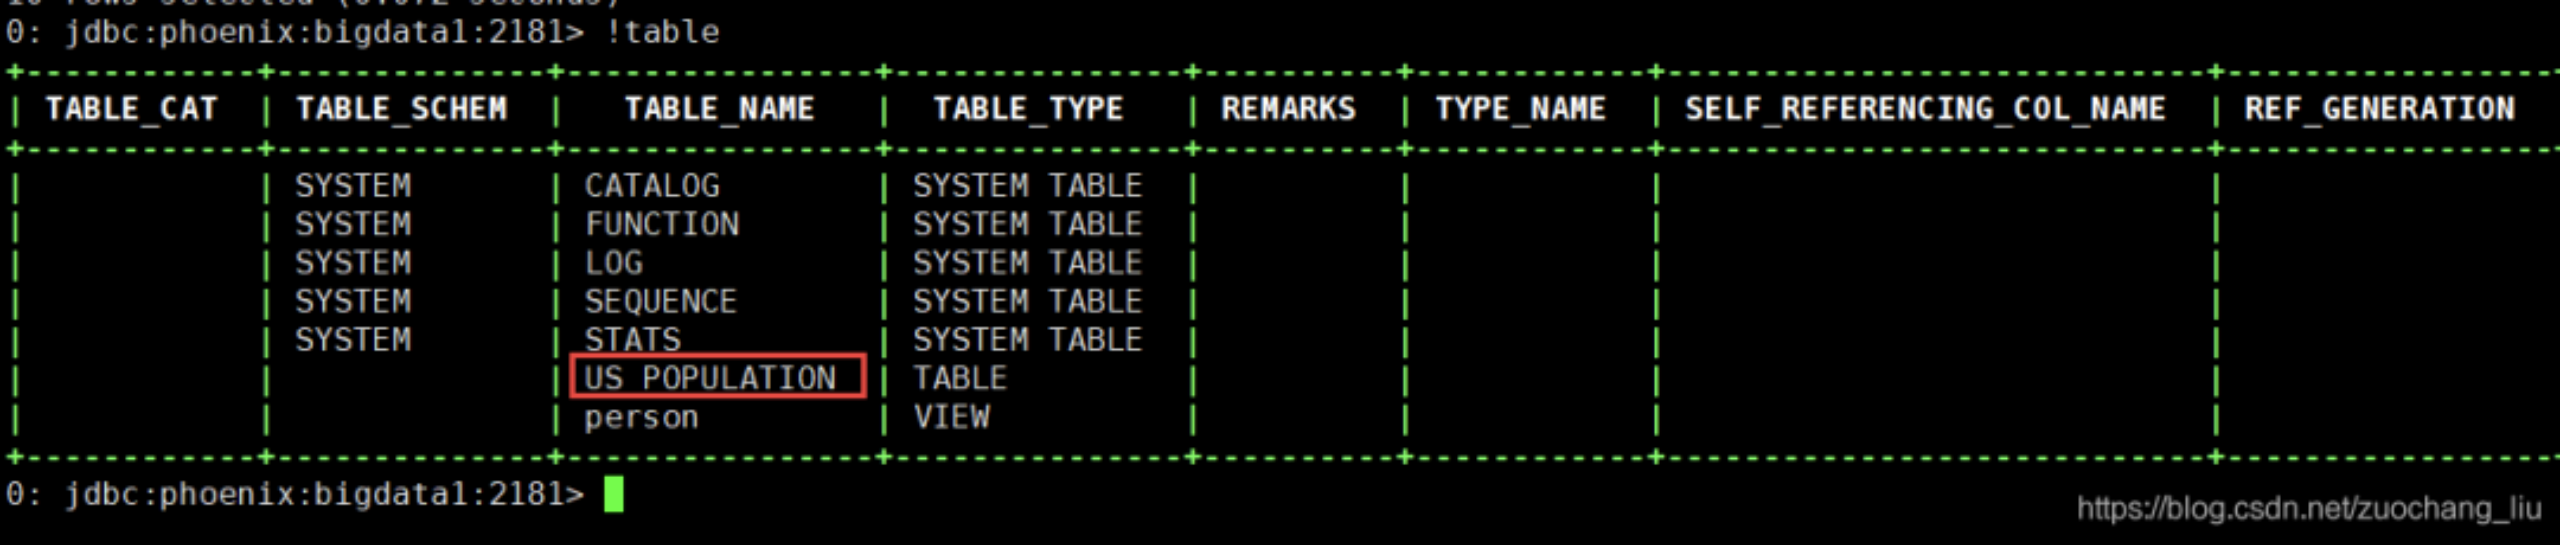
使用!tables 查看创建的表:
| >> !tables |
|---|
编辑并导入数据
在Phoenix 目录下创建一个data 目录,在data 目录下创建:
vi us_population.csv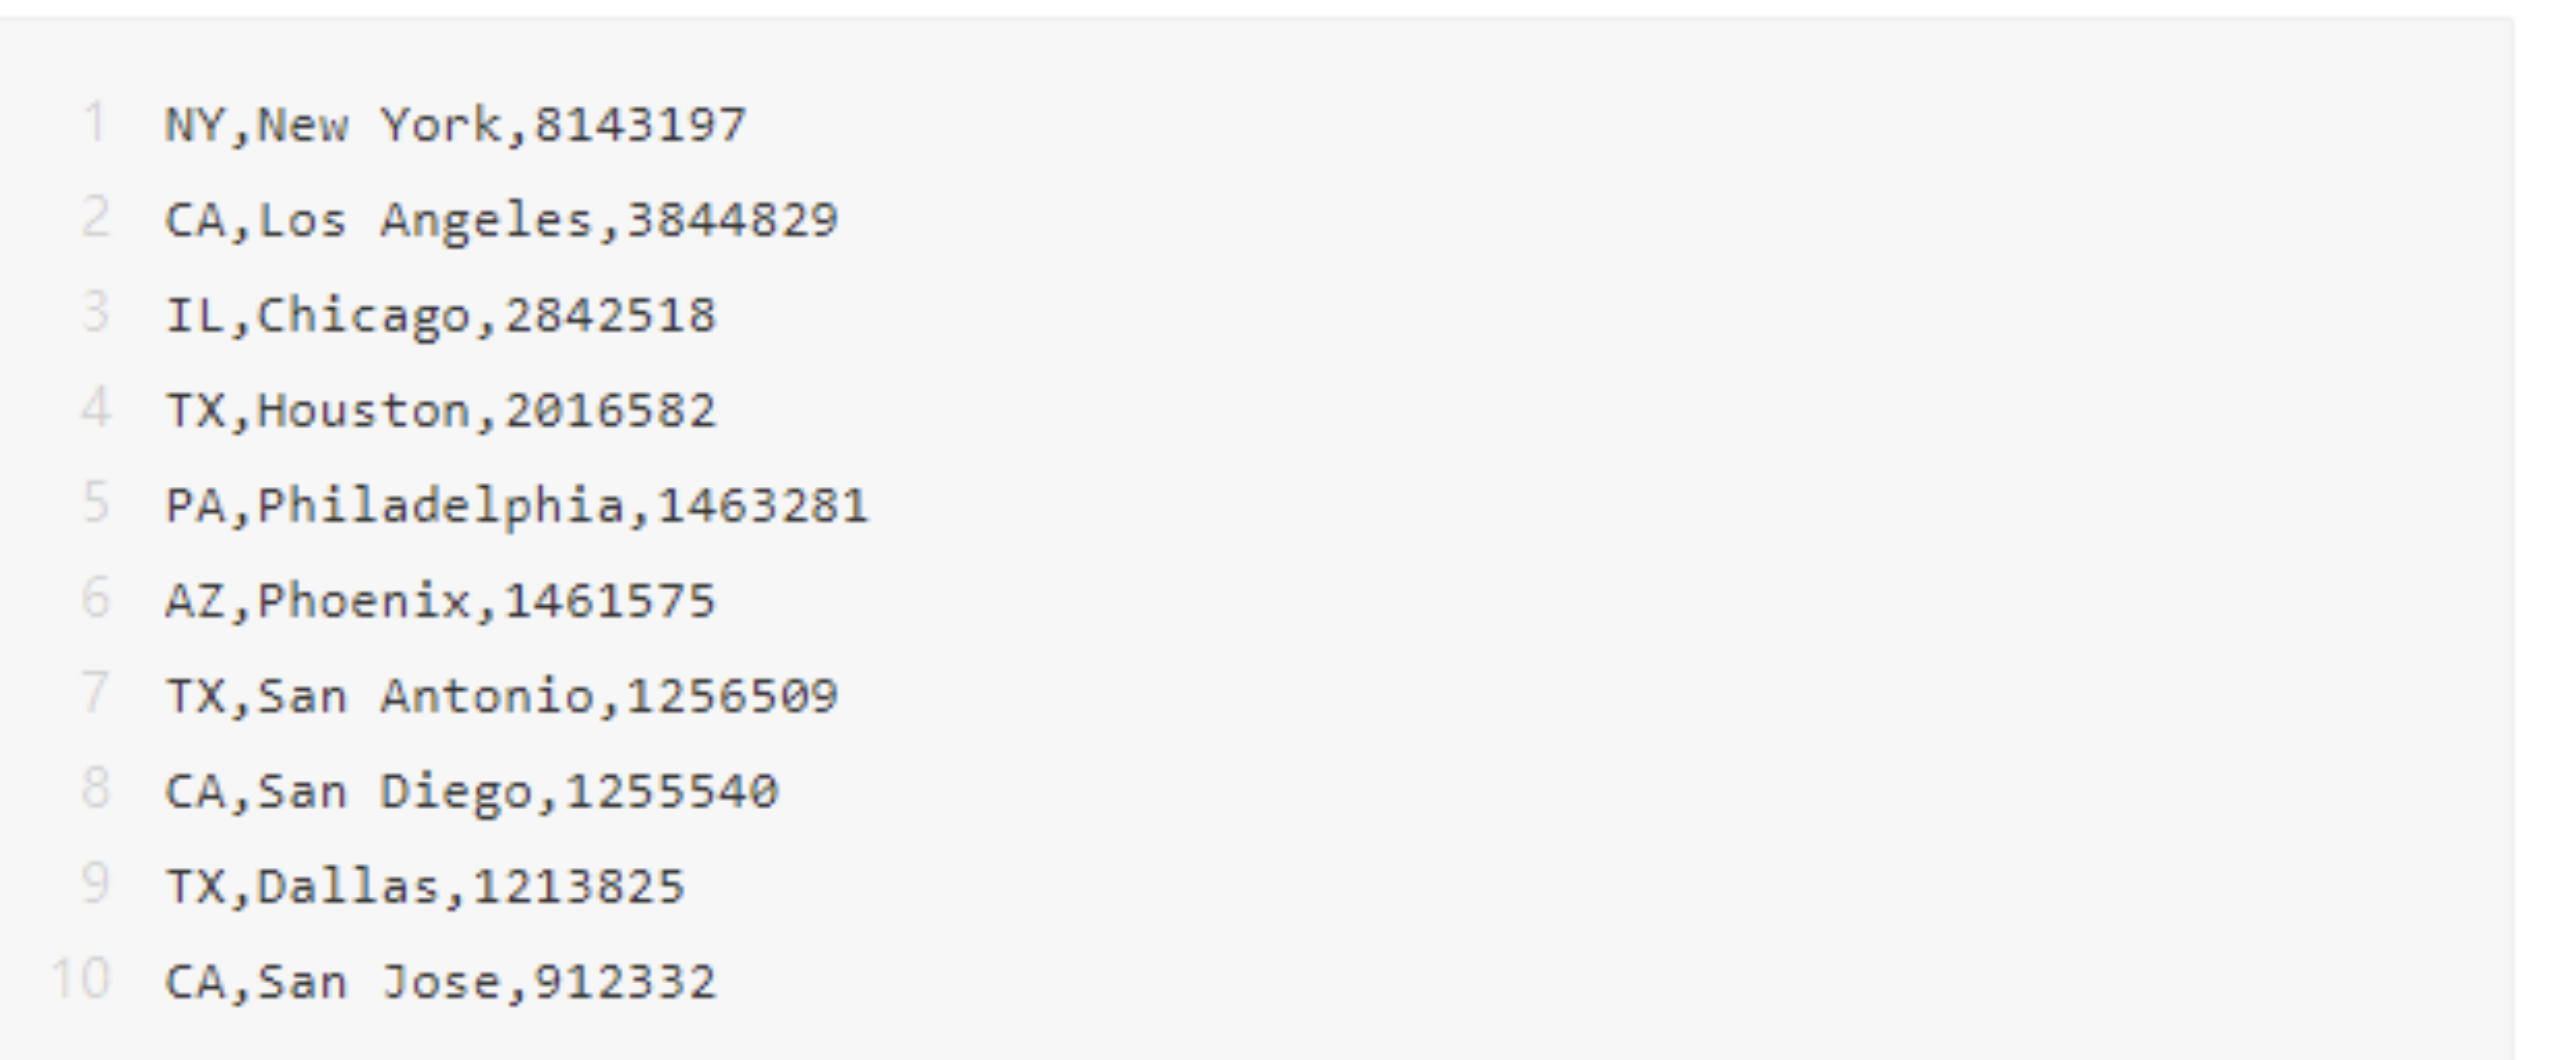
执行bin/psql.py data/us_population.csv 导入数据。
# 除了导入数据外,还可以使用Phoenix 的语法插入数据:upsert into us_population values(‘NY’,’NewYork’,8143197);
1.4.3 查询数据
方式一:在data 目录下创建us_population_queries.sql 文件:
| SELECT state as “State”,count(city) as “City Count”,sum(population) as “Population Sum” FROM us_population GROUP BY state ORDER BY sum(population) DESC; |
|---|
执行bin/psql.py data/us_population_queries.sql 检索数据。
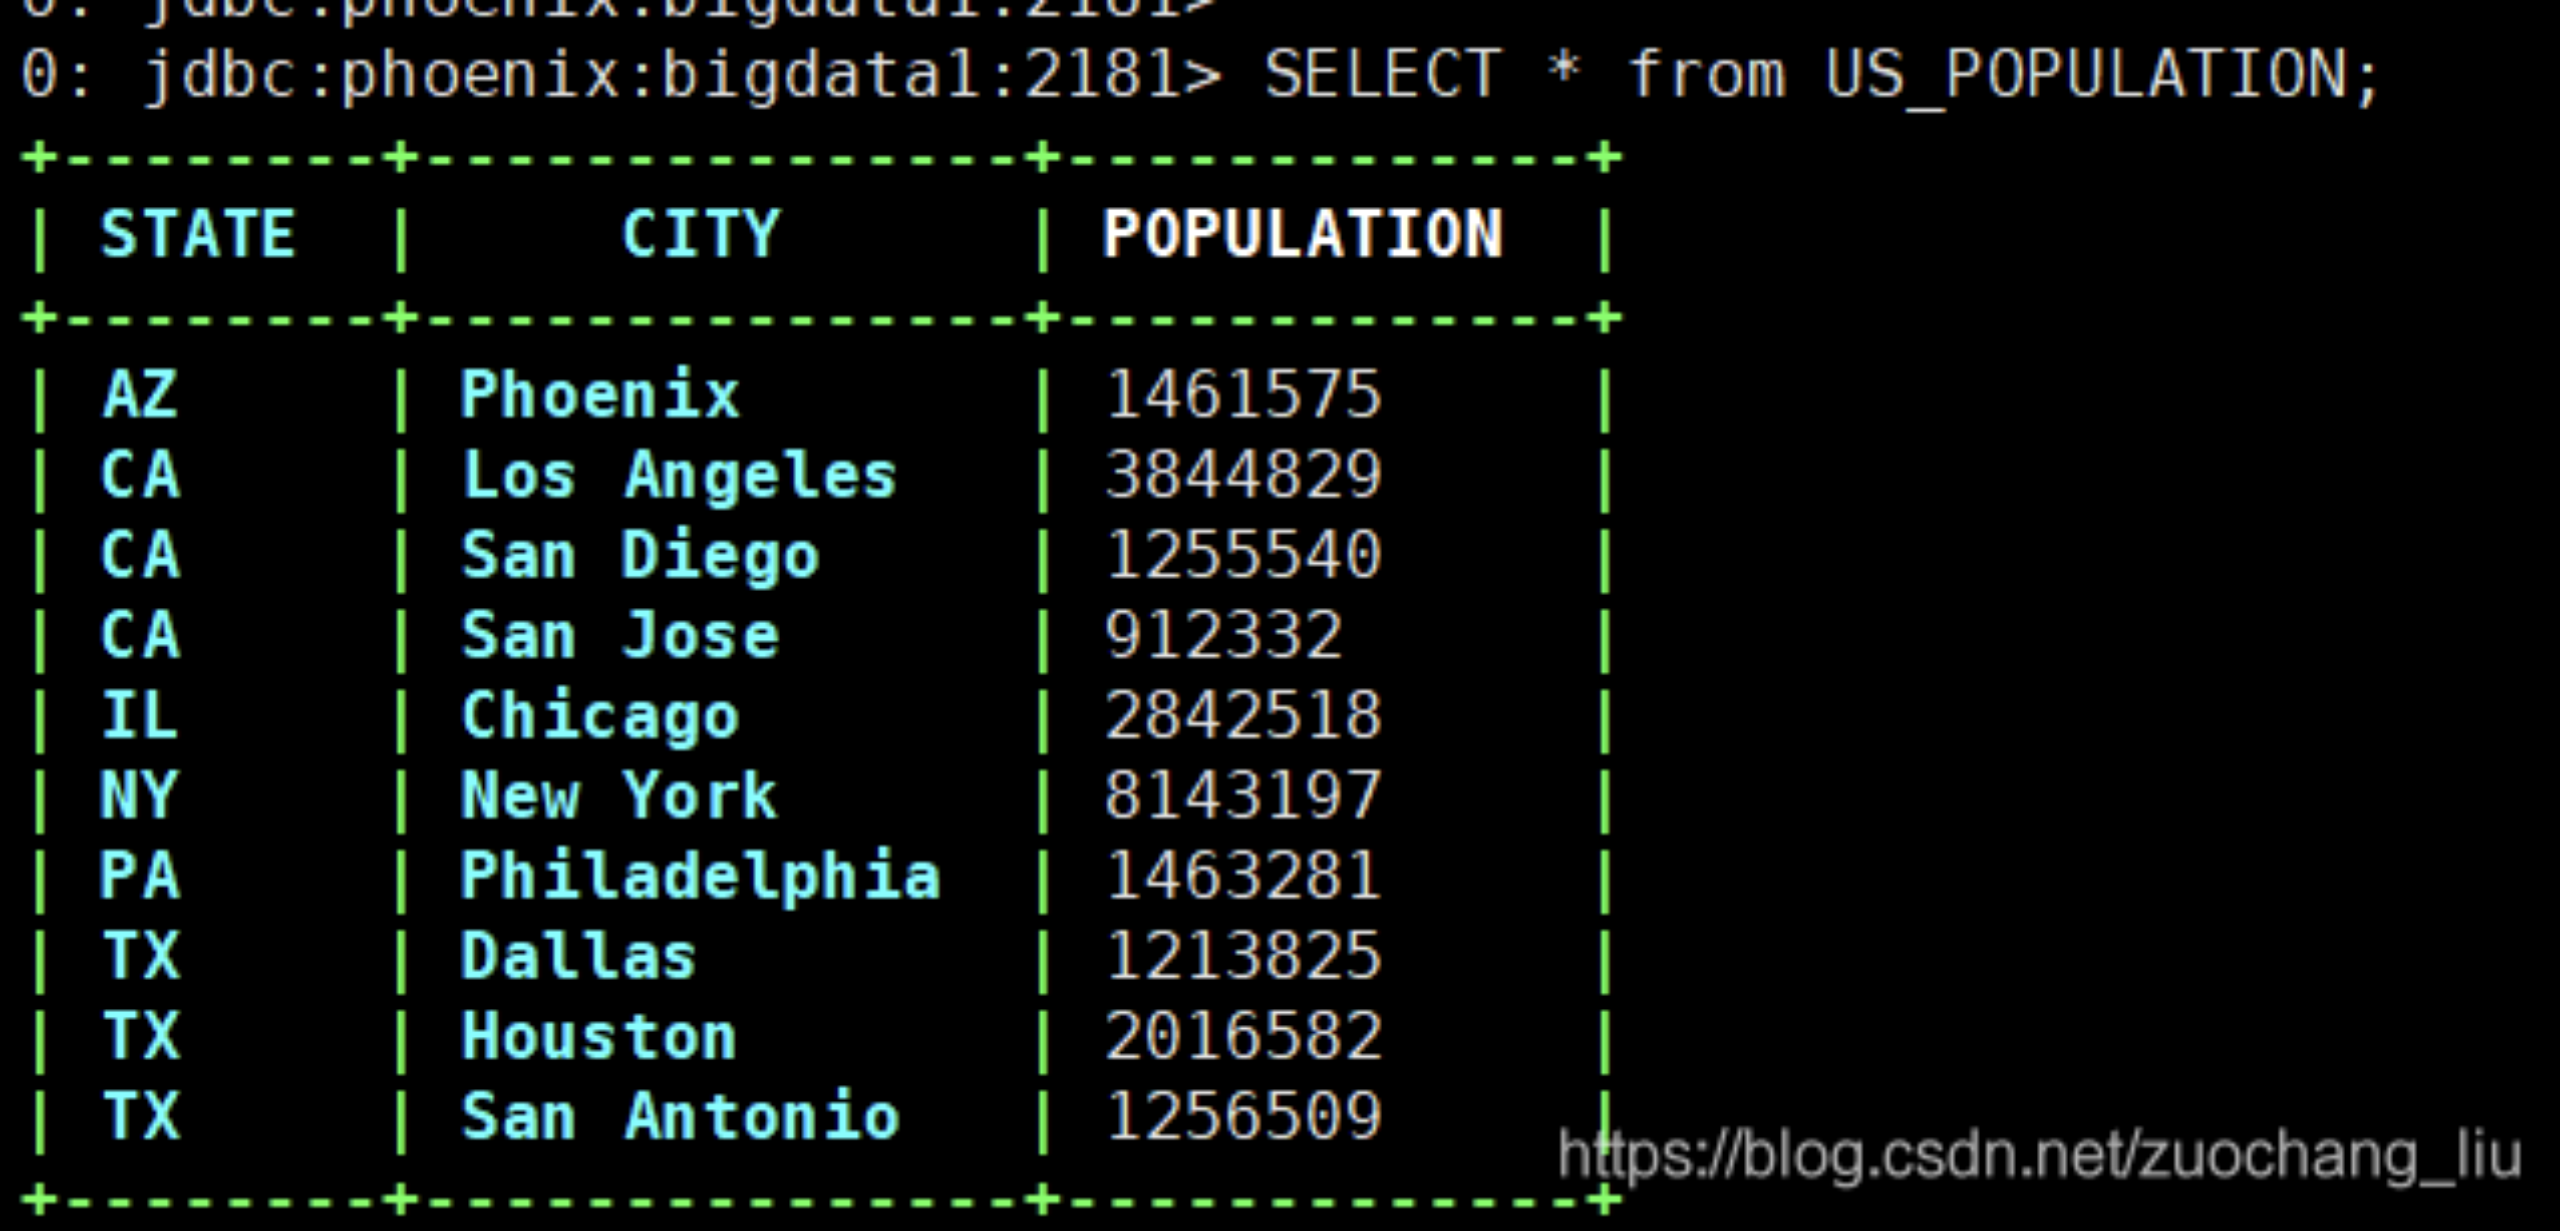
方式二:使用命令行终端
| bin/sqlline.py bigdata1:2181 >> select * from us_populcation; |
|---|
11.4 Squirrel-sql 连接Phoenix
11.4.1下载Squirrel-sql
http://www.squirrelsql.org/#installation
11.4.2设置Squirrel-sql 连接Phoenix
拷贝Phoenix Client jar【phoenix-4.14.0-HBase-1.2-client.jar】到Squirrel-sql 的lib 目录;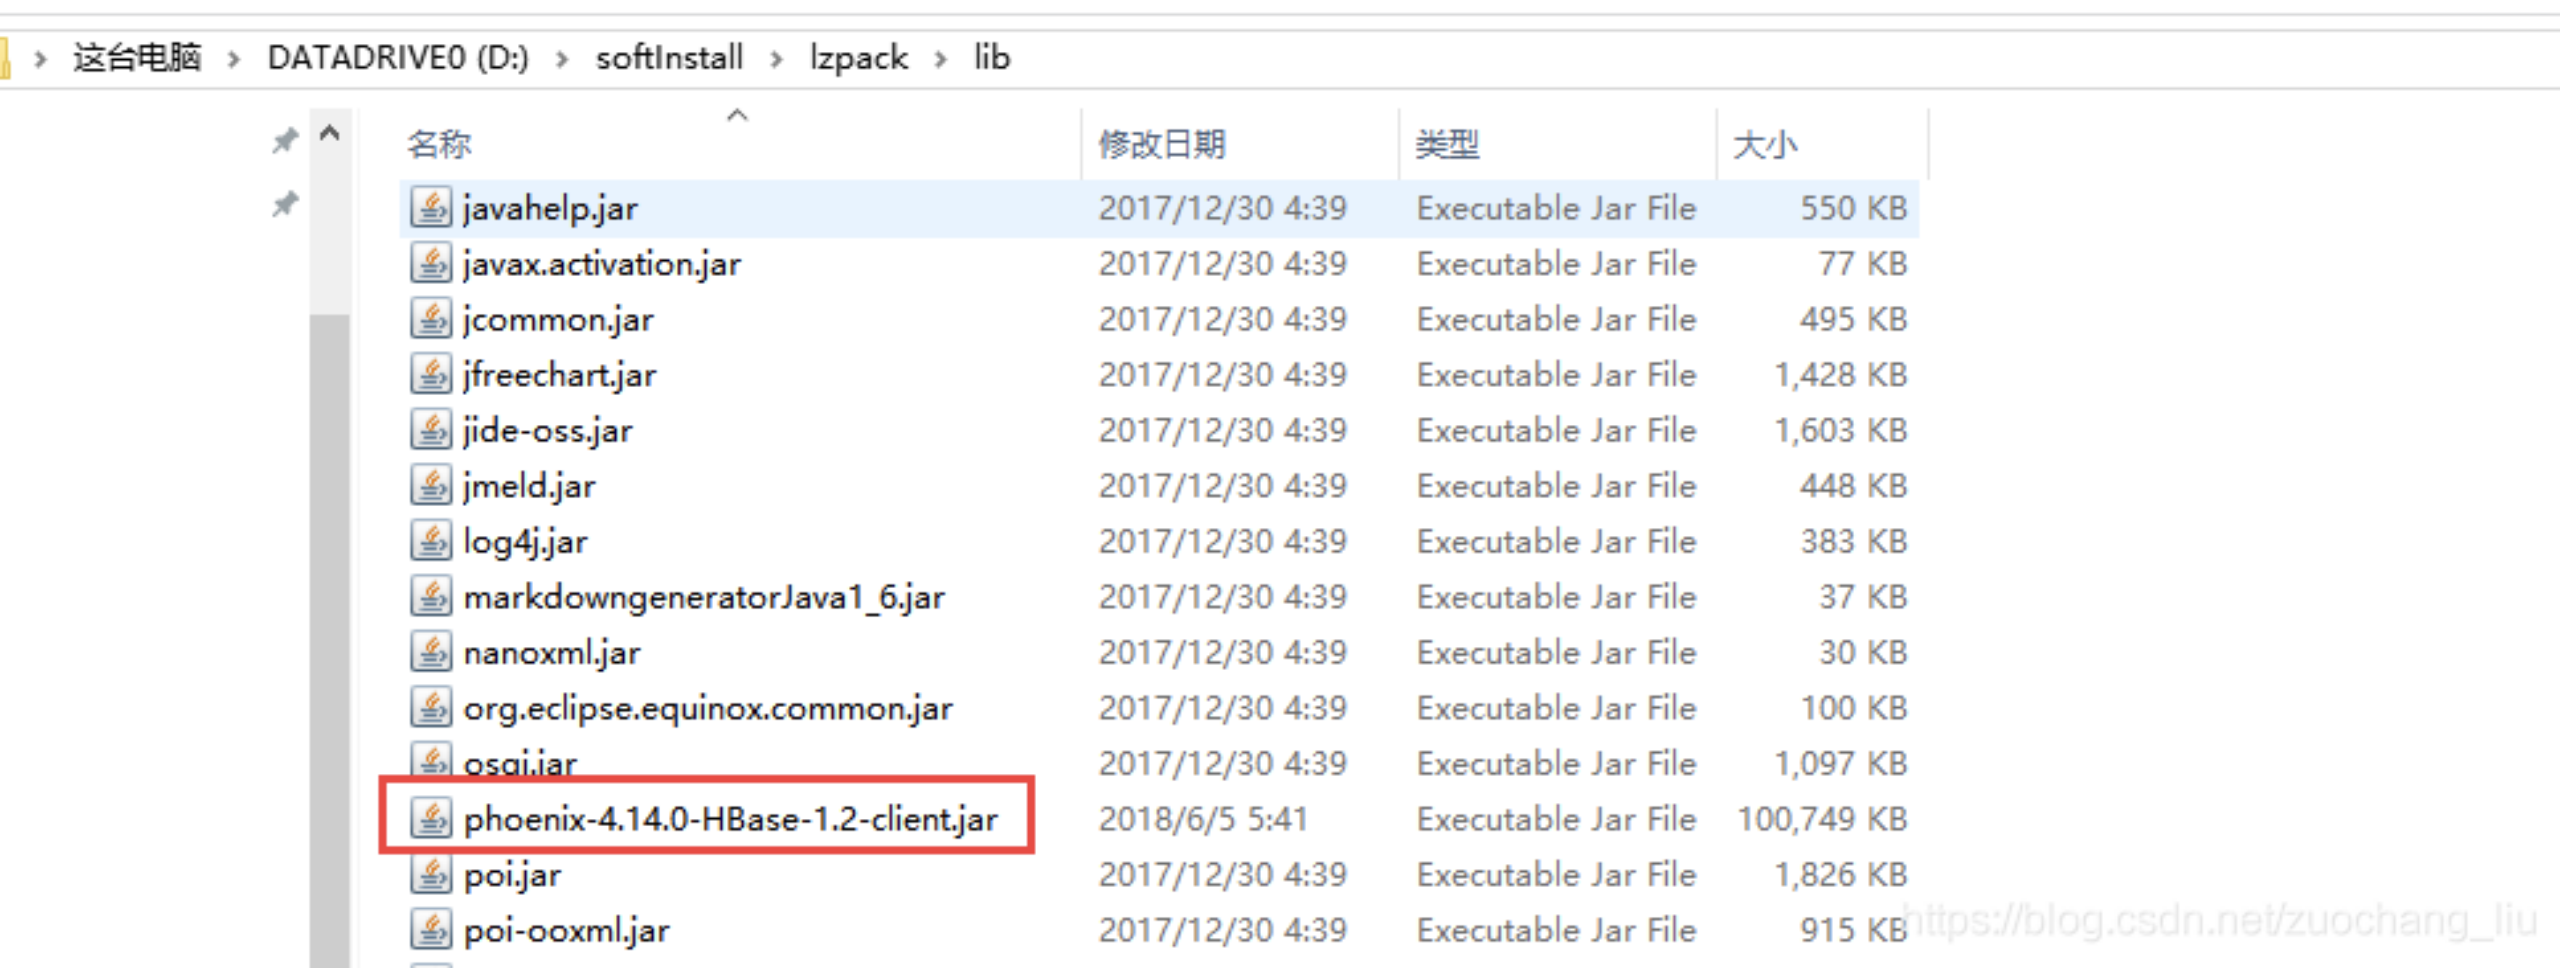
设置Phoenix 连接的Driver 信息,其中localhost 为zookeeper 所在的主机地址,填写一个即可。


11.5 Phoenix 映射Hbase 表
进入Hbase 命令行终端bin/hbase shell
创建Hbase 表’phoenix’:
— 创建Hbase 表Phoenix,列族info
create ‘phoenix’,’info’
— 添加数据
| put ‘phoenix’, ‘row001’,’info:name’,’phoenix’ put ‘phoenix’, ‘row002’,’info:name’,’hbase’ |
|---|
映射HBase 表的方式有两种,一直是视图映射,一种是表映射。
两者的区别就是对HBase 的物理表有没有影响;
删除Phoenix 视图映射不会对Hbase 的表造成影响;
删除Phoenix 表映射会将Hbase 的表也删除;
非必要情况下一般创建视图映射。
11.5.1视图映射
在Phoenix 下创建视图映射HBase 表:
— 创建视图关联映射Hbase 表
| — 创建视图关联映射Hbase 表 create view “phoenix” ( pk VARCHAR primary key, “info”.”name” VARCHAR ); |
|---|
查询创建好的Phoenix 视图: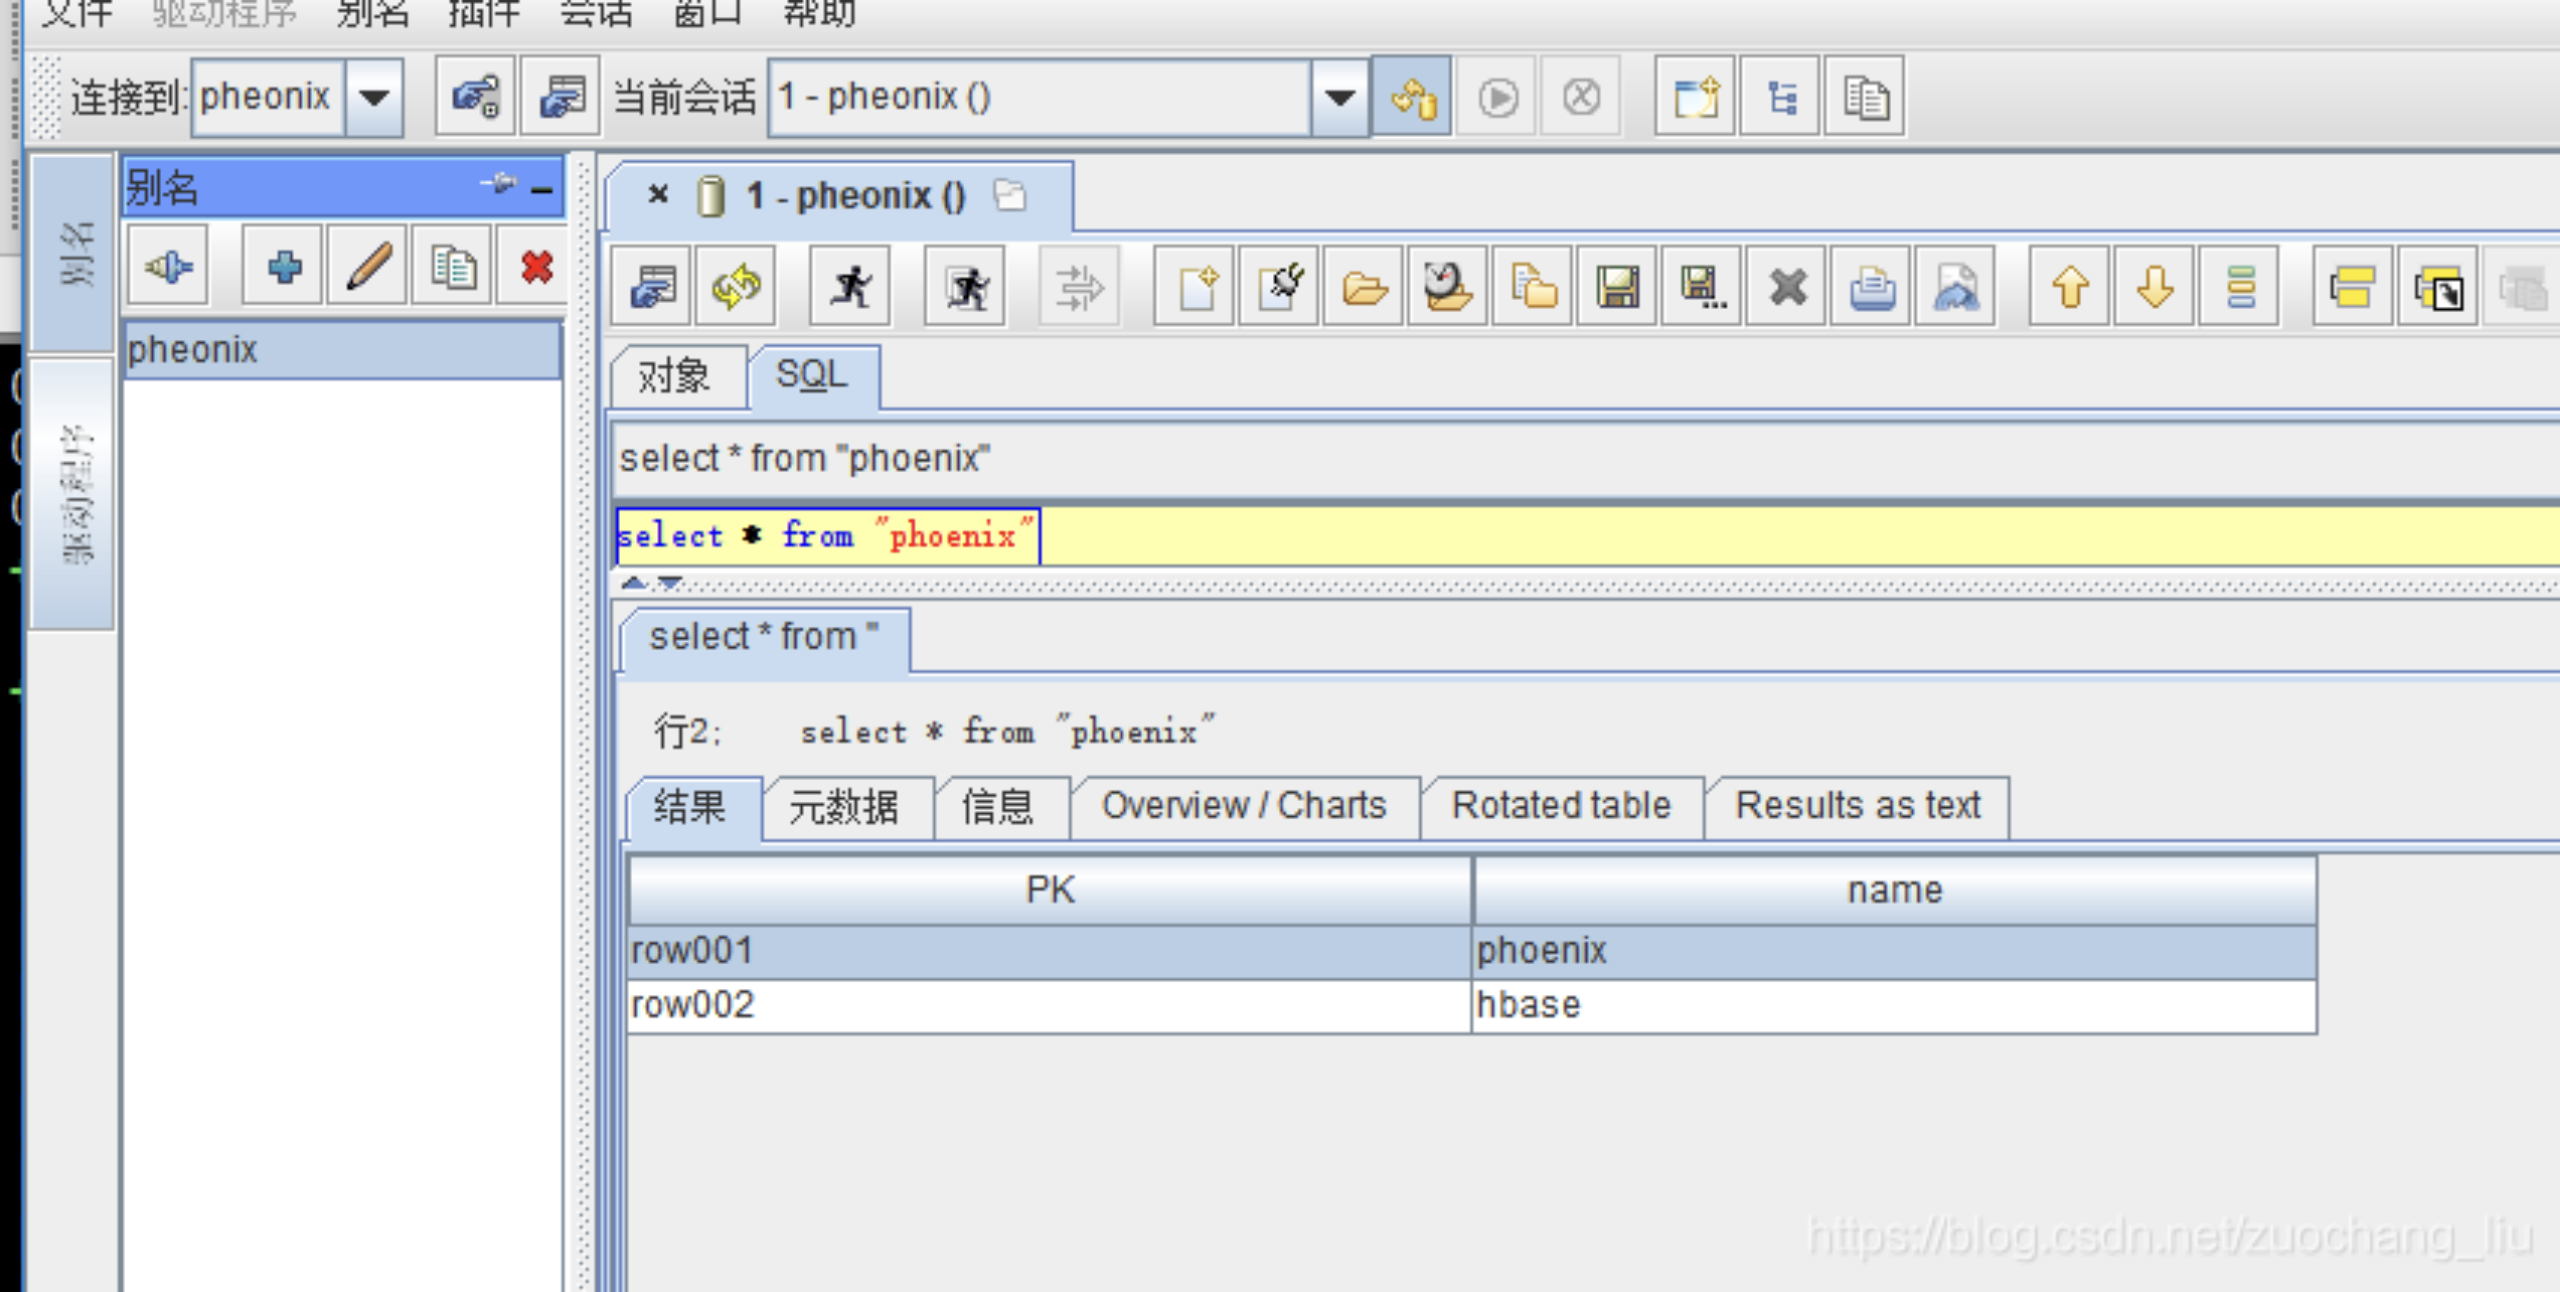
— 删除视图后,在hbase shell 终端下查看phoenix 依然存在
| drop view “phoenix”; |
|---|
11.5.2表映射
在Phoenix 下创建表映射HBase 表:
— 创建表关联映射Hbase 表,4.10 以后Phoenix 优化了列映射,COLUMN_ENCODED_BYTES=0 禁用列映射。
| create table “phoenix” ( pk VARCHAR primary key, “info”.”name” VARCHAR ) COLUMN_ENCODED_BYTES = 0; |
|---|
查询数据: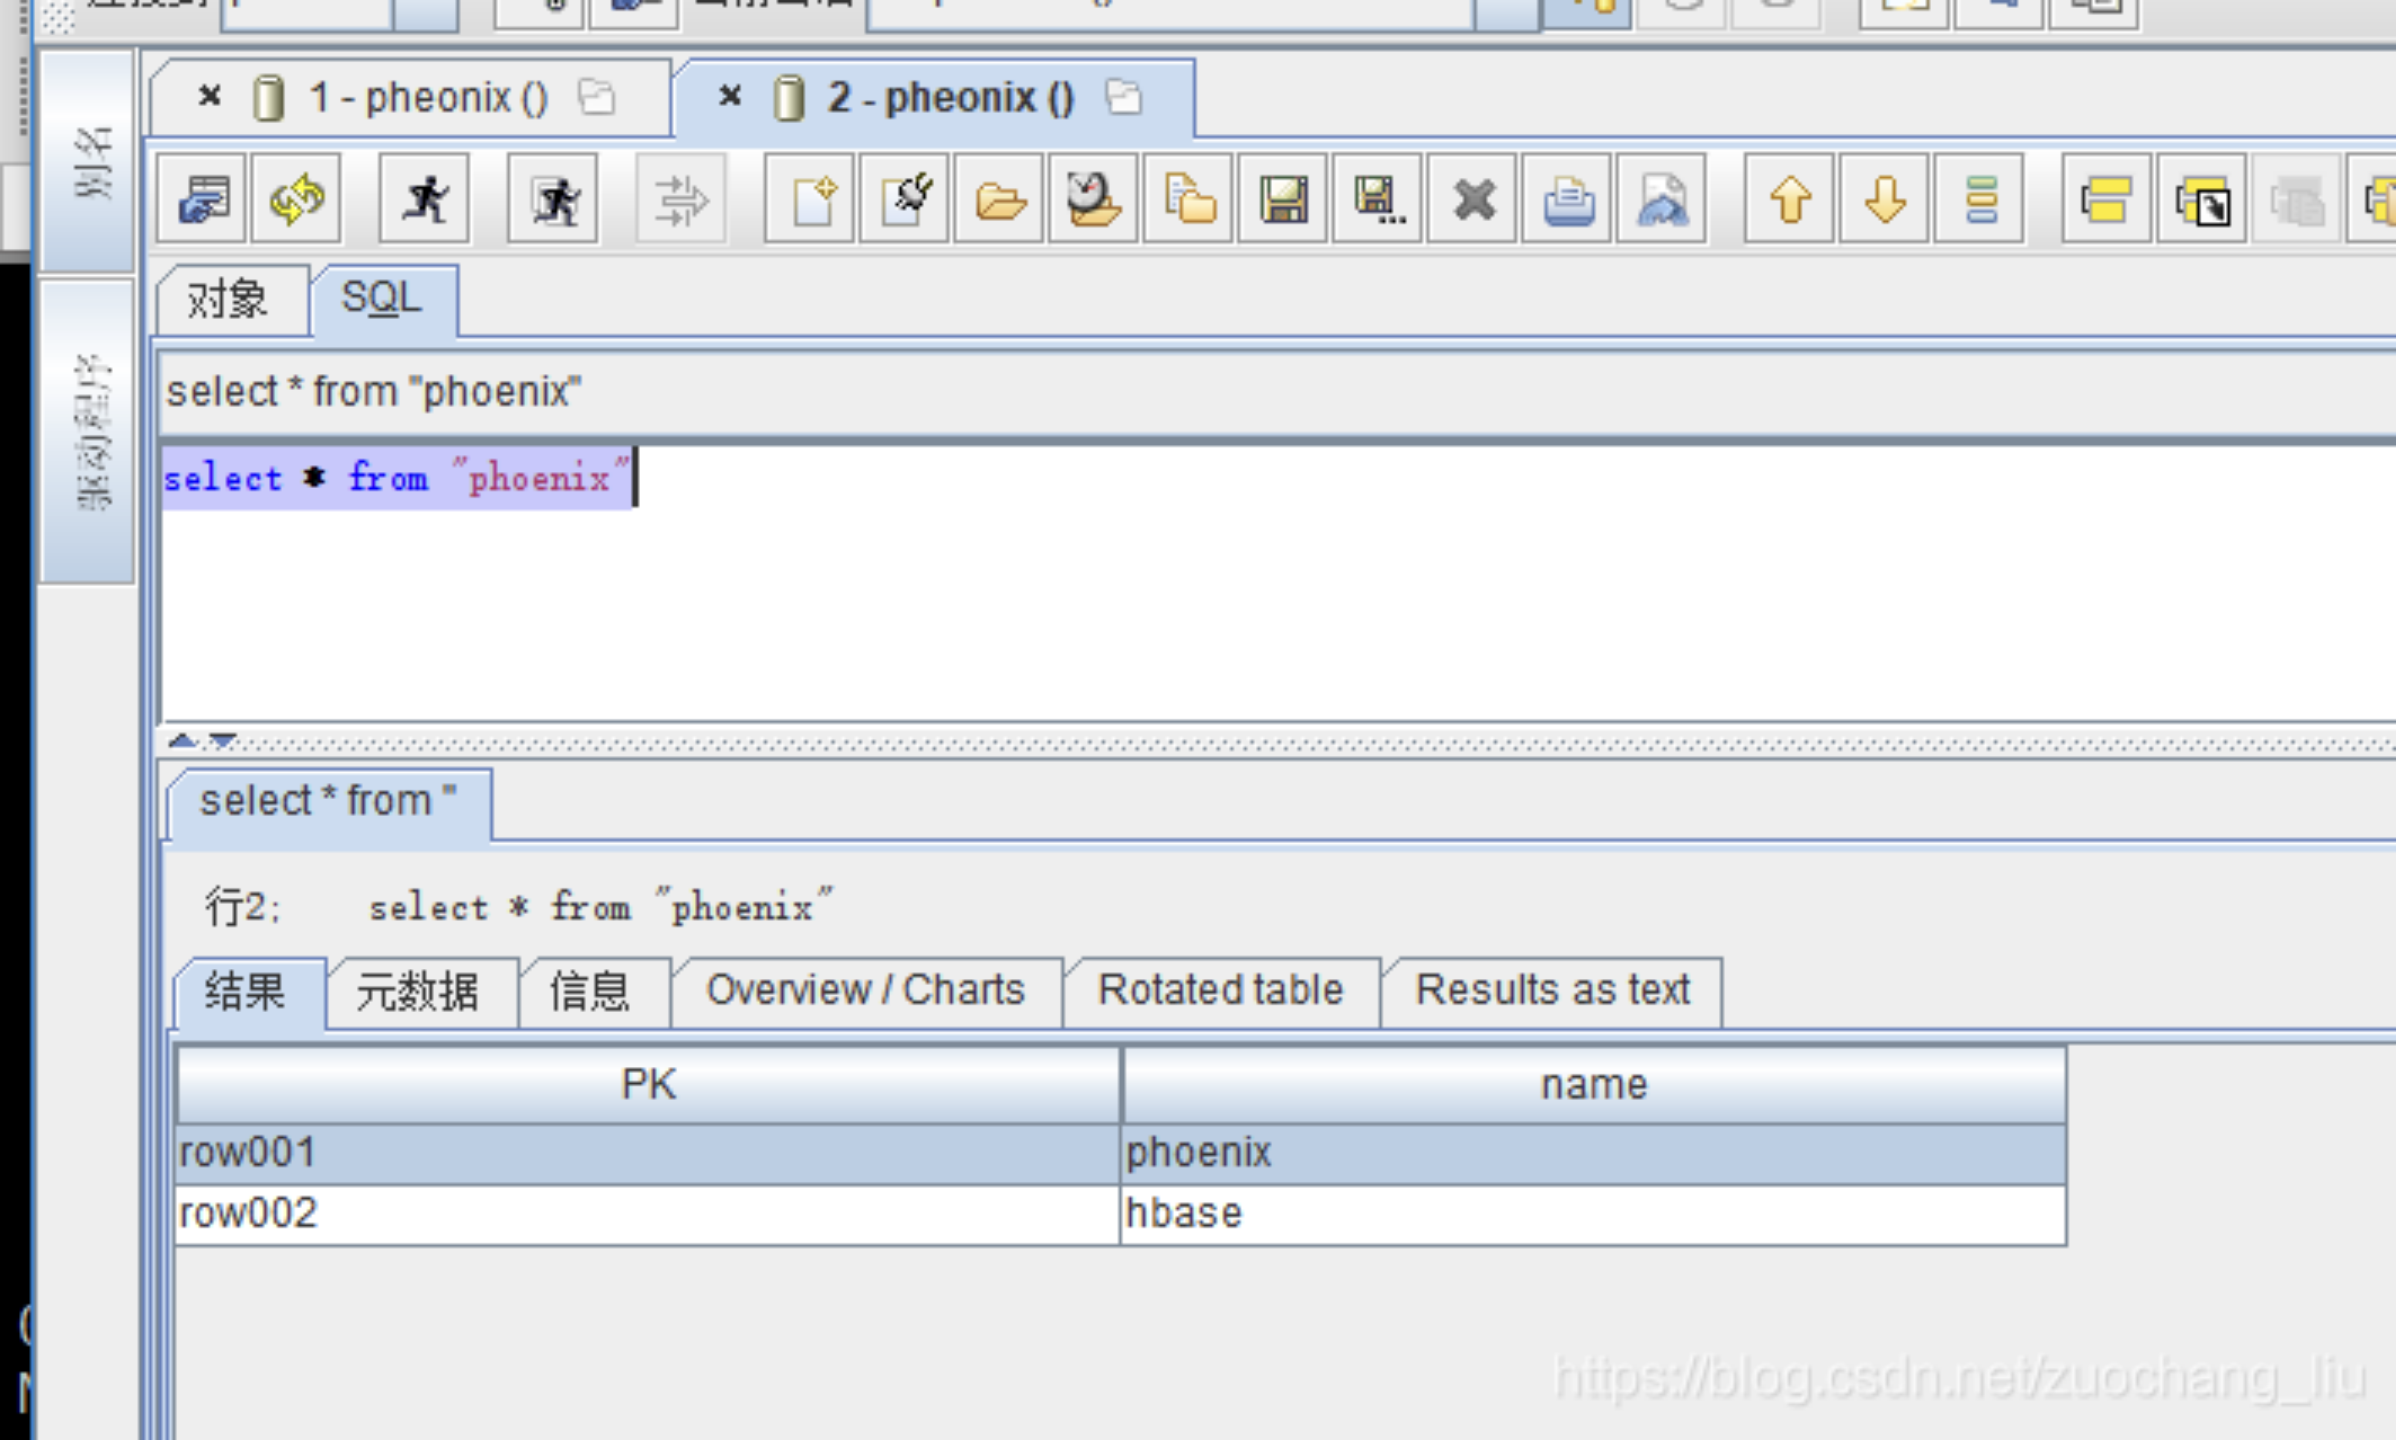

若有收获,就点个赞吧
0 人点赞
