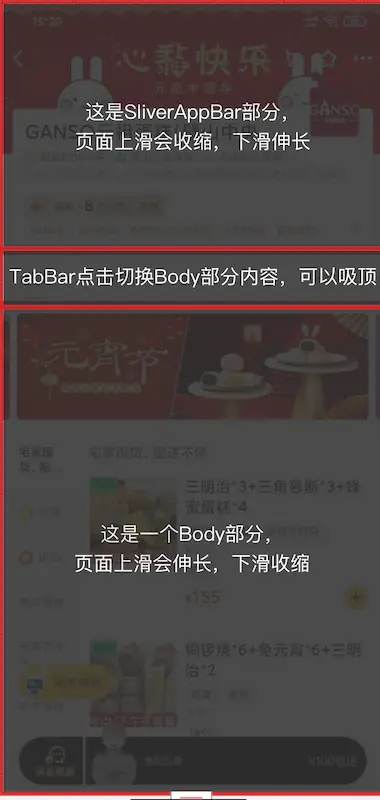
首先,我们看看目标和实现效果

我这边是把放活动的地方放在了TabBar上方。至于为什么,哈哈,我怕麻烦,因为美团外卖的放活动的组件和下方商品的组件一并点菜、评价、商家页面的切换而消失,但是这玩意儿又随商品页面的上滑而消失,算上主滑动组件,我们得做让从商品列表组件上的滑动穿透两级,实在是麻烦。所以我便把活动的组件放在了TabBar上方。
然后我们来分析一下页面结构

 看了前面的动态图片,我们知道,
TabBar下方的内容(即结构图中的Body部分)随页面上滑而延伸,内部也包括了滑动组件。看到这种结构,我们自然很容易想到NestedScrollView这个组件。但是直接使用NestedScrollView有一些问题。举个例子,先看例子代码:
Widget build(BuildContext context) {return Scaffold(backgroundColor: Colors.white,body: NestedScrollView(headerSliverBuilder: (BuildContext context, bool boxIsScrolled) {return <Widget>[SliverAppBar(pinned: true,title: Text("首页",style: TextStyle(color: Colors.black)),backgroundColor: Colors.transparent,bottom: TabBar(controller: _tabController,labelColor: Colors.black,tabs: <Widget>[Tab(text: "商品"),Tab(text: "评价"),Tab(text: "商家"),],),)];},body: Container(color: Colors.blue,child: Center(child: Text("Body部分"),),),),);}复制代码
 看代码,我将
SliverAppBar的背景设置为透明。当页面上滑的时候,问题出现了,Body部分穿过了SliverAppBar和状态栏下方,到达了屏幕顶部。这样的话,做出来的效果肯定不是我们想要的。另外,由于NestedScrollView内部里面只有一个ScrollController(下方代码中的innerController),Body里面的所有列表的ScrollPosition都将会attach到这个ScrollController上,那么就又有问题了,我们的商品页面里面有两个列表,如果共用一个控制器,那么ScrollPosition也使用的同一个,这可不行啊,毕竟列表都不一样,所以因为NestedScrollView内部里面只有一个ScrollController这一点,就决定了我们不能凭借NestedScrollView来实现这个效果。但是,NestedScrollView对我们也不是没有用,它可是为我们提供了关键思路。 为什么说NestedScrollView依然对我们有用呢?因为它的特性呀,Body部分会随页面上滑而延伸,Body部分的底部始终在屏幕的底部。那么这个Body部分的高度是怎么来的?我们去看看NestedScrollView的代码:
List<Widget> _buildSlivers(BuildContext context,ScrollController innerController, bool bodyIsScrolled) {return <Widget>[...headerSliverBuilder(context, bodyIsScrolled),SliverFillRemaining(child: PrimaryScrollController(controller: innerController,child: body,),),];}复制代码
NestedScrollView的body放到了SliverFillRemaining中,而这SliverFillRemaining的的确确是NestedScrollView的body能够填满在前方组件于NestedScrollView底部之间的关键。好的,知道了这家伙的存在,我们可以试试自己来做一个跟NestedScrollView有些类似的效果了。我选择了最外层滑动组件CustomScrollView,嘿嘿,NestedScrollView也是继承至CustomScrollView来实现的。
实现一个 NestedScrollView 类似的效果
首先我们写一个跟NestedScrollView结构类似的界面ShopPage出来,关键代码如下:
class _ShopPageState extends State<ShopPage>{@overrideWidget build(BuildContext context) {return Scaffold(body: CustomScrollView(controller: _pageScrollController,physics: ClampingScrollPhysics(),slivers: <Widget>[SliverAppBar(pinned: true,title: Text("店铺首页", style: TextStyle(color: Colors.white)),backgroundColor: Colors.blue,expandedHeight: 300),SliverFillRemaining(child: ListView.builder(controller: _childScrollController,padding: EdgeInsets.all(0),physics: ClampingScrollPhysics(),shrinkWrap: true,itemExtent: 100.0,itemCount: 30,itemBuilder: (context, index) => Container(padding: EdgeInsets.symmetric(horizontal: 1),child: Material(elevation: 4.0,borderRadius: BorderRadius.circular(5.0),color:index % 2 == 0 ? Colors.cyan : Colors.deepOrange,child: Center(child: Text(index.toString())),))))],),);}}页面结构 滑动效果复制代码
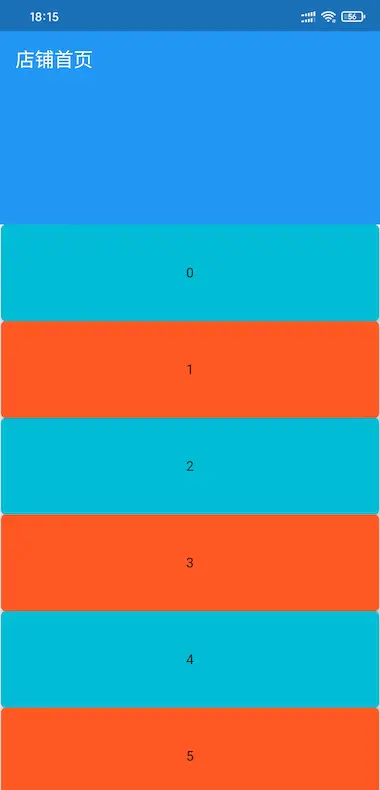
 由动图可以看到,滑动下面的
ListView不能带动CustomScrollView中的SliverAppBar伸缩。我们应该怎么实现呢?首先想想我们要的效果:
- 向上滑动
ListView时,如果SliverAppBar是展开状态,应该先让SliverAppBar收缩,当SliverAppBar不能收缩时,ListView才会滚动。 - 向下滑动
ListView时,当ListView已经滑动到第一个不能再滑动时,SliverAppBar应该展开,直到SliverAppBar完全展开。
SliverAppBar应不应该响应,响应的话是展开还是收缩。我们肯定需要根据滑动方向和CustomScrollView与ListView已滑动距离来判断。所以我们需要一个工具来根据滑动事件是谁发起的、CustomScrollView与ListView的状态、滑动的方向、滑动的距离、滑动的速度等进行协调它们怎么响应。
至于这个协调器怎么写,我们先不着急。我们应该搞清楚 滑动组件原理,推荐文章:
从零开始实现一个嵌套滑动的PageView(一)
从零开始实现一个嵌套滑动的PageView(二)
从零开始实现一个嵌套滑动的PageView(三)
Flutter的滚动以及sliver约束
看了这几个文章,结合我们的使用场景,我们需要明白:
- 当手指在屏幕上滑动时,
ScrollerPosition中的applyUserOffset方法会得到滑动矢量; - 当手指离开屏幕时,
ScrollerPosition中的goBallistic方法会得到手指离开屏幕前滑动速度; - 至始自终,主滑动组件上发起的滑动事件,对子滑动部件无干扰,那么我们在协调时,只需要把子部件的事件传给协调器分析、协调。
简单来说,我们需要修改 ScrollerPosition, ScrollerController。修改ScrollerPosition是为了把手指滑动距离或手指离开屏幕前滑动速度传递给协调器协调处理。修改ScrollerController是为了保证滑动控制器在创建ScrollerPosition创建的是我们修改过后的ScrollerPosition。那么,开始吧!
实现子部件上下滑动关联主部件
首先,假设我们的协调器类名为ShopScrollCoordinator。
滑动控制器 ShopScrollerController
我们去复制ScrollerController的源码,然后为了方便区分,我们把类名改为ShopScrollController。 控制器需要修改的部分如下:
class ShopScrollController extends ScrollController {final ShopScrollCoordinator coordinator;ShopScrollController(this.coordinator, {double initialScrollOffset = 0.0,this.keepScrollOffset = true,this.debugLabel,}) : assert(initialScrollOffset != null),assert(keepScrollOffset != null),_initialScrollOffset = initialScrollOffset;ScrollPosition createScrollPosition(ScrollPhysics physics,ScrollContext context, ScrollPosition oldPosition) {return ShopScrollPosition(coordinator: coordinator,physics: physics,context: context,initialPixels: initialScrollOffset,keepScrollOffset: keepScrollOffset,oldPosition: oldPosition,debugLabel: debugLabel,);}///其他的代码不要动}复制代码
滑动滚动位置 ShopScrollPosition
原版的ScrollerController创建的ScrollPosition 是 ScrollPositionWithSingleContext。 我们去复制ScrollPositionWithSingleContext的源码,然后为了方便区分,我们把类名改为ShopScrollPosition。前面说了,我们主要是需要修改applyUserOffset,goBallistic两个方法。
class ShopScrollPosition extends ScrollPositionimplements ScrollActivityDelegate {final ShopScrollCoordinator coordinator; // 协调器ShopScrollPosition({@required this.coordinator,@required ScrollPhysics physics,@required ScrollContext context,double initialPixels = 0.0,bool keepScrollOffset = true,ScrollPosition oldPosition,String debugLabel}): super(physics: physics,context: context,keepScrollOffset: keepScrollOffset,oldPosition: oldPosition,debugLabel: debugLabel,) {if (pixels == null && initialPixels != null) correctPixels(initialPixels);if (activity == null) goIdle();assert(activity != null);}/// 当手指滑动时,该方法会获取到滑动距离/// [delta]滑动距离,正增量表示下滑,负增量向上滑/// 我们需要把子部件的 滑动数据 交给协调器处理,主部件无干扰@overridevoid applyUserOffset(double delta) {ScrollDirection userScrollDirection =delta > 0.0 ? ScrollDirection.forward : ScrollDirection.reverse;if (debugLabel != coordinator.pageLabel)return coordinator.applyUserOffset(delta, userScrollDirection, this);updateUserScrollDirection(userScrollDirection);setPixels(pixels - physics.applyPhysicsToUserOffset(this, delta));}/// 以特定的速度开始一个物理驱动的模拟,该模拟确定[pixels]位置。/// 此方法遵从[ScrollPhysics.createBallisticSimulation],该方法通常在当前位置超出/// 范围时提供滑动模拟,而在当前位置超出范围但具有非零速度时提供摩擦模拟。/// 速度应以每秒逻辑像素为单位。/// [velocity]手指离开屏幕前滑动速度,正表示下滑,负向上滑@overridevoid goBallistic(double velocity, [bool fromCoordinator = false]) {if (debugLabel != coordinator.pageLabel) {// 子部件滑动向上模拟滚动时才会关联主部件if (velocity > 0.0) coordinator.goBallistic(velocity);} else {if (fromCoordinator && velocity <= 0.0) return;}assert(pixels != null);final Simulation simulation =physics.createBallisticSimulation(this, velocity);if (simulation != null) {beginActivity(BallisticScrollActivity(this, simulation, context.vsync));} else {goIdle();}}/// 返回未使用的增量。/// 从[NestedScrollView]的自定义[ScrollPosition][_NestedScrollPosition]拷贝double applyClampedDragUpdate(double delta) {assert(delta != 0.0);final double min =delta < 0.0 ? -double.infinity : math.min(minScrollExtent, pixels);final double max =delta > 0.0 ? double.infinity : math.max(maxScrollExtent, pixels);final double oldPixels = pixels;final double newPixels = (pixels - delta).clamp(min, max) as double;final double clampedDelta = newPixels - pixels;if (clampedDelta == 0.0) return delta;final double overScroll = physics.applyBoundaryConditions(this, newPixels);final double actualNewPixels = newPixels - overScroll;final double offset = actualNewPixels - oldPixels;if (offset != 0.0) {forcePixels(actualNewPixels);didUpdateScrollPositionBy(offset);}return delta + offset;}/// 返回过度滚动。/// 从[NestedScrollView]的自定义[ScrollPosition][_NestedScrollPosition]拷贝double applyFullDragUpdate(double delta) {assert(delta != 0.0);final double oldPixels = pixels;// Apply friction: 施加摩擦:final double newPixels =pixels - physics.applyPhysicsToUserOffset(this, delta);if (oldPixels == newPixels) return 0.0;// Check for overScroll: 检查过度滚动:final double overScroll = physics.applyBoundaryConditions(this, newPixels);final double actualNewPixels = newPixels - overScroll;if (actualNewPixels != oldPixels) {forcePixels(actualNewPixels);didUpdateScrollPositionBy(actualNewPixels - oldPixels);}return overScroll;}}复制代码
滑动协调器 ShopScrollCoordinator
class ShopScrollCoordinator {/// 页面主滑动组件标识final String pageLabel = "page";/// 获取主页面滑动控制器ShopScrollController pageScrollController([double initialOffset = 0.0]) {assert(initialOffset != null, initialOffset >= 0.0);_pageInitialOffset = initialOffset;_pageScrollController = ShopScrollController(this,debugLabel: pageLabel, initialScrollOffset: initialOffset);return _pageScrollController;}/// 创建并获取一个子滑动控制器ShopScrollController newChildScrollController([String debugLabel]) =>ShopScrollController(this, debugLabel: debugLabel);/// 子部件滑动数据协调/// [delta]滑动距离/// [userScrollDirection]用户滑动方向/// [position]被滑动的子部件的位置信息void applyUserOffset(double delta,[ScrollDirection userScrollDirection, ShopScrollPosition position]) {if (userScrollDirection == ScrollDirection.reverse) {/// 当用户滑动方向是向上滑动updateUserScrollDirection(_pageScrollPosition, userScrollDirection);final innerDelta = _pageScrollPosition.applyClampedDragUpdate(delta);if (innerDelta != 0.0) {updateUserScrollDirection(position, userScrollDirection);position.applyFullDragUpdate(innerDelta);}} else {/// 当用户滑动方向是向下滑动updateUserScrollDirection(position, userScrollDirection);final outerDelta = position.applyClampedDragUpdate(delta);if (outerDelta != 0.0) {updateUserScrollDirection(_pageScrollPosition, userScrollDirection);_pageScrollPosition.applyFullDragUpdate(outerDelta);}}}}复制代码
现在,我们在_ShopPageState里添加代码:
class _ShopPageState extends State<ShopPage>{// 页面滑动协调器ShopScrollCoordinator _shopCoordinator;// 页面主滑动部件控制器ShopScrollController _pageScrollController;// 页面子滑动部件控制器ShopScrollController _childScrollController;/// build 方法中的CustomScrollView和ListView 记得加上控制器!!!!@overridevoid initState() {super.initState();_shopCoordinator = ShopScrollCoordinator();_pageScrollController = _shopCoordinator.pageScrollController();_childScrollController = _shopCoordinator.newChildScrollController();}@overridevoid dispose() {_pageScrollController?.dispose();_childScrollController?.dispose();super.dispose();}}复制代码
这个时候,基本实现了实现子部件上下滑动关联主部件。效果如图:
实现美团外卖 点菜 页面的Body结构
修改_ShopPageState中SliverFillRemaining中内容:
/// 注意添加一个新的控制器!!SliverFillRemaining(child: Row(children: <Widget>[Expanded(child: ListView.builder(controller: _childScrollController,padding: EdgeInsets.all(0),physics: ClampingScrollPhysics(),shrinkWrap: true,itemExtent: 50,itemCount: 30,itemBuilder: (context, index) => Container(padding: EdgeInsets.symmetric(horizontal: 1),child: Material(elevation: 4.0,borderRadius: BorderRadius.circular(5.0),color: index % 2 == 0? Colors.cyan: Colors.deepOrange,child: Center(child: Text(index.toString())),)))),Expanded(flex: 4,child: ListView.builder(controller: _childScrollController1,padding: EdgeInsets.all(0),physics: ClampingScrollPhysics(),shrinkWrap: true,itemExtent: 150,itemCount: 30,itemBuilder: (context, index) => Container(padding: EdgeInsets.symmetric(horizontal: 1),child: Material(elevation: 4.0,borderRadius: BorderRadius.circular(5.0),color: index % 2 == 0? Colors.cyan: Colors.deepOrange,child: Center(child: Text(index.toString())),))))],))复制代码
看效果 看来还有些问题,什么问题呢?当我只上滑右边的子部件,当
SliverAppBar的最小化时,我们可以看到左边的子部件的第一个居然不是0。如图: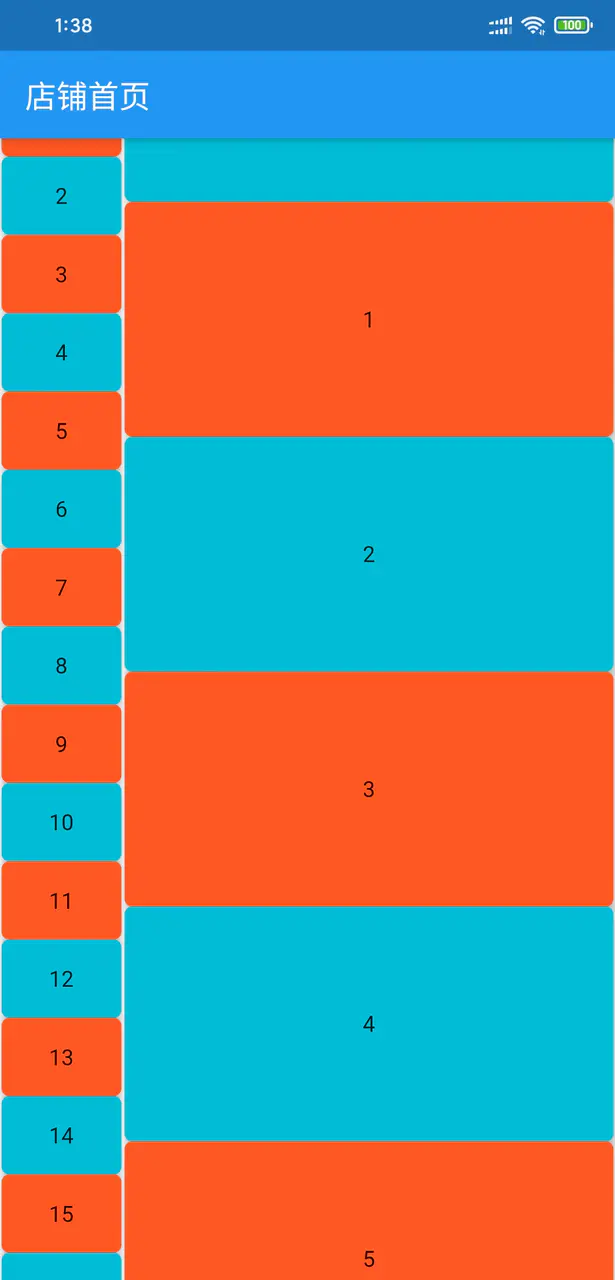 跟前面的
跟前面的NestedScrollView中的问题一样。那我们怎么解决呢?改呗!灵感来自于,Flutter Candies 一桶天下协调器添加方法:
/// 获取body前吸顶组件高度double Function() pinnedHeaderSliverHeightBuilder;bool applyContentDimensions(double minScrollExtent, double maxScrollExtent,ShopScrollPosition position) {if (pinnedHeaderSliverHeightBuilder != null) {maxScrollExtent = maxScrollExtent - pinnedHeaderSliverHeightBuilder();maxScrollExtent = math.max(0.0, maxScrollExtent);}return position.applyContentDimensions(minScrollExtent, maxScrollExtent, true);}复制代码
修改ShopScrollPosition的applyContentDimensions方法:
@overridebool applyContentDimensions(double minScrollExtent, double maxScrollExtent,[bool fromCoordinator = false]) {if (debugLabel == coordinator.pageLabel && !fromCoordinator)return coordinator.applyContentDimensions(minScrollExtent, maxScrollExtent, this);return super.applyContentDimensions(minScrollExtent, maxScrollExtent);}复制代码
这个时候,我们只需要在页面的初始化协调器后,给协调器赋值一个返回body之前的所有锁顶组件折叠后的高度之和的函数就可以了。
实现美团外卖 店铺页面 头部全屏化展开显示店铺信息效果
目标如图: 为什么说是全屏化,这个相信不需要我多讲,展开的卡片周围的灰色就是个
padding而已。 用过SliverAppBar的人基本上都能想到,将它的expandedHeight设置成屏幕高度就可以实现头部在展开的时候填充满整个屏幕。但是,页面中SliverAppBar默认并不是完全展开状态,当然也不是完全收缩状态,完全收缩状态的话,这玩意儿就只剩个AppBar在顶部了。那么我们应该怎么让它默认显示成类似美团那样的呢? 还记得我们的ScrollController的构造函数有个名称为initialScrollOffset可传参数吧,嘿嘿,只要我们把页面主滑动部件的控制器设置了initialScrollOffset,页面岂不是就会默认定在initialScrollOffset对应的位置。 好的,默认位置可以了。可是,从动图可以看到,当我们下拉部件,使默认位置 < 主部件已下滑距离 < 最大展开高度并松开手指时,SliverAppBar会继续展开至最大展开高度。那么我们肯定要捕捉手指离开屏幕事件。这个时候呢,我们可以使用Listener组件包裹CustomScrollView,然后在Listener的onPointerUp中获取手指离开屏幕事件。好的,思路有了。我们来看看怎么实现吧:
协调器外部添加枚举:
enum PageExpandState { NotExpand, Expanding, Expanded }复制代码
协调器添加代码:
/// 主页面滑动部件默认位置double _pageInitialOffset;/// 获取主页面滑动控制器ShopScrollController pageScrollController([double initialOffset = 0.0]) {assert(initialOffset != null, initialOffset >= 0.0);_pageInitialOffset = initialOffset;_pageScrollController = ShopScrollController(this,debugLabel: pageLabel, initialScrollOffset: initialOffset);return _pageScrollController;}/// 当默认位置不为0时,主部件已下拉距离超过默认位置,但超过的距离不大于该值时,/// 若手指离开屏幕,主部件头部会回弹至默认位置double _scrollRedundancy = 80;/// 当前页面Header最大程度展开状态PageExpandState pageExpand = PageExpandState.NotExpand;/// 当手指离开屏幕void onPointerUp(PointerUpEvent event) {final double _pagePixels = _pageScrollPosition.pixels;if (0.0 < _pagePixels && _pagePixels < _pageInitialOffset) {if (pageExpand == PageExpand.NotExpand &&_pageInitialOffset - _pagePixels > _scrollRedundancy) {_pageScrollPosition.animateTo(0.0,duration: const Duration(milliseconds: 400), curve: Curves.ease).then((value) => pageExpand = PageExpand.Expanded);} else {pageExpand = PageExpand.Expanding;_pageScrollPosition.animateTo(_pageInitialOffset,duration: const Duration(milliseconds: 400), curve: Curves.ease).then((value) => pageExpand = PageExpand.NotExpand);}}}复制代码
这个时候,我们把协调器的onPointerUp方法传给Listener的onPointerUp,我们基本实现了想要的效果。 But,经过测试,其实它还有个小问题,有时候手指松开它并不会按照我们想象的那样自动展开或者回到默认位置。问题是什么呢?我们知道,手指滑动列表然后离开屏幕时,ScrollPosition的goBallistic方法会被调用,所以onPointerUp刚被调用立马goBallistic也被调用,当goBallistic传入的速度绝对值很小的时候,那么列表的模拟滑动距离就很小很小,甚至为0.0。那么结果是怎么样的,自然而然出现在脑袋中了吧。
我们还需要继续修改一下ShopScrollPosition的goBallistic方法:
@overridevoid goBallistic(double velocity, [bool fromCoordinator = false]) {if (debugLabel != coordinator.pageLabel) {if (velocity > 0.0) coordinator.goBallistic(velocity);} else {if (fromCoordinator && velocity <= 0.0) return;if (coordinator.pageExpand == PageExpandState.Expanding) return;}assert(pixels != null);final Simulation simulation =physics.createBallisticSimulation(this, velocity);if (simulation != null) {beginActivity(BallisticScrollActivity(this, simulation, context.vsync));} else {goIdle();}}复制代码
记得页面initState中,初始化_pageScrollController的时候,记得传入默认位置的值。 此时需要注意一下,默认位置的值并不是页面在默认状态下SliverAppBar底部在距屏幕顶部的距离,而是屏幕高度减去其底部距屏幕顶部的距离,即initialOffset = screenHeight - x,而这个x我们根据设计或者自己的感觉来设置便是。这里我取200。 来来来,我们看看效果怎么样!!
文章项目案例 github链接 flutter_meituan_shop
作者:CyJay
链接:https://juejin.im/post/5e3f73b4e51d4526d1209005
来源:掘金
著作权归作者所有。商业转载请联系作者获得授权,非商业转载请注明出处。

若有收获,就点个赞吧
0 人点赞
