Eureka就是帮助我们维护所有服务的信息,以便服务之间的相互调用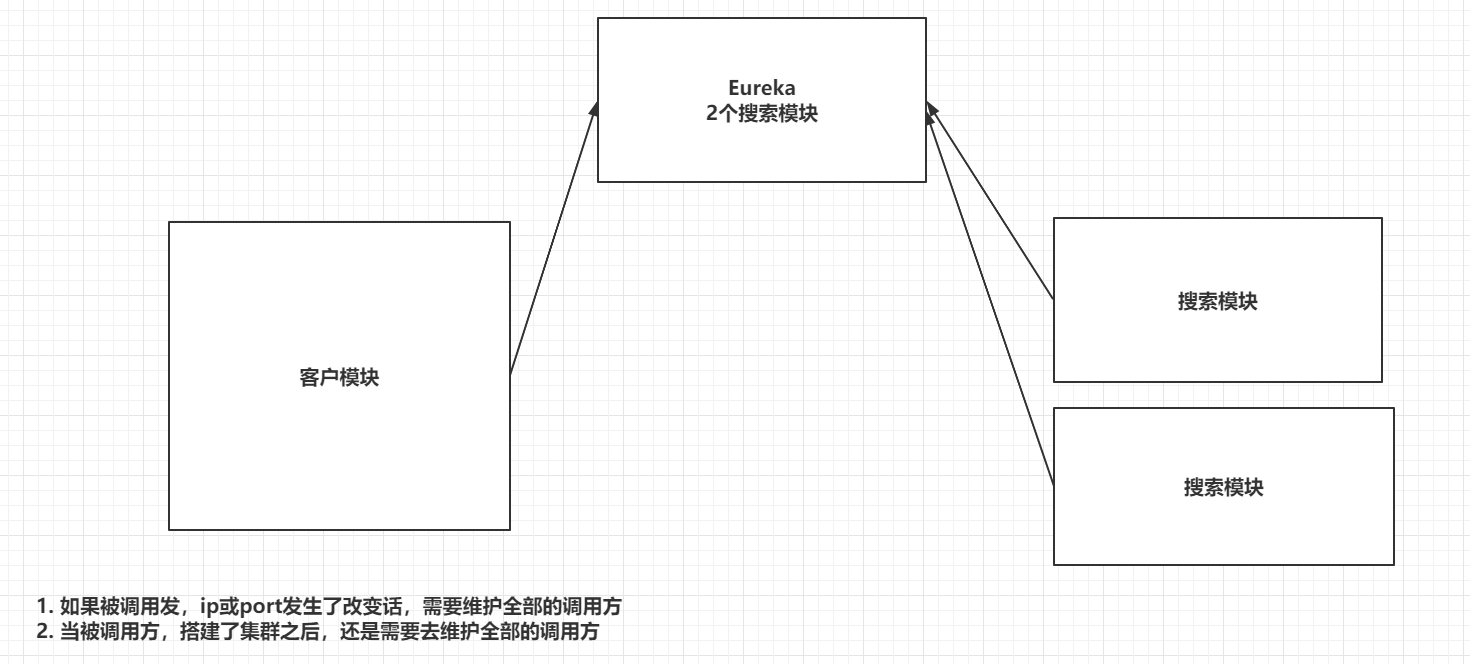
1 Eureka的快速入门
1.1 创建EurekaServer
1.1.1 创建一个父工程,并且在父工程中指定SpringCloud的版本,并且将packaing修改为pom
<packaging>pom</packaging><parent><groupId>org.springframework.boot</groupId><artifactId>spring-boot-starter-parent</artifactId><version>2.3.12.RELEASE</version><relativePath/> <!-- lookup parent from repository --></parent><dependencyManagement><dependencies><dependency><groupId>org.springframework.cloud</groupId><artifactId>spring-cloud-dependencies</artifactId><version>Hoxton.SR12</version><type>pom</type><scope>import</scope></dependency></dependencies></dependencyManagement>
创建eureka的server,创建SpringBoot工程,并且导入依赖,在启动类中添加注解,编写yml文件
1.1.2 导入依赖
<dependencies><dependency><groupId>org.springframework.cloud</groupId><artifactId>spring-cloud-starter-netflix-eureka-server</artifactId></dependency><dependency><groupId>org.springframework.boot</groupId><artifactId>spring-boot-starter-web</artifactId></dependency></dependencies>
1.1.3 启动类添加注解
@SpringBootApplication@EnableEurekaServerpublic class EurekaApplication {public static void main(String[] args) {SpringApplication.run(EurekaApplication.class,args);}}
1.1.4 编写yml
server:port: 8761 # 端口号eureka:instance:hostname: localhost # localhostclient:# 当前的eureka服务是单机版的registerWithEureka: falsefetchRegistry: falseserviceUrl:defaultZone: http://${eureka.instance.hostname}:${server.port}/eureka/
1.2 创建EurekaClient
创建Maven工程,修改为SpringBoot
1.2.1 导入依赖
<dependency><groupId>org.springframework.cloud</groupId><artifactId>spring-cloud-starter-netflix-eureka-client</artifactId></dependency>
1.2.2
在启动类上添加注解
@SpringBootApplication@EnableEurekaClientpublic class CustomerApplication {public static void main(String[] args) {SpringApplication.run(CustomerApplication.class,args);}}
1.2.3 编写配置文件
# 指定Eureka服务地址eureka:client:service-url:defaultZone: http://localhost:8761/eureka# 指定服务的名称spring:application:name: CUSTOMER
1.3 测试Eureka
@Autowiredprivate EurekaClient eurekaClient;@GetMapping("/customer")public String customer(){//1. 通过eurekaClient获取到SEARCH服务的信息InstanceInfo info = eurekaClient.getNextServerFromEureka("SEARCH", false);//2. 获取到访问的地址String url = info.getHomePageUrl();System.out.println(url);//3. 通过restTemplate访问String result = restTemplate.getForObject(url + "/search", String.class);//4. 返回return result;}
1.4 启动类中配置(各人配置不一样) RestTemplate
@SpringBootApplication@EnableEurekaClientpublic class UserApplication {public static void main(String[] args) {SpringApplication.run(UserApplication.class,args);}@Beanpublic RestTemplate restTemplate(){return new RestTemplate();}}

若有收获,就点个赞吧
0 人点赞
