IOC:控制反转
在pom.xml中注入spring-context依赖
<dependency><groupId>org.springframework</groupId><artifactId>spring-context</artifactId><version>5.3.9</version></dependency>
xx.xml的头文件
<?xml version="1.0" encoding="UTF-8"?><beans xmlns="http://www.springframework.org/schema/beans"xmlns:xsi="http://www.w3.org/2001/XMLSchema-instance"xsi:schemaLocation="http://www.springframework.org/schema/beans http://www.springframework.org/schema/beans/spring-beans.xsd">
如何实例化对象
1)构造器
默认构造器
bean中 scope属性决定是否是单例的
prototype 原型的;非单例的
singleton 单例的
<!--默认构造器--><bean id="car1" class="bean.Car"></bean>
有参认构造器
<!--有参构造器--><bean id="car3" class="bean.Car" ><constructor-arg index="0" value="10002"></constructor-arg><constructor-arg index="1" value="QAQ"></constructor-arg><constructor-arg index="2" value="100000"></constructor-arg></bean>
2)静态工厂
核心配置文件bean
<bean id="car" class="factor.CarFactor" factory-method="getCar"><constructor-arg index="0" value="BMW"></constructor-arg></bean>
index类中方法的参数位置索引,value方法的参数值
index可以使用name,name后跟参数对应的参数名
3)实例化工厂
核心配置文件bean
<bean id="CarFactor2" class="factor.Carfactor2"></bean><bean id="car2" factory-bean="CarFactor2" factory-method="getCar"><constructor-arg index="0" value="QQ"></constructor-arg></bean>
如何初始化对象信息:
1)构造器注入
<bean id="car3" class="bean.Car" ><constructor-arg index="0" value="10002"></constructor-arg><constructor-arg index="1" value="QAQ"></constructor-arg><constructor-arg index="2" value="100000"></constructor-arg></bean>
2)set注入
依赖于set方法
<bean id="car4" class="bean.Car" ><property name="id" value="10004"></property><property name="name" value="劳斯莱斯"></property><property name="pricce" value="10000000"></property></bean>
3)工厂注入<br />①静态工厂注入
<bean id="car" class="factor.CarFactor" factory-method="getCar"><constructor-arg index="0" value="BMW"></constructor-arg></bean>
`
`
②实例化工厂注入
<bean id="CarFactor2" class="factor.Carfactor2"></bean><bean id="car2" factory-bean="CarFactor2" factory-method="getCar"><constructor-arg index="0" value="QQ"></constructor-arg></bean>
用到ref
4)p标签注入
配置好.xml文件后在创建test类进行测试
public void test2(){//读取核心配置文件ApplicationContext app=new ClassPathXmlApplicationContext("spring.xml");//获取beanCar car=(Car) app.getBean("car2");System.out.println(car);}
可变参数传入多个文件名
//读取核心配置文件ApplicationContext app=new ClassPathXmlApplicationContext("spring.xml","dao.xml")
通过总的配置文件导入其他配置文件
<import resource="spring.xml"/><import resource="dao.xml"/><import resource="service.xml"/>
工厂模式:
静态工厂
public class CarFactor {public static Car getCar(String type){if ("BMW".equals(type)){return new Car(10000,"宝马",600000);}else if ("QQ".equals(type)){return new Car(10001,"Q",50000);}else {return null;}}}
实例化工厂
public class CarFactor {public Car getCar(String type){if ("BMW".equals(type)){return new Car(10000,"宝马",600000);}else if ("QQ".equals(type)){return new Car(10001,"Q",50000);}else {return null;}}}
`
`
各种类型属性的配置
有一个User类
public class User {private int id;private String sname;private Date brith;private String[] hobby;private List<String> ulist;private Set<String> uset;private Map<String,Object> maps;private Properties prop;public User() {}public int getId() {return id;}public void setId(int id) {this.id = id;}public String getSname() {return sname;}public void setSname(String sname) {this.sname = sname;}public Date getBrith() {return brith;}public void setBrith(Date brith) {this.brith = brith;}public String[] getHobby() {return hobby;}public void setHobby(String[] hobby) {this.hobby = hobby;}public List<String> getUlist() {return ulist;}public void setUlist(List<String> ulist) {this.ulist = ulist;}public Set<String> getUset() {return uset;}public void setUset(Set<String> uset) {this.uset = uset;}public Map<String, Object> getMaps() {return maps;}public void setMaps(Map<String, Object> maps) {this.maps = maps;}public Properties getProp() {return prop;}public void setProp(Properties prop) {this.prop = prop;}@Overridepublic String toString() {return "User{" +"id=" + id +", sname='" + sname + '\'' +", brith=" + brith +", hobby=" + Arrays.toString(hobby) +", ulist=" + ulist +", uset=" + uset +", maps=" + maps +", prop=" + prop +'}';}}
对其中各种类型的属性进行注入
<bean id="u1" class="bean.User"><!--int String类型变量注入--><property name="id" value="101"></property><property name="sname" value="麒麟子"></property><!--String[]类型变量注入--><property name="hobby" ><array><value>吸烟</value><value>喝酒</value><value>烫头</value></array></property><!--List<String>类型变量注入--><property name="ulist"><list><value>aaa</value><value>bbb</value><value>ccc</value></list></property><!--Set<String>类型变量注入--><property name="uset"><set><value>语文</value><value>数学</value><value>英语</value></set></property><!--Map<String,Object>类型变量注入--><property name="maps"><map><entry key="中国银行" value="1224525442544222222"></entry></map></property><!--Propertise类型变量注入--><property name="prop"><props><prop key="driver">com.mysql.jdbc.Driver</prop><prop key="url">jdbc:mysql:///java11</prop><prop key="username">root</prop><prop key="password">123456</prop></props></property><!--Date类型变量注入--><property name="brith" ref="date"></property></bean><bean id="date" class="java.util.Date"><property name="year" value="2011"></property><property name="month" value="11"></property><property name="date" value="11"></property></bean>
junit注解
@Test 测试注解
@Before 测试之前运行注解 可做测试前准备工作
@After 测试之后运行注解
注解开发IOC
自动装配
@Autowired
1.配置环境
<?xml version="1.0" encoding="UTF-8"?><beans xmlns="http://www.springframework.org/schema/beans"xmlns:p="http://www.springframework.org/schema/p"xmlns:xsi="http://www.w3.org/2001/XMLSchema-instance"xmlns:context="http://www.springframework.org/schema/c"xsi:schemaLocation="http://www.springframework.org/schema/beans http://www.springframework.org/schema/beans/spring-beans.xsd">
2开始自动化注入
<!-- 开始注解--><context:annotation-config/><!-- 实例化Dao--><bean id="userDao" class="com.xxxx.dao.UserDao"></bean><!--实例化Service--><bean id="userService" class="com.xxxx.service.UserService"></bean>
可使用@Autowired注解,是根据类型装配
配合使用@Qualifier(value = “ueseDao”),选择自己要注入的
@Resource
import javax.annotation.Resource;
环境配置
在pom.xml中注入
<dependency><groupId>javax.annotation</groupId><artifactId>javax.annotation-api</artifactId><version>1.3.2</version></dependency>
使用@Resource(name = “userDao”)根据名字注入
优先根据名称查找,若不写名称,根据类型查找
注解开发:
设置自动化扫描
<?xml version="1.0" encoding="UTF-8"?><beans xmlns="http://www.springframework.org/schema/beans"xmlns:p="http://www.springframework.org/schema/p"xmlns:xsi="http://www.w3.org/2001/XMLSchema-instance"xmlns:context="http://www.springframework.org/schema/context"xsi:schemaLocation="http://www.springframework.org/schema/beans http://www.springframework.org/schema/beans/spring-beans.xsdhttp://www.springframework.org/schema/context http://www.springframework.org/schema/context/spring-context.xsd"><!-- 开启扫描--><context:component-scan base-package="com.xxxx"/></beans>
注解:
任意类:
@Component 组件
dao层
@Repository 仓库
@Repositorypublic class UserDao {public void test(){System.out.println("UserDao test....");}}
service层
@Service 服务层
@Servicepublic class UserService {@Autowiredprivate UserDao userDao;public void test(){System.out.println("UserService test......");userDao.test();}}
contorller层
@Controller 控制层
@Controller("uc")public class UserController {@Autowiredprivate UserService userService;public void test11(){System.out.println("UserContorller test...");userService.test();}}
bean的作用域和生命周期
作用域:
默认情况瞎,从spring容器中拿到的对象都是单例的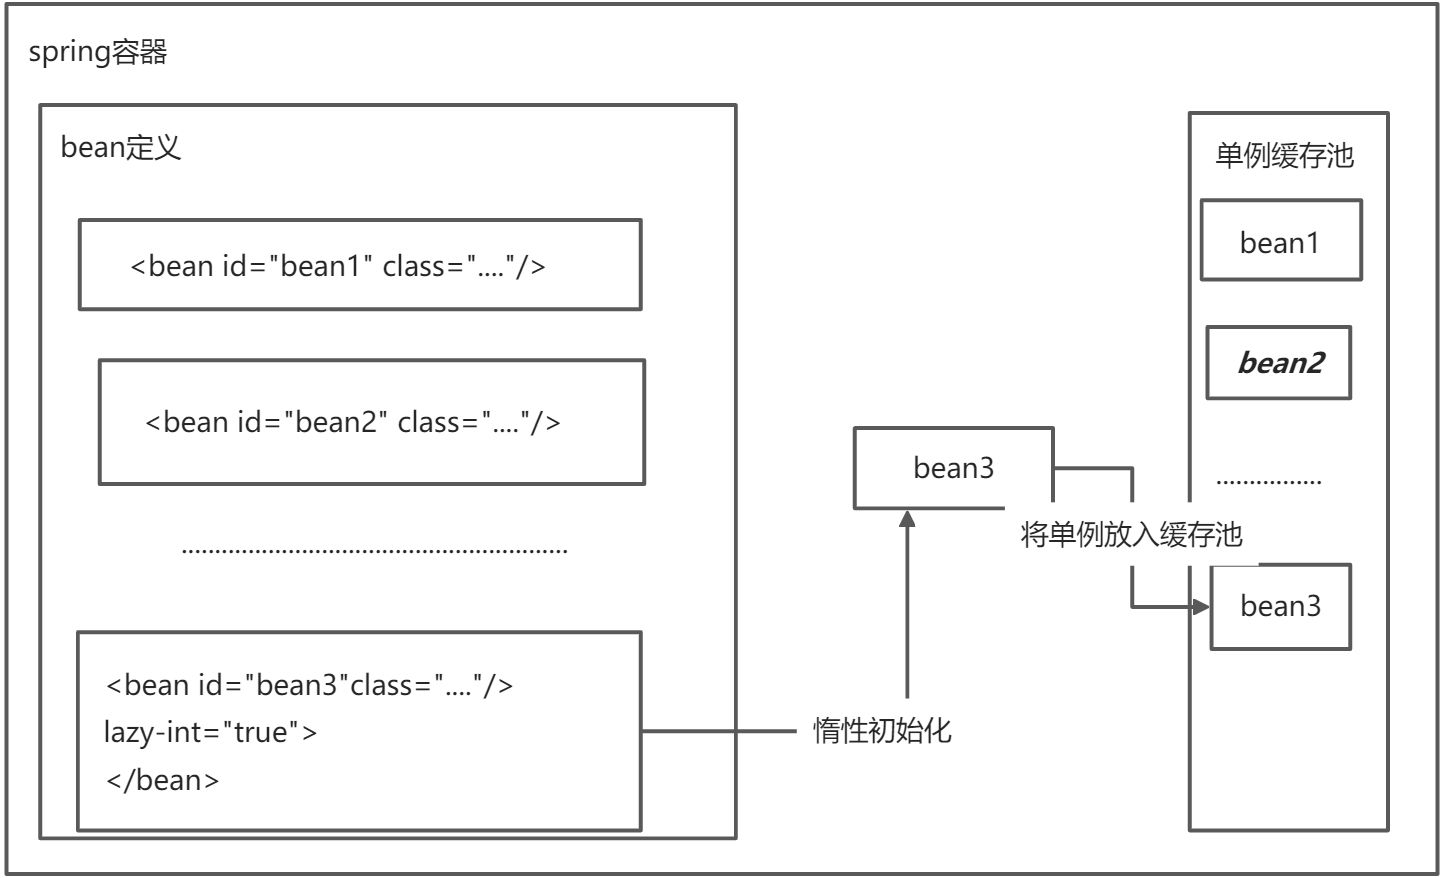
lazy -int=”true”时,spring启动的时候 不会去实例化这个bean,调用时才会去实例化;false时,spring启动时实例化这个bean
prototype作用域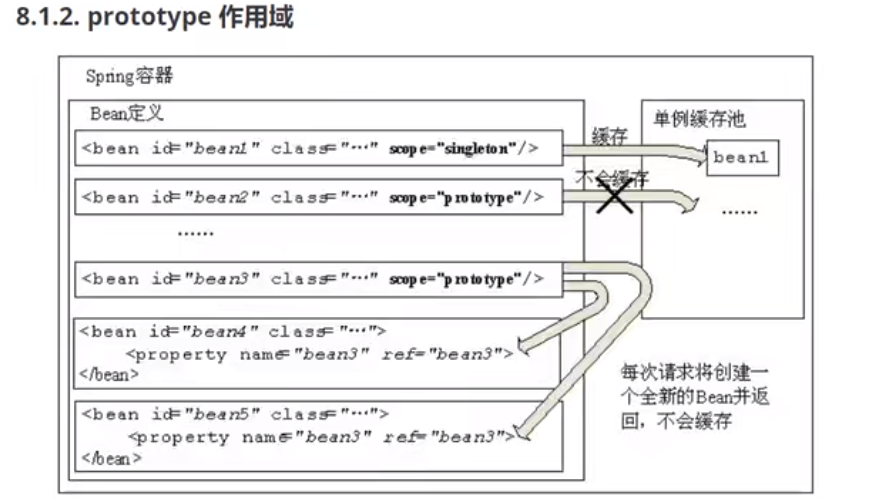
每次向spring容器请求获取bean都会得到一个全新的bean,相对于singleton来说不缓存
bean的创建和销毁可由自己决定
有一个User类
public class User {private int id;private String name;private String psw;public User() {System.out.println("构造器调用了");}public User(int id, String name, String psw) {this.id = id;this.name = name;this.psw = psw;}public void init(){System.out.println("init..执行了");}public void destroy(){System.out.println("destory.......执行了");}public int getId() {return id;}public void setId(int id) {this.id = id;}public String getName() {return name;}public void setName(String name) {this.name = name;}public String getPsw() {return psw;}public void setPsw(String psw) {this.psw = psw;}@Overridepublic String toString() {return "User{" +"id=" + id +", name='" + name + '\'' +", psw='" + psw + '\'' +'}';}}
其中定义了init和destory方法
在spring02.xml文件中配置该类的bean,将User类中的init方法和destroy方法给init-method和destroy-method
<bean id="user" class="com.xxxx.bean.User" scope="singleton" init-method="init" destroy-method="destory"><property name="id" value="1001"></property><property name="name" value="lisi"></property><property name="psw" value="123456"></property></bean>
这样就可以通过调用方法来决定bean合适被销毁
spring AOP
aop:面向切面编程
注入springAop
<!-- 注入spring Aop--><dependencies><dependency><groupId>org.aspectj</groupId><artifactId>aspectjweaver</artifactId><version>1.8.9</version></dependency></dependencies>
添加spring.xml的配置
添加命名空间
xmlns:aop="http://www.springframework.org/schema/aop"http://www.springframework.org/schema/aop http://www.springframework.org/schema/aop/spring-aop.xsd"
配置文件
<!-- 注解开发aop--><aop:aspectj-autoproxy/>
aopsprig.xml相关配置
<!-- aop相关配置--><aop:config><!-- aop切面--><aop:aspect ref="cutLog"><!-- 定义切入点--><aop:pointcut id="cut" expression="execution(* com.xxx.service.UserService.add*(..))"/><!-- 配置前置通知方法名,并引入切入点--><aop:before method="addLog" pointcut-ref="cut"/><!-- 配置返回通知方法名--><aop:after-returning method="setLog" pointcut-ref="cut"/><!-- 配置指定异常通知--><aop:after-throwing method="" pointcut-ref="cut"/><!-- 配置最终通知--><aop:after method="" pointcut-ref="cut"/><!-- 配置环绕通知--><aop:around method="" pointcut-ref="cut"/></aop:aspect></aop:config>
aop vs oop
切面:
切点:
增强|通知:
advice
Before
After
around
连接点:目标对象所有的方法都是连接点,连接点不一定是切点,切点一定是连接点
织入:将切面应用到目标对象并生成代理对象的这个过程即为织入
引入:在不修改原有应用程序代码的情况下,在程序运行期间为类动态添加方法或字段的过程
springmvc
servlet的主要作用:
1)映射:将目标方法映射地址栏
2)接收参数request
3)存储数据
作用域对象
4)页面转发

若有收获,就点个赞吧
0 人点赞
