- 8_多线程
- 9常用类
- 枚举类&注解
- java集合
- 泛型
- IO流
- 网络编程
尚硅谷
8_多线程
1.程序、线程、进程的理解
01程序
概念:是为完成特定任务、用某种语言编写的一组指令的集合。即指一段静态代码
02进程
概念:是程序的一次执行过程,或是正在运行的一个程序。是一个动态的过程:有其自身的产生、存在、消亡的过程。——生命周期
说明:进程作为资源分配单位,系统在运行时会为每个进程分配不同的内存区域
03线程
概念:进程可以进一步细分为线程,是程序内部的一条执行路径
说明:线程作为调度和执行的单位,每个线程拥有独立的运行栈和程序计数器,线程切换的开销小
内存结构: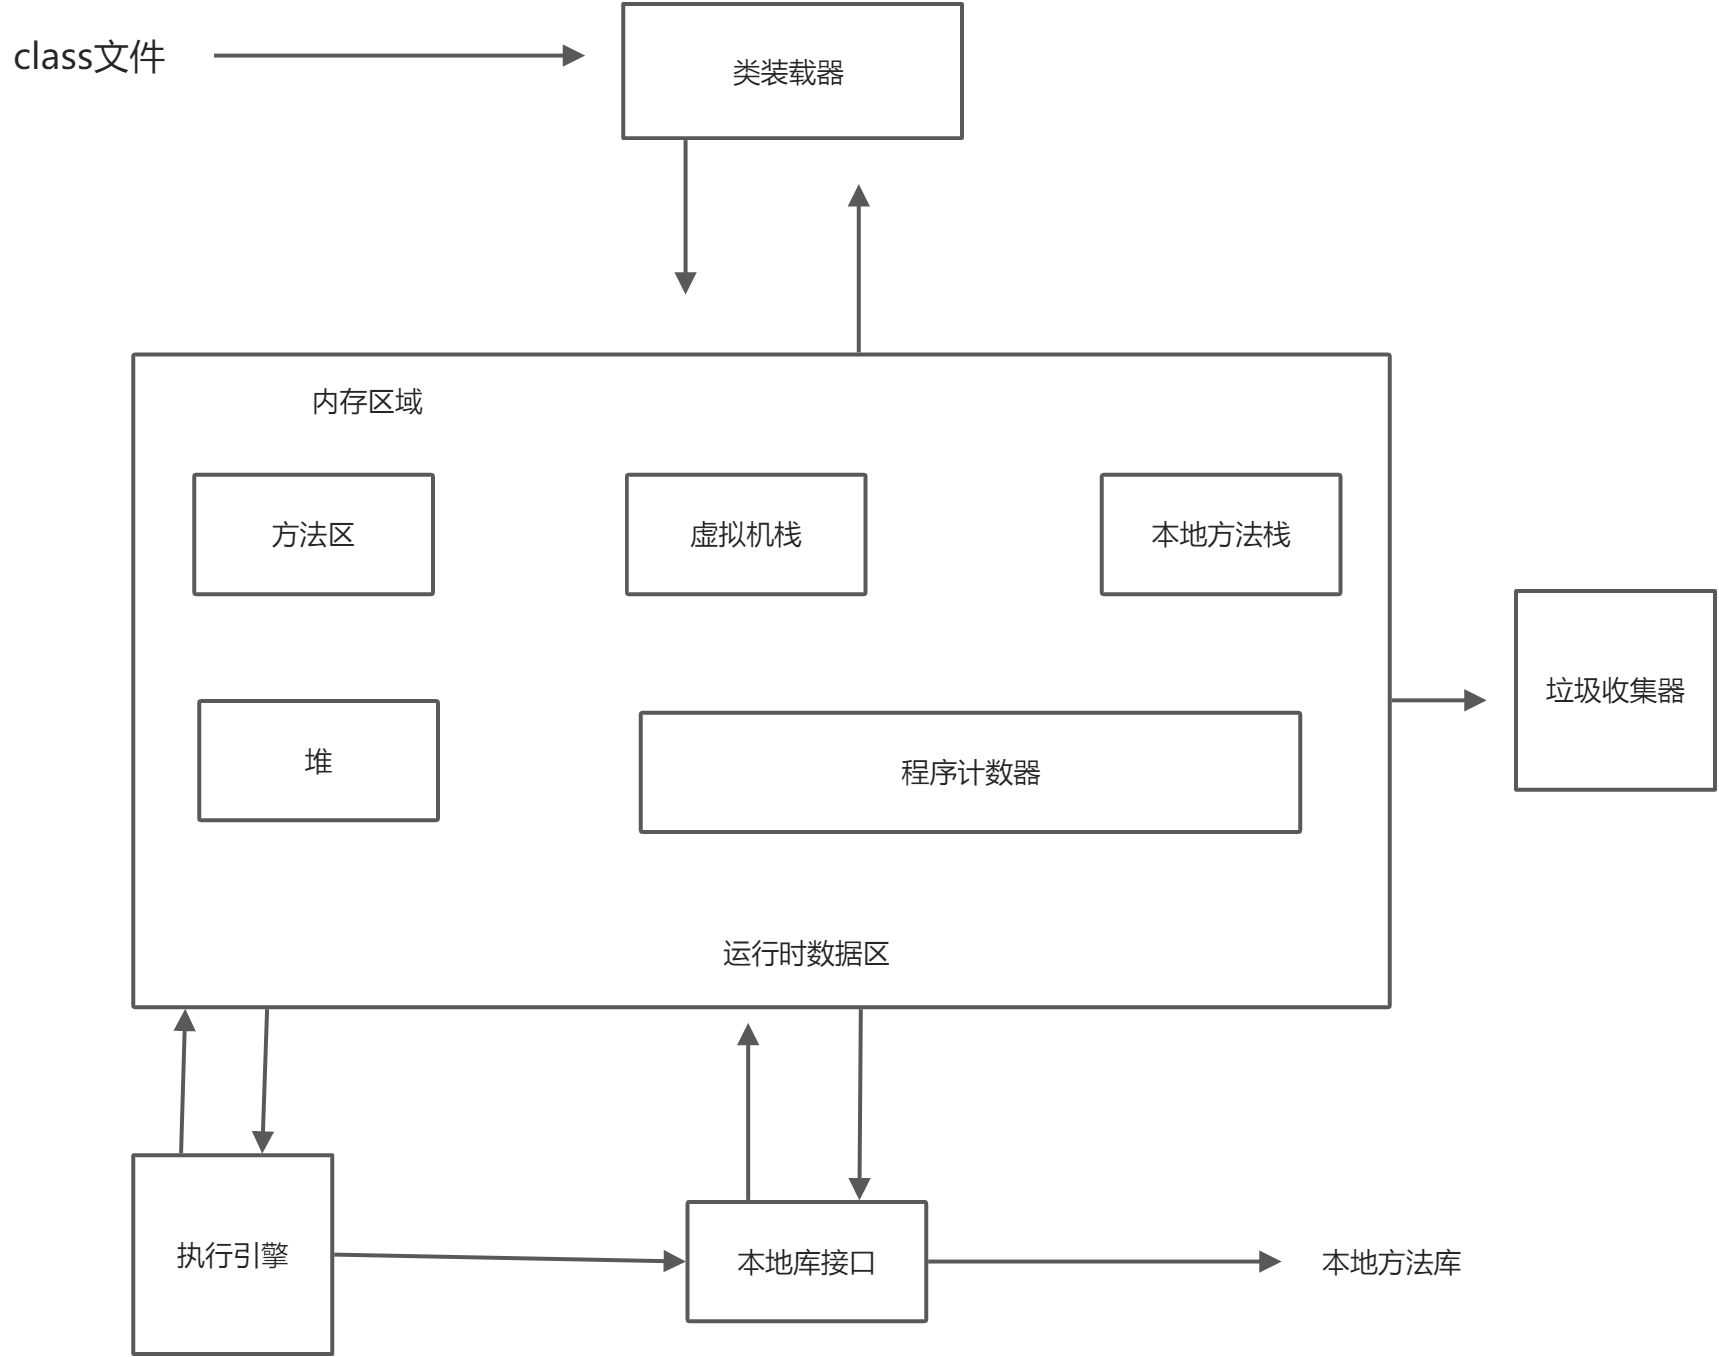
进程可以细化为多个线程
每个线程拥有自己独立的:栈、程序计数器
多个线程,共享同一个进程中的机构:方法区和堆
并行与并发
01并行和并发的理解
并行:多个cpu同时执行多个任务。比如:多个人同时做不同的事
并发:一个cpu同时执行多个任务
创建多线程的两种方式
方式一:继承Thread类的方式
1.创建一个继承于Thread类的子类
2.重写Thread类中的run()—>将此线程执行的操作声明到run()方法中
3.创建Thread类的子类的对象
4.通过此对象调用start()方法
说明两个问题:
启用一个线程必须调用start方法,不能调用run方法来启动
如果再启动一个线程,必须重新创建一个Thread类的子类的对象,调用此对象的start方法
方式二:实现Runnable接口的方式
1.创建一个实现了Runnable接口的子类
2.在实现类中实现Runnable接口中的抽象方法:run()
3.创建实现类的对象
4.将此对象作为参数传递到Thread类的构造器中,创建Thread类的对象
5.用Thread类的对象来调用start()
两种方式对比:
开发中:优先选择实现Runnable接口的方式
原因:1.实现的方式没有类的单继承性的局限性
2.实现的方式更适合来处理多个j线程共享数据的情况
联系:public class Thread implements Runnable
相同点:两种方式都需要重写run(),将线程要执行的逻辑声明在run()中
都需要调用start方法来启动
Thread类中的常用方法
常用方法
1.start():启动当前线程,调用当前线程的run()
2.run():重写Thread类中的run()—>将此线程执行的操作声明到run()方法中
3.currentThread():静态方法,返回执行当前线程的代码的线程
4.getName():获取当前线程的名字
5.setName():设置当前线程的名字
6.yiled():释放当前cpu的执行权
7.join():在线程a中调用线程b的join(),此时线程a就进入阻塞状态直到线程b完全执行完,线程a才结束阻塞状态
8stop():已过时。执行此方法时,强制结束当前线程
9.sleep(Long millitime):让当前线程睡眠,指定millitime毫秒。在指定毫秒下该线程是阻塞状态
10.isAlive():判断当前线程是否存活
线程优先级
MAX_PRIORITY:10
MIN_PRIORITY:1
NORM_PRIORITY:5 默认优先级
设置和获取当前线程的优先级
getPriority():获取当前线程的优先级
setPriority(int p):设置当前线程的优先级
说明:高优先级要抢占低优先级的线程cpu执行权。但只是从概率上讲
线程通信:wait()/notify()/notifyAll():此三个方法是定义在Object类中
java线程分为:守护线程和用户线程
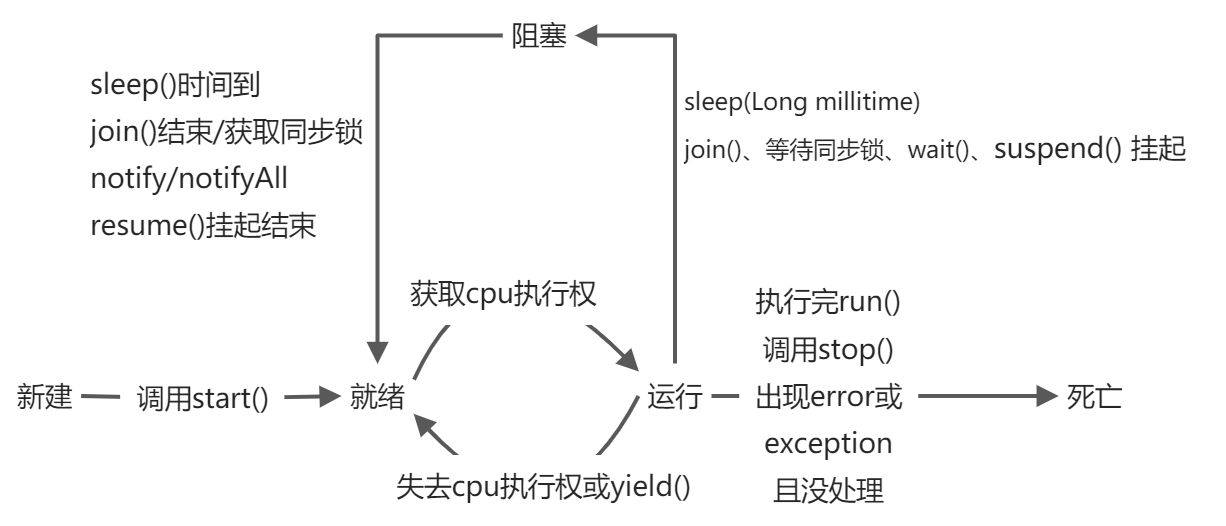
线程的生命周期
线程同步(解决线程安全问题)
在java中通过同步机制,解决线程安全问题
同步解决了线程安全问题,操作同步代码时,其他线程等待,相当于一个单线程的过程,效率低
解决线程安全问题方式一:同步代码块
synchronized(同步监视器){//需要被同步的代码}
实现runnable接口的方法(售票问题)
package day17;/*** @author Lilei* @date 2021/11/18-@17:39*/public class Window1 implements Runnable{private int ticket=100;Object object=new Object();@Overridepublic void run() {while (true) {try {Thread.sleep(100);} catch (InterruptedException e) {e.printStackTrace();}synchronized (object) {//同步监视器可以使用this,因为此时的this是唯一的Window1对象if (ticket > 0) {System.out.println(Thread.currentThread().getName() + ":卖票,票号为:" + ticket);ticket--;} else {break;}}}}}class WindowTest1{public static void main(String[] args) {Window1 w1= new Window1();Thread t1=new Thread(w1);Thread t2=new Thread(w1);Thread t3=new Thread(w1);t1.setName("窗口一:");t2.setName("窗口二:");t3.setName("窗口三:");t1.start();t2.start();t3.start();}}
继承Thread类
package day18.java;/*** @author Lilei* @date 2022/1/7-@18:31*/class Window extends Thread{private static int ticket=100;private static Object object=new Object();//static保证锁是唯一的@Overridepublic void run() {while (true){try {Thread.sleep(10);} catch (InterruptedException e) {e.printStackTrace();}//synchronized(Window.class) Class class=Window.class,Window.class只会加载一次synchronized(object){if (ticket>0){System.out.println(getName()+":卖票,票号为:"+ticket);ticket--;}else{break;}}}}}public class WindowsTest {public static void main(String[] args) {Window w1=new Window();Window w2=new Window();Window w3=new Window();w1.setName("窗口一");w2.setName("窗口二");w3.setName("窗口三");w1.start();w3.start();w2.start();}}
说明:1.操作共享数据的代码,即需要被同步的代码
2.共享数据:多个线程共同操作的变量
3.同步监视器:俗称:锁。任何一个类的对象都可以充当一个锁
要求多个线程必须用同一把锁
解决线程安全问题方式二:同步方法
如果操作共享数据的完整代码声明在一个方法中,我们可以将此方法声明为同步的。
非静态的同步代码块,同步监视器是this
静态的同步代码块,同步监视器是当前类本身
解决实现Runnable接口的线程安全问题
package day18.java;/*** @author Lilei* @date 2022/1/7-@19:04*** 出现重票错票线程安全问题* 问题出现原因:当某个线程操作买票的过程,尚未完成操作时,其他线程参与进来,也操作车票* 如何解决:当一个线程在操作共享数据,其他线程不能参与进来,直到线程a操作完成,其他线程才可以造成,即使a阻塞,也不能改变**/class Window3 implements Runnable {private int ticket = 100;@Overridepublic void run() {while (true) {show();}}private synchronized void show() {//同步监视器即使thisif (ticket > 0) {try {Thread.sleep(10);} catch (InterruptedException e) {e.printStackTrace();}System.out.println(Thread.currentThread().getName() + ":卖票,票号:" + ticket);ticket--;}}}public class WindowTest3{public static void main(String[] args) {Window3 window3=new Window3();Thread t1=new Thread(window3);Thread t2=new Thread(window3);Thread t3=new Thread(window3);t1.setName("窗口1");t2.setName("窗口2");t3.setName("窗口3");t1.start();t2.start();t3.start();}}
解决继承Thread类的线程安全问题
package day18.java;/*** @author Lilei* @date 2022/1/7-@18:31*/class Window2 extends Thread {private static int ticket = 100;@Overridepublic void run() {while (true) {show();}}private static synchronized void show() {//同步监视器是Window2.classtry {Thread.sleep(10);} catch (InterruptedException e) {e.printStackTrace();}if (ticket > 0) {System.out.println(Thread.currentThread().getName() + ":卖票,票号为:" + ticket);ticket--;}}}public class WindowTest2 {public static void main(String[] args) {Window2 w1=new Window2();Window2 w2=new Window2();Window2 w3=new Window2();w1.setName("窗口一");w2.setName("窗口二");w3.setName("窗口三");w1.start();w3.start();w2.start();}}
解决单例模式中的线程安全问题
package day18.exe;/*** @author Lilei* @date 2022/1/11-@16:35*/public class BankTest {public static void main(String[] args) {Bank bank1=Bank.getInstance();Bank bank2=Bank.getInstance();System.out.println(bank1==bank2);}}//懒汉式单例class Bank{private Bank(){}private static Bank instance=null;public static Bank getInstance(){//方式一:效率稍差// synchronized (Bank.class){// if (instance==null){// instance=new Bank();// }// return instance;// }//方式二:效率更高if (instance==null){synchronized (Bank.class){if (instance==null){instance=new Bank();}}}return instance;}}
线程的死锁问题
不同的线程分别占用对方需要的共享资源不放弃,都在等对方释放自己需要的共享资源,就形成了死锁
出现死锁后,不会出现异常、提示,只是所有线程都在阻塞状态,无法继续
解决线程安全问题方式三:Lock锁—jdk5.0新增
package day18.exe;import java.util.concurrent.locks.ReentrantLock;/*** @author Lilei* @date 2022/1/11-@17:29*/class Window implements Runnable{private int ticket=100;//1.实例化ReetrantLockprivate ReentrantLock lock=new ReentrantLock();@Overridepublic void run() {while (true){try{//调用锁方法lock.lock();if (ticket>0){try {Thread.sleep(100);} catch (InterruptedException e) {e.printStackTrace();}System.out.println(Thread.currentThread().getName()+":售票,票号:"+ticket);ticket--;}else {break;}}finally {//调用解锁方法lock.unlock();}}}}public class LockTest {public static void main(String[] args) {Window w=new Window();Thread t1 = new Thread(w);Thread t2 = new Thread(w);Thread t3 = new Thread(w);t1.setName("窗口一");t2.setName("窗口二");t3.setName("窗口三");t1.start();t2.start();t3.start();}}
面试题:synchronized与Lock方式的异同
相同:都可解决线程安全问题
不同:synchronized机制在执行完相应的同步代码后,会自动的释放同步监视器
Lock需要手动的去启动同步(lock.lock()),同时结束也需要手动结束(lock.unlock())
优先使用顺序:Lock锁—>同步代码块(已经进入方法体,分配了相应资源)—>同步方法(在方法体外面)
面试题:如何解决线程安全问题?有集中方式?
(synchronized)同步代码块 同步方法 Lock锁
线程通信
例子:使用两个线程打印1-100
package day18.exe;/*** @author Lilei* @date 2022/1/11-@21:55*/public class CommunicationTest {public static void main(String[] args) {Number num = new Number();Thread t1 = new Thread(num);Thread t2 = new Thread(num);t1.setName("t1");t2.setName("t2");t1.start();t2.start();}}class Number implements Runnable{private int number=1;@Overridepublic void run() {while (true) {synchronized(this){notifyAll();if (number <= 100) {System.out.println(Thread.currentThread().getName() + ":" + number);number++;try {//调用wait方法使线程进入阻塞,可以释放同步监视器wait();} catch (InterruptedException e) {e.printStackTrace();}} else {break;}}}}}
涉及到三个方法:
wait():一旦执行此方法,当前线程就会进入阻塞状态,并释放同步监视器
notify():一旦执行此方法,就会唤醒一个被wait的线程
notifyAll():一旦执行此方法,就会唤醒所有被wait的线程
说明:1.只能出现在同步代码块或者同步方法中
2.调用者必须是同步代码块或同步方法中的同步监视器
3.三个方法定义在java.long.Object类中。
面试题:sleep()和wait()的异同
相同点:一旦执行方法,都可以使当前线程进入阻塞状态。
不同点:1.两个方法声明的位置不同Threa()类中声明sleep(),Object类中声明wait()
2.调用的范围要求不同:sleep()可以在任何需要的场景下调用。wait()必须使用在同步方法或同步代码块中。
3.关于是否是否同步监视器:如果两个方法都写在同步代码块或同步方法中,sleep方法不会释放同步监视器,wait方法会释放同步监视器
JDK5.0新增创建线程方式
方式一:实现Callable接口
与Runnable相比,Callable功能更强大一些
1.相比run()方法,可以有返回值
2.方法可以抛出异常
3.支持泛型的返回值
4.需要借助FutureTask类,比如获取返回值结果
package day18.java;import java.util.concurrent.Callable;import java.util.concurrent.ExecutionException;import java.util.concurrent.FutureTask;/*** @author Lilei* @date 2022/1/25-@21:09*///1.创建一个实现Callable接口的实现类class NumThread implements Callable{//2.实现call方法,将需要执行的操作写在此方法中@Overridepublic Object call() throws Exception {int sum=0;for (int i = 1; i <100 ; i++) {if (i%2==0){System.out.println(i);sum+=i;}}return sum;}}public class ThreadNew {public static void main(String[] args) {//3.创建callable接口实现类的对象NumThread numThread=new NumThread();//4.将此callable接口实现类的对象作为参数传递到FutureTask构造器中,创建FutureTask的对象FutureTask futureTask = new FutureTask(numThread);//5.将FutureTask的对象作为参数传递到Thread类的构造器中,创建Thread对象,并调用start()new Thread(futureTask).start();try {//6.获取Callable中call方法的返回值Object sum=futureTask.get();System.out.println("总和为:"+sum);} catch (InterruptedException e) {e.printStackTrace();} catch (ExecutionException e) {e.printStackTrace();}}}
方式二:使用线程池
好处:1.提高响应速度(减少线程创建时间)
2.降低资源消耗(重复利用线程池中线程,不需要每次都创建)
3.便于管理
corePoolSize:核心池大小
maximumPoolSize:最大线程数
keepAliveTime:线程没有任务时最多保持多长时间会终止
9常用类
字符串相关类
String
String类:代表字符串,字符串是常量用双引号引起来表示
String实现了Serializable接口:表示字符串是支持序列化的
实现了Comparable接口:表示String可比较大小
String对象的字符内容是存储在一个字符数组value[]中 fianl char[] value
String类是一个final类,代表不可变的字符序列,不可被继承
体现:当对字符串重新赋值,需要重新指定内存区域,不能使用原有的value赋值
当对现有字符串进行连接操作时,也需要重新指定内存区域赋值
当调用String的replace方法修改指定字符或字符串时,也需要重新指定内存区域赋值
通过字面量的方式给一个字符串赋值,此时的字符串值声明在字符串常量池中
常量池中不会存放相同内容的字符串
String实例化的方式
方式一:通过字面量定义的方式
方式二:通过new+构造器的方式
@Testpublic void test(){String s1="javaee";String s2="hadoop";String s3="javaeehadoop";String s4="javaee"+"hadoop";String s5=s1+"hadoop";String s6="javaee"+s2;String s7=s1+s2;String s8=s5.intern();//返回值得到的s8使用的是常量池中已经存在的"javaeehadoop"System.out.println(s3==s4);//trueSystem.out.println(s3==s5);//falseSystem.out.println(s3==s6);//falseSystem.out.println(s3==s6);//falseSystem.out.println(s3==s7);//falseSystem.out.println(s5==s6);//falseSystem.out.println(s5==s7);//falseSystem.out.println(s6==s7);//falseSystem.out.println(s3==s8);//true}
结论:常量与常量的拼接结果在常量池中,且常量池中不会存在相同内容的常量
只要其中有一个变量,结果就在堆中
如果拼接的结果调用intern()方法,返回值就在常量池中
String的常用方法1
int length():返回字符串长度:return value.length
char charAt(int index):返回某索引处的字符 return value[index]
boolean isEmpty():判断是否是空字符串:return value.length==0
String toLowerCase():使用默认语言环境,将String中的所有字符转换为小写
String toUpperCase():使用默认语言环境,将String中的所有字符转换为大写
String trim():返回字符串的副本,忽略前导空白和尾部空白
boolean equals(Object obj):比较字符串的内容是否相同
boolean equalsIgnoreCase(String anotherString):与equals方法类似,忽略大小写
String concat(String str):将指定字符串连接到此字符串结尾,等价于用“+”
int compareTo(String anotherString):比较两个字符串大小
String substring(int beginIndex):返回一个新字符串,他是此字符串的从beginIndex开始截取
String substring(int beginIndex,int endIndex):返回一个新字符串,他是此字符串的从beginIndex到endIndex(不包含)截取
@Testpublic void test2(){/*int length():返回字符串长度:return value.lengthchar charAt(int index):返回某索引处的字符 return value[index]boolean isEmpty():判断是否是空字符串:return value.length==0String toLowerCase():使用默认语言环境,将String中的所有字符转换为小写String toUpperCase():使用默认语言环境,将String中的所有字符转换为大写String trim():返回字符串的副本,忽略前导空白和尾部空白boolean equals(Object obj):比较字符串的内容是否相同boolean equalsIgnoreCase(String anotherString):与equals方法类似,忽略大小写String concat(String str):将指定字符串连接到此字符串结尾,等价于用“+”int compareTo(String anotherString):比较两个字符串大小String substring(int beginIndex):返回一个新字符串,他是此字符串的从beginIndex开始截取String substring(int beginIndex,int endIndex):返回一个新字符串,他是此字符串的从beginIndex到endIndex(不包含)截取*/String s1="Helloworld";String s2="helloworld";System.out.println(s1.length());System.out.println(s1.charAt(5));System.out.println(s1.isEmpty());System.out.println(s1.toUpperCase());System.out.println(s1.toLowerCase());String s3=" he l o wo rld ";String s4 = s3.trim();//去除首尾空格System.out.println(s3);System.out.println(s4);System.out.println(s1.equals(s2));System.out.println(s1.equalsIgnoreCase(s2));String s5="abc";String s6=s1.concat(s5);System.out.println(s6);String s7="abd";System.out.println(s5.compareTo(s7));String s8=s1.substring(3);System.out.println(s8);String s9=s1.substring(3,6);System.out.println(s9);}
String的常用方法2
boolean endsWith(String suffix):测试此字符串是否以指定的后缀结束
boolean startsWith(String prefix):测试此字符串是否以指定的前缀开始
boolean startsWith(String prefix,int toffset):测试此字符串从指定索引开始的子字符串是否以指定前缀开始
boolean contains(CharSequence s):当且仅当此字符串包含指定的char值序列时,返回true
int indexOf(String str):返回指定子字符串在此字符串中第一次出现处的索引
int indexOf(String str,int formIndex):返回指定子字符串在此字符串中第一次出现处的索引,从指定的索引开始
int lastIndexOf(String str):返回指定子字符串在此字符串中最右边出现处的索引
int lastIndexOf(String str,int formIndex):返回指定子字符串在此字符串中最右边出现处的索引,从指定的索引开始
indexOf和lastIndexOf方法如果未找到都返回-1
public void test3(){/*boolean endsWith(String suffix):测试此字符串是否以指定的后缀结束boolean startsWith(String prefix):测试此字符串是否以指定的前缀开始boolean startsWith(String prefix,int toffset):测试此字符串从指定索引开始的子字符串是否以指定前缀开始*/String str1="helloworld";System.out.println(str1.endsWith("ld"));System.out.println(str1.startsWith("he"));System.out.println(str1.startsWith("ll", 2));String str2="wo";System.out.println(str1.contains(str2));System.out.println(str1.indexOf(str2));System.out.println(str1.indexOf(str2,6));}
什么情况下,indexOf(str)和lastIndexOf(str)返回值相同?
情况一:只存在一个str 情况二:不存在str
String的常用方法3
替换:<br />String replace(char oldChar, char newChar):返回一个新的字符串它是通过用newChar替换此字符串中出现的所有oldChar得到的。<br />String replace(CharSequence target,CharSequence replacement):使用指定的字面值替换序列替换此字符串所有匹配字面值目标序列的子字符串。<br />String replaceAll(String regex,String replacement):使用给定的replacement替换此字符串所有匹配给定的正则表达式的子字符串。<br />String replaceFirst(String regex,String replacement):使用给定的replacement替换此字符串匹配给定的正则表达式的第一个子字符串。<br />string split(String regex):根据给定正则表达式的匹配拆分此字符串<br />匹配:<br />boolean matches(String regex):告知此字符串是否匹配给定的正则表达式。<br />切片:<br />string split(String regex):根据给定正则表达式的匹配拆分此字符串<br />Stringl split(String regex, int limit):根据匹配给定的正则表达式来拆分此字符串,最多不超过limit个,如果超过了,剩下的全部都放到最后一个元素中。
@Testpublic void test4(){/*替换:String replace(char oldChar, char newChar):返回一个新的字符串它是通过用newChar替换此字符串中出现的所有oldChar得到的。String replace(CharSequence target,CharSequence replacement):使用指定的字面值替换序列替换此字符串所有匹配字面值目标序列的子字符串。String replaceAll(String regex,String replacement):使用给定的replacement替换此字符串所有匹配给定的正则表达式的子字符串。String replaceFirst(String regex,String replacement):使用给定的replacement替换此字符串匹配给定的正则表达式的第一个子字符串。string split(String regex):根据给定正则表达式的匹配拆分此字符串匹配:boolean matches(String regex):告知此字符串是否匹配给定的正则表达式。切片:string split(String regex):根据给定正则表达式的匹配拆分此字符串Stringl split(String regex, int limit):根据匹配给定的正则表达式来拆分此字符串,最多不超过limit个,如果超过了,剩下的全部都放到最后一个元素中。*/String str1="甘肃某某某";String str2 = str1.replace('某', '谋');System.out.println(str1);System.out.println(str2);String str3 = str1.replace("甘肃", "天津");System.out.println(str3);String str4="123java456mysql78web9";//把字符串数字替换为逗号,并且结果开头或结尾有逗号要去掉String str5 = str4.replaceAll("\\d+", ",").replaceAll("^,|,$", "");System.out.println(str5);String str6="123456";//判断字符串是不是全部由数字组成System.out.println(str6.matches("\\d+"));String str7="0571-4534289";//判断是否为一个杭州的固定电话System.out.println(str7.matches("0571-\\d{7,8}"));String str8="hello|world|java";String [] strs=str8.split("\\|");for (int i = 0; i <strs.length; i++) {System.out.println(strs[i]);}String str9="hello.world.java";String [] strings=str9.split("\\.",2);for (int i = 0; i <strings.length ; i++) {System.out.println(strings[i]);}}
String与基本数据类型、包装类之间的转换
String—->基本数据类型、包装类:调用包装类的静态方法:parseXxx(str)
基本数据类型、包装类—->String:调用Sting承载的valueOf(xxx)方法
@Testpublic void test5(){String s1="123";int i = Integer.parseInt(s1);String str2 = String.valueOf(i);}
String与char[]之间的转换
String—->char[]:调用String的toCharArray()
char[]—->String:调用String的构造器
@Testpublic void test6() {String str1 = "abc123";char[] chars = str1.toCharArray();for (int i = 0; i < chars.length; i++) {System.out.println(chars[i]);}char[] chars1= new char[]{'h', 'e', 'l', 'l', 'o'};String string = new String(chars1);System.out.println(string);}
String和byte[]之间的转换
string—->byte[]:调用String的getBytes()
byte[]——->String :调用String的构造器
编码:字符串—->字节(看得懂—->看不懂的二级制数据)
解码:字节—->字符串(看不懂的二进制—->看得懂)
说明:解码时,要求解码使用的字符集必须与编码使用的字符集相同,否则会出现乱码
@Testpublic void test7() throws UnsupportedEncodingException {String str1="abc123中国";byte[] bytes=str1.getBytes();System.out.println(Arrays.toString(bytes));//使用默认字符集转换byte[] gbks= new byte[0];try {gbks = str1.getBytes("gbk");//使用gbk字符集转换} catch (UnsupportedEncodingException e) {e.printStackTrace();}System.out.println(Arrays.toString(gbks));String str2=new String(bytes);//使用默认字符集解码System.out.println(str2);String str3=new String(gbks);//出现乱码。原因:编码集和解码集不一致System.out.println(str3);String str4=new String(gbks,"gbk");System.out.println(str4);}
StringBuffer和StringBuilder
String、StringBuffer、StringBuilder的异同
String:不可变的字符序列;底层使用char[]存储
StringBuffer:可变的字符序列;线程安全的,效率低;底层使用char[]存储
StringBuilder:可变的字符序列;jdk5.0新增,线程不安全的,效率高;底层使用char[]存储
源码分析:
String str=new String();//new char [0];
String str1=new String(“abc”);new char[]{‘a’,’b’,’c’}
StringBuffer sbq1=new StringBuffer();//new char[16];底层创建了一个长度为16的数组
sb1.append(‘a’);//value[0]=’a’;
sb1.append(‘b’);//value[1]=’b’;
StringBuffer sb2=new StringBuffer(“abc”);//char[] value=new char[“abc”.length+16]
//问题一:SYstem.out.println(sb2.length);//3
//问题二:扩容问题:如果要添加的数据底层数组盛不下了,那就需要扩容底层的数组
默认情况下扩容为原来的2倍+2,同时将原有数组中的元素复制到新的数组中
指导意义:开发中建议使用:StringBuffer(int capacity)或StringBuilder(int capacity)
StringBuffer的常用方法:
stringBuffer append(xxx):提供了很多的append()方法,用于进行字符串拼接
StringBuffer delete(int start,int end):删除指定位置的内容
StringBuffer repLace(int start, int end,string str):把[start,end)位置替换为str
StringBuffer insert(int offset, xxx):在指定位置插入xxx
StringBuffer reverse() :把当前字符序列逆转
public int indexof(String str):返回当前字符的索引
public string substring(int start,int end):返回一个[start,end)的子字符串
public int length()
public char charAt(int n )
public void setCharAt(int n ,char ch):修改指定位置字符
总结:增:append(xxx)
删:delete(int start,int end)
改:setCharAt(int n ,char ch);repLace(int start, int end,string str);
查:charAt(int n )
插:insert(int offset, xxx)
长度:length()
遍历:for()+charAt
@Testpublic void test(){StringBuffer s1=new StringBuffer("abc");s1.append("1");s1.append(1);System.out.println(s1);// s1.delete(2,4);// s1.replace(2,4,"hello");// s1.insert(2,"false");// s1.reverse();String s2=s1.substring(1,3);System.out.println(s2);}
String、StringBuffer、StringBuilder三者效率对比
StringBuilder>StringBuffer>String
常见算法题目
1.模拟一个trim方法,去除字符串两端的空格
2.将一个字符串进行反转。将字符串指定部分反转。
public class StringDemo {//方法一:先转换为char[]public String reverse(String str,int startIndex,int endIndex){if (str!=null){char[] arr = str.toCharArray();for (int x=startIndex,y=endIndex;x<y;x++,y--){char temp=arr[x];arr[x]=arr[y];arr[y]=temp;}return new String(arr);}return null;}//方法二:String的拼接操作public String reverse1(String str,int startIndex,int endIndex){if (str!=null){String reverseStr=str.substring(0,startIndex);for (int i=endIndex;i>=startIndex;i--){reverseStr+=str.charAt(i);}reverseStr+=str.substring(endIndex+1);return reverseStr;}return null;}//方法三:使用StringBuffer、StringBuilder替换Stringpublic String reverse2(String str,int startIndex,int endIndex){if (str!=null){StringBuilder builder=new StringBuilder(str.length());builder.append(str.substring(0,startIndex));for (int i=endIndex;i>=startIndex;i--){builder.append(str.charAt(i));}builder.append(str.substring(endIndex+1));return builder.toString();}return null;}@Testpublic void test(){String s="abcdefg";String reverse=reverse1(s,2,5);System.out.println(reverse);}}
3.获取一个字符串在另一个字符串中的次数
public class StringDemo1 {/*获取一个字符串在另一个字符串中的字数如“ab"在"abkkcadkabfkabkskab"*//**获取sunStr在mainStr中出现的次数* @param mainStr* @param subStr* @return*/public int getCount(String mainStr,String subStr){int mainLength=mainStr.length();int subLength=subStr.length();int count=0;int index=0;if (mainLength>=subLength){//方法一:// while ((index=mainStr.indexOf(subStr))!=-1){// count++;// mainStr=mainStr.substring(index+subStr.length());// }//方法二:while ((index=mainStr.indexOf(subStr,index))!=-1){count++;index+=subLength;}return count;}else {return 0;}}@Testpublic void test(){String mainStr="abkkcadkabfkabkskab";String subStr="ab";int count = getCount(mainStr, subStr);System.out.println(count);}}
4.获取两个字符串中最大相同子串
public class StringDemo2 {/*获取两个字符串中最大相同子串如str1=“abcwerthelloyuiodef”,str2="cvhellobnm"提示:将短的字符串进行长度一次递减的子串与较长的串比较*/public String getMaxString(String str1,String str2){if(str1!=null&&str2!=null){String MaxString = (str1.length()>= str2.length()) ? str1 : str2;String MinString = (str1.length() < str2.length()) ? str1 : str2;for (int i=0;i<MinString.length();i++){for (int x = 0, y =MinString.length()-i;y<=MinString.length();x++,y++){System.out.println(x+"::::"+y);String subStr = MinString.substring(x, y);if (MaxString.contains(subStr)){return subStr;}}}}return null;}@Testpublic void test(){String str1="abcwerthelloyuiodef";String str2="cvhellobnm";String maxStr = getMaxString(str1, str2);System.out.println(maxStr);}}
jdk8之前的日期时间API
java.lang.System类
1.System类中的currentTimeMillis()
System类中提供的public static long currentTimeMillis()用来返回当前时间与1970年1月1日0时0分0秒之间的以毫秒为单位的时间差值
称为时间戳
@Testpublic void test(){long time=System.currentTimeMillis();System.out.println(time);}
java.util.date类
1.两个构造器的使用
》//构造器一:创建了一个对应当前时间的Date对象
》//构造器二:创建指定毫秒数的Date对象
2.两个方法的使用
》tostring():显示当前的年月日时分秒
》getTime():获取当前Date对象对应的毫秒数。时间戳
@Testpublic void test1(){//构造器一:创建了一个对应当前时间的Date对象Date date1 = new Date();System.out.println(date1.toString());System.out.println(date1.getTime());//构造器二:创建指定毫秒数的Date对象Date date2 = new Date(1645429322318L);System.out.println(date2);}
java.sql.Date对应着数据库中的日期类型变量
如何实例化
java.sql.Date date3 = new java.sql.Date(2323235656424L);//2043-08-15util.Date>>>sql.Date对象
//情况一:Date date4=new java.sql.Date(2323235656424L);java.sql.Date date5=(java.sql.Date)date4;//情况二:Date date6=new Date();java.sql.Date date7=new java.sql.Date(date6.getTime());SimpleDateFormat
SimpleDateFormat的使用:SimpleDateFormat对日期Date类的格式化和解析
1.两个操作:
1.1格式化:日期——》指定格式的字符串
1.2解析:格式化的逆过程,字符串—->日期
2.SimpleDateFormat的实例化 ```java
@Testpublic void testSimpleDateFormat() throws ParseException {//实例化SimpleDateFormatSimpleDateFormat sdf = new SimpleDateFormat();//格式化Date date = new Date();System.out.println(date);String format = sdf.format(date);System.out.println(format);//解析String str="22/2/22 上午2:22";Date date1 = sdf.parse(str);System.out.println(date1);//***********按照指定方式格式化和解析************************SimpleDateFormat sdf1=new SimpleDateFormat("yyyy-MM-dd hh:mm:ss");//格式化String format1 = sdf1.format(date);System.out.println(format1);Date date2 = sdf1.parse("2022-02-22 04:56:22");System.out.println(date2);}
<a name="G5Tfs"></a>### Calendar(日历)类_Calendar日历类(抽象类)的使用_```java@Testpublic void testCalendar(){//实例化//方式一:创建子类(GregorianCalender)的对象//方式二:调用其静态方法getInstanceCalendar instance = Calendar.getInstance();System.out.println(instance.getClass());//常用方法//get()int days = instance.get(instance.DAY_OF_MONTH);System.out.println(days);System.out.println(instance.get(instance.DAY_OF_YEAR));//set()instance.set(instance.DAY_OF_MONTH,22);days=instance.get(instance.DAY_OF_MONTH);System.out.println(days);//add()instance.add(instance.DAY_OF_MONTH,3);days=instance.get(instance.DAY_OF_MONTH);System.out.println(days);//getTime():日历类----》》DateDate date = instance.getTime();System.out.println(date);//setTime():Date--->>日历类Date date1 = new Date();instance.setTime(date1);System.out.println(instance.get(instance.DAY_OF_MONTH));}
jdk8中新日期时间API
背景
可变性:像日期时间这样的类应该都是不可变的。
偏移量:Date中年份是从1900年开始的,月份都是从0开始的
格式化:格式化只对Date有用,对Calendar则不行
此外,他们也不是线程安全的,不能处理闰秒等
LocalDate、LocalTime、LocalDateTime的使用
@Testpublic void test1(){//now():获取当前时间日期、时间或者日期加时间LocalDate nowDate = LocalDate.now();LocalTime nowTime = LocalTime.now();LocalDateTime nowDateTime = LocalDateTime.now();System.out.println(nowDate);System.out.println(nowTime);System.out.println(nowDateTime);//of():设置指定日期时间没有偏移量LocalDateTime localDateTime1 = LocalDateTime.of(2020, 10, 12, 13, 23, 53);System.out.println(localDateTime1);//getXxx():获取相关属性System.out.println(nowDateTime.getMonth());System.out.println(nowDateTime.getDayOfMonth());System.out.println(nowDateTime.getDayOfWeek());System.out.println(nowDateTime.getMonthValue());//withXxx():设置相关的属性(体现不可变性)LocalDate localDate = nowDate.withDayOfMonth(23);System.out.println(localDate);System.out.println(nowDate);LocalDateTime localDateTime = nowDateTime.withHour(3);System.out.println(localDateTime);System.out.println(nowDateTime);}
Instant 瞬时
时间线上的一个瞬时点。可能被用来记录应用程序中事件时间戳
@Testpublic void test2(){//now():获取本初子午线对应的标准时间Instant instant = Instant.now();System.out.println(instant);//添加时间的偏移量OffsetDateTime offsetDateTime = instant.atOffset(ZoneOffset.ofHours(8));System.out.println(offsetDateTime);//toEpochMilli():获取自1970年1月1日0时0分0秒(UTC)开始的毫秒数long toEpochMilli = instant.toEpochMilli();System.out.println(toEpochMilli);//ofEpochMilli():通过给定的毫秒数获取Instant实例-->Date(Long millis)Instant instant1 = instant.ofEpochMilli(1650285961834L);System.out.println(instant1);}
DateTimeFormatter
格式化解析日期时间(类似于SimpleDateFormat)
@Testpublic void test3(){//实例化方式://方式一:预定义的标准格式。如:IOS_LOCAL_DATE_TIME;IOS_LOCAL_DATE:IOS_LOCAL_TIMEDateTimeFormatter formatter=DateTimeFormatter.ISO_LOCAL_DATE_TIME;//格式化:日期->字符串LocalDateTime localDateTime=LocalDateTime.now();String format = formatter.format(localDateTime);System.out.println(localDateTime);System.out.println(format);//解析:字符串->日期:TemporalAccessor parse = formatter.parse(format);System.out.println(parse);//方式二:本地化相关格式。如:ofLocalizedDateTime()//FormatStyle.LONG/FormatStyle.MEDIUM/FormatStyle.SHORTDateTimeFormatter formatter1 = DateTimeFormatter.ofLocalizedDateTime(FormatStyle.SHORT);//格式化String format1 = formatter1.format(localDateTime);System.out.println(format1);//解析TemporalAccessor parse1 = formatter1.parse(format1);System.out.println(parse1);//ofLocalizedDate()//FormatStyle.FULL/FormatStyle.LONG/FormatStyle.MEDIUM/FormatStyle.SHORT:适用于LocalDateDateTimeFormatter formatter2 = DateTimeFormatter.ofLocalizedDate(FormatStyle.FULL);//格式化LocalDate localDate = LocalDate.now();String format2 = formatter2.format(localDate);System.out.println(format2);//解析TemporalAccessor parse2 = formatter2.parse(format2);System.out.println(parse2);//方式三:自定义格式.如:ofPattern("yyyy-MM-dd hh:mm:ss")DateTimeFormatter formatter3 = DateTimeFormatter.ofPattern("yyyy-MM-dd hh:mm:ss");//格式化String format3 = formatter3.format(localDateTime);System.out.println(format3);//解析TemporalAccessor parse3 = formatter3.parse(format3);System.out.println(parse3);}
其他API
Zoneld:包含所有的时区信息,一个时区的ID
ZoneldDateTime:一个在IOS-8601日历系统时区的日期时间
Clock:使用时区提供对当前即时、日期和时间的访问时钟
持续时间:Duration:用于计算两个时间间隔
日期间隔:Period:用于计算两个日期间隔
TempporalAdjuster:时间校正器。
TempporalAdjuster:通过静态方法提供大量的常用TemporalAdjuster的实现
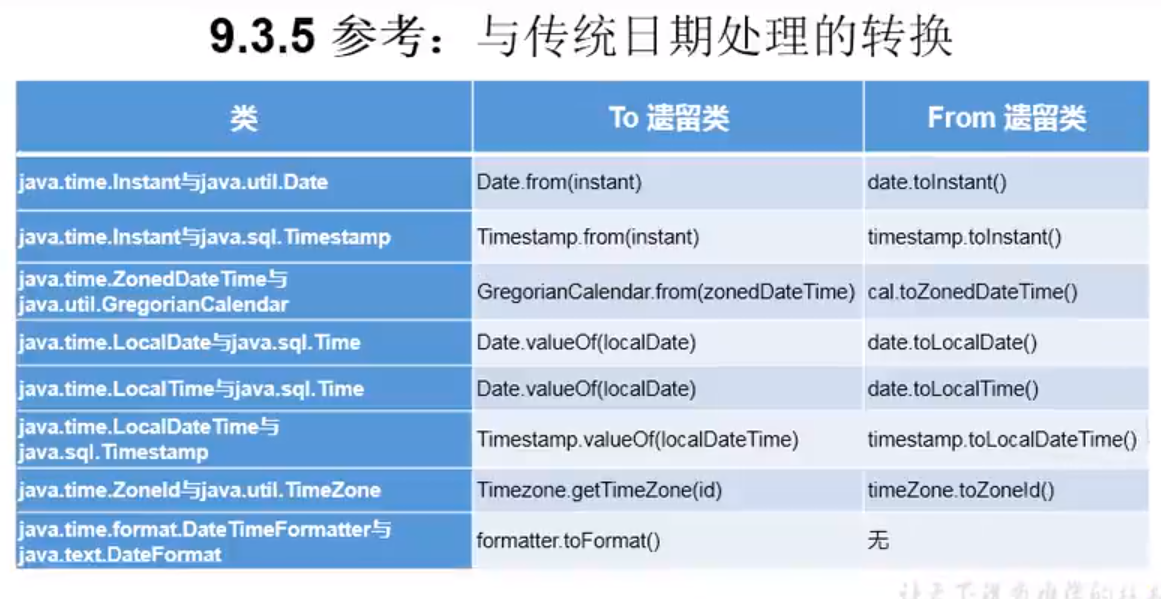
与传统日期的处理转换
java比较器
一、说明:Java中的对象,正常情况下,只能进行比较: ==或!=。不能使用〉或<的但是在开发场景中,我们需要对多个对象进行排序,言外之意,就需要比较对象的大小。如何实现﹖使用两个接口中的任何一个: Comparable或Comparator
Comparable
Comparable接口的使用举例:自然排序
1.像String、包装类等实现了Comparable接口,重写了compareTo(obj)方法,给出了比较两个对象大小的方式
2.像String、包装类重写CompareTo()方法以后,进行了从小到大的排列
3.重写CompareTo(obj)的规则:
如果当前对象this大于形参对象obj,则返回正整数,
如果当前对象this小于形参对象obj,则返回负整数,
如果当前对象this等于形参对象obj,则返回0
4.对于自定义类来说,如果需要排序,我们可以让自定义类实现Comparable接口,重写CompareTo(obj)方法,在CompareTo(obj)方法说明如何排序。
@Testpublic void test1(){String[] arr=new String[]{"aa","bb","cc","KK","MM","GG"};Arrays.sort(arr);System.out.println(Arrays.toString(arr));}
例题
重写了CompareTo()方法,按照指定属性排序
public class Goods implements Comparable{private String name;private double price;public Goods() {}public Goods(String name, double price) {this.name = name;this.price = price;}public String getName() {return name;}public void setName(String name) {this.name = name;}public double getPrice() {return price;}public void setPrice(double price) {this.price = price;}@Overridepublic String toString() {return "Goods{" +"name='" + name + '\'' +", price=" + price +'}';}//指明按照商品比较大小方式 :按价格从低到高@Overridepublic int compareTo(Object o) {if(o instanceof Goods){Goods goods=(Goods)o;if (this.price>goods.price){return 1;}else if (this.price<goods.price){return -1;}else {return 0;}//方式二://return Double.compare(this, price, goods.price);}throw new RuntimeException("传入的数据类型不一致!!!");}
@Testpublic void test2(){Goods[] goods=new Goods[4];goods[0]=new Goods("leisheMouse",34);goods[1]=new Goods("dellMouse",43);goods[2]=new Goods("xiaomiMouse",12);goods[3]=new Goods("huaweiMouse",65);Arrays.sort(goods);System.out.println(Arrays.toString(goods));}
Comparator
1.背景:
当元素的类型没有实现java.lang.Comparable接口而又不方便修改代码,或者实现了java.lang.Comparable接口的排序规则不适合当前操作,那么可以考虑使用Comparator的对象排序
2.重写Compare(Object o1,Object o2)方法,比较o1和o2大小
如果返回正整数,则表示o1大于o2,如果返回负整数,表示o1小于o2,如果返回零,则表示相等
@Testpublic void test3(){String[] arr=new String[]{"aa","bb","cc","KK","MM","GG"};Arrays.sort(arr, new Comparator<String>() {//按照字符串从大到小@Overridepublic int compare(String o1, String o2) {if (o1 instanceof String && o2 instanceof String){String s1=(String) o1;String s2=(String) o2;return -s1.compareTo(s2);}throw new RuntimeException("输入数据类型不一致");}});System.out.println(Arrays.toString(arr));}
例题
Good类还是用之前那个
@Testpublic void test4(){Goods[] goods=new Goods[5];goods[0]=new Goods("leisheMouse",34);goods[1]=new Goods("dellMouse",43);goods[2]=new Goods("xiaomiMouse",12);goods[3]=new Goods("huaweiMouse",65);goods[4]=new Goods("xiaomiMouse",20);Arrays.sort(goods, new Comparator<Goods>() {//指明商品比较大小的方式,按照产品名称价格从低到高,在按照价格从高到低@Overridepublic int compare(Goods o1, Goods o2) {if (o1 instanceof Goods && o2 instanceof Goods){Goods g1=(Goods)o1;Goods g2=(Goods)o2;if (g1.getName().equals(g2.getName())){return -Double.compare(g1.getPrice(),g2.getPrice());}else{return g1.getName().compareTo(g2.getName());}}throw new RuntimeException("输入数据类型不一致");}});System.out.println(Arrays.toString(goods));}
Comparable接口和Comparator的使用对比
Comparable接口的方式一旦一定,保证Comparable接口实现类的对象在任何位置都可以比较大小
Comparable接口属于临时性比较
System类
@Testpublic void test1(){String version = System.getProperty("java.version");System.out.println("java的version:"+version);String home= System.getProperty("java.home");System.out.println("java的home:"+home);String osHome = System.getProperty("os.home");System.out.println("os的home:"+osHome);String osversion = System.getProperty("osversion");System.out.println("os的version:"+osversion);String userName = System.getProperty("user.name");System.out.println("user的name:"+userName);String userHome = System.getProperty("user.home");System.out.println("user的home:"+userHome);String userDir = System.getProperty("user.dir");System.out.println("user的dir:"+userDir);}
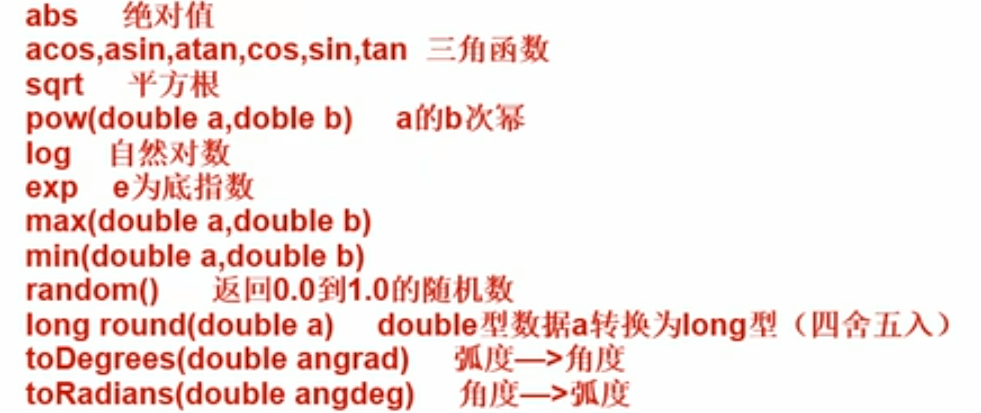
Math类
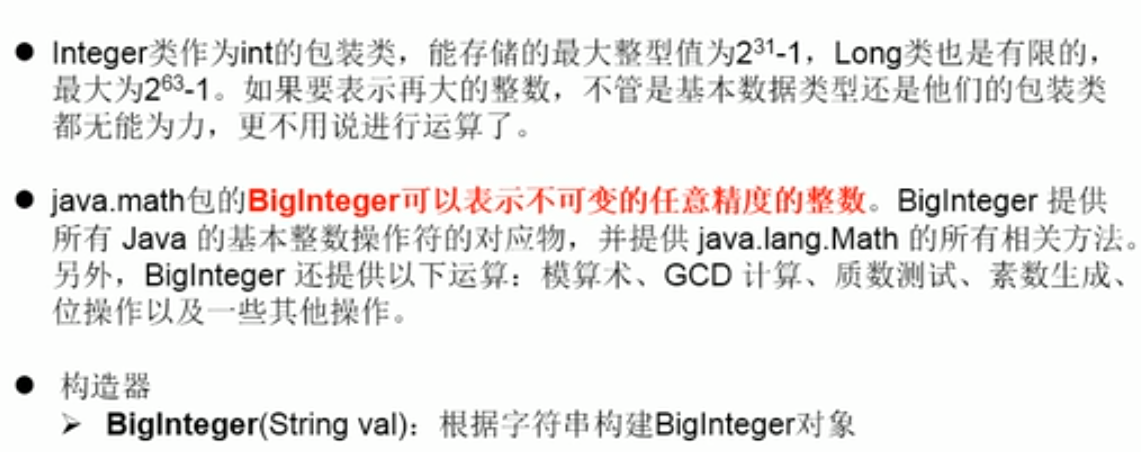
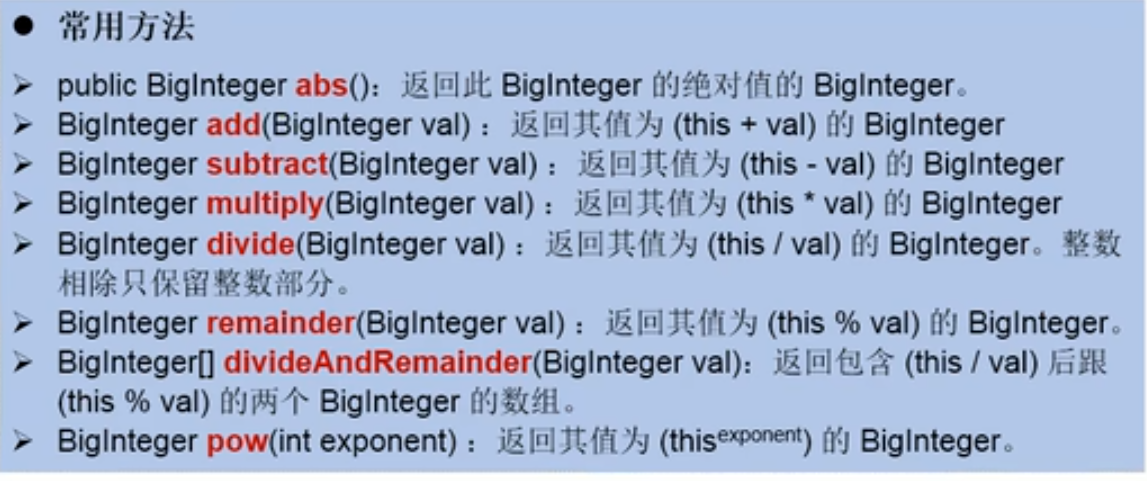
BigInteger和BigDecimal
BigInteger
BigDecimal
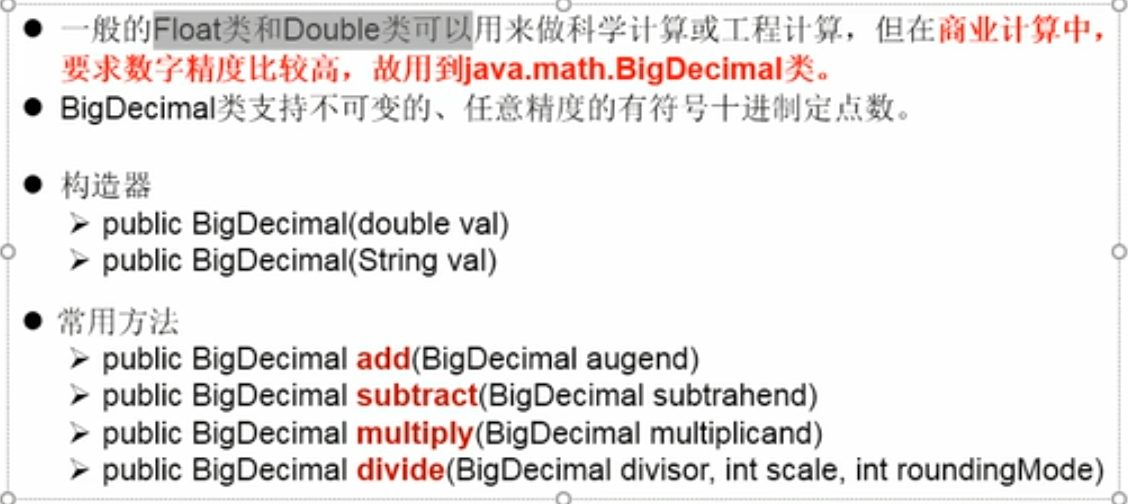
@Testpublic void test2(){BigInteger bigInteger=new BigInteger("12433241123");BigDecimal bigDecimal = new BigDecimal("12435.351");BigDecimal bigDecimal1 = new BigDecimal("11");System.out.println(bigInteger);//四舍五入System.out.println(bigDecimal.divide(bigDecimal1, BigDecimal.ROUND_HALF_UP));//保留25位小数位,四舍五入System.out.println(bigDecimal.divide(bigDecimal1, 25, BigDecimal.ROUND_HALF_UP));}
枚举类&注解
枚举类
一、枚举类的使用
1.类的对象只有有限个,确定的
2.当需要定义一组常量时,建议使用枚举类
3.如果枚举类中只有一个对象,它就可以作为一种单例模式的实现方式
二、如何定义枚举类
方式一:jdk5.0之前,自定义枚举类
package Day21;/*** @author Lilei* @date 2022/4/28-@12:06*/public class seasonTest {public static void main(String[] args) {Season spring = Season.SPRING;System.out.println(spring);}}class Season{//声明Season对象的属性:private final修饰private final String sName;private final String sDesc;//1.私有化构造器private Season(String sName,String sDesc){this.sName=sName;this.sDesc=sDesc;}//3.提供当前枚举类的多个对象:public static final修饰public static final Season SPRING=new Season("春天","出暖花开");public static final Season SUMMER=new Season("夏天","夏日炎炎");public static final Season AUTUMN=new Season("秋天","秋高气爽");public static final Season WINTER=new Season("冬天","冰天雪地");//4.其他诉求:获取枚举类对象的属性public String getsDesc() {return sDesc;}public String getsName() {return sName;}@Overridepublic String toString() {return "Season{" +"sName='" + sName + '\'' +", sDesc='" + sDesc + '\'' +'}';}}
方式二:jdk5.0,可以使用enum关键字定义枚举类
说明:定义的枚举类默认继承于java.lang.Enum
package Day21;import exercise.Student1;/*** @author Lilei* @date 2022/4/28-@15:05*/public class SeasonTest1 {public static void main(String[] args) {Season1 summer = Season1.SUMMER;System.out.println(summer);}}//enum关键字定义enum Season1 {//1.提供当前枚举类的多个对象:多个对象之间用逗号隔开,末尾对象分号结束SPRING("春天", "出暖花开"),SUMMER("夏天", "夏日炎炎"),AUTUMN("秋天", "秋高气爽"),WINTER("冬天", "冰天雪地");//声明Season对象的属性:private final修饰private final String sName;private final String sDesc;//1.私有化构造器private Season1(String sName, String sDesc) {this.sName = sName;this.sDesc = sDesc;}//4.其他诉求:获取枚举类对象的属性public String getsDesc() {return sDesc;}public String getsName() {return sName;}@Overridepublic String toString() {return "Season{" +"sName='" + sName + '\'' +", sDesc='" + sDesc + '\'' +'}';}}
三、Enum类的常用方法
values()方法:返回枚举类型的对象数组。该方法可以很方便的遍历所有的枚举值
valueOf(String str)方法:可以把一个字符串转为对应的枚举类对象。要求字符串必须是枚举类对象名
toString():返回当前枚举类对象的常量名
package Day21;import exercise.Student1;/*** @author Lilei* @date 2022/4/28-@15:05*/public class SeasonTest1 {public static void main(String[] args) {Season1 summer = Season1.SUMMER;//toString():System.out.println(summer);System.out.println("***************************************");//values():Season1[] values = Season1.values();for (int i = 0; i <values.length ; i++) {System.out.println(values[i]);}System.out.println("*******************************************");//valueOf():Season1 winter = Season1.valueOf("WINTER");System.out.println(winter);}}//enum关键字定义enum Season1 {//1.提供当前枚举类的多个对象:多个对象之间用逗号隔开,末尾对象分号结束SPRING("春天", "出暖花开"),SUMMER("夏天", "夏日炎炎"),AUTUMN("秋天", "秋高气爽"),WINTER("冬天", "冰天雪地");//声明Season对象的属性:private final修饰private final String sName;private final String sDesc;//1.私有化构造器private Season1(String sName, String sDesc) {this.sName = sName;this.sDesc = sDesc;}//4.其他诉求:获取枚举类对象的属性public String getsDesc() {return sDesc;}public String getsName() {return sName;}// @Override// public String toString() {// return "Season{" +// "sName='" + sName + '\'' +// ", sDesc='" + sDesc + '\'' +// '}';// }}
四、使用enum关键字定义的枚举类实现接口的情况
情况一:实现接口,在enum类中实现抽象方法
package Day21;import exercise.Student1;/*** @author Lilei* @date 2022/4/28-@15:05*/public class SeasonTest1 {public static void main(String[] args) {Season1 summer = Season1.SUMMER;// //toString():// System.out.println(summer);//// System.out.println("***************************************");// //values():// Season1[] values = Season1.values();// for (int i = 0; i <values.length ; i++) {// System.out.println(values[i]);//// }// System.out.println("*******************************************");// //valueOf():// Season1 winter = Season1.valueOf("WINTER");// System.out.println(winter);summer.show();}}interface info{void show();}//enum关键字定义enum Season1 implements info{//1.提供当前枚举类的多个对象:多个对象之间用逗号隔开,末尾对象分号结束SPRING("春天", "出暖花开"),SUMMER("夏天", "夏日炎炎"),AUTUMN("秋天", "秋高气爽"),WINTER("冬天", "冰天雪地");//声明Season对象的属性:private final修饰private final String sName;private final String sDesc;//1.私有化构造器private Season1(String sName, String sDesc) {this.sName = sName;this.sDesc = sDesc;}//4.其他诉求:获取枚举类对象的属性public String getsDesc() {return sDesc;}public String getsName() {return sName;}// @Override// public String toString() {// return "Season{" +// "sName='" + sName + '\'' +// ", sDesc='" + sDesc + '\'' +// '}';// }@Overridepublic void show() {System.out.println("这是一个季节");}}
情况二:让枚举类的对象分别实现接口中的抽象方法
package Day21;import exercise.Student1;/*** @author Lilei* @date 2022/4/28-@15:05*/public class SeasonTest1 {public static void main(String[] args) {Season1 summer = Season1.SUMMER;// //toString():// System.out.println(summer);//// System.out.println("***************************************");//values():Season1[] values = Season1.values();for (int i = 0; i <values.length ; i++) {System.out.println(values[i]);values[i].show();}// System.out.println("*******************************************");// //valueOf():// Season1 winter = Season1.valueOf("WINTER");// System.out.println(winter);summer.show();}}interface info{void show();}//enum关键字定义enum Season1 implements info{//1.提供当前枚举类的多个对象:多个对象之间用逗号隔开,末尾对象分号结束SPRING("春天", "出暖花开"){@Overridepublic void show() {System.out.println("春天在哪里?");}},SUMMER("夏天", "夏日炎炎"){@Overridepublic void show() {System.out.println("夏日炎炎,有你超甜");}},AUTUMN("秋天", "秋高气爽"){@Overridepublic void show() {System.out.println("秋天是个分手的季节");}},WINTER("冬天", "冰天雪地"){@Overridepublic void show() {System.out.println("大约在冬季");}};//声明Season对象的属性:private final修饰private final String sName;private final String sDesc;//1.私有化构造器private Season1(String sName, String sDesc) {this.sName = sName;this.sDesc = sDesc;}//4.其他诉求:获取枚举类对象的属性public String getsDesc() {return sDesc;}public String getsName() {return sName;}// @Override// public String toString() {// return "Season{" +// "sName='" + sName + '\'' +// ", sDesc='" + sDesc + '\'' +// '}';// }// @Override// public void show() {// System.out.println("这是一个季节");// }}
注解
注解(Annotation)的概述
jdk 5.0新增
Annotation其实就是代码的特殊标记
可用于修饰包、类、构造器、方法、成员变量、参数、局部变量的声明
常见的Annotation示例
示例一:生成文档相关的注解
示例二:在编译时进行格式检查(JDK内置的三个基本注解)
@Override:限定重写父类的方法
@Deprecated:用于表示所修饰的元素(类,方法等)已过时。
@Suppresswarnings:抑制编译器警告
示例三:跟踪代码依赖性,实现替代配置文件功能
如何自定义注解
注解声明为:@interface
自动继承了java.lang.annotation.Annotation接口
成员变量的以无参数方法的形式来声明。类型只能是八种基本数据类型、String类型、Class类型、enum类型、Annotation类型、以上所有类型的数组
指定成员变量的初始值可以使用default关键字
如果只有一个参数成员,建议使用参数名为value
没有成员定义的Annotation称为标记
自定义注解必须配上注解的信息处理流程(使用反射)才有意义
自定义注解一般都会指明两个元注解Retention、Target
jdk提供的四种元注解
jdk的元Annotation修饰其他Annotation定义(对现有的注解进行解释说明的注解)
Retention
@Retention:只能用于修饰一个Annotation定义,用于指定该Annotation的生命周期。包含一个RetentionPolicy类型的成员变量,使用时必须为该成员变量指定值
SOURCE\CLASS(默认行为)\RUNTIME
只有声明为RUNTIME生命周期的注解才能通过反射获取。
Target
@Target用于修饰Annotation定义,用于指定被修饰的Annotation能用于修饰哪些程序元素。也包含一个名为value的成员变量
Documented
用于指定被该元注解修饰的注解类将被javadoc工具提取成文档(被javadoc解析式保留下来)。默认情况下,javadoc是不包括注解的
Inherited
被它修饰的Annotation将具有继承性,子类自动具有该注解
通过反射获取注解信息
jdk 8 中注解的新特性:可重复注解、类型注解
可重复注解
在MyAnnotation上声明@Repeatable(),成员值为MyAnnotations.class
MyAnnotation的Target和Retention和MyAnnotations相同
@Inherited@Repeatable(MyAnnotations.class)@Retention(RetentionPolicy.RUNTIME)@Target({ElementType.TYPE,ElementType.FIELD,ElementType.METHOD,ElementType.PARAMETER,ElementType.CONSTRUCTOR,ElementType.LOCAL_VARIABLE})public @interface MyAnnotation {String value() default "hello";}
@Target({ElementType.TYPE,ElementType.FIELD,ElementType.METHOD,ElementType.PARAMETER,ElementType.CONSTRUCTOR,ElementType.LOCAL_VARIABLE})@Retention(RetentionPolicy.RUNTIME)public @interface MyAnnotations {MyAnnotation[] value();}
类型注解
ElementType.TYPE_PARAMETER:表示该注解能写在类型变量的声明语句中
ElementType.TYPE_USE:表示该注解能写在使用类型的任何语句中
@Inherited@Repeatable(MyAnnotations.class)@Retention(RetentionPolicy.RUNTIME)@Target({ElementType.TYPE_PARAMETER,ElementType.TYPE,ElementType.FIELD,ElementType.METHOD,ElementType.PARAMETER,ElementType.CONSTRUCTOR,ElementType.LOCAL_VARIABLE,ElementType.TYPE_USE})public @interface MyAnnotation {String value() default "hello";}
class Generic<@MyAnnotation T>{public void show()throws @MyAnnotation RuntimeException{ArrayList<@MyAnnotation String> list=new ArrayList<>();int num=(@MyAnnotation int) 10L;}}
java集合
集合框架的概述
1.集合、数组都是对多个数据进行存储操作的结构,简称java容器
说明:此时的存储,主要指内存层面的存储,不涉及持久化存储(.txt,.jpg,.avi,数据库中)
2.1数组在存储多个数据方面的特点
>一旦初始化以后,其长度就确定了
>数组一旦定义好,其元素的类型也就确定了。我们也就只能操作指定类型的数据了。比如:String[] arr;int[] arr1;Object[] arr2;
2.2数组在存储多个数据方面的缺点:
>一旦初始化以后,其长度不可修改
>数组中提供的方法非常有限,对于添加、删除、插入数据等操作,非常不便,同时效率不高
>获取数组中实际元素的个数,数组没有现成的属性或方法可用
>数组存储数据的特点:有序、可重复。对于无序、不可重复的需求,不能满足
Collection接口中声明方法的测试
向Collection接口的实现类的对象中添加数据obj时,要求obj所在类要重写equals()方法
@Testpublic void test(){Collection coll=new ArrayList();//add(Object e):将元素e添加到集合中coll.add(123);coll.add(456);coll.add(new String("Tom"));coll.add(false);coll.add(new Person("jerry",20));//size():获取添加的元素的个数System.out.println(coll.size());//4//addAll(Collection coll1):将coll1中的元素添加到当前集合中Collection coll1= Arrays.asList("AA","BB");coll.addAll(coll1);System.out.println(coll.size());//6System.out.println(coll);//clear():清空集合元素coll.clear();//isEmpty():判断当前集合是否为空System.out.println(coll.isEmpty());}
@Testpublic void test1(){Collection coll=new ArrayList();//add(Object e):将元素e添加到集合中coll.add(123);coll.add(456);coll.add(new String("Tom"));coll.add(false);coll.add(new Person("jerry",20));//contains(Object obj):判断当前集合是否包含objboolean contains = coll.contains(123);System.out.println(contains);//trueSystem.out.println(coll.contains(new String("Tom")));//trueSystem.out.println(coll.contains(new Person("jerry",20)));//containsAll(Collection coll1):判断coll1中所有的元素是否都在当前集合中Collection coll1= Arrays.asList(123,456);System.out.println(coll.containsAll(coll1));}
@Testpublic void test2(){Collection coll=new ArrayList();coll.add(123);coll.add(456);coll.add(new String("Tom"));coll.add(false);coll.add(new Person("jerry",20));//remove(Object obj):从当前集合移除obj元素coll.remove(1234);coll.remove(new Person("jerry",20));System.out.println(coll);//removeAll(Collection coll1):从当前集合中移除coll1中所有的元素Collection coll1= Arrays.asList(123,4567);coll.removeAll(coll1);System.out.println(coll);}
@Testpublic void test3(){Collection coll=new ArrayList();coll.add(123);coll.add(456);coll.add(new String("Tom"));coll.add(false);coll.add(new Person("jerry",20));// //retainAll(Collection coll1):获取当前集合和coll1集合的交集,并返回给当前集合// Collection coll1= Arrays.asList(123,4567,false);// coll.retainAll(coll1);// System.out.println(coll);//equals(Obkect obj):当前集合和形参集合的元素都相同,返回trueCollection coll1=new ArrayList();coll1.add(123);coll1.add(456);coll1.add(new String("Tom"));coll1.add(false);coll1.add(new Person("jerry",20));System.out.println(coll.equals(coll1));}
@Testpublic void test4(){Collection coll=new ArrayList();coll.add(123);coll.add(456);coll.add(new String("Tom"));coll.add(false);coll.add(new Person("jerry",20));//hashCode():返回当前对象的hash值System.out.println(coll.hashCode());//集合---->数组:toArry()Object[] objects = coll.toArray();for (int i = 0; i <objects.length ; i++) {System.out.println(objects[i]);}//数组--->集合:调用Arrays类的静态方法asList()List<String> strings = Arrays.asList(new String[]{"AA", "BB"});System.out.println(strings);List arr=Arrays.asList(new int[]{123,456});System.out.println(arr);//[[I@3f0ee7cb]List arr1=Arrays.asList(new Integer[]{123,456});System.out.println(arr1);//[123, 456]//iterator():返回Iterator接口的实例,用于遍历集合元素。放在IteratorTest.java中测试}
迭代器Iterator接口
每次调用iterator方法都得到一个新的迭代器对象,系统游标都默认在集合第一个元素之前
hasNext和next方法
@Testpublic void test(){Collection coll=new ArrayList();coll.add(123);coll.add(456);coll.add(new String("Tom"));coll.add(false);coll.add(new Person("jerry",20));Iterator iterator = coll.iterator();//方式一:不推荐// for (int i = 0; i <coll.size() ; i++) {// System.out.println(iterator.next());// }//方式二:推荐//hasNext():判断是否还有下一个元素while (iterator.hasNext()){//next():①指针下移②将下移以后集合上的元素返回System.out.println(iterator.next());}}
内部定义的remove方法,不同于集合直接调用remove
@Testpublic void test2(){Collection coll=new ArrayList();coll.add(123);coll.add(456);coll.add(new String("Tom"));coll.add(false);coll.add(new Person("jerry",20));Iterator iterator = coll.iterator();//remove():删除集合中的Tom。不同于集合直接调用removewhile (iterator.hasNext()){Object next = iterator.next();if ("Tom".equals(next)){iterator.remove();}}Iterator iterator1 = coll.iterator();while (iterator1.hasNext()){System.out.println(iterator1.next());}}
如果还未调用next()或者在上一次调用next方法之后已经调用了remove方法,再调用remove都会报IllegalStateException
Foreach循环
@Testpublic void test(){Collection coll=new ArrayList();coll.add(123);coll.add(456);coll.add(new String("Tom"));coll.add(false);coll.add(new Person("jerry",20));//for(集合元素的类型 局部变量:集合对象)//内部仍然调用迭代器for (Object obj:coll){System.out.println(obj);}}@Testpublic void test1(){String[] arr=new String[]{"MM","MM","MM"};//普通for循环赋值// for (int i = 0; i <arr.length ; i++) {// arr[i]="gg";// }//增强for循环//修改不会改变原有数组中的元素for (String s:arr) {s="GG";}for (int i = 0; i <arr.length ; i++) {System.out.println(arr[i]);}}
Collection接口:单例集合,用来存储一个一个对象
List接口:存储有序的、可重复的数据。“动态”数组
ArrayList:作为List接口的主要实现类;线程不安全的,效率高;底层使用Object[] elementData存储
源码分析:
:::info
jdk 7情况下
ArrayList list=new ArrayList();//底层创建了长度为10的Object[]数组elementData
list.add(123);//=elementData[0]=new Integer(123);
……
list.add(11);//如果此次的添加导致底层elementDAta数组容量不够时,则扩容。默认情况下,扩容为原来的1.5倍,同时需要将原有的数组中的数据复制到新的数组中。
:::
:::info
结论:建议开发中使用带参的构造器:ArrayList list=new ArrayList(int capacity);
:::
:::info
jdk 8中ArrayList的变化
ArrayList list=new ArrayList();//底层Object[] elementData初始化为{}。并没有创建长度为10的数组。
list.add(123);//第一次调用add()时,底层才创建了长度为10的数组,并将数据123添加到elementData[0]
……
后续添加和扩容与jdk7无异
:::
:::info 小结:jdk7中ArrayList的对象的创建类似于单例的饿汉式,而jdk8中ArrayList的对象的创建类似于单例的懒汉式,延迟了数组的创建,节省内存 :::
LinkedList:对于频繁的插入、删除操作,使用此类效率比ArrayList高;底层使用双向链表存储
源码分析:
:::info
LinkedList list=new LinkedList();//内部声明了Node类型的first和last属性,默认值为null
list.add(123);//将数据123封装到Node中,创建了Node对象
其中Node定义为:体现了LinkedList的双向链表的说法
private static class Node
E item;
Node
Node
Node(Node<E> prev, E element, Node<E> next) {<br /> this.item = element;<br /> this.next = next;<br /> this.prev = prev;<br /> }<br />}
Vector:作为List接口的古老实现类。线程安全,效率低;底层使用Object[] elementData存储
源码分析
:::info
jdk7和jdk8中通过Vector()构造器创建对象时,底层都创建了长度为10的数组
在扩容反面,默认扩容为原来数组长度的二倍
:::
List接口的常用方法
@Testpublic void test(){ArrayList list=new ArrayList();list.add(123);list.add(456);list.add("AA");list.add(new Person("Tom",22));list.add(456);System.out.println(list);//[123, 456, AA, Person{name='Tom', age=22}, 456]//void add(int index,Obj ele):在index位置插入ele元素list.add(1,"BB");System.out.println(list);//[123, BB, 456, AA, Person{name='Tom', age=22}, 456]//bollean addAll(int index,Collection eles):在index位置将eles中的所有元素添加到当前数组List integers = Arrays.asList(1, 2, 3);list.addAll(2,integers);System.out.println(list.size());//9//Object get(int index):获取指定index位置的元素System.out.println(list.get(5));//456//int indexOf(Object obj):返回obj在集合中首次出现的位置;如果不存在返回-1System.out.println(list.indexOf(456)); //5//int lastIndexOf(Object obj):返回obj在当前集合中末次出现的位置System.out.println(list.lastIndexOf(456));//8//Object remove(int index):移除指定index位置的元素,并返回此元素Object remove = list.remove(0);System.out.println(remove);System.out.println(list);//Object set(int index,Object ele):设置指定index位置的元素为elelist.set(1, "cc");System.out.println(list);//List subList(int fromIndex,int toIndex):返回从fromIndex到toIndex位置的子集合 [fromIndex,toIndex)System.out.println(list.subList(1, 3));}
@Testpublic void test1(){ArrayList list=new ArrayList();list.add(123);list.add(456);list.add("AA");list.add(new Person("Tom",22));list.add(456);//遍历:// ①:Iterator迭代器Iterator iterator = list.iterator();while (iterator.hasNext()){System.out.println(iterator.next());}System.out.println("***************************");//②:foreach循环for (Object object:list){System.out.println(object);}System.out.println("***************************");//③:普通for循环for (int i = 0; i <list.size() ; i++) {System.out.println(list.get(i));}}
面试题:
ArrayList、LinkedList、Vector三者异同?
同:三个类都实现List接口,存储数据的特点相同:存储有序、可重复的数据
不同:
ArrayList:作为List接口的主要实现类;线程不安全的,效率高;底层使用Object[] elementData存储
LinkedList:对于频繁的插入、删除操作,使用此类效率比ArrayList高;底层使用双向链表存储
Vector:作为List接口的古老实现类。线程安全,效率低;底层使用Object[] elementData存储
区分List中remove(int index)和remove(Object obj)
/*区分List当中remove方法*/@Testpublic void testListRemove(){List list=new ArrayList();list.add(1);list.add(2);list.add(3);updateList(list);System.out.println(list);}private void updateList(List list){list.remove(new Integer(2))//删除集合中的元素2list.remove(2);//删除2位置的元素}
Set接口:存储无序的、不可重复的数据。
Set接口中没有定义额外的方法,使用的都是Collection中声明过的方法
要求:
:::info
向Set中添加的数据,其所在的类一定要重写hashCode()和equals()
重写的hashCode()和equals()尽可能保持一致性:相等的对象必须具有相等的散列码
:::
一、Set:存储无序的、不可重复的数据
以HashSet为例
:::info
1.无序性:不等于随机性。存储的数据在底层数组中并非按照数组索引的顺序添加,而是根据数据的哈希值
:::
:::info
2.不可重复性:保证添加的元素按照equals()判断时,不能返回true。即相同的元素只能添加一个
:::
二、添加元素的过程:以HashSet为例
:::info
我们向HashSet中添加元素a,首先调用元素a所在类的hashCode()方法,计算元素a的哈希值,此哈希值接着通过某种算法计算出HashSet底层数组中的存放位置,判断数组此位置上是否已经有元素:
如果此位置上没有其他元素,则元素a添加成功——>情况一
如果此位置上有其他元素b(或者以链表的形式存放多个元素),则比较元素a与元素b的哈希值:
如果哈希值不相同,则元素a添加成功——>情况二
如果哈希值相同,进而需要调用元素a所在类的equals()方法:
equals()返回true,则元素a添加失败
equals()返回false,则元素a添加成功———->情况三
对于添加成功的情况2情况3而言:元素a与已经存在指定索引位置上的数据以链表的形式存储
jdk7:元素a放到数组中,指向原来的元素
jdk8:原来的元素放到数组中,指向元素a
:::
HashSet:作为Set接口的主要实现类;线程不安全的;可以存储null值
LinkedHashSet:作为HashSet的子类;遍历其内部数据时可以按照添加的顺序遍历
作为HashSet的子类,在添加数据的同时,每个数据还维护了两个引用,记录此数据的前一个数据和后一个数据
优点:对于频繁的遍历操作,LinkedHashSet效率高于HashSet
TreeSet:可以按照添加对象指定属性,进行排序
向TreeSet中添加数据,要求是相同类的对象
两种排序方法:自然排序(实现Comparable接口)和定制排序(实现comparator接口)
自然排序中,比较两个对象是否相同的标准为compareTo(),不再是equals()
@Testpublic void test2(){TreeSet treeSet = new TreeSet();//失败:不能添加不同类的对象// treeSet.add(123);// treeSet.add(456);// treeSet.add("AA");// treeSet.add(new Person("Tom",23));//举例一:// treeSet.add(123);// treeSet.add(32);// treeSet.add(-33);// treeSet.add(11);// treeSet.add(8);//-33//8//11//32//123//举例二:treeSet.add(new Person("Tom",21));treeSet.add(new Person("Jerry",15));treeSet.add(new Person("Jim",25));treeSet.add(new Person("Mike",8));treeSet.add(new Person("Jack",17));treeSet.add(new Person("Jack",56));Iterator iterator = treeSet.iterator();while (iterator.hasNext()){System.out.println(iterator.next());}}
//按照姓名从大到小,年龄从小到大@Overridepublic int compareTo(Object o) {if (o instanceof Person){Person person=(Person) o;// return -this.name.compareTo(person.name);int comapre=-this.name.compareTo(person.name);if (comapre!=0){return comapre;}else{return Integer.compare(this.age,person.age);}}else {throw new RuntimeException("输入类型不匹配");}}
定制排序中,比较两个对象是否相等的标准为:compare()返回0,不再是equals()
@Testpublic void test3(){Comparator com=new Comparator() {//按照年龄从小到大排序@Overridepublic int compare(Object o1, Object o2) {if (o1 instanceof Person&&o2 instanceof Person){Person person1=(Person)o1;Person person2=(Person)o2;return Integer.compare(person1.getAge(),person2.getAge());}else {throw new RuntimeException("输入数据类型不一致");}}};TreeSet treeSet = new TreeSet(com);treeSet.add(new Person("Tom",21));treeSet.add(new Person("Jerry",15));treeSet.add(new Person("Jim",25));treeSet.add(new Person("Mike",8));treeSet.add(new Person("Jhon",17));treeSet.add(new Person("Jack",17));Iterator iterator = treeSet.iterator();while (iterator.hasNext()){System.out.println(iterator.next());}}
练习题
package day22.exe;/*** @author Lilei* @date 2022/5/8-@14:01*/public class Employee implements Comparable{private String name;private int age;private MyDate birthday;public Employee() {}public Employee(String name, int age, MyDate birthday) {this.name = name;this.age = age;this.birthday = birthday;}public String getName() {return name;}public void setName(String name) {this.name = name;}public int getAge() {return age;}public void setAge(int age) {this.age = age;}public MyDate getBirthday() {return birthday;}public void setBirthday(MyDate birthday) {this.birthday = birthday;}@Overridepublic String toString() {return "Employee{" +"name='" + name + '\'' +", age=" + age +", birthday=" + birthday +'}';}//按照姓名顺序排@Overridepublic int compareTo(Object o) {if (o instanceof Employee){Employee e=(Employee)o;return this.name.compareTo(e.name);}else {return 0;}}}
package day22.exe;/*** @author Lilei* @date 2022/5/8-@11:57*/public class MyDate {private int year;private int month;private int day;public MyDate(int year, int month, int day) {this.year = year;this.month = month;this.day = day;}public MyDate() {}public int getYear() {return year;}public void setYear(int year) {this.year = year;}public int getMonth() {return month;}public void setMonth(int month) {this.month = month;}public int getDay() {return day;}public void setDay(int day) {this.day = day;}@Overridepublic String toString() {return "MyDate{" +"year=" + year +", month=" + month +", day=" + day +'}';}}
package day22.exe;import org.junit.Test;import java.util.Comparator;import java.util.Iterator;import java.util.TreeSet;/*** @author Lilei* @date 2022/5/8-@14:03*/public class EmployeeTest {//问题一:使用自然排序@Testpublic void test(){TreeSet set=new TreeSet();set.add(new Employee("刘德华",55,new MyDate(1967,5,5)));set.add(new Employee("张学友",43,new MyDate(1979,11,1)));set.add(new Employee("郭富城",44,new MyDate(1978,11,11)));set.add(new Employee("梁朝伟",51,new MyDate(1971,10,25)));set.add(new Employee("黎明",37,new MyDate(1985,1,5)));Iterator iterator = set.iterator();while (iterator.hasNext()){System.out.println(iterator.next());}}//问题一:使用生日日期的先后排序@Testpublic void test1(){TreeSet set=new TreeSet(new Comparator() {@Overridepublic int compare(Object o1, Object o2) {if (o1 instanceof Employee && o2 instanceof Employee){Employee employee1=(Employee)o1;Employee employee2=(Employee)o2;MyDate birthday1 = employee1.getBirthday();MyDate birthday2 = employee2.getBirthday();int minYears = birthday1.getYear() - birthday2.getYear();if (minYears!=0){return minYears;}int minMonth = birthday1.getMonth() - birthday2.getMonth();if (minMonth!=0){return minMonth;}return birthday1.getDay() - birthday2.getDay();}throw new RuntimeException("传入数据类型不一致");}});Employee employee = new Employee("liudehua", 55, new MyDate(1967, 5, 5));Employee employee1 = new Employee("zhangxueyou", 43, new MyDate(1979, 11, 1));Employee employee2 = new Employee("guofucheng", 44, new MyDate(1979, 11, 11));Employee employee3 = new Employee("liangchaowei", 51, new MyDate(1971, 10, 25));Employee employee4 = new Employee("liming", 37, new MyDate(1985, 1, 5));set.add(employee);set.add(employee1);set.add(employee2);set.add(employee3);set.add(employee4);Iterator iterator = set.iterator();while (iterator.hasNext()){System.out.println(iterator.next());}}}
Map接口:双例集合,用来存储一对(key-value)一对数据
Map结构的理解
:::info
Map中的key:无序的、不可重复的,使用Set存储所有的key—->key所在的类要重写equals()和HashCode() (以HashMap为例)
Map中的value:无序的、可重复的,使用Collection存储——->value所在类要重写equals()
一个键值对:key-value构成了一个Entry对象。
Map中的Entry:无序的、不可重复的,使用Set存储所有的entry
Map中的常用方法
@Testpublic void test(){Map map=new HashMap();//Object put(Object key,Object value):将指定key-value添加到(或修改)当前map对象中//添加map.put("AA",123);map.put(45,123);map.put("BB",56);//修改map.put("AA",87);System.out.println(map);Map map1=new HashMap();map1.put("CC",123);map1.put("DD",123);//putAll(Map M):将m中所有的key-value添加到当前map对象map.putAll(map1);System.out.println(map);//remove(Obejct key):移除指定key的key-value对并返回valueObject cc = map.remove("CC");System.out.println(cc);System.out.println(map);//clear():清空当前mapmap.clear();//与map=null不同System.out.println(map);}
@Testpublic void test1(){Map map=new HashMap();map.put("AA",123);map.put(45,123);map.put("BB",56);//Object get(Object key):获取指定key位置的valueSystem.out.println(map.get(45));//boolean containsKey(Object key):是否包含指定的keyboolean isExit = map.containsKey("BB");System.out.println(isExit);//boolean containsValue(Object value):是否包含指定的valueisExit=map.containsValue("123");System.out.println(isExit);//int size():返回map中key-value对的个数System.out.println(map.size());//boolean isEmpty():判断当前map是否为空// map.clear();isExit=map.isEmpty();System.out.println(isExit);//boolean equals(Object obj):判断当前map和参数obj是否相等Map map1=new HashMap();map1.put("AA",123);map1.put(45,123);map1.put("BB",56);System.out.println(map.equals(map1));}
/*元视图的操作方法Set keySet():返回所有key构成的Set集合Collection values():返回所有value构成的Collection集合Set entrySet():返回所有key-value对构成的Set集合*/@Testpublic void test2(){Map map=new HashMap();map.put("AA",123);map.put(45,1234);map.put("BB",56);//遍历所有的Key集Set set = map.keySet();Iterator iterator = set.iterator();while (iterator.hasNext()){System.out.println(iterator.next());}System.out.println("=====================");//遍历所有的valueCollection values = map.values();for (Object obj:values) {System.out.println(obj);}System.out.println("=====================");//遍历所有的key-valueSet set1 = map.entrySet();Iterator iterator1 = set1.iterator();while (iterator1.hasNext()){Object obj=iterator1.next();//entryset集合中的元素都是entryMap.Entry entry=(Map.Entry)obj;System.out.println(entry.getKey()+"-->"+entry.getValue());}}
HashMap:作为Map的主要实现类;线程不安全,效率高;能存储null的key或value
:::info
底层:数组+链表(jdk7之前)
数组+链表+红黑树(jdk8)
:::
HashMap的底层实现原理
以jdk7为例
:::info
HashMap map=new HashMap();
在实例化以后底层创建了一个长度为16的数组Entry[] table。
……可能已经执行过多次put…….
map.put(key1,value1);
首先调用key1所在类的HashCode()计算key1的哈希值,此哈希值经过某种算法计算以后,得到Entry数组中的存放位置。
如果此位置上数据为空,此时的key1-value1添加成功———情况1
如果此位置上数据不为空(以为存在一个或多个数据(以链表的形式存在)),比较key1和已经存在的一个或多个数据的哈希值:
如果key1的哈希值与已经存在数据的哈希值都不相同,此时key1-value1添加成功———情况2
如果key1的哈希值与已经存在数据的某一个的哈希值相同,继续比较;调用key1类所在的equals()方法,比较:
如果equals()返回false:此时key1-value1添加成功——-情况3
如果equals()返回true:使用value1替换相同的key的value值。
补充:关于情况2和情况3,此时key1-value1和原来的数据以链表的形式存储
正在不断的添加过程中会涉及到扩容问题,默认的扩容方式:当超出临界值(且要存放的位置非空),扩容为原来容量的2倍,并将原有的数据复制过来。
:::
jdk8相较于jdk7在底层实现反面的不同:
:::info
1.new HashMap():底层没有创建一个长度为16的数组
2.jdk8 底层的数组是Node[],并非Entry[]
3.首次调用put()方法时,底层创建长度为16的数组
4.jdk7 的底层结构只有数组+链表。jdk8中底层结构:数组+链表+红黑树
当数组的某一个索引位置上的元素以链表的形式存在的数据个数>8且当前数组长度超过64时,此时此索引位置上的数组采用红黑树存储。
DEFAUL TINITIAL_CAPACITY : HashMap的默认容量,16
DEFAULT_LOAD_FACTOR: HashMap的默认加载因子:0.75
threshold:扩容的临界值,=容量填充因升 160.75=12
TREEIFY THRESHOLD: Bucket中链表长度大于该默认值,转化为红黑树:8
MIN_TREEIFY_CAPACITY:桶中的Node被树化时最小的hash表容量。:64
:::
LinkedHashMap:保证在遍历map元素时,可以按照添加的顺序实现遍历
:::info
原因:在原有的HashMap底层结构基础上,添加了一堆指针,指向前一个和后一个元素
对于频繁的遍历操作,此类高效与HashMap
:::
源码中:
static class Entry<K,V> extends HashMap.Node<K,V> {Entry<K,V> before, after;//能够记录添加元素的先后顺序Entry(int hash, K key, V value, Node<K,V> next) {super(hash, key, value, next);}}
面试题:
1.HashMap的底层实现原理 :::info
::: 2.HashMap和Hashtable的异同 :::info
TreeMap:保证按照添加的key-value对进行排序,实现排序遍历。此时考虑key的自然排序或者定制排序
:::info 底层使用红黑树 :::
//向TreeMap中添加key-value,要求key必须是由同一个类创建的对象//因为要按照key进行排序:自然排序和定制排序@Testpublic void test(){TreeMap map=new TreeMap();Person person1=new Person("Tom",23);Person person2=new Person("Jerry",32);Person person3=new Person("Jack",20);Person person4=new Person("Rose",18);map.put(person1,98);map.put(person2,89);map.put(person3,76);map.put(person4,100);Set set = map.entrySet();Iterator iterator = set.iterator();while (iterator.hasNext()){Object next = iterator.next();Map.Entry entry=(Map.Entry)next;System.out.println(((Map.Entry) next).getKey()+"=="+((Map.Entry) next).getValue());}}
@Testpublic void test1(){TreeMap map=new TreeMap(new Comparator() {@Overridepublic int compare(Object o1, Object o2) {if (o1 instanceof Person &&o2 instanceof Person){Person person=(Person)o1;Person person1=(Person)o2;return Integer.compare(person.getAge(),person1.getAge());}throw new RuntimeException("输入数据类型不一致");}});Person person1=new Person("Tom",23);Person person2=new Person("Jerry",32);Person person3=new Person("Jack",20);Person person4=new Person("Rose",18);map.put(person1,98);map.put(person2,89);map.put(person3,76);map.put(person4,100);Set set = map.entrySet();Iterator iterator = set.iterator();while (iterator.hasNext()){Object next = iterator.next();Map.Entry entry=(Map.Entry)next;System.out.println(((Map.Entry) next).getKey()+"=="+((Map.Entry) next).getValue());}}
Hashtable:作为古老实现类;线程安全,效率低;不能存储null的key或value
Properties:常用来处理配置文件,key和value都是String类型
public class PropertiesTest {public static void main(String[] args){FileInputStream files= null;try {Properties pros=new Properties();files = new FileInputStream("jdbc.properties");pros.load(files);//加载流对应的文件String name = pros.getProperty("name");String password = pros.getProperty("password");System.out.println("name:"+name+","+"password:"+password);} catch (IOException e) {e.printStackTrace();} finally {if (files!=null){try {files.close();} catch (IOException e) {e.printStackTrace();}}}}}
Collections工具类
Collections:操作Collection、Map的工具类
面试题:Collection和Collections的区别
Collection是一个集合,Collectins是操作Collection和Map的工具类
/*reverse(List list):反转list中元素的顺序shuffle(List list):对list集合元素进行随机排序sort(List list):根据元素的自然顺序对指定的list集合元素按升序排序sort(List list,Comaprator):根据指定的Comparator产生的顺序对list集合元素进行排序swap(Listlist,int i,int j):将指定list集合中的i处元素和j处元素进行交换*//*Object max(Collection):根据元素的自然排序,返回集合中指定的最大值Object max(Collection,Comparator):根据Comparator指定的顺序,返回集合中指定的最大值Object min(Collection):根据元素的自然排序,返回集合中指定的最小值Object min(Collection,Comparator):根据Comparator指定的顺序,返回集合中指定的最小值int frequency(Collection,Object):返回指定集合中指定元素出现的次数void copy(List dest,List src):将src中的内容复制到destboolean repalceAll(List list,Object oldVal,Object newVal):*/public class CollectionsTest {@Testpublic void test(){List list=new ArrayList();list.add(123);list.add(43);list.add(765);list.add(765);list.add(765);list.add(-97);list.add(0);System.out.println(list);//[123, 43, 765, -97, 0]//reverse(List list):反转list中元素的顺序//Collections.reverse(list);//[0, -97, 765, 43, 123]//shuffle(List list):对list集合元素进行随机排序// Collections.shuffle(list);//[-97, 0, 43, 765, 123]//sort(List list):根据元素的自然顺序对指定的list集合元素按升序排序// Collections.sort(list);//[-97, 0, 43, 123, 765}//swap(Listlist,int i,int j):将指定list集合中的i处元素和j处元素进行交换// Collections.swap(list,0,3);//[-97, 43, 765, 123, 0]//int frequency(Collection,Object):返回指定集合中指定元素出现的次数//System.out.println(Collections.frequency(list, 765));//3//void copy(List dest,List src):将src中的内容复制到destList destList= Arrays.asList(new Object[list.size()]);Collections.copy(destList,list);System.out.println(destList);}
:::info Collections中提供了多个synchronizedXxx()方法,该方法可使将指定的集合包装成线程同步的集合,从而可以解决多线程并发访问集合时的线程安全问题 :::
泛型
在集合中使用泛型
总结:
①集合接口或集合类在jdk5.0时都修改为带泛型的结构
②在实例化集合类时,可以指明具体的泛型的类型
③在集合类或者接口中,凡是定义类或接口时,内部结构使用到类的泛型位置,都指定为你实例化时泛型类型
比如add(E e)—->实例化以后add(指定类型 e)
④注意点:泛型类型必须是类,不能是基本数据类型。需要用到基本数据类型的位置用包装类替换
⑤如果实例化时,没有指定泛型的类型,默认类型为java.lang.Object类型
@Testpublic void test(){ArrayList<Integer> integers = new ArrayList<>();integers.add(77);integers.add(89);integers.add(100);integers.add(60);//在编译是会进行类型检查,保证数据的安全// integers.add("Tom");for (Integer sroce:integers) {//避免强制转换操作int stusroce=sroce;System.out.println(stusroce);}}
@Testpublic void test1(){HashMap<String, Integer> stringIntegerHashMap = new HashMap<>();stringIntegerHashMap.put("Jerry",87);stringIntegerHashMap.put("Tom",90);stringIntegerHashMap.put("Jack",60);// stringIntegerHashMap.put(123,"ABC");//泛型的嵌套Set<Map.Entry<String, Integer>> entries = stringIntegerHashMap.entrySet();Iterator<Map.Entry<String, Integer>> iterator = entries.iterator();while (iterator.hasNext()){Map.Entry<String, Integer> next = iterator.next();String k=next.getKey();Integer v=next.getValue();System.out.println(k+"=="+v);}}
自定义泛型类举例
public class Order<T> {String orderName;int orderId;//类的内部结构可以使用类的泛型T orderT;public Order(){ };public Order(String orderName,int orderId,T orderT){this.orderName=orderName;this.orderId=orderId;this.orderT=orderT;}public T getOrderT(){return orderT;}public void setOrderT(T orderT) {this.orderT = orderT;}@Overridepublic String toString() {return "Order{" +"orderName='" + orderName + '\'' +", orderId=" + orderId +", orderT=" + orderT +'}';}}
@Testpublic void test(){//如果定义了泛型类,实例化时没有指明泛型类型,则认为泛型类型为为Object类型//要求:如果定义的类是带泛型的,实例化时建议指明类的泛型Order order=new Order();order.setOrderT(123);//建议:实例化时指明类的泛型Order<String> order1=new Order<>();}
public class SubOrder extends Order<Integer>{//指明父类的泛型类型}
public class SubOrder1<T> extends Order<T>{//SubOrder:不是泛型类}
@Testpublic void test1(){SubOrder subOrder=new SubOrder();//由于子类在继承带泛型的父类时,指明了泛型的类型,则实例化子类对象时不在需要指明泛型subOrder.setOrderT(1122);SubOrder1<String> subOrder1=new SubOrder1<>();subOrder1.setOrderT("Order2......");}
自定义泛型方法
在方法中出现了泛型结构,泛型的参数与类的泛型参数没用任何关系
泛型方法所属的类是不是泛型类都没有关系
泛型方法可以声明为静态的。原因:泛型参数是在调用方法时确定的,并非在实例化类时确定
public <E> List<E> copyList(E[] arr){ArrayList<E> list = new ArrayList<>();for (E e:arr) {list.add(e);}return list;}
@Testpublic void test2(){Order<String> order=new Order<>();Integer[] arr=new Integer[]{1,2,3,4};//泛型方法调用时泛型参数的类型List<Integer> integerList = order.copyList(arr);System.out.println(integerList);}
泛型在继承方面的体现
/*泛型在继承方面的体现类A是类B的父类,G<A>和G<B>二者不具备子父类关系,二者是并列关系类A是类B的父类,A<G>是B<G>的父类*/@Testpublic void test(){List<Object> list=null;List<String> list1=null;//此时list和list1的类型不具有子父类关系//编译不通过// list=list1;List<String> list2=null;ArrayList<String> list3=null;list2=list3;}
通配符的使用
/*通配符:?类A是类B的父类,G<A>和G<B>是没有关系的,二者共同父类是:G<?>*/@Testpublic void test1(){List<Object> list=null;List<String> list1=null;List<?> list2=null;list2=list;list2=list1;print(list1);print(list);}public void print(List<?> list){Iterator<?> iterator = list.iterator();while (iterator.hasNext()){System.out.println(iterator.next());}}
通配符使用后的写入和读取
@Testpublic void test1(){List<Object> list=null;List<String> list1=null;List<?> list2=null;list2=list;list2=list1;// print(list1);// print(list);//List<String> list3=new ArrayList<>();list3.add("AA");list3.add("bb");list3.add("DD");list2=list3;//添加:对于List<?>就不能向其内部添加数据,除了添加null// list2.add("BB");// list2.add(`?`);list2.add(null);//读取:允许读取数据,读取的数据类型为ObjectObject o = list2.get(0);System.out.println(o);}
有限制条件的通配符的使用
_? extends A:G<? extends A>可以作为G和G的父类,其中B是A的子类
? super A:G<? super A>可以作为G和G的父类,其中B是A的父类_
IO流
File类的使用
1.File类的一个对象,代表一个文件或文件目录
2.File类声明在java.io包下
3.Feil类涉及关于文件或文件目录的创建、删除、重命名、修改时间、文件大小等方法,并未涉及到写入或者读取文件内容的操作。如果需要读取或者写入文件内容,必须使用IO流来完成。
4.后续File类的对象常会作为参数传递到流的构造器里,指明读取或写入的”终点“
File类的实例化
1.如何创建File类的实例
File(String filePath)
File(String parentPath,String childPath)
File(File parentFile,String childPath)
2.
相对路径:相较于某个路劲下,指明的路径
绝对路径:包含盘符在内的文件或文件目录的路径
3.路径分隔符
windows:\
unix:/
/*1.如何创建File类的实例File(String filePath)File(String parentPath,String childPath)File(File parentFile,String childPath)2.相对路径:相较于某个路劲下,指明的路径绝对路径:包含盘符在内的文件或文件目录的路径3.路径分隔符windows:\\unix:/*/@Testpublic void test(){//构造器1File file=new File("hello.txt");//相对于当前项目File file1 = new File("D:\\myjava\\ll\\src\\day24\\he.txt");System.out.println(file);System.out.println(file1);//构造器2File file2 = new File("D:\\myjava","ll");System.out.println(file2);//构造器3File file3 = new File(file2,"hi.txt");System.out.println(file3);}
File类的常用方法
:::info
String getAbsolutePath():获取绝对路径
String getPath():获取路径
String getName():获取名称
String getParent():获取上层文件目录路径。若无返回null
long length():获取文件长度(字节数)。不能获取目录的长度
long lastModified():获取最后一次修改的时间。毫秒数
String[] list():获取指定目录下的所有文件或者文件目录的名称数组<br /> File[] listFiles():获取指定目录下的所有文件或者文件目录的File数组
:::
/*String getAbsolutePath():获取绝对路径String getPath():获取路径String getName():获取名称String getParent():获取上层文件目录路径。若无返回nulllong length():获取文件长度(字节数)。不能获取目录的长度long lastModified():获取最后一次修改的时间。毫秒数String[] list():获取指定目录下的所有文件或者文件目录的名称数组File[] listFiles():获取指定目录下的所有文件或者文件目录的File数组*/@Testpublic void test1(){File file = new File("hello.txt");File file1 = new File("d:\\myjava\\hi.txt");System.out.println(file.getAbsolutePath());System.out.println(file.getName());System.out.println(file.getPath());System.out.println(file.getParent());System.out.println(file.length());System.out.println(new Date(file.lastModified()));System.out.println("*************************");System.out.println(file1.getAbsolutePath());System.out.println(file1.getName());System.out.println(file1.getPath());System.out.println(file1.getParent());System.out.println(file1.length());System.out.println(file1.lastModified());}@Testpublic void test2(){File file = new File("d:\\myjava");String[] list = file.list();for (String s:list) {System.out.println(s);}File[] files = file.listFiles();for (File f:files) {System.out.println(f);}}
:::info
boolean renameTo(File dest):把文件重命名为指定的文件路径
如:file.renameTo(file1)
要保证返回true,需要file在硬盘中是存在的,且file1不能在硬盘中存在
:::
@Testpublic void test3(){File file = new File("hello.txt");File file1 = new File("d:\\myjava\\hi.txt");boolean b = file.renameTo(file1);System.out.println(b);}
:::info
boolean isDirectory():判断是否是文件目录
boolean isFile():判断是否是文件
boolean exists():判断是否存在
boolean canRead():判断是否可读
boolean canWrite():判断是否可写
boolean isHdden():判断是否隐蔽
:::
@Testpublic void test4(){File file=new File("hello.txt");System.out.println(file.isDirectory());System.out.println(file.isFile());System.out.println(file.canRead());System.out.println(file.canWrite());System.out.println(file.isHidden());}
:::info
_/*
boolean createNewFile():创建文件。若文件存在,则不创建返回false
boolean mkdir():创建文件目录。如果文件目录存在,就不创建。如果此文件目录的上层目录不存在,也不创建
boolean mkidrs():创建文件目录。如果上层文件目录不存在,一并创建
boolean delete():删除文件或文件夹
注意:java中删除不走回收站
*/_
:::
@Testpublic void test5() throws IOException {//文件创建File file=new File("hi.txt");if (!file.exists()){file.createNewFile();System.out.println("创建成功");}else {file.delete();System.out.println("删除成功");}}
@Testpublic void test6(){File file=new File("d:\\io\\io1");boolean mkdir = file.mkdir();if (mkdir){System.out.println("success");}else {file.mkdirs();System.out.println("无上层,一并创建成功");}}
IO流原理及流的分类
流的分类
按操作数据单位不同:字节流(8bit)、字符流(16bit)
按数据流的流向不同:输入流、输出流
按流的角色不同:节点流、处理流
流的体系结构
抽象基类 节点流(或文件流) 缓冲流(处理流的一种)
InputStream FileInputStream(read(byte[] buffer)) BufferedInputStream(read(byte[] buffer))
OutputStream FileOutputStream(write(byte[] buffer,0,len)) BufferedOutputStream(同)
Reader FileReader(read(char[] buffer)) BufferedReader(readline())
Writer FileWriter(write(chare[] buffer,0,len)) BufferedWrite(同)r
节点流
FileReader
:::info
将hello.txt文件内容读入程序中,并输出到控制台
说明:
1.read()的理解:返回读入的一个字符。如果达到文件末尾,返回-1
2.异常的处理:为了保证流的资源一定可以执行关闭操作,需要使用try-catch-finally处理
3.读入的文件一定要存在,否则就会报FileNotFoundException.
:::
@Testpublic void testFileReader() {FileReader fr= null;try {//实例化File类对象,指明要操作的文件File file=new File("hello.txt");//提供具体的流fr = new FileReader(file);//数据的读入//read():返回读入一个字符。如果达到文件末尾,返回-1int read = fr.read();while (read!=-1){System.out.print((char) read);read = fr.read();}} catch (IOException e) {e.printStackTrace();} finally {//关闭流if (fr!=null){try {fr.close();} catch (IOException e) {e.printStackTrace();}}}
:::info 对read()操作的升级:使用read的重载方法 :::
@Testpublic void testFileReader1() {FileReader reader = null;try {//1.对File类的实例化File file = new File("hello.txt");//2.FileReader流的实例化reader = new FileReader(file);//3.读入操作//read(char[] cbuf):返回每次读入cbuf数组中的字符的个数。如果达到文件末尾,返回-1char[] cbuf=new char[5];int len;while ((len = reader.read(cbuf))!=-1){for (int i = 0; i < len; i++) {System.out.print(cbuf[i]);}}} catch (IOException e) {e.printStackTrace();} finally {if (reader!=null){//4.资源关闭try {reader.close();} catch (IOException e) {e.printStackTrace();}}}}
FileWriter
从内盘中写出数据到硬盘的文件里
说明:
1.输出操作,对应的File可以不存在的
File对应的硬盘中文件如果不存在,在输出的过程中,会自动创建此文件夹
File对应的硬盘中文件如果存在:
如果流使用的构造器是:FileWriter(file,false)/FileWriter(file):对原有文件的覆盖
如果流使用的构造器是:FileWriter(file,true):不会对原有文件覆盖,而是在原有文件基础上追加内容
@Testpublic void testFileWriter() throws IOException {//1.提供File类的对象,指出写出到的位置File file = new File("hello.txt");//2.提供FileWriter的对象,用于数据写出FileWriter fileWriter = new FileWriter(file);//3.写出的操作fileWriter.write("I have a dream!\n");fileWriter.write("you need to have a dream!");//4.流的关闭fileWriter.close();}
FileReader FileWriter
文件的复制
@Testpublic void testFileReaderFileWriter() {FileReader fileReader = null;FileWriter fileWriter = null;try {//1.创建File类的对象,指明读入和写出的文件File file = new File("hello.txt");File file1 = new File("hello1.txt");//2.创建输入输出流的对象fileReader = new FileReader(file);fileWriter = new FileWriter(file1);//3.数据的读入和写出操作char[] cbuf=new char[5];int len;while ((len=fileReader.read(cbuf))!=-1){fileWriter.write(cbuf,0,len);}} catch (IOException e) {e.printStackTrace();} finally {//4.关闭流资源try {if (fileWriter!=null)fileWriter.close();} catch (IOException e) {e.printStackTrace();}finally {try {if (fileReader!=null)fileReader.close();} catch (IOException e) {e.printStackTrace();}}}}
FileInputStream
对于文本文件(.txt/.java/.c/.cpp),使用字符流处理
对于非文本文件(.jpg/.mp3/.mp4/.avi/.doc/.ppt),使用字节流
//使用字节流FileInputStream处理文本文件,可能出现乱码@Testpublic void testFileInputStream() {FileInputStream fileInputStream= null;try {//1.实例化File类对象,指明要操作的文件File file = new File("hello.txt");//2.提供具体的流fileInputStream = new FileInputStream(file);//数据的读入byte[] buffer=new byte[5];int len;//记录每次读取的字节个数while ((len=fileInputStream.read(buffer))!=-1){String s = new String(buffer, 0, len);System.out.print(s);}} catch (IOException e) {e.printStackTrace();} finally {if (fileInputStream!=null){//关闭流try {fileInputStream.close();} catch (IOException e) {e.printStackTrace();}}}}
FileOutputStream FileInputStream
实现对图片的复制
@Testpublic void testFileInputOutputStream() {FileInputStream fileInputStream= null;FileOutputStream fileOutputStream= null;try {File file = new File("猫.png");File file2 = new File("猫1.png");fileInputStream = new FileInputStream(file);fileOutputStream = new FileOutputStream(file2);byte[] buffer =new byte[5];int len;while ((len=fileInputStream.read(buffer))!=-1){fileOutputStream.write(buffer,0,len);}} catch (IOException e) {e.printStackTrace();} finally {if (fileInputStream!=null){try {fileInputStream.close();} catch (IOException e) {e.printStackTrace();}}if (fileOutputStream!=null){try {fileOutputStream.close();} catch (IOException e) {e.printStackTrace();}}}}
/指定路径下文件的复制
public void copyFile(String srcPath,String destPath){FileInputStream fileInputStream= null;FileOutputStream fileOutputStream= null;try {File file = new File(srcPath);File file2 = new File(destPath);fileInputStream = new FileInputStream(file);fileOutputStream = new FileOutputStream(file2);byte[] buffer =new byte[1024];int len;while ((len=fileInputStream.read(buffer))!=-1){fileOutputStream.write(buffer,0,len);}} catch (IOException e) {e.printStackTrace();} finally {if (fileInputStream!=null){try {fileInputStream.close();} catch (IOException e) {e.printStackTrace();}}if (fileOutputStream!=null){try {fileOutputStream.close();} catch (IOException e) {e.printStackTrace();}}}}
@Testpublic void testCopyFile(){String srcPath="C:\\Users\\L.LEI\\Desktop\\实验6-视频演示.mp4";String destPath="C:\\Users\\L.LEI\\Desktop\\实验6-1-视频演示.mp4";long start = System.currentTimeMillis();copyFile(srcPath,destPath);long end = System.currentTimeMillis();System.out.println("复制操作花费的时间为:"+(end-start));}
缓冲流
处理流之一:缓冲流的使用
1.缓冲流:
BufferedInputStream
BufferedOutputStream
BufferedReader
BufferedWriter
作用:提高流的读取写入速度
提高读写速度的原因:内部提供了一个缓冲区
BufferedInputStream/BufferedOutputStream
实现非文本文件的复制
@Testpublic void BufferedStreamTest() {FileInputStream fis = null;FileOutputStream fos = null;BufferedInputStream bis = null;BufferedOutputStream bos = null;try {//1.造文件File file = new File("猫.png");File file1 = new File("猫2.png");//2.造流//2.1节点流fis = new FileInputStream(file);fos = new FileOutputStream(file1);//2.2缓冲流bis = new BufferedInputStream(fis);bos = new BufferedOutputStream(fos);//3.读取写入byte[] buffer=new byte[10];int len;while ((len=bis.read(buffer))!=-1){bos.write(buffer,0,len);}} catch (IOException e) {e.printStackTrace();} finally {if (bos!=null){try {bos.close();} catch (IOException e) {e.printStackTrace();}}if (bis!=null){try {bis.close();} catch (IOException e) {e.printStackTrace();}}}//流资源关闭//要求:先关外层流,在关内层流// //关闭外层流时内层流也会自动关闭// fos.close();// fis.close();}
/指定路径下文件的复制
public void fileCopyWithBuffered(String srcPath,String destPath){FileInputStream fis = null;FileOutputStream fos = null;BufferedInputStream bis = null;BufferedOutputStream bos = null;try {//1.造文件File file = new File(srcPath);File file1 = new File(destPath);//2.造流//2.1节点流fis = new FileInputStream(file);fos = new FileOutputStream(file1);//2.2缓冲流bis = new BufferedInputStream(fis);bos = new BufferedOutputStream(fos);//3.读取写入byte[] buffer=new byte[1024];int len;while ((len=bis.read(buffer))!=-1){bos.write(buffer,0,len);}} catch (IOException e) {e.printStackTrace();} finally {if (bos!=null){try {bos.close();} catch (IOException e) {e.printStackTrace();}}if (bis!=null){try {bis.close();} catch (IOException e) {e.printStackTrace();}}}}
@Testpublic void testFileCopyWithBuffered(){String src="C:\\Users\\L.LEI\\Desktop\\实验6-视频演示.mp4";String dest="C:\\Users\\L.LEI\\Desktop\\实验6-2-视频演示.mp4";long start = System.currentTimeMillis();fileCopyWithBuffered(src,dest);long end = System.currentTimeMillis();System.out.println("复制操作花费的时间为:"+(end-start));//81}
BufferedReader/BufferdWriter
public void testBufferedReaderBufferedWriter() {BufferedReader br= null;BufferedWriter bw= null;try {br = new BufferedReader(new FileReader(new File("hello.txt")));bw = new BufferedWriter(new FileWriter(new File("hello3.txt")));//方式一char[] cbuf=new char[1024];int len;while ((len=br.read(cbuf))!=-1){bw.write(cbuf,0,len);}//方式二// String data;// while ((data=br.readLine())!=null){// bw.write(data);//不包含换行符// bw.newLine();//提供换行操作// }} catch (IOException e) {e.printStackTrace();} finally {if (bw!=null){try {bw.close();} catch (IOException e) {e.printStackTrace();}}if (br!=null){try {br.close();} catch (IOException e) {e.printStackTrace();}}}}
转换流
InputStreamReader
处理流之二:转换流(属于字符流)
InputstreamReader:将一个字节的输入流转换成字符的输入流
OutputStreamWriter:将一个字符的输出流转换为字节的输出流
作用:提供字节流与字符流之间的转换
解码:字节、字节数组———>字符数组、字符串
编码:字符数组、字符串—->字节、字节数组
字符集:
ASCII:美国标准信息交换码。用一个字节的七位可以表示
ISO8859-1:拉丁码表,欧洲码表。用一个字节的8未表示
GB2321:中国的中文编码表。最多两个字节编码所有字符
GBK:中国的中文编码表升级,融合了更多中文文字符号。最多两个字节编码
Unicode:国际标准码。融合了目前人类使用的所有字符。为每个字符分配唯一的字符码。所有的文字用两个字符表示
UTF-8:变长的编码方式,可用1-4个字节来表示一个字符
实现字节的输入流到字符的输入流的转换
@Testpublic void test1(){FileInputStream fis = null;try {fis = new FileInputStream("hello.txt");InputStreamReader isr = new InputStreamReader(fis);//使用系统默认字符集//参数二指明字符集,具体使用哪个字符集,取决于文件保存时使用的字符集// InputStreamReader isr = new InputStreamReader(fis,"UTF-8");char[] cbuf=new char[1024];int len;while ((len=isr.read(cbuf))!=-1){String s = new String(cbuf, 0, len);System.out.print(s);}} catch (IOException e) {e.printStackTrace();} finally {if (fis!=null){try {fis.close();} catch (IOException e) {e.printStackTrace();}}}}
InputStreamReader\OutStreamWriter
@Testpublic void test2(){InputStreamReader isr = null;OutputStreamWriter osw = null;try {File file = new File("hello.txt");File file1 = new File("hello_gbk.txt");FileInputStream fis = new FileInputStream(file);FileOutputStream fos = new FileOutputStream(file1);isr = new InputStreamReader(fis,"UTF-8");osw = new OutputStreamWriter(fos,"gbk");char[] cbuf=new char[20];int len;while ((len=isr.read(cbuf))!=-1){osw.write(cbuf,0,len);}} catch (IOException e) {e.printStackTrace();} finally {if (isr!=null){try {isr.close();} catch (IOException e) {e.printStackTrace();}}if (osw!=null){try {osw.close();} catch (IOException e) {e.printStackTrace();}}}}
标准的输入输出流
System.in:标准的输入流,默认从键盘输入
System.out:标准的输出流,默认从控制台输出
System类的setIn(InputStream is)/steOut(PrintStream ps)方式重新指定输入和输出的流
练习:
从键盘输入字符串,要求将读取到的整行字符串转成大写输出。然后继续进行输入操作,直至当输入“e”或”
exit“时,退出程序
public static void main(String[] args) {BufferedReader br = null;try {InputStreamReader isr = new InputStreamReader(System.in);br = new BufferedReader(isr);while (true){System.out.println("请输入字符串:");String data=br.readLine();if ("e".equalsIgnoreCase(data)||"exit".equalsIgnoreCase(data)){System.out.println("程序结束");break;}String upperCase = data.toUpperCase();System.out.println(upperCase);}} catch (IOException e) {e.printStackTrace();} finally {if (br!=null){try {br.close();} catch (IOException e) {e.printStackTrace();}}}}
打印流
打印流:PrintStream和PrintWriter
提供了一系列重载的print()和println()
数据流
DataInputStream
DataOutputStream
作用:用于读取或写出基本数据类型的变量或字符串
DataOutputStream
练习:将内存中的字符串、基本数据类型的变量写出到文件中
@Testpublic void test2() {DataOutputStream dos = null;try {dos = new DataOutputStream(new FileOutputStream("data.txt"));dos.writeUTF("刘谋");dos.flush();dos.writeInt(23);dos.flush();dos.writeBoolean(true);dos.flush();} catch (IOException e) {e.printStackTrace();} finally {if (dos!=null){try {dos.close();} catch (IOException e) {e.printStackTrace();}}}}
DataInputStream
将文件中存储的基本数据类型变量和字符串读取到内存中,保存在变量中
注意点:读取不同类型的数据的顺序要与当初写入文件的顺序保持一致。
@Testpublic void test3(){DataInputStream dis= null;try {dis = new DataInputStream(new FileInputStream("data.txt"));String name = dis.readUTF();int age = dis.readInt();boolean isMale = dis.readBoolean();System.out.println("name:"+name);System.out.println("age:"+age);System.out.println("isMale:"+isMale);} catch (IOException e) {e.printStackTrace();} finally {if (dis!=null){try {dis.close();} catch (IOException e) {e.printStackTrace();}}}}
对象流
对象流的使用
1.ObjectInputStream和ObjectOutputStream
2.作用:用于存储和读取基本数据类型数据对象或对象的处理流。它的强大之处就是可以把java中的对象写入到
数据源中,也能把对象从数据源中还原回来
3.要想一个java对象是可序列化的,需要满足相应要求:见Person.java
需要实现接口:Serializable
当前类提供一个全局常量:static final long serivalVersionUID
除了当前类需要实现Serializable接口之外,还必须保证其内部所有属性也必须可序列化
(默认情况下基本数据类型都是可序列化的)
public class Person implements Serializable {public static final long serivalVersionUID=4232326L;private String name;private int age;public Person() {}public Person(String name, int age) {this.name = name;this.age = age;}public String getName() {return name;}public void setName(String name) {this.name = name;}public int getAge() {return age;}public void setAge(int age) {this.age = age;}@Overridepublic String toString() {return "Person{" +"name='" + name + '\'' +", age=" + age +'}';}@Overridepublic boolean equals(Object o) {if (this == o) return true;if (o == null || getClass() != o.getClass()) return false;Person person = (Person) o;if (age != person.age) return false;return name != null ? name.equals(person.name) : person.name == null;}@Overridepublic int hashCode() {int result = name != null ? name.hashCode() : 0;result = 31 * result + age;return result;}
补充:ObjectInputStream和ObjectOutputStream不能序列化static和transient修饰的成员变量
4.序列化机制:对象序列化机制允许把内存中的java对象转换成平台无关的二进制流,从而允许把这种二级制
流持久的保存在磁盘上,或通过网络将这种二进制流传输到另一个网络节点。当其他程序获取了这一种二进制流,
就可以恢复成原来的java对象_
ObjectOutputStream
序列化过程:将内存中的java对象保存到磁盘中或通过网络传输出去.使用ObjectOutputStream实现
@Testpublic void testObjectOutputStream(){ObjectOutputStream oos = null;try {oos = new ObjectOutputStream(new FileOutputStream("Object.dat"));oos.writeObject(new String("我爱中华!!"));oos.flush();//刷新操作oos.writeObject(new Person("王维",2000));oos.flush();} catch (IOException e) {e.printStackTrace();} finally {if (oos!=null){try {oos.close();} catch (IOException e) {e.printStackTrace();}}}}
ObjectInputStream
反序列化:将磁盘文件中的对象还原为内存中的一个java对象
@Testpublic void testObjectInputStream(){ObjectInputStream ois = null;try {ois = new ObjectInputStream(new FileInputStream("Object.dat"));Object object = ois.readObject();String s = (String) object;Person p = (Person) ois.readObject();System.out.println(s);System.out.println(p);} catch (IOException e) {e.printStackTrace();} catch (ClassNotFoundException e) {e.printStackTrace();} finally {if (ois!=null){try {ois.close();} catch (IOException e) {e.printStackTrace();}}}}
随机存取文件流(RandomAccessFile)
RandomAccessFile的使用
1.RandomAccessFile直接继承于java.lang.Object类,实现了DataInput和DataOutput接口
2.RandomAccessFile既可以作为一个输入流,也可以作为一个输出流
@Testpublic void test1(){RandomAccessFile raf = null;RandomAccessFile raf1 = null;try {raf = new RandomAccessFile(new File("猫1.png"),"r");raf1 = new RandomAccessFile(new File("猫3.png"),"rw");byte[] buff=new byte[1024];int len;while ((len=raf.read(buff))!=-1){raf1.write(buff,0,len);}} catch (IOException e) {e.printStackTrace();} finally {if (raf!=null){try {raf.close();} catch (IOException e) {e.printStackTrace();}}if (raf1!=null){try {raf1.close();} catch (IOException e) {e.printStackTrace();}}}}
_3.如果RandomAccessFile作为一个输出流存在时,写出到的文件如果不存在,则在执行过程中自动创建
如果写出到的文件存在,则对原有文件内容进行覆盖(默认从头覆盖)
@Testpublic void test2(){RandomAccessFile raf = null;try {raf = new RandomAccessFile("hello.txt", "rw");raf.seek(3);//把指针调到角标为3的位置raf.write("xyz".getBytes());} catch (IOException e) {e.printStackTrace();} finally {if (raf!=null){try {raf.close();} catch (IOException e) {e.printStackTrace();}}}}
4.通过相关操作,实现RandomAccessFile“插入”数据的效果
/*实现插入文件的效果*/@Testpublic void test3(){RandomAccessFile raf = null;try {raf = new RandomAccessFile("hello.txt", "rw");raf.seek(3);//可以将StringBuilder替换为ByteArrayOutputStreamStringBuilder builder=new StringBuilder((int) new File("hello.txt").length());byte[] buff=new byte[20];int len;while ((len=raf.read(buff))!=-1){builder.append(new String(buff,0,len));}raf.seek(3);raf.write("xyz".getBytes());raf.write(builder.toString().getBytes());} catch (IOException e) {e.printStackTrace();} finally {if (raf!=null){try {raf.close();} catch (IOException e) {e.printStackTrace();}}}}
Path常用方法
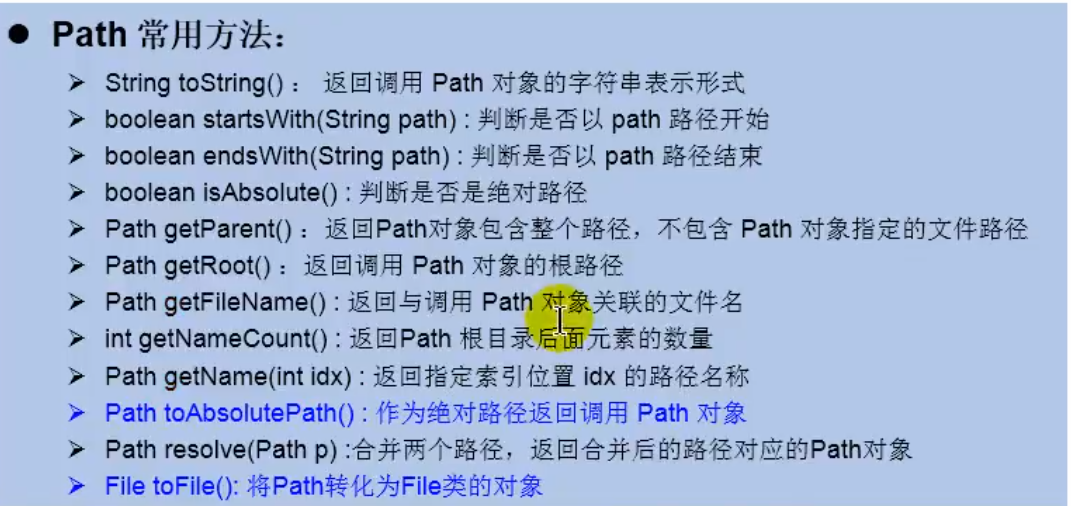
Files工具类


网络编程
网络编程概述
目的:
如何实现网络中的主机互相通信
通信双方地址
一定规则
OSI参考模型:模型过于理想化,未能在因特网上进行广泛推广
TCP/IP参考模型(TCP/IP协议):事实上的国际标准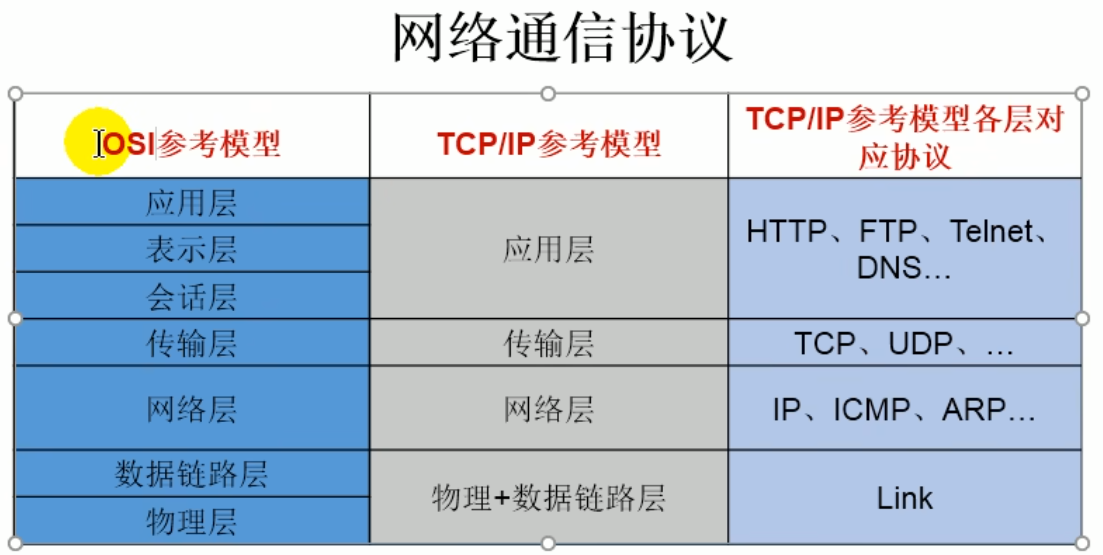
网络通信要素概述
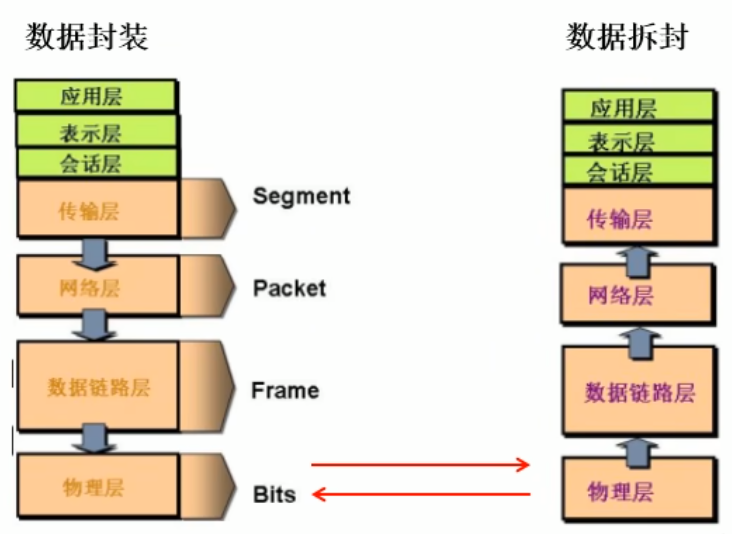
通信要素:IP和端口号
Ip地址:InetAddress
唯一的标识Internet上的计算机
本地回环地址(hostAddress):127.0.0.1 主机名(hostName)localhost
ip地址分类:IPV4和IPV6
IPV4:由四个字节组成,4个0-255
IPV6:128位(16个字节),写成8个无符号整数,每个整数用四位16进制数表示,之间用冒号隔开
分类方式二:公网地址(万维网)和私有地址(局域网)
192.168开头的就是私有地址,192.168.0.0-192.168.255.255
如何实例化InetAdress:getByName/getLocalhost
两个常用方法:getHostName、getHostAdress
public class InetAdressTest {public static void main(String[] args) {try {InetAddress inetAddress = InetAddress.getByName("www.vip.com");//www.vip.com/14.215.62.22System.out.println(inetAddress);//获取本地ipInetAddress localHost = InetAddress.getLocalHost();System.out.println(localHost);//getHostNameSystem.out.println(inetAddress.getHostName());//www.vip.com//getHostAdressSystem.out.println(inetAddress.getHostAddress());//14.215.62.22} catch (UnknownHostException e) {e.printStackTrace();}}}
端口号
端口号标识正在计算机上运行的进程(程序)
不同的进程有不同的端口号
被规定为一个16位整数0-65535
端口分类:
公认端口: 0-1023。被预先定义的服务通信占用(如HTTP:80,FTP:21,Telnet:23)
注册端口:1024-49151(如Tomcat:8080,MySql:3306,Oracle:1521等
动态\私有端口:49152-65535
端口号和IP地址的组合得出一个网络套接字:Socket
通信要素:网络协议

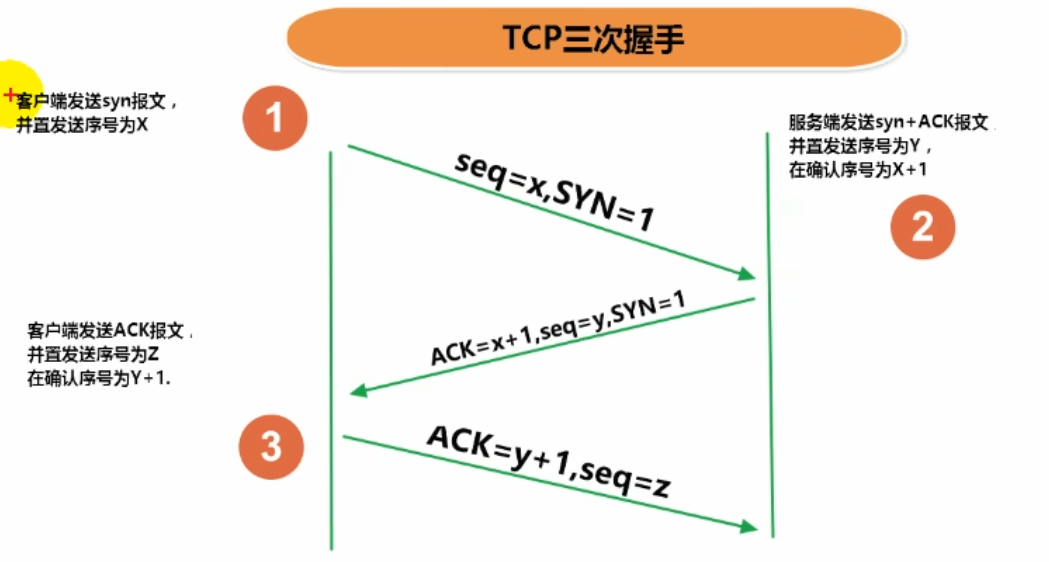
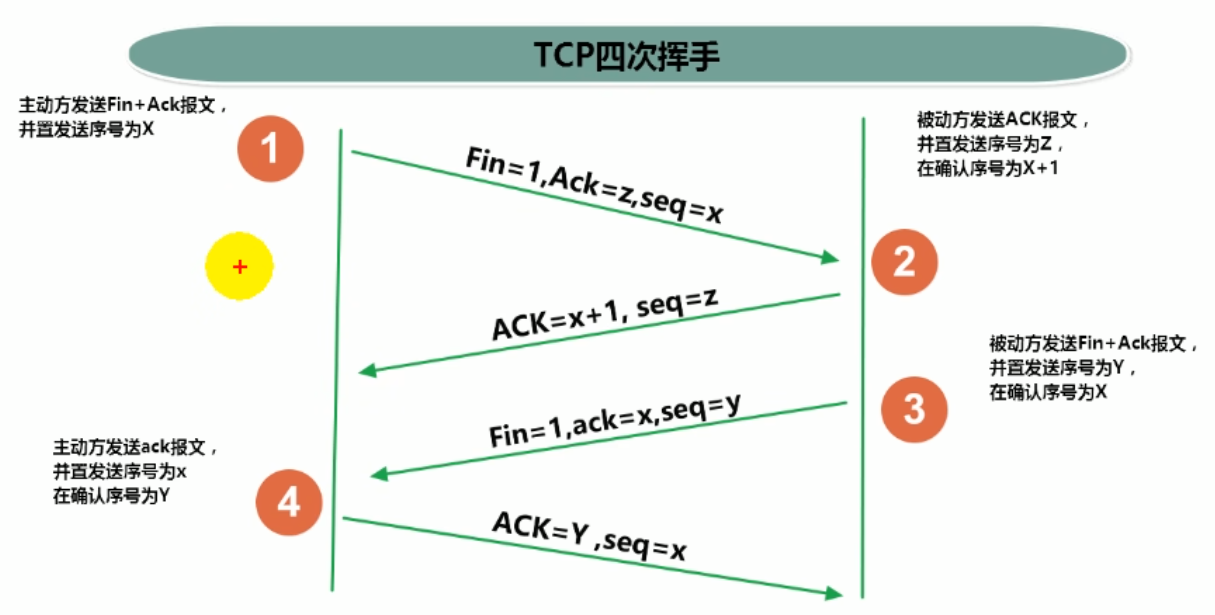
TCP网络编程
例1:客户端发送信息给服务端,服务将信息显示在控制台
public class TCPTest {//客户端@Testpublic void client(){Socket socket= null;OutputStream os = null;try {//1.创建Socket对象,指明服务器端的ip和端口号InetAddress inetAddress = InetAddress.getByName("2.0.3.251");socket = new Socket(inetAddress,8899);//获取一个输出流用于输出数据os = socket.getOutputStream();//写出数据的操作os.write("你好,我是客户端".getBytes());} catch (IOException e) {e.printStackTrace();} finally {//资源关闭if (os!=null){try {os.close();} catch (IOException e) {e.printStackTrace();}}if (socket!=null){try {socket.close();} catch (IOException e) {e.printStackTrace();}}}}//服务端@Testpublic void server(){ServerSocket serverSocket = null;Socket accept = null;InputStream is = null;ByteArrayOutputStream baos = null;try {//创建服务器端的serverSocket指明自己的端口号serverSocket = new ServerSocket(8899);//调用accept()表示接收来自于客户端的Socketaccept = serverSocket.accept();//获取输入流中的数据is = accept.getInputStream();//可能会有乱码// byte[] buff=new byte[1024];// int len;// while ((len=is.read(buff))!=-1){// String s = new String(buff, 0, len);// System.out.println(s);// }//获取输入流中的数据baos = new ByteArrayOutputStream();byte[] buff=new byte[1024];int len;while ((len=is.read(buff))!=-1){baos.write(buff,0,len);}System.out.println(baos.toString());System.out.println("收到了来自:"+accept.getInetAddress().getHostAddress()+"的信息");} catch (IOException e) {e.printStackTrace();} finally {//关闭流资源if (baos!=null){try {baos.close();} catch (IOException e) {e.printStackTrace();}}if (is!=null){try {is.close();} catch (IOException e) {e.printStackTrace();}}if (accept!=null){try {accept.close();} catch (IOException e) {e.printStackTrace();}}if (serverSocket!=null){try {serverSocket.close();} catch (IOException e) {e.printStackTrace();}}}}}
例题2:客户端发送文件给服务器,服务器将文件保存在本地
public class TCPTest1 {//客户端@Testpublic void client() {Socket socket = null;OutputStream os = null;FileInputStream fis = null;try {//1.创建一个Socket并指明ip和端口号socket = new Socket(InetAddress.getByName("127.0.0.1"), 9090);//获取一个输出流os = socket.getOutputStream();//创建输入流,获取猫.png文件fis = new FileInputStream(new File("猫.png"));//读取文件并输出byte[] buff = new byte[1024];int len;while ((len = fis.read(buff)) != -1) {os.write(buff, 0, len);}} catch (IOException e) {e.printStackTrace();} finally {//关闭流if (fis != null) {try {fis.close();} catch (IOException e) {e.printStackTrace();}}if (os != null) {try {os.close();} catch (IOException e) {e.printStackTrace();}}if (socket != null) {try {socket.close();} catch (IOException e) {e.printStackTrace();}}}}//服务端@Testpublic void server() {ServerSocket serverSocket = null;Socket s = null;InputStream is = null;FileOutputStream fos = null;try {//创建服务端的ServerSocketserverSocket = new ServerSocket(9090);////调用accept()表示接收来自于客户端的Sockets = serverSocket.accept();//获取一个输入流其中数据is = s.getInputStream();//创建一个输出流,输出文件fos = new FileOutputStream(new File("猫4.png"));//获取输入流中的数据输出byte[] buffer = new byte[1024];int len;while ((len = is.read(buffer)) != -1) {fos.write(buffer, 0, len);}} catch (IOException e) {e.printStackTrace();} finally {//关闭流if (fos!=null){try {fos.close();} catch (IOException e) {e.printStackTrace();}}if (is!=null){try {is.close();} catch (IOException e) {e.printStackTrace();}}if (s!=null){try {s.close();} catch (IOException e) {e.printStackTrace();}}if (serverSocket!=null){try {serverSocket.close();} catch (IOException e) {e.printStackTrace();}}}}}
例题2:客户端发送文件给服务器,服务器将文件保存在本地
public class TCPTest2 {//客户端@Testpublic void client() {Socket socket = null;OutputStream os = null;FileInputStream fis = null;InputStream is=null;ByteArrayOutputStream baos=null;try {//1.创建一个Socket并指明ip和端口号socket = new Socket(InetAddress.getByName("127.0.0.1"), 9090);//获取一个输出流os = socket.getOutputStream();//创建输入流,获取猫.png文件fis = new FileInputStream(new File("猫.png"));//读取文件并输出byte[] buff = new byte[1024];int len;while ((len = fis.read(buff)) != -1) {os.write(buff, 0, len);}//关闭数据的输出socket.shutdownOutput();//接收来自服务端的反馈is = socket.getInputStream();baos = new ByteArrayOutputStream();byte[] buffer = new byte[1024];int len1;while ((len1=is.read(buffer))!=-1){baos.write(buffer,0,len1);}System.out.println(baos.toString());} catch (IOException e) {e.printStackTrace();} finally {//关闭流if (fis != null) {try {fis.close();} catch (IOException e) {e.printStackTrace();}}if (os != null) {try {os.close();} catch (IOException e) {e.printStackTrace();}}if (socket != null) {try {socket.close();} catch (IOException e) {e.printStackTrace();}}if (is!=null){try {is.close();} catch (IOException e) {e.printStackTrace();}}if (baos!=null){try {baos.close();} catch (IOException e) {e.printStackTrace();}}}}//服务端@Testpublic void server() {ServerSocket serverSocket = null;Socket s = null;InputStream is = null;FileOutputStream fos = null;OutputStream os=null;try {//创建服务端的ServerSocketserverSocket = new ServerSocket(9090);////调用accept()表示接收来自于客户端的Sockets = serverSocket.accept();//获取一个输入流其中数据is = s.getInputStream();//创建一个输出流,输出文件fos = new FileOutputStream(new File("猫5.png"));//获取输入流中的数据输出byte[] buffer = new byte[1024];int len;while ((len = is.read(buffer)) != -1) {fos.write(buffer, 0, len);}//服务端接收成功后给予客户端反馈os = s.getOutputStream();os.write("你好,照片已收到".getBytes());} catch (IOException e) {e.printStackTrace();} finally {//关闭流if (fos!=null){try {fos.close();} catch (IOException e) {e.printStackTrace();}}if (is!=null){try {is.close();} catch (IOException e) {e.printStackTrace();}}if (s!=null){try {s.close();} catch (IOException e) {e.printStackTrace();}}if (serverSocket!=null){try {serverSocket.close();} catch (IOException e) {e.printStackTrace();}}if (os!=null){try {os.close();} catch (IOException e) {e.printStackTrace();}}}}}
UDP网络编程
public class UDPTest {//发送端@Testpublic void sender(){DatagramSocket ds = null;try {ds = new DatagramSocket();String str="我是UDP方式.......";byte[] data=str.getBytes();InetAddress inet = InetAddress.getByName("127.0.0.1");DatagramPacket dp = new DatagramPacket(data,0,data.length,inet,9090);ds.send(dp);} catch (IOException e) {e.printStackTrace();} finally {if (ds!=null){ds.close();}}}//接收端@Testpublic void receiver(){DatagramSocket ds = null;try {ds = new DatagramSocket(9090);byte[] buff=new byte[100];DatagramPacket dp = new DatagramPacket(buff, 0, buff.length);ds.receive(dp);System.out.println(new String(dp.getData(),0,dp.getLength()));} catch (IOException e) {e.printStackTrace();} finally {if (ds!=null){ds.close();}}}}
URL编程
URL(Uniform Resource Locator):统一资源定位符,它表示Internet上某一资源的地址。
基本结构:<传输协议>://
public class UPLTest {public static void main(String[] args) {try {URL url = new URL("http://localhost:8080/examples/mao.png");System.out.println(url.getProtocol());//获取该URL的协议名System.out.println(url.getHost());//获取该URL的主机名System.out.println(url.getPort());//获取该URL的端口号System.out.println(url.getPath());//获取该URL的文件路径System.out.println(url.getFile());//获取该URL的文件名System.out.println(url.getQuery());//获取该URL的查询名} catch (MalformedURLException e) {e.printStackTrace();}}}
public class UPLTest1 {public static void main(String[] args) {HttpURLConnection uc = null;InputStream is = null;FileOutputStream fos = null;try {URL url = new URL("http://localhost:8080/examples/mao.png");uc = (HttpURLConnection)url.openConnection();uc.connect();is = uc.getInputStream();fos = new FileOutputStream("mao6.png");byte[] buff=new byte[1024];int len;while ((len=is.read(buff))!=-1){fos.write(buff,0,len);}System.out.println("下载完成");} catch (IOException e) {e.printStackTrace();} finally {if (fos!=null){try {fos.close();} catch (IOException e) {e.printStackTrace();}}if (is!=null){try {is.close();} catch (IOException e) {e.printStackTrace();}}if (uc!=null){uc.disconnect();}}}}

若有收获,就点个赞吧
0 人点赞
