一、SpringCloud Bus概述
1、什么是总线?
在微服务架构的系统中,通常会使用轻量级的消息代理来构建一个共用的消息主题,并让系统中所有的微服务实力都连接上来。由于该主题中产生的消息会被所有实例监听和消费,所以称它为消息总线。在总线上的各个实例,都可以方便地广播一些需要让其他连接在 主题上的实例都知道的消息。
2、什么是 SpringCloud Bus?
SpringCloud Stream是构建与共享消息系统相连的高度可扩展事件驱动的微服务的框架。
- 官方定义Spring Cloud Stream是一个构建消息驱动微服务的框架。
- 应用程序通过inputs或者outputs来与Spring cloud Stream中binder对象交互
- 通过我们配置的binding(绑定),而Spring Cloud Stream的binder对象负责与消息中间件交互。所以,我们只需要搞清楚如何与Spring Cloud Stream交互就可以方便使用消息驱动的方式。
- 通过使用Spring Integration来连接消息代理中间件以实现消息事件驱动。
- Spring Cloud Stream为一些供应商的消息中间件产品提供了个性化的自动化配置实现,引用了发布-订阅、消费组、分区的三个核心概念。
- 目前仅支持RabbitMQ、Kafka。
SpringCloud Bus能管理和传播分布式系统间的消息,就像一个分布式执行器,可用于广播状态更改、事件推送等,也可以当作微服务间的通信通道,,原理就是消息中间件。
3、设计思想
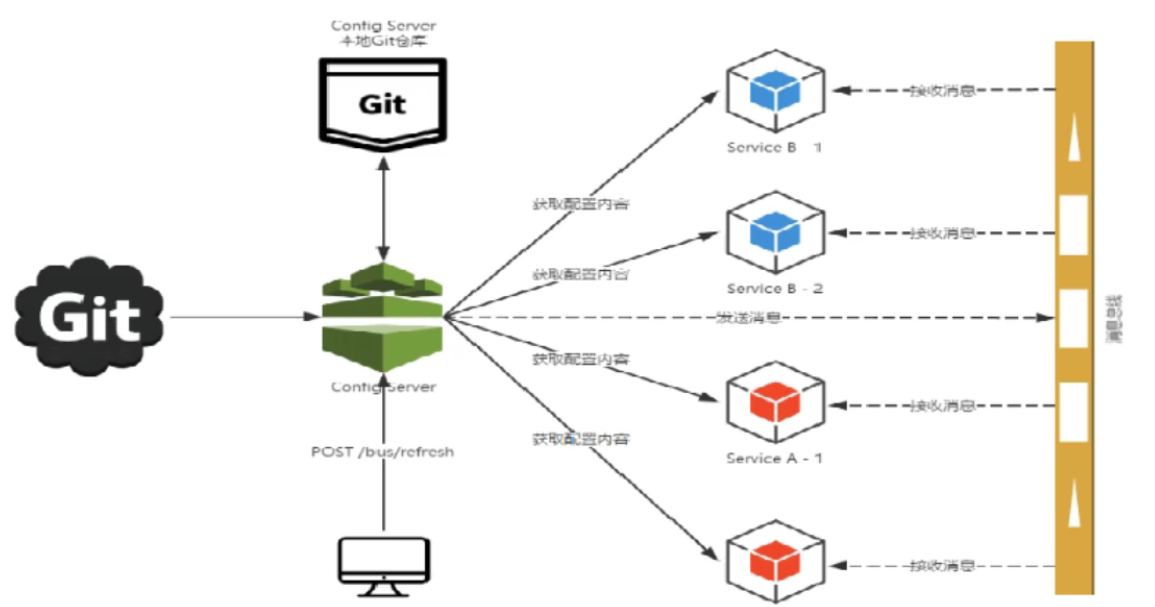
图一:利用消息总线触发一个客户端/bus/refresh,而刷新所有客户端的配置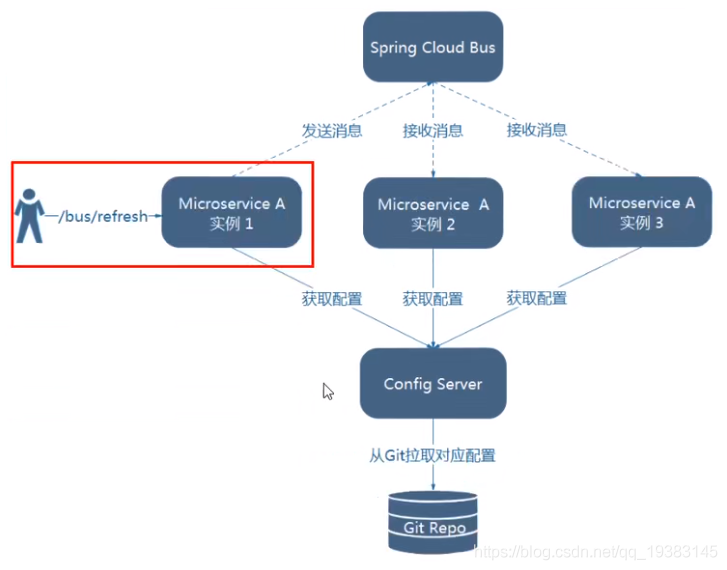
图二:利用消息总线触发一个服务端ConfigServer的/bus/refresh端点,而刷新所有客户端的配置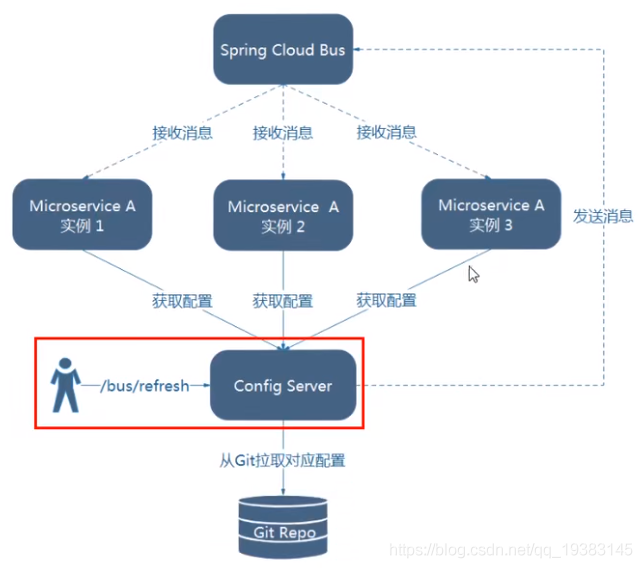
显然更加图二的架构适合,主要原因如下:
- 打破了微服务的职责单一性,因为微服务本身是业务模块,它本不应该承担配置刷新的职责。
- 坏了微服务各节点的对等性。
- 有一定的局限性。例如,微服务在迁移时,它的网络地址常常会发生变化,此时如果想要做到自动刷新,那就会增加更多的修改。
二、Bus环境搭建
本次采用的是设计思想中的图二。1、消息中间件环境搭建
本次学习MQ不是重点,因此会选择较方便的搭建方式 Docker,选择的消息中间件是 RabbitMQ。
安装erlang
# 准备环境yum -y install make gcc gcc-c++ kernel-devel m4 ncurses-devel openssl-devel epel-release# 先下载rpm包wget https://packages.erlang-solutions.com/erlang-solutions-1.0-1.noarch.rpm# rpm解压rpm -Uvh erlang-solutions-1.0-1.noarch.rpm# 安装sudo yum install erlang# 查看安装路径whereis erlang# 检验是否安装成功erl
docker 安装 rabbitmq ```bash
方式一:默认guest 用户,密码也是 guest
docker run -d —hostname my-rabbit —name rabbit -p 15672:15672 -p 5672:5672 rabbitmq:management
方式二:设置用户名和密码
docker run -d —hostname my-rabbit —name rabbit -e RABBITMQ_DEFAULT_USER=user -e RABBITMQ_DEFAULT_PASS=password -p 15672:15672 -p 5672:5672 rabbitmq:management
3. 测试:[http://localhost:15672/](http://localhost:15672/)<a name="NnF0z"></a>## 2、在Config Server 添加消息总线支持1. 在pom添加消息总线RabbitNQ支持```xml<dependency><groupId>org.springframework.cloud</groupId><artifactId>spring-cloud-starter-bus-amqp</artifactId></dependency>
- 写yaml ```yaml server: port: 3344
spring: application: name: cloud-config-center
mq
rabbitmq: host: 192.168.184.137 port: 5672 username: guest password: guest cloud: config: server: git: uri: https://gitee.com/codesofun-tao/gitee-springcloud-config.git username: password:
# 搜索目录search-paths:- gitee-springcloud-config# 分支label: master
暴露监控端点 actuator
management: endpoints: web: exposure: include: ‘bus-refresh’
3. 主启动类```java@SpringBootApplication@EnableConfigServerpublic class ConfigCenterBus3344 {public static void main(String[] args) {SpringApplication.run(ConfigCenterBus3344.class, args);}}
3、在Config Client 添加消息总线支持
写pom
<dependency><groupId>org.springframework.cloud</groupId><artifactId>spring-cloud-starter-bus-amqp</artifactId></dependency>
写yaml ```yaml server: port: 3355
spring: application: name: config-client cloud: config: uri: http://localhost:3344 name: config profile: dev label: master
# 合起来就是 master分支上的 config-dev.yml
暴露监控端点 actuator
management: endpoints: web: exposure: include: ‘*’
3. 主启动类
```java
@SpringBootApplication
//@EnableEurekaClient
public class ConfigClient3355 {
    public static void main(String[] args) {
        SpringApplication.run(ConfigClient3355.class, args);
    }
}
业务类
@RestController
@RefreshScope //动态刷新
public class TestController {
 @Value("${config.info}")
 private String value;

 @GetMapping("/show")
 public String index() {
     System.out.println(value);
     return value;
 }
}
4、动态刷新全局广播
此处是基于设计思想二来实现的,即通知服务端更新配置从而带动客户端更新配置。启动服务之后,发送POST请求给服务端,通知刷新配置。
curl -X POST "http://localhost:3344/actuator/bus-refresh"
做完了这些工作,此时再在github上对配置文件修改,客户端就可以动态刷新。
5、动态定点刷新
指定通知某一个实例生效而不是全部

若有收获,就点个赞吧
0 人点赞
