四种创建线程的方式:
- 继承Thread类(是一个Runnable接口的实现类)
- 实现Runnable接口(常用,使用lambda表达式扔到Thread类中执行)
- 实现callable接口(有返回值和范型,使用FutureTask类,再扔到Thread类中执行)
使用Executors来创建线程池再创建线程(使用ThreadPool)
lambda与内部类
```java public class TestLambda { // 2.静态内部类 static class Like2 implements Like{
@Overridepublic void lambda() {System.out.println("l2");}
}
public static void main(String[] args) {
// 1.传统方法Like l1 = new ILike();l1.lambda();// 2.静态内部类Like2 l2 = new Like2();l2.lambda();// 3.局部内部类class Like3 implements Like{@Overridepublic void lambda() {System.out.println("l3");}}Like3 l3 = new Like3();System.out.println("l3");// 4. 匿名内部类Like l4 = new Like(){@Overridepublic void lambda() {System.out.println("l4");}};l4.lambda();// 5. lambdaLike l5 = ()->System.out.println("l5");l5.lambda();
}
} // 定义一个接口 interface Like{ void lambda(); }
// 定义接口实现类 class ILike implements Like{
@Overridepublic void lambda() {System.out.println("l1");}
}
<a name="GJUMu"></a>### Runnable + Synchronized锁 + wait、notifyAll线程通信方式- Synchronized锁,普通方法锁的是实例对象,静态方法锁的是class类模板。- Synchronized锁有两种使用方式1. 锁方法public Synchronized void add(){}2. 锁对象 (一般锁有共享访问属性的对象)Synchronized(obj){}- 生产者消费者模式:判断 -> 不满足等待(wait) -> 满足就执行并唤醒(notifyAll)```java/*** synchronized方法版* 使用OOP类封装属性和同步方法,再去调用Thread线程,传入实例对象的方法开启多线程*/public class TestJucSyn {public static void main(String[] args) {// 实例一个需要多线程操作的对象Fun fun = new Fun();// 使用lambda表达式简化// 将对象需要多线程操作的方法用lambda重写run()方法// 再传给Thread接口开启多线程操作// 模板 new Thread(()->{}, "Name").start();// 开启4个线程new Thread(()->{// @Override// public void run(){for (int i = 0; i < 10; i++) {try {fun.increament();} catch (InterruptedException e) {e.printStackTrace();}}}, "A").start();new Thread(()->{for (int i = 0; i < 10; i++) {try {fun.decreament();} catch (InterruptedException e) {e.printStackTrace();}}}, "B").start();new Thread(()->{for (int i = 0; i < 10; i++) {try {fun.increament();} catch (InterruptedException e) {e.printStackTrace();}}}, "C").start();new Thread(()->{for (int i = 0; i < 10; i++) {try {fun.decreament();} catch (InterruptedException e) {e.printStackTrace();}}}, "D").start();}}class Fun {private int num = 0;public synchronized void increament() throws InterruptedException {// 使用while 防止多线程唤醒失败while (num == 1) {this.wait();}num++;System.out.println(Thread.currentThread().getName() +"=>"+ num);this.notifyAll();}public synchronized void decreament() throws InterruptedException {while (num == 0) {this.wait();}num--;System.out.println(Thread.currentThread().getName() +"=>"+ num);this.notifyAll();}}//输出/*A=>1B=>0A=>1B=>0A=>1B=>0A=>1B=>0A=>1B=>0A=>1B=>0A=>1B=>0A=>1B=>0A=>1B=>0A=>1B=>0C=>1D=>0C=>1D=>0C=>1D=>0C=>1D=>0C=>1D=>0C=>1D=>0C=>1D=>0C=>1D=>0C=>1D=>0C=>1D=>0进程已结束,退出代码为 0*/
Runnable + Lock锁 + condition线程通信方式
- 使用Lock锁需要先
Lock lock = new ReentrantLock(); - Lock的线程通信需要先
Condition condition = lock.newCondition();,try 语句块加锁 lock.lock(), finally语句块解锁 lock.unlock; ```java import sun.jvm.hotspot.memory.ContiguousSpace;
import java.util.concurrent.locks.Condition; import java.util.concurrent.locks.Lock; import java.util.concurrent.locks.ReentrantLock;
/**
- Lock方法版
使用OOP类封装属性和同步方法,再去调用Thread线程,传入实例对象的方法开启多线程 */ public class TestJucLock { public static void main(String[] args) {
// 实例一个需要多线程操作的对象Funs fun = new Funs();// 将对象需要多线程操作的方法 传给Thread接口开启多线程操作new Thread(()->{for (int i = 0; i < 10; i++) {try {fun.increament();} catch (InterruptedException e) {e.printStackTrace();}}}, "A").start();new Thread(()->{for (int i = 0; i < 10; i++) {try {fun.decreament();} catch (InterruptedException e) {e.printStackTrace();}}}, "B").start();new Thread(()->{for (int i = 0; i < 10; i++) {try {fun.increament();} catch (InterruptedException e) {e.printStackTrace();}}}, "C").start();new Thread(()->{for (int i = 0; i < 10; i++) {try {fun.decreament();} catch (InterruptedException e) {e.printStackTrace();}}}, "D").start();
} }
class Funs { private int num = 0;
// 使用Lock 需要先在类的作用域定义,不要定义到了方法作用域里面了,// 不然每次线程调用方法,都会新建一个锁,就锁不住了Lock lock = new ReentrantLock();Condition condition = lock.newCondition();public void increament() throws InterruptedException {try {lock.lock();// 使用while 防止多线程唤醒失败while (num == 1) {condition.await();}num++;System.out.println(Thread.currentThread().getName() +"=>"+ num);condition.signalAll();} catch (Exception e) {e.printStackTrace();} finally {lock.unlock();}}public void decreament() throws InterruptedException {try {lock.lock();// 使用while 防止多线程唤醒失败while (num == 0) {condition.await();}num--;System.out.println(Thread.currentThread().getName() +"=>"+ num);condition.signalAll();} catch (Exception e) {e.printStackTrace();} finally {lock.unlock();}}
}
// 输出 // 运行结果与上面类似
<a name="AWYUq"></a>### Callbale```javaimport java.util.concurrent.Callable;import java.util.concurrent.ExecutionException;import java.util.concurrent.FutureTask;public class TestJucCallable {public static void main(String[] args) throws ExecutionException, InterruptedException {// new Thread(new Runnable()).start()// FutureTask是Runnable的实现类// new Thread(new FutureTask<V>(Callable)).start()MythreadCall call = new MythreadCall();FutureTask futureTask = new FutureTask(call);new Thread(futureTask, "A").start();new Thread(futureTask, "B").start(); // 不会打印call,A的结果会被缓存Integer o = (Integer)futureTask.get(); // 返回值System.out.println(o);}}class MythreadCall implements Callable<Integer> {@Overridepublic Integer call() throws Exception {System.out.println("call");return 123;}}// 输出/*call123进程已结束,退出代码为 0*/
线程池
- 线程池接口:ExecutorService 。 ExecutorService接口继承自Executor接口
- 线程池的工厂类:Executors(不推荐使用)
ThreadPoolExecutor(推荐)
ExecutorService service = new ThreadPoolExecutor();
Executors返回的线程池对象的弊端:
- FixedThreadPool 和 SingleThreadPolol:
允许的请求队列长度为 Integer.MAX_VALUE(21亿),可能会堆积大量的请求,从而导致OOM。
- CachedThreadPool 和 ScheduleThreadPool:
允许的创建线程数量为Integer.MAX_VALUE,可能会堆积大量的线程,从而导致OOM。
import java.util.concurrent.ExecutorService;import java.util.concurrent.Executors;public class TestThreadPool{public static void main(String[] args) {// 创建线程池ExecutorService service = Executors.newFixedThreadPool(5);for (int i = 1; i <= 10; i++) {service.execute(()->{System.out.println(Thread.currentThread().getName());});}// 线程池关闭service.shutdown();}}// 输出,可以看出最多只有5个线程/*pool-1-thread-1pool-1-thread-2pool-1-thread-3pool-1-thread-4pool-1-thread-5pool-1-thread-1pool-1-thread-2pool-1-thread-3pool-1-thread-4pool-1-thread-3进程已结束,退出代码为 0*/
JUC并发
集合
- 普通集合都是线程不安全的
- List、Map、Set集合都可以使用Collections.synchronizedXXX()进行加锁实现线程安全
- 直接使用JUC下的线程安全集合 CopyOnWriteArrayList()、CopyOnWriteArraySet()、ConcurrentHashMap()、ConcurrentLinkedDeque()、ConcurrentLinkedQueue()
ConcurrentHashMap()为例:
import java.util.Map;import java.util.UUID;import java.util.concurrent.ConcurrentHashMap;public class TestConcurrentHashMap {public static void main(String[] args) {// HashMap默认初始值: new HashMap<>(16, 0.75) 16的容量,0.75的装填因子Map<String, String> map = new ConcurrentHashMap<>();for (int i = 0; i < 30; i++) {new Thread(()->{map.put(Thread.currentThread().getName(), UUID.randomUUID().toString().substring(0,5));System.out.println(map);}, String.valueOf(i)).start();}}}
常用辅助类
CountDownLatch(线程减法计数器)
允许一个或多个线程等待,直到在其他线程中执行的一组操作完成同步辅助(说白了就是一个线程减法计数器)
import java.util.concurrent.CountDownLatch;public class CountDownLatchDemo {// 这里Main函数不应该抛出异常的,但是这里目的是为了简化演示代码就不写try catch了public static void main(String[] args) Throws InterruptedException{// 线程中的辅助计数器CountDownLatch countDownLatch = new CountDownLatch(6);for (int i = 1; i <= 6; i++) {new Thread(()->{System.out.println(Thread.currentThread().getName()+" Go out");countDownLatch.countDown(); // 计数器-1}, String.valueOf(i)).start();}countDownLatch.await(); // 等待线程计数器归零,才会继续往下执行代码System.out.println("Close Door");}}// 输出/*1 Go out2 Go out3 Go out4 Go out5 Go out6 Go outClose Door进程已结束,退出代码为 0*/
CyclicBarrier(线程加法计数器)
import java.util.concurrent.BrokenBarrierException;import java.util.concurrent.CyclicBarrier;public class CyclicBarrierDemo {public static void main(String[] args) {/*** 用多线程实现 集齐7个龙珠召唤神龙*/// 第一个参数是计数器激活值,第二参数是到达激活值运行的一个RunnableCyclicBarrier cyclicBarrier = new CyclicBarrier(7, () -> {System.out.println("召唤神龙");});for (int i = 1; i <= 7; i++) {// lambda由于是匿名内部类的进化版,是拿不到外部的for循环的i值的// 需要将i值进行finnal处理为一个常量final int temp = i;new Thread(()->{System.out.println(Thread.currentThread().getName()+ "==>收集第" + temp + "个龙珠");try {// 线程等待,直到满足线程计数设定值才会往下继续执行// 返回值是当前线程计数值,每个新线程会自动加一int await = cyclicBarrier.await();// 召唤神龙之后才会打印,多线程打印,随机顺序System.out.println(await);} catch (InterruptedException e) {e.printStackTrace();} catch (BrokenBarrierException e) {e.printStackTrace();}}).start();}}}// 输出/*Thread-0==>收集第1个龙珠Thread-1==>收集第2个龙珠Thread-2==>收集第3个龙珠Thread-3==>收集第4个龙珠Thread-4==>收集第5个龙珠Thread-5==>收集第6个龙珠Thread-6==>收集第7个龙珠召唤神龙0432561进程已结束,退出代码为 0*/
CyclicBarrier和CountDownLatch的区别
- CountDownLatch是减法计数器,CyclicBarrier是加法计数器。
- CountDownLatch的计数器只能使用一次,而CyclicBarrier的计数器可以使用reset()方法重置。CountDownLatch和CyclicBarrier都有让多个线程等待同步然后再开始下一步动作的意思,但是CountDownLatch的下一步的动作实施者是主线程,具有不可重复性;而CyclicBarrier的下一步动作实施者还是“其他线程”本身,具有往复多次实施动作的特点。
CyclicBarrier还提供其他有用的方法,getNumberWaiting()方法可以获得阻塞线程的数量;isBroken()方法可以了解阻塞的线程是否被中断。
Semaphore(规定线程数量,限流作用)
有点wait()、notifyAll()的味道,但是是自动计算阈值的,并且控制的是线程
acquire() 获取,也就是激活一个线程,直到满足设定的线程最大数量时进入等待状态
- release() 释放,释放当前的线程,线程数量+1,然后唤醒等待线程
作用
- 多个共享资源互斥的使用
- 并发限流,控制最大线程数 ```java import java.util.concurrent.Semaphore; import java.util.concurrent.TimeUnit;
public class SemaphoreDemo { /*
* 完成停车位功能* @param args*/public static void main(String[] args) {// 参数就是信号量,也就是限制线程数量Semaphore semaphore = new Semaphore(3);for (int i = 1; i <=6 ; i++) {// 只会运行3个线程运行new Thread(()->{try {// 获取,也就是激活一个线程semaphore.acquire();System.out.println(Thread.currentThread().getName()+"==>进入车位");// 线程等待2sTimeUnit.SECONDS.sleep(1);System.out.println(Thread.currentThread().getName()+"==>离开车位");} catch (InterruptedException e) {e.printStackTrace();}finally {semaphore.release(); // 释放线程}}).start();}}
}
/* 输出:
Thread-0==>进入车位 Thread-2==>进入车位 Thread-1==>进入车位 Thread-1==>离开车位 Thread-2==>离开车位 Thread-3==>进入车位 Thread-0==>离开车位 Thread-4==>进入车位 Thread-5==>进入车位 Thread-5==>离开车位 Thread-3==>离开车位 Thread-4==>离开车位
进程已结束,退出代码为 0
*/
<a name="AARPh"></a>### 读写锁<a name="Pv4zV"></a>#### ReadWriteLock作用:- 比ReentrantLock有更小的细粒度,可以对读写分别加锁,并且写入锁是**排他锁**,读取锁是**共享锁**- 在需要加锁的类的属性域中定义:**ReadWriteLock readWriteLock = new ReentrantReadWriteLock();**在加锁方法中**try块**进行加锁**readWriteLock.writeLock().lock();**<br />**finally块**进行解锁 **readWriteLock.writeLock().unlock();**```javaimport java.util.HashMap;import java.util.Map;import java.util.concurrent.locks.ReadWriteLock;import java.util.concurrent.locks.ReentrantReadWriteLock;public class ReadWriteLockDemo {public static void main(String[] args) {MyCacheLock cache = new MyCacheLock();// 写入for (int i = 1; i <= 5; i++) {final int temp = i;new Thread(()->{cache.put(temp+"",temp);}).start();}System.out.println("========="); // main主线程,只会执行一次,而且与其他线程抢夺资源// 读取for (int i = 1; i <= 5; i++) {final int temp = i;new Thread(()->{cache.get(temp+"");}).start();}System.out.println("=========");}}// 设计一个缓存/*这里提一句LRU缓存,使用HashMap + 双向链表实现(其实可以直接继承LinkedHashMap),get和set都将缓存对象提升到链表头,当缓存满了的时候,就删掉链表尾部的缓存*/class MyCacheLock{private volatile Map<String, Integer> map = new HashMap<>();private ReadWriteLock readWriteLock = new ReentrantReadWriteLock();// 存入public void put(String key, int value) {try {readWriteLock.writeLock().lock();System.out.println(Thread.currentThread().getName()+ "==>写入" + key);map.put(key, value);System.out.println(Thread.currentThread().getName()+ "==>写入完毕,ok");} catch (Exception e) {e.printStackTrace();} finally {readWriteLock.writeLock().unlock();}}// 读取public void get(String key) {try {readWriteLock.readLock().lock();System.out.println(Thread.currentThread().getName()+ "==>读取" + key);Integer i = map.get(key);System.out.println(Thread.currentThread().getName()+ "==>读取完毕,ok");} catch (Exception e) {e.printStackTrace();} finally {readWriteLock.readLock().unlock();}}}// 输出/*Thread-0==>写入1Thread-0==>写入完毕,okThread-1==>写入2Thread-1==>写入完毕,okThread-2==>写入3Thread-2==>写入完毕,okThread-3==>写入4Thread-3==>写入完毕,okThread-4==>写入5Thread-4==>写入完毕,ok=========Thread-5==>读取1Thread-5==>读取完毕,okThread-6==>读取2Thread-6==>读取完毕,okThread-7==>读取3Thread-7==>读取完毕,okThread-8==>读取4Thread-8==>读取完毕,ok=========Thread-9==>读取5Thread-9==>读取完毕,ok进程已结束,退出代码为 0*/
阻塞队列
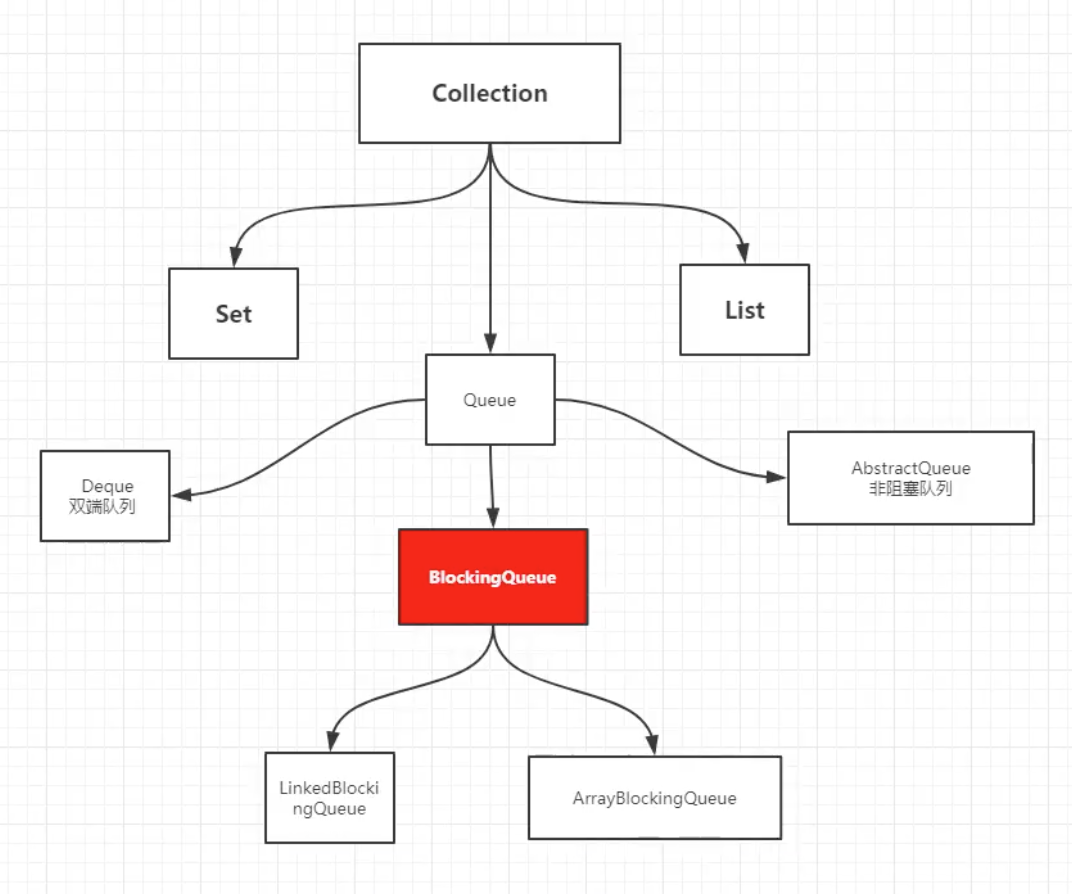
BlockingQueue(实现类:ArrayBlockingQueue、LinkedBlockingQueue、同步队列SynchronousQueue)
SynchronousQueue
同步队列,put了一个元素就必须等待take取出来,不然不能再put任何元素!
import java.util.concurrent.BlockingDeque;import java.util.concurrent.BlockingQueue;import java.util.concurrent.SynchronousQueue;import java.util.concurrent.TimeUnit;public class SynchronousQueueDemo {public static void main(String[] args) {BlockingQueue<String> synQueue = new SynchronousQueue<>();new Thread(()->{try {System.out.println(Thread.currentThread().getName() + " put 1");synQueue.put("1");System.out.println(Thread.currentThread().getName() + " put 2");synQueue.put("2");System.out.println(Thread.currentThread().getName() + " put 3");synQueue.put("3");} catch (InterruptedException e) {e.printStackTrace();}}, "T1").start();new Thread(()->{try {TimeUnit.SECONDS.sleep(1);System.out.println(Thread.currentThread().getName() + " take " + synQueue.take());TimeUnit.SECONDS.sleep(1);System.out.println(Thread.currentThread().getName() + " take " + synQueue.take());TimeUnit.SECONDS.sleep(1);System.out.println(Thread.currentThread().getName() + " take " + synQueue.take());} catch (InterruptedException e) {e.printStackTrace();}}, "T2").start();}}// 输出/*T1 put 1T2 take 1T1 put 2T2 take 2T1 put 3T2 take 3进程已结束,退出代码为 0*/
线程池(池化技术)
ExecutorService service = new ThreadPoolExecutor();
线程的 3大方法,7大参数。
3大方法:(都是ThreadPoolExecutor()的不同参数,不推荐使用;推荐直接使用ThreadPoolExecutor())
Executors.newFixedThreadPool(int nThreads); // 创建一个固定的线程池大小
Executors.newCachedThreadPool(); // 可伸缩的线程池
Executors.newSingleThreadExecutor(); // 单个线程
源码:
// newFixedThreadPoolpublic static ExecutorService newFixedThreadPool(int nThreads) {return new ThreadPoolExecutor(nThreads, nThreads,0L, TimeUnit.MILLISECONDS,new LinkedBlockingQueue<Runnable>());}// newCachedThreadPoolpublic static ExecutorService newCachedThreadPool() {return new ThreadPoolExecutor(0, Integer.MAX_VALUE,60L, TimeUnit.SECONDS,new SynchronousQueue<Runnable>());}// newSingleThreadExecutorpublic static ExecutorService newSingleThreadExecutor() {return new FinalizableDelegatedExecutorService(new ThreadPoolExecutor(1, 1,0L, TimeUnit.MILLISECONDS,new LinkedBlockingQueue<Runnable>()));}
通过源码可以看出,3大方法的本质就是调用了 ThreadPoolExecutor(),
7大参数 就是指的ThreadPoolExecutor的参数
public ThreadPoolExecutor(int corePoolSize, // 核心线程池大小int maximumPoolSize, // 最大核心线程池大小long keepAliveTime, // 无调用,超时释放TimeUnit unit, // 超时单位BlockingQueue<Runnable> workQueue, // 阻塞队列ThreadFactory threadFactory, // 线程工厂RejectedExecutionHandler handler) // 拒绝策略
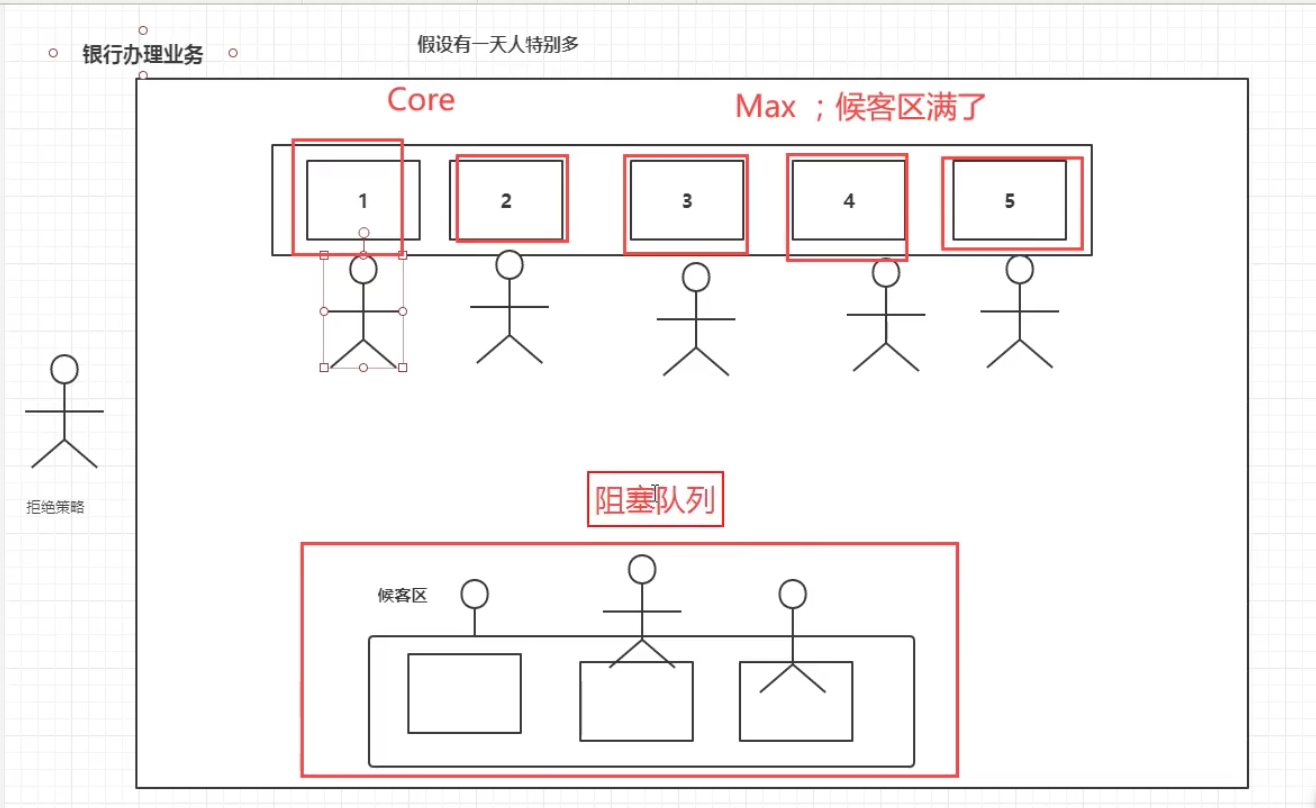
四种拒绝策略 最大线程定义准则(CPU密集型、IO密集型)
import java.util.concurrent.*;/*** 实现银行业务办理*/public class ThreadPoolExecutorDemo {public static void main(String[] args) {// 最大线程定义准则:// 1、CPU密集型// 2、IO密集型: 定义为程序中非常消耗IO的线程 的两倍// 获取CPU核数int i1 = Runtime.getRuntime().availableProcessors();ExecutorService threadPool = new ThreadPoolExecutor(2, // 核心业务窗口数量i1, // 最大核心业务窗口数量3, // 超时释放时间TimeUnit.SECONDS, // 超时单位new LinkedBlockingDeque<>(3), // 阻塞队列大小Executors.defaultThreadFactory(), // 默认工厂类new ThreadPoolExecutor.AbortPolicy() // 队列满了还有元素进来,不处理并且抛出异常//new ThreadPoolExecutor.CallerRunsPolicy() // 回自到己的线程去//new ThreadPoolExecutor.DiscardPolicy() // 队列满了,丢掉任务,不抛出异常//new ThreadPoolExecutor.DiscardOldestPolicy() // 队列满了,尝试和最早的竞争,不会抛出异常);try {for (int i = 1; i <= 9; i++) {threadPool.execute(() -> {System.out.println(Thread.currentThread().getName());});}} catch (Exception e) {e.printStackTrace();} finally {threadPool.shutdown();}}}
四大函数式接口
Function、Predict、Consumer、Supplier
- Function 函数型接口:范型第一个参数是输入类型,第二个参数是输出类型
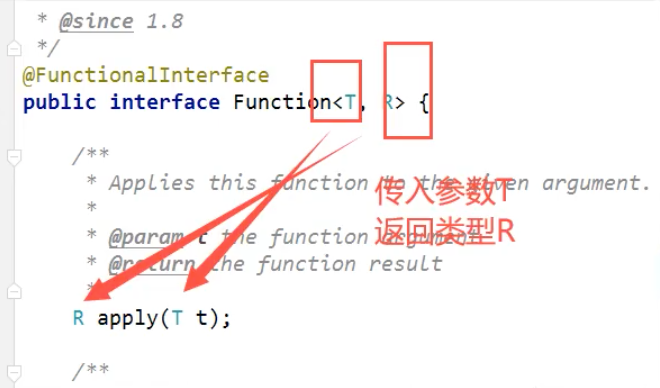
Function<String, String> function = (str)->{return str;};System.out.println(function.apply("aaa")) // out: "aaa"
- Predict 断定型接口:一个输入参数,返回只能是 布尔值
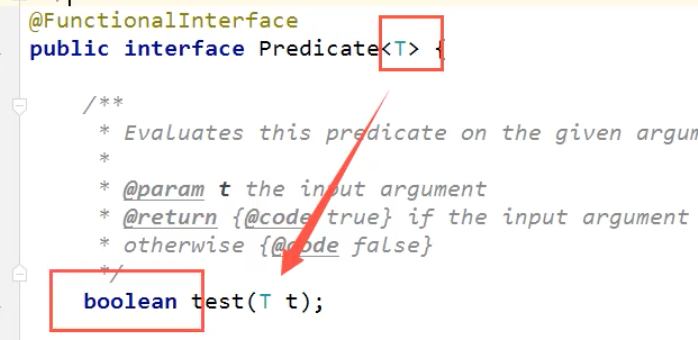
Predict<String> predict= (str)->{return str.isEmpty();};System.out.println(predict.test("")) // out: true
- Consumer 消费型接口:只有输入,没有返回值
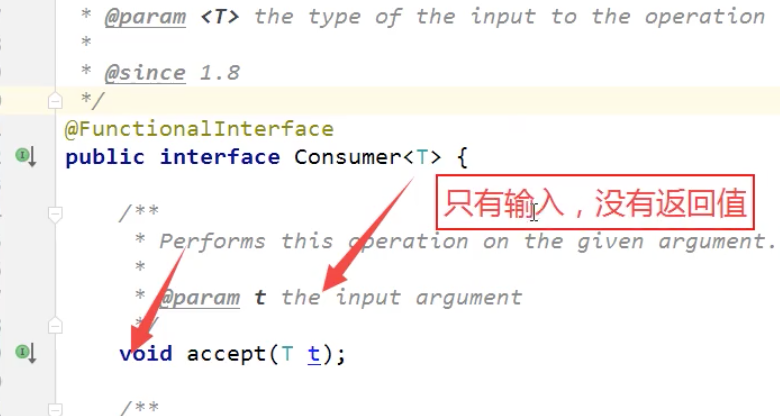
Consumer<String> consumer = (str)->{System.out.println(str);};consumer.accept("asdasda"); // out: asdasda
- Supplier 供给型接口:没有参数,只有返回值
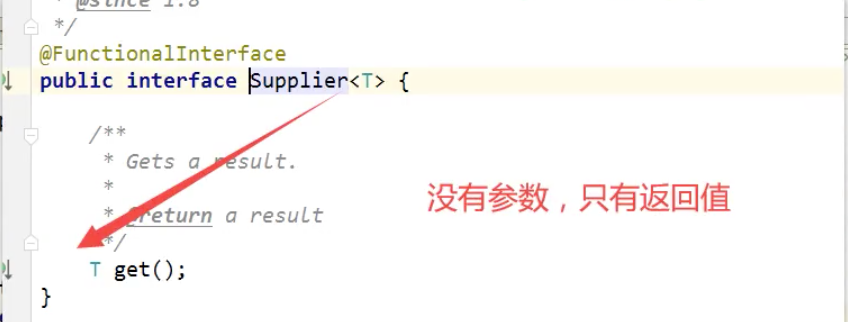
Supplier<> supplier = ()->{return 1024;};System.out.println(supplier.get()); // out: 1024
Stream流式计算
执行机制:

users.stream().filter(u -> u.getId()%2==0) // 过滤器.map(u -> u.getAge()+1) // 映射器//.count(); // 计数器//.sorted() // 排序//.min() // 求最小值//.limit() // 分页//.collect(Collectors.toList()) // 将流转换成集合和聚合元素。Collectors 可用于返回列表或字符串.forEach(System.out::println);
ForkJoin
- 将大任务拆成小任务
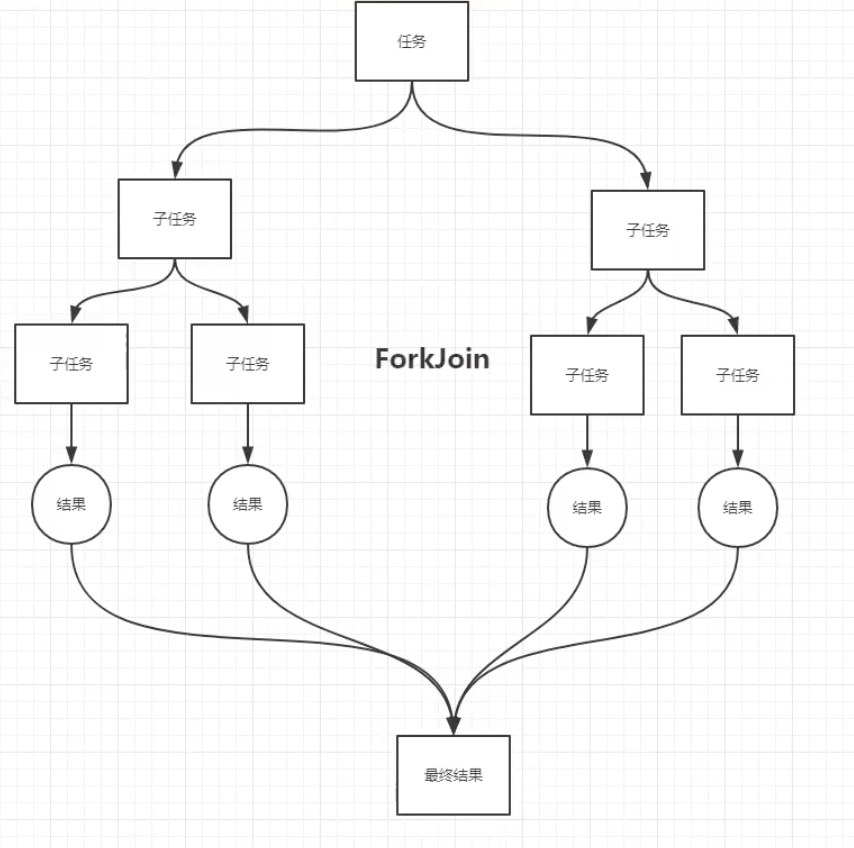
- 计算类继承ForkJoinTask类,一般继承下面的两个子类(RecursiveAction、RecursiveTask)
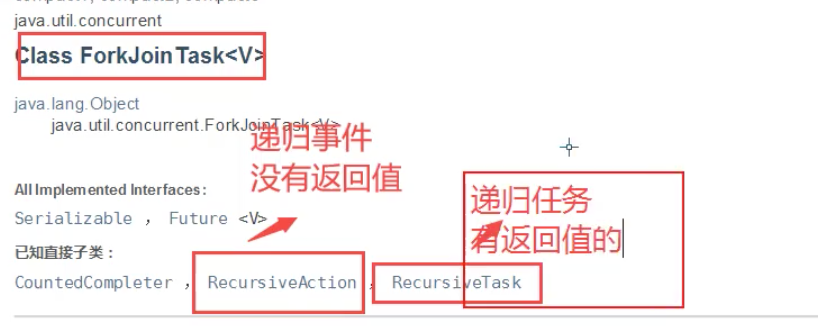
- 计算类代码 ```java package stream;
import java.util.concurrent.RecursiveTask;
public class ForkJoinDemo extends RecursiveTask
private Long start;private Long end;// 临界值private Long temp = 10000L;public ForkJoinDemo(Long start, Long end) {this.start = start;this.end = end;}@Overrideprotected Long compute() {if ((end - start) < temp) {Long sum = 0L;for (Long i = start; i <= end; ++i) {sum += i;}return sum;}// ForkJoin 递归计算// 任务拆分Long mid = (start + end) / 2; // 中间值// 任务1ForkJoinDemo task1 = new ForkJoinDemo(start, mid);task1.fork(); // 把任务压入线程队列中// 任务2ForkJoinDemo task2 = new ForkJoinDemo(mid+1, end);task2.fork(); // 把任务压入线程队列中// 结果合并return task1.join() + task2.join();}
}
- 测试类代码```javapackage stream;import java.util.concurrent.ExecutionException;import java.util.concurrent.ForkJoinPool;import java.util.concurrent.ForkJoinTask;import java.util.stream.LongStream;public class TestForkJoin {public static void main(String[] args) throws ExecutionException, InterruptedException {//test1(); // 执行时间8122test2(); // 执行时间7944//test3(); // 执行时间499}public static void test1() {Long sum =0L;long start = System.currentTimeMillis();for (Long i = 1L; i <= 10_0000_0000L; ++i)sum += i;long end = System.currentTimeMillis();System.out.println("sum="+ sum +" 执行时间"+(end - start)); // 8276}// ForkJoinpublic static void test2() throws ExecutionException, InterruptedException {long start = System.currentTimeMillis();ForkJoinPool forkJoinPool = new ForkJoinPool();ForkJoinTask<Long> task = new ForkJoinDemo(1L, 10_0000_0000L);ForkJoinTask<Long> submit = forkJoinPool.submit(task);Long sum = submit.get();long end = System.currentTimeMillis();System.out.println("sum="+ sum +" 执行时间"+(end - start)); // 130}// Stram并行流public static void test3() {long start = System.currentTimeMillis();long sum = LongStream.rangeClosed(0L, 10_0000_0000L).parallel().reduce(0, Long::sum);long end = System.currentTimeMillis();System.out.println("sum="+ sum +" 执行时间"+(end - start)); // 483}}
异步回调
使用Future的实现类CompletableFuture
import java.util.concurrent.CompletableFuture;import java.util.concurrent.ExecutionException;import java.util.concurrent.TimeUnit;/*** 异步调用: CompletableFuture* 异步执行* 成功回调* 失败回调*/public class AsynDemo {public static void main(String[] args) throws Exception {// // 异步执行,没有返回值// CompletableFuture<Void> voidCompletableFuture = CompletableFuture.runAsync(()->{// try {// TimeUnit.SECONDS.sleep(1);// } catch (InterruptedException e) {// e.printStackTrace();// }//// System.out.println(Thread.currentThread().getName()+"runAsync => Void");// });//// // 不管异步线程,继续执行Main线程// System.out.println("111");//// voidCompletableFuture.get(); // 获取异步执行结果// 有返回值调CompletableFuture<Integer> completableFuture = CompletableFuture.supplyAsync(() -> {try {TimeUnit.SECONDS.sleep(1);System.out.println(Thread.currentThread().getName()+ "supplyAsync=>Integer");//int i = 1/0;} catch (InterruptedException e) {e.printStackTrace();}return 1024;});System.out.println("111");System.out.println(completableFuture.whenComplete((t, u) -> {System.out.println("t=> " + t); // 第一个参数:成功 异步回调调返回值, 失败 nullSystem.out.println("u=> " + u); // 第二个参数:成功nul,失败 错误返回值}).exceptionally((e) -> {System.out.println(e.getMessage());return 233;}).get()); // 成功:1024,失败:233}}
